To get the PKCS#11 Engine working smoothly with your Utimaco HSM and Encryption Consulting’s
CodeSign Secure, you’ll need a few key things. Here are the steps to install the resources
that are essential for setting up the Windows environment:
Utimaco Security Server
Utimaco SecurityServer provides cryptographic libraries, tools, and interfaces (e.g.,
PKCS#11, CSP, and JCE) to manage keys and perform cryptographic operations securely.
The software includes the CryptoServer SDK, administrative tools, and simulators,
facilitating seamless HSM integration for enhanced security and regulatory
compliance.
Installation Steps:
Step 1: Download the Provider
Download the provider (e.g., SecurityServerEvaluation-V6.1.1 for Windows) from the
Utimaco customer portal.
Step 2: Install the Provider
Extract the downloaded package, run the MSI installer, and follow the prompts to
set up the Utimaco Security Server on your system.
It will install the required tools to the default location (C:\Program
Files\Utimaco), unless otherwise specified while installing, and will also
create shortcuts for the following tools on the current user’s Desktop for
easier access:
CryptoServer Administration
PKCS#11 CryptoServer Administration
CryptoServer Simulator
Along with this, it will also modify the Environment Variables with the
Utimaco SecurityServer’s selected locations and configuration files.
OpenSSL 3.x
OpenSSL 3.x is required for cryptographic operations and to leverage the PKCS#11
provider with the Utimaco HSM.
Installation Steps:
Step 1: Download OpenSSL
Download the latest 64-bit OpenSSL 3.x installer for Windows using this link.
Step 2: Install OpenSSL
Run the downloaded installer with administrative privileges.
Choose the default installation directory (C:\Program Files\OpenSSL-Win64)
unless you have specific requirements.
Step 3: Configure Environment Variable
Add the OpenSSL binary directory to the system PATH:
C:\Program Files\OpenSSL-Win64\bin
Step 4: Verification
Open a new Command Prompt and run the following command to test openssl installation.
openssl version
Java Runtime Environment
Utimaco SecurityServer also requires a Java Runtime Environment (Tested version Java
15). Refer to the below matrix to check the Java compatible version:
Java Runtime Environment
Version
Oracle Java
8,11,15
OpenJDK
8,11,15
Installation Steps:
Step 1: Download Java 15
Download the compatible Java executable from here for your Windows system.
Step 2: Install Java 15
Run the downloaded executable and follow the prompts to set up Java 15.
Step 3: Verification
Open a new Command Prompt and run the following command to test java installation.
java -version
Microsoft Visual Studio Build Tools
Microsoft Visual Studio Build Tools are required to compile the OpenSC PKCS#11
Wrapper Library (libp11) on Windows
Installation Steps:
Step 1: Download Visual Studio Build Tools
Download the Microsoft Build Tools for Visual Studio 2022 using this link.
Step 2: Install Build Tools
Run the installer (vs_buildtools.exe) with administrative privileges.
Step 3: Verify Installation
Open the x64 Native Tools Command Prompt from the Start menu and run
nmake /?
This should display the help for the nmake utility, confirming the build tools are
installed.
NOTE: “x64 Native Tools Command Prompt” should be present inside
C:\ProgramData\Microsoft\Windows\Start Menu\Programs\Visual Studio 2022\Visual
Studio Tools\VC
OpenSC PKCS#11 Wrapper Library
The OpenSC PKCS#11 Wrapper Library (libp11) provides the PKCS#11 engine plugin
(pkcs11.dll) for OpenSSL to interact with the HSM.
Installation Steps:
Step 1: Download the Source Code
Clone the OpenSC/libp11 repository from GitHub or download it as a ZIP file.
NOTE: Ensure OPENSSL_DIR points to your OpenSSL
installation directory.
Step 3: Verify Compilation
Check for the pkcs11.dll file in the libp11\src folder. This is the OpenSC PKCS#11
Engine Plugin.
Step 4: Copy the SRC folder
Copy the src folder that you just created to your OpenSSL bin directory, i.e.,
C:\Program Files\OpenSSL-Win64\bin
Configuration
After installing the prerequisites, you need to configure the Utimaco SecuritySever, OpenSSL,
and the OpenSC PKCS#11 Wrapper Library to enable communication with your Utimaco HSM.
Configure the Utimaco SecurityServer
Configuring Utimaco SecurityServer requires setting up environment variables,
updating configuration files (e.g., PKCS#11 settings), to manage HSM access and
operations securely.
Steps:
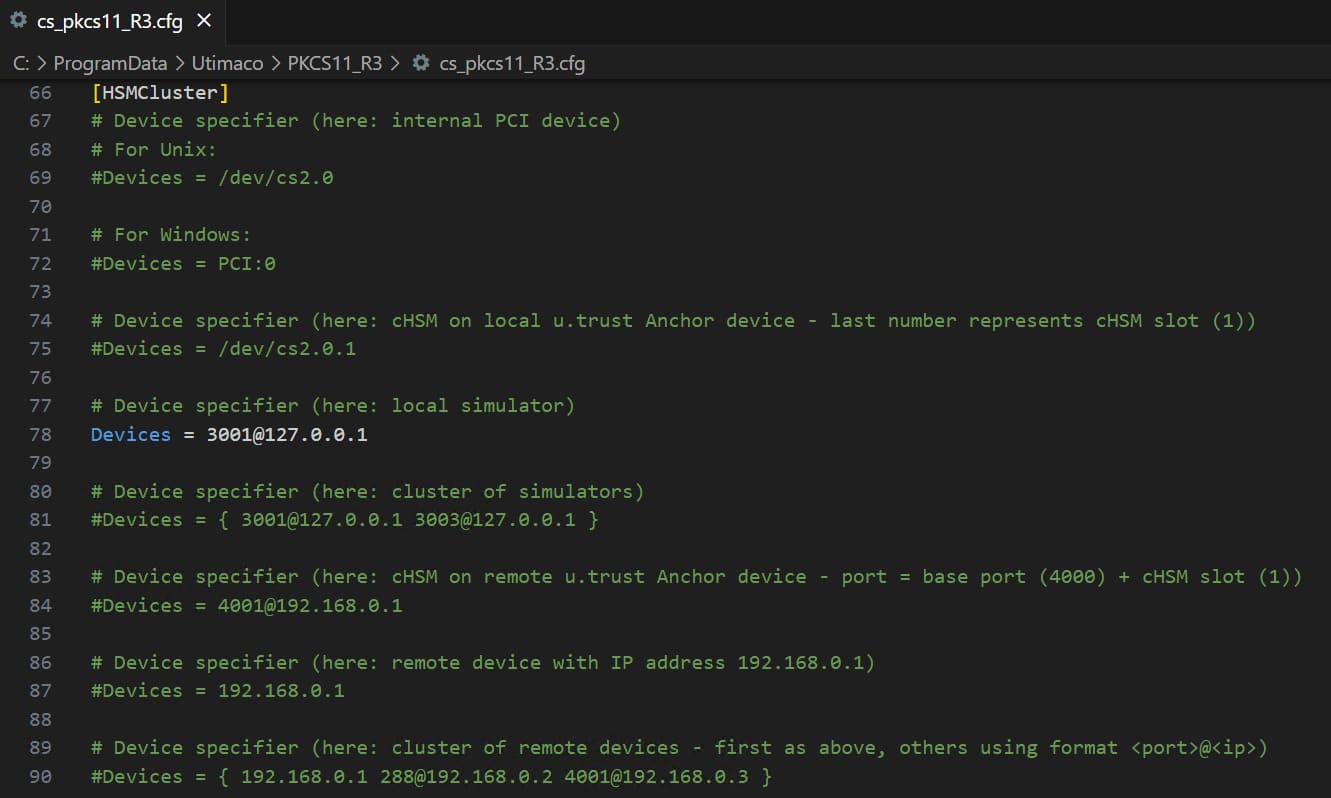
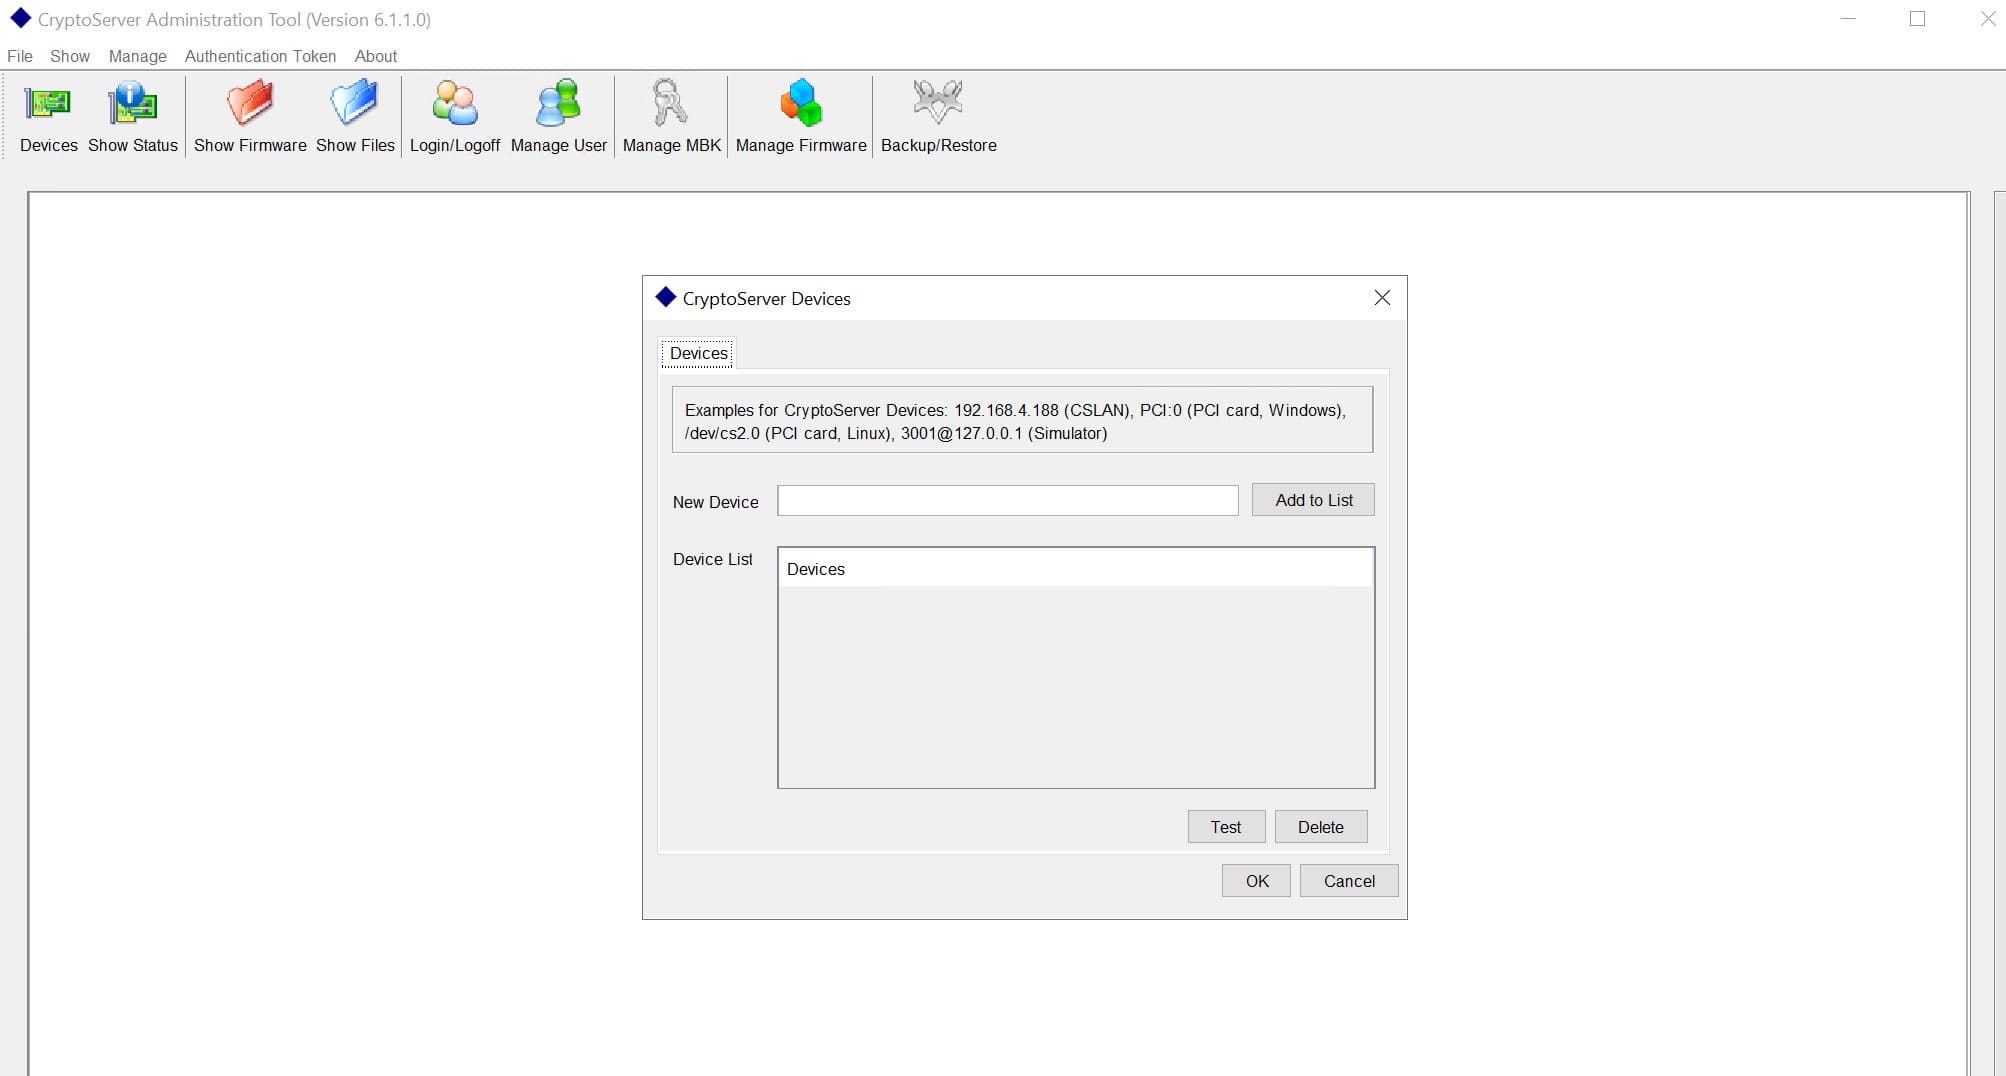
Step 1: Locate the Configuration File (cs_pkcs11_R3.cfg)
Navigate to the Utimaco PKCS#11 Provider installation directory, typically:
C:\ProgramData\Utimaco\PKCS11_R3
Step 2: Update the IP address of the HSM
Under the [HSMCluster] section, update the IP address of your Utimaco HSM. Remember
to uncomment (remove the hash symbol) the line (e.g., [email protected]) where
you have added the IP.
Here, we will be using a local simulator that runs, by default, on localhost
(127.0.0.1) port 3001.
Create User Roles for a Slot
To generate keys and certificates using Utimaco SecurityServer, you will need to
create and define user roles—Admin, Security Officer (SO), and Cryptographic User.
Steps:
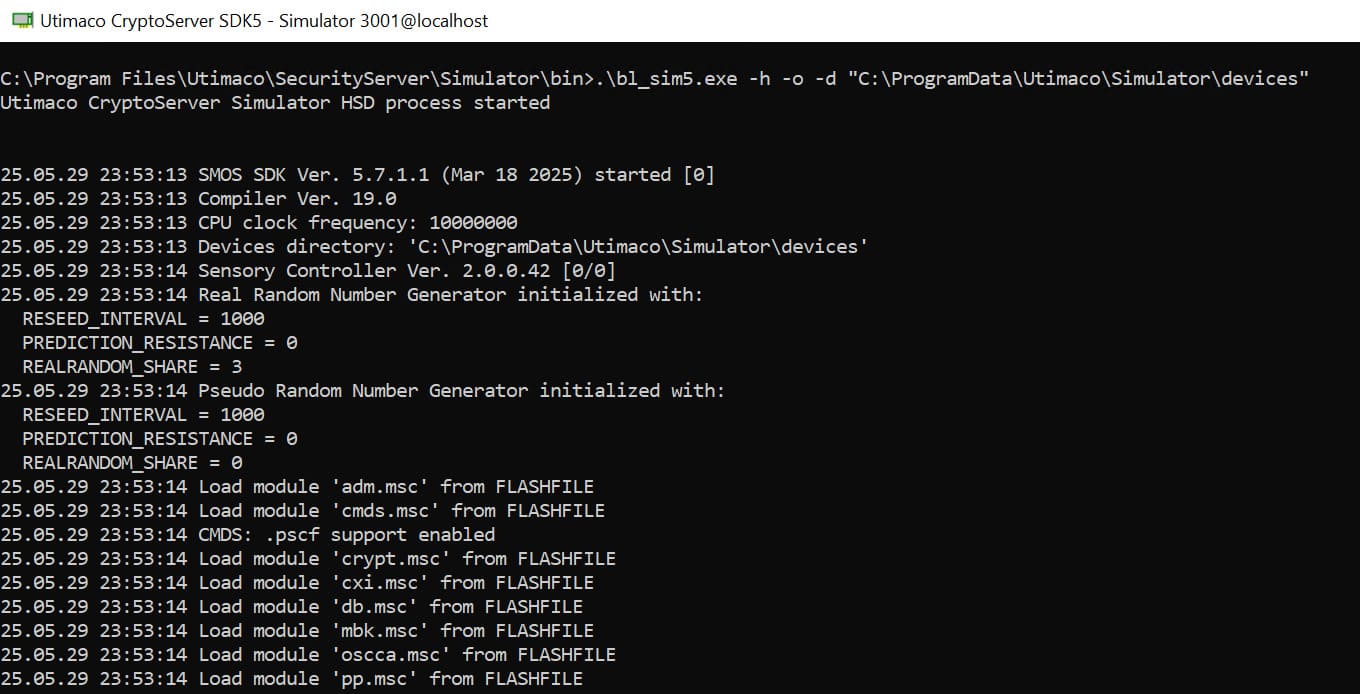
Step 1: Start the CryptoServer Simulator
Start the CryptoServer Simulator, provided on the Desktop, to initialize the
required settings.
NOTE: In case you using an actual Utimaco HSM, you will need
to start the CryptoServer Administrator application, also present on the
Desktop.
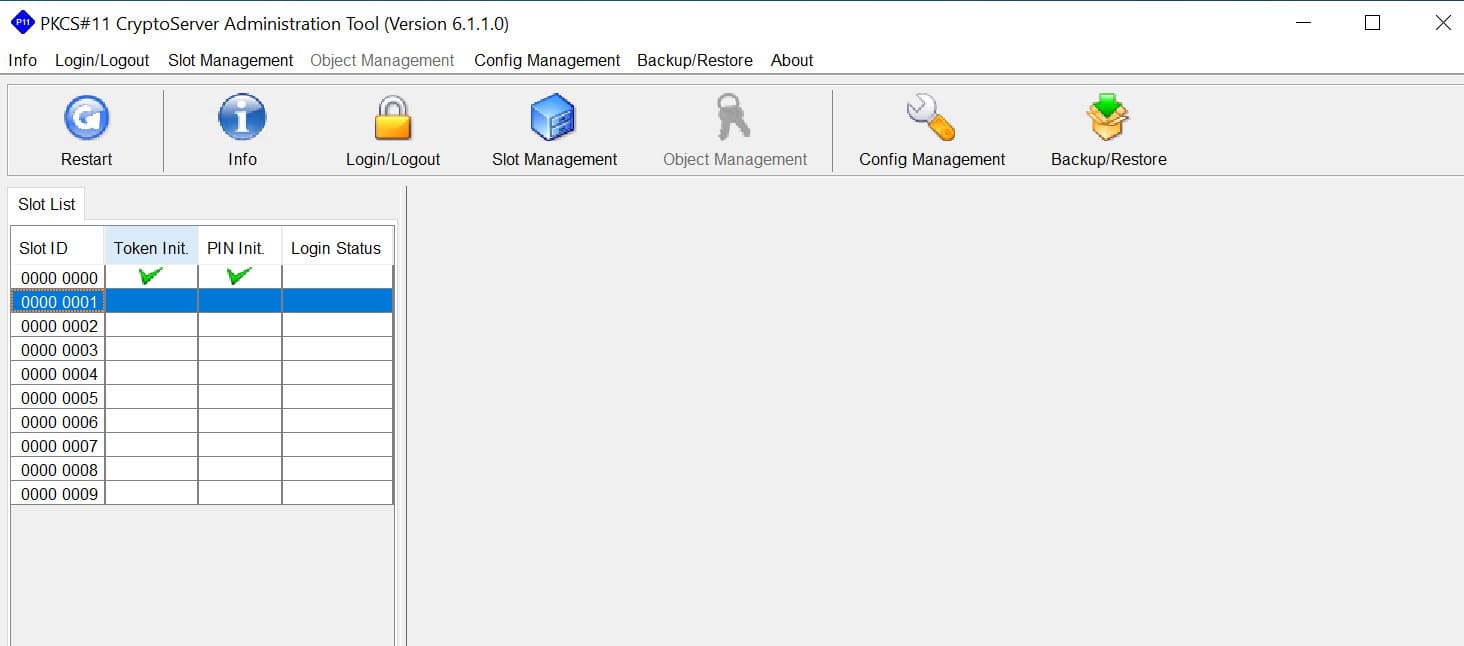
Step 2: Locate the PKCS#11 CryptoServer Administration Application
Open the PKCS#11 CryptoServer application, typically provided on the user’s Desktop
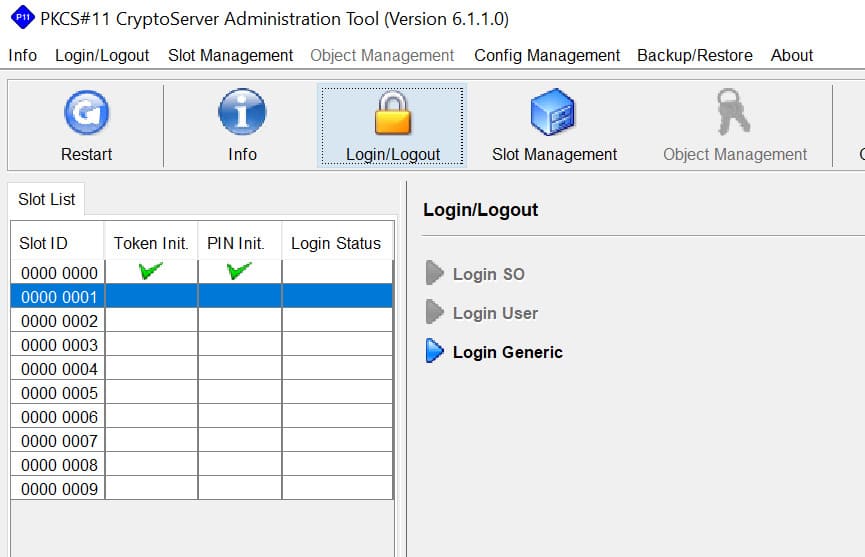
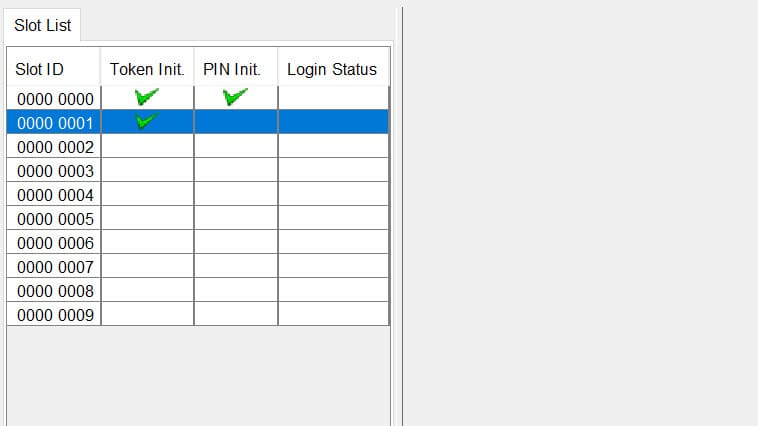
Step 3: Select the Required Slot
From the left side table, click on the required slot number. Here, we have selected
slot number 1
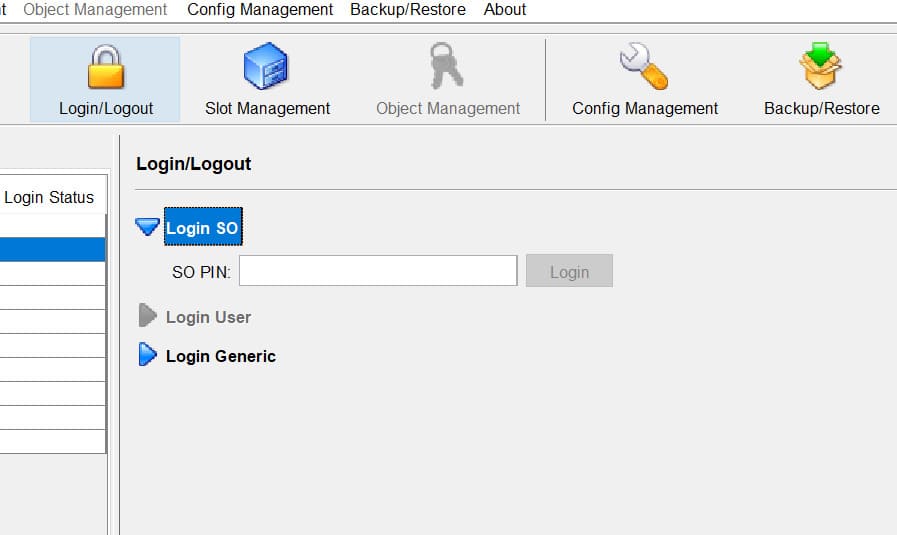
Step 4: Log in as the ADMIN
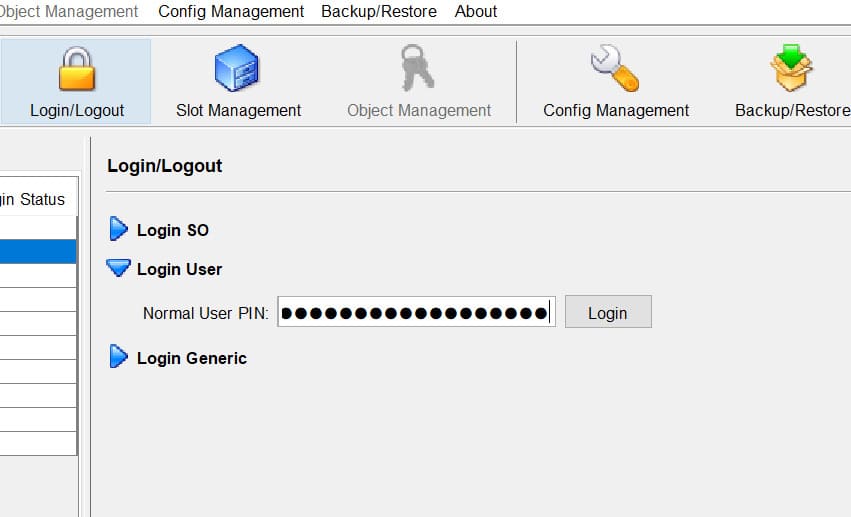
Go to the Login/Logout section from the top bar and select the “Login
Generic” option.
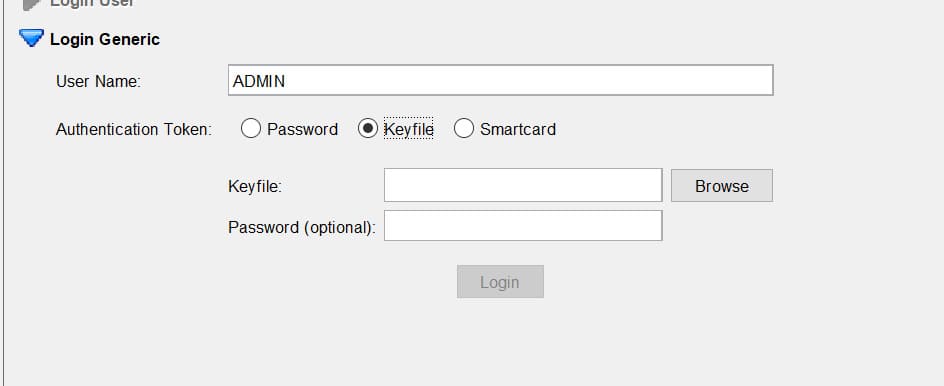
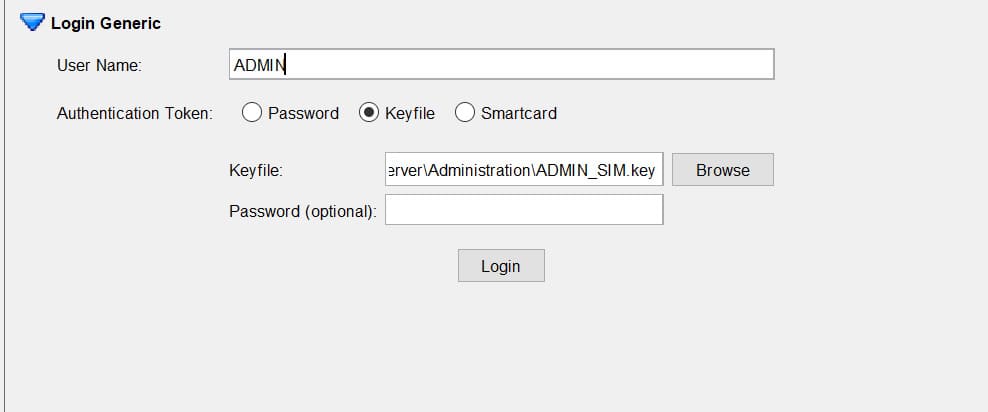
Enter “ADMIN” as the username and select “Keyfile” option for the password.
Browse the Keyfile and provide the password file. When running the simulator,
select the “ADMIN_SIM.key” file; otherwise, use the “ADMIN_EC.key”. These
key files are usually present in the “C:\Program
Files\Utimaco\SecurityServer\Administration” directory.
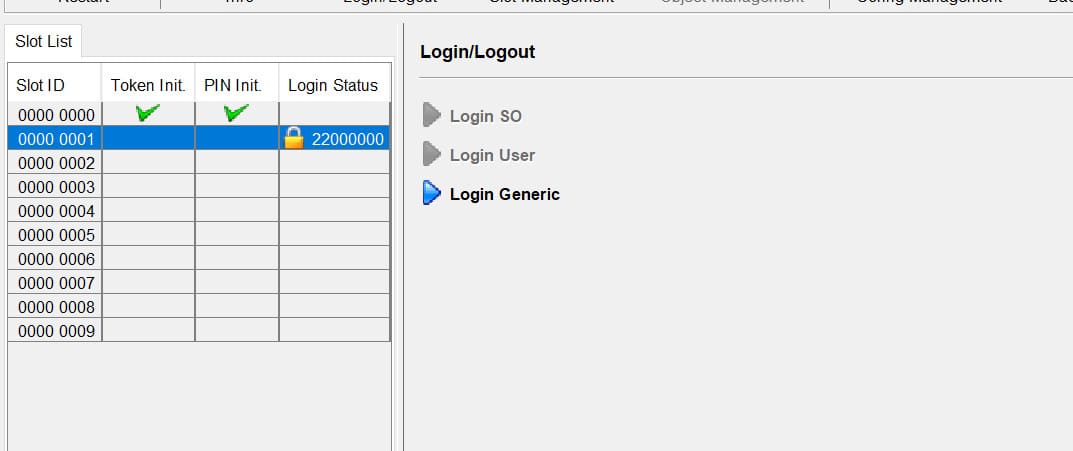
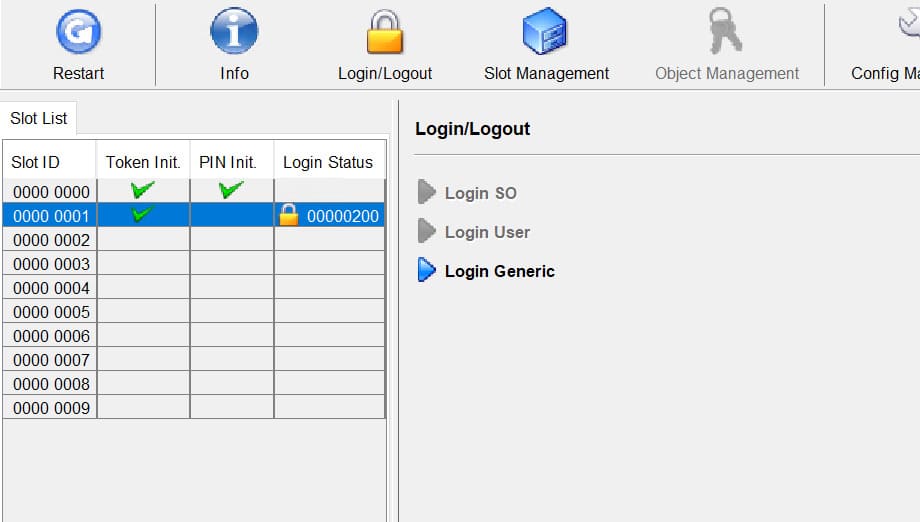
Click Login to log in as the ADMIN user. It will show you a lock in the Login
Status in the left table for that slot.
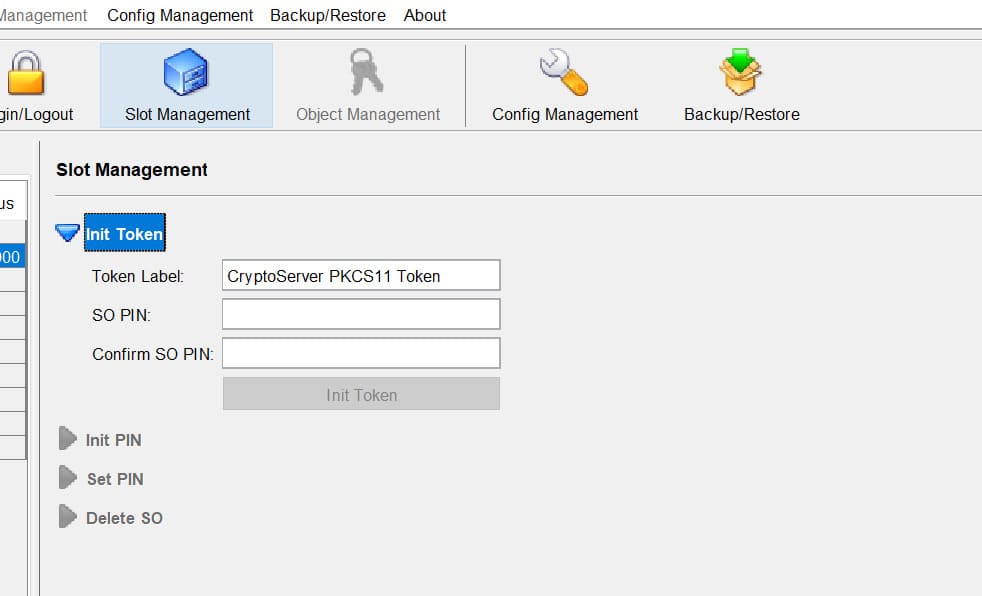
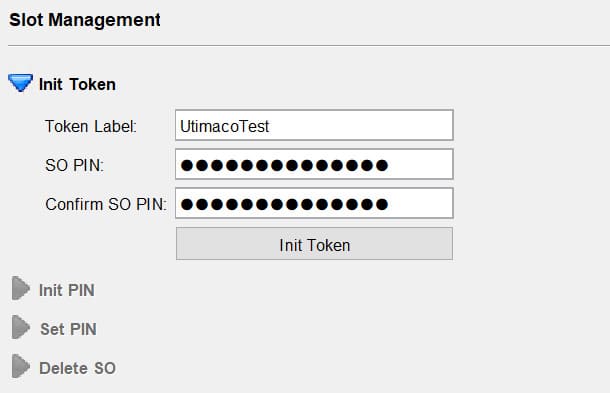
Step 5: Initialize the Token for this slot
Open the Slot Management section from the top bar and select the “Init Token”
option.
Enter the required token name for this slot and provide a temporary PIN for
the Security Officer role (this PIN will be changed in the later steps)
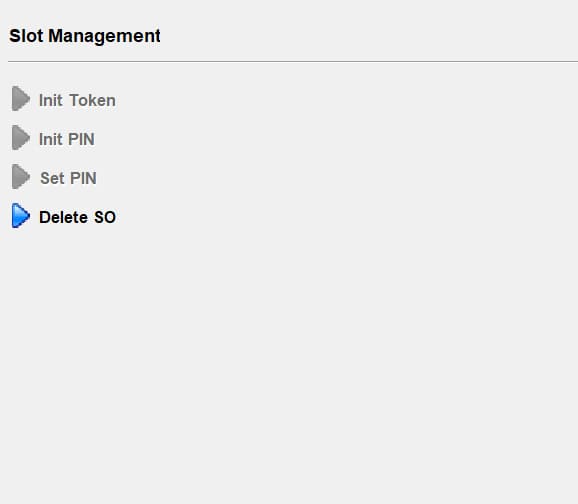
Click on the “Init Token” button to finalize the token. It will now disable
the “Init Token” option for this slot and enable the “Delete SO” option.
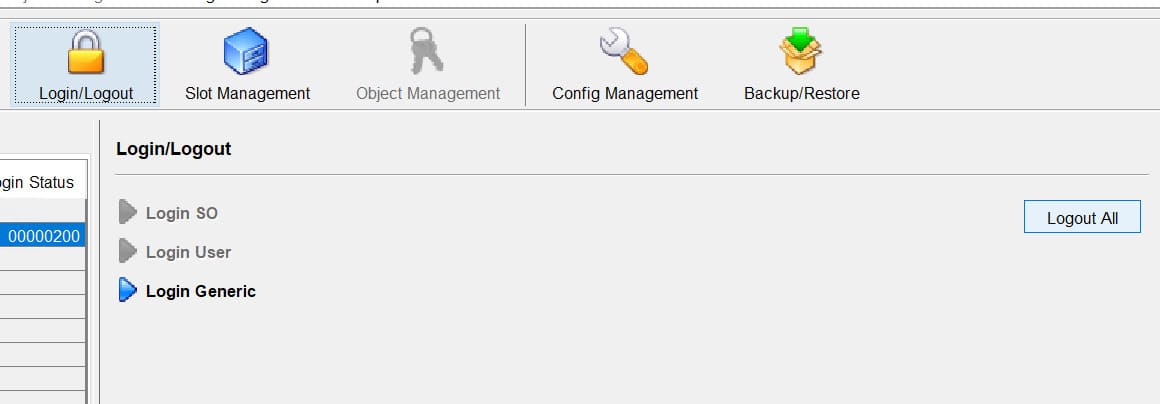
Now, go to the Login/Logout section and click on the “Logout All” option to
log out all the active user roles.
It will show a green check mark in the left table under Token Init for this
slot.
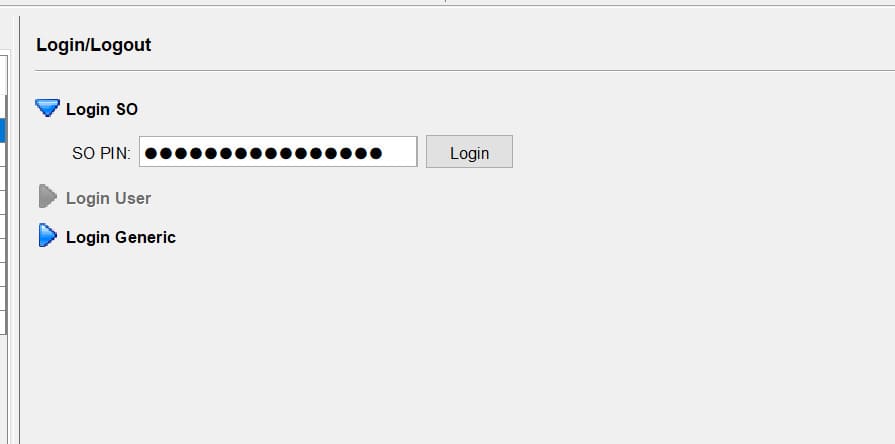
Step 6: Set up the Security Officer role
Go to the “Login/Logout” section and select the “Login SO” option.
Enter the temporary SO PIN that you had set up in the earlier step for the
Security Officer role and click “Login” button. It will show you a lock
symbol in the left table under “Login Status”.
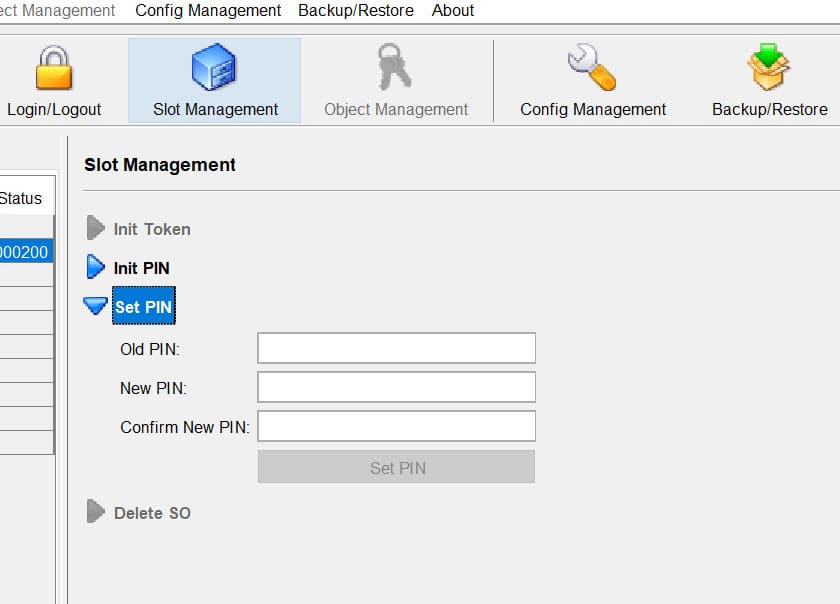
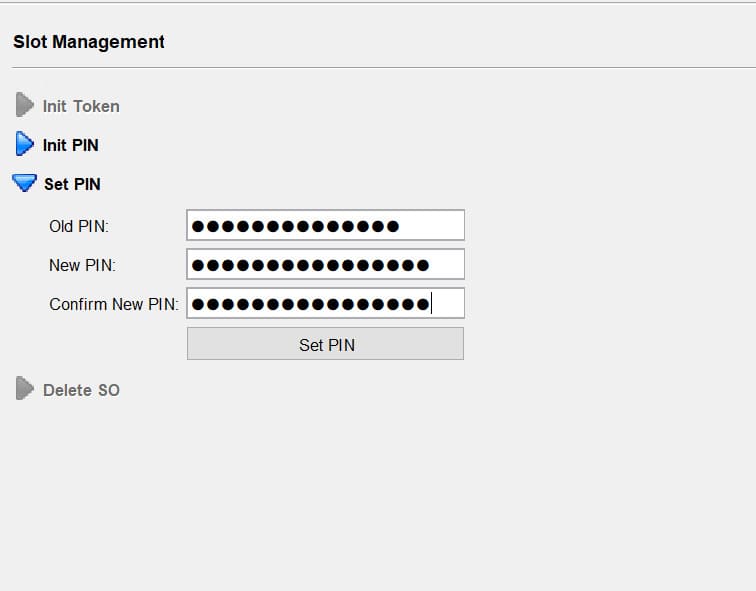
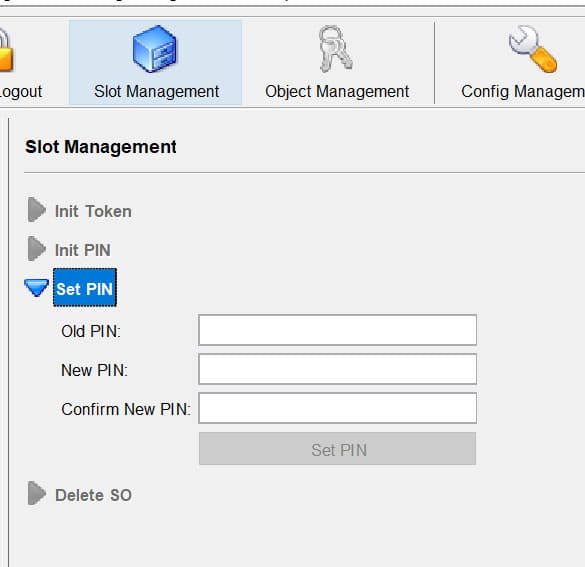
Now, go to the Slot Management section from the top bar, and set a new PIN
for the Security Officer role by selecting “Set PIN” option.
Set a new SO PIN for this slot’s Security Officer.
It will log you out from the current session as the SO, which you can see
from the “Login/Logout” section or the left side table’s “Login Status”
column.
Log in again as the SO with the new SO PIN by selecting “Login SO” in the
“Login/Logout” section.
It will show you a lock in the left side table on successful log in.
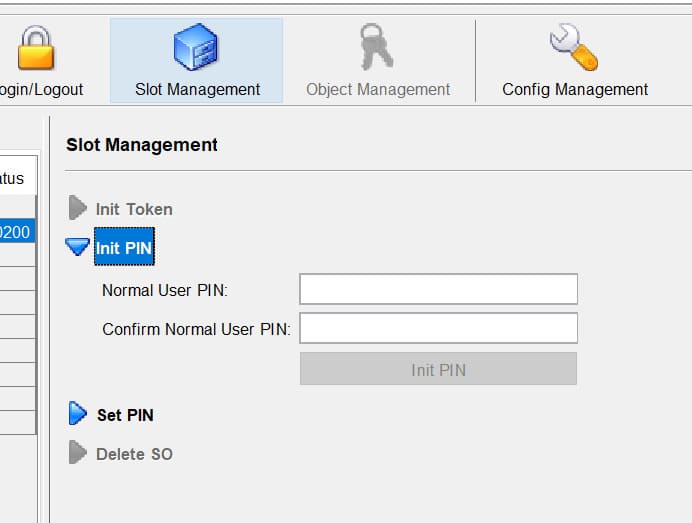
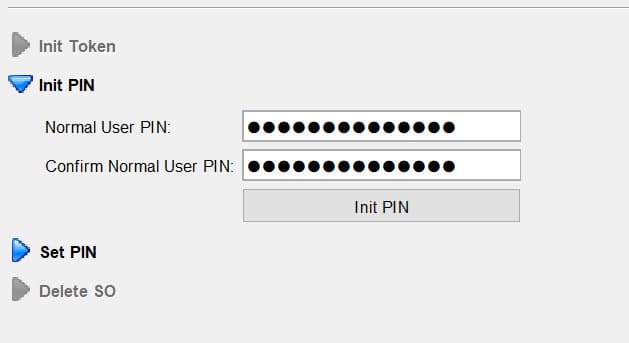
Step 7: Set up the Cryptographic User role
Go to the “Slot Management” section and select the “Init PIN” option.
Enter a temporary PIN for the cryptographic user for this slot and click on
“Init PIN” button.
Now log out all active sessions from the “Login/Logout” section.
Now log in as the Cryptographic User using the temporary PIN by selecting the
“Login User” option in the “Login/Logout” section.
Go to the “Slot Management” section and set up a new PIN for the
cryptographic user using the “Set PIN” option.
Update the PIN for the cryptographic user in this slot
This will log you out of your current session. Log in again as the user from
the “Login/Logout” section.
You are ready with all the required roles for this slot. You will need to be
logged in as the Cryptographic User to perform any object management, such
as key or certificate generation.
Configure OpenSSL to Use the PKCS#11 Engine
OpenSSL must be configured to load the Utimaco PKCS#11 Provider (cs_pkcs11_R3.dll)
and the OpenSC PKCS#11 Engine Plugin (pkcs11.dll) to perform cryptographic
operations with the HSM.
Steps:
Step 1: Locate the OpenSSL Configuration File (openssl.cfg)
Find the OpenSSL configuration file: C:\Program Files\Common Files\SSL
Step 2: Edit the OpenSSL Configuration
Open openssl.cfg in a text editor with administrative privileges.
Add the following at the top of the file to enable dynamic engine loading:
openssl_conf = openssl_init
Add the following at the end of the file to configure the PKCS#11 engine:
dynamic_path: Path to the OpenSC PKCS#11 Engine Plugin
(pkcs11.dll) compiled in the prerequisites.
MODULE_PATH: Path to the Utimaco SecurityServer PKCS#11 Provider
DLL.
Step 3: Verify OpenSSL Configuration and Connection
Open a Command Prompt and run:
openssl engine pkcs11 -t
Expected output confirms the PKCS#11 engine is available:
(pkcs11) PKCS#11 engine
[ available ]
Configure CodeSign Secure
CodeSign Secure requires configuration to connect to the Utimaco SecurityServer HSM
for secure code signing operations. The app-config.properties file specifies the
various details needed to successfully connect to Utimaco HSM.
Steps:
Step 1: Locate the app-config.properties File
Navigate to the CertificateManagement folder inside the CodeSign Secure installation
directory and locate the app-config.properties file, typically:
C:\CodeSignSecure\src\CertificateManagement
Step 2: Update the HSM Details Fields
Open app-config.properties in a text editor with administrative privileges.
Update the following fields, replacing placeholders with your HSM connection
details:
HSM_LIB_PATH_UTIMACO=
<Path of cs_pkcs11_R3.dll file>
HSM_PIN_UTIMACO=
<Login PIN for the Cryptographic User for a desired slot>
Fill out the form to access our complete Integration Guide for our
product
Discover how our solutions integrate seamlessly with your existing
tools and infrastructure. Get practical insights into enabling digital
trust across cloud, DevOps, IAM, and more, all in one comprehensive
guide.
Explore supported integrations across cloud platforms, DevOps
tools, and HSMs
Learn how to enhance automation, scalability, and compliance with
each integration
Get step-by-step guidance for faster deployment and reduced
configuration errors
Understand real-world use cases to streamline implementation in
complex environments