All the domain names and IP addresses protected by the certificate are listed systematically using the SAN or Subject Alternative Name. The Subject Alternate Names must be provided on an SSL/TLS certificate when further website actions need to be secured so that the DNS server can map the IP address to the domain name.
The SANs information can be found in the SSL/TLS certificate data by clicking on the padlock icon in most web browsers’ address bars. The term SSL SAN, or Secure Socket Layer Subject Alternative Name, describes an SSL certificate’s capacity to cover numerous hostnames, including domains and subdomains. The Subject Alternative Name (SAN) field incorporated in the certificate protects multiple fully qualified domain names (FQDN) with a single SAN SSL certificate, simplifying certificate management and improving security across numerous domains.
In this blog, we will talk about how to add Subject Alternate Name attributes to a certificate, i.e., Web Server Certificate Enrollment with SAN Extension. Also, we will cover an error, i.e., Adding SAN (Subject Alternative Name) into the Additional attributes field on the Microsoft CA Certificate request form doesn’t produce does not automatically produce a certificate with a “Subject Alternative Name” entry.
Web Server Certificate Enrollment with SAN Extension
Enrolling a certificate with a custom SAN extension is now super simple. There is a certain set of instructions to follow, and you’ll get it.
Setting Certificate Template
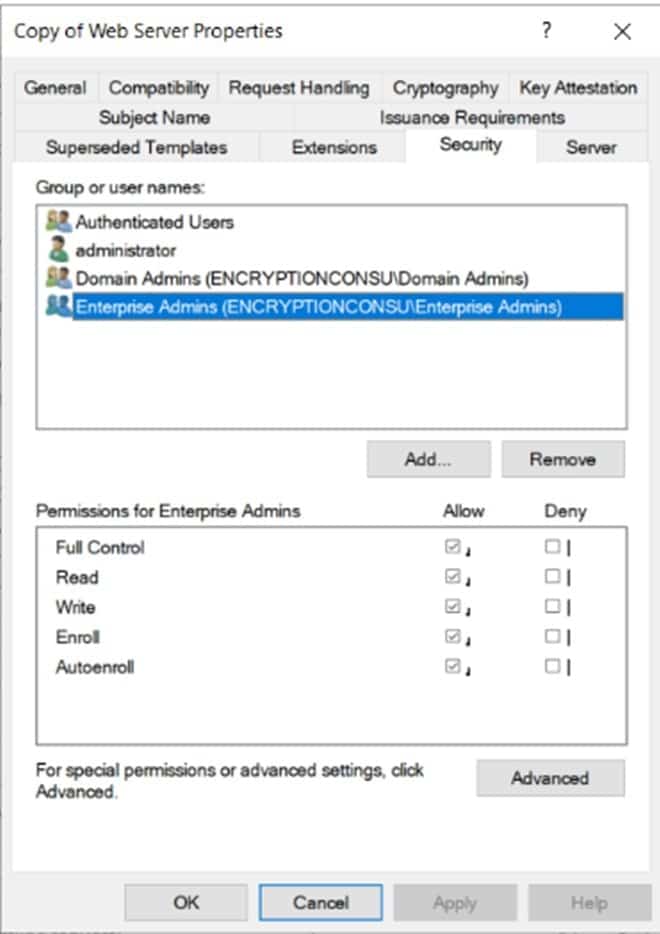
Most certificate templates are set up to build a subject from Active Directory. But in the case of SSL Certificates, they use Supply in the request because they use a custom subject name. If you are using the default web server template, then there is no need to modify anything. For the custom certificate template, you should update it as given below.
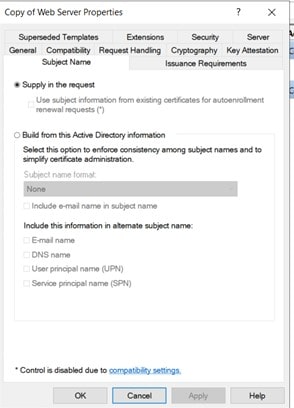
Also, you need to give Read and Enroll permissions from the security tab to your account.
Setting Certification Authority
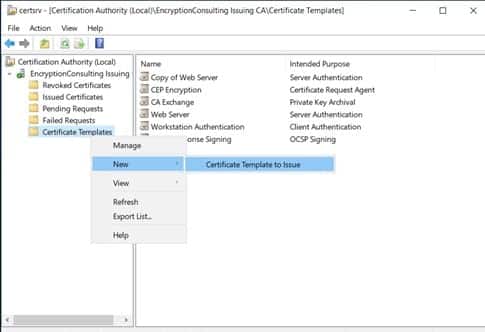
- Go to the certsrv console and expand Issuing CA.
- Go to Certificate Template and open it.
- Check whether the template is listed in the window; if not, right-click on the certificate template and then New -> Certificate Template to issue.
- Select the required template and click on add.
Certificate Enrollment Process
-
Open mmc console. In the Console1 window, go to File-> Add/Remove Snap-in.
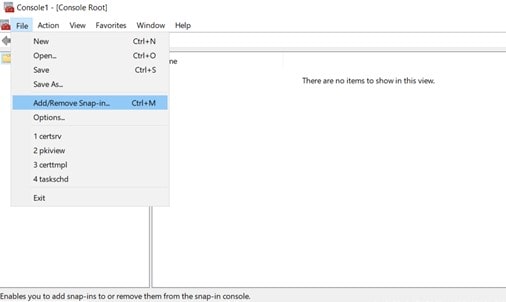
-
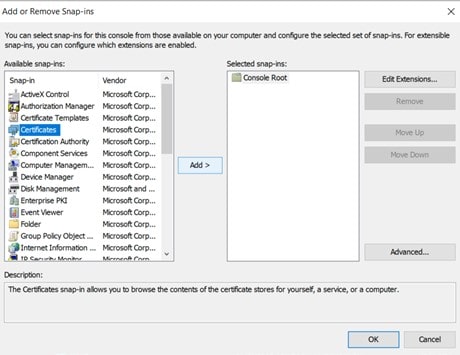
In the Add/Remove Snap-in dialog box, click on certificates and add.
-
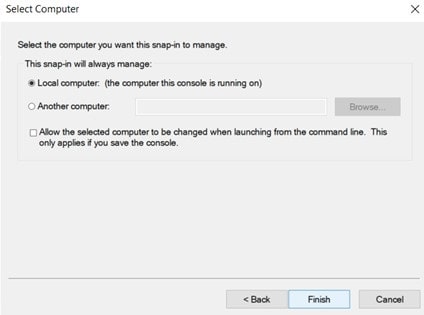
In certificates, snap in box, click computer account, and next.
-
In the select computer window, click Local Computer and Finish.
-
Click Ok and close the snap-in.
-
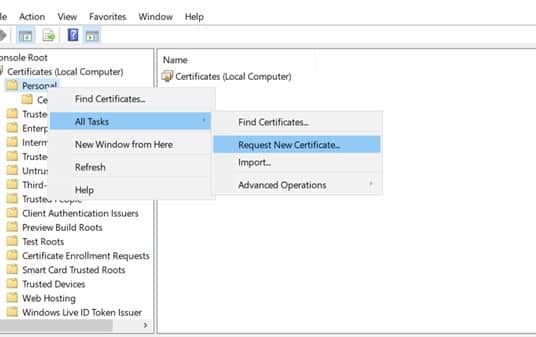
Right-click on the personal node. Click on All tasks-> Request new certificate.
-
In the Before you begin page, click Next.
-
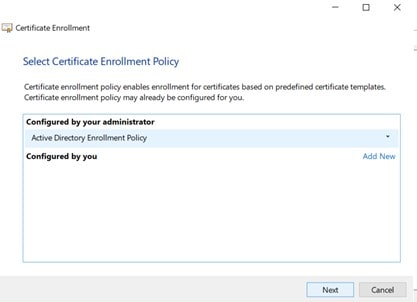
In the select enrollment policy page, select the appropriate policy and go next.
-
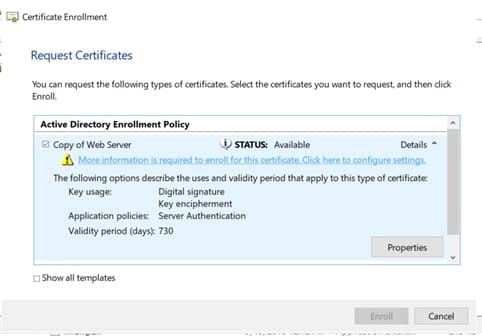
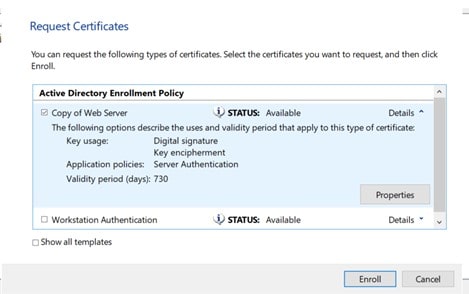
In the Request Certificate box, click on the required template, expand its details, and open its properties to configure it.
-
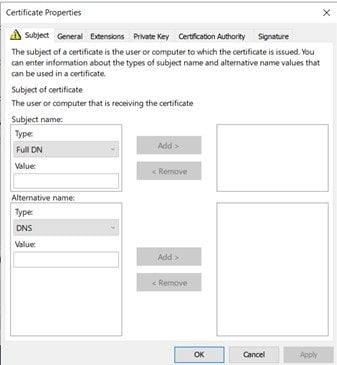
Certificate Properties Dialog box will appear like this.
-
Since you are using Subject Alternate Name (SAN), you can leave the Subject name empty. In the dropdown, select the proper type for SAN. (In the case of SSL certificates, DNS is common).
-
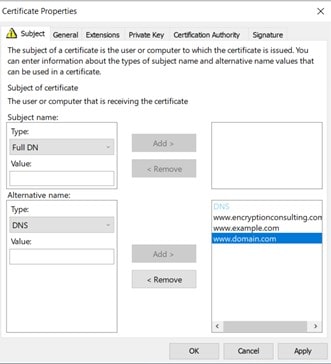
In the value box, enter the names in the corresponding format and click add. Repeat this step for all the values you want to add.
-
Hit Ok and close. You’ll return to the certificate enrollment page. Click on enroll.
-
Click finish when the certificate is successfully installed.

-
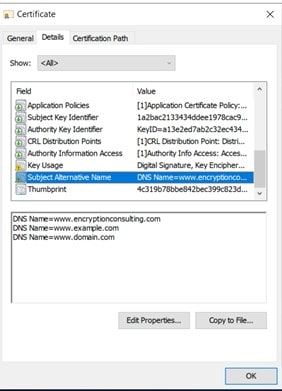
Here, you can view the Certificate’s SAN details.
Troubleshooting
Issue
The certificate generated doesn’t include SAN (Subject Alternative Name) entry even after adding SAN in the additional attributes field.
Cause
If Microsoft CA’s issuance policy is not set up to accept the Subject Alternative Name(s) attribute via the CA Web enrollment page, executing the preceding steps could not result in a certificate that includes a SAN entry.
Solution
To solve this, we need to run this command through the administrative command prompt:
certutil -setreg policy\EditFlags +EDITF_ATTRIBUTESUBJECTALTNAME2
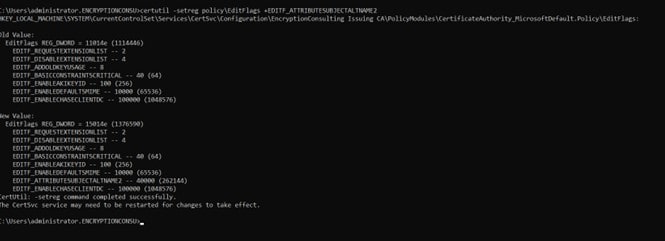
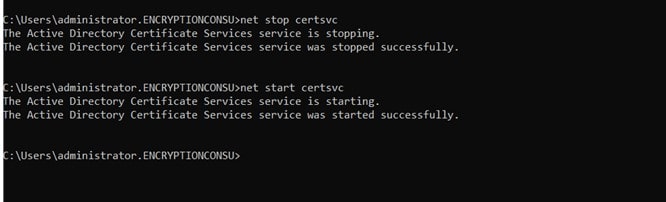
After running this command, make sure to restart the ADCS Services by running
net stop certsvc and net start certsvc
Now, you can create the certificate with the SAN entry by using the CA’s web enrollment page.
Create a Subject Alternative Name (SAN) certificate request (CSR)
We will configure this using OpenSSL so, you need to be working out of your OpenSSL\bin directory from a cmd prompt or a PowerShell session.
The Steps are:
- Create an openssl configuration file that enables subject alternative names (.cnf)
To generate CSR for SAN we need distinguished_name and req_extensions
Edit your openssl cnf file as the example below
[req]
distinguished_name = req_distinguished_name
req_extensions = v3_req
countryName = Country Name (2 letter code
stateOrProvinceName = State or Province Name (full name)
localityName = Locality Name (eg, city)
organizationalUnitName = Organizational Unit Name (eg, section)
commonName = [example.com]
[ v3_req ]
# Extensions to add to a certificate request
subjectAltName = @alt_names
[alt_names]
DNS.1 = [example.com]
DNS.2 = [example.example.com]
DNS.3 = [example.com.edu]
- Create a Certificate Request File (.csr) by running a command.
# openssl req -newkey [priv.key] -out [san.csr] -config [san.cnf]
Please replace [priv.key] with your private key, [san.csr] with your desired csr name and [san.cnf] with your configuration file name.
Conclusion
All the domain names and IP addresses protected by the certificate are organized into a SAN or subject alternative name. You can easily add SAN entries to the certificates by following the certain instructions depicted in this blog. There is an issue when the certificate generated comes out without a SAN entry, even after adding a SAN entry. This can be solved by running a single command which adds the entry, and now you can create the certificate.