GitLab Integration Guide
Using Gitlab for the code signing process requires you to set up a runner that has Signtool, ECSigningKSP, and a GitLab Account. Listing down the pre-requisites:
- Self-hosted Runner, which has ECSigning KSP, Signtool installed and configured. This runner should be provided with Administrative privileges.
- A GitLab Account.
To set up the ECSigningKSP and Signtool, please navigate to section 11.2. After doing so, please follow the steps below:
- Set Up a GitLab Account. Navigate to creating a New Blank Project.
-
Scroll down to settings -> CI/CD and navigate to the runner. Expand it.

- Install GitLab runner on your device using the link. This link is for Windows. You can look at this link to see the steps to install it on your specific device.
- You can follow the documentation to set up your runner and register it as per your device.
To register a runner under Windows:
-
Run the following command:
.exe register
- Enter your GitLab instance URL (also known as the GitLab CI coordinator URL). Example: https://gitlab.com
- Enter the token you obtained to register the runner. You can access this from settings -> CI/CD -> Expand -> Project runners. Under the project runners, you can find the token.
- Enter a description for the runner. You can change this value later in the GitLab user interface. Example: Device
- Enter the tags associated with the runner, separated by commas. You can change this value later in the GitLab user interface. Example: WindowsRunner
- Enter any optional maintenance note for the runner.
- Provide the runner executor. We're operating this in Shell.
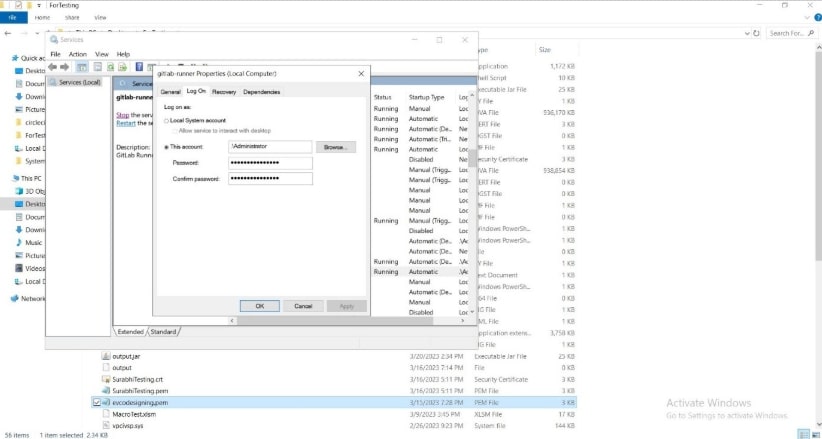
Once the runner is installed and configured, navigate to services in your device, scroll down to GitLab Runner, and log in as Administrator. Provide Admin Password here.
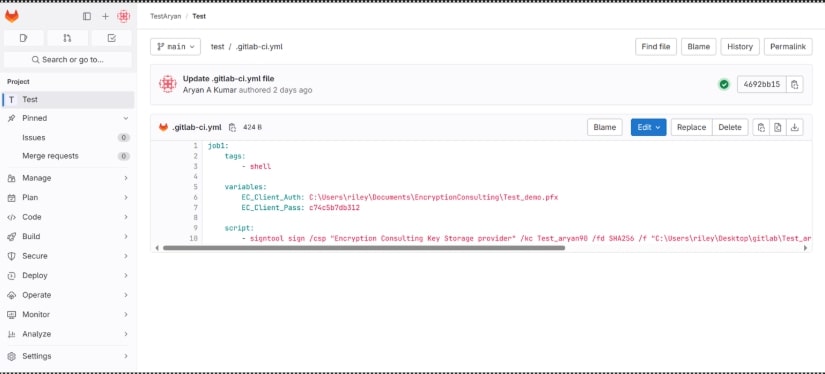
Once this is done, go to your project. You might have to rename the .ym file. Rename it to .gitlab-ci.yml.
There are three sections in this pipeline.
-
Tags
The tags you provided while setting up the runner
-
Variables
- EC_Client_Auth:Corresponds to the path of your SSL Authentication certificate, which can be created from CodeSignSecure.
- EC_Client_Pass: Corresponds to the password for your certificate, which was provided at the time of creation of the certificate.
-
Script
- Provide the signtool command to sign a file.
- A sample script is given below to perform code signing.
job1:
  tags:
    - shell

  variables:
    EC_Client_Auth: C:\Users\riley\Documents\EncryptionConsulting\Test_demo.pfx
    EC_Client_Pass: c74c5b7db312

  script:
    - signtool sign /csp "Encryption Consulting Key Storage provider" /kc Test_aryan90 /fd SHA256 /f "C:\Users\riley\Desktop\gitlab\Test_aryan90.pem" /tr http://timestamp.digicert.com /td SHA256 "C:\Users\riley\Desktop\agent.exe"
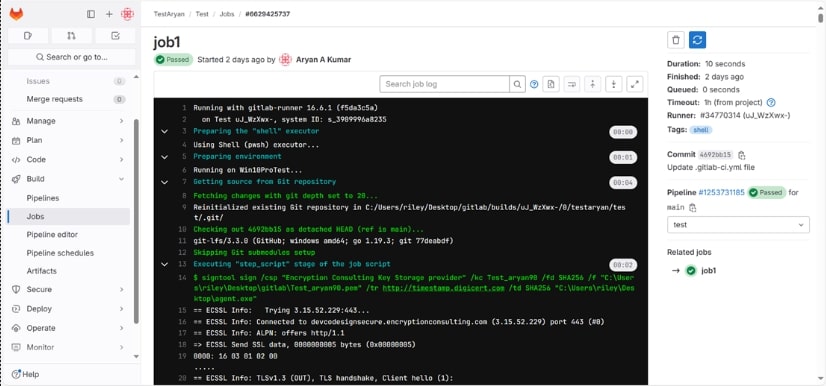
If you click on Build -> Jobs, you'll see it being successfully signed.
You'll need to modify the command as per your variables.
- kc <certificate name>: replace evcodesiging with your key name
- f <certificate location>: replace location with the location of your .pem file to perform codesigning. You can get this by signing KSP. From the command prompt, reach the directory using SigningKSP. Use the command ECGetCert.ece to get your certificate's PEM file.
- tr http://timestamp.digicert.com: time stamping server
- td SHA256 <file location>: location of the file you want to get signed.