
- Introduction and overview of the Test Lab
- Major Steps
- Activity 1. Active Directory Forest
- Activity 2: Install the Standalone Offline Root CA
- Activity 3: Perform Post Installation Configuration for Root CA
- Activity 4: Install Enterprise Issuing CA
- Activity 5: Install Subordinate Issuing CA
- Activity 6: Perform Post Installation Configuration Tasks on the Subordinate Issuing CA
- Activity 7: Install and Configure the Online Responder Role Service
- Activity 8: Verify the MSPKI Hierarchy Health
Introduction and overview of the Test Lab
There are five computers/machines involved in this two-tier PKI hierarchy lab using Microsoft ADCS.
- There is one domain controller (DC01) that is also running Active Directory-integrated Domain Name Service (DNS). This computer will also provide the Lightweight Directory Access Protocol (LDAP) location for the CDP and the AIA point for the MSPKI configuration.
- One Standalone Offline Root CA (CA01).
- One Enterprise Issuing CA (CA02).
- One Web Server (SRV1) (HTTP CDP/AIA) and
- One Windows 10 (Win10) Client computer.
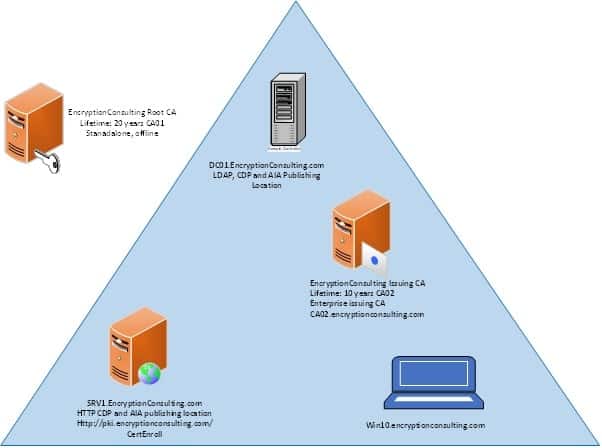
| Virtual Machine | Roles | OS Type | IP Address | Subnet mask | Preferred DNS server |
|---|---|---|---|---|---|
| DC01.encryptionconsulting.com | DC & DNS – LDAPCDP/AIA | Windows Server 2019 | 192.168.1.10 | 255.255.255.0 | 192.168.1.10 |
| CA01 | Standalone Offline Root CA | Windows Server 2019 | NA | NA | NA |
| CA02.encryptionconsulting.com | Enterprise Issuing CA | Windows Server 2019 | 192.168.1.12 | 255.255.255.0 | 192.168.1.10 |
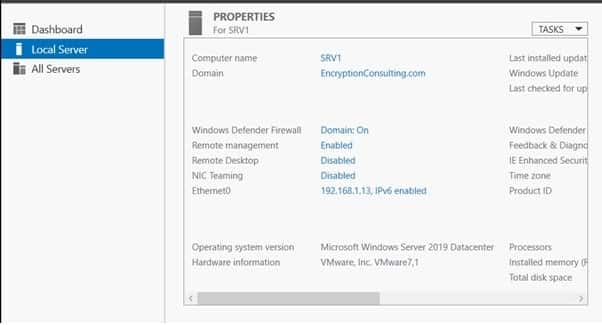
| SRV1.encryptionconsulting.com | Web Server – HTTP CDP/AIA | Windows Server 2019 | 192.168.1.13 | 255.255.255.0 | 192.168.1.10 |
| WIN10.encryptionconsulting.com | Windows Client Computer | Windows 10 | 192.168.1.14 | 255.255.255.0 | 192.168.1.10 |
Major Steps
There are eight major steps in this step-by-step guide as listed below (each includes several sub-tasks).
- Install the Active Directory Forest
- Prepare the webserver for CDP and AIA publication
- Install the standalone offline root CA
- Perform post-installation configuration steps on the standalone offline root CA
- Install Subordinate Issuing CA
- Perform the post-installation configuration on the subordinate issuing CA
- Install and configure the online responder
- Verify the MSPKI hierarchy health
Activity 1. Active Directory Forest
Task 1: Install a new forest by using Server Manager
To install the EncryptionConsulting.com forest:
- Go to Portal.azure.com and Log onto DC01 as DC01\Administrator.
- Open Server Manager. Select Start, click Administrative Tools and then click Server Manager.
- In the console tree, right-click Manage and then click Add Roles & Features
- On the Before You Begin page, click Next.
- On the Select Installation Type, click Role-Based or Feature-Based installation
- On Server Selection, select a server from the server pool and click on Then click Next
- On the Select Server Roles page, select Active Directory Domain Services. Click Next.
- If prompted by the Add Roles Wizard, click Add Required Features and then click Next.
- On the Features page, click next.
- On the Active Directory Domain Services page, click Next.
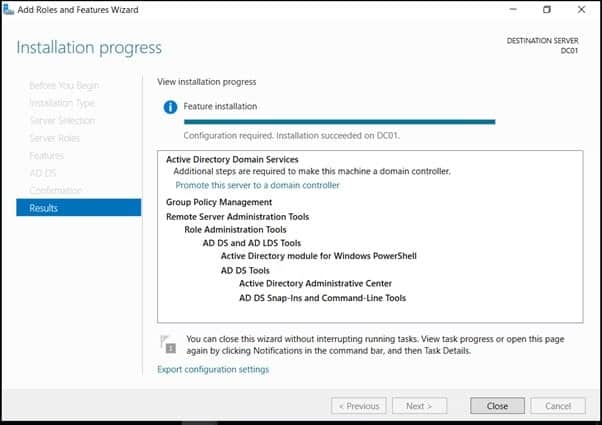
- On the Confirm Installation Selections page, click Install.
- When completed, click the hyperlink to Promote this server to a domain controller
- On the Welcome to the Active Directory Domain Services Installation Wizard page, click Next.
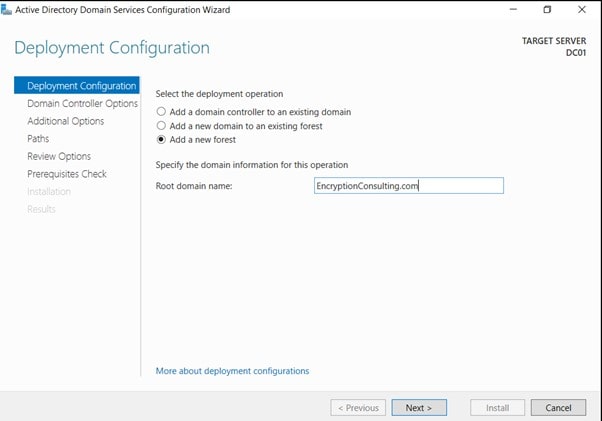
- On the Deployment Configuration page, select Add a new forest, Specify Forest Root Domain page, in FQDN of the forest root domain, type EncryptionConsulting.com, and then click Next.
- On the Set Forest Functional Level page, in the Forest functional level drop-down menu, select Windows Server 2016 and then click Next
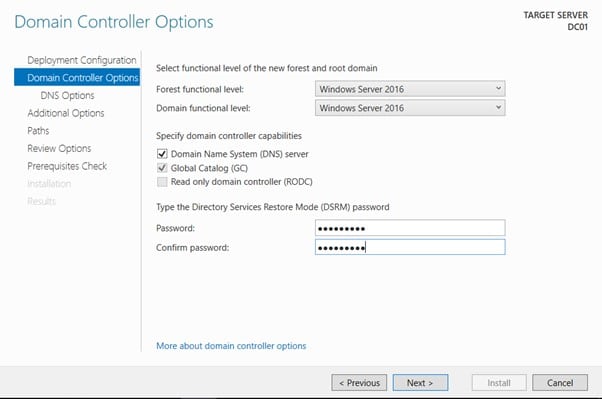
On the Directory Services Restore Mode Administrator Password page, type and confirm the restore mode password, and then click Next. This password must be used to start AD DS in Directory Service Restore Mode for tasks that must be performed offline.
DNS server is selected by default so that your forest DNS infrastructure can be created during AD DS installation. In our scenario we are going to use Active Directory–integrated DNS so we have selected to install DNS
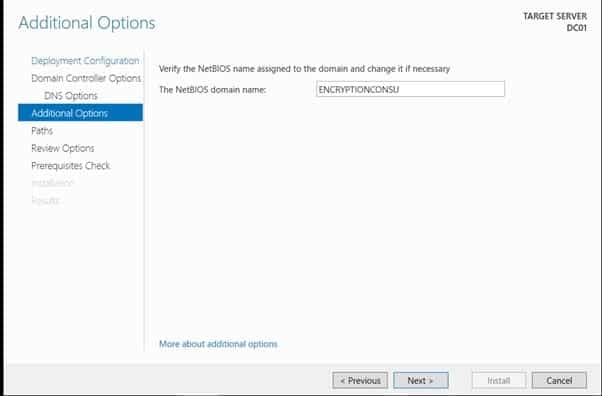
- On the Additional Options page, click Next.
If no static IP address is assigned for the network adapter, a warning message appears advising you to set static addresses.
The wizard displays a message indicating that it cannot create a delegation for the DNS server. Click Yes to continue.
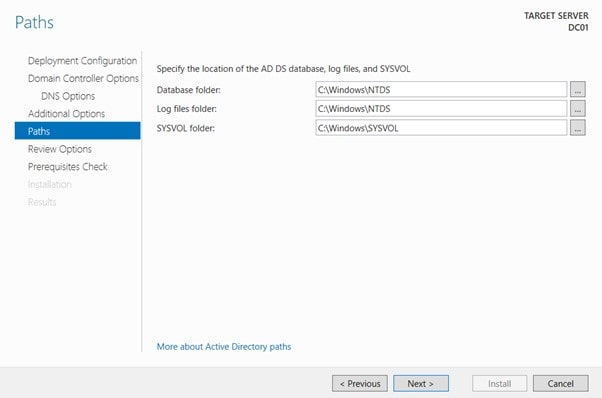
- On the Location for Database, Log Files, and SYSVOL page, click Next.
- On the Prerequisites Check page, review your selections and click install Active Directory Domain Services.
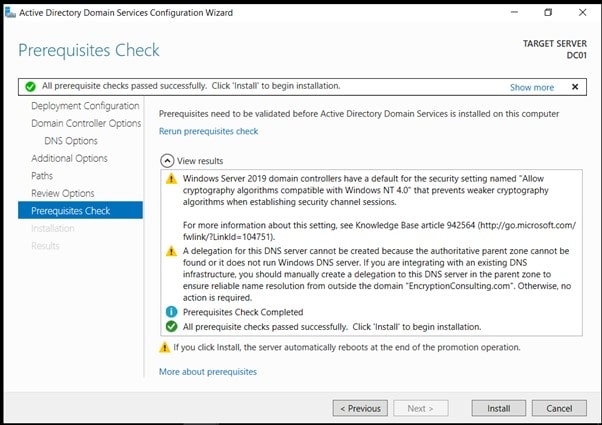
- Wait for some time until the installation completes and the system restarts.
NOTE: If you are using Active Directory-integrated DNS, the IP address for the Preferred DNS server for the first domain controller in the forest is automatically set to the loopback address of 127.0.0.1. This helps assure that the IP address of the first domain controller will be resolved in DNS even if the static IP address of the server is changed. If you prefer to configure the actual IP address of the DNS server rather than the loopback address, then replace it with 192.168.1.10 after the restart.
Task 2 : HTTP Web Server: CDP and AIA Publication
- Log on to SRV1 as the local administrator.
- Click Start, type sysdm.cpl, and press ENTER. Click Change.
- In Member of, select Domain, and then type EncryptionConsulting.com Click OK.
- In Windows Security, enter the User name and password for the domain administrator account. Click OK.
- You should be welcomed to the Encryption Consulting domain Click OK.
- When prompted that a restart is required, click OK. Click Close. Click Restart Now.
Task 3 : Install Web Server (IIS) Role
- Log on to EncryptionConsulting.com as Encryptionconsu\Administrator. (Ensure that you switch user to log on as Encryptionconsu\Administrator)
- Open Server Manager.
- Right-click on Roles and then select Add Roles.
- On the Before You Begin page select Next.
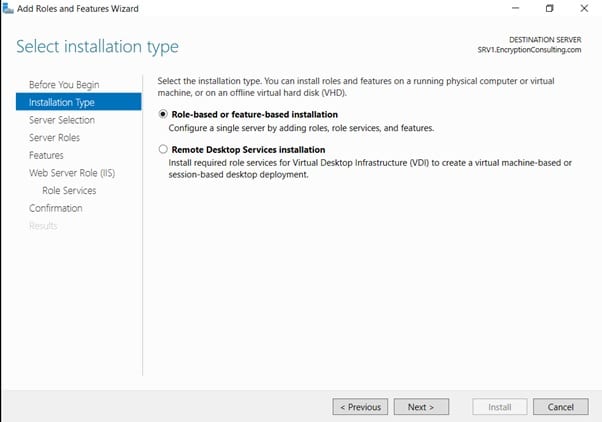
- On the Select Installation Type page, select Role-based or feature-based installation
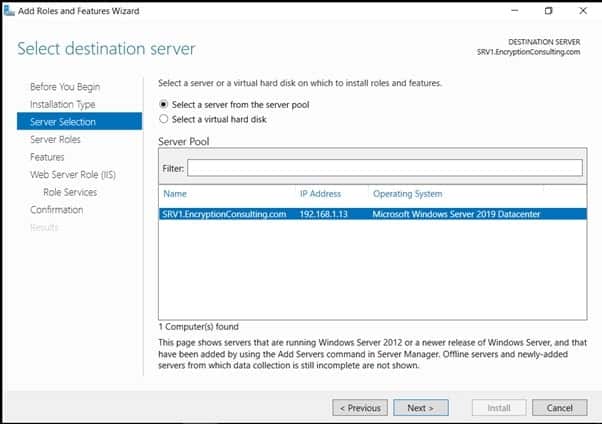
- On Select Destination Server, select a server from the server pool and click on EncryptionConsulting.com, then click Next
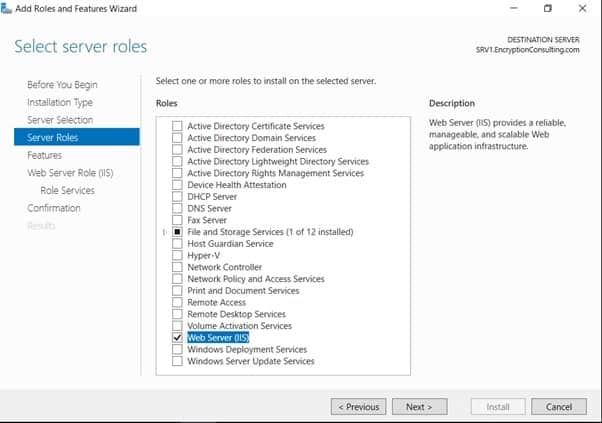
- On the Select Server Roles page select Web Server (IIS) and then click Next
- On the Select features page, click next
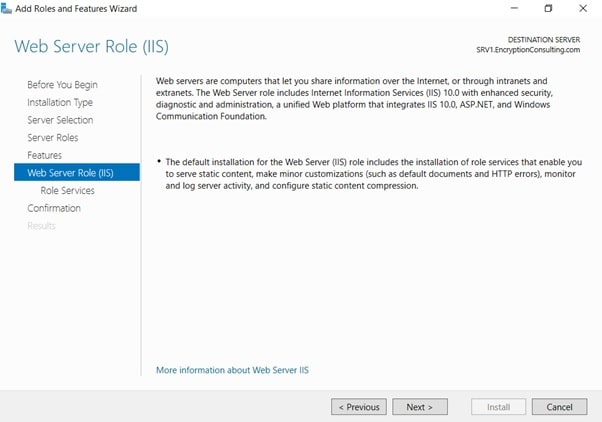
- On the Web Server (IIS) page, click Next
- Leave the defaults on the Select Role Services page and then click Next.
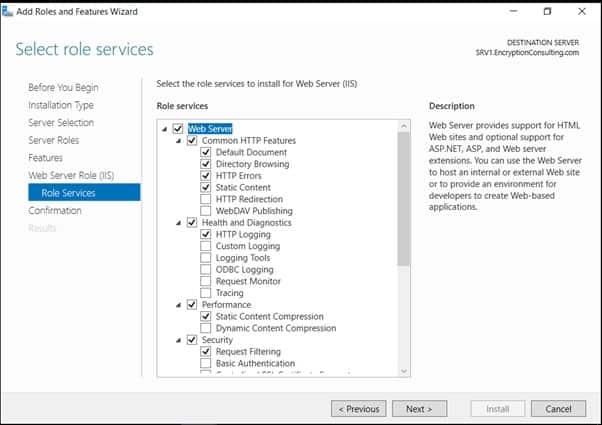
- On Confirm Installation Selections page, click Install.
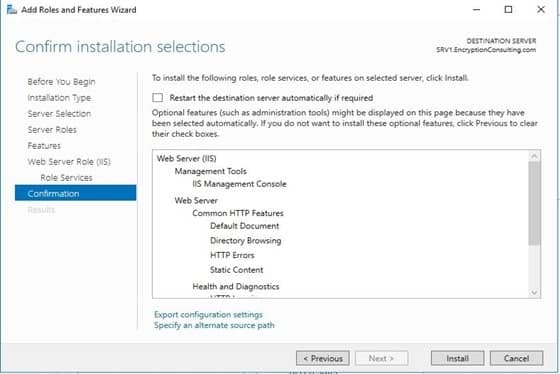
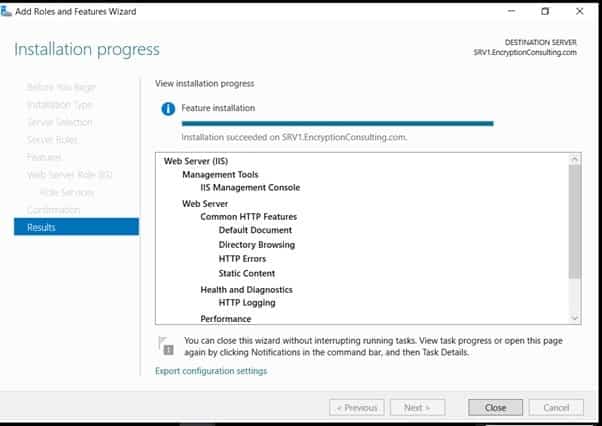
- On the Installation Results page, click Close
Task 5 : Create CertEnroll Folder and grant Share & NTFS Permissions to Cert Publishers group
Your task is to share and configure the Share and NTFS permissions for the CertEnroll folder.
- Log onto EncryptionConsulting.com as Encryptionconsu\Administrator.
- Click Start and select Computer to open Windows Explorer and then go to C: drive
- Create a folder called CertEnroll at the root of C: drive
- Right-click on the CertEnroll folder and select Properties.
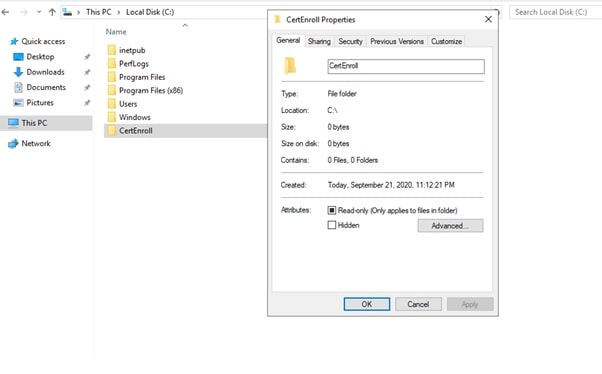
- On the CertEnroll Properties page select Sharing tab to configure share permissions.
- Click on the Advanced Sharing option and then select Share this folder.
- Click on Permissions and then click Add.
- On Select Users or Groups page, in the Enter, the object names to select, type Encryptionconsu\Cert Publishers, and then click
- On the Permissions for CertEnroll dialog box, select Cert Publishers group and then in the Allow column select Change permission. Click OK twice to go back to the CertEnroll Properties page.
- Select the Security tab and click Edit to configure NTFS permissions.
- On Permissions for CertEnroll page click Add.Windows
- On Select Users or Groups page, under the Enter the object names to select, enter Encryptionconsu\Cert Publishers, and then click OK.
- On the Permissions for CertEnroll page highlight, the Cert Publishers group, and then under the Allow column select Modify permission Click OK.

- On the CertEnroll Properties page, click OK.
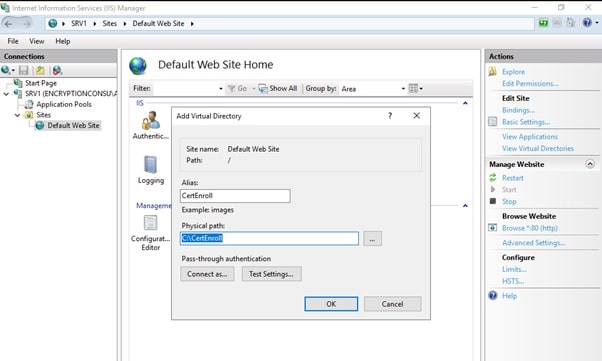
Task 6 : Create CertEnroll Virtual Directory in IIS
- Ensure you are logged on to EncryptionConsulting.com as Encryptionconsu\Administrator.
- Click Start, Administrative Tools, and then select Internet Information Services (IIS) Manager.
- On the Connections, expand SRV1 and then expand Sites.
- Right-click on Default Web Site and select Add Virtual Directory.
- On Add Virtual Directory page, in Alias, type CertEnroll. In the Physical path, type C:\Certenroll, and then click OK.
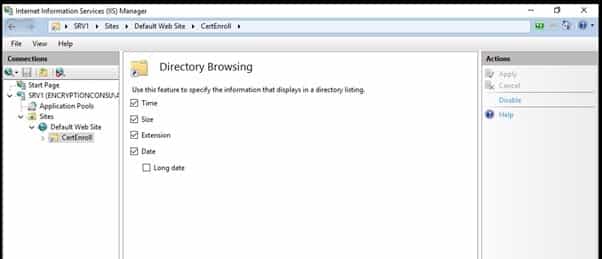
- In the Connections pane, under the Default Web Site, ensure the CertEnroll virtual directory is selected.
- In the CertEnroll Home pane, double-click on Directory Browsing.
- In the Actions pane click Enable.
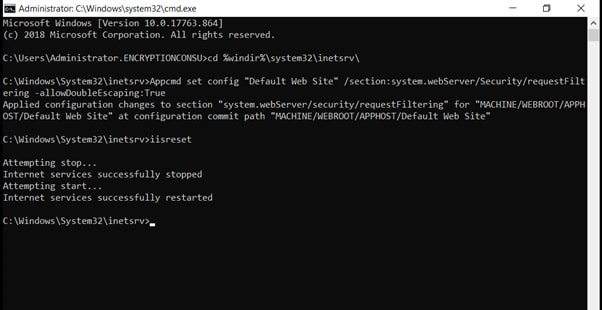
Task 7: Enable Double Escaping on IIS Server
Allowing double escaping makes it possible for the webserver to host Delta CRLs.
- Ensure you are logged on to EncryptionConsulting.com as Encryptionconsu\Administrator.
- Open a Command Prompt. To do so, click Start, click Run, and then type cmd. Click OK.
- Then type cd %windir%\system32\inetsrv\ and press ENTER.
-
Type the following command and press Enter.
Appcmd set config “Default Web Site” /section:system.webServer/Security/requestFiltering -allowDoubleEscaping:True
- Restart IIS service. To do so, type iisreset and press ENTER.
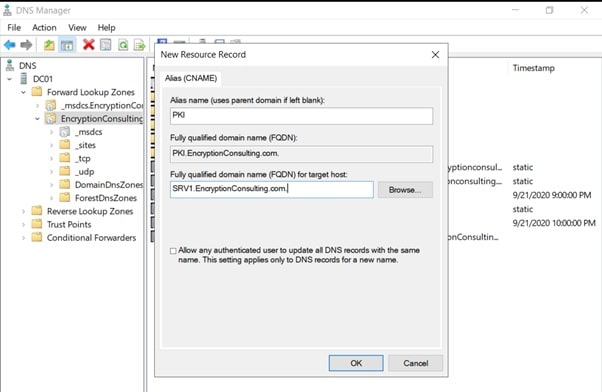
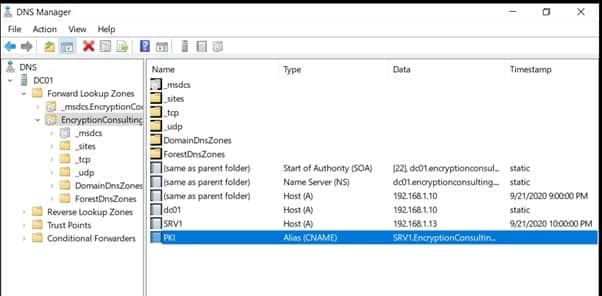
Task 8: Create CNAME (pki.EncryptionConsulting.com) in DNS
- Ensure that you are logged on to EncryptionConsulting.com as Encryptionconsu\Administrator.
- Open the DNS Console. You can do so by clicking Start, click Run, and then type dnsmgmt.msc. Click OK.
- Expand Forward Lookup Zones, select and then right-click EncryptionConsulting.com zone. Click New Alias (CNAME).
- In Alias name (uses parent domain if left blank), type PKI. In the Fully qualified domain name (FQDN) for the target host field, type EncryptionConsulting.com. and then click OK.
Note – Include the terminating “.” in the FQDN in the previous step. In a production environment, this alias can resolve to a load balancer that distributes requests to any number of web servers that contain the CA certificates and CRLs.
Activity 2: Install the Standalone Offline Root CA
The standalone offline root CA should not be installed in the domain. As a matter of fact, it should not even be connected to a network at all.
Task 1: Create a CAPolicy.inf for the standalone offline root CA
To create a CAPolicy.inf for the standalone offline root CA:
- Log onto CA01 as CA01\Administrator.
- Click Start, click Run, and then type notepad C:\Windows\CAPolicy.inf and press ENTER.
- When prompted to create a new file, click Yes.
-
Type in the following as contents of the file.
[Version]
Signature="$Windows NT$"
[Certsrv_Server]
RenewalKeyLength=2048 ; recommended 4096
RenewalValidityPeriod=Years
RenewalValidityPeriodUnits=20
AlternateSignatureAlgorithm=0
Click File and Save to save the CAPolicy.inf file under C:\Windows directory.
Warning CAPolicy.inf with the .inf extension. Type .inf at the end of the file name and select the options as described, the file will be saved as a text file and will not be used during CA installation.
- Close Notepad.
NOTE: Make sure you change the computer name as “CA01”. Windows > Run > sysdm.cpl > Change the computer name and restart the machine.
Task 2: Installing the Standalone Offline Root CA
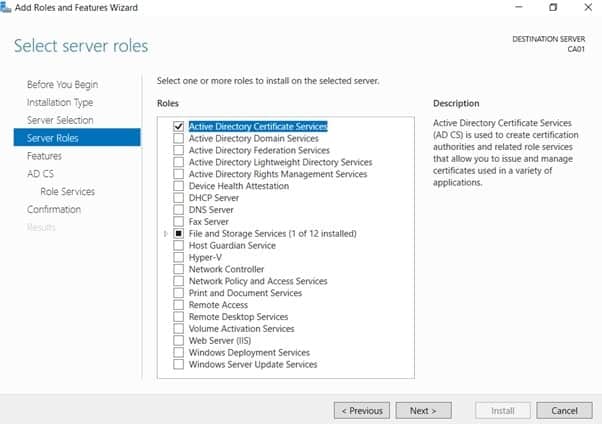
To install the standalone offline root CA:
- Log onto CA01 as CA01\Administrator.
- Click Start, click Administrative Tools, and then click Server Manager.
- Right-click on Roles and then click Add Roles.
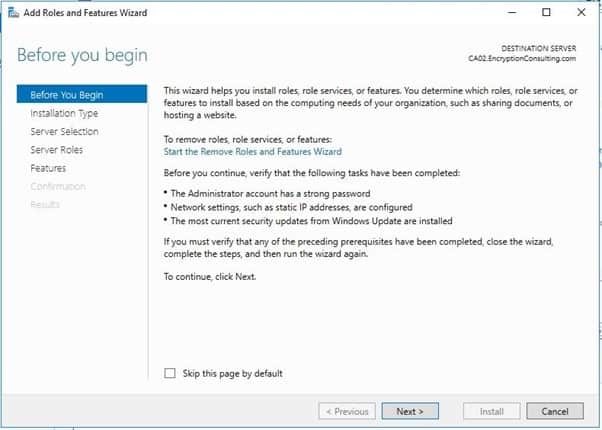
- On the Before You Begin page click Next.
- On the Installation Type page, choose Role-based or Featured based installation, and then click Next.
- On the server selection page, click next.
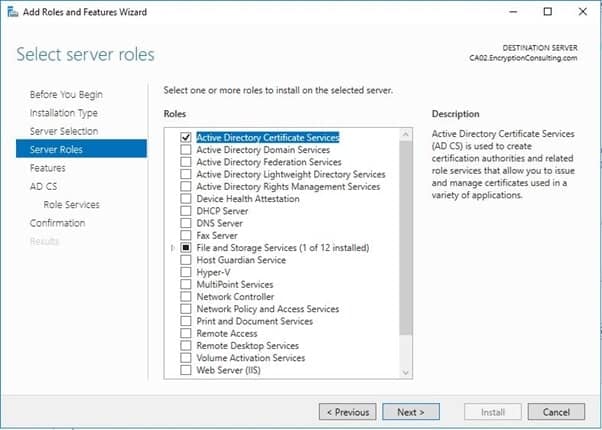
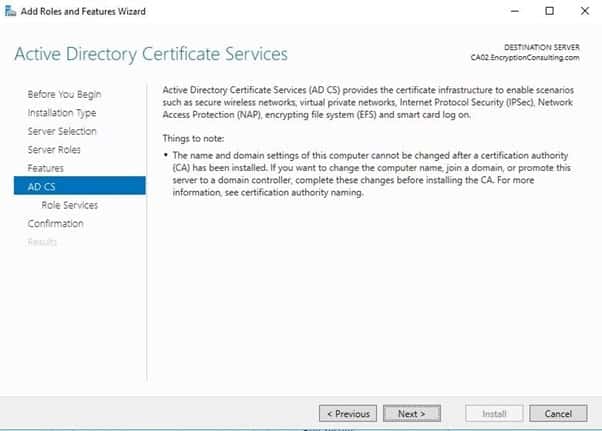
- On the Select Server Roles page select Active Directory Certificate Services, and then click Next.
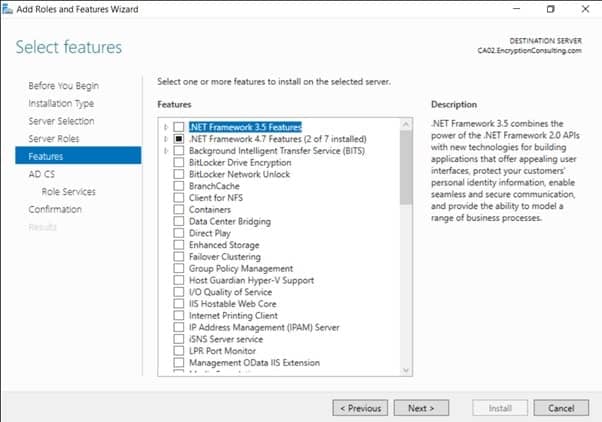
- On the select features page, click next.
- On the Introduction to Active Directory Certificate Services page, click Next.
- On the Select Role Services page, ensure that Certification Authority is selected, and then Next.
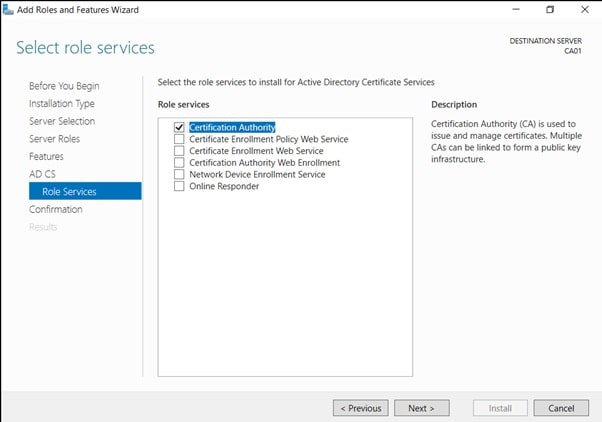
- On the confirmation page, click install
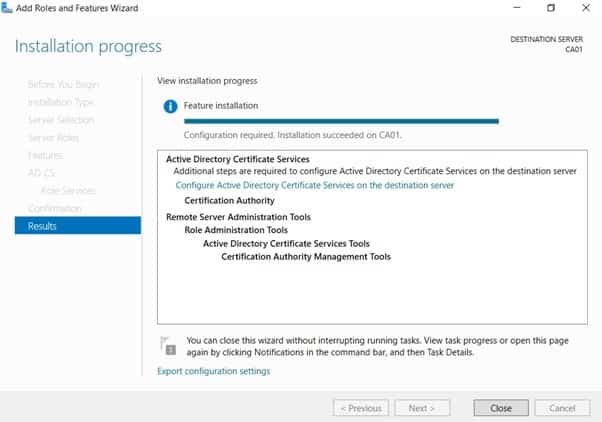
- Click on configure “Active Directory Certificate Services on the destination server”.
- On the Specify Credential to configure roles and services page, the credential should be CA01\Administrator, then click Next.
- On the Select Role, services to configure page, choose Certificate Authority, and then click Next.
- On the Specify Setup Type page, ensure that Standalone is selected, and then click Next.
- Note: Enterprise option is greyed out as CA01 server is not joined to Active Directory domain.
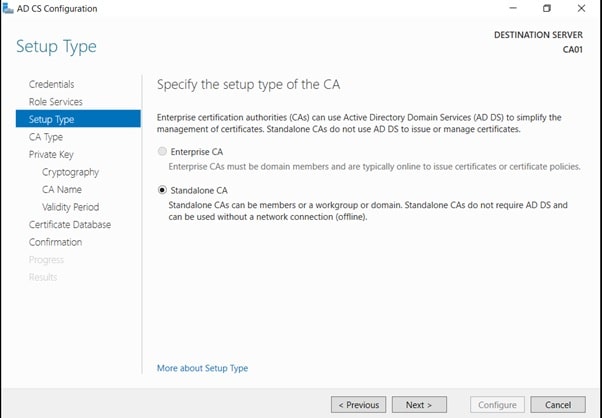
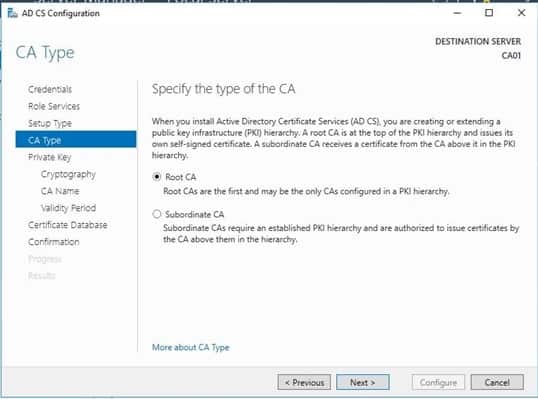
- On the Specify CA Type page, ensure that Root CA is selected, and then click Next.
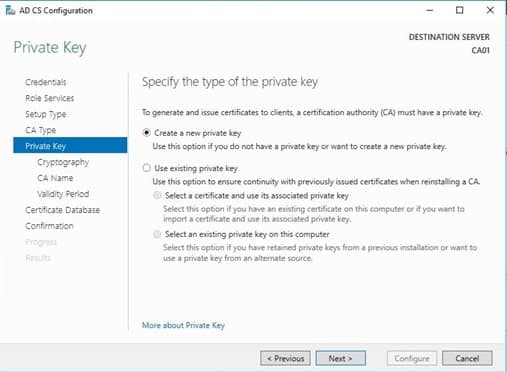
- On the Set Up Private Key page, ensure that Create a new private key is selected, and then click Next.
- Leave the defaults on the Configure Cryptography for CA page, and then click Next.
- Important: In a production environment, you would set the CSP, Hash Algorithm, and Key length to meet application compatibility requirements.

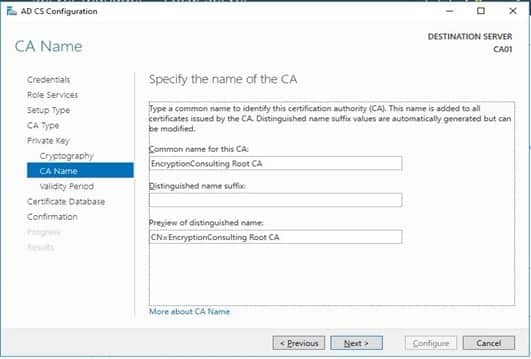
- On Configure CA Name page, under the Common name for this CA, clear the existing entry and type EncryptionConsulting Root CA. Click Next.
- Note: A Distinguished Name Suffix is optional for a root CA. This will be configured in a later step.
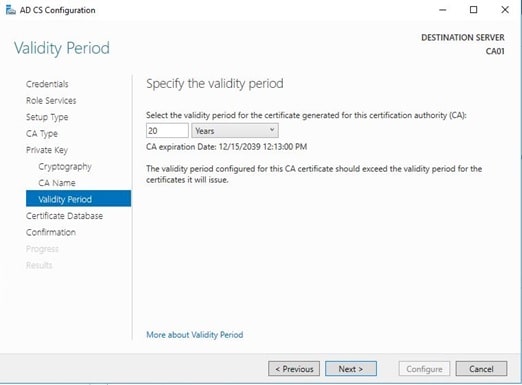
- On the Set Validity Period page, under Select validity period for the certificate generated for this CA, clear the existing entry and then type 20. Leave the selection box set to Years. Click Next.
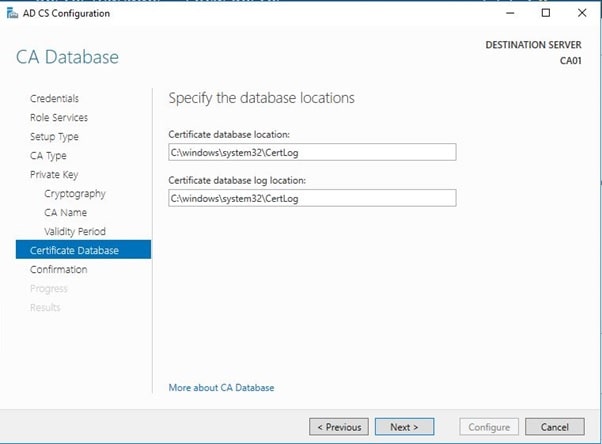
- Keep the default settings on the Configure Certificate Database page, and then click Next.
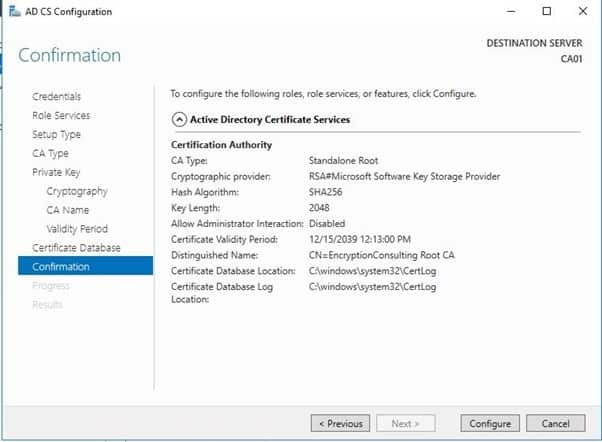
- On the Confirm Installation Selections page, review the settings, and then click Configure.
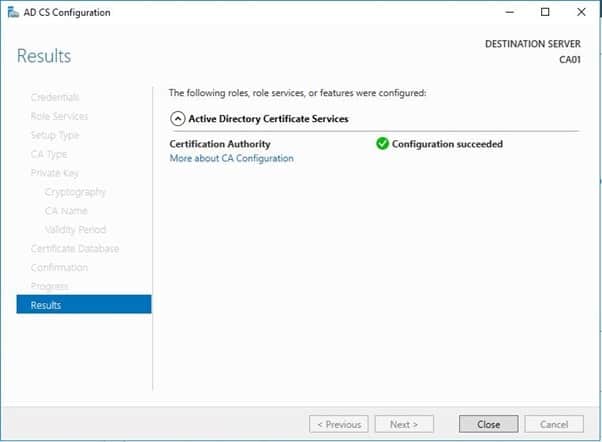
- Review the information on the Installation Results page to verify that the installation is successful and then click Close.
Activity 3: Perform Post Installation Configuration for Root CA
- Ensure that you are logged on to CA01 as CA01\Administrator.
- Open a command prompt. To do so, you can click Start, click Run, type cmd and then click OK.
- To define the Active Directory Configuration Partition Distinguished Name, run the following command from an administrative command prompt:
- Certutil -setreg CA\DSConfigDN “CN=Configuration,DC=EncryptionConsulting,DC=com”
- To define CRL Period Units and CRL Periods, run the following commands from an administrative command prompt:
- Certutil -setreg CA\CRLPeriodUnits 52
- Certutil -setreg CA\CRLPeriod “Weeks”
- Certutil -setreg CA\CRLDeltaPeriodUnits 0
- To define CRL Overlap Period Units and CRL Overlap Period, run the following commands from an administrative command prompt:
- Certutil -setreg CA\CRLOverlapPeriodUnits 12
- Certutil -setreg CA\CRLOverlapPeriod “Hours”
- To define Validity Period Units for all issued certificates by this CA, type the following command and then press Enter. In this lab, the Enterprise Issuing CA should receive a 10-year lifetime for its CA certificate. To configure this, run the following commands from an administrative command prompt:
- Certutil -setreg CA\ValidityPeriodUnits 10
- Certutil -setreg CA\ValidityPeriod “Years”
Task 1: Enable Auditing on the Root CA
CA auditing depends on system Audit Object Access to be enabled. The following instructions describe how to use the Local Security Policy to enable object access auditing.
- Click Start, click Administrative Tools, and then select Local Security Policy.
- Expand Local Policies and then select Audit Policy.
- Double click Audit Object Access and then select Success and Failure then click OK.

- Close Local Security Policy editor.
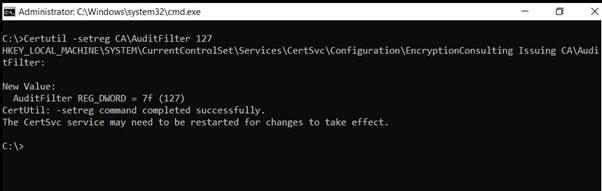
-
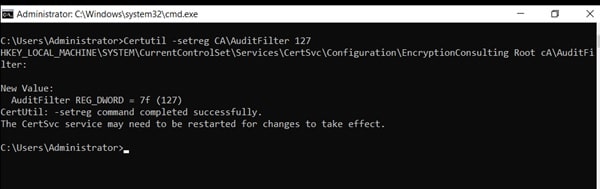
Enable auditing for the CA by selecting which group of events to audit in the Certificate Authority MMC snap-in or by configuring the AuditFilter registry key setting. To configure Auditing for all CA related events, run the following command from an administrative command prompt:
Certutil -setreg CA\AuditFilter 127
Task 2: Configure the AIA and CDP
There are multiple different methods for configuring the Authority Information Access (AIA) and certificate revocation list distribution point (CDP) locations. You can use the user interface (in the Properties of the CA object), certutil, or directly edit the registry. The AIA is used to point to the public key for the windows server certification authority (CA). The CDP is where the certificate revocation list is maintained, which allows client computers to determine if a certificate has been revoked. In this lab there will be three locations for the AIA and four locations for the CDP.
Task 3: Configure the AIA
Using a certutil command is a quick and common method for configuring the AIA. When you run the following certutil command, you will be configuring a static file system location, a lightweight directory access path (LDAP) location, and HTTP location for the AIA. The certutil command to set the AIA modifies the registry, so ensure that you run the command from a command prompt run as Administrator. Run the following command:
certutil -setreg CA\CACertPublicationURLs “1:C:\Windows\system32\CertSrv\CertEnroll\%1_%3%4.crt\n2:ldap:///CN=%7,CN=AIA,CN=Public Key Services,CN=Services,%6%11\n2:http://pki.EncryptionConsulting.com/CertEnroll/%1_%3%4.crt”
After you have run that command, run the following command to confirm your settings:
certutil -getreg CA\CACertPublicationURLs
If you look in the registry, under the following path: HKEY_LOCAL_MACHINE\System\CurrentControlSet\Services\CertSvc\Configuration\EncryptionConsulting Root CA, you can confirm the CACertPublicationURLs by opening that REG_MULTI_SZ value. You should see the following:
- C:\Windows\system32\CertSrv\CertEnroll\%1_%3%4.crt
- ldap:///CN=%7,CN=AIA,CN=Public Key Services,CN=Services,%6%11
- http://pki.EncryptionConsulting.com/CertEnroll/%1_%3%4.crt
You can also see this in the CA (certsrv) console. To open the console, click Start, click Administrative Tools, and then click Certification Authority. In the navigation pane, expand the Certificate Authority (Local). Right-click EncryptionConsulting Root CA and then click Properties. On the Extensions tab, under Select extension, click Authority Information Access (AIA) and you will see the graphical representation of the AIA settings.
Task 4: Configure the CDP
The certutil command to set the CDP modifies the registry, so ensure that you run the command from an command
certutil -setreg CA\CRLPublicationURLs “1:C:\Windows\system32\CertSrv\CertEnroll\%3%8%9.crl\n10:ldap:///CN=%7%8,CN=%2,CN=CDP,CN=Public Key Services,CN=Services,%6%10\n2:http://pki.EncryptionConsulting.com/CertEnroll/%3%8%9.crl”
After you run that command, run the following certutil command to verify your settings:
certutil -getreg CA\CRLPublicationURLs
In the registry location: HKEY_LOCAL_MACHINE\SYSTEM\CurrentControlSet\Services\CertSvc\Configuration\EncryptionConsulting Root CA you can open the REG_MULTI_SZ value and see the configuration of these values:
-
C:\Windows\system32\CertSrv\CertEnroll\%3%8%9.crl
10:ldap:///CN=%7%8,CN=%2,CN=CDP,CN=Public Key Services,CN=Services,%6%10
- http://pki.EncryptionConsulting.com/CertEnroll/%3%8%9.crl
You can also see this in the CA (certsrv) console. To open the console, click Start, click Administrative Tools, and then click Certification Authority. In the navigation pane, ensure that Certificate Authority (Local) is expanded. Right-click EncryptionConsultng Root CA and then click Properties. On the Extensions tab, under Select extension, click CRL Distribution Point (CDP) and you will see the graphical representation of the CDP settings.
At an administrative command prompt, run the following commands to restart Active Directory Certificate Services and to publish the CRL
net stop certsvc
net start certsvc
certutil -crl
Activity 4: Install Enterprise Issuing CA
Task 1: Join CA02 to the domain
To join CA02 to the domain:
- Log on to CA02 as the local administrator.
- Click Start, type sysdm.cpl, and press ENTER. Click Change.
- In the Computer name, type CA02 and then click OK.
- When prompted that you need to restart the computer, click OK. Click Close. Click Restart Now.
- After CA02 restarts, log on as a local administrator.
- Click Start, type sysdm.cpl, and press ENTER. Click Change.
- In Member of, select Domain, and then type EncryptionConsulting.com. Click OK.
- In Windows Security, enter the User name and password for the domain administrator account. Click OK.
- You should be welcomed to the EncryptionConsulting domain. Click OK.
- When prompted that a restart is required, click OK. Click Close. Click Restart Now.
Task 2: Create CAPolicy.inf for Enterprise Issuing CA
- Log onto EncryptionConsulting.com as ENCRYPTIONCONSU\Administrator. (Ensure that you switch user to log on as ENCRYPTIONCONSU\Administrator)
- Click Start, select Run, and then type notepad C:\Windows\CAPolicy.inf and press ENTER.
- When prompted to create a new file, click Yes.
-
Type in the following as the content of the file.
[Version]
Signature="$Windows NT$"
[PolicyStatementExtension]
Policies=InternalPolicy
[InternalPolicy]
OID= 1.2.3.4.1455.67.89.5
URL=http://pki.EncryptionConsulting.com/cps.txt
[Certsrv_Server]
RenewalKeyLength=2048
RenewalValidityPeriod=Years
RenewalValidityPeriodUnits=10
LoadDefaultTemplates=0
AlternateSignatureAlgorithm=0
-
Click File and Save to save the CAPolicy.inf file under C:\Windows directory
Important: Ensure that the CAPolicy.inf is saved as a .inf file. The file will not be used if it is saved with any other file extension.
- Close Notepad
Task 3: Publish the Root CA Certificate and CRL
- Ensure you are logged on to CA02. EncryptionConsulting.com as EncryptionConsulting\Administrator.
- Copy Root CA Certificate (CA01_EncryptionConsulting Root CA.crt) and Root CA CRL (EncryptionConsulting Root CA.crl) files from C:\Windows\System32\CertSrv\CertEnroll directory on CA01 internal server to removable media (A:).
-
On CA02, to publish EncryptionConsulting Root CA Certificate and CRL in Active Directory, run the following commands at an administrative command prompt. Ensure that you substitute the correct drive letter of your removable media (for A:) in the commands that follow:
certutil -f -dspublish “A:\CA01_EncryptionConsulting Root CA.crt” RootCA
certutil -f -dspublish “A:\EncryptionConsulting Root CA.crl” CA01
-
To publish EncryptionConsulting Root CA Certificate and CRL to http://pki. EncryptionConsulting.com/CertEnroll, copy EncryptionConsulting Root CA Certificate and CRL to \\srv1. EncryptionConsulting.com\C$\CertEnroll directory. Run the following commands from an administrative command prompt. Ensure that you substitute the correct drive letter of your removable media (for A:)
copy “C:\CA01_EncryptionConsulting Root CA.crt” \\SRV1.EncryptionConsulting.com\C$\CertEnroll\
copy “C:\EncryptionConsulting Root CA.crl” \\SRV1.EncryptionConsulting.com\C$\CertEnroll\
-
To add EncryptionConsulting Root CA Certificate and CRL in CA02. com local store, run the following command from an administrative command prompt. Ensure that you substitute the correct drive letter of your removable media (for A:) in the commands that follow:
- certutil -addstore -f root “A:\CA01_ EncryptionConsulting Root CA.crt”
- certutil -addstore -f root “A:\EncryptionConsulting CA.crl”
Activity 5: Install Subordinate Issuing CA
Subordinate issuing CA on CA02. EncryptionConsulting com
- Ensure that you are logged on to CA02. EncryptionConsulting.com as EncryptionConsulting\ Administrator.
- Open Server Manager.
- Right-click Roles and then select Add Roles.
- On the Before You Begin page select Next.
- On the Installation Type page, choose Role-based or Featured based installation, and then click Next
- On the server selection page, click
- On the Select Server Roles page select Active Directory Certificate Services, and then click Next.
- On the Select features page, click Next.
- On the Introduction to Active Directory Certificate Services page, click Next.
- On the Select Role Services page, select Certification Authority and Certification Authority Web Enrollment. If you see the Add Roles Wizard, click Add Required Role Services. Click Next.
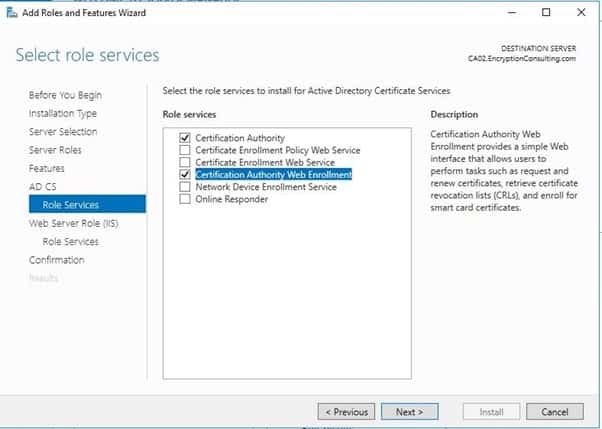
- On the Web Server Role IIS page, click Next.
- Leave the Role Services as default and click Next.
- On the confirmation page, review the details and click Install.
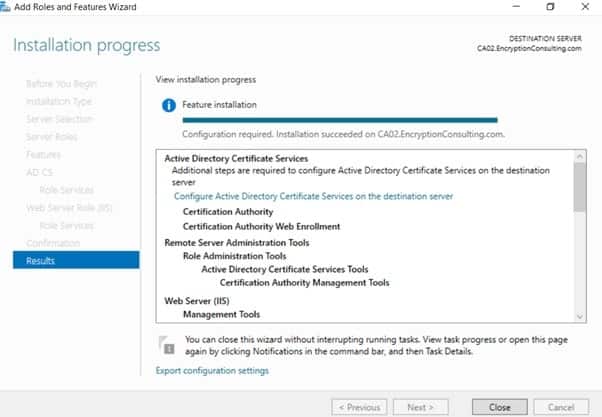
- Click on “configure Active Directory Certificate Services on the destination server”.
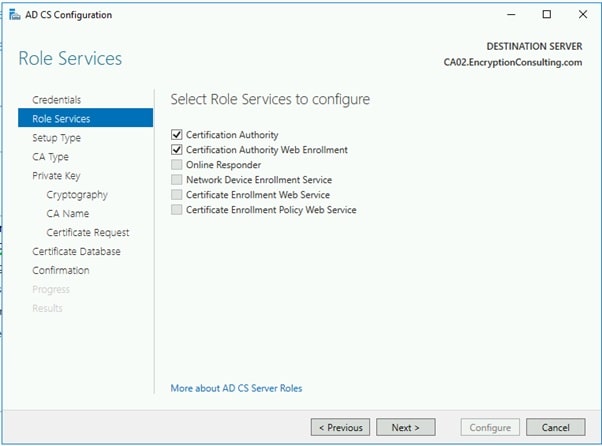
- On the Specify Credential to configure roles and services page, the credential should be Encryptionconsu\Administrator, then click Next.
- On the Select Role services to configure page, select Certificate Authority and Certificate Authority Web Enrollment then click Next.
- On the Specify Setup Type page, ensure that Enterprise is selected, and then click Next.
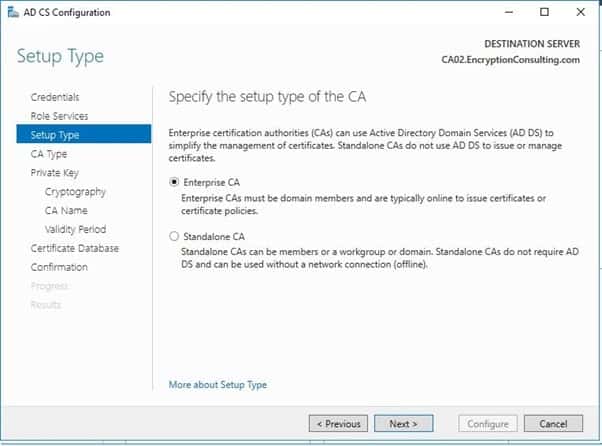
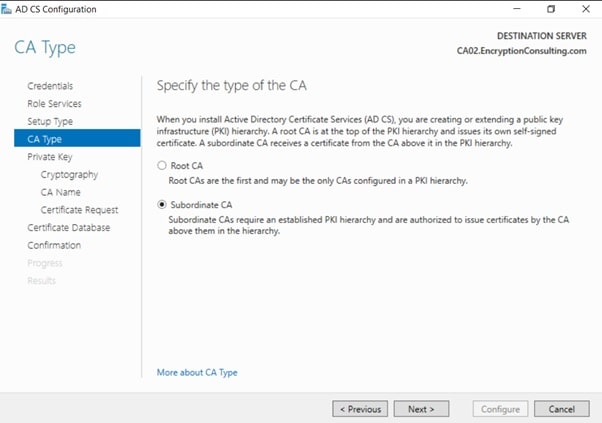
- On the Specify CA Type page, select Subordinate CA and then click Next
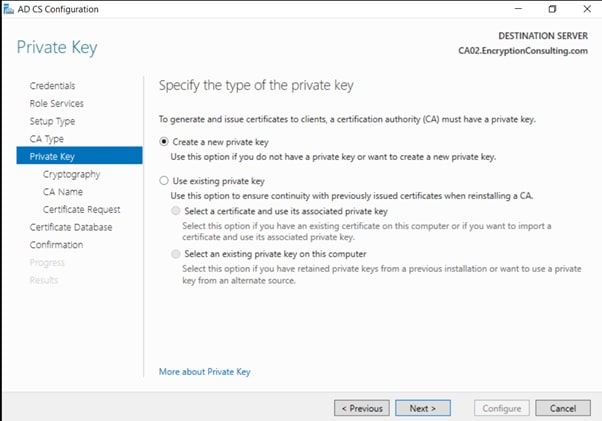
- On the Set Up Private Key page, ensure that Create a new private key is selected, and then click Next.
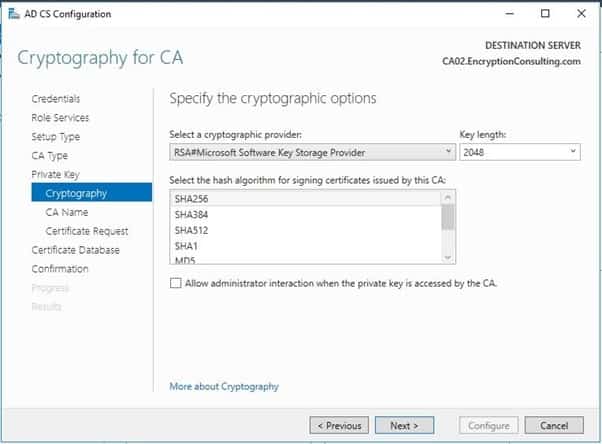
- Leave the defaults on the Configure Cryptography for CA page, then click Next.
Important: When installing in a production environment, the CSP, Hash Algorithm and Key length selected must support application compatibility requirements.
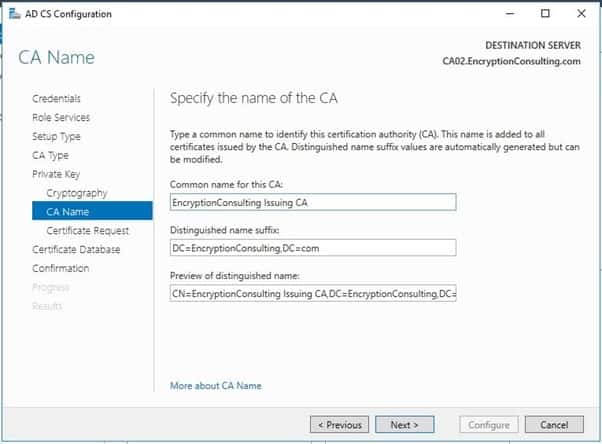
On Configure CA Name page, clear the existing entry for the Common name for this CA box, and enter EncryptionConsulting Issuing CA, then select Next.
Note – Distinguished Name Suffix is automatically populated and should not be modified.
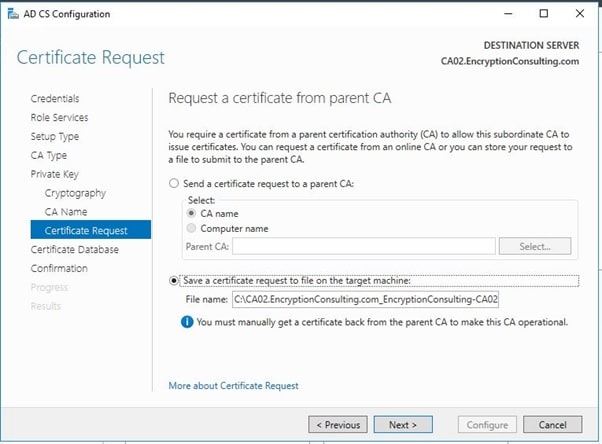
- On the Request certificate from a parent CA page, select Save a certificate request to file on the target machine option then click Next.
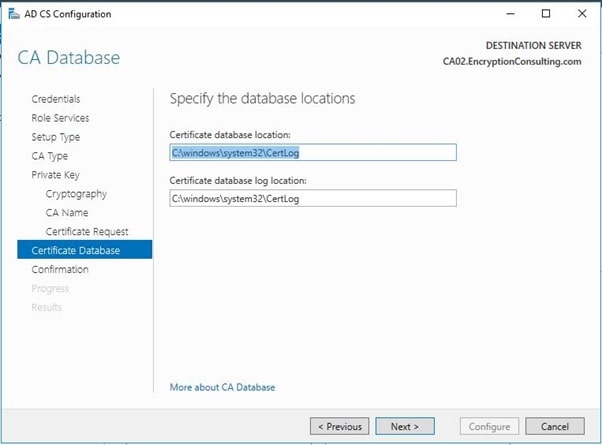
- Leave the defaults on the Configure Certificate Database page, and then click Next.
- On the Confirm Installation Selections page, click configure.
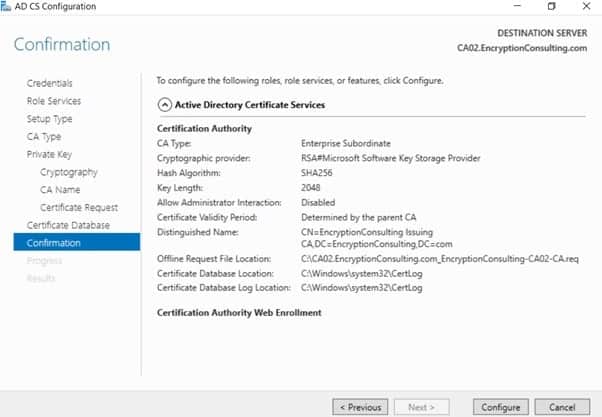
-
Review the information on the Installation Results page to verify that the installation is successful and then click Close.
- The following warning message is expected: “The Active Directory Certificate Services installation is incomplete. To complete the installation, use the requested file “C:CA02.EncryptionConsulting.com_EncryptionConsulting-CA02-CA.req” to obtain a certificate from the parent CA. Then, use the windows server Certification Authority snap-in to install the certificate. To complete this procedure, right-click the node with the name of the CA, and then click Install CA Certificate. The operation was completed successfully. 0x0 (WIN32: 0).”

-
Copy C:\ CA02.EncryptionConsulting.com_EncryptionConsulting-CA02-CA.req to your removable media. For example, if you want to copy to a floppy disk drive using the drive letter A:, you would run the following command from a command prompt:
- copy “C:\CA02.EncryptionConsulting.com_EncryptionConsulting-CA02-CA.req” A:\
Task 1: Submit the Request and Issue Encryption Consulting Issuing CA Certificate
To submit the certificate request and issue the requested certificate:
- Ensure that you are logged on to CA01 as CA01\Administrator. Place the removable media with the certificate request into CA01.
- On CA01, open an administrative command prompt. Then, submit the request using the following command (assuming that A: is your removable media drive letter):
- certreq -submit “A:CA02.EncryptionConsulting.com_EncryptionConsulting-CA02-CA.req”
- Note: Pay attention to the RequestID number that is displayed after you submit the request. You will use this number when retrieving the certificate.
- In the Certification Authority List dialog box, ensure that EncryptionConsulting Root CA is selected and then click OK
- Open the Certification Authority console. To do so, click Start, click Administrative Tools, and click Certification Authority.
- In the certsrv [Certification Authority (Local)] dialog box, in the console tree, expand EncryptionConsulting Root CA.
- Click Pending Requests. In the details pane, right-click the request you just submitted, click All Tasks, and then click Issue.
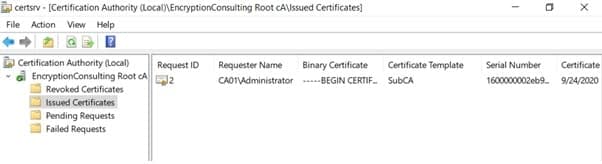
- Return to the administrative command prompt to accept the issued certificate by running the following command. Ensure that you substitute the appropriate drive letter of your removable media for A: as well as the correct RequestID for 2:
- certreq -retrieve 2 “A:\ CA02.EncryptionConsulting.com_EncryptionConsulting-CA02-CA.crt”
- In the Certification Authority List dialog box, ensure that EncryptionConsulting Root CA is selected and then click OK.
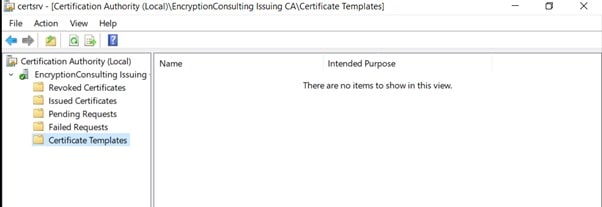
Task 2: Install the Encryption Consulting Issuing CA Certificate on CA02
To install the certificate and start the windows server Certification Authority service on CA02:
- Ensure that you are logged on to CA02. EncryptionConsulting.com as EncryptionConsu\Administrator. Place the removable media with the issued certificate for CA02. EncryptionConsulting.com into CA02.
- Open the Certification Authority console.
- In the Certification Authority console tree, right-click EncryptionConsulting Issuing CA, and then click Install CA Certificate.
- In the Select file to complete CA installation, navigate to your removable media. Ensure that you are displaying All Files (*.*) and click the CA02.EncryptionConsulting.com_EncryptionConsulting-CA02-CA certificate. Click Open.
- In the console tree, right-click EncryptionConsulting Issuing CA, click All Tasks, and then click Start Service.
- In the console tree, expand EncryptionConsulting Issuing CA and then click Certificate Templates. Notice there are no certificates shown in the details pane. This is because the CAPolicy.inf specified not to install the default templates in the line LoadDefaultTemplates=0.
Activity 6: Perform Post Installation Configuration Tasks on the Subordinate Issuing CA
There are multiple settings to configure to complete the installation of the issuing CA. These are like the tasks that were needed to complete the configuration of the root CA.
Task 1: Configure Certificate Revocation and CA Certificate Validity Periods
To configure certificate revocation and CA certificate validity periods:
- Ensure that you are logged on to CA02. EncryptionConsulting.com as EncryptionConsu\Administrator.
-
Configure the CRL and Delta CRL settings by running the following command from an administrative command prompt:
- Certutil -setreg CA\CRLPeriodUnits 1
- Certutil -setreg CA\CRLPeriod “Weeks”
- Certutil -setreg CA\CRLDeltaPeriodUnits 1
- Certutil -setreg CA\CRLDeltaPeriod “Days”
-
Define CRL overlap settings by running the following command from an administrative command prompt:
- Certutil -setreg CA\CRLOverlapPeriodUnits 12
- Certutil -setreg CA\CRLOverlapPeriod “Hours”
-
The default setting for the Validity Period is 2 years in the registry. Adjust this setting accordingly to meet your needs of entity certificate’s lifetime issued from EncryptionConsulting Issuing CA. It is recommended that you do not configure validity periods that are longer than half of the total lifetime of the EncryptionConsulting Issuing CA certificate, which was issued to be valid for 10 years. To limit issued certificates to 5 years, run the following commands from an administrative command prompt:
- Certutil -setreg CA\ValidityPeriodUnits 5
- Certutil -setreg CA\ValidityPeriod “Years”
Task 2: Enable Auditing on the Issuing CA
CA auditing depends on system Audit Object Access to be enabled. The following instructions describe how to use the Local Security Policy to enable object access auditing.
- Click Start, click Administrative Tools, and then select Local Security Policy.
- Expand Local Policies and then select Audit Policy.
- Double click Audit Object Access and then select Success and Failure then click OK.
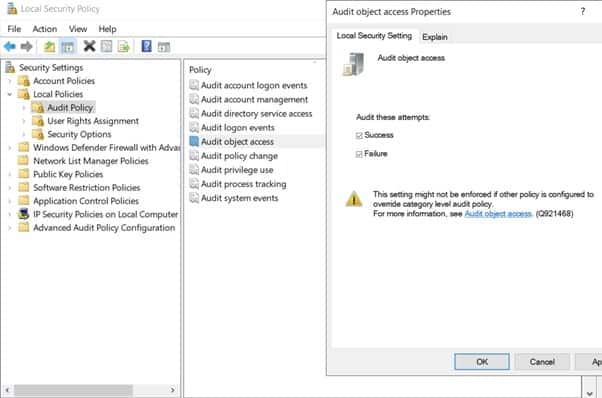
- Close Local Security Policy editor.
-
Enable auditing for the CA by selecting which group of events to audit in the Certificate Authority MMC snap-in or by configuring the AuditFilter registry key setting. To configure Auditing for all CA related events, run the following command from an administrative command prompt:
Certutil -setreg CA\AuditFilter 127
Task 3: Configure the AIA
Using a certutil command is a quick and common method for configuring the AIA. When you run the following certutil command, you will be configuring a static file system location, a lightweight directory access path (LDAP) location, and HTTP location for the AIA. The certutil command to set the AIA modifies the registry, so ensure that you run the command from a command prompt run as Administrator. Run the following command:
certutil -setreg CA\CACertPublicationURLs “1:C:\Windows\system32\CertSrv\CertEnroll\%1_%3%4.crt\n2:ldap:///CN=%7,CN=AIA,CN=Public Key Services,CN=Services,%6%11\n2:http://pki.EncryptionConsulting.com/CertEnroll/%1_%3%4.crt”
After you have run that command, run the following command to confirm your settings:
certutil -getreg CA\CACertPublicationURLs
If you look in the registry, under the following path: HKEY_LOCAL_MACHINE\System\CurrentControlSet\Services\CertSvc\Configuration\ EncryptionConsulting Issuing CA, you can confirm the CACertPublicationURLs by opening that REG_MULTI_SZ value. You should see the following:
- C:\Windows\system32\CertSrv\CertEnroll\%1_%3%4.crt
- ldap:///CN=%7,CN=AIA,CN=Public Key Services,CN=Services,%6%11
- http://pki.EncryptionConsulting.com/CertEnroll/%1_%3%4.crt
You can also see this in the CA (certsrv) console. To open the console, click Start, click Administrative Tools, and then click Certification Authority. In the navigation pane, expand the Certificate Authority (Local). Right-click EncryptionConsulting Root CA and then click Properties. On the Extensions tab, under Select extension, click Authority Information Access (AIA) and you will see the graphical representation of the AIA settings.
From an administrative command prompt, run the following command to copy the EncryptionConsulting Issuing CA certificate to the HTTP AIA location:
copy “c:\Windows\System32\certsrv\certenroll\CA02.EncryptionConsulting.com_EncryptionConsulting Issuing CA.crt” \\srv1.EncryptionConsulting.com\c$\certenroll\
Task 4: Configure the CDP
The certutil command to set the CDP modifies the registry, so ensure that you run the command from a command prompt run as Administrator. Run the following command:
certutil -setreg CA\CRLPublicationURLs “65:C:\Windows\system32\CertSrv\CertEnroll\%3%8%9.crl\n79:ldap:///CN=%7%8,CN=%2,CN=CDP,CN=Public Key Services,CN=Services,%6%10\n6:http://pki.EncryptionConsulting.com/CertEnroll/%3%8%9.crl\n65:\\srv1.EncryptionConsulting.com\CertEnroll\%3%8%9.crl”
After you run that command, run the following certutil command to verify your settings:
certutil -getreg CA\CRLPublicationURLs
In the registry location: HKEY_LOCAL_MACHINE\SYSTEM\CurrentControlSet\Services\CertSvc\Configuration\ EncryptionConsulting Issuing CA you can open the REG_MULTI_SZ value and see the configuration of these values:
- C:\Windows\system32\CertSrv\CertEnroll\%3%8%9.crl
- ldap:///CN=%7%8,CN=%2,CN=CDP,CN=Public Key Services,CN=Services,%6%10
- http://pki.EncryptionConsulting.com/CertEnroll/%3%8%9.crl
- \\srv1.EncryptionConsulting.com\CertEnroll\%3%8%9.crl
You can also see this in the CA (certsrv) console. To open the console, click Start, click Administrative Tools, and then click Certification Authority. In the navigation pane, ensure that Certificate Authority (Local) is expanded. Right-click EncryptionConsulting Root CA and then click Properties. On the Extensions tab, under Select extension, click CRL Distribution Point (CDP) and you will see the graphical representation of the CDP settings.
At an administrative command prompt, run the following commands to restart Active Directory Certificate Services and to publish the CRL.
net stop certsvc && net start certsvc
certutil -crl
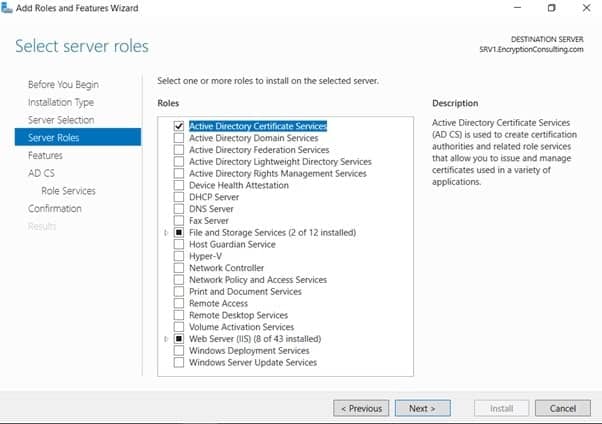
Activity 7: Install and Configure the Online Responder Role Service
Task 1: Install the Online Responder Role Service on SRV1
-
- Ensure that you are logged on to SRV1. EncryptionConsulting.com as EncryptionConsu\Administrator.
- Open Server Manager.
- Right click on Roles, and then click Add Roles.
- On the Before You Begin page, then select Next.
- On the Select Installation type page, select Role-based or feature-based installation and then click Next.
- On the Server Selection page, click Next.
- On the Select Server Roles page, select Active Directory Certificate Services and then click Next.
- On the Features page, click Next.
- On Introduction to Active Directory Certificate Services page, click Next.
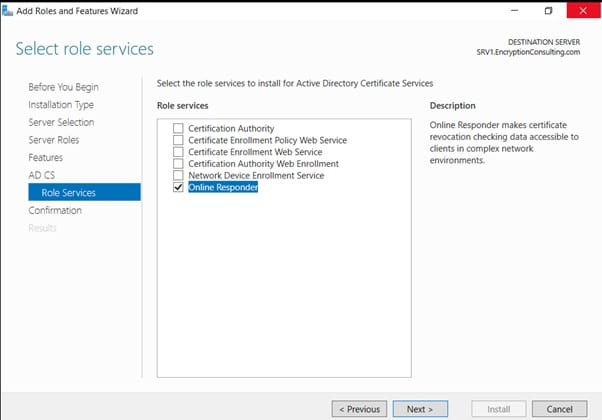
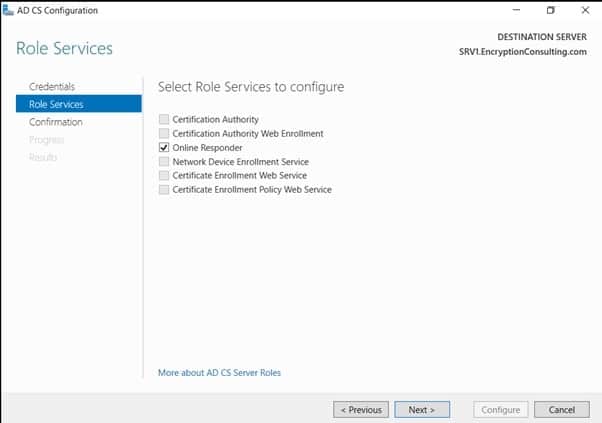
- On the Select Role Services page, clear the Certification Authority, and then select Online Responder. Click Next.
- Note: You do not want to install a Certification Authority on SRV1.EncryptionConsulting.com, so you are clearing that checkbox.
- If the Add role services and features required for Online Responder page appears, click Add Required Role Services and then click Next. Then, on the Web Server (IIS), click Next.
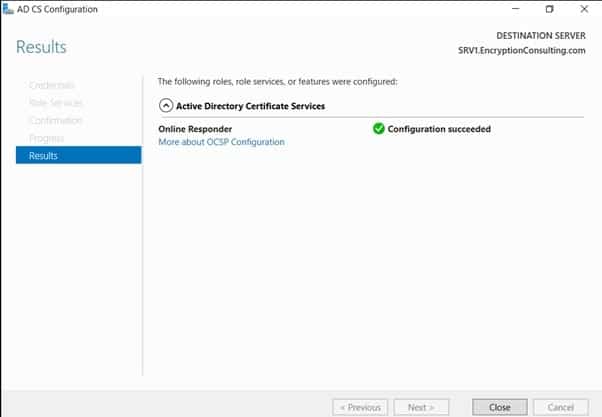
- On the Confirm Installation Selections page, click Install. Click Close when the installation is complete.
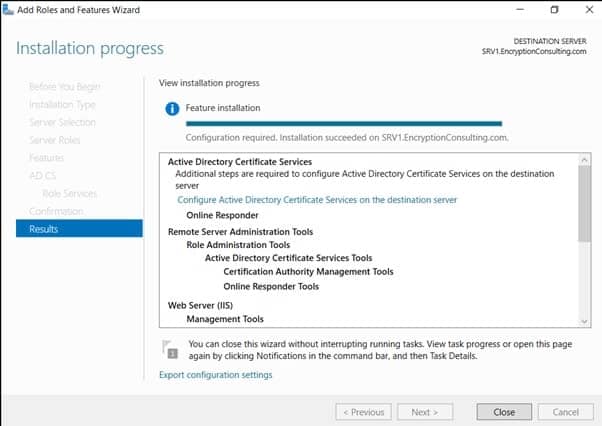
- Click on “Configure Active Directory Certificate Services on the destination server“, on the Credential Page, make sure Encryptionconsu\Administrator is mentioned, then click Next.
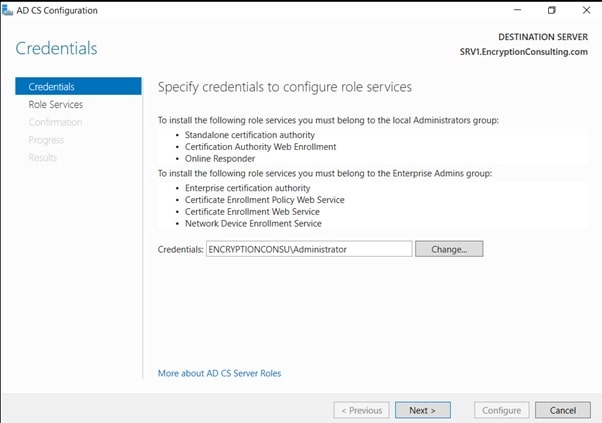
- On the Select Role, Services to configure page, select “online Responder” and click Next.
- On the confirmation page, verify the details and click Next.
Task 2: Add the OCSP URL to the Encryption Consulting Issuing CA
To add the OCSP URL to the EncryptionConsulting Issuing CA:
-
- Ensure that you are logged on to CA02. EncryptionConsulting.com as EncryptionConsu\Administrator
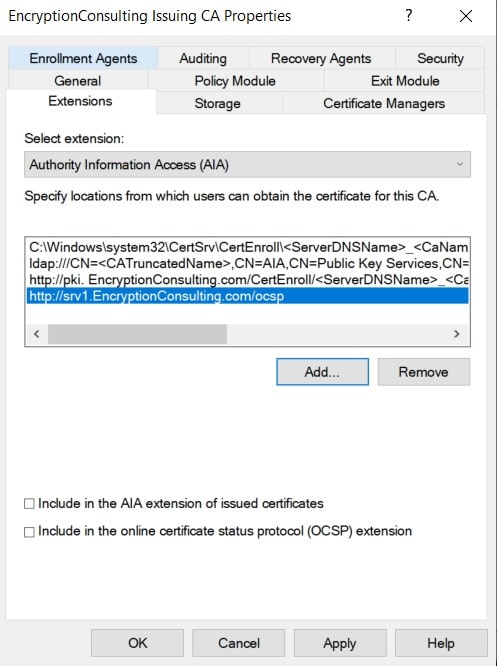
- In the Certification Authority console, in the console tree, right-click EncryptionConsulting Issuing CA, and then click Properties.
- On the Extensions tab, under Select extension, select Authority Information Access (AIA), and then click Add.
- In Location, type http://srv1.EncryptionConsulting.com/ocsp
- and then click OK.
- Select Include in the online certificate status protocol (OCSP) extension.
- Note: A common misconfiguration is to select both checkboxes in the Extensions tab, which is incorrect. Ensure that Include in the online certificate status protocol (OCSP) extension checkbox is the only one selected.
-
Click OK. When prompted by the Certification Authority dialog box to restart Active Directory Certificate Services, click Yes.
Important: The EncryptionConsulting Issuing CA will now include http://srv1. EncryptionConsulting.com/ocsp URL as part of Authority Information Access (AIA) extension in all newly issued certificates issued or renewed or re-enrolled certificates. However, certificates enrolled from EncryptionConsulting Issuing CA prior to this change will not have this URL.
Task 3: Configure and Publish the OCSP Response Signing Certificate on the Encryption Consulting Issuing CA
To configure the OCSP response signing certificate:
- On CA02. EncryptionConsulting.com, ensure that you are logged on as EncryptionConsu\Administrator.
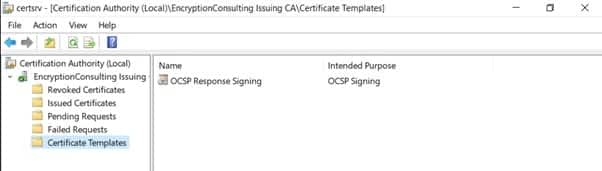
- In the Certification Authority console, ensure that the EncryptionConsulting Issuing CA is expanded in the console tree.
- Right-click on Certificate Templates and then click Manage. Certificate Templates opens and displays the certificate templates stored in Active Directory.
- In the details pane (middle pane) right-click OCSP Response Signing and then click Properties.
- On the Security tab click Add. Click Object Types.
- In the Object Types dialog box, select Computers and then click OK.
- In Enter the object names to select, type SRV1 and then click Check Names. Click OK.
- Ensure that SRV1 is selected and in the Allow column, ensure that the Read and Enroll permissions are selected. Click OK.
- Close Certificate Templates MMC console.
- In certsrv console, right-click Certificate Templates, then select New and then select Certificate Template to Issue.
- In the Enable Certificate Templates dialog box, click OCSP Response Signing and the click OK.
Task 4: Configure Revocation Configuration on the Online Responder
To configure the revocation configuration:
- On SRV1.EncryptionConsulting.com, ensure that you are logged on as EncryptionConsu\Administrator.
- Open Server Manager navigate to Tools and click on “Online Responder Management“.
- Right-click Revocation Configuration and then click Add Revocation Configuration.
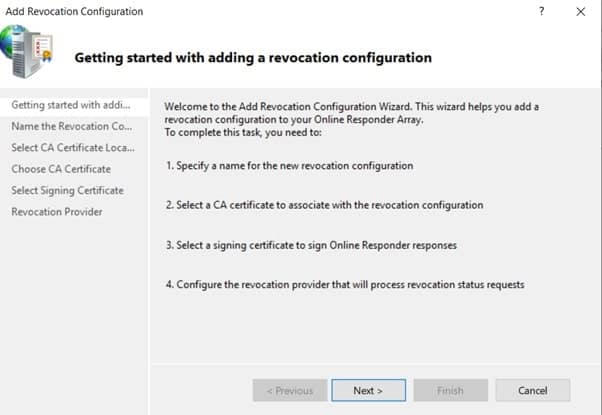
- On the Getting Started with Adding a Revocation Configuration page click Next.
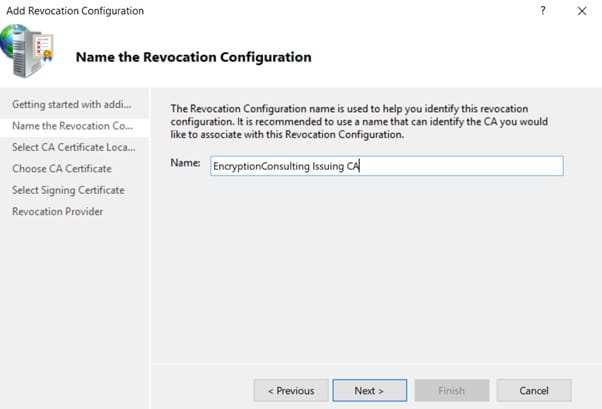
- In Name, enter EncryptionConsulting Issuing CA, and then click Next.
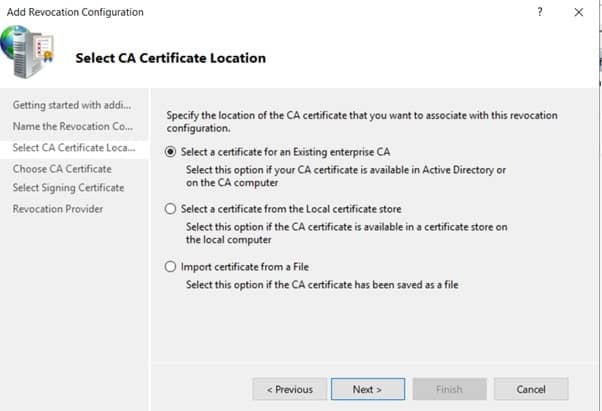
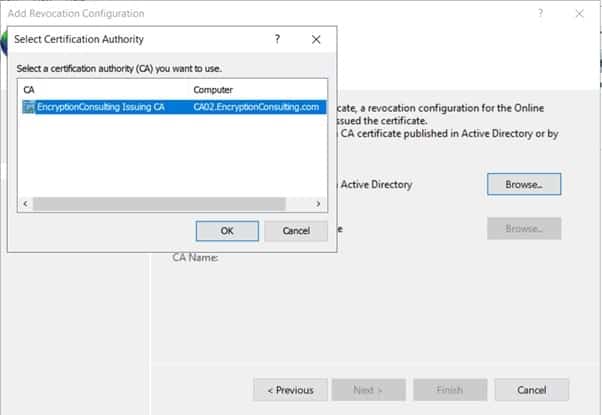
- On the Select CA Certificate Location page ensure that Select a certificate for an Existing enterprise CA is selected, then click Next.
- Leave the defaults on the Select Signing Certificate page, and then click Next.
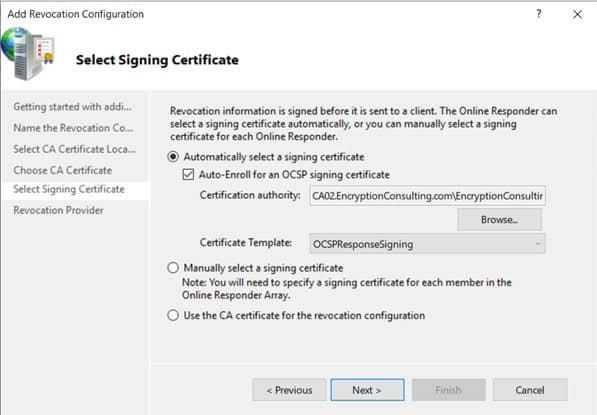
- On the Revocation Provider page, click Provider.
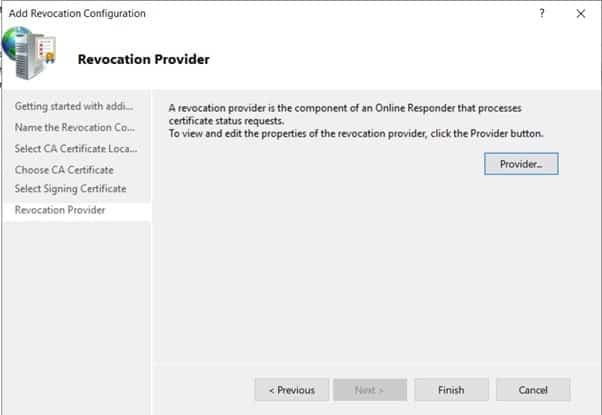
-
Review the choices listed for OCSP Responder to down CRLs in the form of LDAP and HTTP locations.
- Note: Depending on your needs you could select either the LDAP or HTTP as your primary location for OCSP Responder to download CRLs. You can change the order for LDAP and HTTP URLs using Move Up or Move Down Leave the defaults as they appear.
-
Clear the Refresh CRLs based on their validity periods. In the Update, CRLs at this refresh interval (min) box, type 15 and then click OK. Click Finish.
- Note: Modifying this setting to download CRLs at a faster rate than the CRL’s normal expiration makes it possible for the OCSP responder to rapidly download new CRLs rather than use the last downloaded CRL’s normal expiration date. Production needs may differ from the value chosen here.
- In the Certification Authority console, expand Array Configuration and then click SRV1.
- Review Revocation Configuration Status in the middle pane to ensure there is a signing certificate present and the status reports as OK. The provider is successfully using the current configuration.
Task 5: Configure Group Policy to Provide the OCSP URL for the EncryptionConsulting Issuing CA
This configuration would only be needed to allow existing certificate holders to take advantage of a new OCSP responder without having to re-enroll new certificates with the required OCSP URL added to them.
- Ensure you are logged on to DC01. EncryptionConsulting.com as EncryptionConsu\Administrator.
- Open an administrative command prompt and run the following commands:
- cd\
- certutil -config “ca02.EncryptionConsulting.com\EncryptionConsulting Issuing CA” -ca.cert EncryptionConsultingissuingca.cer
- Click Start, click Run, and then type gpmc.msc. Press ENTER.
- Expand Forest, expand Domains, expand EncryptionConsulting.com, and then expand Group Policy Objects.
- Right-click Default Domain Policy, then click Edit.
- Under Computer Configuration, expand Policies, expand Windows Settings, expand Security Settings, and then expand Public Key Policies.
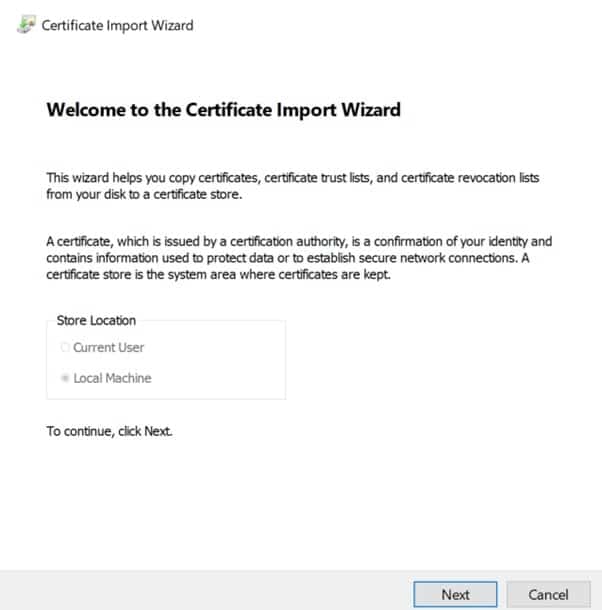
- Right-click Intermediate Certification Authorities, and then click Import.
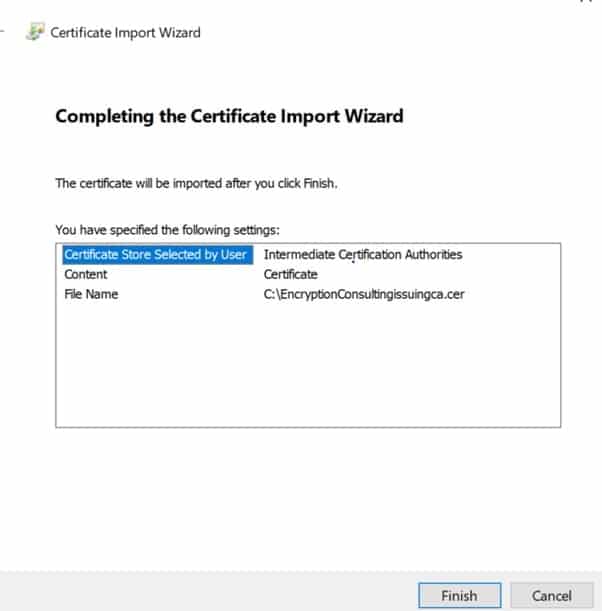
- On the Welcome to Certificate Import Wizard page, click Next.
- In the File name, type C:\EncryptionConsultingissuingca.cer, and then click Next.
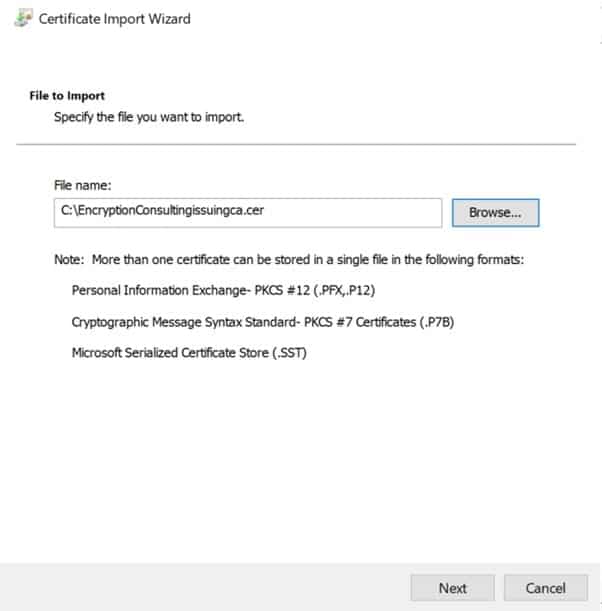
- On the Certificate Store page, click Next.
- On the Completing the Certificate Import Wizard, click Finish and then click OK.
- In the console tree, select Intermediate Certification Authorities
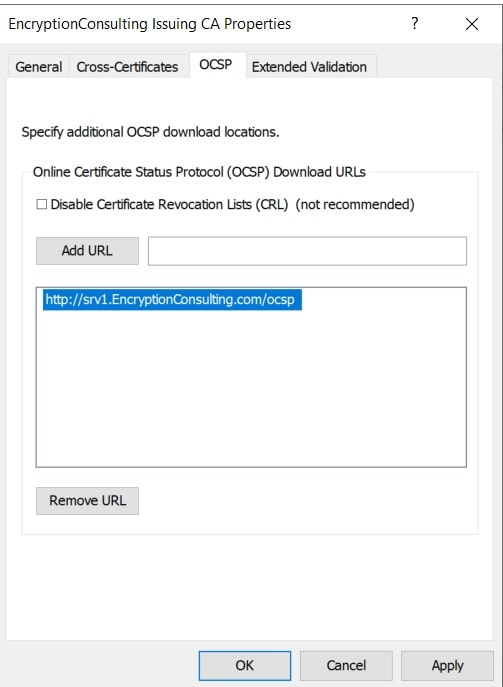
- In the details pane, right-click EncryptionConsulting Issuing CA certificate, then click Properties.
- On the OCSP tab, in Add URL enter http://srv1.EncryptionConsulting.com/ocsp, and then click Add URL. Click OK.
- Close the Group Policy Management Editor and then close Group Policy Management console.
Activity 8: Verify the MSPKI Hierarchy Health
Task 1: Win10
- Log on to WIN10 as the local administrator.
- Click Start, type sysdm.cpl, and press ENTER. Click Change. (Ensure the computer name is already set to WIN10 – otherwise, change it)
- In Member of, select Domain, and then type EncryptionConsulting.com. Click OK.
- In Windows Security, enter the Username and password for the domain administrator account. Click OK.
- You should be welcomed to the EncryptionConsulting domain. Click OK.
- When prompted that a restart is required, click OK. Click Close. Click Restart Now.
Task 2: Check PKI Health with Enterprise PKI
To use the Enterprise PKI console to check PKI health:
- On CA02. EncryptionConsulting.com, ensure that you are logged on as EncryptionConsu\Administrator.
- Open Server Manager.
-
In the console tree, under Roles and Active Directory Certificate Services, click Enterprise PKI.
- Alternatively, you can run Enterprise PKI by running PKIView.msc from an administrative command prompt.
- Right-click Enterprise PKI and then click Manage AD Containers.
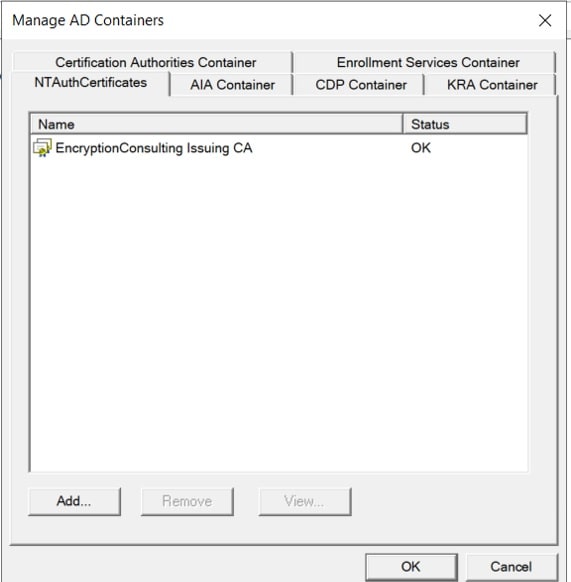
- On the NTAuthCertificates tab, verify the EncryptionConsulting Issuing CA certificate appears with a status of OK.
- On the AIA Container tab, verify both the EncryptionConsulting Root CA and the EncryptionConsulting Issuing CA certificates are present with a status of OK.
- On the CDP Container tab, verify EncryptionConsulting Root CA base CRL, EncryptionConsulting Issuing CA base, and the Delta CRLs are present with a status of OK.
- On Certification Authorities Container, verify EncryptionConsulting Root CA certificate is present with a status of OK.
- On Enrollment Services Container, verify EncryptionConsulting Issuing CA certificate is present with a status of OK.
Task 3: Configure Certificate Distribution on the Encryption Consulting Issuing CA
To publish a certificate for computers in the enterprise:
- On CA02. com, ensure that you are logged on as EncryptionConsu\Administrator.
- In the Certification Authority console, ensure that EncryptionConsulting Issuing CA is expanded.
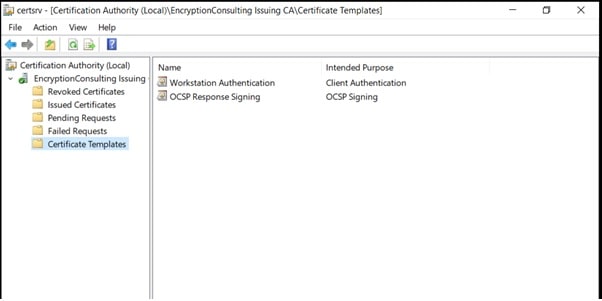
- Right-click Certificate Templates select New and select Certificate Template to Issue.
- On the Enable Certificate Templates dialog box, click Workstation Authentication, page and then click OK.
Task 4: Obtain a Certificate Using WIN10 and Verify PKI Health
To obtain a certificate for WIN10 and verify PKI health:
- Log into Win10. com as EncryptionConsu\Administrator. (Ensure that you switch user to log on as EncryptionConsu\Administrator)
- Click Start, type mmc, and then press ENTER.
- Click File, and then click Add/Remove Snap-in.
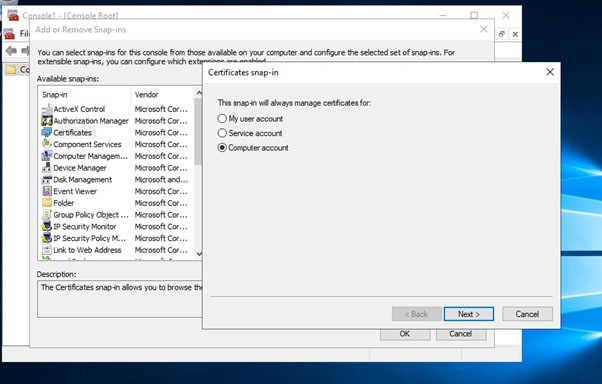
- Click Certificates, then click Add. Select Computer Account, and then click Finish. Click OK.
- Expand Certificates, right-click Personal, click All Tasks, and then click Request New Certificate.
- On the Before you begin page, click Next.
- On the Select Certificate Enrollment Policy page, click Next.
- Select Workstation Authentication, and click Enroll. When the certificate is enrolled, click Enroll.

- In the console tree, expand Personal, and click Certificates. In the details pane, right-click the EncryptionConsulting.com certificate, click All Tasks, and then click Export.
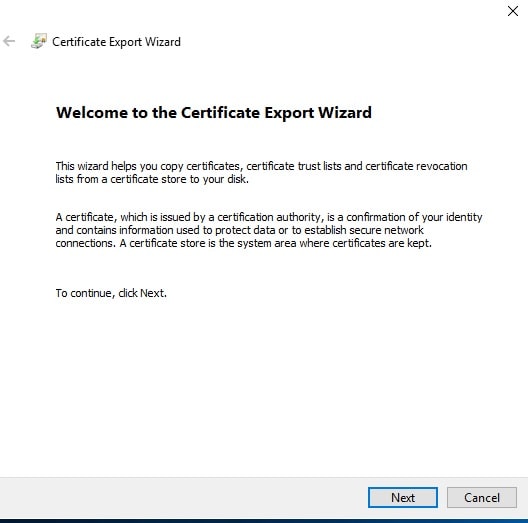
- On the Welcome to Certificate Export Wizard page, click Next.
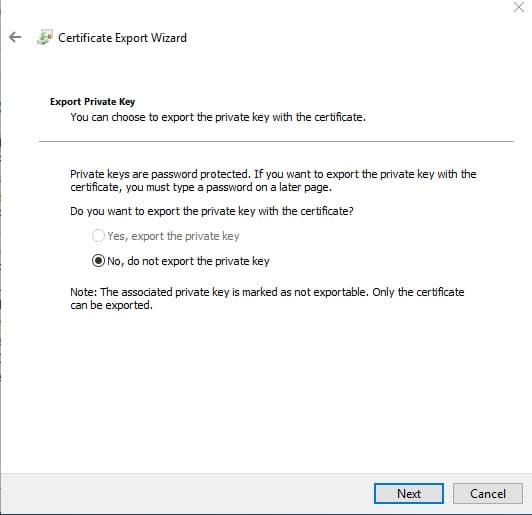
- On the Export Private Key, click Next. (No, do not export the private key selected by default).
- On the Export File Format page, click Next. [DER encoded binary X.509 (.CER) is the default selection].
- On the File to Export page, type C:\win10, and then click Next.
- On the Completing the Certificate Export Wizard page, click then Finish, and then click OK.
-
Open a command prompt and run the following commands: (To open a command prompt, click Start, type cmd, and then press ENTER)
- cd\
- certutil -URL C:\win10.cer
-
In the URL Retrieval Tool, perform the following steps, in the Retrieve section:
- Select OCSP (from AIA) option and then click Retrieve. Confirm that it shows status as Verified.
- Select CRLs (from CDP) option and then click Retrieve. Confirm that it shows status as Verified.
- Select the Certs (from AIA) option and then click Retrieve. Confirm that it shows status as Verified.
- Click Exit to close the URL Retrieval Tool.
- From a command prompt run the following command to thoroughly verify certificate chain retrieval and revocation status.
- certutil -verify -urlfetch c:\win10.cer
- Review the output and make sure all the chain retrieval and revocation status are successfully verified.
- Introduction and overview of the Test Lab
- Major Steps
- Activity 1. Active Directory Forest
- Task 1: Install a new forest by using Server Manager
- Task 2 : HTTP Web Server: CDP and AIA Publication
- Task 3 : Install Web Server (IIS) Role
- Task 5 : Create CertEnroll Folder and grant Share & NTFS Permissions to Cert Publishers group
- Task 6 : Create CertEnroll Virtual Directory in IIS
- Task 7: Enable Double Escaping on IIS Server
- Task 8: Create CNAME (pki.EncryptionConsulting.com) in DNS
- Task 1: Install the Online Responder Role Service on SRV1
- Task 2: Add the OCSP URL to the Encryption Consulting Issuing CA
- Task 3: Configure and Publish the OCSP Response Signing Certificate on the Encryption Consulting Issuing CA
- Task 4: Configure Revocation Configuration on the Online Responder
- Task 5: Configure Group Policy to Provide the OCSP URL for the EncryptionConsulting Issuing CA