
Issuing CA often needs to be decommissioned for a variety of reasons, such as
- The operating system is reaching the end of its life
- CA might be compromised
- CA is having operational issues and is too complicated to clean up.
No matter the reason, migrating to a new issuing CA can seem easy. Still, it can come with new challenges, such as mitigating risks, minimizing operational impact, etc.
While migrating issuing CAs, we need to ensure,
- The current certificates that are issued remain operational until their validity runs out.
- The old issuing CA should not issue any more certificates.
- We can move to other CDP/AIA points according to the required changes, but the issuing CA would have a minimal operation and no impact on the PKI infrastructure.
Prerequisites
Before we begin, you need a new server that will act as the new issuing CA. The server should be configured, and issuing CA should be installed.
Steps to Migrate
These steps will help organizations migrate to new issuing CA.
If CDP/AIA points are not being changed, steps 2, 4, and 5 are optional and shouldn’t be followed.
- Log onto the old Issuing CA
- Identify CDP/AIA Distribution Points (optional)
- Open command prompt
- Type the command
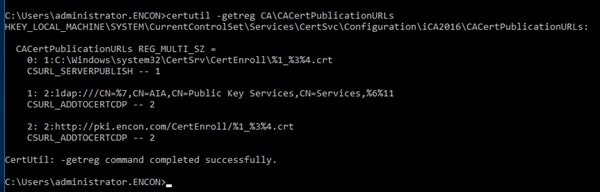
certutil -getreg CA\CACertPublicationURLs
-
Document the HTTP AIA points. Ignore LDAP and C:\%windir%
As per the screenshot, the AIA point is http://pki.encon.com/CertEnroll/%1_%3%4.crt
%1 refers to ServerDNSName
%3 refers to CaName
%4 refers to Certificate Name
Actual URL: http://pki.encon.com/CertEnroll/iCA2016.encon.com_iCA2016.crt
-
Type the command
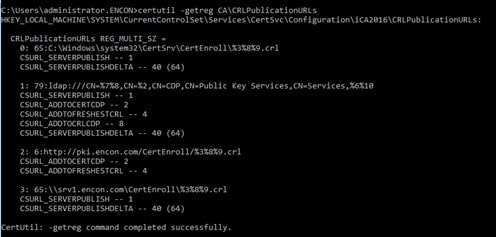
certutil -getreg CA\CRLPublicationURLs
-
Document the HTTP CDP Points. Ignore LDAP and C:\%windir%
As per the screenshot, the CDP point is http://pki.encon.com/CertEnroll/%3%8%9.crl
%3 refers to CaName
%8 refers to CRLNameSuffix
%9 refers to DeltaCRLAllowed
Actual URL: http://pki.encon.com/CertEnroll/iCA2016.crl
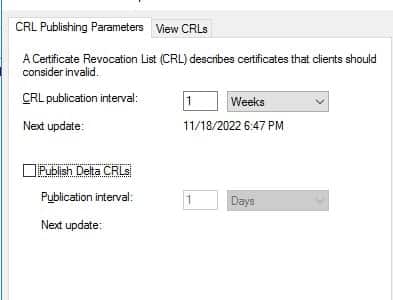
- Disabling the Delta CRL and issue a new long Certificate Revocation List (CRL)
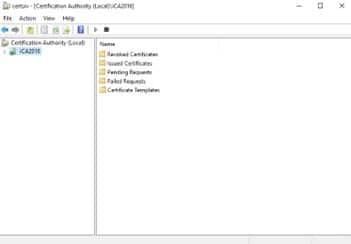
- Open Certificate Authority Console
- Right-click on Revoked Certificates, and then click properties
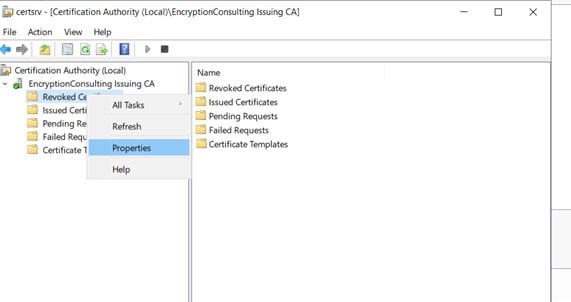
- Uncheck “Publish Delta CRL”
- Edit the “CRL publication interval” to 99 years
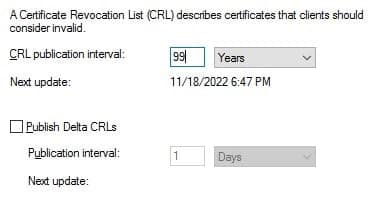
Click OK
- Open command prompt as administrator
- Type the following command
certutil -crl

- Open Certificate Authority Console
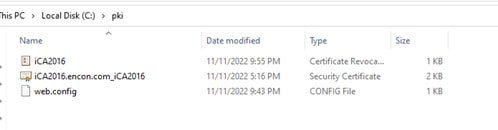
- Copy old CA’s certificate (crt) and Certificate Revocation List (CRLs) files to new CDP/AIA Points (optional)
- Navigate to %windir%\System32\CertSrv\CertEnroll
- Copy the old CA’s crt and CRL files to new CDP/AIA Points
-
Redirect AIA and CDP points of old CA to the new location
This can be done using an
- IIS redirect, or
- DNS CNAME
redirecting the AIA and CRL of the old Certification Authority.
- Document all certificate templates and stop certificate publishing on old Issuing CA
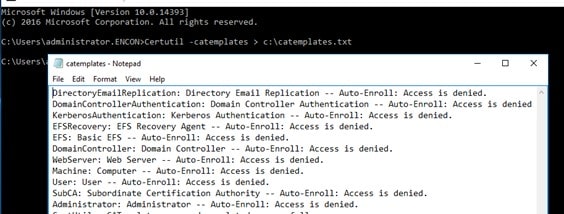
- Open the command line with elevated privileges
- Run
Certutil -catemplates > c:\catemplates.txt
and document all certificate templates published at the old Certification Authority

In total, certificate templates are present.
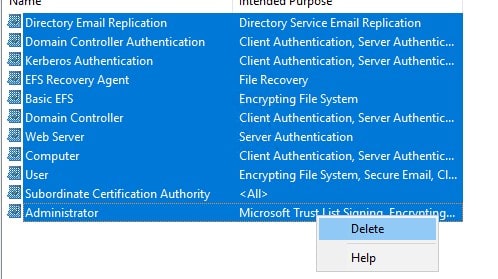
- Launch the Certification Authority console
- Navigate to “Certificate Templates”
- Highlight all templates in the right pane, right-click and then click “Delete”
The old Certification Authority cannot issue any certificates and has all of its AIA and CRLs redirected to a new CRL Distribution point. The next steps will detail how users can document the certificates templates published on the old issuing CA and how to make them available at the new issuing CA.
- Sort Certification Authority Database, identify and document all certificates issued based on certificate templates
- Open Certificate Authority Console.
- Highlight Issued Certificates.
- Move to the right and sort by “Certificate Templates.”
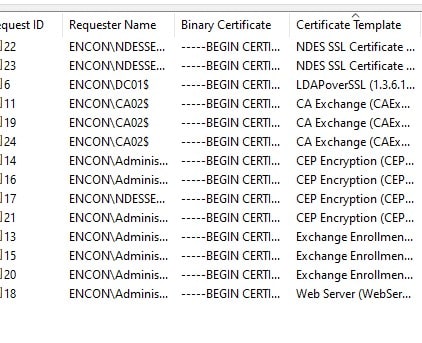
- Identify the certificates that are issued by default certificate template types.
- Document the certificates issued by custom certificate templates i.e. any template other than the default certificate templates.
- Document certificates based on default certificate template types
- Open command prompt with elevated privileges
- Run
Certutil -view -restrict “Certificate Template=Template” -out “SerialNumber,NotAfter,DistinguishedName,CommonName”> c:\TemplateType.txt
Note: Replace the Template with the correct template name
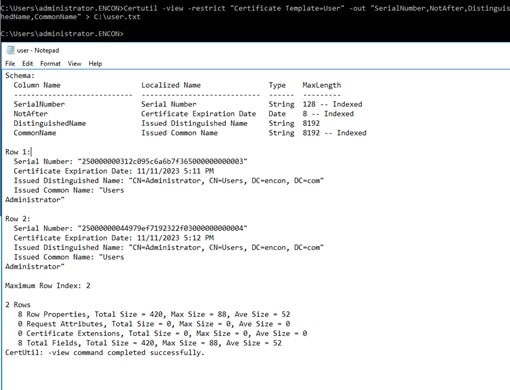
- Review the output on TemplateType.txt and document all certificates that need immediate action (requiring issuance from the new CA infrastructure if needed, such as Web Server Certificate)
- Consult with application administrators using the certificates to determine the best approach to replace the certificates if needed
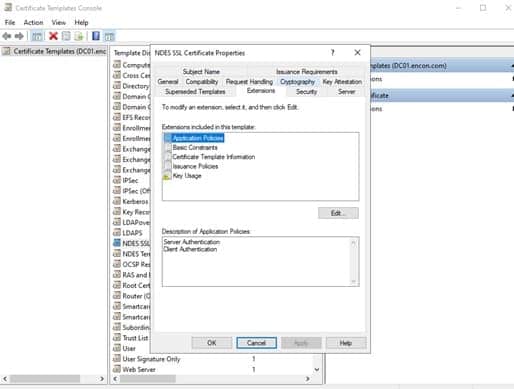
- Document certificates based on custom certificate types
- Open Certification Authority Console
- Right click on Certificate Templates, and click Manage
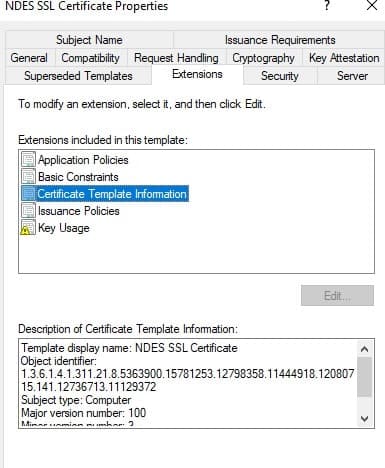
- Double-click the certificate template and click on the “Extensions” tab
- Click on “Certificate Template Information”
- Copy the Object Identifier (OID) number – the number will look similar to
1.3.6.1.4.1.311.21.8.5363900.15781253.12798358.11444918.12080715.141.12736713.11129372
- Open the command prompt with elevated privileges
- Run
Certutil -view -restrict “Certificate Template= 1.3.6.1.4.1.311.21.8.5363900.15781253.12798358.11444918.12080715.141.12736713.11129372″ -out “SerialNumber,NotAfter,DistinguishedName,CommonName”> c:\CustomTemplateType.txt
Note: Replace the OID number with the number identified in step 5

- Examine the output of c:\CustomTemplateType.txt and document all the certificates needing immediate action (requiring issuance from the new CA infrastructure if needed, such as custom SSL certificates).
- Consult with the application administrator using the certificates to determine the best approach to replace the certificates if needed
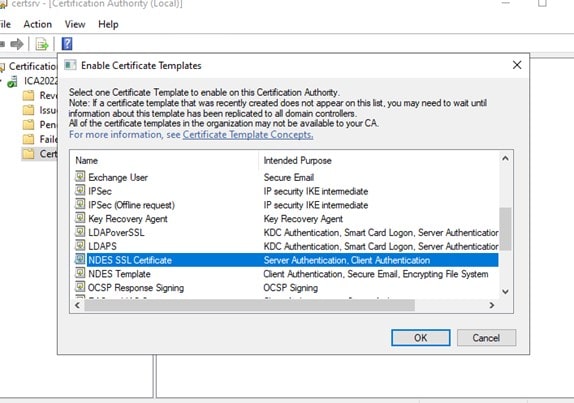
- Enable certificate templates needed on the results of steps 7 to 9 on new Issuing CA
- Login to new Issuing CA.
- Right-click on “Certificate Templates,” click New, and click “Certificate Templates to Issue.”
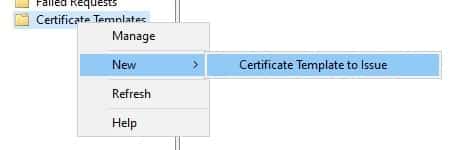
- Choose all certificate templates needed in the “Enable Certificate Templates” windows and click >OK.


Conclusion
With these steps, organizations can migrate to the new issuing CA while decommissioning the old Issuing CA. With Windows 2012 ending in October 2023 organizations need something to help migrate to newer operating systems with minimal impact.
If your organization needs assistance with this migration, feel free to email us at [email protected], and we will ensure that your migration goes as smoothly as possible.