When a program, script, or macro is downloaded, a popup window asking, “Are you sure you want to run this?” will appear during installation or execution. or “Do you want to let the next program affect this computer?” Code signing is being used in this popup. Code signing tools are crucial because they distinguish between legitimate software and malicious or rogue code.
Signing ClickOnce manifests in Visual Studio, in short: import your code signing certificate into the Personal certificate store (via a KSP tool if the key is HSM-backed), then in the Publish wizard’s Sign manifests step, check “Sign the ClickOnce manifests” and select the imported certificate. Visual Studio signs the .application and .manifest files automatically on publish.
Key Takeaways
- Visual Studio needs the certificate visible in the Windows certificate store (Personal/My), not just present in an HSM. A KSP-based import tool bridges the two so the private key stays in hardware while Visual Studio can still reference it by thumbprint.
- Signing happens automatically as part of publishing, there’s no separate manual signing command once the wizard is configured, which also means automating this for CI/CD requires driving the same settings through MSBuild parameters rather than the GUI.
Environment Matrix
| Component | Requirement |
|---|---|
| IDE | Visual Studio (2019/2022) with the ClickOnce publish workflow available for the project type |
| Project type | .NET Framework or .NET desktop app supporting ClickOnce deployment |
| Certificate visibility | Must be imported into the Windows certificate store (Personal), not just held in an HSM |
| HSM bridging tool | A KSP (Key Storage Provider) utility, e.g., ECGetCert.exe, to expose the HSM-backed key to Windows’ certificate store |
| Certificate reference | SHA-1 thumbprint, used with certutil to repair/register the store entry against the KSP |
Code signing is a procedure that verifies the legitimacy of the author and the originality and authenticity of digital information, particularly software code. It also ensures that the information is not malicious code. Additionally, it guarantees that this information has not been altered, falsified, or canceled after being digitally signed.
Your projects developed in Visual Studio with Visual Basics and Visual C# can be published and updated using ClickOnce. ClickOnce is a Microsoft technology used to deploy and update Windows desktop applications over the internet. It allows developers to publish their applications on a web server or network file share and make them available to users via a single click without any complex installation or configuration process.
While you publish your project using ClickOnce, you can sign ClickOnce manifests using a certificate. This will help prove the legitimacy of your application, and this process is called Code signing. Codesigning with ClickOnce provides several security features to ensure that the application and its updates are downloaded from a trusted source and that users are protected against potential security threats. It adds an extra layer of security to your application and can help increase user trust.
When you publish your project using ClickOnce without codesigning, such application when run by the user, a dialogue box is often prompted with a security warning.
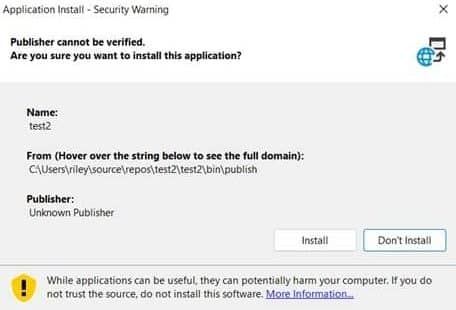
But no such warnings are prompted when you Sign ClickOnce manifests with a code signing certificate.
Encryption Consulting has a CodeSigning solution, “CodeSign Secure,” which can help you with tamper-proof storage for the keys and complete visibility and control of Code Signing activities. The private keys of the code-signing certificate can be stored in an HSM to eliminate the risks associated with stolen, corrupted, or misused keys.
This solution provides a tool and certificate for signing ClickOnce manifests. You will have to install and configure the tool and follow the steps below to proceed.
- Install and Configure the tool (SigningKSP)
-
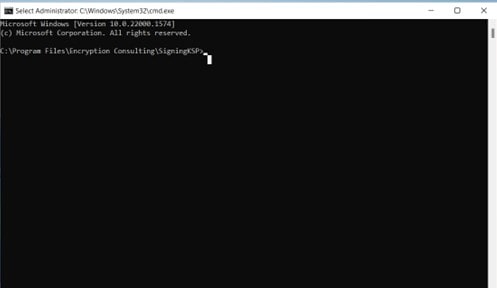
From the command prompt, reach the directory where ECGetCert.exe is located.
-
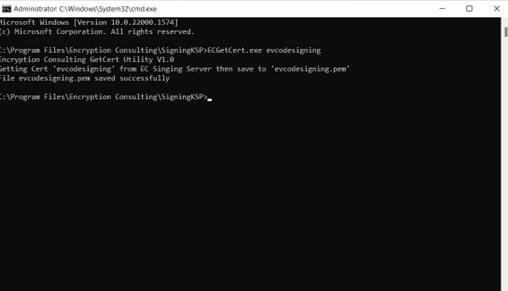
Run the command: ECGetCert.exe evcodesigning Here, evcodesigning is the certificate name that we are using for the codesigning purpose.
This command will save evcodesigning.pem (certificatename.pem) file in the same directory
-
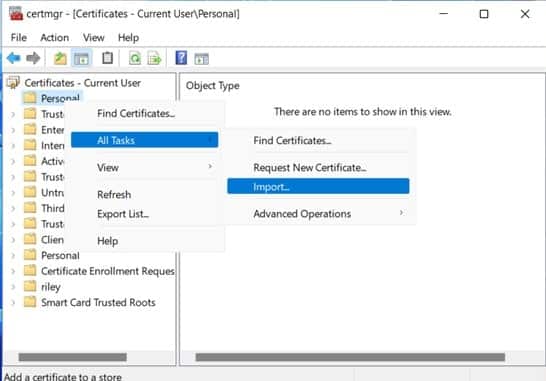
Open certmgr.msc and navigate to Personal -> certificates. If there is no certificate folder, right-click on personal -> All Tasks -> Import
-
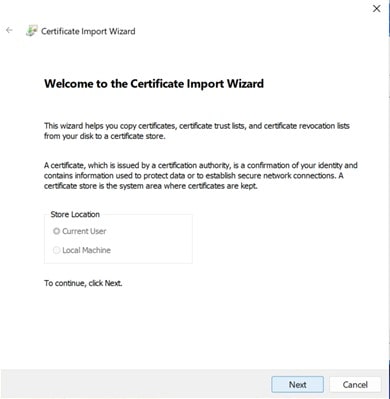
A Certificate import wizard Opens. Click on next; the store location here is, by default, the current user.
-
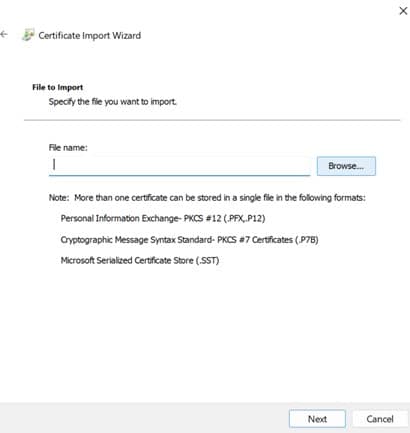
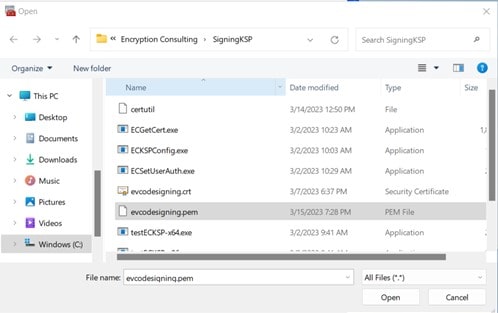
On the next page, browse for the certificate. It should be saved in the same directory where EGGetCert. Exe is located. From there, select evcodesigning.pem (certificatename.pem). If you can’t see the file select all files at the bottom instead of X.509 certificate. Once the certificate is selected, click next.
-
On the other page, ensure that “Place all the certificates in the following store” is selected. Under that, the Certificate store is set to Personal. Click on next and then Click on Finish. You’ll see a dialogue box saying the import was successful.
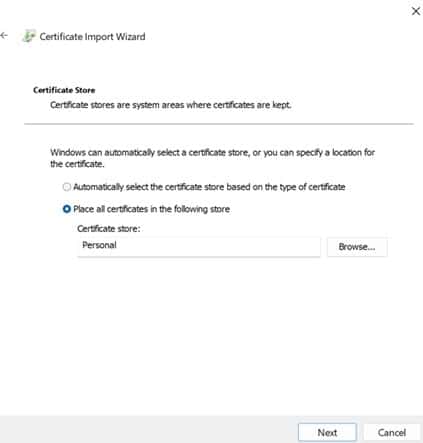
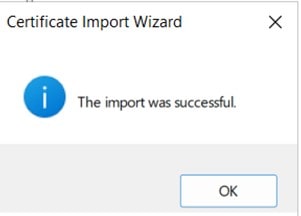
-
Once the certificate import is done, you need the thumbprint value of your certificate. Click on Personal -> Certificates -> and then the imported certificate. Navigate to “Details” and scroll down to thumbprint. You can copy the value.
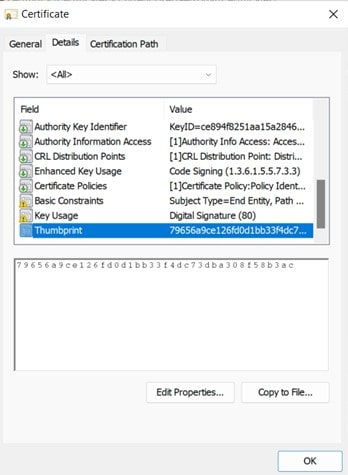
Return to the command prompt. Run the following command. Ensure that you place the Thumbprint of your certificate in your command.
certutil -f -repairstore -csp “Encryption Consulting Key Storage Provider” -user “My” 79656a9ce126fd0d1bb33f4dc73dba308f58b3ac
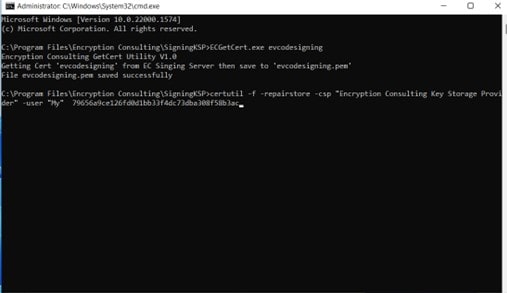
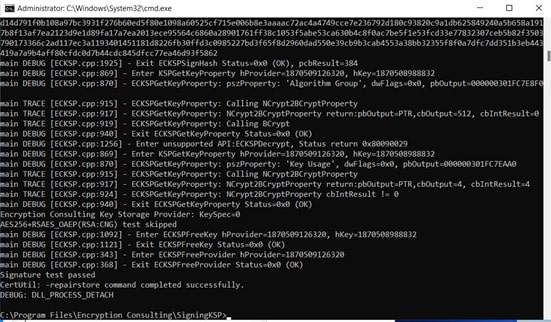
-
Once the command runs, navigate to the project in Visual Studio that you want to publish with ClickOnce.
-
In the Solution Explorer, Right Click on your project and navigate to Publish. Click on it.
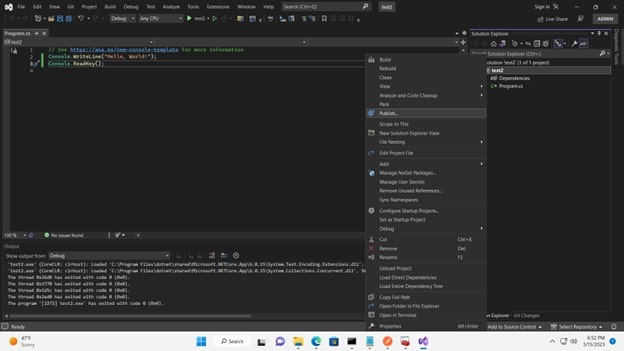
-
A new dialogue box opens. Select ClickOnce and click on Next.
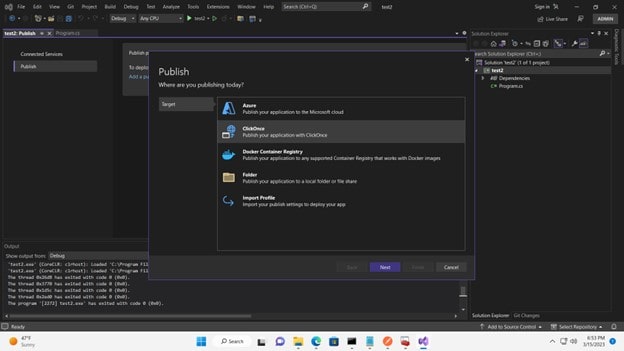
-
On the next page, choose a publish location or leave the default bin\publish and click Next.
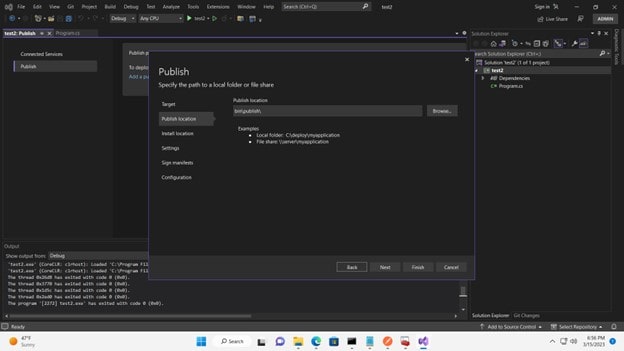
-
You can choose the Install Location as per your choice or leave the default. Click on Next.
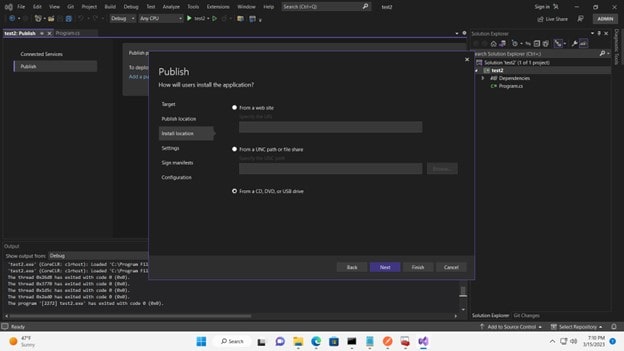
-
Select your settings in the next tab as you like and click Next
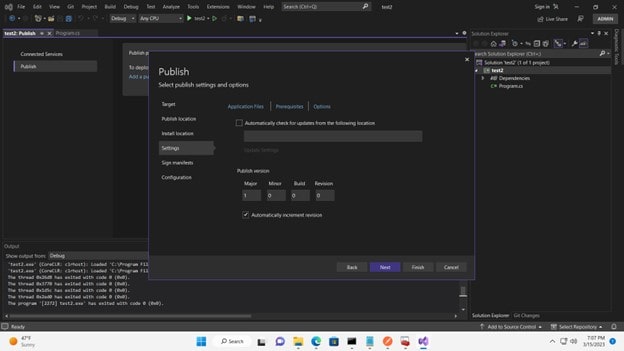
-
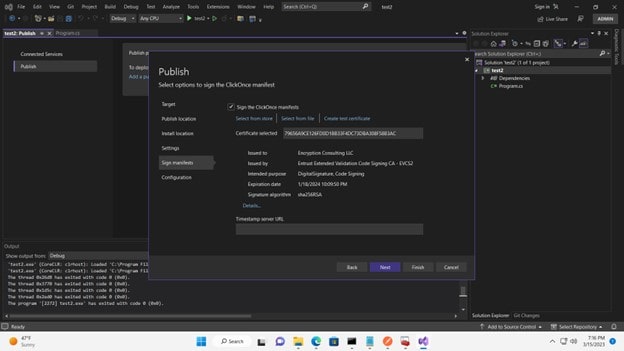
In Sign manifests, check the box “Sign the ClickOnce manifests” and click on select a certificate from the store.
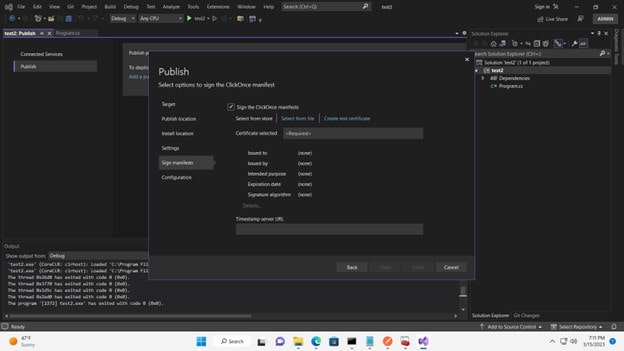
A dialogue box opens with a certificate, which was initially imported. Click OK to proceed.
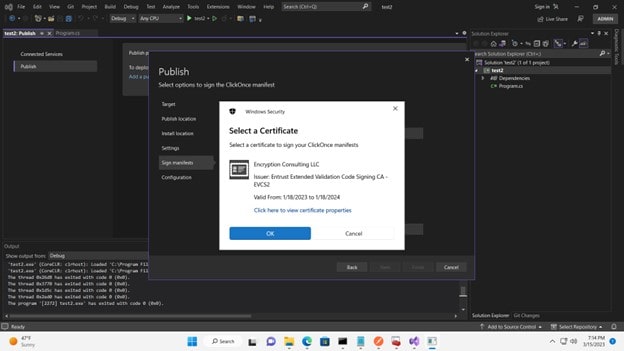
You can now see the certificate details in Sign manifests
-
Click on next to choose your configuration and click on Finish.
-
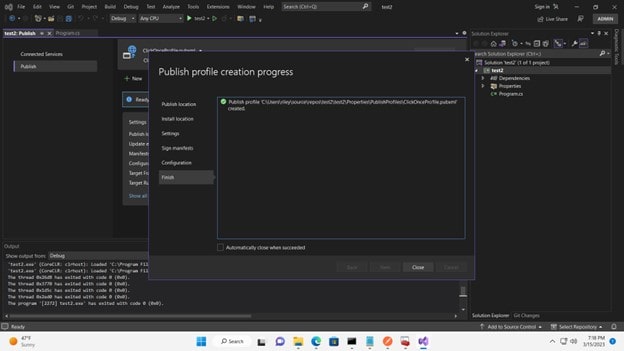
You’ll see Publish profile creation progress and a green tick when successful
-
You can see the Publish Profile created.
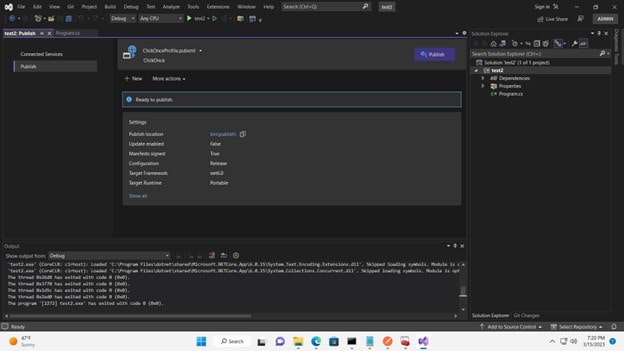
We have successfully signed ClickOnce manifests with Visual Studio. Click on Publish to publish your project.
Verifying the Signature
After publishing, confirm the signature took effect before distributing the application: right-click the published .application file in Windows Explorer, open Properties, and check the Digital Signatures tab, it should list your certificate with a valid status. From the command line, mage.exe -Verify yourapp.application (Mage.exe ships with the Windows SDK) checks the manifest signature and reports success or the specific validation failure.
Common Errors
| Error | Likely Cause | Fix |
|---|---|---|
| No certificate appears in the Visual Studio certificate picker | Certificate wasn’t imported into the Personal store, or was imported to Local Machine instead of Current User | Re-import via certmgr.msc, confirming “Personal” as the store and “Current User” as the location |
| certutil -repairstore fails or reports the thumbprint not found | Wrong thumbprint copied, or extra whitespace/hidden characters pasted from the certificate details view | Re-copy the thumbprint directly from the certificate’s Details tab and retype rather than paste if the error persists |
| Publish succeeds but the manifest shows as unsigned | “Sign the ClickOnce manifests” checkbox was unchecked, or the certificate selection was cleared on a later wizard page | Re-open Publish properties and confirm the Sign manifests checkbox and certificate are still set before republishing |
CI/CD Use and Cleanup
The Publish wizard’s settings are stored in the project’s .pubxml file, so a CI/CD pipeline can drive the same signing behavior non-interactively by invoking msbuild with the appropriate /p:PublishProfile and manifest-signing MSBuild properties (SignManifests, ManifestCertificateThumbprint) rather than clicking through the GUI. The build agent still needs the certificate visible in its own certificate store via the same KSP bridging step described above; there’s no way to point MSBuild directly at an HSM without that intermediate registration.
For cleanup: once a build agent no longer needs signing capability, remove the certificate from its Personal store and un-register the KSP binding, rather than leaving a signing-capable identity sitting on a machine that no longer needs it.
Frequently Asked Questions
Can I automate ClickOnce manifest signing without opening Visual Studio?
Yes. Run msbuild against the project’s publish profile with the manifest-signing properties set (SignManifests, ManifestCertificateThumbprint), the certificate still needs to be visible in the build agent’s certificate store first.
How do I confirm a published ClickOnce app is actually signed?
Check the .application file’s Digital Signatures tab in Windows Explorer, or run mage.exe -Verify against it from the command line.
Does the private key ever leave the HSM during this process?
No, provided the KSP is set up correctly. Visual Studio references the certificate by thumbprint through the Key Storage Provider; the private key operation happens inside the HSM, not on the signing machine.
Conclusion
With its digital signature and other security features, Signing ClickOnce manifests enables developers to establish the level of trust users should have in an application. This can decrease the probability that harmful software will be executed on a user’s machine. With the rapid increase in viruses and malware on applications online, it’s necessary to take such measures to prevent any damage. It’s always better to be safe than sorry.
To summarize, incorporating code signing into software security is crucial to safeguard it against malware attacks and tampering. Encryption Consulting’s Code Sign Secure offers various advantages, including seamless integration with development workflows, robust authentication and encryption, and customizable pricing options. To learn more about how you could use Code Sign Secure visit: www.encryptionconsulting.com/code-signing-solution/ or contact us at: [email protected]