
The data security industry is one of the most rapidly advancing sectors in the world and with these constant advancements, the risks of vulnerabilities continue to rise. It is crucial for organizations to take a proactive approach to data protection by not just assessing but also effectively managing these vulnerabilities in order to enhance security against cyber threats.
One such serious vulnerability exists within Active Directory Certificate Services (AD CS) that attackers can exploit. This vulnerability provides a backdoor for attacks to elevate their privileges from a Child Domain Admin to an Enterprise Admin level across the entire forest.
Our blog gives you all the information you need about the vulnerability within AD Certificate Services (AD CS) that can be exploited to elevate Domain Admin privileges. We’ll explore methods to eliminate this risk by understanding the vulnerability to help you protect your AD environment.
Pre-requisites
The first step is to build a good understanding of the AD structure. This attack specifically targets Active Directory with a forest containing a parent domain (also called the root domain) and one or more child domains.
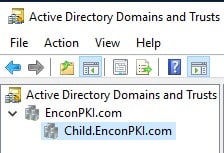
In this example scenario, the environment contains two domains:
- Parent Domain: EnconPKI.com
- Child Domain: Child.EnconPKI.com
Note: The Parent Domain (EnconPKI.com) is set up with a fully functional AD CS PKI Environment, while the Child Domain (Child.EnconPKI.com) contains only a writable Domain Controller.
Understanding the AD CS Escalation of Privilege Attack
The exploit begins with an attacker gaining initial access to a system within the network. If this compromised system belongs to a user with domain admin privileges for a child domain, the attacker could potentially elevate their access to Enterprise Admin privileges across the forest.
This compromise could grant them complete control over the entire Active Directory environment, including the ability to:
- Data Breach: The attacker can steal sensitive data stored within Active Directory, such as usernames, passwords, and financial information.
- Disrupted Operations: The attacker can tamper with critical Active Directory objects, disrupting essential network services and applications.
- Lateral Movement: The attacker can leverage their exploited privileges to move laterally across the network, compromising additional systems and escalating their control.
- Persistent Access: The attacker can create new user accounts with permanent administrative access, allowing them to control the environment even after the initial compromise is detected.
Step-By-Step Breakdown
Here’s a detailed explanation of each step involved in this exploit:
Step 1: Gaining ‘Write’ Access to a Writable Domain Controller (DC) in a Child Domain
First, the attacker tries to establish initial access to the network. This could be achieved through various means, such as phishing campaigns, exploiting software vulnerabilities on a user’s machine, or compromising a low-privileged account. For this attack to work, the compromised account must have ‘write’ access to a writable domain controller (DC) within a child domain.
Step 2: Deploying a Fraudulent Enterprise CA
Once the attacker has ‘write’ permission to a DC in the child domain, they can leverage the ‘System’ account’s excessive permissions within the Active Directory Configuration Naming Context. This vulnerability allows them to create a new rogue Certificate Authority (CA) within the child domain. This fraudulent CA appears legitimate to other machines within the domain, allowing the attacker to issue malicious certificates later.
Here’s a detailed breakdown of how the attacker deploys the rogue CA using PowerShell on the compromised DC:
-
Open an elevated PowerShell prompt (Run as Administrator)
-
Search for “PowerShell” in the Start Menu
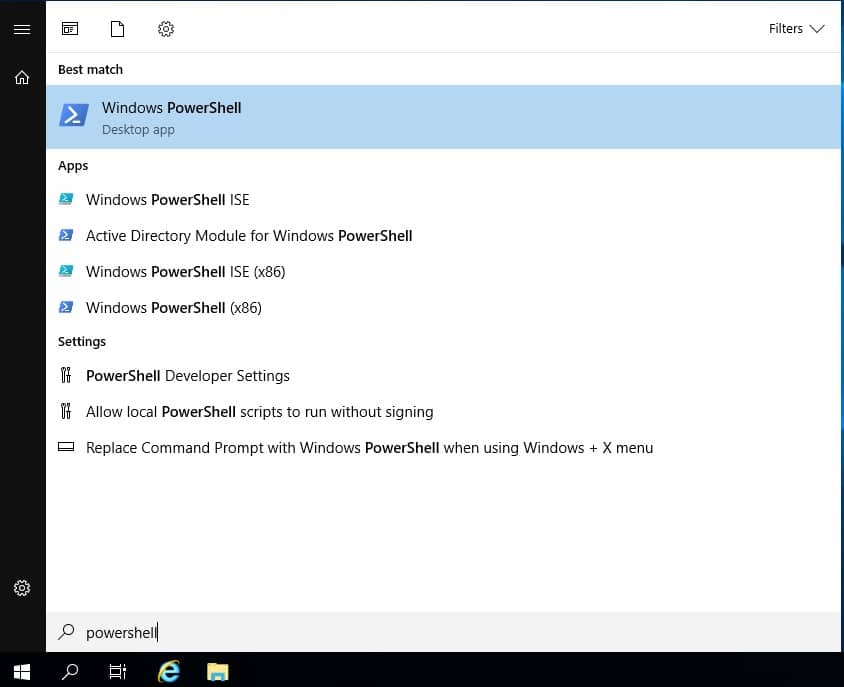
- Right-click on “Windows PowerShell” (or “PowerShell”)
- Select “Run as Administrator”
Note: You might be prompted for your administrator credentials. Enter the username and password for the compromised account with administrative privileges.
-
-
Open an elevated PowerShell prompt (Run as Administrator)
Once PowerShell opens in a new window, you can verify if you have elevated privileges:
- Look for the title bar of the PowerShell window. If it displays “Administrator” after your username, you’ve successfully opened an elevated PowerShell prompt.
-
Alternatively, you can run the following command.
`Get-ExecutionPolicy`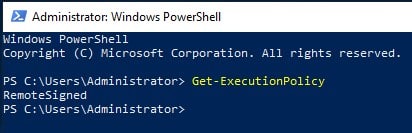
If the output displays “RemoteSigned” or “Bypass”, you have elevated privileges. If it shows “Restricted” or “AllSigned”, you won’t be able to execute the commands needed to deploy the fraudulent CA.
-
Execute the Install-AdcsCertificationAuthority cmdlet
The following command installs a new Enterprise Root CA on the compromised DC:
-
Execute the following cmdlet command in the PowerShell window:
`Install-WindowsFeature AD-Certificate, ADCS-Cert-Authority -IncludeManagementTools`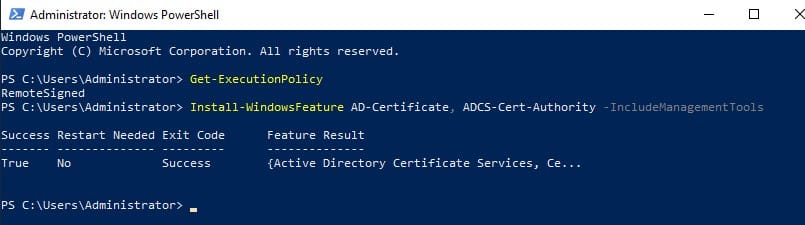
This command will install the required Active Directory Server roles and features on the System.
-
Next, execute the following command in the PowerShell window:
`Install-AdcsCertificationAuthority -CAType EnterpriseRootCA -CACommonName “Fraudulent CA”`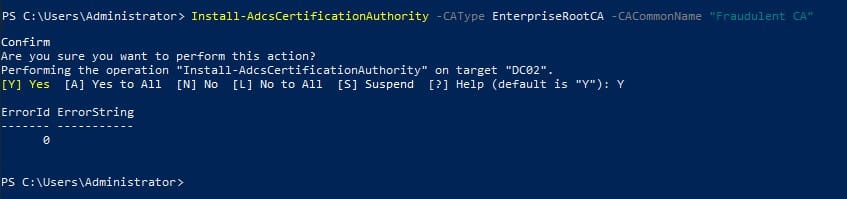
- Press Enter and follow any on-screen prompts.
-
Verify the CA using pkihealth.msc tool and AD Containers.
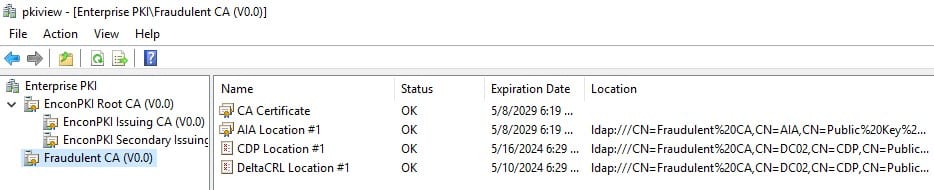
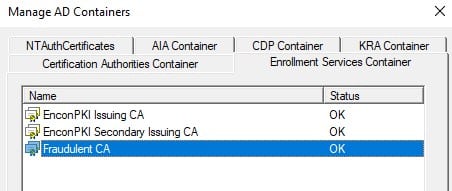
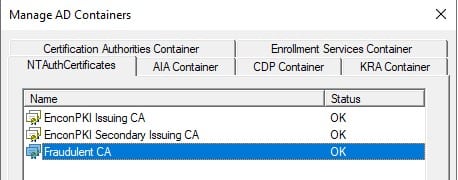
The CA has been successfully registered as an Enrollment Service in the AD Container. The rogue CA has established trust within the Active Directory forest, allowing any member – users, computers, and even other domain controllers – to request certificates from it.
-
Step 3: Creating a Malicious Certificate Template
Once the fake CA is established, the attacker can design a malicious certificate template and manipulate it to grant themselves elevated privileges, such as mimicking an Enterprise Admin account.
Here’s how the attacker can create a Malicious Certificate Template:
-
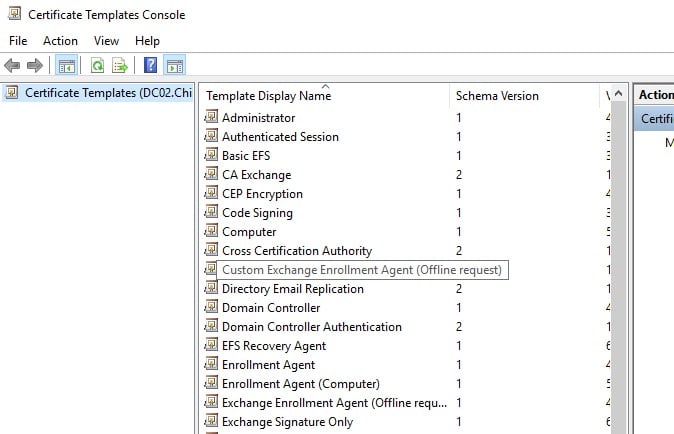
Open the Certificate Templates MMC Snap-in
-
From an elevated PowerShell prompt, type `certtmpl.msc` and press Enter.
-
-
Create a Copy of the Default User Template
- Right-click on the “User” template.
-
Select “Duplicate Template”.
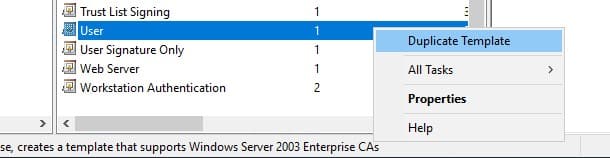
This creates a copy of the default user template that the attacker can modify for malicious purposes.
-
Configure the Extensions and Subject Naming Information Tabs
The attacker will now focus on configuring two specific tabs within the newly created template properties:
-
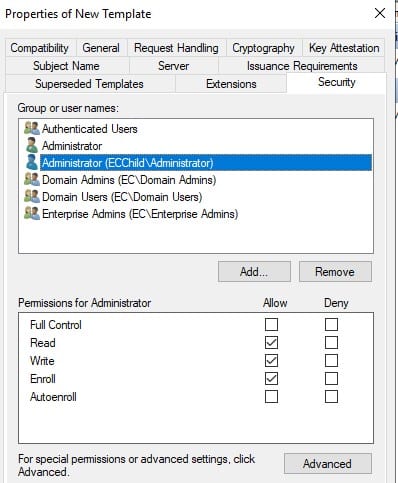
Security Tab: Here, the attacker can manipulate certificate access to grant themselves unauthorized privileges.
-
Add the account if required and provide all permissions – ‘Read’, ‘Write’ and ‘Enroll’.
-
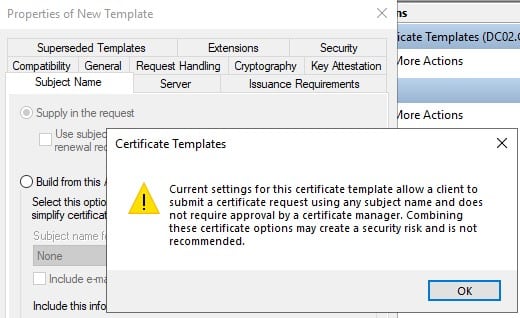
- Subject Naming Information Tab: This tab defines the information in the certificate subject field, identifying the certificate holder. The attacker can manipulate this field to mimic a legitimate Enterprise Admin account.
- Select the “Supply in the request” radio button.
-
A Warning Alert appears specifying the risk associated with these settings. Since we are simulating the attacker’s steps, we can continue. Click ‘OK’.
-
Security Tab: Here, the attacker can manipulate certificate access to grant themselves unauthorized privileges.
-
Add the certificate template to Certificate Authority
- Bring up the Certificate Authority by executing `certsrv.msc` in the PowerShell.
-
Expand the current CA and right-click on Certificate Templates.
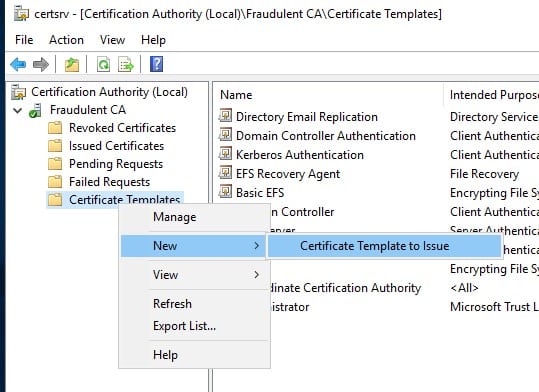
- Click New, Select Certificate Template to Issue.
-
Select the malicious certificate template and click on OK.
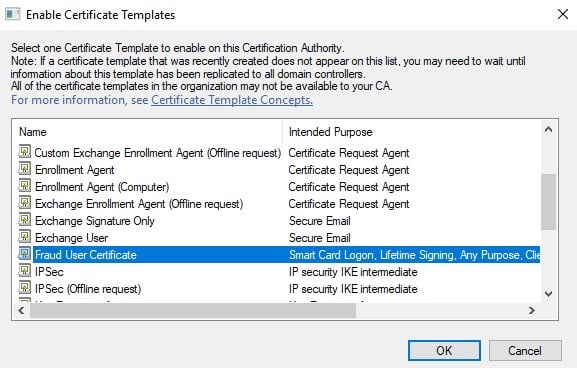
Note: Attackers often use the built-in “Domain Controller” template for enabling smart card logon functionality across an entire forest. Here’s why:
- Automatic Enrollment: Domain controllers are programmed to automatically pick up certificates issued from the “Domain Controller” template. This eliminates the need for manual configuration or enrollment policies typically required for other certificate templates like “Domain Controller Authentication” or “Kerberos Authentication.”
- Global Smart Card Logon: By issuing a malicious certificate from the Domain Controller template, the attacker can enable smart card logon for the entire forest without needing to configure individual machines. This simplifies their process and grants them broader access.
By creating a malicious certificate template, the attacker lays the groundwork for issuing a certificate that grants them unauthorized access. They can potentially use this certificate to impersonate a privileged user and gain control over critical domain resources.
Step 4: Issuing a Certificate for a Targeted Enterprise Admin Account
Using the compromised DC, the attacker can issue a certificate signed by the fake CA. This certificate is intended to look like it was issued for a legitimate Enterprise Admin account. The attacker can manipulate different certificate fields like the “Subject” (which identifies the certificate holder) to mimic a real Enterprise Admin account.
The following steps are used by the attacker to issue the malicious certificate:
-
Open the Microsoft Management Console (MMC)
- Navigate to the “Start Menu” and search for “mmc.exe”. This opens the Microsoft Management Console.
- Click “File” and then “Add/Remove Snap-in…”.
-
In the “Available snap-ins” list, select “Certificates” and click “Add”.
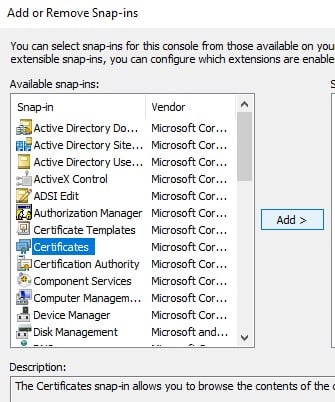
- Choose “User account” and click “Finish”.
- Click “OK” on the “Add/Remove Snap-in” window.
Now you should see the “Certificates” snap-in listed in the MMC console tree.
-
Request a Malicious Certificate
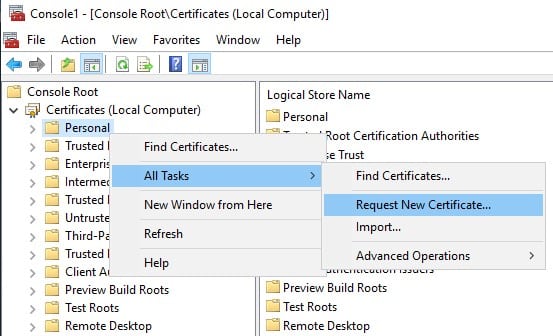
- In the opened MMC, right-click on Personal.
-
Go to All Tasks, Select “Request New Certificate…”
- Click on Next.
-
Navigate through the wizard, “Request Certificates” action is encountered.
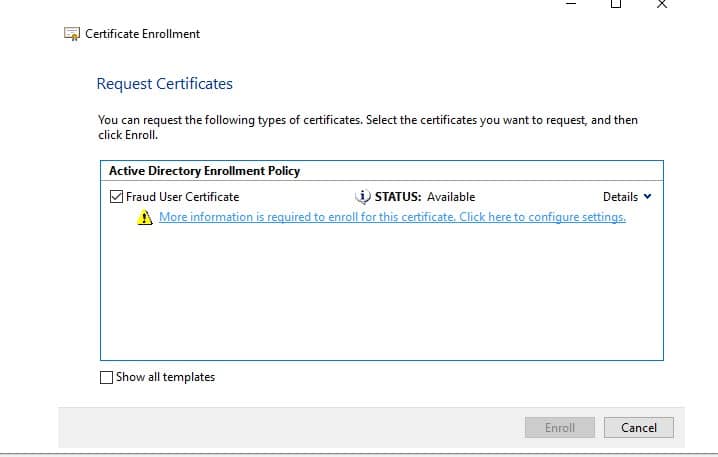
- Select the template’s checkbox and Click on the Alert.
-
Under Subject tab, in Alternative Name box add “User Principal Name” and set the value to be target account’s UPN.
The format must be [email protected]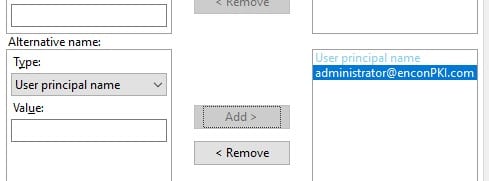
- Click OK. Then, click Enroll.
- Click on Finish.
-
Retrieve and Install the Issued Certificate
-
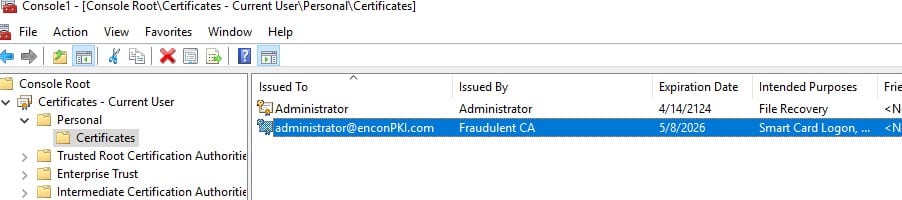
Once the certificate request is processed, it will appear under the Personal Certificates.
-
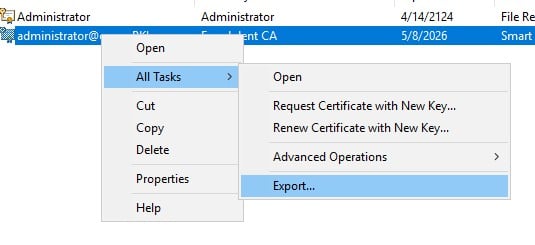
Right-click on the newly issued certificate and select “All Tasks” -> “Export”.
-
Choose the PKCS#12 (.PFX) format for exporting the certificate and private key together. You’ll need to provide a strong password to protect the exported file.
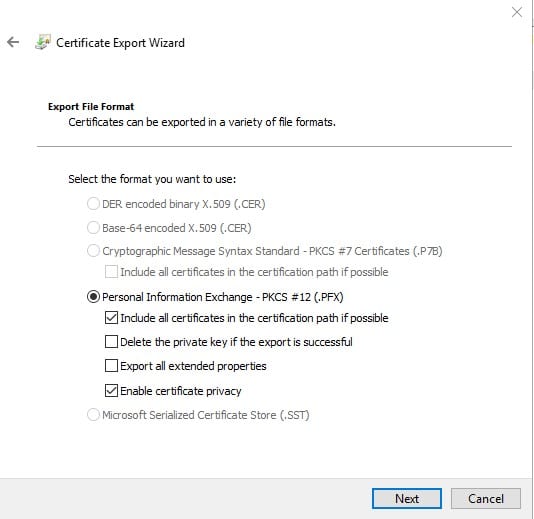
Now, the attacker has a certificate file that appears legitimate and impersonates a privileged Enterprise Admin account.
-
Step 5: Utilizing the Certificate to Gain Unauthorized Access with Increased Privileges
Now the attacker can leverage this forged certificate to gain unauthorized access to domain resources. Since the certificate appears legitimate and signed by a seemingly trusted CA (the Fraudulent CA), the attacker can potentially bypass security measures and access resources typically restricted to Enterprise Admins. This allows them to move laterally within the network, steal sensitive data, or disrupt critical operations.
Why This Attack Works
This attack exploits the default configuration of AD CS, where the “System” account has full control permissions within the Active Directory Configuration NC. This excessive permission allows attackers with “write” access to a DC to manipulate critical AD objects with elevated privileges.
Securing Your AD Environment
There are so many preventative actions that one can take to protect their AD defenses and prevent these exploits. Here are the most common and effective steps you can take to protect your AD environment today:
- Implement Least Privilege: Grant users and systems only the minimum permissions they need to perform their tasks. This reduces the impact if an attacker gains access to a compromised account.
- Minimize Permissions on the ADSI: Restrict write access to the Active Directory Service Interface Configurations to authorized administrators and Domain Controllers originating from the forest root domain.
- Monitor and Audit AD Activity: Actively monitor for suspicious activities like unauthorized DC access attempts, modifications to the CNC, or the creation of rogue CAs.
- Patch Systems Promptly: It is crucial to patch vulnerabilities in AD and related services promptly. Keep your AD environment and related software up to date with the latest security patches to address known vulnerabilities.
- Implement Multi-Factor Authentication (MFA): MFA adds an extra layer of security by requiring a second factor beyond just a username and password to access sensitive resources.
- Educate Users: Train your users to be vigilant against phishing attacks and other social engineering tactics that could be used to gain initial access to your network.
Conclusion
It is important for us to remember that these continuous advancements in technology will also leave room for vulnerabilities within the environment and the most effective long-term strategy is one where organizations like yours adopt a proactive approach by continuously monitoring your infrastructure, assessing the vulnerabilities, and minimizing risks factors.
So, always remember to continuously monitor your architecture and include strong authentication, permission control, network segmentation, and user education in your security strategy to render such external attacks ineffective.
How Encryption Consulting can help
At Encryption Consulting, we specialize in helping organizations like yours identify and mitigate security risks through tailored PKI Assessments. Our team of experts can provide a customized strategy to protect your PKI architecture from emerging threats, ensuring your data and infrastructure remain secure.
Our full range of Public Key Infrastructure (PKI) services helps you safeguard your digital assets and enhance your organization’s overall security posture,
For those seeking a hands-off solution, our PKI as a Service (PKIaaS) delivers all the benefits of PKI without the burden of in-house management. We ensure to provide four parameters:
- Scalability: We help your PKI infrastructure grow as your business expands.
- Cost Efficiency: We reduce overhead by offloading infrastructure maintenance.
- Security: We ensure your organization stay compliant and secure with up-to-date PKI management.
- Compliance: We ensure your solution meets all regulatory requirements.
With Encryption Consulting’s PKIaaS, you can focus on your core business while we handle the complexities of PKI management. Let us provide the peace of mind that comes from knowing your digital trust and security needs are in expert hands. Reach out today at [email protected] to explore how we can help your organization stay secure against cyber threats.
- Pre-requisites
- Understanding the AD CS Escalation of Privilege Attack
- Step-By-Step Breakdown
- Step 1: Gaining ‘Write’ Access to a Writable Domain Controller (DC) in a Child Domain
- Step 2: Deploying a Fraudulent Enterprise CA
- Step 3: Creating a Malicious Certificate Template
- Step 4: Issuing a Certificate for a Targeted Enterprise Admin Account
- Step 5: Utilizing the Certificate to Gain Unauthorized Access with Increased Privileges
- Why This Attack Works
- Securing Your AD Environment
- Conclusion
- How Encryption Consulting can help