Certificate Signing Requests (CSRs) are pivotal in web security and encryption. They are integral to the process of obtaining a Secure Socket Layer (SSL) or Transport Layer Security (TLS) certificate from a Certificate Authority (CA). This blog will guide you through understanding and generating a CSR, highlighting its importance in maintaining web security.
What is a CSR?
A block of encrypted text known as a Certificate Signing Request is sent when requesting an SSL Certificate from a Certificate Authority. It is typically generated on the server where the certificate will be installed. It contains information in the certificate, such as the organization name, common name (Domain name), place, and nation. Furthermore, it includes the public key that will be used to sign the certificate.
Why are CSRs important?
CSRs act as a conduit between the entity requesting the SSL certificate and the CA issuing it. By generating a CSR, you are creating two essential items. The first is the public key, which is included in the CSR. The second is the private key, generated simultaneously as the CSR and remains on your server. The private key must be kept secret, as it allows the server to authenticate and decode information once the SSL certificate is operational.
Overview of Luna Cloud HSM by Thales: Features and Benefits
Luna Cloud HSM is a Hardware Security Module (HSM) provided by Thales. The “Cloud HSM” part signifies that it’s a cloud-based offering. You can access it as a service over the internet instead of physically installing and managing an HSM in your data center. The Luna Cloud HSM is part of the CipherTrust Cloud Key Manager service provided by Thales.
An HSM is a dedicated hardware device with specialized cryptographic processors designed to manage digital keys and perform cryptographic operations. They provide a secure environment where you can generate, manage, and use encryption keys, keeping them isolated from other system parts to enhance security. HSMs are typically used to secure an organization’s most sensitive digital assets.
The Luna Cloud HSM brings the best of the cloud to the HSM world – scalability, accessibility, and lower upfront costs. You get the security of a traditional HSM with the added benefits of a cloud service.
The main features of Luna Cloud HSM are:
-
Robust Security
Luna Cloud HSM leverages Thales’s strong encryption and key management capabilities, delivering one of the highest cloud data protection levels. The HSMs are tamper-resistant and provide a secure environment for cryptographic operations.
-
Scalability
As your cryptographic needs grow, Luna Cloud HSM can easily scale with them. You don’t have to worry about buying and installing additional HSM hardware.
-
High Availability
Luna Cloud HSM provides high availability and automatic failover capabilities to ensure business continuity. You can deploy HSMs across multiple regions to mitigate local outages.
-
Compliance
Luna Cloud HSM helps you meet regulatory standards related to cryptographic operations and key management, including PCI-DSS, GDPR, and HIPAA. The service comes with comprehensive auditing and logging capabilities.
-
Interoperability
Luna Cloud HSM supports a wide range of cryptographic APIs, libraries, and integrations, such as PKCS#11, Java (JCE), Microsoft CryptoAPI, and Microsoft CNG, making it compatible with a broad range of applications and services.
Also, check the list of Supported Client Platforms for Luna Cloud HSM here.
How to Generate a CSR?
Generating a CSR can differ depending on the software you are using, but the core steps remain the same. Here is a general outline of the process:
-
Preparation
You must have all the relevant details before generating your CSR. This includes your domain name, organization name, locality (city), state or province name, and country code.
-
Generate a Key Pair
The first step in generating a CSR is creating a public-private key pair. Remember, your private key should remain securely within the server or hardware module it generates.
-
Generate the CSR
Use a CSR generation tool that aligns with your server software. This tool will ask you for the details prepared in Step 1 and for the private key generated in Step 2. The tool then generates an encoded file with the .csr or .req extension.
During the CSR generation process, you will be prompted to enter your details (common name, organization, locality, etc).
Generating CSR from Luna HSM
We will be generating CSR on Thales DPoD. So, first, we need to do the Application Owner Configuration, which means Adding and Configuring a client.
The client installation uses a .zip (Windows) or .tar (Linux) to deliver the client materials required for configuring your system’s connection to the Luna Cloud HSM Service. The client .zip includes a pre-configured crystoki-template.ini file and a client archive file containing a library and binary files.
Installing the Service Client
-
Access the Service Page and click the service or the partition name you want to generate a client.
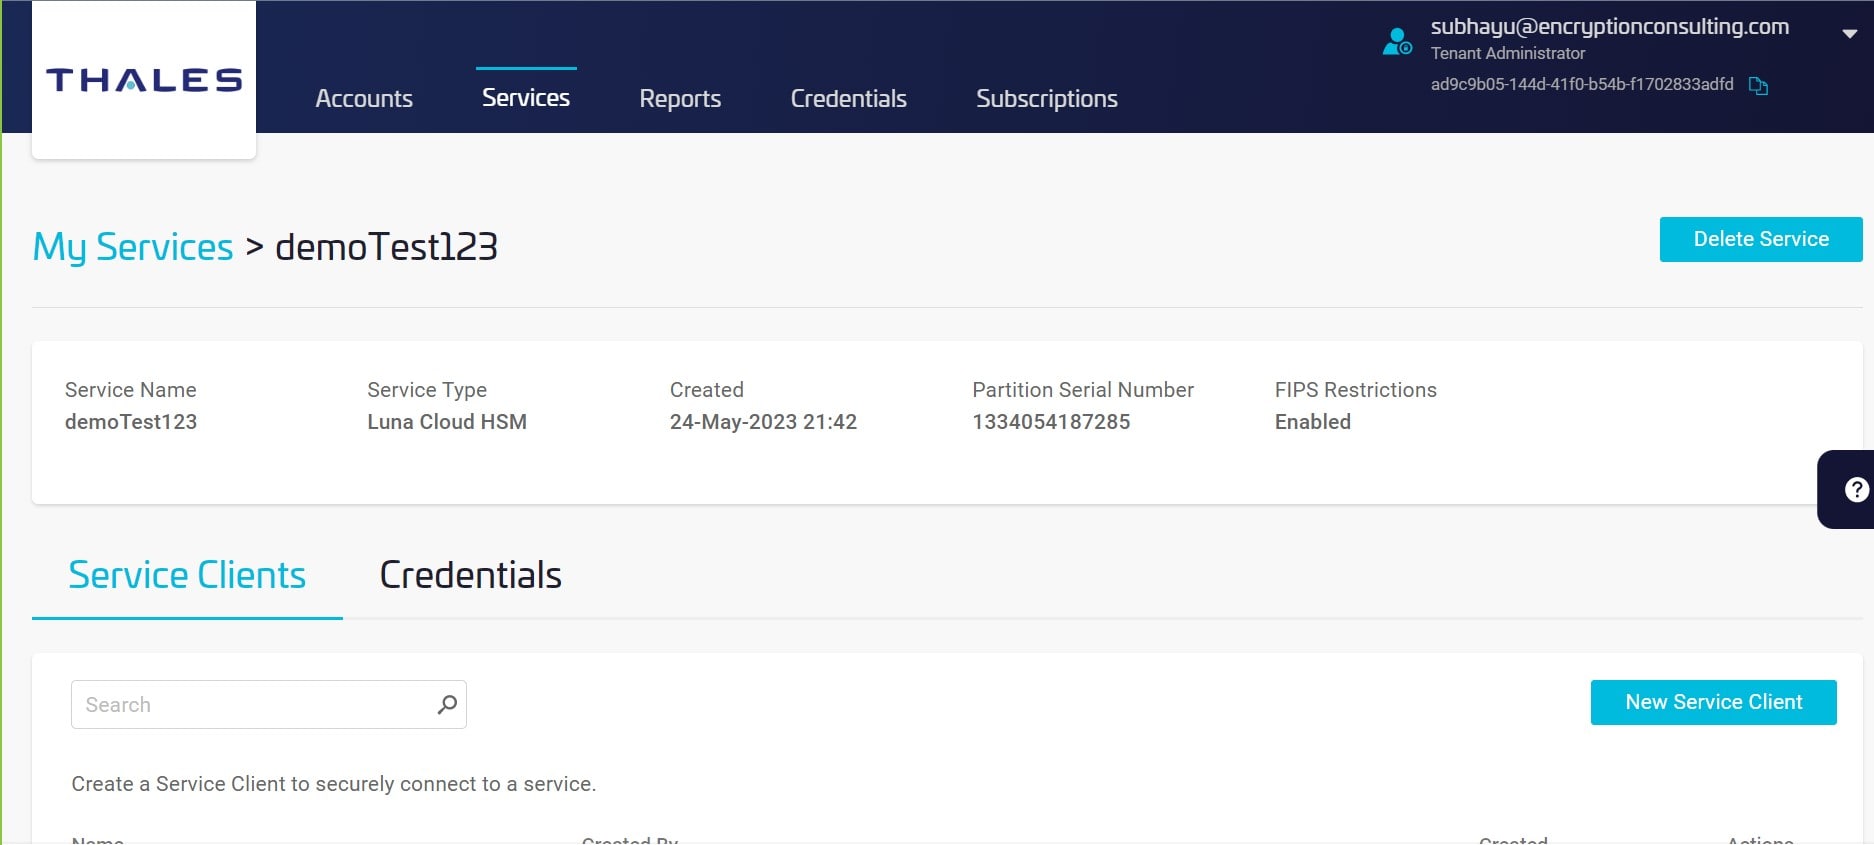
-
Click New Service Client – the Create Service Client window displays.
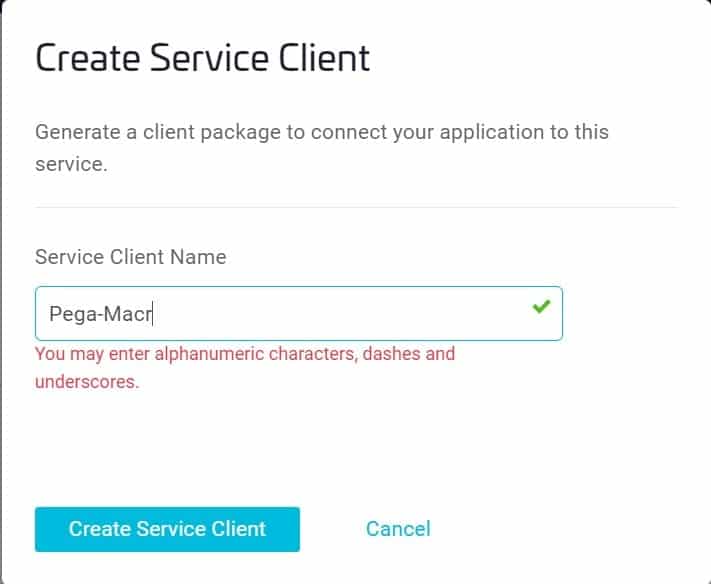
-
In the Create Service Client window, enter a Client Name (e.g., Pega-Macro) and select Create Service Client.

Configuring the Installed Service Client
- A new client (in this case, setup-PKI-Luna.zip) generates and is provided for downloading and installing on your client machine.
- The client is a zip file containing system information needed to connect your machine to an HSM partition. See the section Client Contents for client content details.
- Transfer the client to your machine. You can transfer the client through SCP, PSCP, WinSCP, FTPS, or other security tools.
- Using the Windows GUI or an unzip tool, unzip the file – setup-PKI-Luna.zip.
- Decompress the cvclient-min.zip.
- Extract the cvclient-min.zip within the directory you created in the previous step. This location is required for the setenv command in step 7. Do not extract to a new cvclient-min.zip directory.
-
Set the environment variable. Open an Administrator Command Prompt – right-click Command Prompt and select Run as Administrator. Execute the following in the Administrator Command Prompt:

Configuring the SafeNet Key Storage Provider (KSP)
-
System requires access to the SafeNet Key Storage Provider (KSP). Copy the SafeNetKSP.dll file from your downloaded Luna Cloud HSM Service Client to C:\\Windows\System32.
Note: Failure to copy the SafeNetKSP.dll file will result in no access to the SafeNet Key Storage Providers during the integration. For example, if configuring Microsoft Active Directory Certificate Services, the SafeNet Key Storage Providers will not be available options when setting up the Cryptography for CA.
- Run KspConfig.exe
- Navigate to the KSP installation directory.
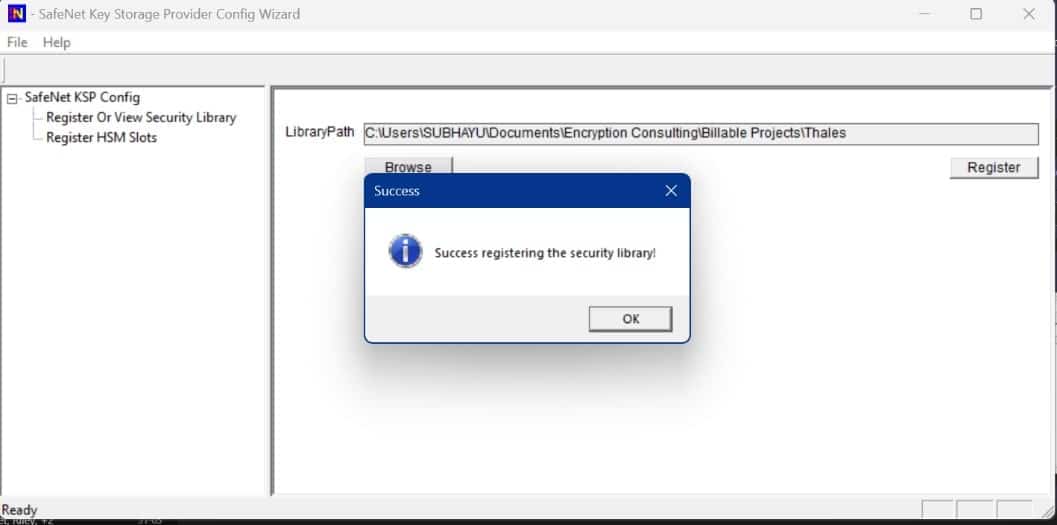
- Double-click Register or View Security Library.
-
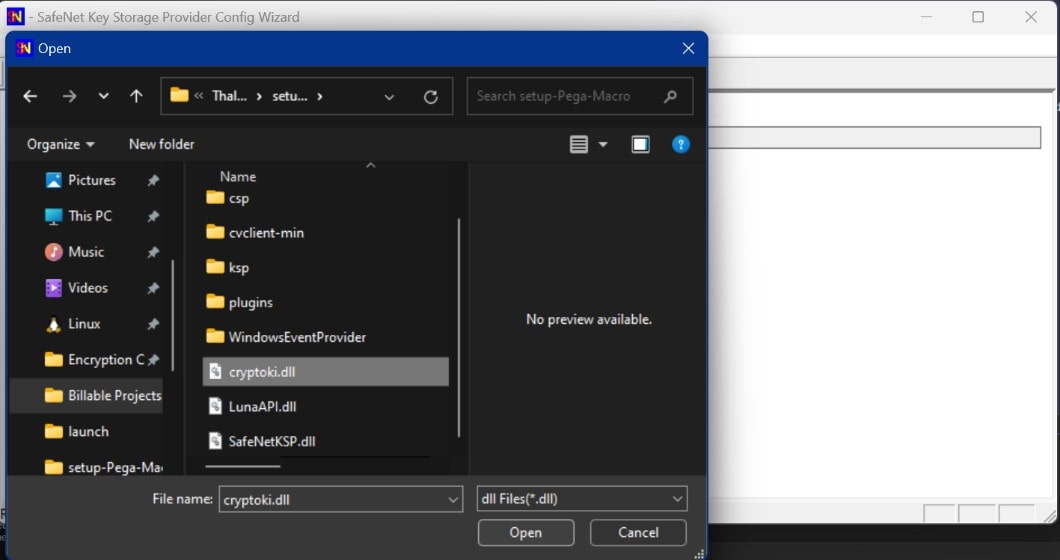
Click Browse. Select the cryptoki.dll file from the Luna Cloud HSM Service Client.
Click Register.
-
On successful registration, a Success! Message displays. Click OK.
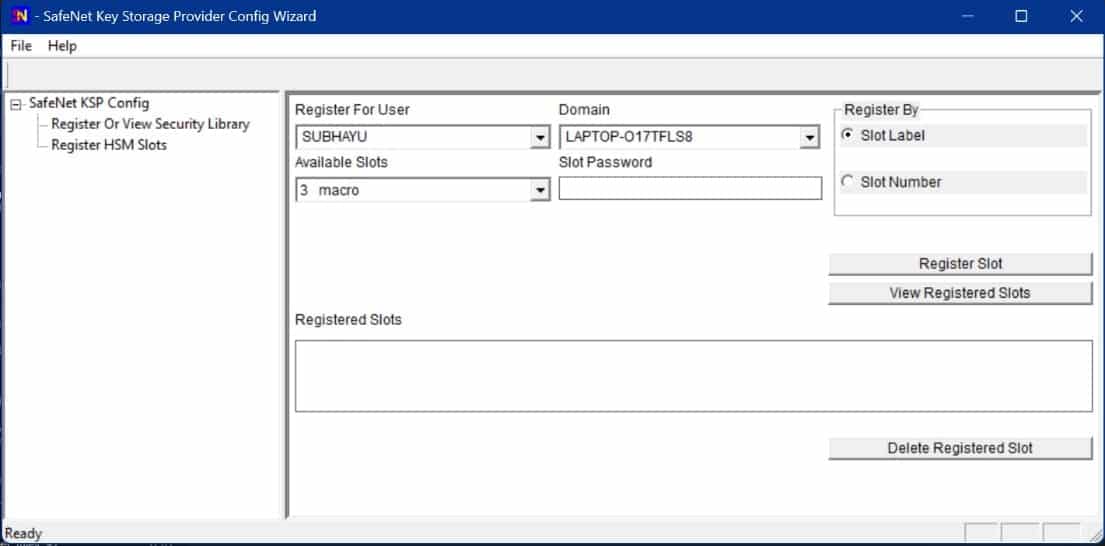
- Double-click Register HSM Slots.
-
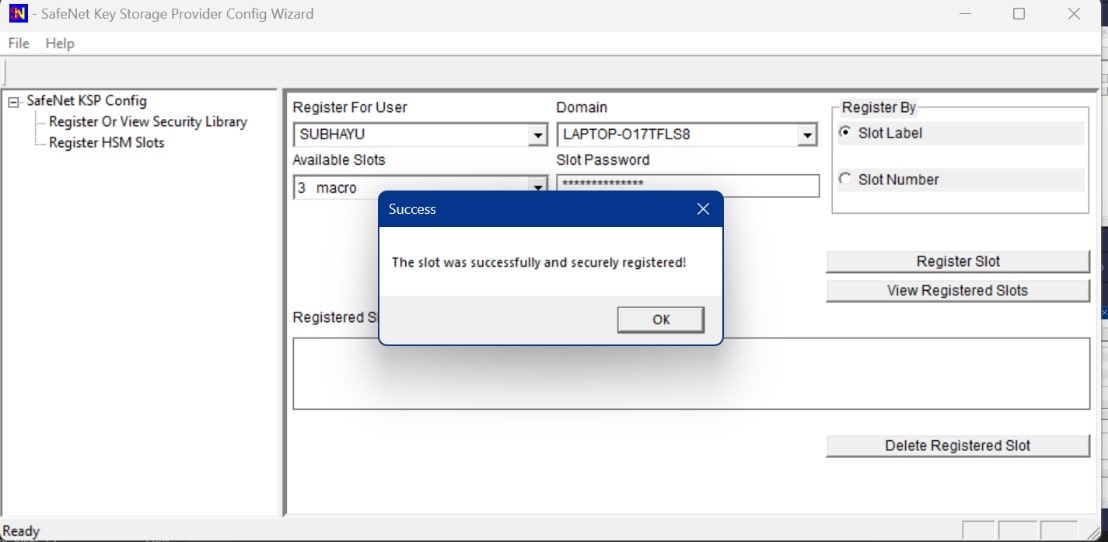
Register the HSM for the Administrator user. For that, Open the Register For User drop-down menu and select Administrator; open the Domain drop-down menu and select your domain. Open the Available Slots drop-down menu, select the service label, Enter the Slot Password, and Click Register Slot.
-
On successful registration, a Success! Message displays. Click OK.
-
Register the HSM for the System user. Open the Register For User drop-down menu and select SYSTEM, the Domain drop-down menu, and NT AUTHORITY. Open the Available Slots drop-down menu, select the service label, Enter the Slot Password, and Click Register Slot.
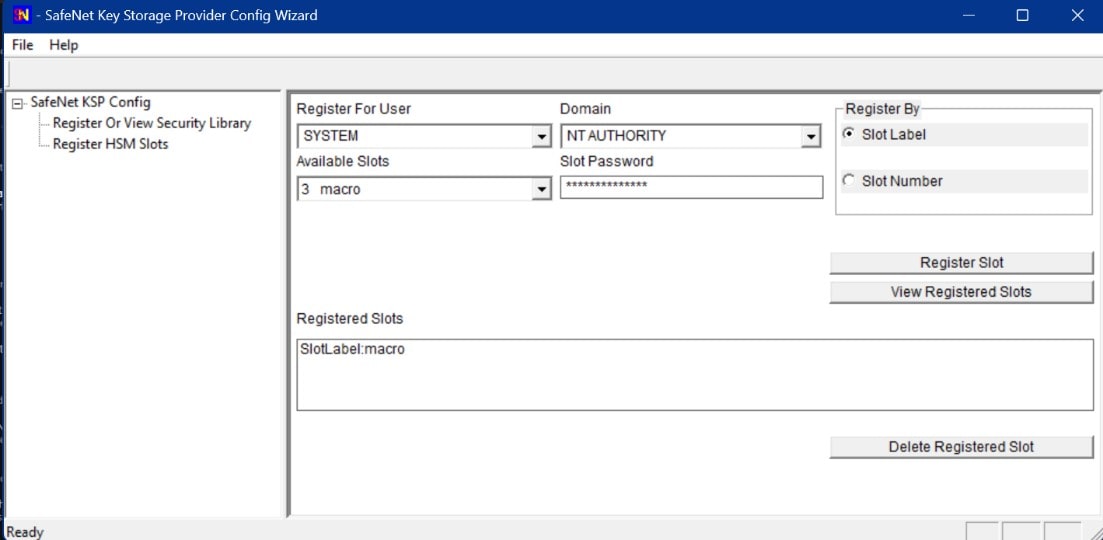
-
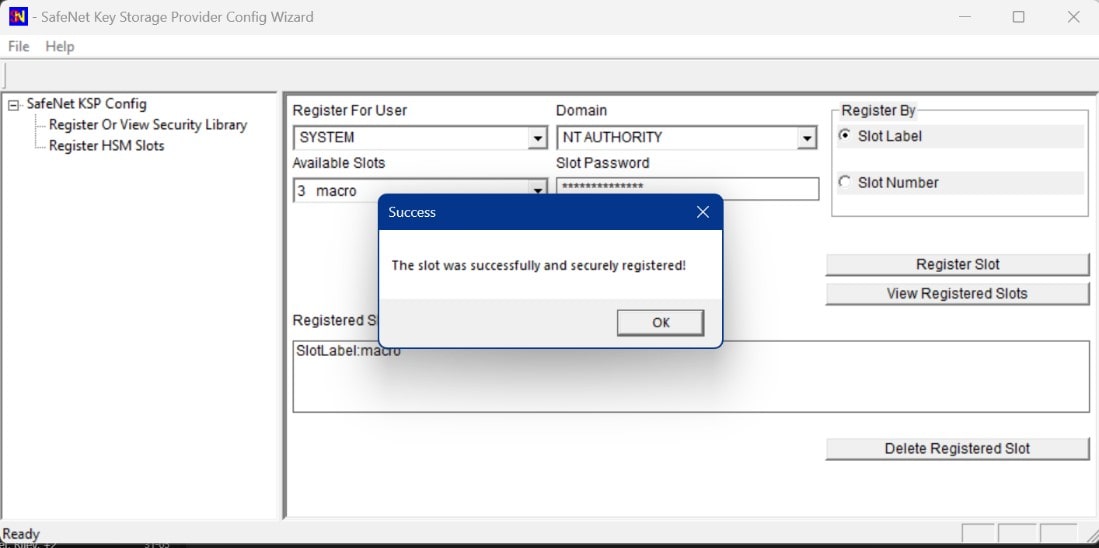
On successful registration, a Success! Message displays. Click OK.
Generating the CSR in the Service Client
-
Create a file named request.inf and fill it with the following details to generate a request for an SSL certificate connected to an RSA key. The contents are:
        [Version]


        Signature = "$Windows NT$"


        [NewRequest]


        Subject = "C=US, S=Dallas, L=Texas, O=Encryption Consulting LLC, OU=Dev, [email protected], CN=ECIssued"


        HashAlgorithm = SHA256


        KeyAlgorithm = RSA


        KeyLength =2048


        ProviderName = "Safenet Key Storage Provider"


        KeyUsage = 0xf0


        MachineKeySet =True


        [EnhancedKeyUsageExtension]


        OID=1.3.6.1.5.5.7.3.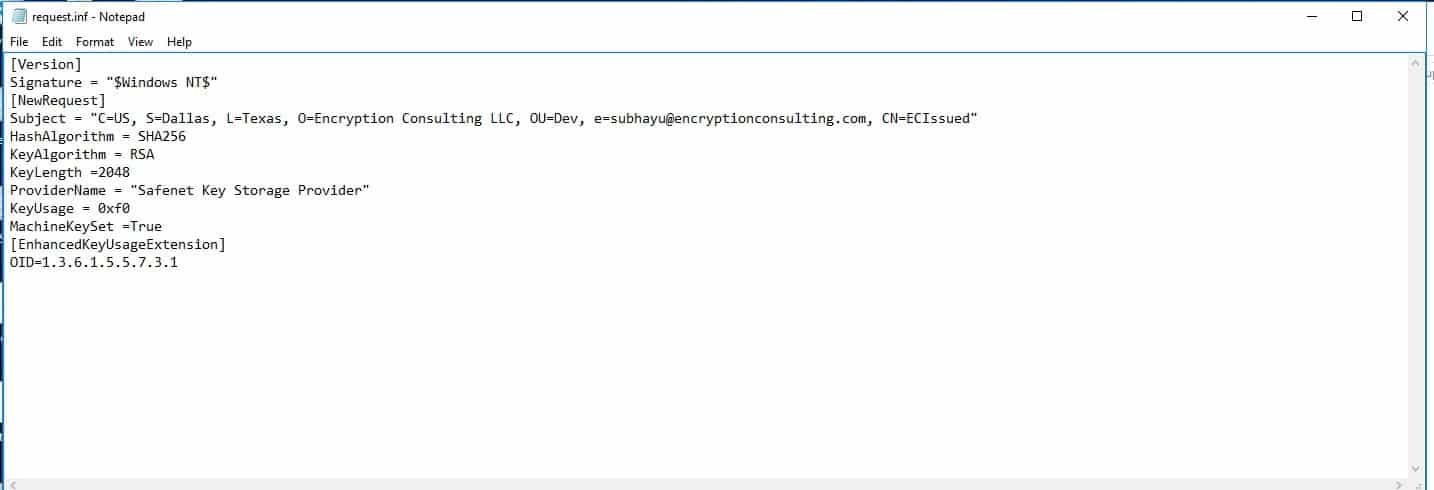
Note: The Subject’s Common Name (CN) is arbitrarily chosen for this request and is subject to change.
The parameters are:
-
Signature
“$Windows NT$” specifies that the INF file is intended for use with Windows NT and later versions of Windows.
-
Subject
- C – defines the two-letter country name for the certificate request’s distinguished subject name (DN). This parameter should be present in the subject DN.
- S – defines the state name for the certificate request’s distinguished subject name (DN). This parameter should be present in the subject DN.
- L – defines the locality (typically the city) for the distinguished subject name of the certificate request. This parameter may be present in the Subject DN.
- O – defines the organization name for the certificate request’s distinguished subject name (DN). This parameter should be present in the subject DN.
- OU – defines the organization unit name for the certificate request’s distinguished subject name (DN). This parameter may be present in the subject DN.
- e – is the official or contact e-mail address of the certificate authority.
- CN – defines the common name for the certificate request’s distinguished subject name (DN). This parameter should be present in the subject DN.
-
HashingAlgorithm
SHA256 sets the hashing algorithm to SHA256, a standard and safe choice.
-
KeyAlgorithm
RSA sets the key algorithm to RSA, a widely used public key algorithm.
-
KeyLength
2048 sets the length of the key to 2048 bits. This is the current industry standard for RSA keys.
-
ProviderName
“SafeNet Key Storage Provider” indicates the Cryptographic Service Provider (CSP) to be used. The CSP is a software library that implements cryptographic functions. In this case, the SafeNet Key Storage Provider is used.
-
KeyUsage
0xf0 specifies the purpose of the key in the certificate. The value 0xf0 in hexadecimal corresponds to the binary value 11110000, which represents Digital Signature (0x80), Key Encipherment (0x20), Data Encipherment (0x10), and Key Agreement (0x08) key usages.
-
MachineKeySet
True indicates the private key is stored in the local computer’s certificate store, not the current user’s.
-
EnhancedKeyUsageExtension
OID=1.3.6.1.5.5.7.3.1 is an Object Identifier (OID) that specifies a usage for the certificate. The OID 1.3.6.1.5.5.7.3.1 represents “Server Authentication,” meaning that the certificate is intended for authenticating servers in SSL/TLS communications.
-
- Open a new command prompt window as an administrator. You can do this by searching for “cmd” in the Start Menu, right-clicking on Command Prompt, and selecting “Run as administrator.”
- Navigate to the path where requested.inf is and pressing Enter.
-
Now, generate the certificate request with the following command:
certreq -new request.inf request.req
This command will create a new Certificate Signing Request (CSR) file named `request.req` based on the configuration in your `request.inf` file. You can send this CSR file to a Certificate Authority (CA) for your SSL certificate.
Sign the CSR using Microsoft CA
There are two different ways of Signing a CSR:
Accepting Certificate Request
-
Transfer the CSR file to Issuing CA and execute the command –
certreq -submit -attrib "CertificateTemplate:<Template Name>" "C:\MacroSign.csr"Here, Template Name = “EncryptionConsuCodeSigning”
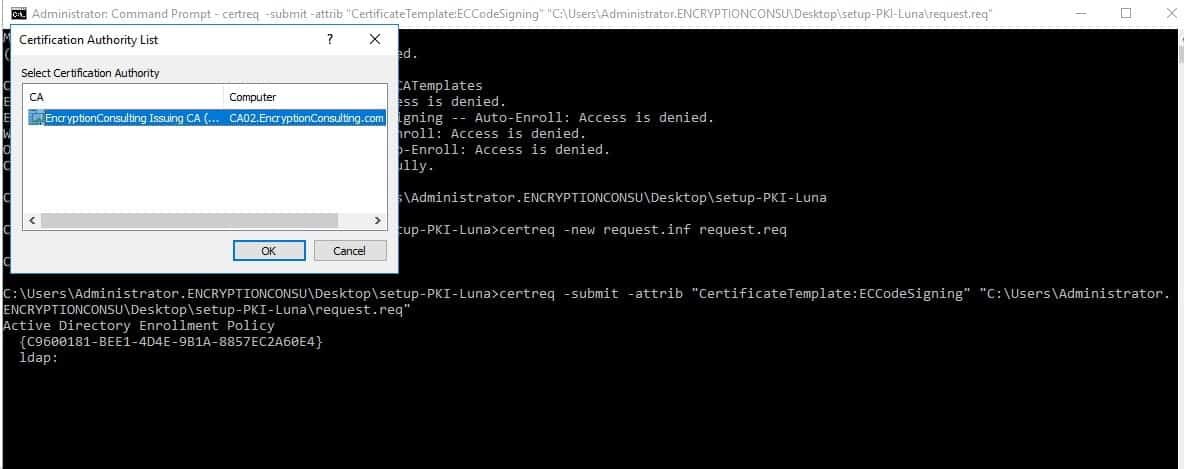
-
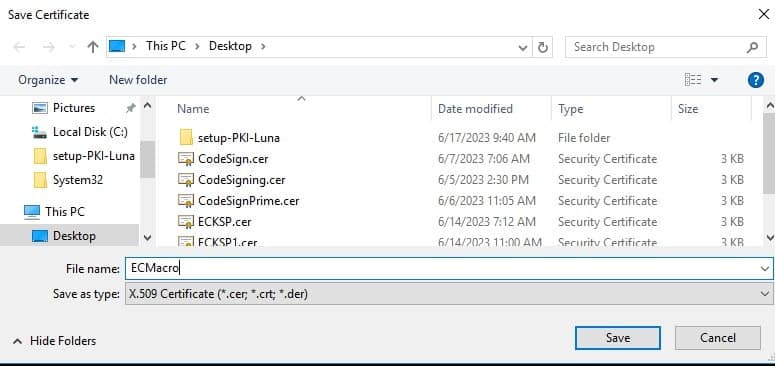
After Selecting the Certificate Authority from the Certificate Authority List, save the certificate with an appropriate name. (E.g.,= ECMacro, the extension should be either .crt or .cer)
-
On successful execution, you will find the Certificate inside the Issued Certificates in Certification Authority
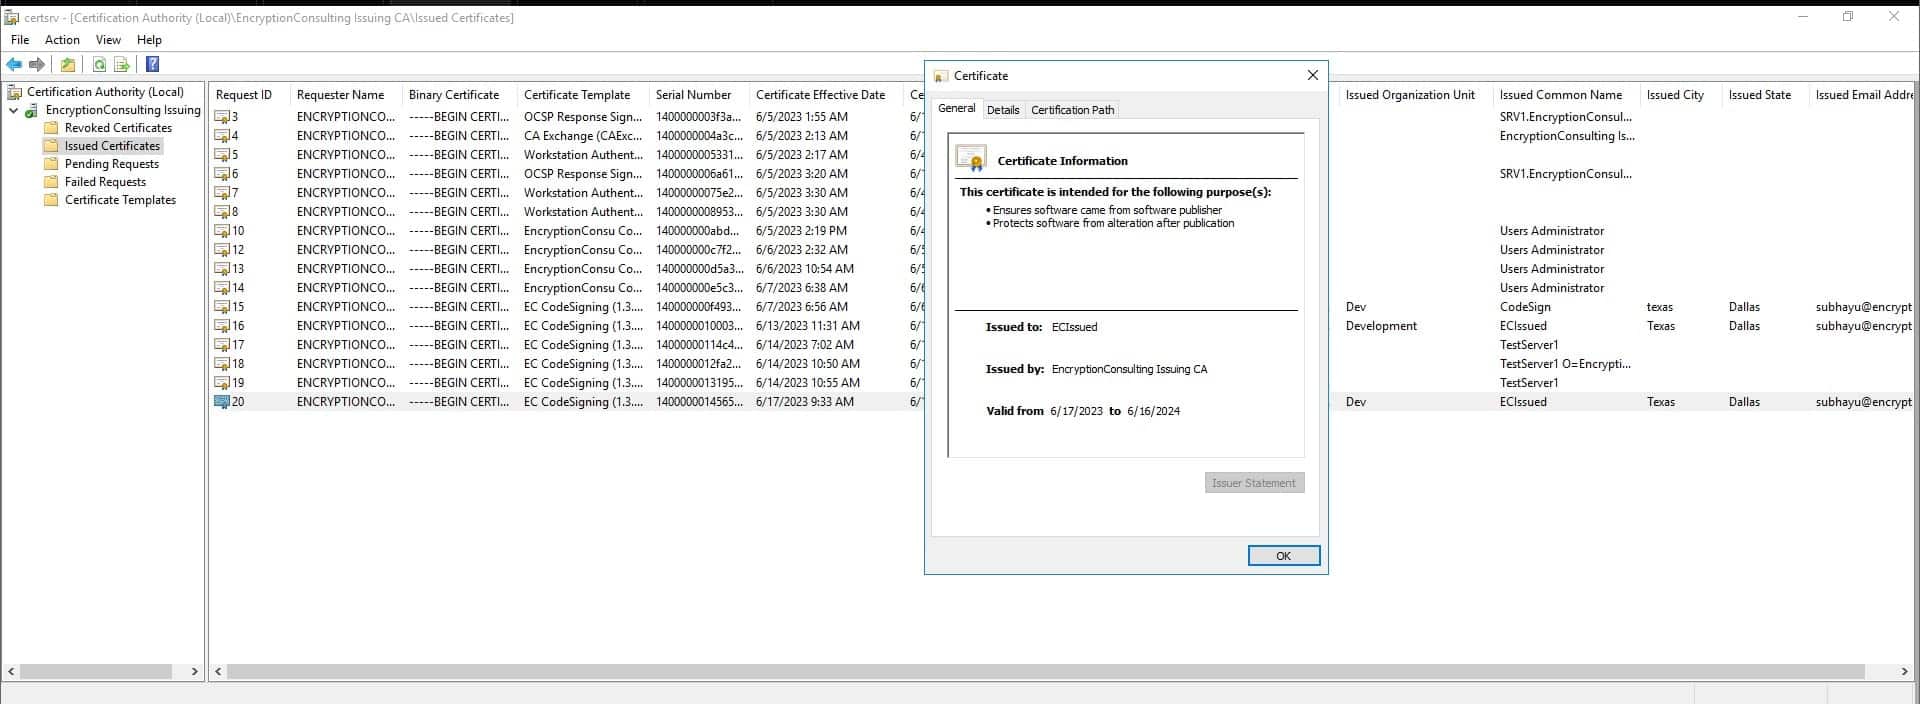
-
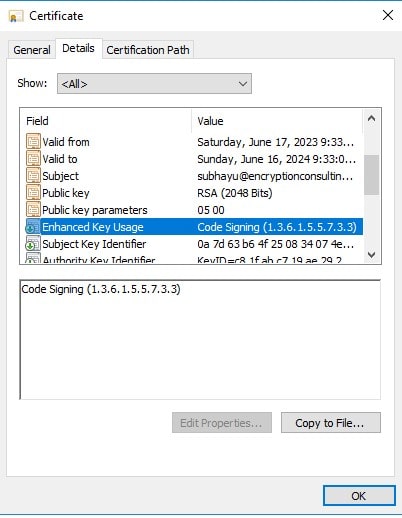
Check whether “Code Signing” is inside the attribute Enhanced Key Usage of the newly generated certificate.
Via Web Enrolment
-
The available Templates in the Certificate Authority
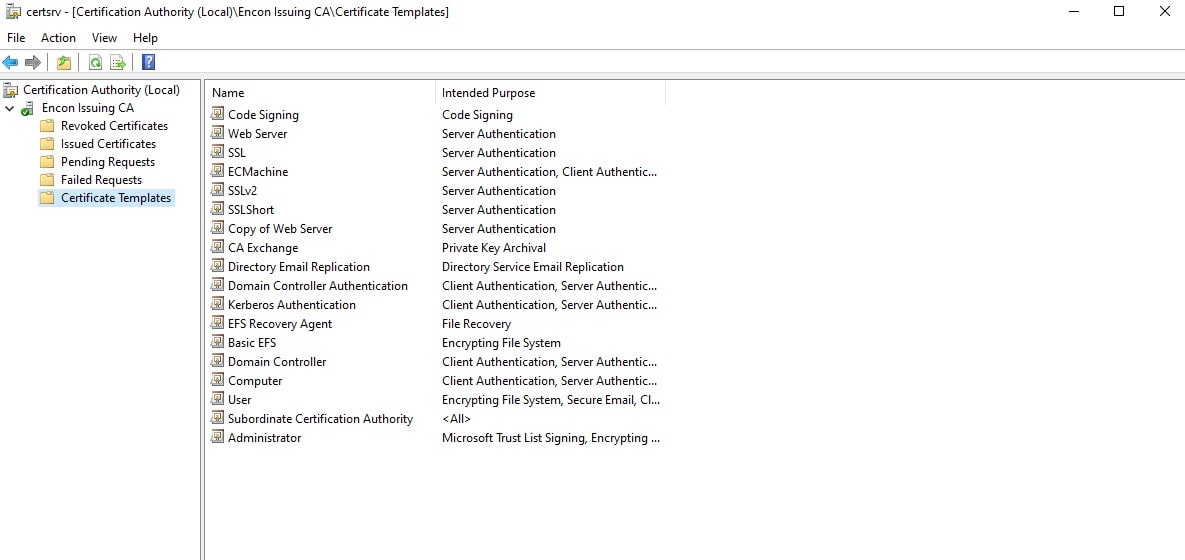
-
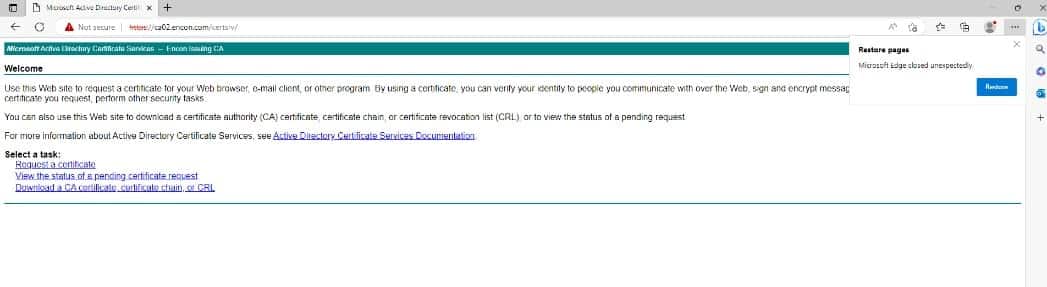
Now, perform the Web Enrollment after selecting a template – “Code Signing.” (in our case – https://ca02.encon.com/certsrv/)
-
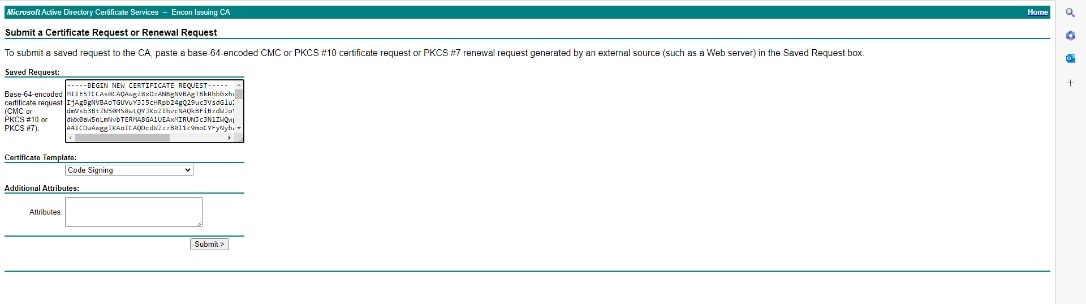
After selecting Request a Certificate, this screen will come up. Select Advanced Certificate Request. (In our case – https://ca02.encon.com/certsrv/certrqus.asp)

-
Paste the contents of the CSR inside Saved Request and select Code Signing in the Certificate template. After that, click on Submit.
-
This will prompt for two options – Download Certificate and Download Certificate chain. Choose the latter one and download the chain to your local system.

-
This is what the Certificate Chain will look like.

Adding the Private key to the Certificate
-
Accepting and installing the certificate to be available within the Windows environment.

-
Next, add the certificate to the “Personal” Certificates of Certificates – Local Computer using the command –
certutil -store MY “<thumbprint of the certificate>”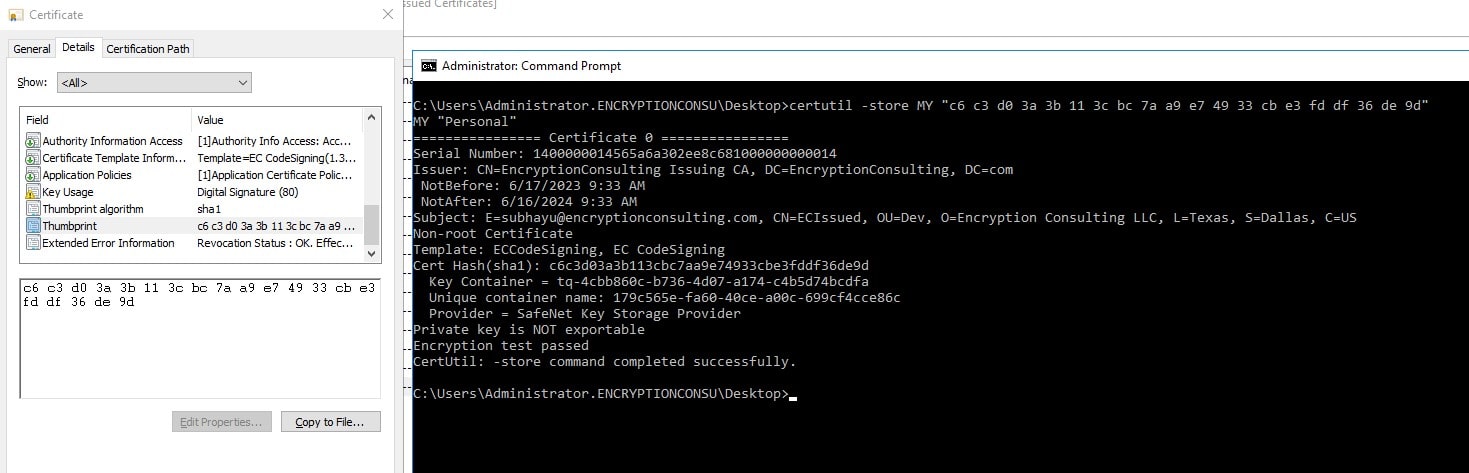
Troubleshooting
-
To check the list of CA templates present inside the Issuing CA –
certutil -CATemplates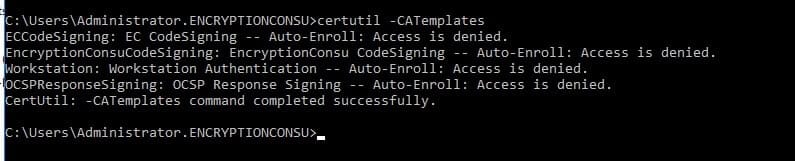
-
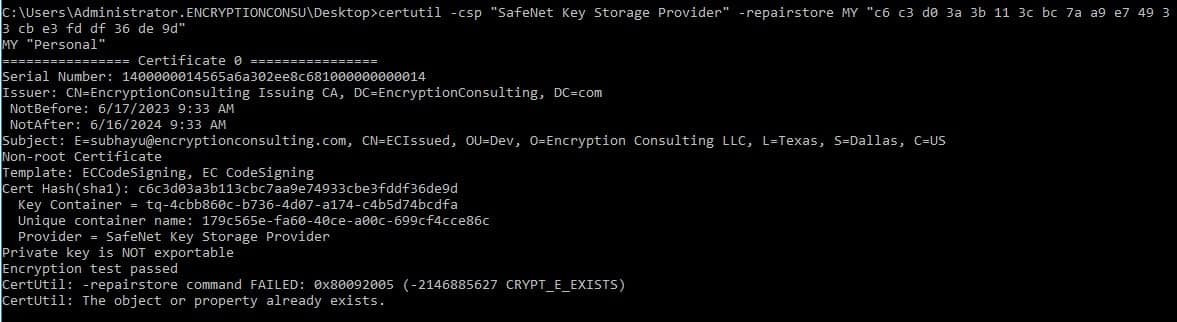
If the private key is not attached to the Certificate, try this “repairstore” command
-
CSP/KSP Registration is failing in Windows.
CSP/KSP Registrations Can Fail if Windows Update is missing as it includes a step that verifies the DLLs are signed by Thales’ certificate that chains back to the DigiCert root of trust G4 (in compliance with industry security standards).
This step can only succeed if your Windows operating system has the required certificate. If your Windows OS is updated, you should already have that certificate.
If your Luna HSM Client host is connected to the internet, use the following commands to update the certificate manually:
          certutil -urlcache -f http://cacerts.digicert.com/DigiCertTrustedRootG4.crt DigiCertTrustedRootG4.crt


          certutil -addstore -f root DigiCertTrustedRootG4.crt
To manually update a non-connected host
- Download the DigiCert Trusted Root G4 (http://cacerts.digicert.com/DigiCertTrustedRootG4.crt DigiCertTrustedRootG4.crt) to a separate internet-connected computer.
- Transport the certificate, using your approved means, to the Luna Client host into a <downloaded cert path> location of your choice
-
Add the certificate to the certificate store using the command:
certutil -addstore -f root <downloaded cert path>
-
If the Subject from the certificate request is not shown on the certificate, try the following steps.
- Open the Certificate Templates Console: On the AD CS server, open the Certificate Templates Console by running `certtmpl.msc` from the Run dialog (Win + R).
- Duplicate an Existing Template: It’s generally a good idea to duplicate an existing template rather than modify one. Find a template that’s similar to what you want, right-click it, and select `Duplicate Template.`
-
Configure the Template: In the properties dialog for the new template, you can configure various settings. To set the Key Usage and Enhanced Key Usage fields:
Key Usage: Go to the `Extensions` tab, select `Key Usage` in the list, and click `Edit.` Here you can select the key usages you want to include, such as `Digital Signature,` `Key Encipherment,` etc.
Enhanced Key Usage: Still on the `Extensions` tab, select `Application Policies` and click `Edit.` Here you can add the enhanced key usages you want to include, such as `Code Signing,` `Server Authentication,` etc.
- Save the Template: Once you’ve configured the template to your liking, give it a name and save it.
- Issue the Template: The new template is now available but needs to be issued before it can be used. In the Certification Authority console (`certsrv.msc`), right-click `Certificate Templates,` select `New,` then `Certificate Template to Issue,` and select your new template.
Requiring a certificate using this template should include the Key Usage and Enhanced Key Usage fields as you’ve configured them.
Conclusion
Once produced, the CSR may be used to seek an SSL certificate from a Certificate Authority. The CSR’s data will be used by the CA to build the certificate, assuring the security of your website and the transmission of information in a secure manner.
Although the procedures and protocols may appear difficult, using an SSL certificate to secure your website is essential for gaining visitors’ trust and safeguarding critical information. A CSR is essential to ensure that the correct data is included in your SSL certificate.