
Container Signing Integration Guide
CodeSign Secure can sign container images using Sigstore’s cosign together with Encryption Consulting’s ec-signer tool, so that the signing key remains inside the HSM and every operation is recorded centrally. Rather than embedding a signature inside the image, container signing publishes a separate signature artifact alongside the image in your registry.
Signing on its own does not prevent an unsigned image from being deployed, so this guide also covers the enforcement side. Two services are deployed into a Kubernetes cluster — an Image Verifier and a Validating Webhook — which together reject any deployment whose image does not carry a valid signature.
Sections 1 to 4 cover installing the tooling and signing an image. Sections 5 to 8 cover deploying the verification services into Kubernetes and confirming that enforcement works. If you only need to sign images and do not intend to enforce signatures at deploy time, you can stop after Section 4.
Prerequisites: A Linux machine on which you have sudo rights, a Docker Hub account, and access to the CodeSign Secure portal. Before proceeding with image signing, docker and cosign need to be installed on that machine.
Install Cosign
Cosign is the Sigstore utility that performs the container image signing. Please follow the steps mentioned below for installing cosign. Choose whichever of the three package formats suits your distribution — you only need one.
Option A: Install from the Binary
# binary
wget "https://github.com/sigstore/cosign/releases/download/v2.0.0/cosign-linux-amd64"
mv cosign-linux-amd64 /usr/local/bin/cosign
chmod +x /usr/local/bin/cosign
Option B: Install from the RPM Package
# rpm
wget "https://github.com/sigstore/cosign/releases/download/v2.0.0/cosign-2.0.0.x86_64.rpm"
rpm -ivh cosign-2.0.0.x86_64.rpm
Option C: Install from the Debian Package
# dpkg
wget "https://github.com/sigstore/cosign/releases/download/v2.0.0/cosign_2.0.0_amd64.deb"
dpkg -i cosign_2.0.0_amd64.deb
NOTE: The commands above pin cosign to v2.0.0. You may substitute a later release, but keep the version consistent across the URL and the package filename.
Install and Set Up Python and Docker
The ec-signer tool is driven by Python and talks to the local Docker daemon, so both must be present along with a few supporting packages.
Step 1: Install the Required Packages
Run the following commands:
sudo apt-get install docker.io
sudo apt-get install python-is-python3
sudo apt install python3-pip
sudo apt-get install python3-docker
sudo apt-get -y install python3-openssl
sudo apt-get install -y dbus-user-session
sudo apt-get install -y docker-ce-rootless-extras
Step 2: Resolve a docker-ce-rootless-extras Error
If docker-ce-rootless-extras gives an error, the Docker apt repository is probably not configured. Follow the below steps to add it, then install the package again.
sudo apt-get update
sudo apt-get install ca-certificates curl gnupg lsb-release
sudo mkdir -p /etc/apt/keyrings
Add the Docker GPG key:
curl -fsSL https://download.docker.com/linux/ubuntu/gpg \
  | sudo gpg --dearmor -o /etc/apt/keyrings/docker.gpg
Then add the repository to your sources list:
echo "deb [arch=$(dpkg --print-architecture) \
signed-by=/etc/apt/keyrings/docker.gpg] \
https://download.docker.com/linux/ubuntu \
$(lsb_release -cs) stable" \
  | sudo tee /etc/apt/sources.list.d/docker.list > /dev/null
Finally, update and install:
sudo apt-get update
sudo apt-get install docker-ce-rootless-extras
NOTE: These two commands must be run separately. On the published documentation page they appear joined together, which will cause the key import to fail.
Step 3: Log In to Docker Hub
Now you would need to log in to your Docker Hub account by running the below command:
sudo docker login
Set Up Container Signing
The Container Signing Tools package contains the ec-signer utility and its configuration file, which authenticates the machine to CodeSign Secure.
Step 1: Download the Container Signing Tools
- Download the Container Signing Tools from the CodeSign Secure portal.
- Extract the package and go to the folder SignImage.
Step 2: Generate the SSL Authentication Certificate
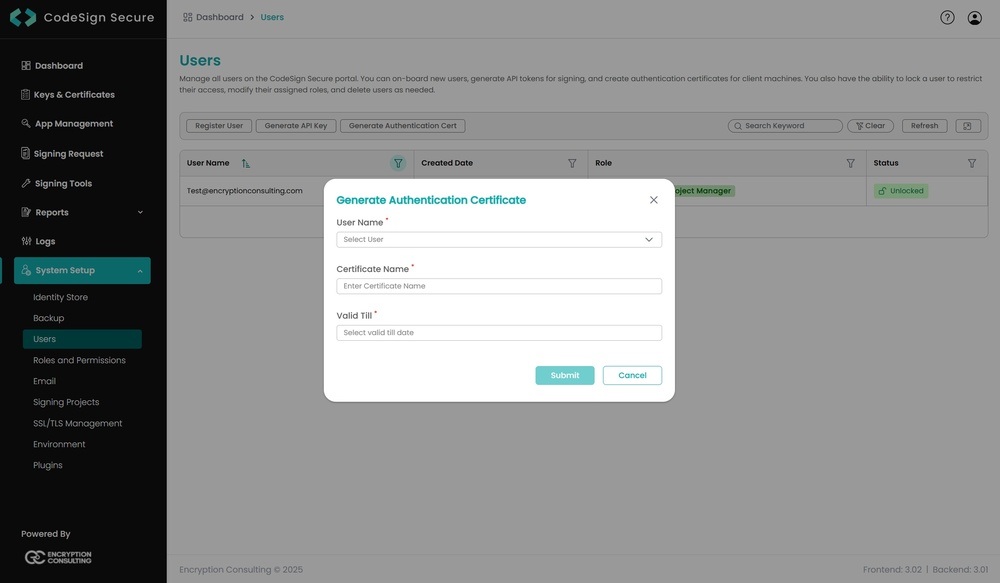
The SSL Authentication Certificate and password can be generated from the CodeSign Secure portal. Navigate to System Setup > User and select the “Generate Authentication Cert” option.
Enter the certificate name, user name, and expiry date. A .pfx certificate is generated and downloaded, and its password is displayed.
NOTE: The password is displayed only once, so copy and store it safely before continuing. You will need both the certificate path and its password in the next step.
Step 3: Configure ec-signer.conf
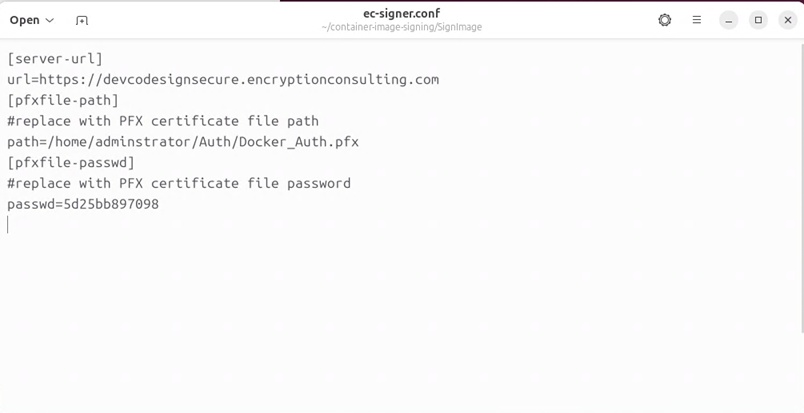
Open the “ec-signer.conf” file and update the codesigning url, path of your SSL Authentication certificate, and the password of the certificate.
Sign the Container Image
With the configuration in place, the image is signed from the SignImage directory using the ec-signer utility.
Step 1: Run the ec-signer Command
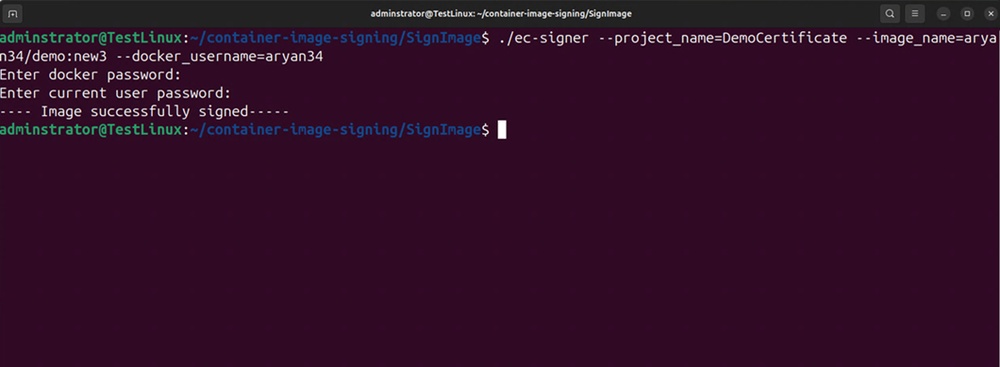
Open a terminal and execute:
./ec-signer --project_name=<certificate name> \
  --image_name=<target container> \
  --docker_username=<your docker username>
You will be prompted to provide the Docker Hub password and the root privileges to the current user. These arrive as two separate prompts — first the docker password, then the current user password.
On completion the tool reports that the image was successfully signed.
Step 2: Parameter Reference
The following are the parameters and their meaning in the command:
| Flag | Description |
|---|---|
| –project_name | The certificate name in CodeSign Secure that should be used to sign the image. |
| –image_name | The target container image to be signed. |
| –docker_username | Your Docker Hub username. |
Step 3: Confirm the Signature Artifact
You will be able to see a new signature image on your Docker Hub account. This is a separate artifact published alongside the image, rather than a change to the image itself.
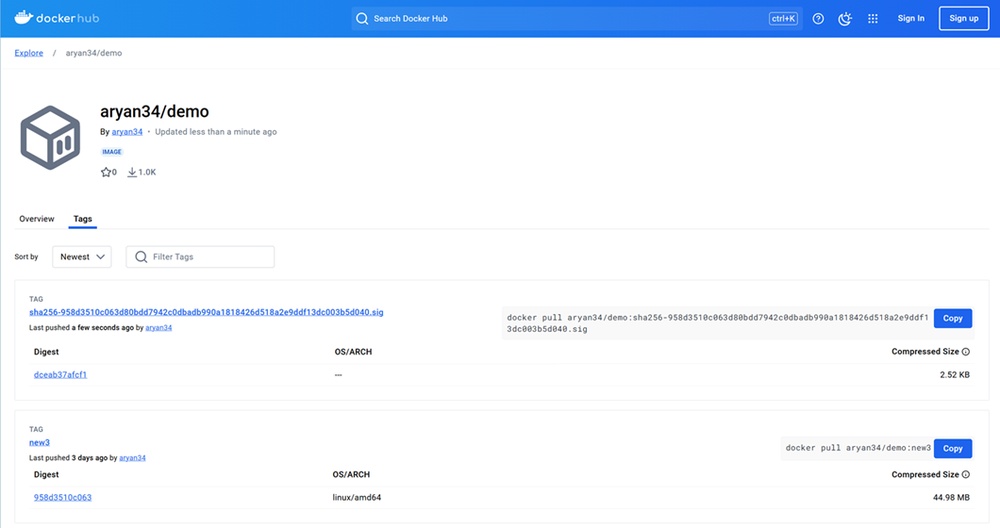
You can also open the CodeSign Secure portal and navigate to Reports > Signing Request Report, where every signing request is recorded for audit purposes.
Install Kubernetes
Verification of container images will allow you to deploy only signed docker images and reject unsigned ones. To verify container image signing, Kubernetes needs to be deployed.
Step 1: Install k3s
Please follow the following command to install Kubernetes:
curl -sfL https://get.k3s.io | sh -
NOTE: Before we can verify an image in a Kubernetes environment, two services need to be deployed in the cluster — the Verify Image Service (Section 6) and the Image Validation Webhook Service (Section 7). Both are required for enforcement to work.
Deploy the Verify Image Service
The Verify Image Service checks a candidate image’s signature against CodeSign Secure. It is built as a container image, pushed to your registry, and then deployed into the cluster.
Step 1: Build the Verifier Image
- Go to the ../VerifyImage/image-verifier directory.
- Create a docker image with name “verifyImage” using the Dockerfile present in the folder. For example:
sudo docker build -t aryan34/demo:verifyImage .
Here “aryan34” is the docker username and “demo” is the Docker Hub repository name. Substitute your own values.
Step 2: Push the Verifier Image
Now push this image to your Docker Hub account. For example:
sudo docker image push aryan34/demo:verifyImage
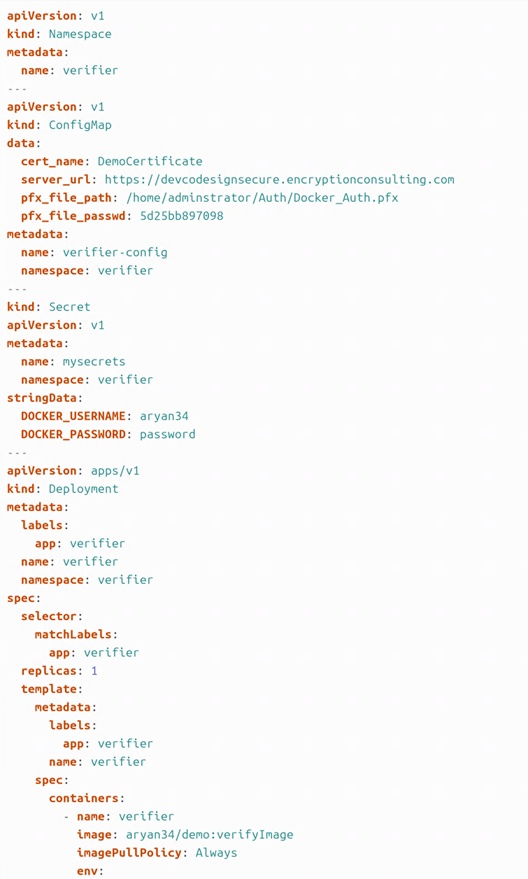
Step 3: Configure validator-deploy.yaml
Now open the validator-deploy.yaml file and update the following settings:
- cert_name: The name of the signing certificate to verify against.
- server_url: The URL of your CodeSign Secure server.
- pfx_file_path: The path to the SSL Authentication certificate.
- pfx_file_passwd: The password for that certificate.
- DOCKER_USERNAME: Your Docker Hub username.
- DOCKER_PASSWORD: Your Docker Hub password.
- image: The image you pushed in Step 2. Keep the image name as “verifyImage” and only change the docker username and repository name.
Step 4: Deploy the Service
Deploy the Image Verifier Service:
sudo kubectl apply -f validator-deploy.yaml
Deploy the Image Validation Webhook Service
The Validating Webhook is what intercepts deployments and asks the Verify Image Service whether the image is signed. Without it, images would not be checked at deploy time.
Step 1: Build the Webhook Image
- Go to the ../VerifyImage/validating-webhook directory.
- Create a docker image with name “image-validation-webhook” using the Dockerfile present in the folder. For example:
sudo docker build -t aryan34/demo:image-validation-webhook .
Step 2: Push the Webhook Image
Now push this image to your Docker Hub account. For example:
sudo docker image push aryan34/demo:image-validation-webhook
Step 3: Deploy the Webhook Secrets and Configuration
Now deploy the webhook secrets and configuration yaml files:
sudo kubectl apply -f webhook-secret.yaml
sudo kubectl apply -f webhook-config.yaml
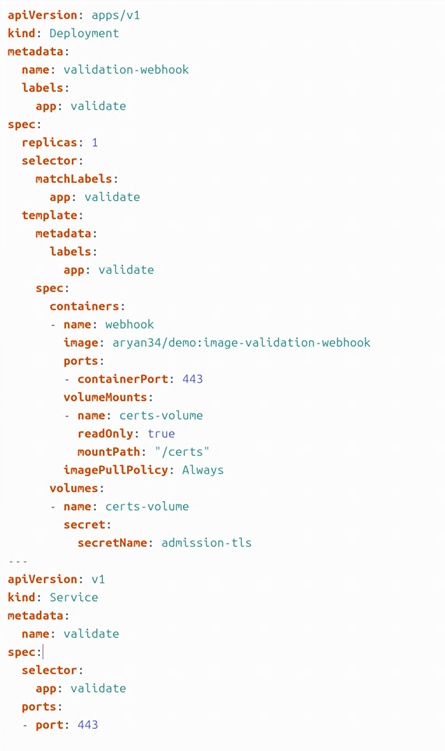
Step 4: Configure webhook-deploy.yaml
Now open the webhook-deploy.yaml file and update the following setting:
- image: The image you pushed in Step 2. Keep the image name as “image-validation-webhook” and only change the docker username and repository name.
Step 5: Deploy the Webhook
Deploy the Image Validation Webhook:
sudo kubectl apply -f webhook-deploy.yaml
Step 6: Confirm Both Services Are Running
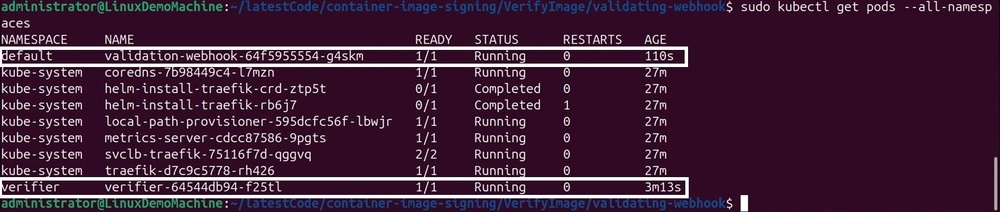
If the services are successfully deployed, when we execute the following command:
sudo kubectl get pods --all-namespaces
We should get the following output:
Confirm that both a validation-webhook pod and a verifier pod show a Running status. The webhook runs in the default namespace and the verifier in its own verifier namespace.
Test the Enforcement
If we try to deploy any container image which is not signed, deployment will fail. We will only be able to deploy a signed image, due to our verifier and validation Kubernetes services. The two tests below confirm both halves of that behaviour.
Step 1: Deploy an Unsigned Image
We need to create a yaml file for the unsigned image. Here we have created a demo-deployment-unsigned.yaml file to deploy the unsigned aryan34/demo:notSigned image.
Here is a sample yaml file. Remember to change the deployed service name, image name, and the port number.
apiVersion: apps/v1
kind: Deployment
metadata:
  name: demo-deployment-unsigned
  labels:
    app: demo
spec:
  replicas: 1                 # Number of desired replicas
  selector:
    matchLabels:
      app: demo
  template:
    metadata:
      labels:
        app: demo
    spec:
      containers:
      - name: demo
        image: aryan34/demo:notSigned   # unsigned demo image
        ports:
        - containerPort: 8997           # Port to expose
To deploy the unsigned image using Kubernetes, run the below command:
sudo kubectl apply -f demo-deployment-unsigned.yaml
The deployment is rejected by the validating webhook, confirming that unsigned images cannot be deployed.
The server returns an admission webhook error stating that it denied the request because it failed to verify the image. This is the expected result of this test.

Step 2: Deploy a Signed Image
Here is a sample yaml file for a signed image. Remember to change the deployed service name, image name, and the port number.
apiVersion: apps/v1
kind: Deployment
metadata:
  name: demo-deployment
  labels:
    app: demo
spec:
  replicas: 1                 # Number of desired replicas
  selector:
    matchLabels:
      app: demo
  template:
    metadata:
      labels:
        app: demo
    spec:
      containers:
      - name: demo
        image: aryan34/demo:new3        # signed demo image
        ports:
        - containerPort: 8999           # Port to expose
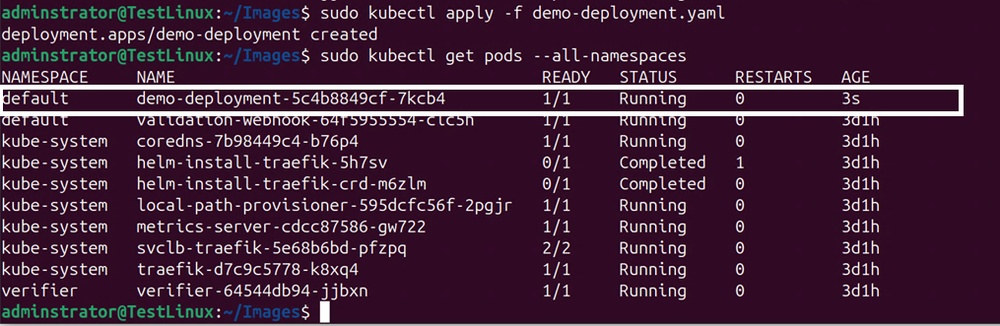
To deploy the signed image using Kubernetes, run the below command:
sudo kubectl apply -f demo-deployment.yaml
Now if you check all the pods, you will see a demo-deployment service successfully running.
NOTE: YAML is whitespace sensitive, so preserve the indentation shown above exactly when copying these files.