
PKCS#11 Wrapper – APK Signing Integration Guide
For APK signing, we use APKSigner, which is a command-line utility included in the Android SDK Build Tools that allows you to sign Android application package (APK) files and verify their signatures. It is an essential tool for Android developers to ensure the integrity and authenticity of their apps.
Encryption Consulting’s PKCS#11 Wrapper exposes the keys held in your HSM through the standard PKCS#11 interface, which means APKSigner can use them through Java’s built-in SunPKCS11 provider without any change to the tool itself. The keystore is given as type PKCS11 rather than a local file, so the private key never leaves the HSM and every signing operation is recorded centrally.
Section 1 covers the steps that are common to every platform. After that, follow only the track for your operating system — Sections 2 and 3 for Linux (Ubuntu), Sections 4 and 5 for macOS, or Sections 6 and 7 for Windows. Each track ends with signing and verification.
Prerequisites: Access to the CodeSign Secure portal, administrative rights on the client machine, and a sample APK file to sign.
Common Setup
Two things are needed regardless of platform: a P12 authentication certificate that identifies your machine to CodeSign Secure, and the two configuration files that ship inside the PKCS#11 Wrapper download.
Step 1: Generate a P12 Authentication Certificate
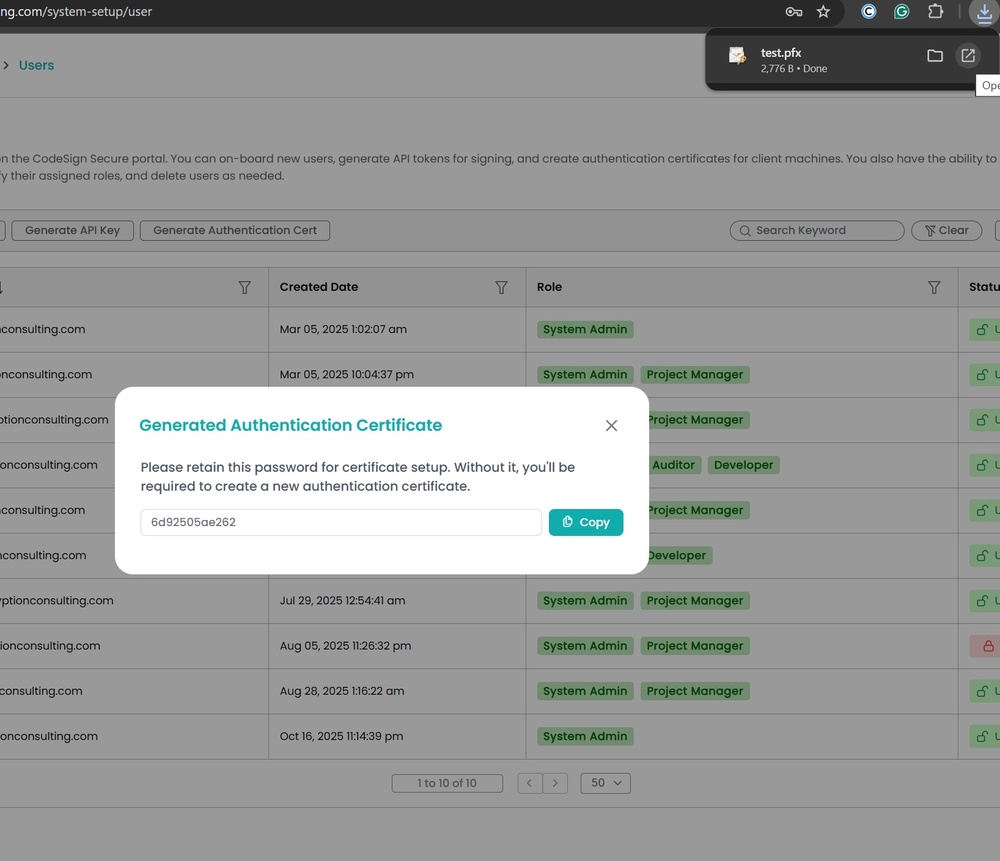
Generate a P12 Authentication certificate from the System Setup > User > Generate Authentication Certificate dropdown in the CodeSign Secure portal.
Enter the certificate name, user name, and expiry date. A .pfx certificate is generated and downloaded, and its password is displayed.
NOTE: The password is displayed only once, so copy and store it safely. Both the certificate path and its password are referenced by the wrapper configuration in your platform track.
Step 2: Understand the Two Configuration Files
The PKCS#11 Wrapper download contains two files that must be edited before use:
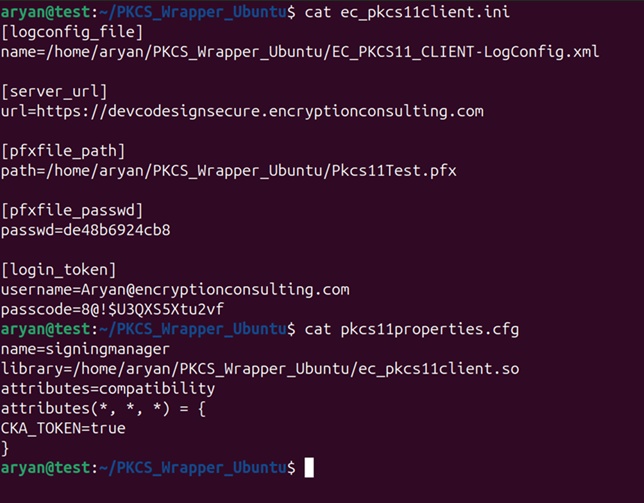
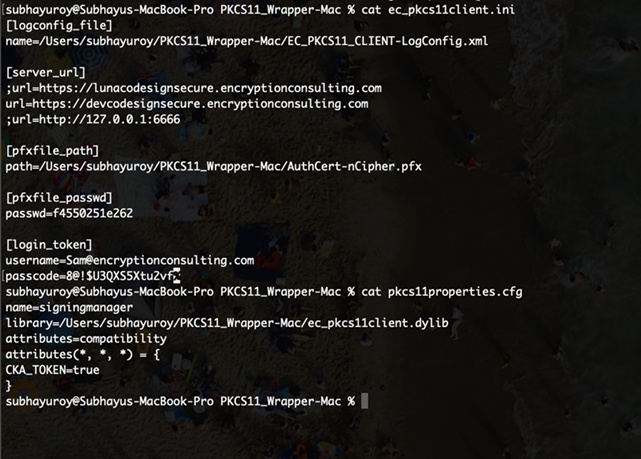
- ec_pkcs11client.ini: Points the wrapper at your CodeSign Secure server and at the P12 authentication certificate generated in Step 1.
- pkcs11properties.cfg: The SunPKCS11 provider configuration that Java reads. Its path is supplied to APKSigner through the
--provider-argoption.
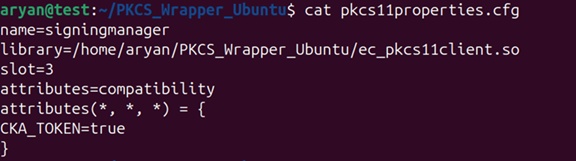
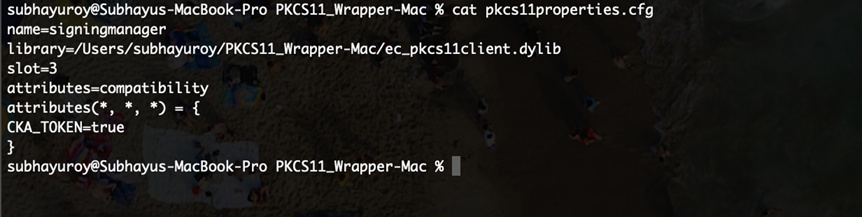
NOTE: When using a Luna HSM, the slot number must also be added to the pkcs11properties.cfg file. Each platform track below shows this variation.
Linux (Ubuntu): Set Up the Wrapper
To sign your APK using APKSigner and our PKCS#11 wrapper in Ubuntu, please follow the below steps.
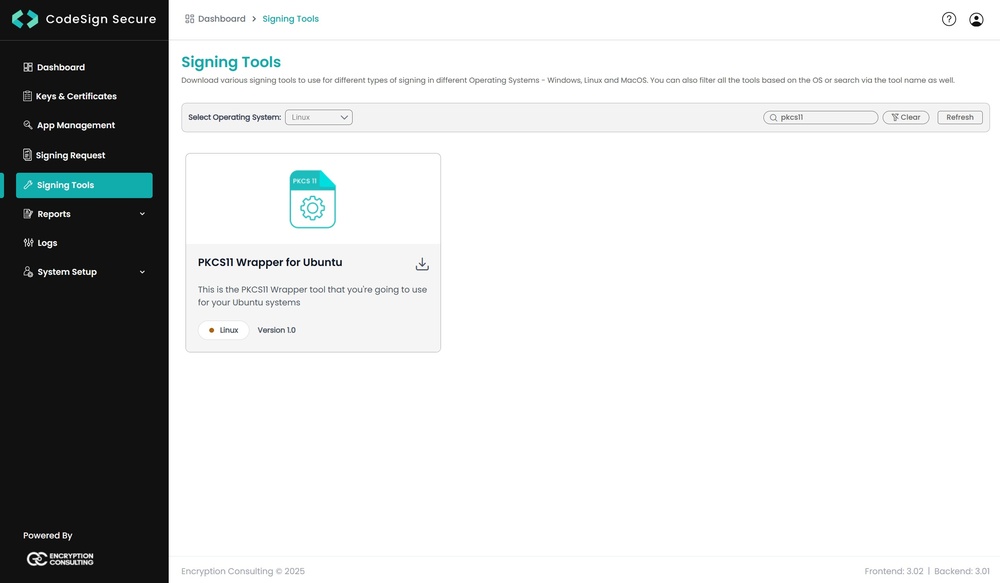
Step 1: Download the PKCS#11 Wrapper for Ubuntu
Go to EC CodeSign Secure v3.02’s Signing Tools section and download the PKCS11 Wrapper for Ubuntu.
Step 2: Edit the Configuration Files
Go to your Ubuntu client system and edit the configuration files (ec_pkcs11client.ini and pkcs11properties.cfg) downloaded in the PKCS11 Wrapper.
NOTE: When using Luna HSM, add the slot number in the pkcs11properties.cfg file as shown below.
Step 3: Set the EC_INI_FILE_PATH Environment Variable
Now we need to add the environment variable for the pkcs11 client library.
Run the below command to open the bashrc file:
nano ~/.bashrc

Now add the EC_INI_FILE_PATH variable with the path of the .ini at the end of the bashrc file, like:
export EC_INI_FILE_PATH=\
/home/administrator/PKCS11_Wrapper-Ubuntu/ec_pkcs11client.ini
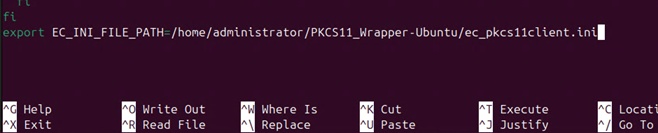
Press Ctrl+X, then enter Y, and then press Enter to save.
Reload the environment variables:
source ~/.bashrc

Check whether the variable has been set correctly:
echo $EC_INI_FILE_PATH

NOTE: If you cannot see the file location from the echo command, open a new terminal and try again.
Step 4: Install the Prerequisites
Now, let us install some prerequisites in your client system to run the PKCS11 Wrapper.
Install Java 8:
sudo apt install openjdk-8-jdk
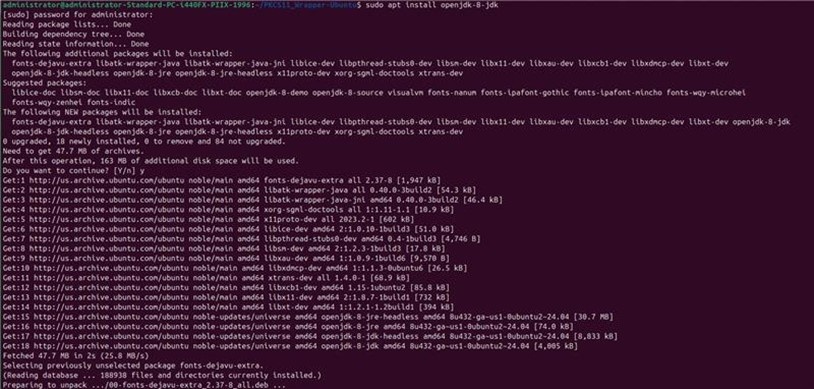
Set Java 8 as the active version:
sudo update-alternatives --config java

Install the Android SDK command-line tools:
sudo apt install google-android-cmdline-tools-13.0-installer
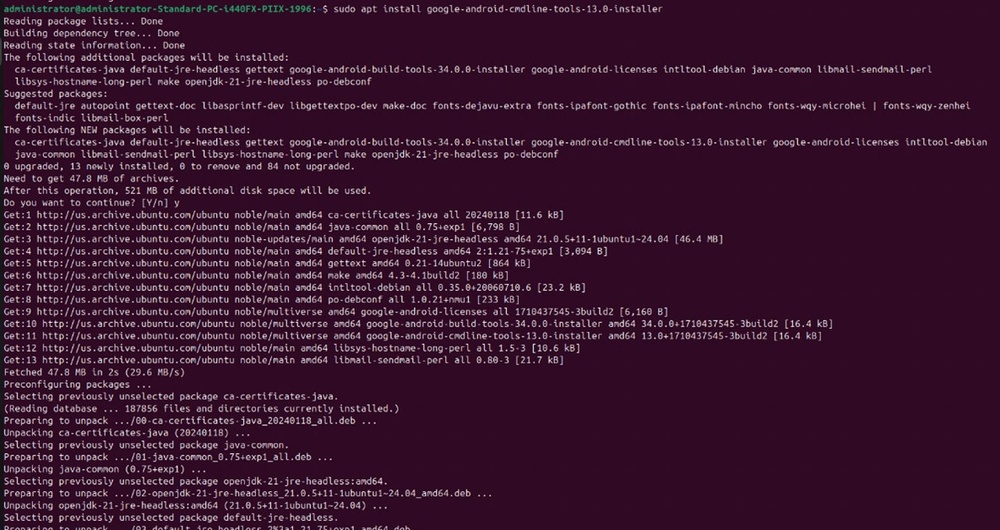
Ensure that the SDK Manager for Android Studio has been properly installed:
sdkmanager --version

Install Build tools using SDKManager, which contains the APKSigner:
sdkmanager "build-tools;34.0.0"

Ensure that APKSigner is present:
apksigner --version

Two packages are required to run the PKCS11 Wrapper on your system. First, install liblog4cxx-dev:
sudo apt-get install liblog4cxx-dev

The last prerequisite is to install the curl package:
sudo apt-get install curl
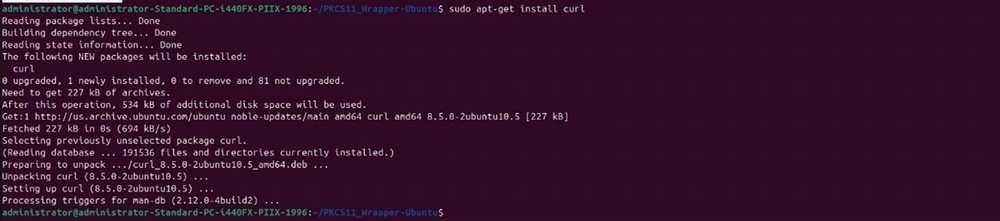
Linux (Ubuntu): Sign and Verify
Now that all the configurations and prerequisites have been installed, let us perform the signing operation.
Step 1: Run the Signing Command
The signing command will look something like this. Ensure you run this command only inside the folder where your PKCS11 Wrapper is installed.
apksigner sign \
  --provider-class sun.security.pkcs11.SunPKCS11 \
  --provider-arg <path of the pkcs11properties.cfg file> \
  --ks NONE \
  --ks-type PKCS11 \
  --ks-pass pass:abcd1234 \
  --ks-key-alias <private key alias> \
  --in <path of the APK file you want to sign> \
  --out <path of the Signed APK file>
A sample command is provided below:
apksigner sign \
  --provider-class sun.security.pkcs11.SunPKCS11 \
  --provider-arg \
    /home/administrator/PKCS11_Wrapper-Ubuntu/pkcs11properties.cfg \
  --ks NONE --ks-type PKCS11 --ks-pass pass:abcd1234 \
  --ks-key-alias gpg2 --in Sample.apk --out signed.apk

NOTE: When working with Luna HSM, append --min-sdk-version 28 to the signing command shown above.
Step 2: Option Reference
The following are the options and their meaning in the command:
| Option | Description |
|---|---|
--provider-class |
The Java security provider to use. This is always sun.security.pkcs11.SunPKCS11, the JDK’s built-in PKCS#11 provider. |
--provider-arg |
The path to the pkcs11properties.cfg file in your system, which tells the provider how to reach the PKCS#11 Wrapper. |
--ks |
The keystore. This is NONE because the keys live in the HSM rather than in a keystore file. |
--ks-type |
The keystore type, which must be PKCS11. |
--ks-pass |
The keystore password, supplied in the form pass:<password>. |
--ks-key-alias |
The alias of the private key to sign with. |
--in |
The path of the APK file you want to sign. |
--out |
The path of the signed APK file to produce. |
--min-sdk-version |
The lowest Android API level the signature must be valid for. Required when working with a Luna HSM. |
Step 3: Verify the Signature
After successfully signing the APK, let us verify it using this command:
apksigner verify -verbose <path of the signed APK file>
A sample command is provided below:
apksigner verify -verbose signed.apk

NOTE: When working with Luna HSM, use: apksigner verify -verbose --min-sdk-version 28 <path of the signed APK file>
Step 4: Cross-Check in CodeSign Secure
Open the CodeSign Secure portal and navigate to Reports > Signing Request Report, where every signing request performed through the wrapper is recorded for audit purposes.
macOS: Set Up the Wrapper
To perform APK Signing using the APKSigner tool and our PKCS11 Wrapper on a macOS machine, you would need to follow the below steps.
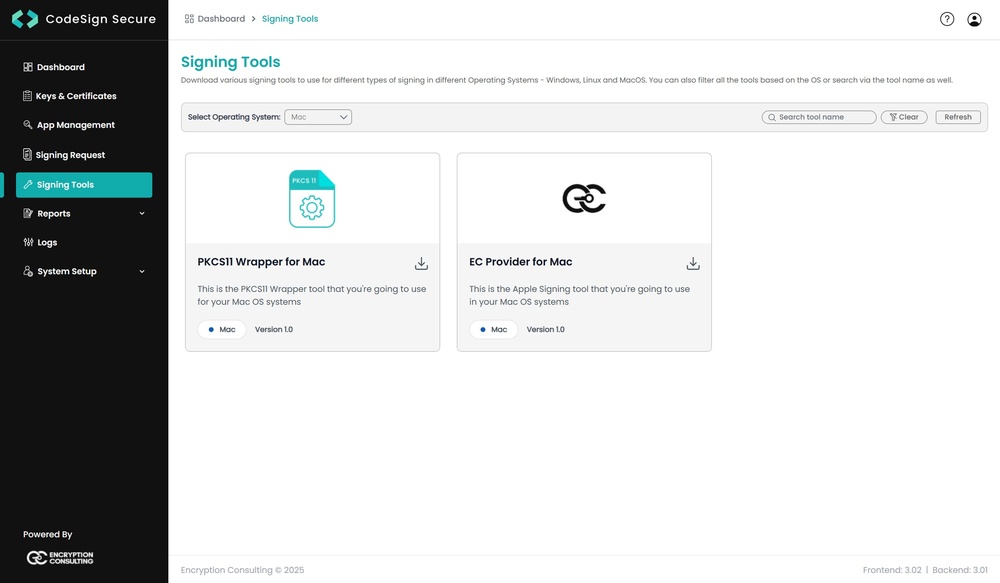
Step 1: Download the PKCS#11 Wrapper for macOS
Go to EC CodeSign Secure v3.02’s Signing Tools section and download the PKCS11 Wrapper for MacOS.
Step 2: Edit the Configuration Files
Go to your macOS client system and edit the configuration files (ec_pkcs11client.ini and pkcs11properties.cfg) downloaded in the PKCS11 Wrapper.
NOTE: When using Luna HSM, add the slot number in the pkcs11properties.cfg file as shown below.
Step 3: Install and Activate Java 17
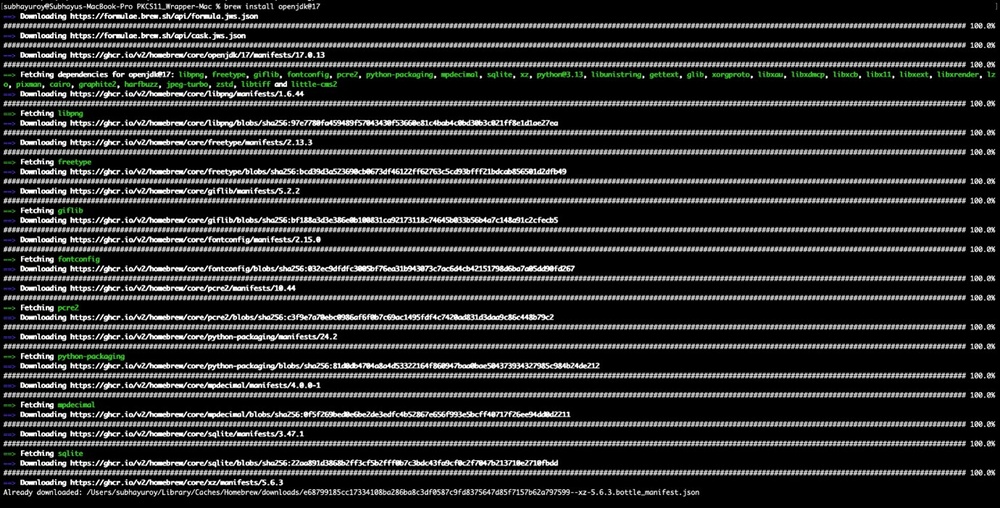
Install Java 17:
brew install openjdk@17
Set Java 17 as the active version. For Zsh:
nano ~/.zshrc
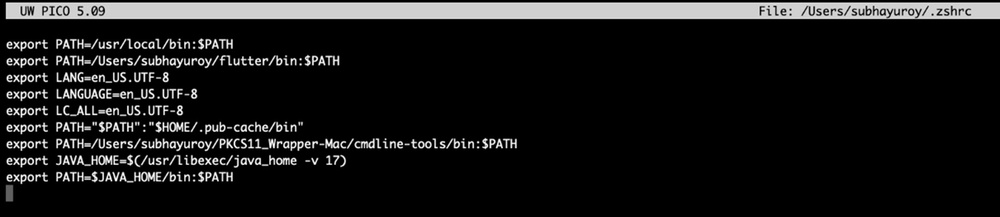
For Bash:
nano ~/.bash_profile
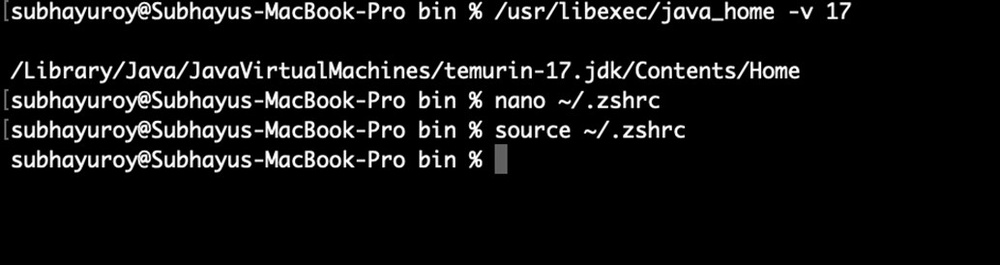
Add these lines:
export JAVA_HOME=$(/usr/libexec/java_home -v 17)
export PATH=$JAVA_HOME/bin:$PATH
And then run one of the following, matching your shell:
source ~/.zshrc
source ~/.bash_profile
Step 4: Install the Android SDK Command-Line Tools
Install the Android SDK command-line tools from this site.
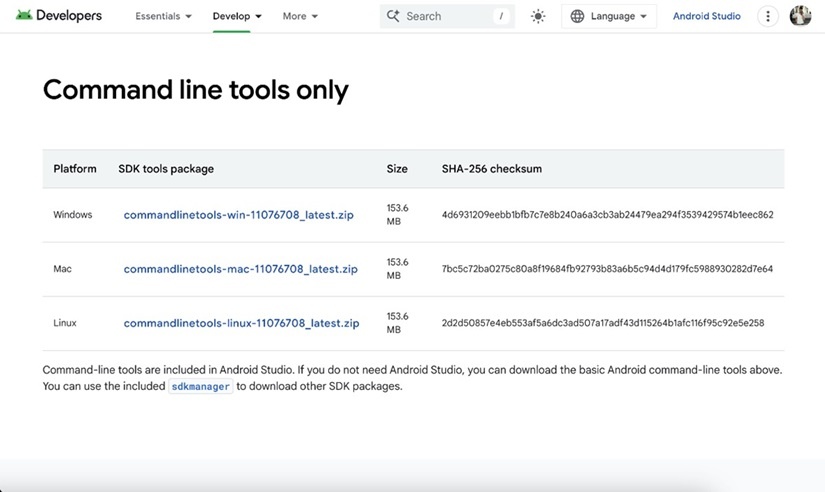
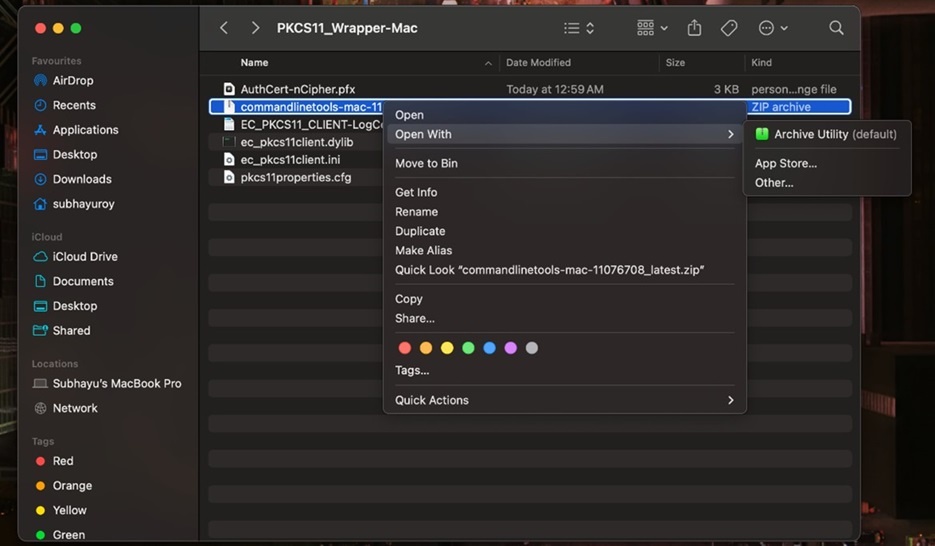
Ensure that the SDK Manager for Android Studio has been properly installed:
sdkmanager --sdk_root=/Users/subhayuroy/PKCS11_Wrapper-Mac \
  --version

Install Build tools using SDKManager, which contains the APKSigner:
sdkmanager --sdk_root=/Users/subhayuroy/PKCS11_Wrapper-Mac \
  "build-tools;34.0.0"
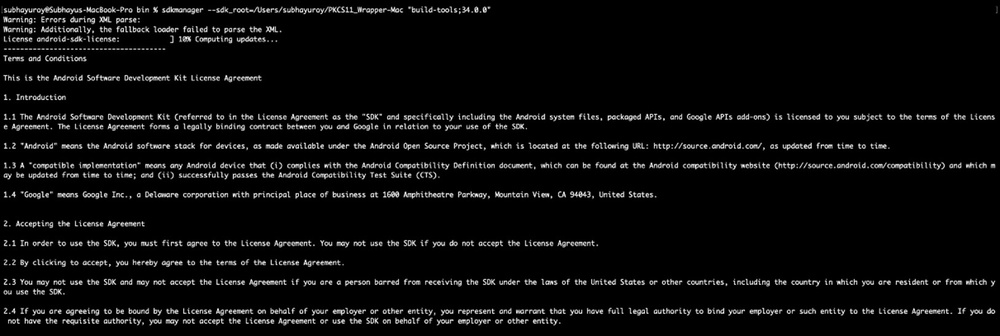
Ensure that APKSigner is present:
ls /Users/subhayuroy/PKCS11_Wrapper-Mac/build-tools/34.0.0/\
apksigner

Step 5: Install the Remaining Packages
Two packages are required to run the PKCS11 Wrapper on your system. First, install the log4cxx library:
brew install log4cxx
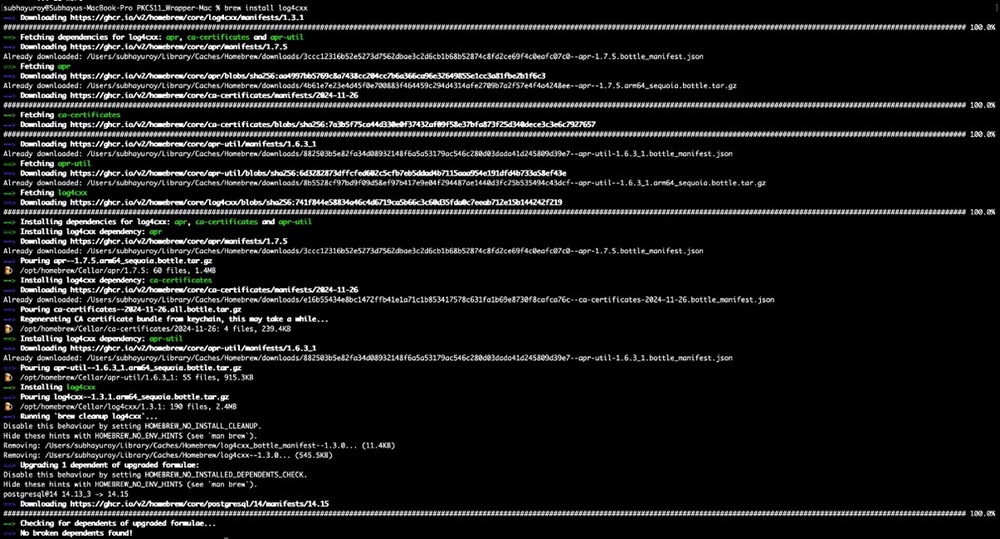
The last prerequisite is to install the curl package:
brew install curl
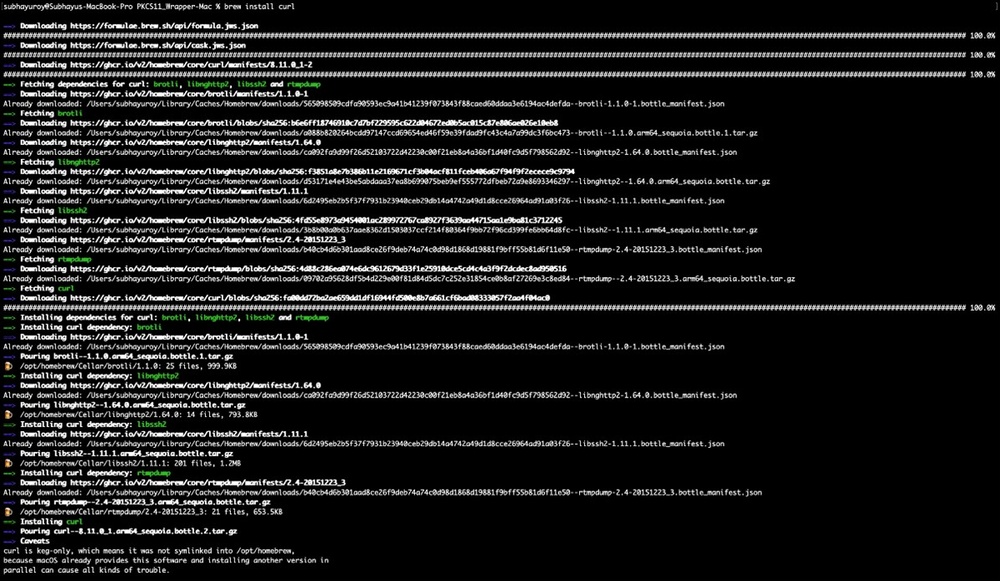
Step 6: Add the Relative Paths to Your PATH
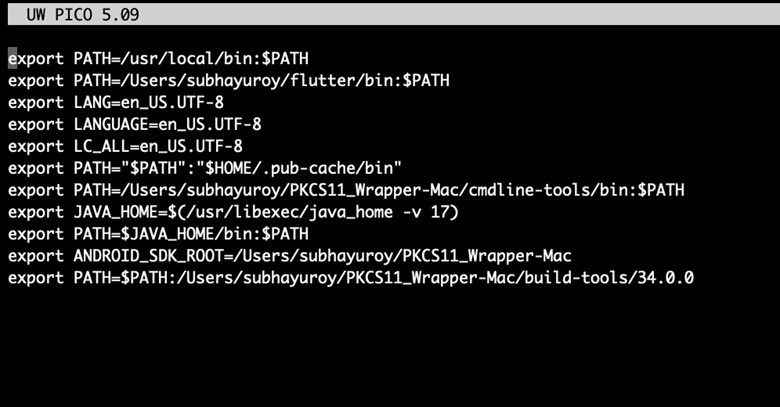
You need to ensure all the relative paths are added to your PATH variable in the ~/.zshrc file:
export PATH=/Users/subhayuroy/PKCS11_Wrapper-Mac/cmdline-tools/\
bin:$PATH
export JAVA_HOME=$(/usr/libexec/java_home -v 17)
export PATH=$JAVA_HOME/bin:$PATH
export ANDROID_SDK_ROOT=/Users/subhayuroy/PKCS11_Wrapper-Mac
export PATH=$PATH:/Users/subhayuroy/PKCS11_Wrapper-Mac/\
build-tools/34.0.0
macOS: Sign and Verify
Now that all the configurations and prerequisites have been installed, let us perform the signing operation. On macOS the signing command invokes the APKSigner jar through java directly, so that the PKCS#11 module can be exported to the tool.
Step 1: Run the Signing Command
The signing command will look something like this. Ensure you run this command only inside the folder where your PKCS11 Wrapper is installed.
java \
  --add-exports=jdk.crypto.cryptoki/sun.security.pkcs11=ALL-UNNAMED \
  -jar <path of the apksigner.jar in your system> sign \
  --provider-class sun.security.pkcs11.SunPKCS11 \
  --provider-arg <path of the pkcs11properties.cfg file> \
  --ks NONE \
  --ks-type PKCS11 \
  --ks-pass pass:abcd1234 \
  --ks-key-alias <private key alias> \
  --in <path of the APK file you want to sign> \
  --out <path of the Signed APK file>
A sample command is provided below:
java \
  --add-exports=jdk.crypto.cryptoki/sun.security.pkcs11=ALL-UNNAMED \
  -jar /Users/subhayuroy/PKCS11_Wrapper-Mac/build-tools/34.0.0/\
lib/apksigner.jar \
  sign \
  --provider-class sun.security.pkcs11.SunPKCS11 \
  --provider-arg \
    /Users/subhayuroy/PKCS11_Wrapper-Mac/pkcs11properties.cfg \
  --ks NONE \
  --ks-type PKCS11 \
  --ks-pass pass:abcd1234 \
  --ks-key-alias gpg2 \
  --in Sample.apk \
  --out signed.apk
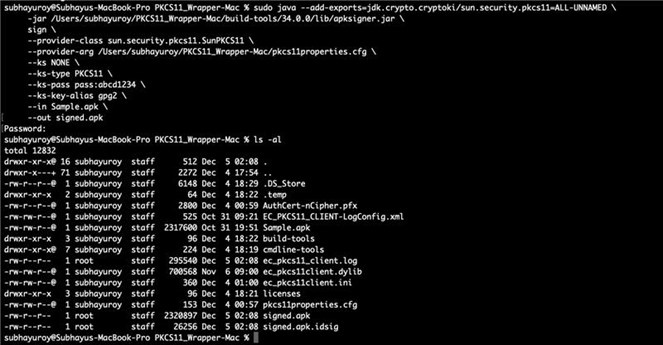
NOTE: The --add-exports option is required because the JDK used here keeps the SunPKCS11 classes in an encapsulated module. The Linux track does not need it because it runs on Java 8, which predates the module system.
Step 2: Verify the Signature
After successfully signing the APK, let us verify it using this command:
apksigner verify -verbose <path of the signed APK file>
A sample command is provided below:
apksigner verify -verbose signed.apk

Step 3: Cross-Check in CodeSign Secure
Open the CodeSign Secure portal and navigate to Reports > Signing Request Report, where every signing request performed through the wrapper is recorded for audit purposes.
Windows: Set Up the Wrapper
To perform APK Signing using the APKSigner tool and our PKCS11 Wrapper on a Windows machine, you would need to follow the below steps.
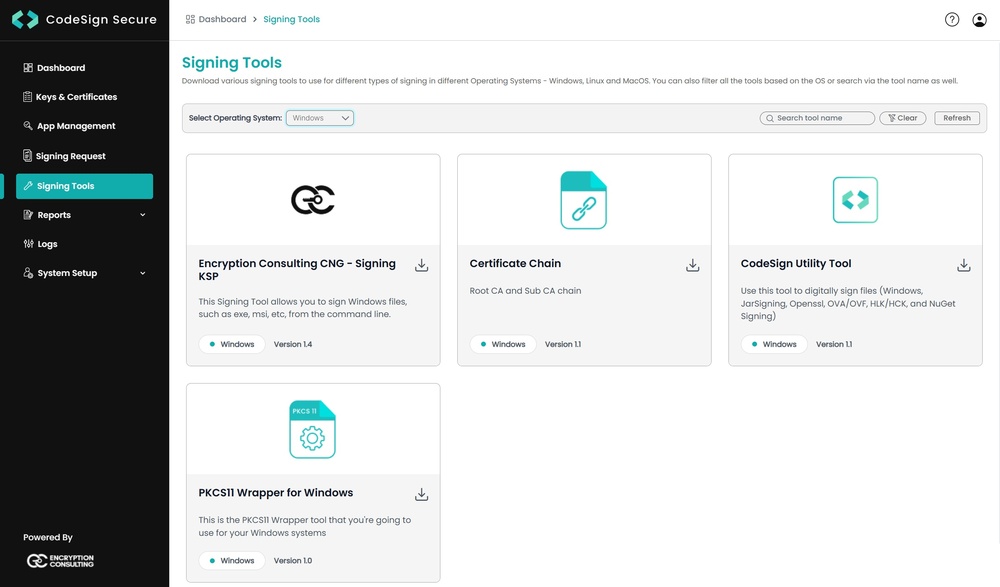
Step 1: Download the PKCS#11 Wrapper for Windows
Go to EC CodeSign Secure v3.02’s Signing Tools section and download the PKCS11 Wrapper for Windows.
Step 2: Edit the Configuration Files
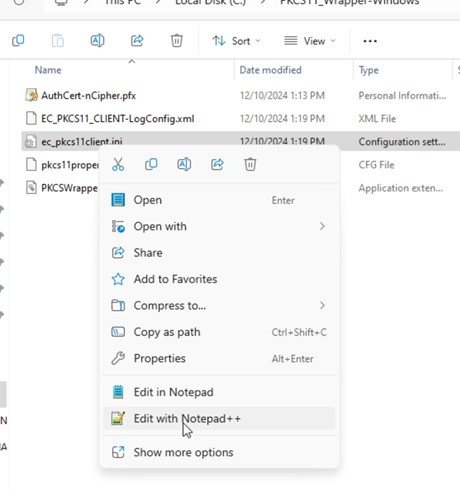
Go to your Windows client system and edit the configuration files (ec_pkcs11client.ini and pkcs11properties.cfg) downloaded in the PKCS11 Wrapper.
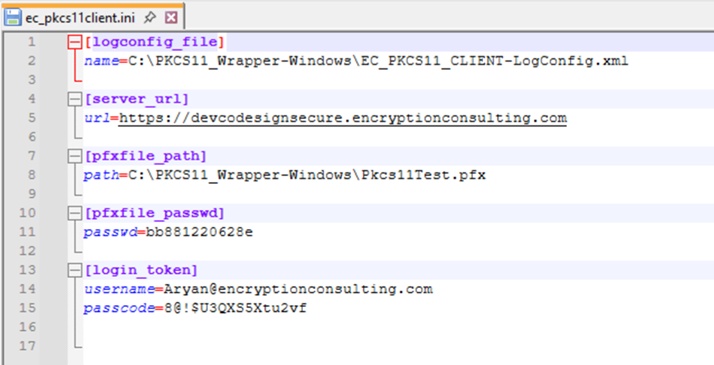
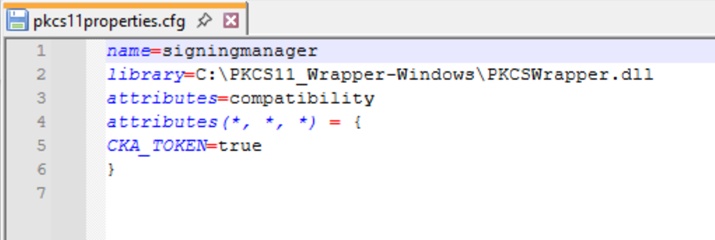
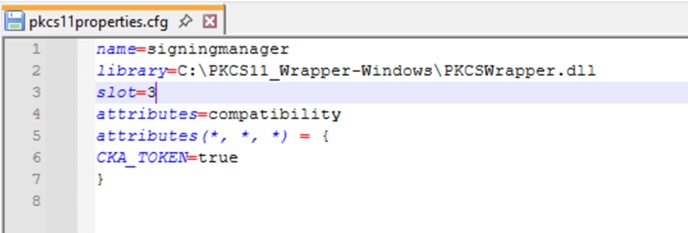
NOTE: When using Luna HSM, add the slot number in the pkcs11properties.cfg file as shown below.
Step 3: Install and Activate Java 22
Install Java 22 from Oracle’s official site, and follow the instructions in the msi file.
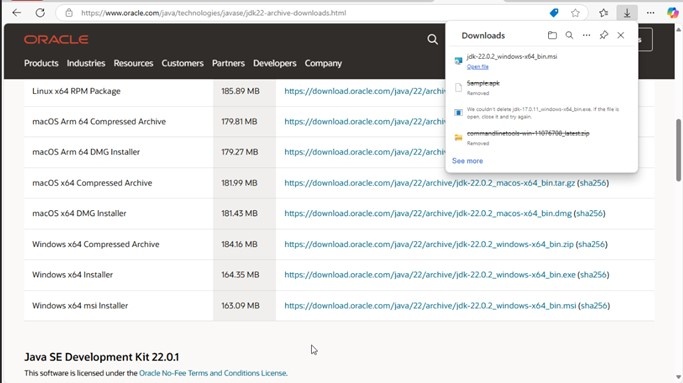
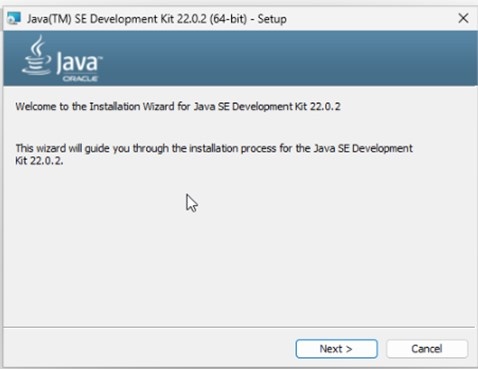
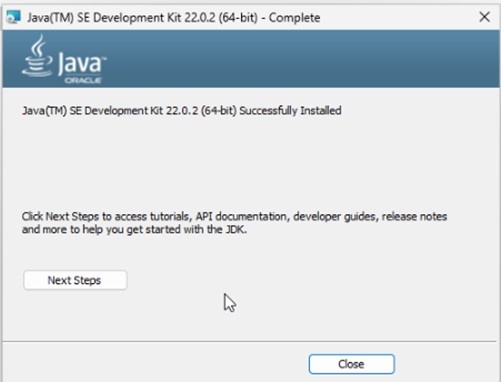
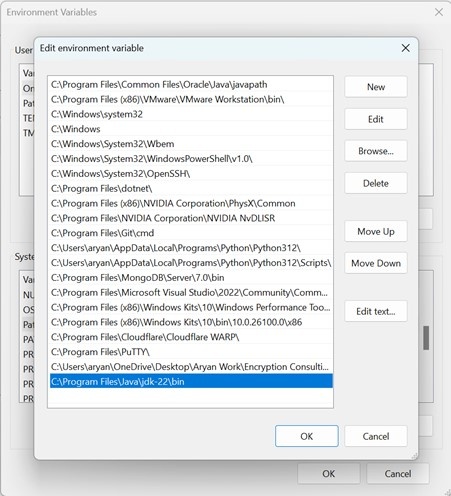
Set Java 22 as the active version by storing the bin path in the PATH variable.
Step 4: Install the Android SDK Command-Line Tools
Install the Android SDK command-line tools from this link here.
Extract the files into a “cmdline-tools” folder and create a subfolder named latest. Now, move the bin and lib folders into the latest folder.
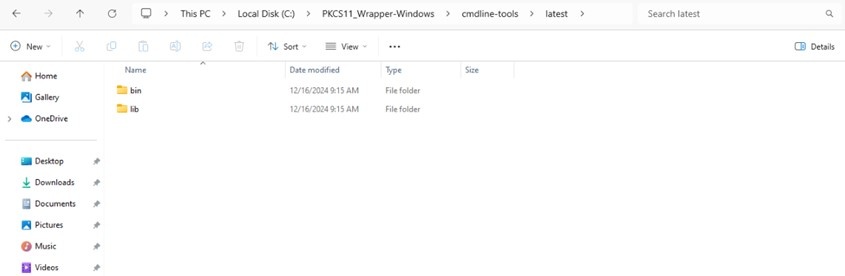
Set an environment variable called ANDROID_HOME and set it to the path where you extracted the command line tools.
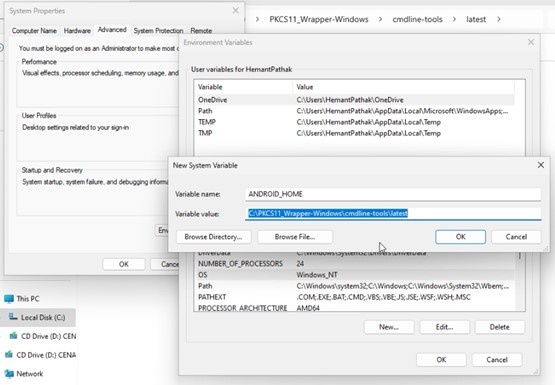
Install Build tools using SDKManager, which contains the APKSigner:
.\bin\sdkmanager --channel=0 --install "build-tools;34.0.0"
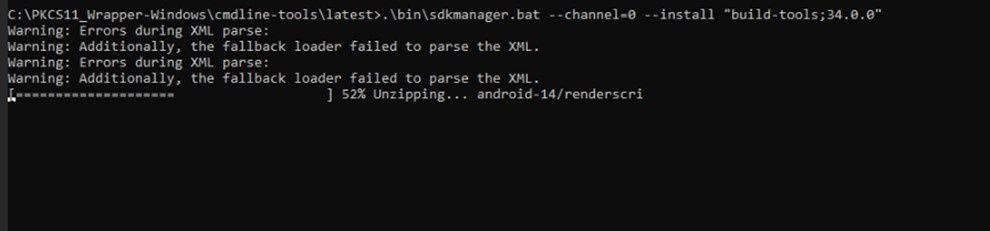
Ensure that APKSigner is present:
Apksigner.bat --version

Step 5: Patch Apksigner.bat for the PKCS#11 Module
Open the Apksigner.bat file and note its current last line.
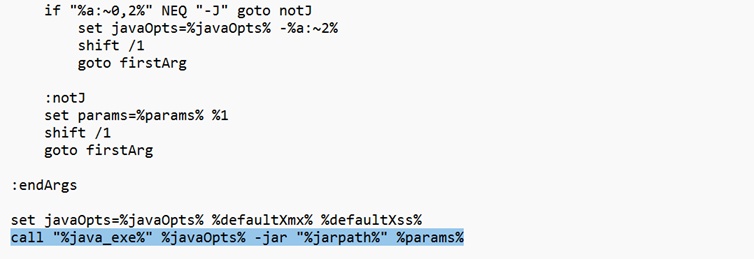
Update the last line to the below command:
call "%java_exe%" --add-exports ^
  jdk.crypto.cryptoki/sun.security.pkcs11=ALL-UNNAMED ^
  %javaOpts% -jar "%jarpath%" %params%
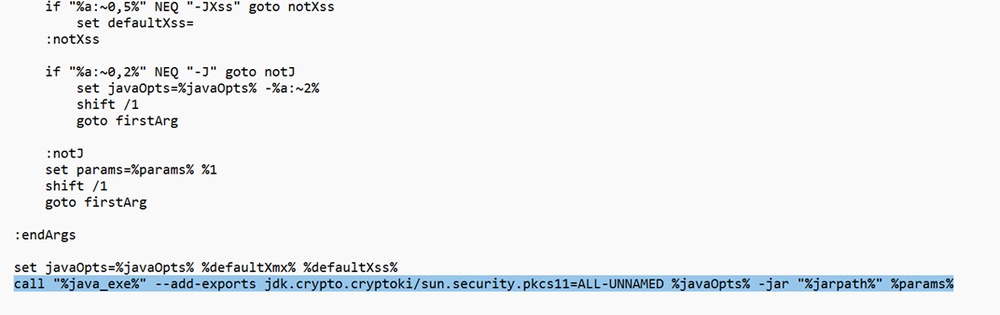
NOTE: This is a single logical line in the batch file. The caret characters shown above are batch line continuations, so you may either keep them or join the three lines into one.
NOTE: This edit performs the same job as the --add-exports option used in the macOS command, so the Windows signing command itself stays short.
Windows: Sign and Verify
Now that all the configurations and prerequisites have been installed, let us perform the signing operation.
Step 1: Run the Signing Command
The signing command will look something like this. Ensure you run this command only inside the folder where your PKCS11 Wrapper is installed.
apksigner sign ^
  --provider-class sun.security.pkcs11.SunPKCS11 ^
  --provider-arg <path of the pkcs11properties.cfg file> ^
  --ks NONE ^
  --ks-type PKCS11 ^
  --ks-pass pass:abcd1234 ^
  --ks-key-alias <private key alias> ^
  --in <path of the APK file you want to sign> ^
  --out <path of the Signed APK file>
A sample command is provided below:
apksigner sign ^
  --provider-class sun.security.pkcs11.SunPKCS11 ^
  --provider-arg ^
    C:\Users\riley\Downloads\PKCS11_Wrapper-Windows\pkcs11properties.cfg ^
  --ks NONE --ks-type PKCS11 --ks-pass pass:secretpassword ^
  --ks-key-alias gpg2 --in Sample.apk --out signed.apk
NOTE: The caret characters are Command Prompt line continuations. You may keep them or join the command onto a single line.
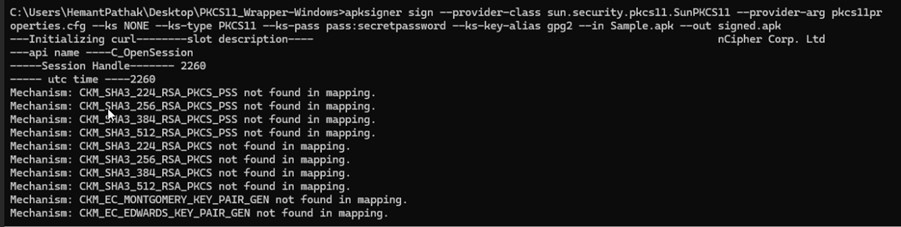
NOTE: The --ks-pass value must match the password configured for your wrapper. The sample above uses a different value from the Linux and macOS samples, so use whichever applies to your own configuration.
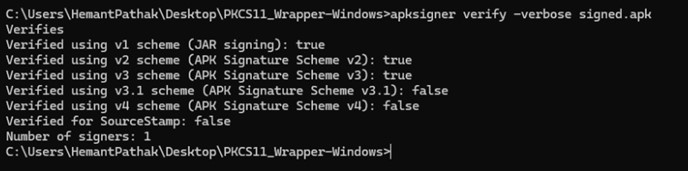
Step 2: Verify the Signature
After successfully signing the APK, let us verify it using this command:
apksigner verify -verbose <path of the signed APK file>
A sample command is provided below:
apksigner verify -verbose signed.apk
Step 3: Cross-Check in CodeSign Secure
Open the CodeSign Secure portal and navigate to Reports > Signing Request Report, where every signing request performed through the wrapper is recorded for audit purposes.