
PKCS#11 Wrapper – JSign Signing Integration Guide
JSign is a versatile, platform-independent tool used for code signing of Windows executable files, installers, and scripts. Because it is written in Java, the same tool signs Windows artifacts from a Linux, macOS, or Windows machine.
JSign reads its signing key from a keystore, and by giving it a keystore type of PKCS11 together with Encryption Consulting’s PKCS#11 wrapper configuration, that keystore becomes your HSM. The private key never leaves the HSM and every signing operation is recorded centrally.
Section 1 covers the steps common to every platform. After that, follow only the track for your operating system — Sections 2 and 3 for Linux (Ubuntu), Sections 4 and 5 for macOS, or Sections 6 and 7 for Windows.
Prerequisites: Access to the CodeSign Secure portal, administrative rights on the client machine, and a file to sign such as an executable, installer, or script.
Common Setup
Every platform needs the same two things before JSign will work: an authentication certificate that identifies your machine to CodeSign Secure, and the two configuration files that ship inside the PKCS#11 Wrapper download.
Step 1: Generate a P12 Authentication Certificate
Generate a P12 Authentication certificate from the System Setup > User > Generate Authentication Certificate dropdown in the CodeSign Secure portal.
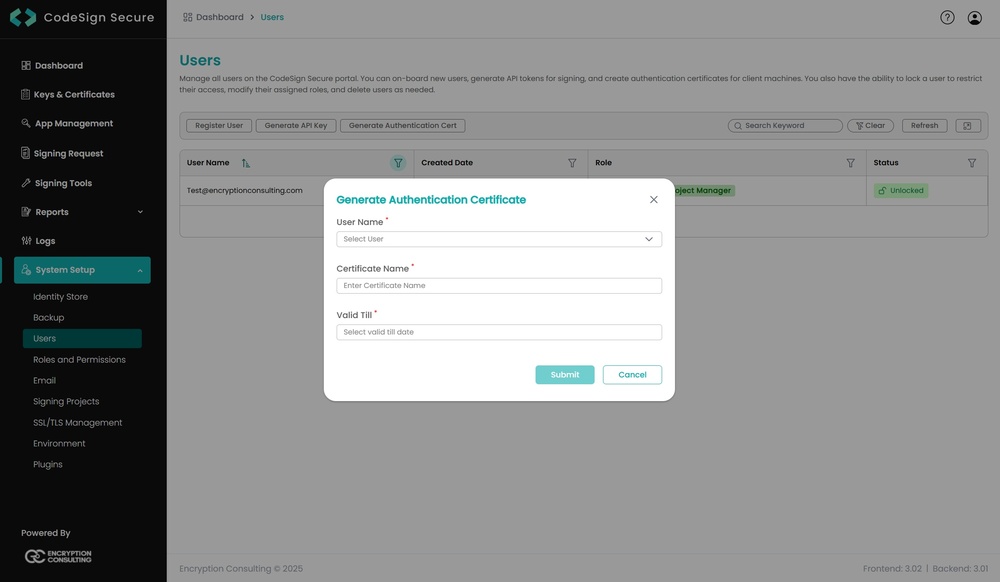
Enter the certificate name, user name, and expiry date. A certificate is generated and downloaded, and its password is displayed.
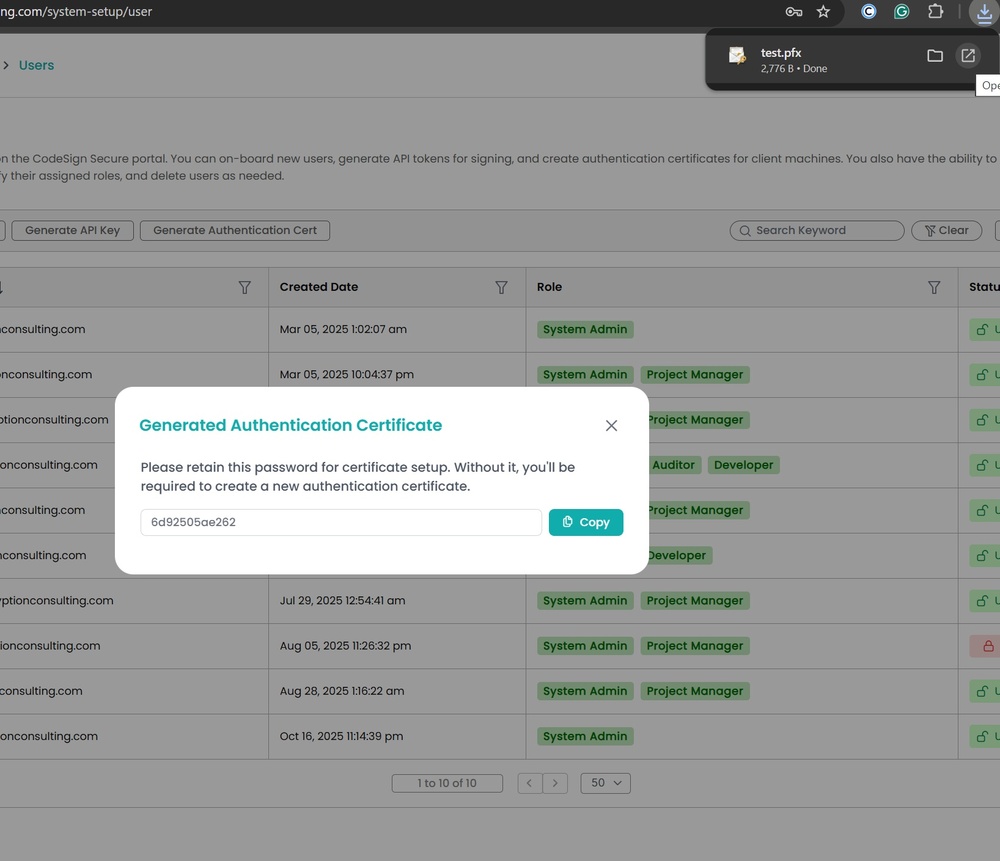
NOTE: The password is displayed only once, so copy and store it safely. Both the certificate path and its password are entered into ec_pkcs11client.ini in your platform track.
Step 2: Understand the Two Configuration Files
The PKCS#11 Wrapper download contains two files that must be edited before use. The same fields apply on every platform.
- pkcs11properties.cfg: Describes the PKCS#11 token to JSign. Update it with the correct library path for your platform. This is also the file passed to JSign as
--keystore. - ec_pkcs11client.ini: Points the wrapper at your CodeSign Secure server and at the authentication certificate from Step 1. The fields to update are listed below.
| Field | Description |
|---|---|
| name | The path location of the Log xml file you downloaded with the PKCS11 Wrapper tool (EC_PKCS11_CLIENT-LogConfig.xml). |
| url | Verify the server url of your CodeSign Secure portal. |
| username | The username of your CodeSign Secure account. |
| passcode | The secret passcode which was used to set up the CodeSign Secure portal. |
| path | The path location of your SSL Authentication certificate. |
| passwd | The password of your SSL Authentication certificate. |
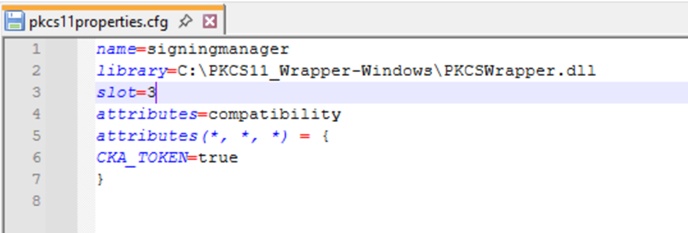
NOTE: When using Luna HSM, the slot number must also be added to the pkcs11properties.cfg file. Each platform track below shows this variation.
Linux (Ubuntu): Install and Configure
To perform signing using JSign Tool and our PKCS11 Wrapper in a Linux (Ubuntu) machine, you would need to follow the below steps.
Step 1: Download the PKCS#11 Wrapper for Ubuntu
Go to EC CodeSign Secure v3.02’s Signing Tools section and download the PKCS11 Wrapper for Ubuntu.
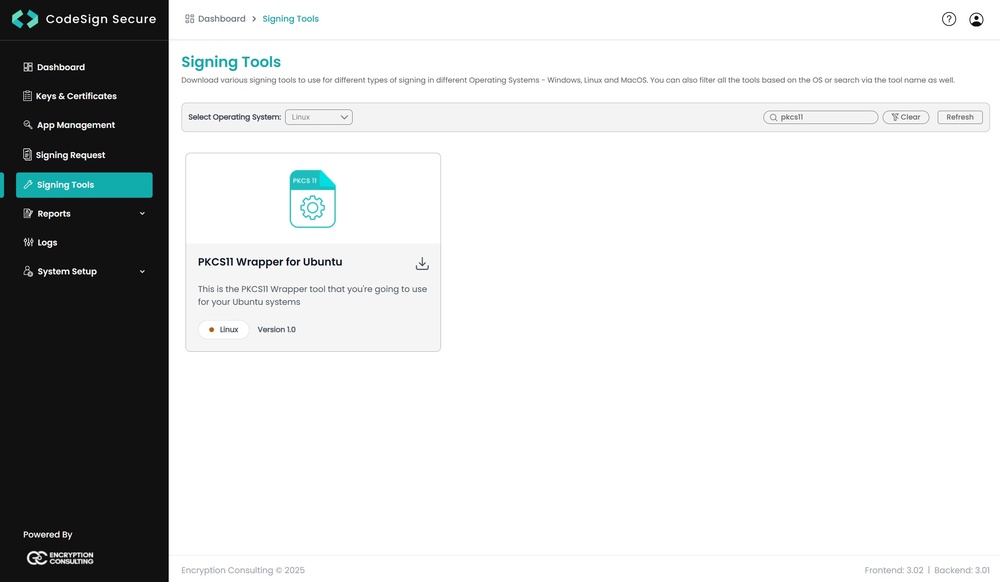
Step 2: Edit the Configuration Files
Go to your Ubuntu client system and edit the configuration files (ec_pkcs11client.ini and pkcs11properties.cfg) downloaded in the PKCS11 Wrapper.
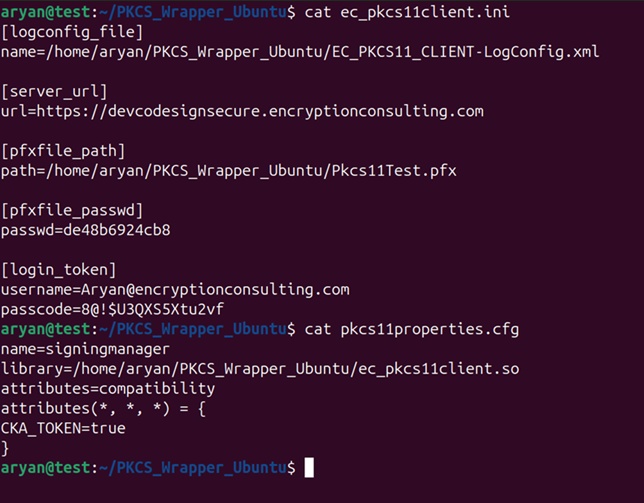
NOTE: When using Luna HSM, add the slot number in the pkcs11properties.cfg file as shown below.
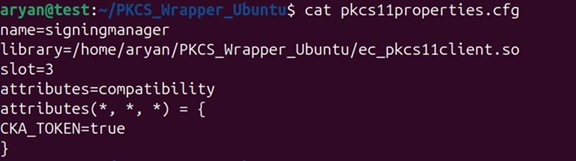
Step 3: Set the EC_INI_FILE_PATH Environment Variable
Now we need to add the environment variable for the pkcs11 client library.
Run the below command to open the bashrc file:
nano ~/.bashrc

Now add the EC_INI_FILE_PATH variable with the path of the .ini at the end of the bashrc file, like:
export EC_INI_FILE_PATH=\
/home/administrator/PKCS11_Wrapper-Ubuntu/ec_pkcs11client.ini
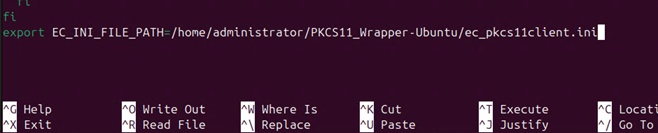
Press Ctrl+X, then enter Y, and then press Enter to save.
Reload the environment variables:
source ~/.bashrc

Check whether the variable has been set correctly:
echo $EC_INI_FILE_PATH

NOTE: If you cannot see the file location from the echo command, open a new terminal and try again.
Step 4: Install the JSign Tool
Now, you will need to download the latest version of the JSign tool (DEB package) on your Ubuntu machine using this link.
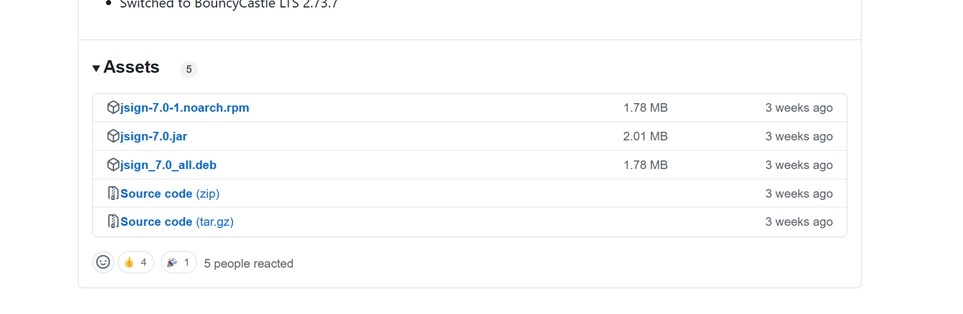
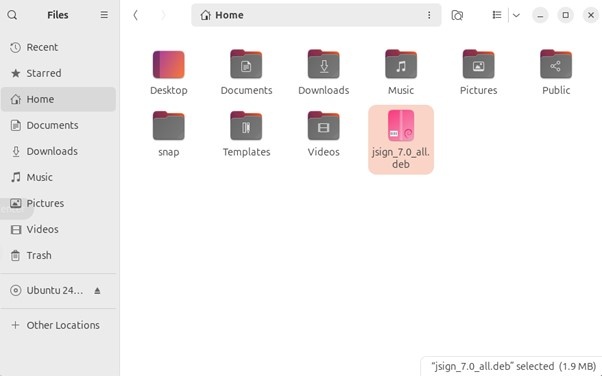
Install the debian package using the below command:
sudo dpkg --install jsign_7.0_all.deb

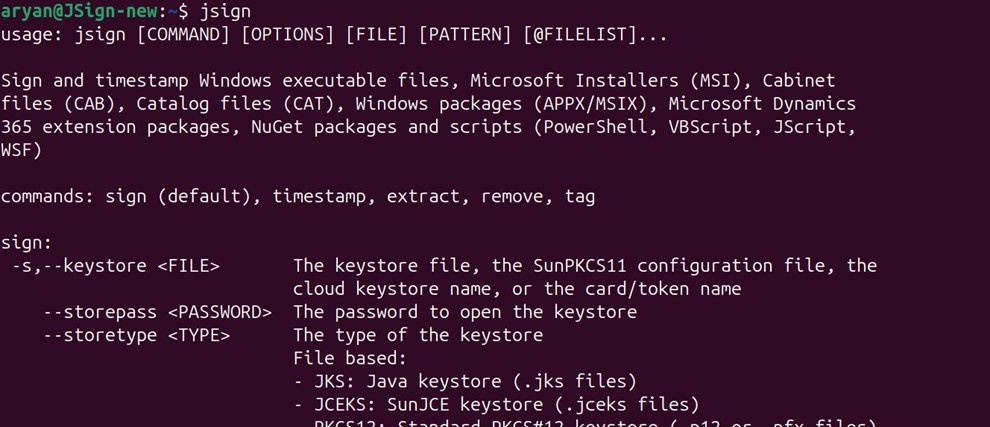
To check whether JSign has been properly installed or not, run the following command:
jsign
Step 5: Install and Activate Java 17
You will also need to install Java (Java 17 or lower) on your Ubuntu machine for JSign to work with our PKCS11 Wrapper.
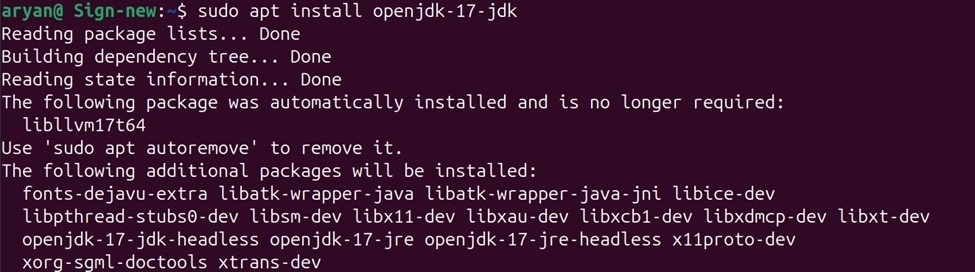
Run the following command to install Java 17 on your Ubuntu machine:
sudo apt install openjdk-17-jdk
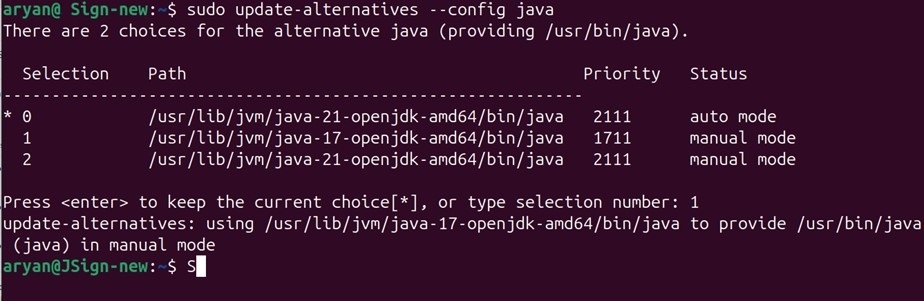
To use Java 17, you will need to set it as the active version.
sudo update-alternatives --config java
Now to check whether Java has been installed properly or not, run:
java -version

Step 6: Install the Remaining Packages
You would also need to install some other pre-requisite packages to perform signing using JSign.
sudo apt-get install curl
sudo apt-get install liblog4cxx-dev
sudo apt-get install liblog4cxx12
NOTE: If the “sudo apt-get install liblog4cxx12” command gives an error, install the package directly for your architecture using the commands below.
For amd architecture:
wget http://archive.ubuntu.com/ubuntu/pool/universe/l/log4cxx/\
liblog4cxx12_0.12.1-4_amd64.deb
sudo dpkg -i liblog4cxx12_0.12.1-4_amd64.deb
For arm architecture:
wget http://ports.ubuntu.com/pool/universe/l/log4cxx/\
liblog4cxx12_0.12.1-4_arm64.deb
sudo dpkg -i liblog4cxx12_0.12.1-4_arm64.deb
We are now ready with our Ubuntu environment to perform the signing using JSign tool and PKCS11 Wrapper.
Linux (Ubuntu): Sign the File
The signing command must be run from the directory containing your configuration, so that the relative paths in the command resolve correctly.
Step 1: Change to the Working Directory
For signing, change the working directory of the terminal to that folder which contains your “ec_pkcs11client.ini” file.

Step 2: Run the Signing Command
Now, run the signing command from this directory.
<Path of JSign tool> --keystore <Path of pkcs11properties.cfg> \
  --storepass NONE \
  --storetype PKCS11 \
  --alias <Key alias of the signing certificate> \
  <Path of the file to be signed>
A sample command is provided below:
jsign --keystore pkcs11properties.cfg \
  --storepass NONE \
  --storetype PKCS11 \
  --alias gpg2 \
  build_project.ps1

NOTE: On Ubuntu the DEB package installs a jsign launcher on the PATH, so the command begins with jsign rather than with java -jar.
Step 3: Option Reference
The following are the options and their meaning in the command:
| Option | Description |
|---|---|
--keystore |
The path of the pkcs11properties.cfg file, which directs JSign to the PKCS#11 wrapper instead of to a keystore file. |
--storepass |
The keystore password. This is NONE because access is controlled by the wrapper configuration. |
--storetype |
The keystore type, which must be PKCS11. |
--alias |
The key alias of the signing certificate in CodeSign Secure. |
| <file path> | The file to be signed, given as the final argument with no option name. |
Step 4: Confirm the Signing Request
NOTE: There is no verification command for the JSign tool.
Open the CodeSign Secure portal and navigate to Reports > Signing Request Report, where every signing request performed through the wrapper is recorded for audit purposes. Confirm that a signing request appears for the certificate you used.
macOS: Install and Configure
To perform signing using JSign Tool and our PKCS11 Wrapper in a MacOS machine, you would need to follow the below steps.
Step 1: Download the PKCS#11 Wrapper
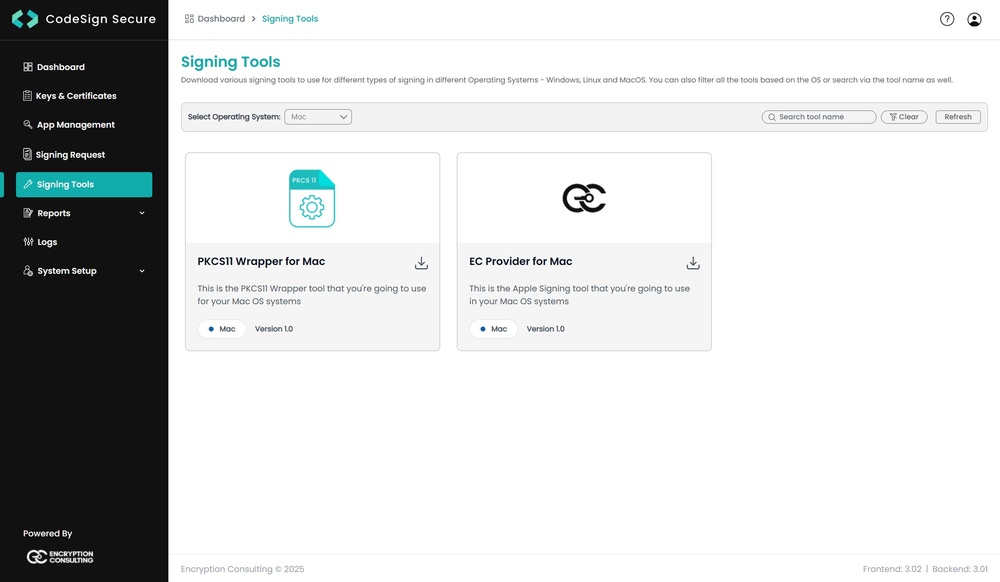
Download our PKCS11 Wrapper Tool from the CodeSign Secure portal in the Signing Tools section in your MacOS.
Step 2: Update the Configuration Files
Go to your PKCS11 Wrapper directory (../PKCS11_Wrapper-Mac) and update the “pkcs11properties.cfg” and “ec_pkcs11client.ini” with the required details.
For “pkcs11properties.cfg”, update the library path.
NOTE: When using Luna HSM, add the slot number in the pkcs11properties.cfg file as shown below.
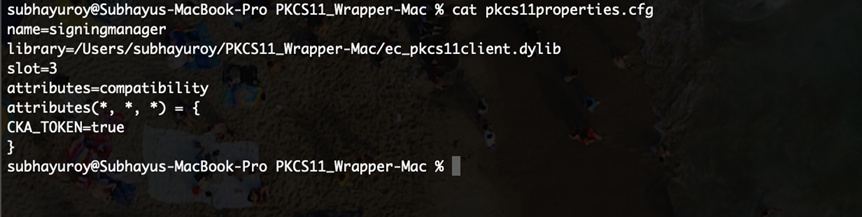
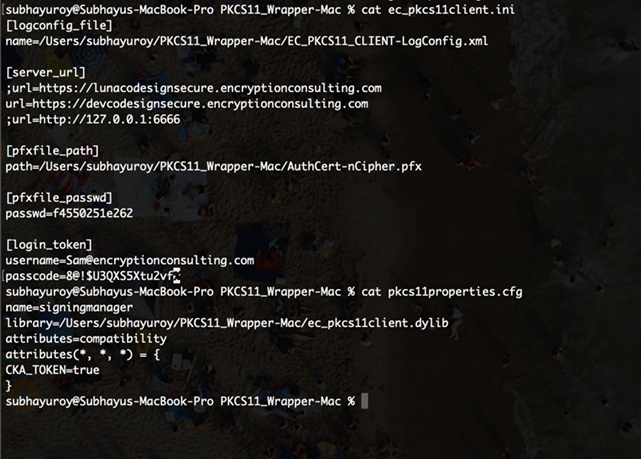
For the “ec_pkcs11client.ini” file, update the six fields listed in Section 1, Step 2.
The initialization and configuration files should look like this with all the correct file paths and settings.
Step 3: Install and Activate Java 17
You will also need to install Java (Java 17 or lower) on your MacOS machine for JSign to work with our PKCS11 Wrapper.
To install Java 17 on your MacOS machine, run the following command:
brew install openjdk@17
Find the location where Java 17 is installed on your machine:
brew info openjdk@17
Now set Java 17 as the active version. For Zsh:
nano ~/.zshrc
For Bash:
nano ~/.bash_profile
After running the above command, add these lines:
export PATH=<Path of Java 17 bin folder>:$PATH
export JAVA_HOME=<Path of Java 17 bin folder>
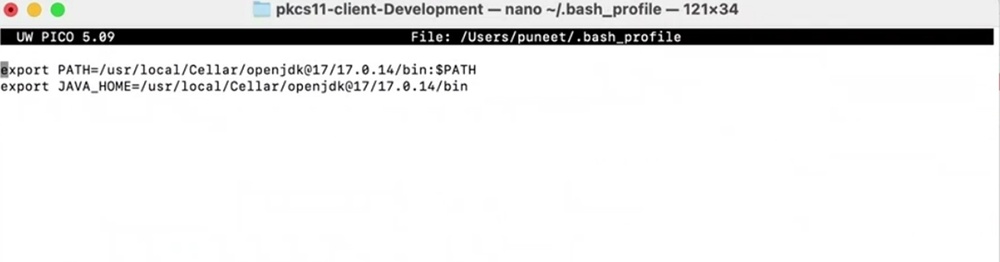
NOTE: JSign is launched with java -jar, which resolves through PATH, so this setting is sufficient for signing. Note that JAVA_HOME is conventionally set to the JDK home directory rather than to its bin subfolder, so if other Java tooling on the machine relies on JAVA_HOME you may wish to point it one level higher.
Reload the environment variables using the below commands. For Zsh:
source ~/.zshrc
For Bash:
source ~/.bash_profile
Step 4: Install the Remaining Packages
You would also need to install some other pre-requisite packages to perform signing using JSign.
brew install log4cxx
brew install curl
Step 5: Download the JSign Tool
Now, you will need to download the latest version of the JSign tool (JAR package) on your MacOS machine using this link.
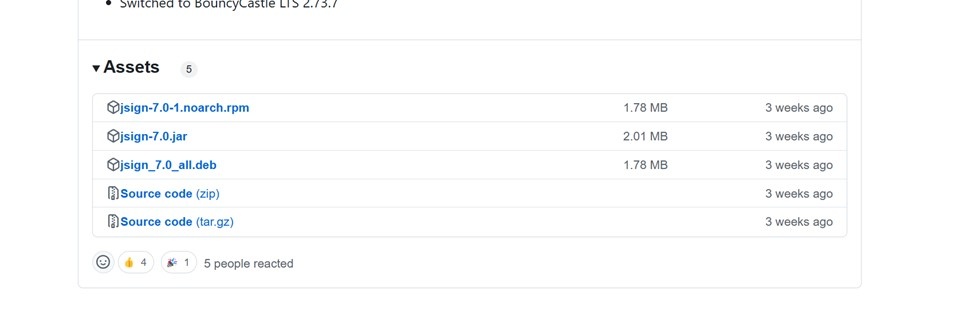
To check whether JSign has been properly installed or not, run the following command:
java -jar <Path of JSign Jar Package>
We are now ready with our MacOS environment to perform the signing using JSign tool and PKCS11 Wrapper.
macOS: Sign the File
As on Linux, the signing command is run from the directory containing your configuration files. On macOS the JAR is invoked through java rather than through an installed launcher.
Step 1: Change to the Working Directory
For signing, change the working directory of the terminal to that folder which contains your “ec_pkcs11client.ini” file.
Step 2: Run the Signing Command
Now, run the signing command from this directory.
java -jar <Path of JSign tool> \
  --keystore <Path of pkcs11properties.cfg> \
  --storepass NONE \
  --storetype PKCS11 \
  --alias <Key alias of the signing certificate> \
  <Path of the file to be signed>
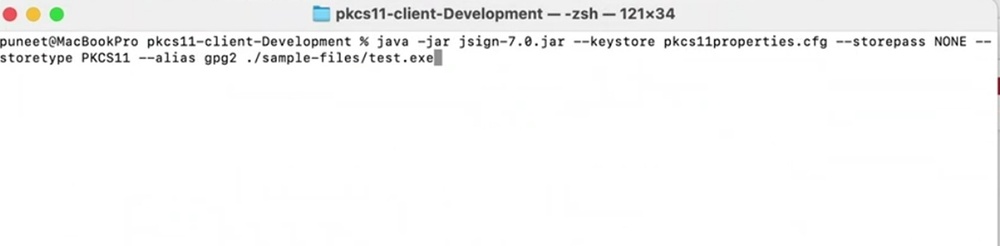
A sample command is provided below:
java -jar jsign-7.0.jar \
  --keystore pkcs11properties.cfg \
  --storepass NONE \
  --storetype PKCS11 \
  --alias gpg2 \
  build_project.ps1
Step 3: Option Reference
The following are the options and their meaning in the command:
| Option | Description |
|---|---|
--keystore |
The path of the pkcs11properties.cfg file, which directs JSign to the PKCS#11 wrapper instead of to a keystore file. |
--storepass |
The keystore password. This is NONE because access is controlled by the wrapper configuration. |
--storetype |
The keystore type, which must be PKCS11. |
--alias |
The key alias of the signing certificate in CodeSign Secure. |
| <file path> | The file to be signed, given as the final argument with no option name. |
Step 4: Confirm the Signing Request
NOTE: There is no verification command for the JSign tool.
Open the CodeSign Secure portal and navigate to Reports > Signing Request Report, where every signing request performed through the wrapper is recorded for audit purposes.
Windows: Install and Configure
To perform signing using JSign Tool and our PKCS11 Wrapper in a Windows machine, you would need to follow the below steps.
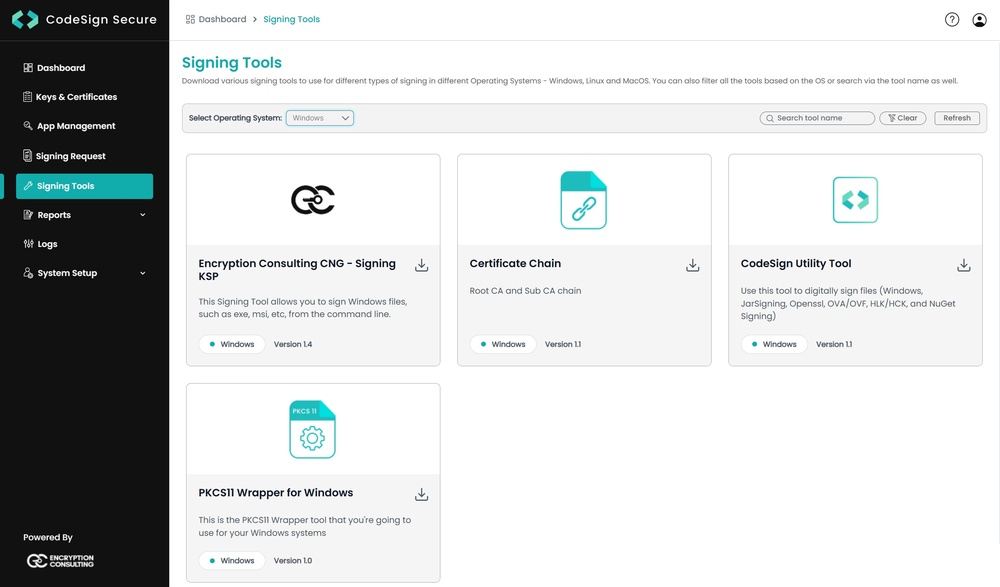
Step 1: Download the PKCS#11 Wrapper for Windows
Go to EC CodeSign Secure v3.02’s Signing Tools section and download the PKCS11 Wrapper for Windows.
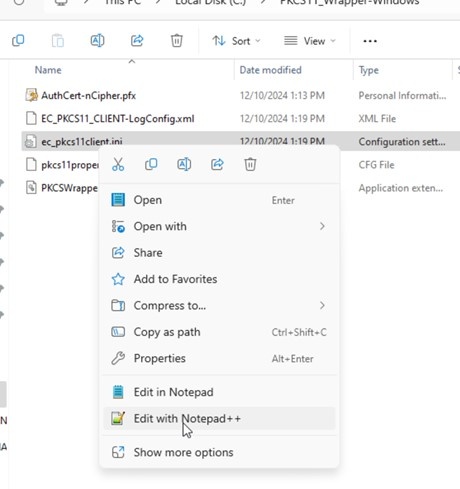
Step 2: Edit the Configuration Files
Go to your Windows client system and edit the configuration files (ec_pkcs11client.ini and pkcs11properties.cfg) downloaded in the PKCS11 Wrapper.
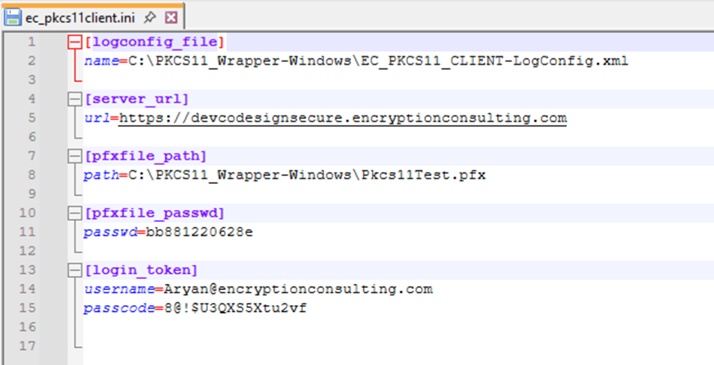
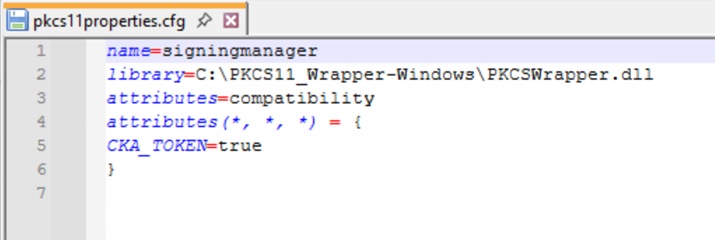
NOTE: When using Luna HSM, add the slot number in the pkcs11properties.cfg file as shown below.
Step 3: Install and Activate Java 22
Now, let us install some prerequisites in your client system to run the PKCS11 Wrapper.
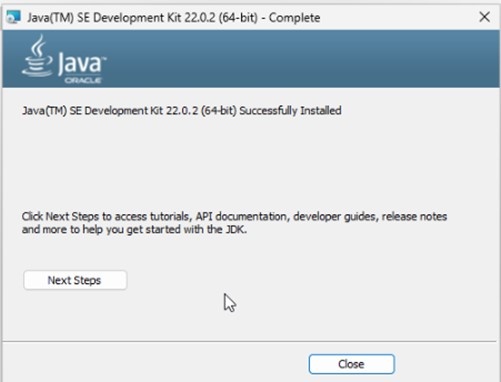
Install Java 22 from Oracle’s official site, and follow the instructions in the msi file.
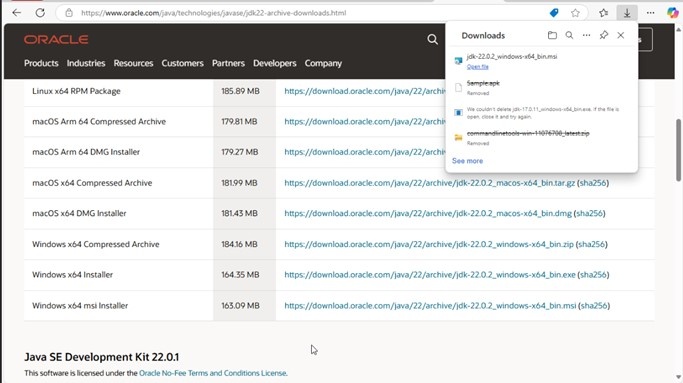
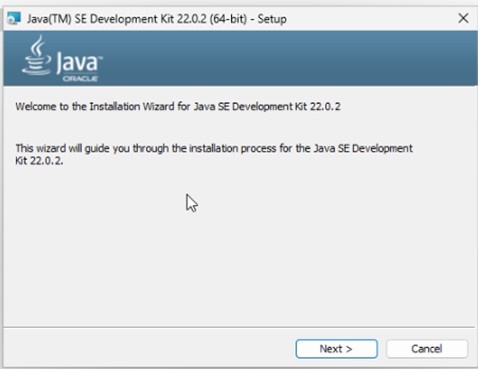
Set Java 22 as the active version by storing the bin path in the PATH variable.
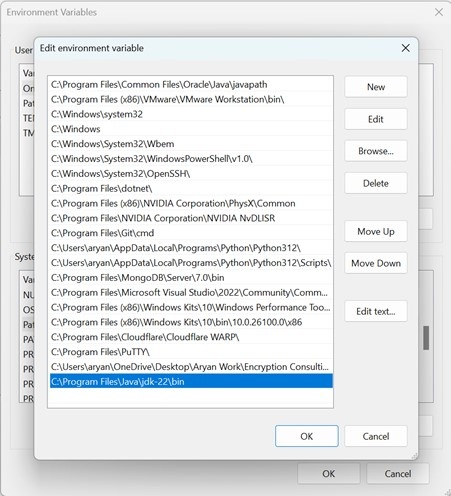
NOTE: The Linux and macOS tracks call for Java 17 or lower, while this track installs Java 22. Confirm which version your JSign release supports before deviating from the version shown for your platform.
Step 4: Download the JSign Tool
Now, you will need to download the latest version of the JSign tool (JAR package) on your Windows machine using this link.
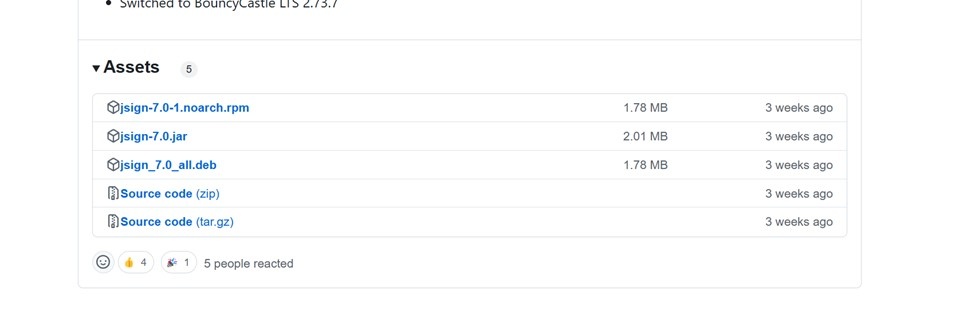
To check whether JSign has been properly installed or not, run the following command:
java -jar <Path of JSign Jar Package>
We are now ready with our Windows environment to perform the signing using JSign tool and PKCS11 Wrapper.
Windows: Sign the File
As on the other platforms, the signing command is run from the directory containing your configuration files.
Step 1: Change to the Working Directory
For signing, change the working directory of the terminal to that folder which contains your “ec_pkcs11client.ini” file.
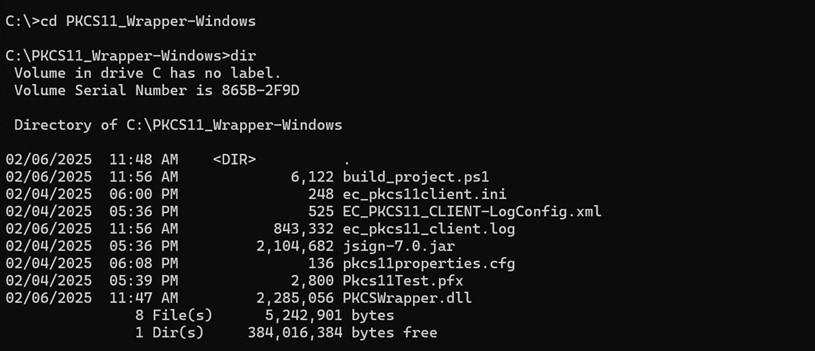
Step 2: Run the Signing Command
Now, run the signing command from this directory.
java -jar <Path of JSign tool> ^
  --keystore <Path of pkcs11properties.cfg> ^
  --storepass NONE ^
  --storetype PKCS11 ^
  --alias <Key alias of the signing certificate> ^
  <Path of the file to be signed>
A sample command is provided below:
java -jar jsign-7.0.jar ^
  --keystore pkcs11properties.cfg ^
  --storepass NONE ^
  --storetype PKCS11 ^
  --alias gpg2 ^
  build_project.ps1

NOTE: The caret characters are Command Prompt line continuations. You may keep them or join the command onto a single line.
Step 3: Option Reference
The following are the options and their meaning in the command:
| Option | Description |
|---|---|
--keystore |
The path of the pkcs11properties.cfg file, which directs JSign to the PKCS#11 wrapper instead of to a keystore file. |
--storepass |
The keystore password. This is NONE because access is controlled by the wrapper configuration. |
--storetype |
The keystore type, which must be PKCS11. |
--alias |
The key alias of the signing certificate in CodeSign Secure. |
| <file path> | The file to be signed, given as the final argument with no option name. |
Step 4: Confirm the Signing Request
NOTE: There is no verification command for the JSign tool.
Open the CodeSign Secure portal and navigate to Reports > Signing Request Report, where every signing request performed through the wrapper is recorded for audit purposes.