
OVA/OVF Signing Integration Guide
Encryption Consulting (EC) understands the need for security in the modern world and strives to solve these problems through CodeSign Secure. To that end, we have developed an easily operated command-line Utility that provides users with seamless and hassle-free OVA/OVF signing.
CodeSign Secure’s Utility Tool is designed with high performance, accuracy, and user-friendliness in mind, making signing of OVA/OVF files simplified for the users. The private key is generated and held inside a Hardware Security Module and never leaves it; only a hash of the package travels to the server, and only a signature comes back.
Sections 1 and 2 prepare the client machine and the signing certificate. Section 3 performs the signing, and Section 4 covers verification.
Prerequisites: Encryption Consulting’s Utility Tool installed in the system, OpenSSL configured in the system, and a sample OVA/OVF present in the system.
Install the Utility Tool and OpenSSL
The Utility Tool performs the signing, and OpenSSL is used by the tool to compute the hash of the OVA/OVF package on the client side.
Step 1: Download and Install OpenSSL
Download and install OpenSSL on your system from here.
Step 2: Install the Encryption Consulting Utility Tool
For installation, you would need to download and run an MSI file from the portal which will install this tool into your machine.
Along with the tool, it will also prompt you to install various signing softwares such as Windows SDK, Java SDK and Encryption Consulting KSP. These signing softwares will be used by the Utility Tool to perform signing operations on different file types.
After successful installation, you will find the Utility Tool.exe in the “C:\Program Files\Encryption Consulting\Utility Tool” directory.
You will need to change the “BASEURL” field in the config file with the URL of your domain.
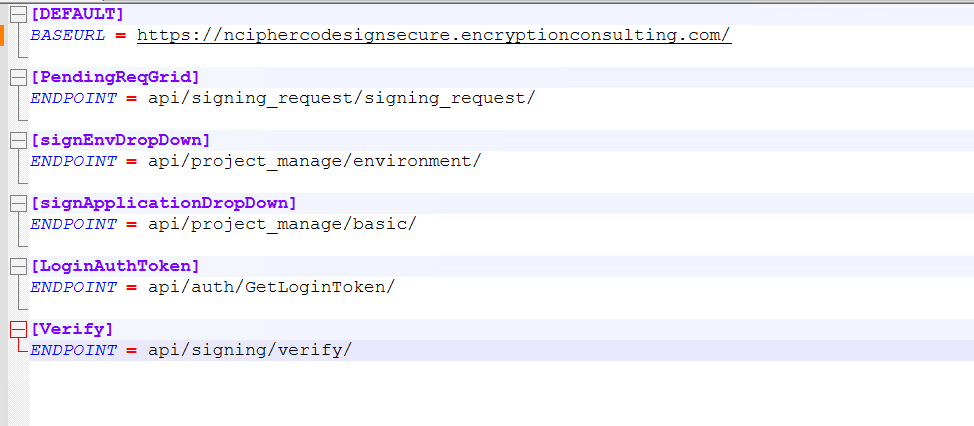
Step 3: Confirm the OVA/OVF File
Place the .ova or .ovf package you intend to sign somewhere convenient on the machine and make a note of its full path. You will supply this path to the tool in Section 3.
Acquire an End-Entity Certificate
To sign the OVA or OVF file, the user needs an end-entity certificate. This certificate can be generated from our web application or can be imported into the utility tool.
Step 1: Generate or Import the Certificate
Generate an end-entity certificate from the CodeSign Secure web portal, in the Keys and Certificates section.
Alternatively, import an existing certificate into the utility tool.
NOTE: We prefer importing an EV (Extended Validation) certificate, as it is the highest form of certificate on the market.
Step 2: Note the Certificate Details
Download the certificate and make a note of its path on disk, as this is supplied to the tool as the Certificate path.
Also note the Application name associated with the certificate in the web portal, and the Environment the certificate belongs to. Both are required inputs in Section 3.
Sign the OVA/OVF File
The user needs to give all the input data, mentioned below, to the utility tool for the signing process.
Step 1: Launch the Utility Tool
Open the Utility Tool installed in Section 1 from the “C:\Program Files\Encryption Consulting\Utility Tool” directory.
Step 2: Provide the Required Inputs
Enter the following details when prompted:
| Input | Description |
|---|---|
| Username | The primary email of the user to proceed with the signing process. |
| Certificate path | The path to the certificate being used for signing the desired file. |
| Input file path | The path to the OVA/OVF file that needs to be signed. |
| Output file path | The path to the signed OVA/OVF output file. |
| Application name | The application associated with the certificate used for signing in our web portal. |
| Environment | The environment name, whether it is production, non-production, Lab, or any specific environment created by the user in our web portal. |
Step 3: Confirm the Result
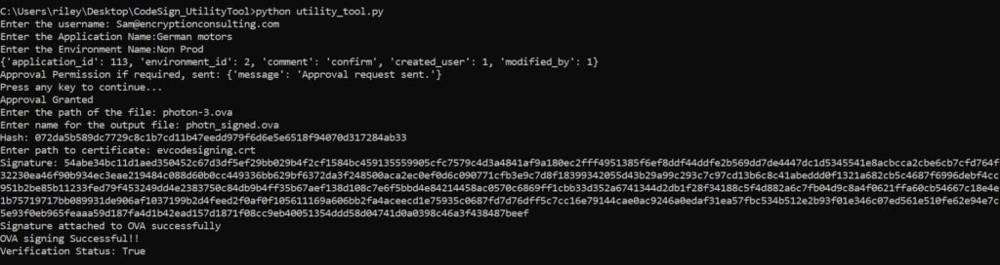
The tool signs the file and writes the signed output to the path you specified. Below is the screenshot of our utility tool signing an OVA file.
Verify the Signature
The Utility Tool checks its own work, and the operation is also recorded centrally for audit purposes.
Step 1: Read the Verification Status
After signing, the tool verifies whether the OVA file has been signed with the provided certificate and reports a verification status of True or False.
A status of True confirms that the file has been signed successfully.
Step 2: Cross-Check in CodeSign Secure
Open the CodeSign Secure portal and navigate to Reports > Signing Request Report, where every signing request performed through the tool is recorded for audit purposes. Confirm that a signing request appears for the certificate you used.
Step 3: Validate on the Target Platform
As a final check, deploy or import the signed package on the platform it is intended for and confirm that it is accepted.