
PKCS#11 Wrapper – OpenSSL Signing Integration Guide
Let us see how to perform OpenSSL-based signing using CodeSign Secure and Encryption Consulting’s PKCS#11 wrapper on both Ubuntu and Windows, covering setup, configuration, and execution. Whether you are working in enterprise environments or building a secure signing process for your app, this setup will help you strengthen your cryptographic hygiene without a steep learning curve.
OpenSSL reaches the HSM through an engine. The PKCS#11 engine is loaded from an OpenSSL configuration file, and that engine in turn loads Encryption Consulting’s PKCS#11 wrapper library. Keys are then referenced by a PKCS#11 URI rather than by a file path, so the private key never leaves the HSM and every signing operation is recorded centrally.
Section 1 covers the steps common to both platforms. After that, follow only the track for your operating system — Sections 2 and 3 for Linux (Ubuntu), or Sections 4 and 5 for Windows. Section 6 collects the security considerations that apply to either track.
Prerequisites: Access to the CodeSign Secure portal, administrative rights on the client machine, and a sample file to sign.
Common Setup
Two things are needed regardless of platform: a P12 authentication certificate that identifies your machine to CodeSign Secure, and the two configuration files that ship inside the PKCS#11 Wrapper download.
Step 1: Generate a P12 Authentication Certificate
Generate a P12 Authentication certificate from the System Setup > User > Generate Authentication Certificate dropdown in the CodeSign Secure portal.
Enter the certificate name, user name, and expiry date. A .pfx certificate is generated and downloaded, and its password is displayed.
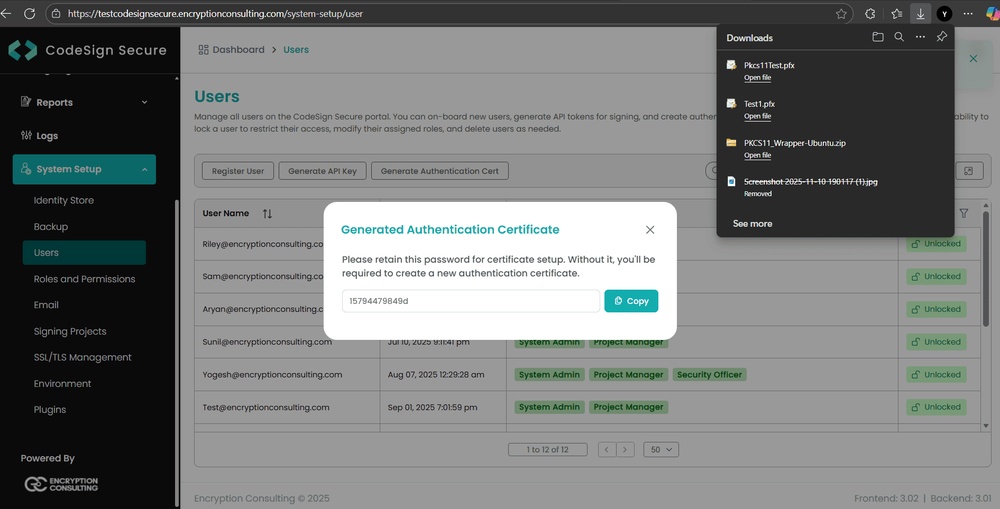
NOTE: The password is displayed only once, so copy and store it safely. Both the certificate path and its password are referenced by the wrapper configuration in your platform track.
Step 2: Understand the Configuration Files
Three configuration files are involved in an OpenSSL signing setup:
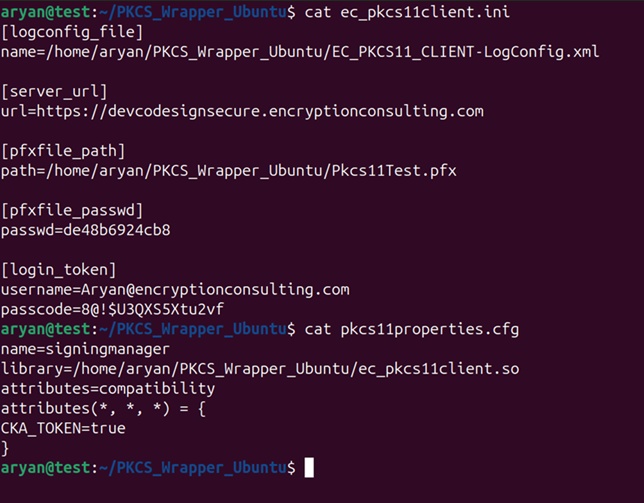
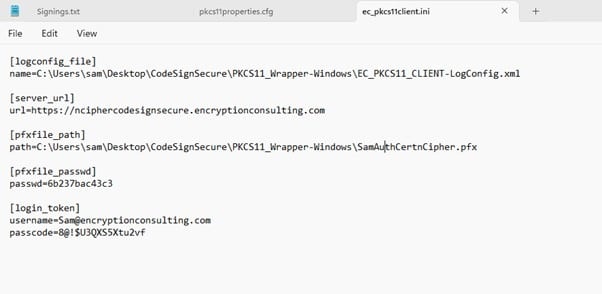
- ec_pkcs11client.ini: Ships inside the PKCS#11 Wrapper download. Points the wrapper at your CodeSign Secure server and at the P12 authentication certificate generated in Step 1.
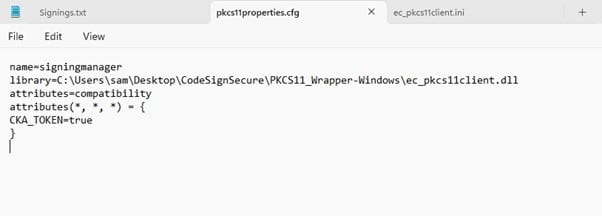
- pkcs11properties.cfg: Also ships inside the wrapper download, and describes the PKCS#11 token.
- The OpenSSL configuration file: Created or edited by you, and tells OpenSSL to load the PKCS#11 engine and which wrapper library to hand it. This is openssl.conf on Ubuntu and openssl.cnf on Windows.
NOTE: The two files that ship in the download must be edited before use. The platform tracks below show this for each operating system.
Linux (Ubuntu): Install and Configure
This section installs the wrapper, the OpenSSL PKCS#11 engine, and the OpenSSL configuration that ties them together.
Step 1: Download the PKCS#11 Wrapper for Ubuntu
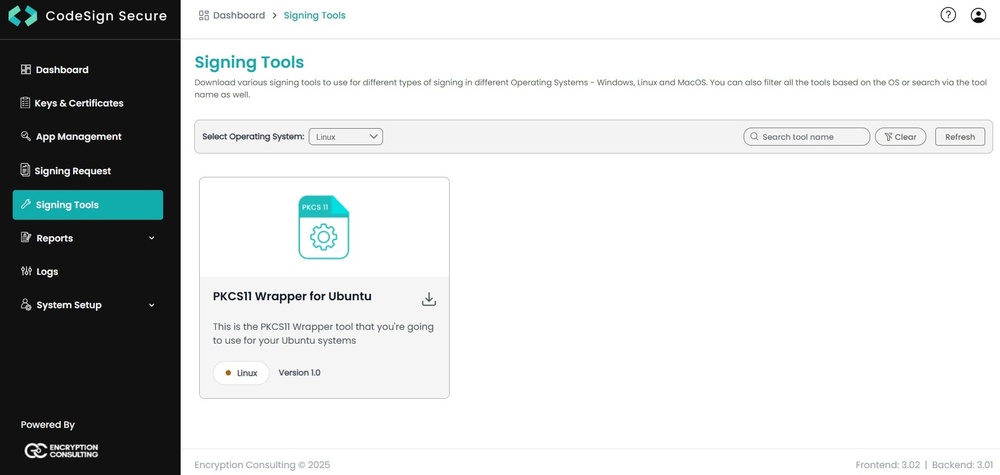
Go to EC CodeSign Secure v3.02’s Signing Tools section and download the PKCS11 Wrapper for Ubuntu.
Step 2: Edit the Wrapper Configuration Files
Go to your Ubuntu client system and edit the configuration files (ec_pkcs11client.ini and pkcs11properties.cfg) downloaded in the PKCS11 Wrapper.
Step 3: Install OpenSSL and the PKCS#11 Engine
Now, let us install some prerequisites in your client system to run the PKCS11 Wrapper.
sudo apt install -y openssl libengine-pkcs11-openssl \
  gnutls-bin xxd
The libengine-pkcs11-openssl package supplies libpkcs11.so, the OpenSSL PKCS#11 engine that the configuration file in the next step points at.
Step 4: Create the OpenSSL Configuration File
Create a config file for PKCS#11 and enter the appropriate details in it, as shown below.
openssl_conf = openssl_init

[openssl_init]
engines = engine_section

[engine_section]
pkcs11 = pkcs11_section

[pkcs11_section]
# Path to the OpenSSL PKCS11 Engine
dynamic_path = "<Path to libpkcs11.so>"
MODULE_PATH = "<Path to ec_pkcs11client.so>"
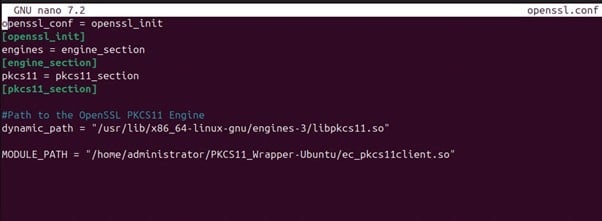
The ec_pkcs11client.so path depends on where you store the file.
The libpkcs11.so path depends on your Linux distribution and version:
| Distribution | Engine path |
|---|---|
| Ubuntu 18.04 | /usr/lib/x86_64-linux-gnu/engines-1.1/libpkcs11.so |
| Ubuntu 20.04 | /usr/lib/x86_64-linux-gnu/engines-1.1/libpkcs11.so |
| Ubuntu 22.04 | /usr/lib/x86_64-linux-gnu/engines-3/libpkcs11.so |
NOTE: Use straight quotation marks in this file. Curly quotation marks copied from a web page will not be interpreted as quotes.
Step 5: Set the OPENSSL_CONF Environment Variable
Set the environment variable for the openssl.conf file:
export OPENSSL_CONF=<path to openssl.conf>

NOTE: This variable applies to the current shell only. Add the line to your ~/.bashrc if you want it to persist across sessions.
Linux (Ubuntu): Sign and Verify
Now that all the configurations and prerequisites have been installed, let us perform the signing operation first.
Step 1: Run the Signing Command
The signing command will look something like this. Ensure you run this command only inside the folder where your PKCS11 Wrapper is installed.
openssl pkeyutl -engine pkcs11 -sign \
  -in <path of the file you want to sign> \
  -inkey "pkcs11:object=<private key alias>;type=private" \
  -keyform engine \
  -out <path of the Signed file>
For example:
openssl pkeyutl -engine pkcs11 -sign \
  -in testfile.txt \
  -inkey "pkcs11:object=CertEnrollTest;type=private" \
  -keyform engine \
  -out readme.sign.sha256
Step 2: Verify the Signature
After successfully signing the file, let us verify it using this command:
openssl pkeyutl -engine pkcs11 -verify \
  -in <path of the file you want to sign> \
  -inkey "pkcs11:object=<private key alias>;type=public" \
  -keyform engine \
  -sigfile <path of the Signed file>
For example:
openssl pkeyutl -engine pkcs11 -verify \
  -in testfile.txt \
  -inkey "pkcs11:object=CertEnrollTest;type=public" \
  -keyform engine \
  -sigfile readme.sign.sha256

NOTE: Signing references the private key object, so the URI ends with type=private. Verification uses type=public, because only the public half of the key pair is needed to check a signature.
Step 3: Option Reference
The following are the options and their meaning in the commands:
| Option | Description |
|---|---|
| -engine pkcs11 | Loads the PKCS#11 engine configured in the OpenSSL configuration file, which in turn loads the Encryption Consulting wrapper library. |
| -sign | Performs the signing operation. |
| -verify | Checks a signature rather than producing one. |
| -in | The path of the file you want to sign or verify. |
| -inkey | The key to use, given as a PKCS#11 URI in the form pkcs11:object=<alias>;type=<private|public> rather than as a file path. |
| -keyform engine | Tells OpenSSL that the value of -inkey is to be resolved by the engine rather than read from disk. |
| -out | The path of the signature file to produce when signing. |
| -sigfile | The path of the signature file to check when verifying. |
Step 4: Cross-Check in CodeSign Secure
Open the CodeSign Secure portal and navigate to Reports > Signing Request Report, where every signing request performed through the wrapper is recorded for audit purposes.
Windows: Install and Configure
On Windows the OpenSSL PKCS#11 engine is not distributed as a package, so it has to be compiled from source using MSYS2 before OpenSSL can be configured to load it.
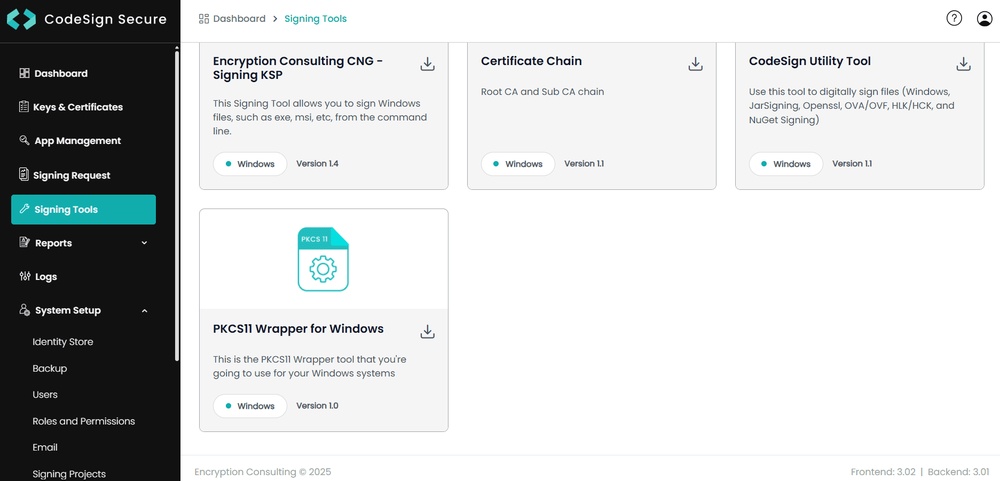
Step 1: Download the PKCS#11 Wrapper for Windows
Go to EC CodeSign Secure v3.02’s Signing Tools section and download the PKCS11 Wrapper for Windows.
Step 2: Edit the Wrapper Configuration Files
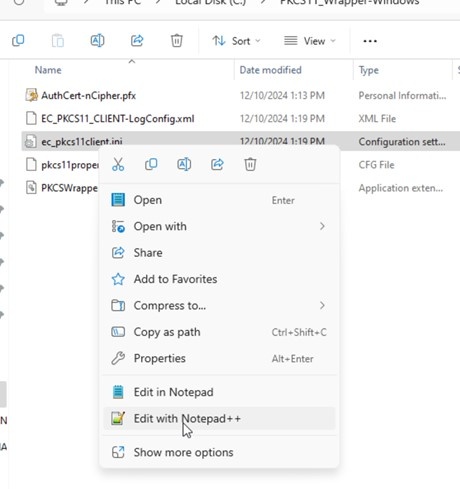
Go to your Windows client system and edit the configuration files (ec_pkcs11client.ini and pkcs11properties.cfg) downloaded in the PKCS11 Wrapper.
Step 3: Install OpenSSL
Download and install OpenSSL on your system from here.
Step 4: Compile the OpenSSL PKCS#11 Engine
The OpenSSL PKCS#11 engine must be compiled manually:
- Download and install msys2-i686-*.exe from here.
- Start an MSYS2 MSYS console from the Start menu.
- Then run the following commands in that console:
pacman -S git pkg-config libtool autoconf automake make gcc \
  openssl-devel
git clone https://github.com/OpenSC/libp11.git
cd libp11
autoreconf -fi
./configure --prefix=/usr/local
make && make install
NOTE: These are six separate commands and must be run one after another. On the published documentation page they appear joined into a single line, which will not work.
Step 5: Edit the OpenSSL Configuration File
Open the configuration file (openssl.cnf) in the folder C:\Program Files\Common Files\SSL and add these lines:
openssl_conf = openssl_init

[openssl_init]
engines = engine_section

[engine_section]
pkcs11 = pkcs11_section

[pkcs11_section]
# Path to the compiled OpenSSL PKCS11 from OpenSC - libp11
dynamic_path = <Path to compiled libp11 pkcs11.dll>
MODULE_PATH = <Path to ec_pkcs11client.dll>


NOTE: dynamic_path and MODULE_PATH are two separate entries on their own lines. On the published documentation page they appear run together on one line.
Windows: Sign and Verify
Now that all the configurations and prerequisites have been installed, let us perform the signing operation first.
Step 1: Run the Signing Command
The signing command will look something like this. Ensure you run this command only inside the folder where your PKCS11 Wrapper is installed.
openssl dgst -engine pkcs11 -keyform engine ^
  -sign "pkcs11:object=<private key alias>;type=private" ^
  -sha256 ^
  -out <path of signed file> ^
  <path of file to sign>
For example:
openssl dgst -engine pkcs11 -keyform engine ^
  -sign "pkcs11:object=CertEnrollTest;type=private" ^
  -sha256 ^
  -out test-signed.bin ^
  testfile.txt
NOTE: The caret characters are Command Prompt line continuations. You may keep them or join the command onto a single line.
NOTE: Signing references the private key object, so the URI ends with type=private. Verification in the next step uses type=public, because only the public half of the key pair is needed to check a signature.
Step 2: Verify the Signature
After successfully signing the file, let us verify it using this command:
openssl dgst -engine pkcs11 -keyform engine ^
  -verify "pkcs11:object=<private key alias>;type=public" ^
  -sha256 ^
  -signature <path of signed file> ^
  <path of file to sign>
For example:
openssl dgst -engine pkcs11 -keyform engine ^
  -verify "pkcs11:object=CertEnrollTest;type=public" ^
  -sha256 ^
  -signature test-signed.bin ^
  testfile.txt
Step 3: Option Reference
The Windows track uses the dgst command rather than pkeyutl:
| Option | Description |
|---|---|
| dgst | Computes a digest of the input file and signs or verifies that digest, so the hash algorithm is chosen explicitly. |
| -sha256 | The digest algorithm to use. |
| -sign | The key URI to sign with. |
| -verify | The key URI to check the signature against. |
| -out | The path of the signature file to produce when signing. |
| -signature | The path of the signature file to check when verifying. |
Step 4: Cross-Check in CodeSign Secure
Open the CodeSign Secure portal and navigate to Reports > Signing Request Report, where every signing request performed through the wrapper is recorded for audit purposes.
Security Considerations
When you are dealing with cryptographic operations — especially digital signing — the protection of your private keys is absolutely non-negotiable. A leaked or compromised private key is pretty much a worst-case scenario because it opens the door to impersonation, unauthorized access, and a whole lot of trust issues.
- Never store private keys in plain files: It might be convenient, but storing private keys as flat files on disk (even with file system permissions) is risky. All it takes is a misconfigured backup system or a curious admin to accidentally expose them. Instead, use secure key storage mechanisms — preferably hardware-backed.
- Use HSMs or secure tokens whenever possible: Hardware Security Modules (HSMs) and smart cards are built specifically for secure key storage. They do not just store keys — they perform operations (like signing or decryption) inside the device, so the private key never actually leaves. This adds a strong layer of protection, especially against malware or insider threats.
- Lock down access to your PKCS#11 modules: Make sure only authorized users or services can talk to the PKCS#11 interface. Use PINs, role-based access, and proper auditing to prevent abuse. If your wrapper or HSM vendor supports logging, enable it — you will want a clear trail of who accessed what and when.
- Avoid leaving tokens unlocked: It is tempting to script things and leave tokens unlocked to keep things running, but that is risky. Instead, look into automated unlock mechanisms that still respect session isolation, or tools that securely cache credentials for short durations with tight access controls.
- Validate what you are signing: It sounds obvious, but make sure you are not signing random or malicious files by accident. Build in sanity checks or use pre-signing verification steps to ensure only approved content goes through your signing flow.