
Reproducible Build Integration Guide
Reproducible build refers to the process of building software so that the result can be replicated bit-for-bit by anyone who follows the same steps using the same source code, build environment, and tools.
CodeSign Secure facilitates this feature, helping users trust the source of the software and avoid signing malicious code. It involves using automated tools to analyse the build process and verify the integrity of the final software code.
In practice this works by having the build server and the signing server independently arrive at the same hash. Jenkins builds the artifact and records its fingerprint; when the signing tool later submits a request, it carries the signing project and build job identifiers alongside the hash. CodeSign Secure compares the incoming hash against the one produced by the pipeline, and only signs if they match. A signing request that cannot be tied back to a known build is declined.
Section 1 explains the two validation modes and Section 2 covers the prerequisites. Sections 3 to 5 configure the signing client, Sections 6 and 7 prepare the Jenkins project and its pipeline script, and Sections 8 and 9 configure the signing project and the key on CodeSign Secure. Section 10 covers what happens at signing time and the notifications you receive.
Prerequisites: A CodeSign Secure deployment, a Jenkins build server, a GitHub source code repository, and a signing client configured with either Signtool and the KSP or JarSigner and the KSP.
Automated Hash Validation
Automated hash validation is a security process that uses cryptographic hash functions to ensure the integrity and authenticity of data throughout an automated workflow. There are two points in the workflow at which it can be applied, and a key is designated for one or the other when it is created.
Pre-Sign Hash Validation
Pre-sign hash validation is a step in the automated hash validation process before the code is signed.
Because the check happens first, a build whose hash does not match the pipeline output is never signed at all. This is the preventative mode.
Post-Sign Hash Validation
Post-sign hash validation is another step within the automated hash validation process, but it occurs after the code has been signed with cryptographic keys.
This confirms that what was signed still corresponds to the recorded build, which detects tampering that occurs around the signing operation itself.
NOTE: Which mode applies is determined by the Reproducible Build Key Usage setting on the key, configured in Section 9. A key can be set to Pre-Sign, Post-Sign, or neither.
Prerequisites and Source Code Repository
Reproducible build spans three systems — a source code repository, a Jenkins build server, and a configured signing client — so all three must be in place before the pipeline can be built.
Step 1: Confirm the Prerequisites
Prerequisites for performing this task include:
- A GitHub repository.
- Signtool installed and configured.
- ECSigning KSP installed and configured.
- Jenkins Build Server and Project.
NOTE: Sections 3 to 5 cover installing and configuring the ECSigning KSP, the authentication certificate, and Signtool on the signing client. If that client is already configured, continue from Section 6.
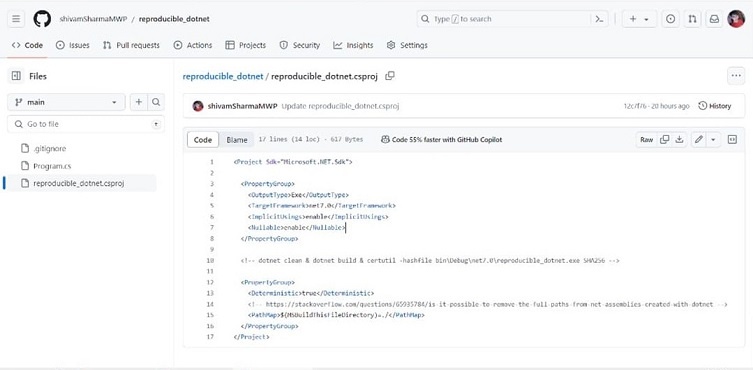
Step 2: Configure the Source Code Repository
Before we get started, we will need to configure a source code repository, that is GitHub. This version control system manages the commits for the builds pushed in the repository.
Set up CodeSign Secure KSP
The Encryption Consulting Key Storage Provider (KSP) for Windows is a software component that extends the Microsoft Cryptography API: Next Generation (CNG) framework. Its primary purpose is to enable Windows applications, such as signtool.exe, to interact seamlessly with the cryptographic keys and certificates stored within an HSM. This is what allows the Jenkins pipeline to sign without a private key ever being present on the build machine.
Step 1: Download the EC KSP
Log in to the CodeSign Secure portal and navigate to the Signing Tools section to download “Encryption Consulting CNG-SigningKSP” (also listed as “EC KSP for Windows”).
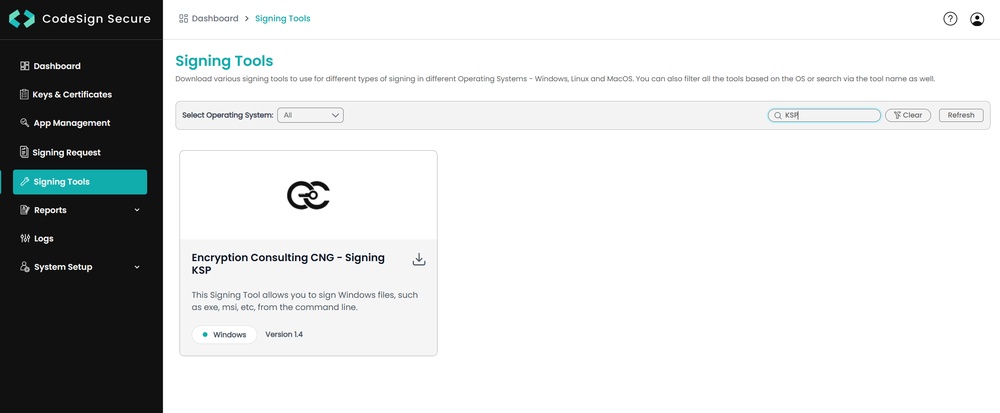
Extract the zip file to get the “Setup.msi” file.
Step 2: Install the EC KSP
Run the “Setup.msi” installer with Administrator privileges.
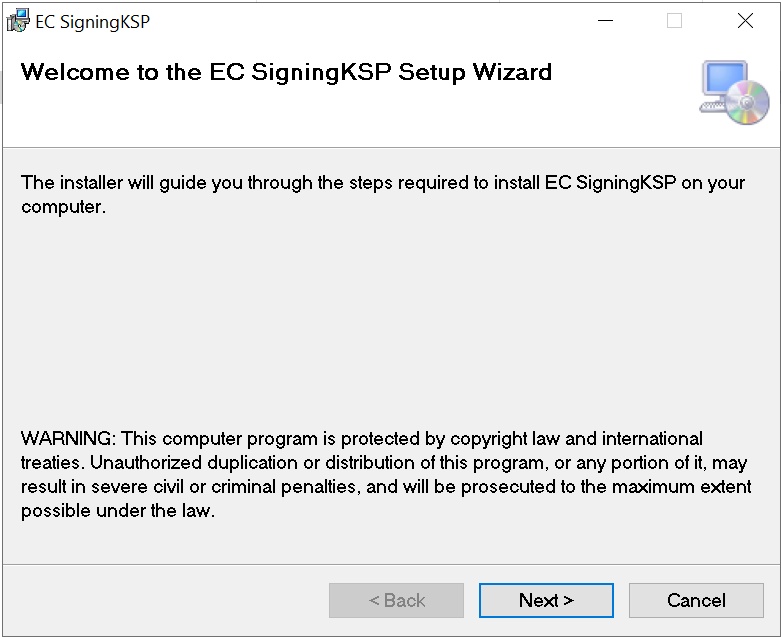
Follow the on-screen prompts of the installation wizard.
- Accept the End-User License Agreement.
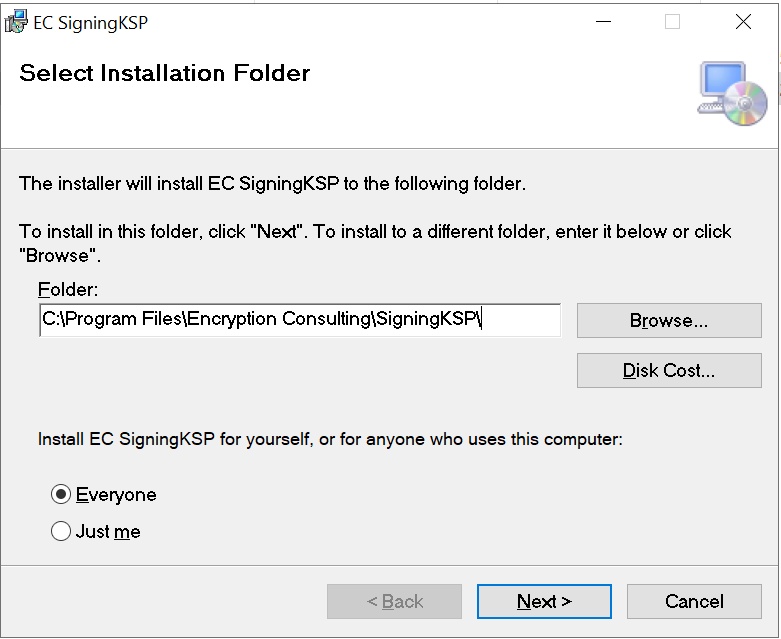
- Choose the installation directory (the default is C:\Program Files\Encryption Consulting\SigningKSP).
- Choose whether you want to install the KSP for Everyone or just for the current user.
Enter the prompted details such as:
- Username: The username/email that you use to log in to the CodeSign Secure portal.
- Code: The secret code that you set at the time of setting up the CodeSign Secure solution (this is the code defined in your conf.ini configuration file).
- IdentityType: Keep this field as default (2). If your deployment authenticates against a local identity store, set this to 1 as described in the product documentation.
- CodeSign Secure URL: The URL to access the portal (remember to add “/api/” at the end of the URL). Leave the API BaseURL unchanged if it is already populated correctly.
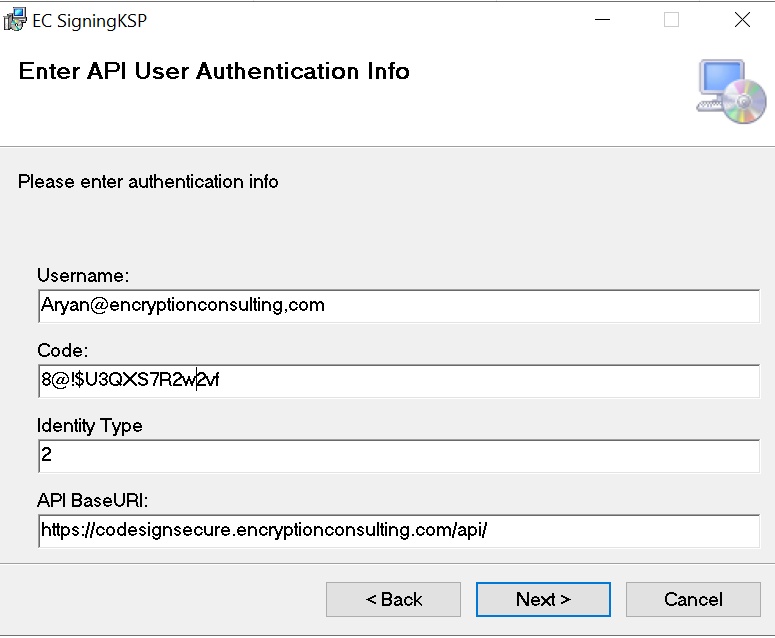
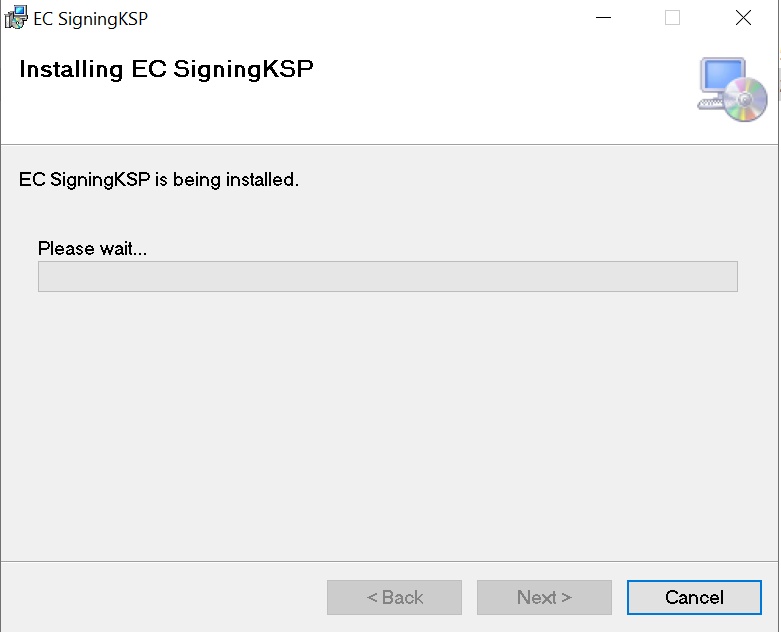
Click Next and confirm the installation. When Windows asks whether you want to allow this program to make changes to your PC, click Yes.
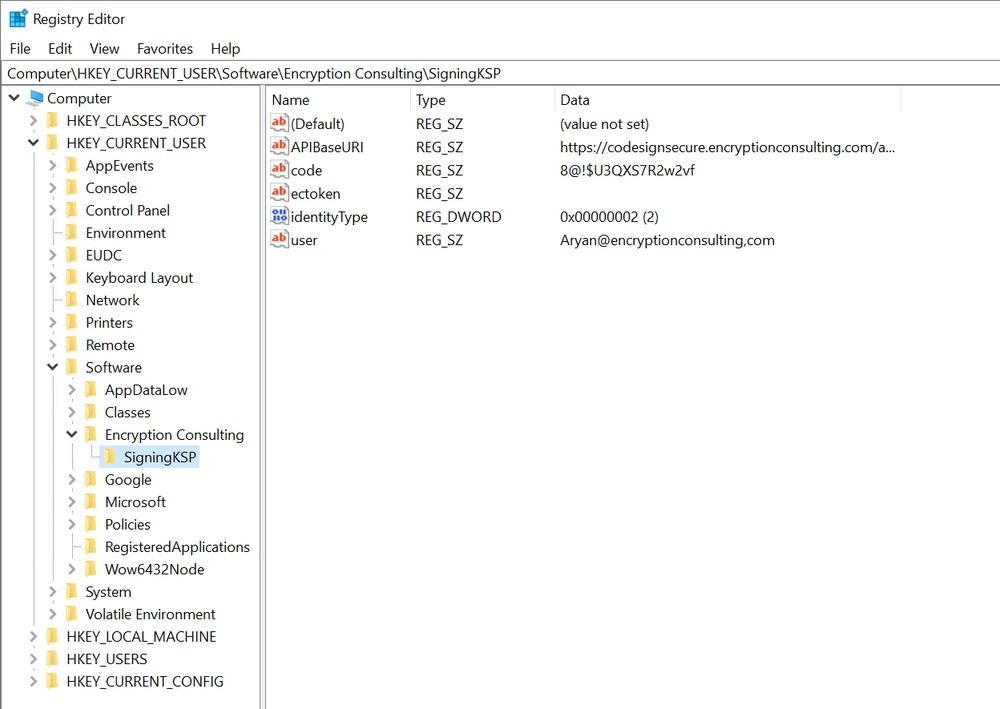
Step 3: Configure the Registry Editor settings
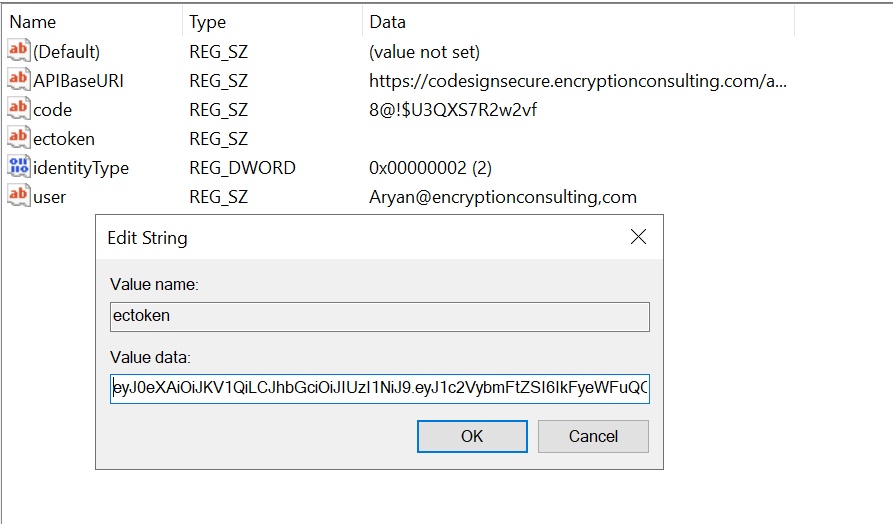
Open the Registry Editor from the Start menu and navigate to HKEY_CURRENT_USER > Software > Encryption Consulting > SigningKSP.
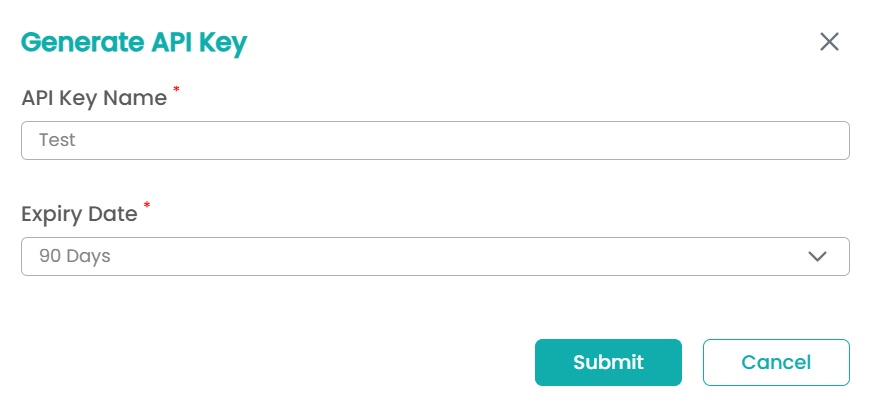
Now open the CodeSign Secure portal and navigate to System Setup > User. Select the “Generate API Key” option.
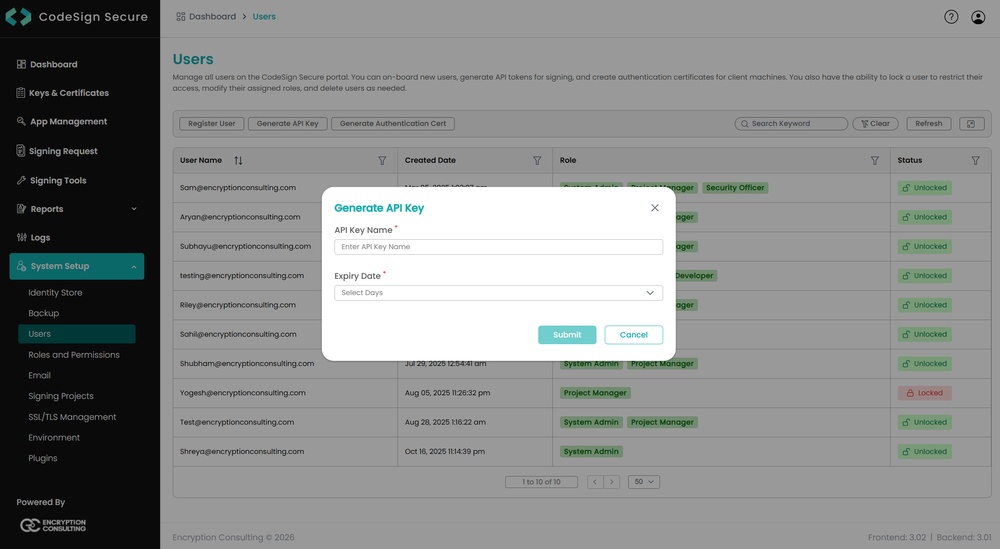
Create a token for your account by providing a name and the validity period. Remember to copy the token as it will be shown only once.
Add this token to the “ectoken” field in the Registry Editor.
Set up P12 Authentication Certificate
Setting up a P12 Certificate involves configuring your environment variables to authenticate your client machine with Encryption Consulting’s CodeSign Secure. This certificate authenticates the machine itself, and is separate from the signing certificate created in Section 9.
Step 1: Create a Machine Authentication Certificate
Open the CodeSign Secure portal and navigate to System Setup > User. Select the “Generate Authentication Cert” option.
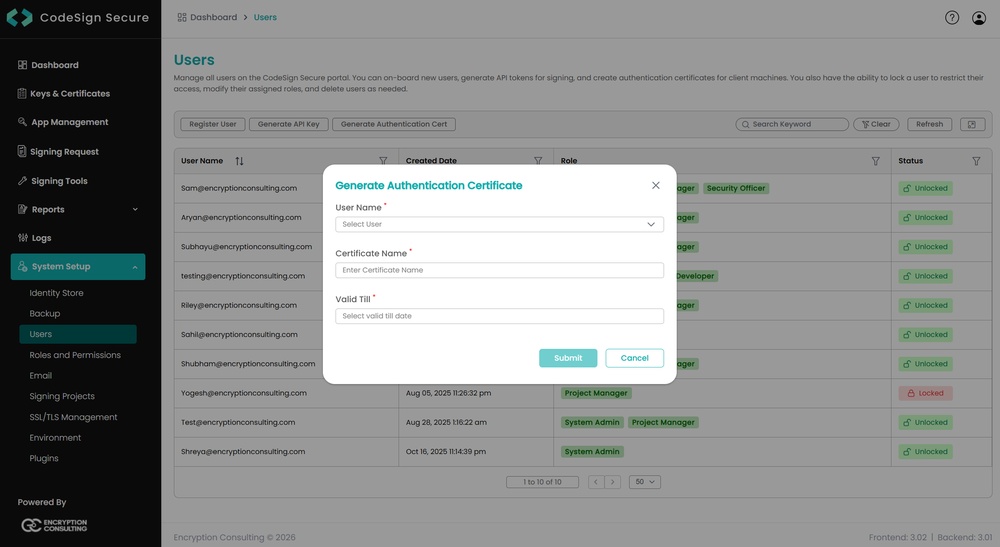
Select the user name from the drop down and enter the details like certificate name and its expiry date.
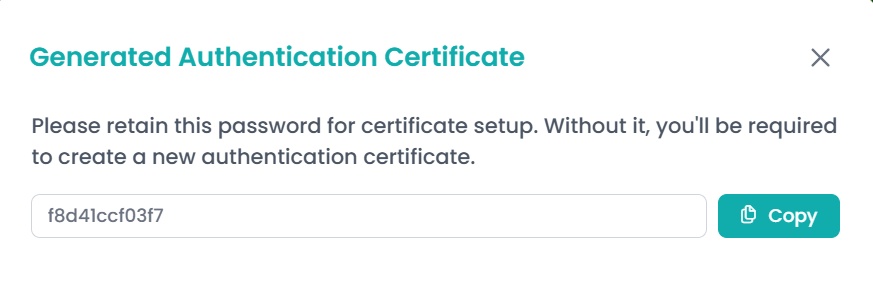
It will then provide you with a .pfx certificate file and also display the password to the certificate file.
NOTE: This password will be displayed only once. So you must copy and store it safely to perform the authentication with the CodeSign Secure server.
Step 2: Configure the Environment Variables
Open the Environment Variables from your Start Menu.
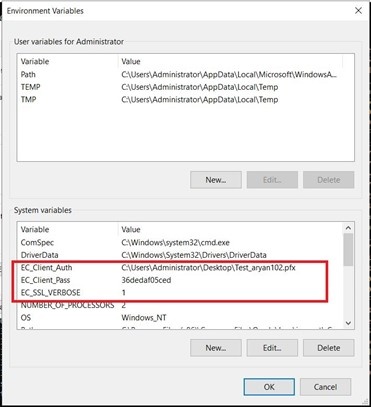
Add new system variables by clicking on the New button. Provide the following variable name and its corresponding details.
- EC_Client_Auth: Corresponds to the path of your SSL Authentication certificate, which can be created from CodeSign Secure.
- EC_Client_Pass: Corresponds to the password of your certificate, which is provided at the time of creation of the certificate.
- EC_SSL_VERBOSE: Corresponds to the setting to either enable (1) or disable (0) the debugging output for EC KSP.
NOTE: These are system variables, so the Jenkins service must be able to read them. If Jenkins runs as a service under a different account, restart the service after setting them so that the pipeline picks up the values.
Set up Signtool for Signing
Setting up signtool for code signing involves ensuring that the Signtool.exe utility is available on your machine and configured to correctly interact with Encryption Consulting’s cryptographic provider that provides access to your code signing certificate’s private key.
Step 1: Download and Install Windows SDK
Using the following download link, download the Windows Software Development Kit: Windows SDK downloads – Windows apps | Microsoft Learn
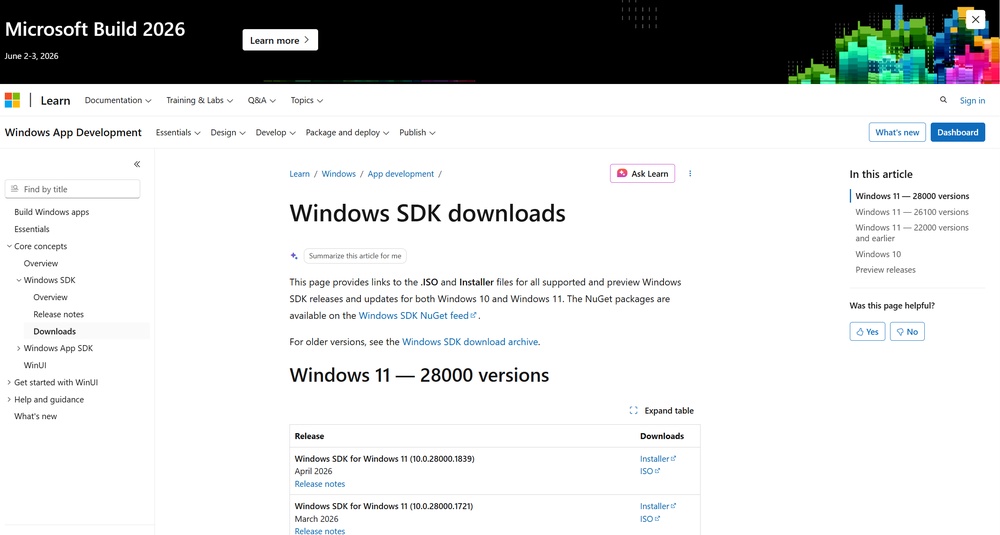
Open the installer once downloaded and select “Next” on the first screen to keep the default settings.
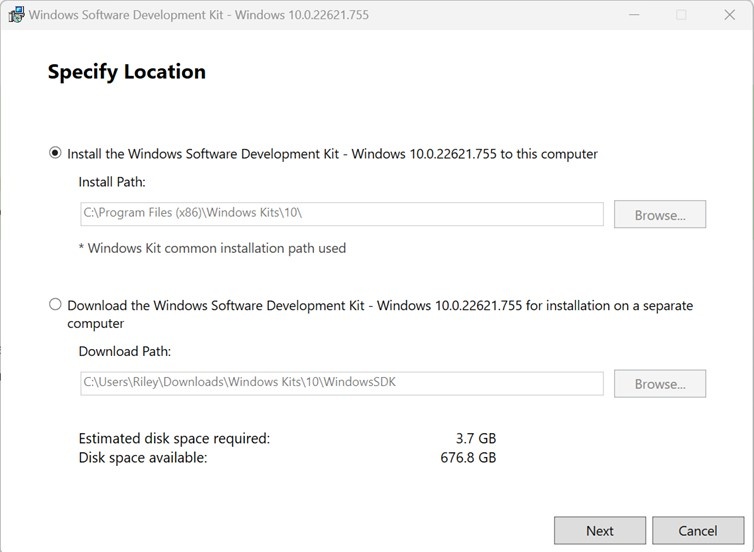
Follow the on-screen prompts of the installation wizard.
- Accept the Windows Kits Privacy notice.
- Accept the End-User License Agreement.
Select “Windows SDK Signing Tools for Desktop Apps” and select “Install”.
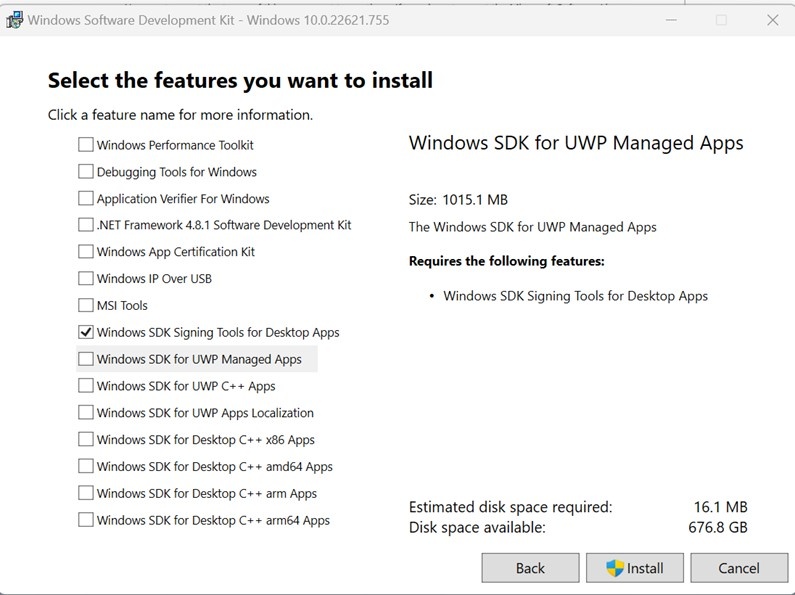
Go to the following path where the tools should have been downloaded to: “C:\Program Files (x86)\Windows Kits\10\bin”. Select the desired version directory and check whether the “signtool.exe” file is present.
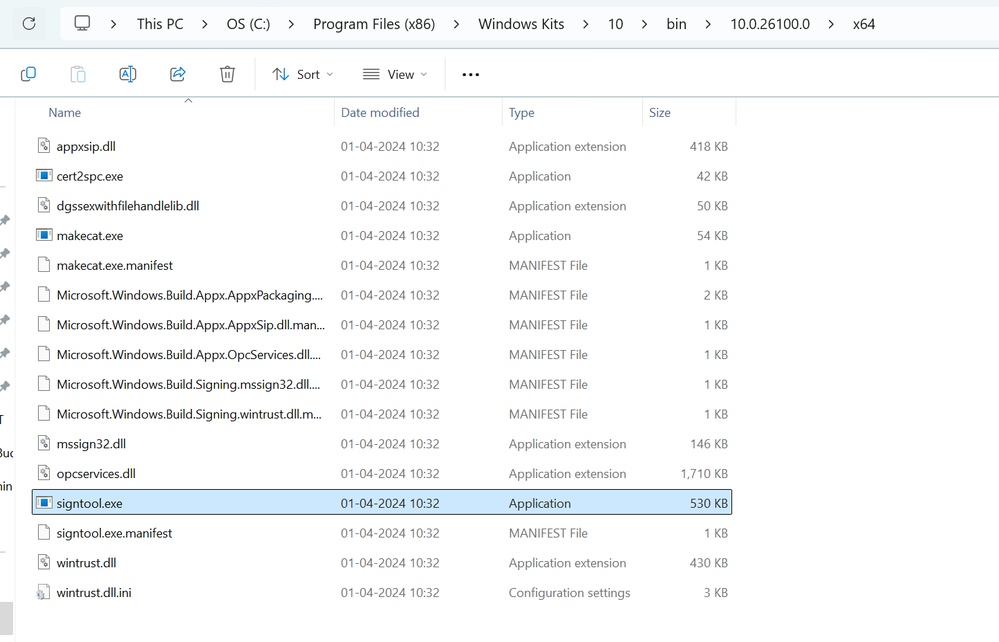
Ensure you are in the x64 directory and copy this directory path.
Step 2: Add Path to Signtool.exe in Environment Variables
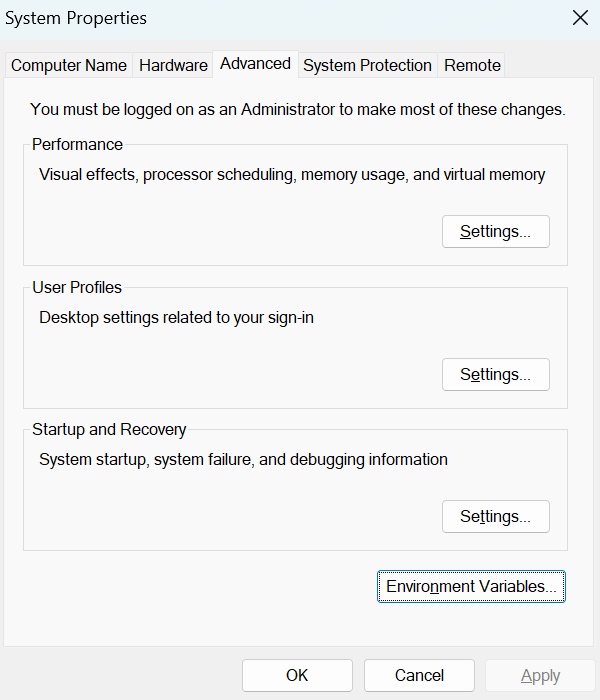
Open the Environment Variables from the Start Menu.
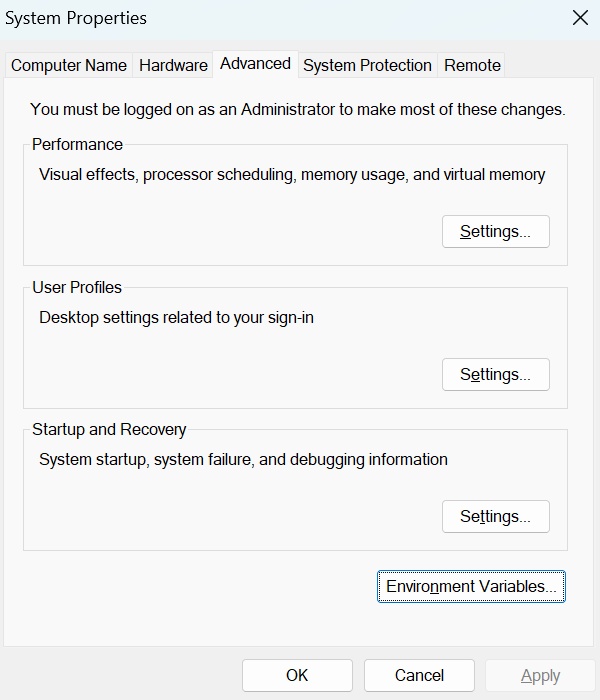
Scroll down through the system variables on the bottom table until you find PATH in the variable names.
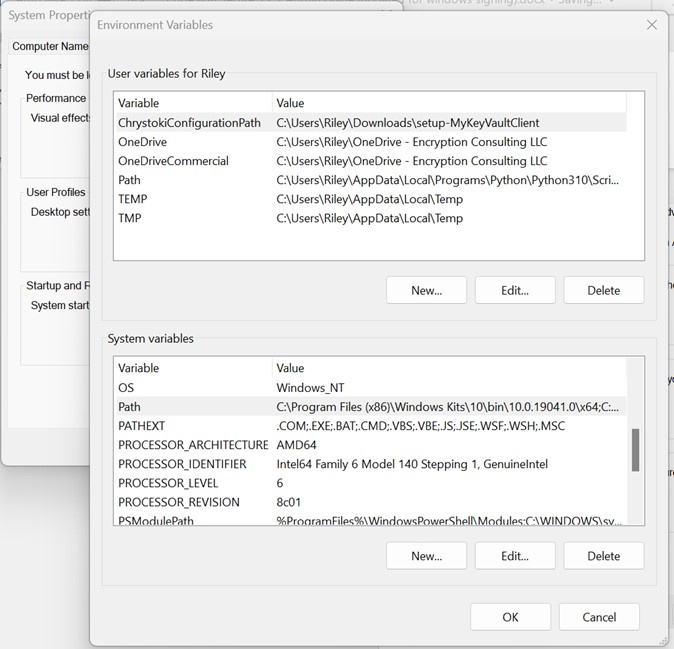
Double click on PATH in system variables and select New on the left of the screen. Paste your copied directory path of “signtool.exe” into the new selection.
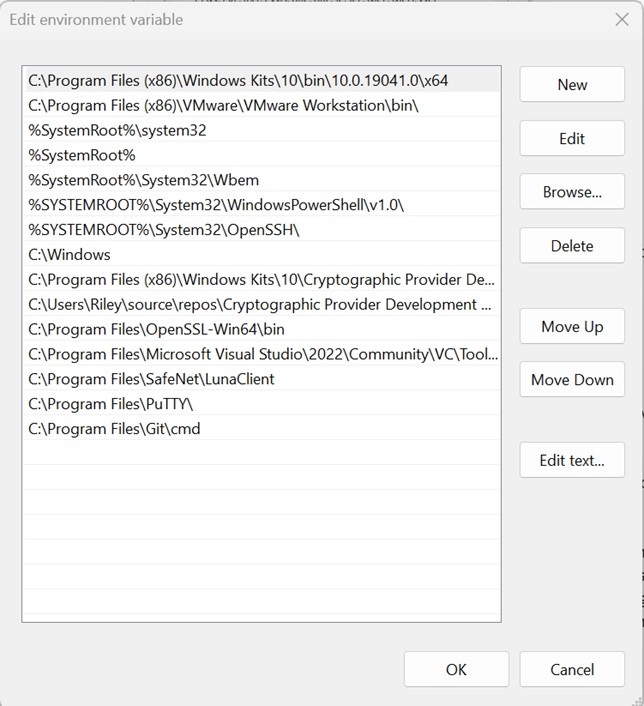
Select OK at the bottom of each page to exit the Environment Variables page.
NOTE: The pipeline script in Section 7 invokes signtool by name rather than by full path, so signtool must be resolvable on the PATH of the account that runs the Jenkins build.
Create the Jenkins Pipeline Project
After configuring the source code repository, we will need to add a project on the Jenkins server to access the latest commit in the repository.
Step 1: Sign In to Jenkins
Sign into Jenkins.
Step 2: Create a New Pipeline
To create a new Pipeline, go to New Item from the sidebar.

Enter the item name and select Pipeline from the list of services provided.
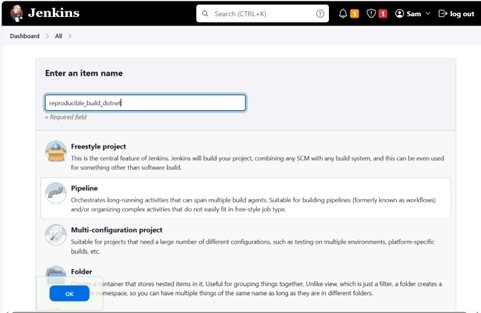
Step 3: Open the Project Configuration
Then the configuration tab will open to modify the settings of the project.
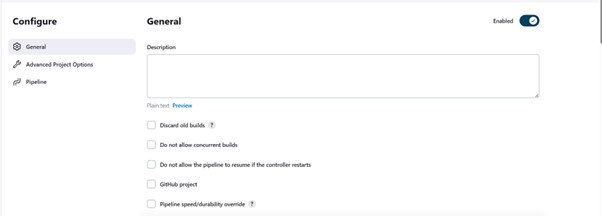
Step 4: Add the Pipeline Parameters
Enter the required details and information for the Pipeline. Here we are adding the String Parameters to convey the branch name of the source code repository from which the latest builds will be accessed.
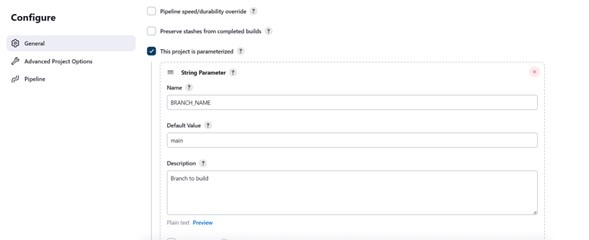
Then we need to provide the Pipeline Script for the Reproducible Build, which is covered in the next section.
NOTE: The String Parameter added here is the BRANCH_NAME parameter referenced by the pipeline script in the next section, so the names must match.
Add the Pipeline Script
The pipeline is what produces the artifact and its fingerprint, so its structure matters to the validation that follows.
Step 1: Understand the Pipeline Script Components
A pipeline script is built from the following components:
- Pipeline Definition: Defines the overall pipeline structure, for example pipeline { … }.
- Stage: Groups related steps into logical phases, for example stage(‘Build’) { … }.
- Condition (Optional): Controls execution based on certain criteria, for example when { expression }.
- Error Handling (Optional): Manages unexpected situations during pipeline execution.
- Shared Resource (Optional): Reusable component, being a function or library, for multiple pipelines.
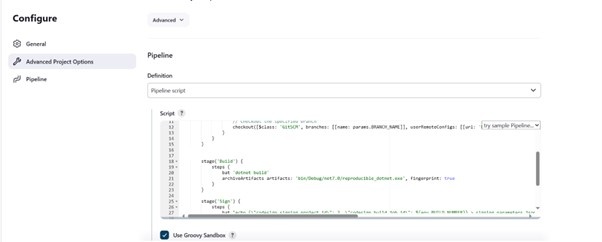
Step 2: Add the Pipeline Script
A sample script for a Jenkins project is provided below.
pipeline {
    agent any
    parameters {
        string(name: 'BRANCH_NAME', defaultValue: 'main', description: 'Branch to build')
    }
    stages {
        stage('Checkout') {
            steps {
                script {
                    // Checks out the existence of the specified branch in the repository
                    checkout([$class: 'GitSCM', branches: [[name: params.BRANCH_NAME]], userRemoteConfigs: [[url: 'https://github.com/shivamSharmaMWP/reproducible_dotnet.git', credentialsId: 'shivamSharmaMWP']]])
                }
            }
        }

        stage('Build') {
            steps {
            // Provide the build command according to source code language
                bat 'dotnet build'
            // Archive the unique versions of the specified file
                archiveArtifacts artifacts: 'bin/Debug/net7.0/reproducible_dotnet.exe', fingerprint: true
            }
        }

        stage('Sign') {
            steps {
            // Provide extra Signing Project Parameters - required for this setup
                bat "echo {\"codesign_signing_project_id\": 2, \"codesign_build_job_id\": ${env.BUILD_NUMBER}} > signing_parameters.json"
            // Provide Signing command
                bat 'set EC_SIGN_PARAMS=.\\signing_parameters.json && signtool sign /csp "Encryption Consulting Key Storage Provider" /kc onetech /fd SHA256 /f c:/websites/onetech.crt /tr http://timestamp.digicert.com /td SHA256 bin/Debug/net7.0/reproducible_dotnet.exe'
            // Archive the unique versions of the specified file
                archiveArtifacts artifacts: 'bin/Debug/net7.0/reproducible_dotnet.exe', fingerprint: true
            }
        }
    }
}
NOTE: Several lines in the script above are longer than the page width and wrap for display only. Each remains a single line in the script itself, so the block can be copied as-is.
The two elements that make this pipeline reproducible-build aware are the fingerprint: true option on archiveArtifacts, which records the artifact hash, and the EC_SIGN_PARAMS variable, which points the signing tool at the parameters file carrying the project and build job IDs.
Step 3: Save and Review the Build Project
Save the configuration for the pipeline. This will create a build project on the Jenkins server.
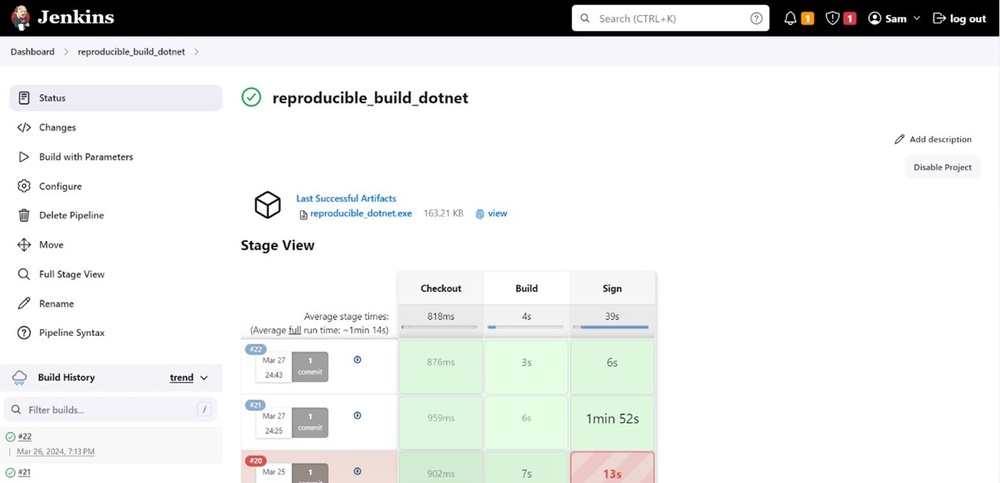
The Jenkins project is configured in such a way that every build job must contain a commit that it uses to pull the specific version of source code.
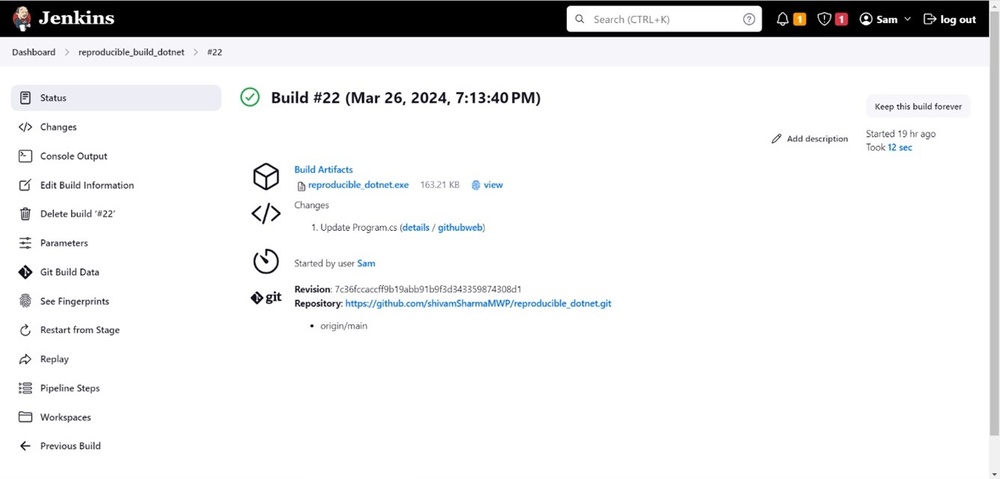
You can adjust your pipeline so that whenever a new commit is made to the source code in the repository, it triggers a new build on the Jenkins server for that specific commit.
Add a Signing Project on CodeSign Secure
To access reproducible build functionality from the CodeSign Secure server, a signing project must be added with the source code repository details, the build commands, the build server project details, and an email address to receive signing status notifications.
Step 1: Open the Signing Projects Screen
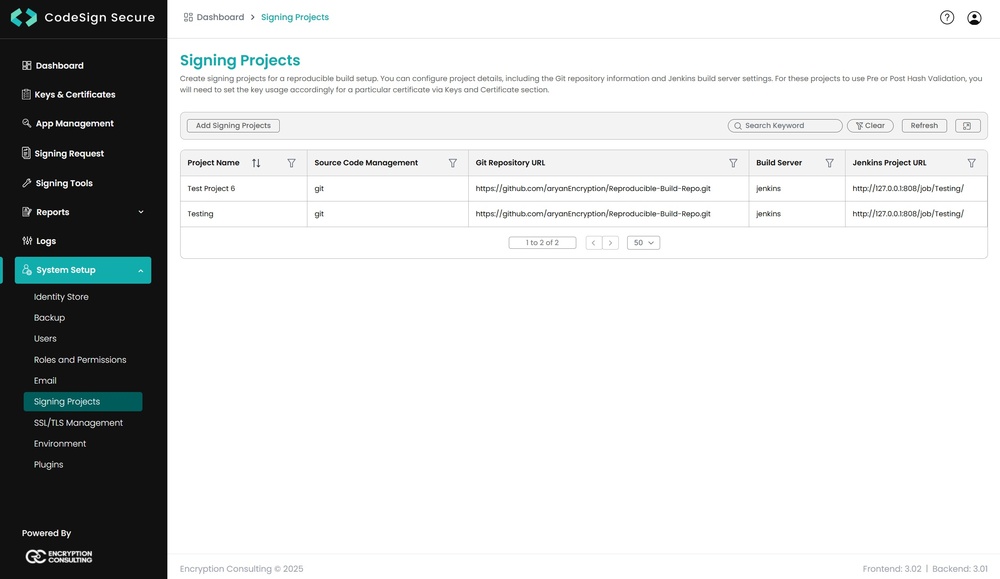
Go to the System Setup tab and click on Signing Projects.
Step 2: Add the Signing Project
Click on Add Signing Project. An input form will open to take the required details of the project.
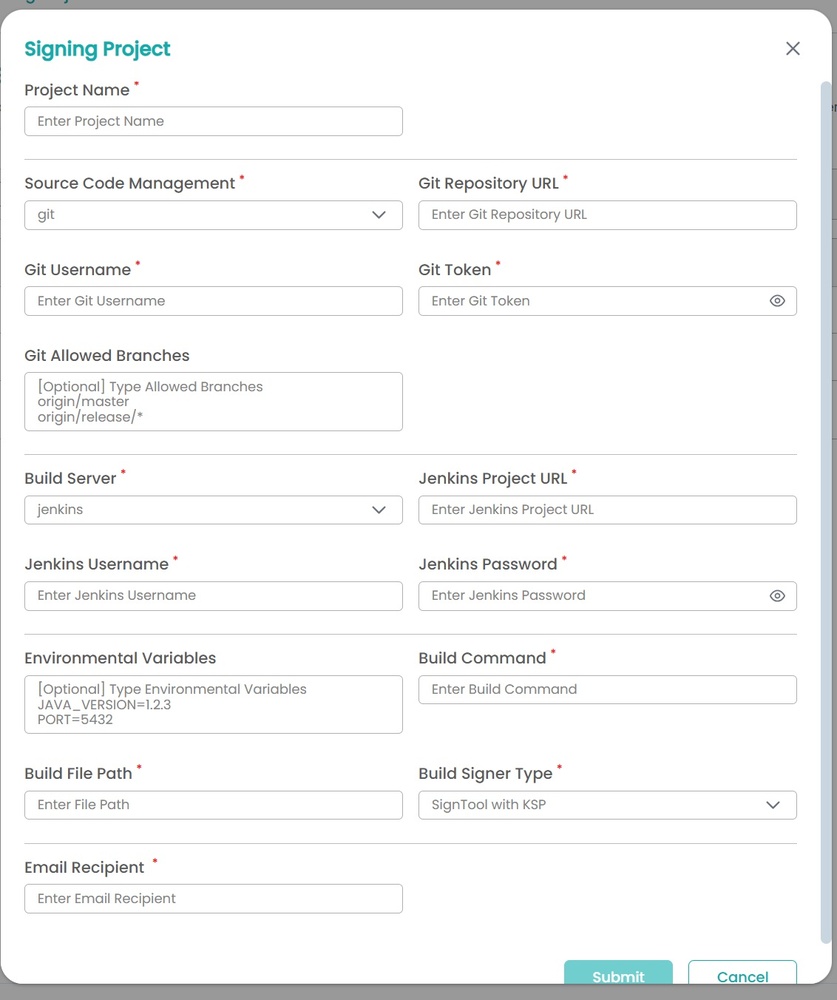
The form takes the following details:
| Field | Description |
|---|---|
| Project Name | Corresponds to the name of the Project that you want to use Hash verification for. |
| Source Code Management | As per best industry standards, GitHub is supported at present. |
| Git Repository URL | Corresponds to the URL of your configured repository. |
| Git Username & Git Token | Corresponds to the credentials for logging in to your git. The form takes a token rather than a password. |
| Git Allowed Branches (Optional) | Corresponds to specific branches from which the builds will be accessed. |
| Environmental Variables | Corresponds to any variables required for the project. |
| Build Command | Corresponds to the command that will be used to create the build files from the repository. |
| Build File Path | Corresponds to the location to store the created build file. |
| Build Server | As per best industry standards, Jenkins is supported at present. |
| Build Signer Type | As per industry standards, SignTool with KSP and JarSigner with KSP tools are supported. |
| Jenkins Project URL | Corresponds to the URL of the Jenkins project that you have created for the pipeline. |
| Jenkins Username & Password | Corresponds to your credentials to access the Jenkins server and project. |
| Email Recipient | Corresponds to your email to get notified regarding the status of Code Signing. |
NOTE: The field labels above follow the form itself. The written documentation refers to these as Git Username & Password, Environment Variables, and Jenkins URL, which differ slightly from what the interface shows.
Step 3: Review the Created Project
After providing the build settings, the project will be created, and details can be overviewed by selecting the specific project.
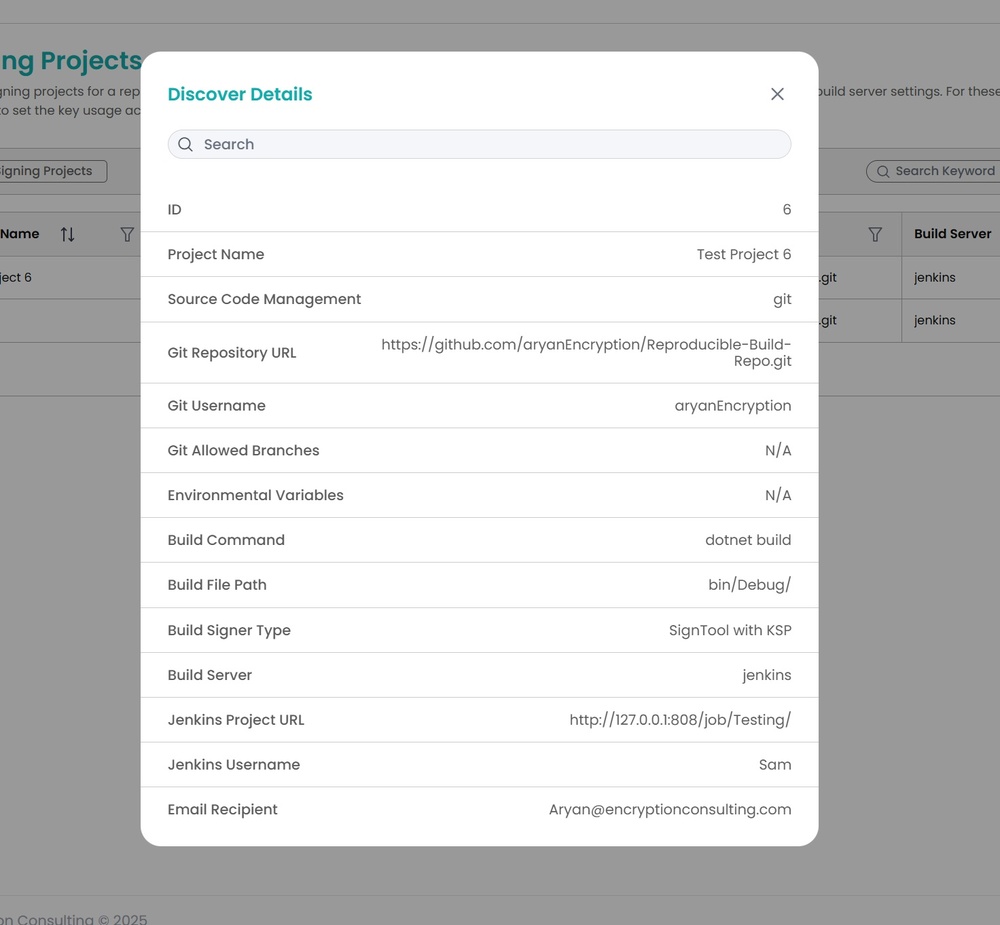
NOTE: Note the project’s ID from this screen. It is the value used for codesign_signing_project_id in the pipeline script in Section 7.
Create the Key and Certificate
Now, use the certificate or key from the CodeSign Secure keys list required for signing the code. The key carries the setting that determines whether validation happens before or after signing.
Step 1: Add a New Certificate
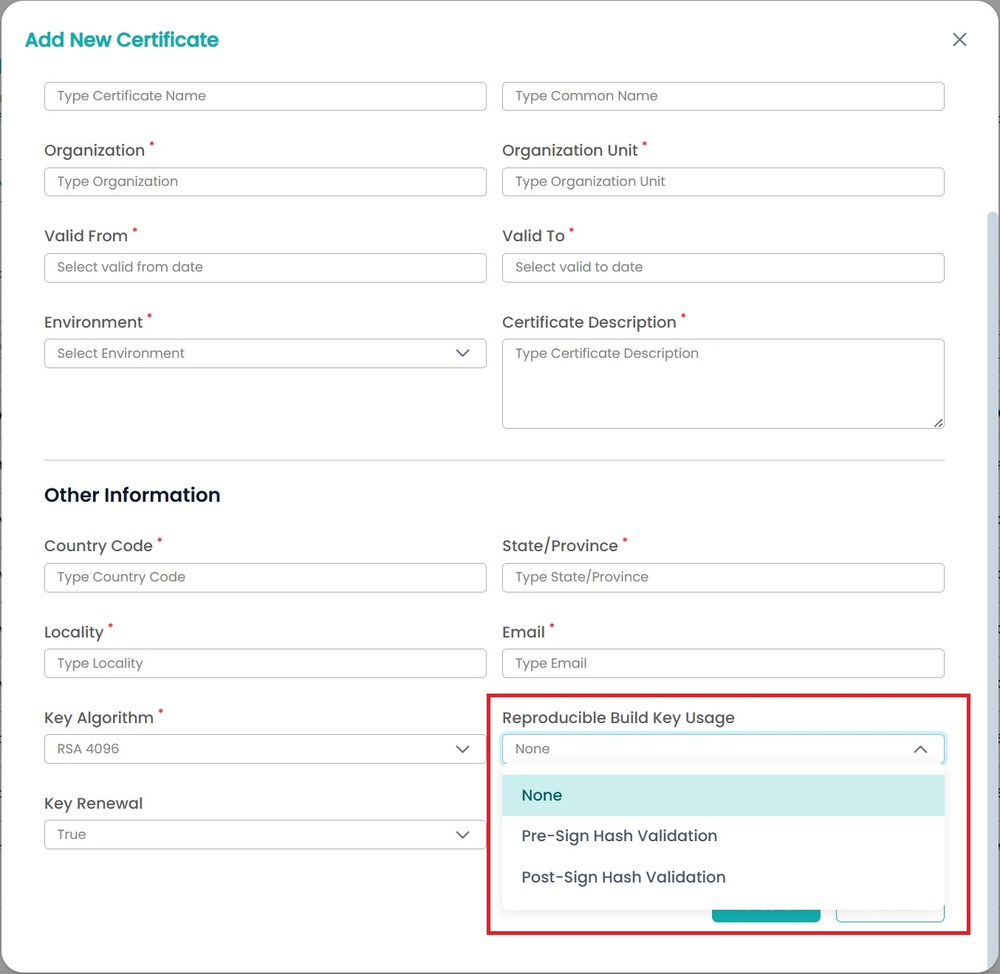
To create a new Key and Certificate, go to the Keys and Certificates tab on CodeSign Secure and click on Add new Certificate.
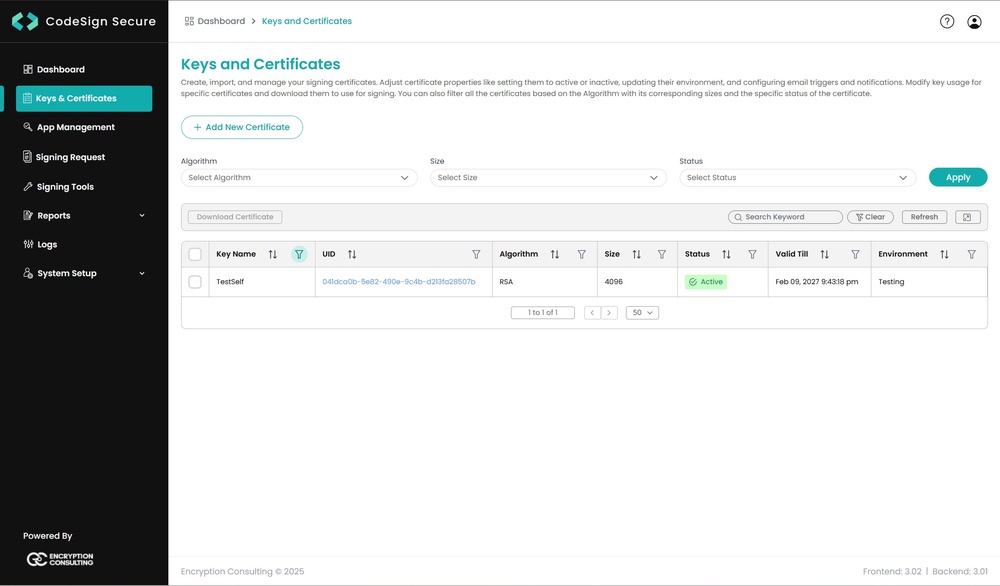
Provide the details regarding the Key and Certificate creation in the input form.
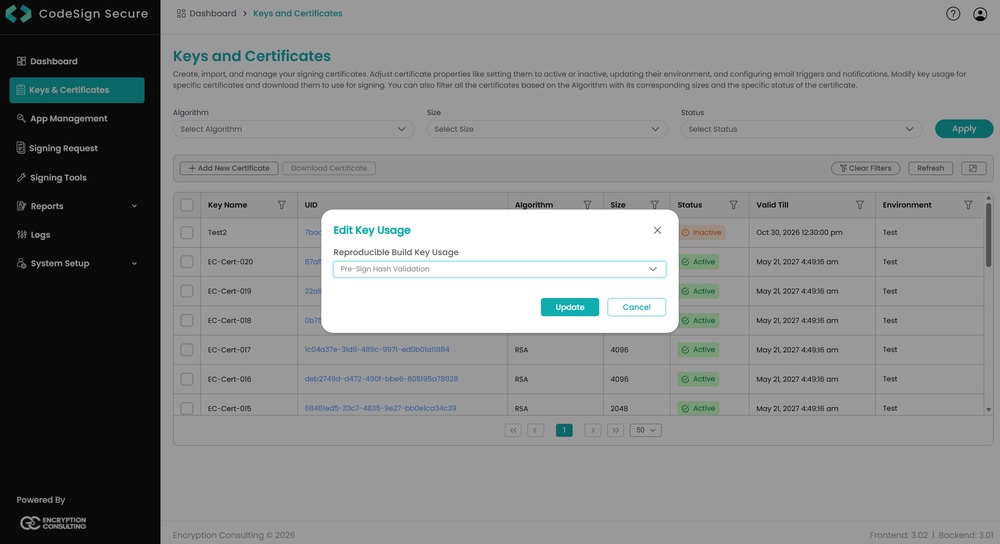
You can also Edit an existing certificate and set its key usage as required.
Step 2: Set the Reproducible Build Key Usage
Reproducible Build Key Usage: This tells whether the key will be used for Pre-Sign Hash Validation or Post-Sign Hash Validation or none of these. This is required for the hash validation of the latest build and to verify the origin of the file.
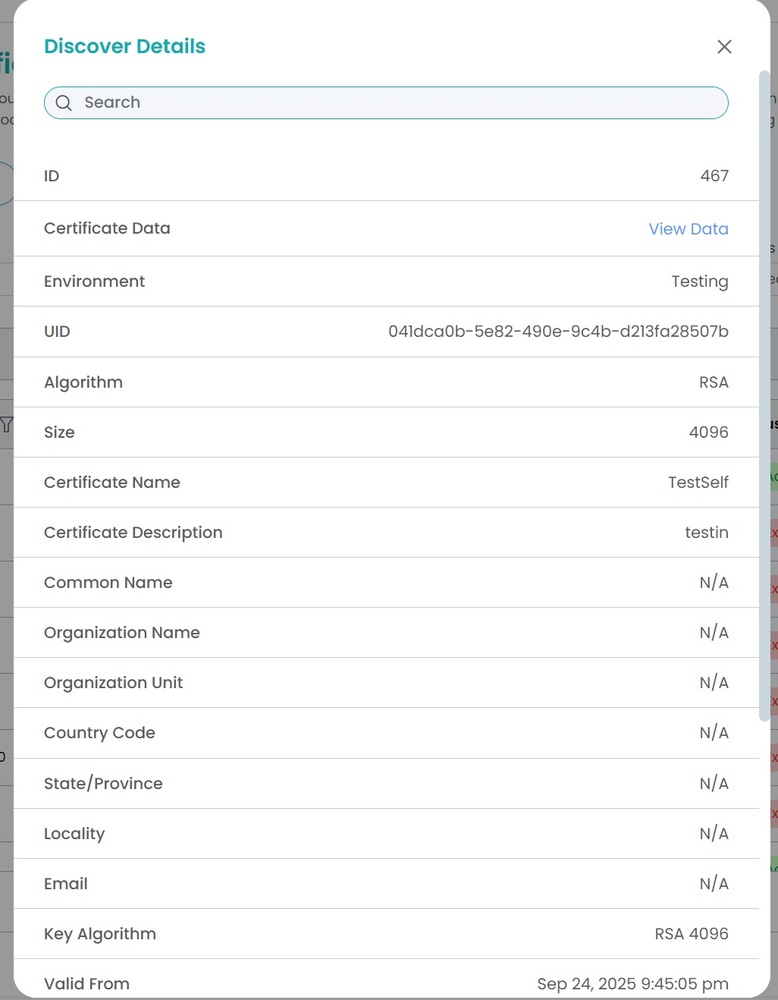
To see the details about a specific key and certificate, click on the respective certificate’s UID.
Step 3: Understand What This Enables
With this setup, whenever you submit the signing request via Signtool, it will automatically pass extra parameters of the Signing Project ID and Build Job ID within the signing request.
It fetches the commit revision and build job ID at code signing time. If the parameters are not correct in this process, code signing will be declined.
Hash Validation and Notifications
The CodeSign Secure server will receive the incoming hash. If the validation is successful, it will proceed with the code signing.
For hash validation, the incoming hash from the client is matched with the hash generated from the Jenkins pipeline. Automated validation depends on the key usage, that is Pre-sign or Post-sign, as configured in Section 9.
Step 1: When the Hashes Match
If the hashes match, a success notification is sent to the email mentioned when creating the signing project on the CodeSign application. Now, the code is considered authentic and proceeds to the code signing stage.
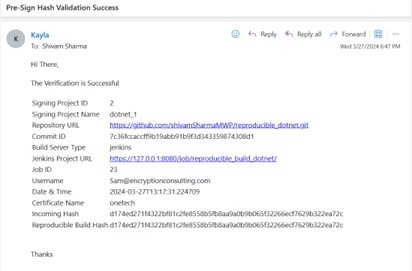
On successful validation, the build will be signed using the cryptographic key and certificate created on the CodeSign Secure platform.
Step 2: When the Hashes Differ
If the hashes differ, a failure or error notification is sent to the user by email.
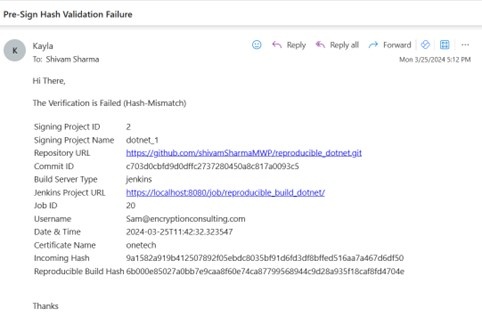
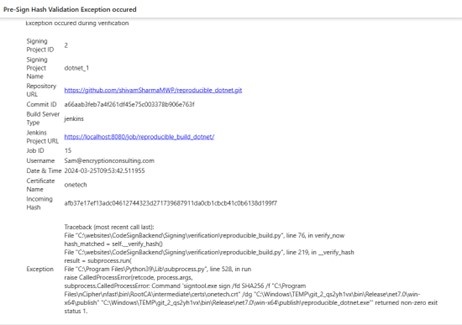
The signing request is refused, so no signature is produced for an artifact that does not match its recorded build.
Step 3: Cross-Check in CodeSign Secure
Open the CodeSign Secure portal and navigate to Reports > Signing Request Report, where every signing request is recorded for audit purposes, including those that were declined.
- Automated Hash Validation
- Prerequisites and Source Code Repository
- Set up CodeSign Secure KSP
- Set up P12 Authentication Certificate
- Set up Signtool for Signing
- Create the Jenkins Pipeline Project
- Add the Pipeline Script
- Add a Signing Project on CodeSign Secure
- Create the Key and Certificate
- Hash Validation and Notifications