
This guide installs EJBCA Community Edition 9.3.7, the open-source edition of EJBCA, on Ubuntu 26.04 and integrates it with an nShield Connect Hardware Security Module (HSM). EJBCA Enterprise installs differently and isn’t covered here.
EJBCA runs on the WildFly application server and stores its data in MariaDB. To use keys on the HSM, EJBCA calls the nShield PKCS#11 library, which passes each request to the local nShield hardserver. The hardserver talks to the HSM over TCP port 9004.
Steps at a glance
- Part 1: Set up EJBCA (Steps 1 to 5): install WildFly, build and deploy EJBCA, configure HTTPS, and log in to AdminWeb.
- Part 2: Integrate the nShield HSM (Steps 6 to 10): install the Security World software, enroll the server with the HSM, and create a crypto token on the HSM.
Prerequisites
- A server running Ubuntu 26.04 LTS with a desktop, a web browser, sudo rights and internet access. The browser must run on the server, because WildFly listens only on 127.0.0.1.
- For Part 2: an nShield Connect HSM with an existing Security World, reachable from the server on TCP port 9004; the Security World 13.9.3 ISO from the nShield support portal; and a copy of your Security World files from the Remote File System (RFS).
Tested with Ubuntu 26.04.1, OpenJDK 21.0.12, MariaDB 11.8.6, WildFly 35.0.1.Final, MariaDB JDBC driver 3.5.10, and nShield Security World 13.9.3 with Connect XC firmware 13.8.3.
In commands, replace anything written <LIKE_THIS> or REPLACE_… with your own value. Save each password you generate in a password manager as soon as you create it.
Install the required software
Install Java 21, Ant, Git, curl, unzip, OpenSC (which provides pkcs11-tool for Part 2) and MariaDB, and start MariaDB at boot:
sudo apt update
sudo apt install openjdk-21-jdk ant git curl unzip opensc mariadb-server
sudo systemctl enable --now mariadb
Open the MariaDB shell with sudo mariadb, and create the ejbca database and user. Replace <DATABASE_PASSWORD> with a strong password (for example, the output of openssl rand -hex 24), and save it in your password manager:
CREATE DATABASE ejbca CHARACTER SET utf8mb4 COLLATE utf8mb4_unicode_ci;
CREATE USER 'ejbca'@'127.0.0.1' IDENTIFIED BY '<DATABASE_PASSWORD>';
GRANT ALL PRIVILEGES ON ejbca.* TO 'ejbca'@'127.0.0.1';
EXIT;
EJBCA requires row-based binary logging. Enable it and restart MariaDB:
printf '[mysqld]\nbinlog_format=ROW\n' \
| sudo tee /etc/mysql/mariadb.conf.d/60-ejbca.cnf
sudo systemctl restart mariadb
Part 1: Set up EJBCA
Step 1: Download EJBCA and WildFly
1.1 Clone EJBCA Community 9.3.7
Clone the EJBCA Community Edition repository at the r9.3.7 tag:
mkdir -p "$HOME/pki-lab"
git clone --depth 1 --branch r9.3.7 \
https://github.com/Keyfactor/ejbca-ce.git "$HOME/pki-lab/ejbca"
1.2 Download WildFly 35.0.1
WF=35.0.1.Final
curl -fL -o "$HOME/pki-lab/wildfly-$WF.zip" \
"https://github.com/wildfly/wildfly/releases/download/$WF/wildfly-$WF.zip"
Step 2: Install and configure WildFly
2.1 Install WildFly and create its service account
Extract WildFly to /opt, link /opt/wildfly to it, and create the wildfly system account that runs it:
sudo unzip -q "$HOME/pki-lab/wildfly-35.0.1.Final.zip" -d /opt
sudo ln -s /opt/wildfly-35.0.1.Final /opt/wildfly
sudo useradd --system --user-group \
--home-dir /opt/wildfly --shell /usr/sbin/nologin wildfly
sudo chown -R wildfly:wildfly /opt/wildfly-35.0.1.Final
2.2 Disable WildFly’s bundled RESTEasy-Crypto
WildFly’s RESTEasy-Crypto module bundles its own Bouncy Castle, which conflicts with the one EJBCA uses. Remove the module:
sudo sed -i.before-ejbca '/org.jboss.resteasy.resteasy-crypto/d' \
/opt/wildfly/modules/system/layers/base/org/jboss/as/jaxrs/main/module.xml
sudo mv \
/opt/wildfly/modules/system/layers/base/org/jboss/resteasy/resteasy-crypto \
/opt/wildfly-disabled-resteasy-crypto
2.3 Set Java options
Back up standalone.conf, then open it:
sudo cp -a /opt/wildfly/bin/standalone.conf \
/opt/wildfly/bin/standalone.conf.before-ejbca
sudo nano /opt/wildfly/bin/standalone.conf
Add these lines at the very bottom of the file, then save and exit:
JAVA_HOME="/usr/lib/jvm/java-21-openjdk-amd64"

JAVA_OPTS="$JAVA_OPTS -Djboss.tx.node.id=ejbca-node1"

JAVA_OPTS="$JAVA_OPTS -Dhttps.protocols=TLSv1.2,TLSv1.3"

JAVA_OPTS="$JAVA_OPTS -Djdk.tls.client.protocols=TLSv1.2,TLSv1.3"

JAVA_OPTS="$JAVA_OPTS -Djdk.tls.ephemeralDHKeySize=2048"

JAVA_OPTS="$JAVA_OPTS --add-exports=jdk.crypto.cryptoki/sun.security.pkcs11.wrapper=ALL-UNNAMED"
Note: The last line exports Java’s internal PKCS#11 wrapper, which EJBCA Community needs to use the HSM in Part 2.
2.4 Create the WildFly systemd service
Create the unit file:
sudo nano /etc/systemd/system/wildfly.service
Paste the following, then save and exit:
[Unit]
Description=WildFly application server for EJBCA
After=network.target mariadb.service

[Service]
Type=simple
User=wildfly
Group=wildfly
WorkingDirectory=/opt/wildfly
ExecStart=/opt/wildfly/bin/standalone.sh -c standalone.xml \
-b 127.0.0.1 -bmanagement 127.0.0.1
Restart=on-failure
RestartSec=5
TimeoutStopSec=120
UMask=0027

[Install]
WantedBy=multi-user.target
2.5 Start WildFly
Reload systemd, then enable and start WildFly:
sudo systemctl daemon-reload
sudo systemctl enable --now wildfly
WildFly takes about 30 seconds to start. If a later jboss-cli.sh command prints Timeout waiting for the system to boot, see T5.
2.6 Deploy the MariaDB JDBC driver
Download the driver and copy it into WildFly’s deployments folder, which deploys it automatically:
JDBC=mariadb-java-client-3.5.10.jar
MAVEN=https://repo.maven.apache.org/maven2/org/mariadb/jdbc
curl -fL -o "$HOME/pki-lab/$JDBC" "$MAVEN/mariadb-java-client/3.5.10/$JDBC"
sudo install -o wildfly -g wildfly -m 0644 "$HOME/pki-lab/$JDBC" \
/opt/wildfly/standalone/deployments/mariadb-java-client.jar
2.7 Create WildFly’s credential store
WildFly keeps its passwords in an encrypted credential store. Create the store’s directory, and a script that generates the store’s master password, so you don’t need to record it:
sudo install -d -o wildfly -g wildfly -m 0700 \
/opt/wildfly/standalone/configuration/keystore
sudo -u wildfly bash -c '
f=/opt/wildfly/bin/credential-store-pass
umask 077
printf "#!/bin/sh\necho %s\n" "$(openssl rand -hex 32)" > "$f"
chmod 700 "$f"'
Open the WildFly CLI:
sudo -u wildfly /opt/wildfly/bin/jboss-cli.sh --connect
Create the credential store:
/subsystem=elytron/credential-store=defaultCS:add(path=keystore/credentials,relative-to=jboss.server.config.dir,credential-reference={clear-text="{EXT}/opt/wildfly/bin/credential-store-pass",type="COMMAND"},create=true)
2.8 Store the database password and create the datasource
In the same CLI session, run these commands one at a time, and paste the data-source add command in one piece. Replace <DATABASE_PASSWORD> with the database password you created earlier, and keep the quotes. history --disable keeps the password out of the CLI history.
history --disable

/subsystem=elytron/credential-store=defaultCS:add-alias(alias=dbPassword,secret-value="<DATABASE_PASSWORD>")

history --enable

data-source add --name=ejbcads \
--connection-url="jdbc:mariadb://127.0.0.1:3306/ejbca" \
--jndi-name="java:/EjbcaDS" \
--use-ccm=true \
--driver-name="mariadb-java-client.jar" \
--driver-class="org.mariadb.jdbc.Driver" \
--user-name="ejbca" \
--credential-reference={store=defaultCS,alias=dbPassword} \
--validate-on-match=true \
--background-validation=false \
--prepared-statements-cache-size=50 \
--share-prepared-statements=true \
--min-pool-size=5 \
--max-pool-size=20 \
--pool-prefill=true \
--transaction-isolation=TRANSACTION_READ_COMMITTED \
--check-valid-connection-sql="select 1;"

:reload

quit
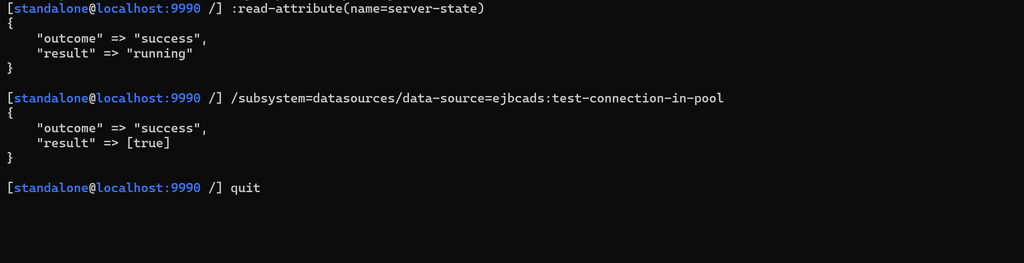
After the reload, WildFly is running and the datasource connects to MariaDB:
2.9 Configure remoting and logging
Open the CLI again:
sudo -u wildfly /opt/wildfly/bin/jboss-cli.sh --connect
Paste the whole block in one go:
batch

/socket-binding-group=standard-sockets/socket-binding=remoting:add(port=4447,interface=management)

/subsystem=undertow/server=default-server/http-listener=remoting:add(socket-binding=remoting,enable-http2=true)

/subsystem=remoting/http-connector=http-remoting-connector:write-attribute(name=connector-ref,value=remoting)

/subsystem=logging/logger=org.ejbca:add(level=INFO)

/subsystem=logging/logger=org.cesecore:add(level=INFO)

/subsystem=logging/logger=com.keyfactor:add(level=INFO)

run-batch
Then reload WildFly and exit the CLI:
:reload
quit
Step 3: Configure, build and initialise EJBCA
3.1 Prepare the EJBCA install directory
Copy the source from 1.1 to /opt/ejbca and give the wildfly user ownership of it:
sudo cp -a "$HOME/pki-lab/ejbca" /opt/ejbca
sudo chown -R wildfly:wildfly /opt/ejbca
3.2 Point EJBCA at the datasource
Open the database settings:
sudo -u wildfly nano /opt/ejbca/conf/database.properties
Enter the following, then save and exit:
database.name=mysql
datasource.jndi-name=EjbcaDS
3.3 Point EJBCA at WildFly
Open EJBCA’s main settings:
sudo -u wildfly nano /opt/ejbca/conf/ejbca.properties
Enter the following, then save and exit:
appserver.home=/opt/wildfly
ejbca.productionmode=true
3.4 Map the EJBCA hostname
Open /etc/hosts:
sudo nano /etc/hosts
Add this line at the end, then save and exit:
127.0.0.1 ejbca-lab.test
3.5 Generate the installation passwords
Run this command four times:
openssl rand -hex 24
Save each output in your password manager under the name shown. Later steps refer to them by these names.
| Output | Save as | Used for |
|---|---|---|
| 1st | SuperAdmin P12 password | Protects the SuperAdmin certificate file |
| 2nd | HTTPS key password | Protects the HTTPS keystore |
| 3rd | Truststore password | Protects the HTTPS truststore |
| 4th | Password encryption key | Encrypts passwords that EJBCA stores in its database |
3.6 Configure the web and admin settings
Open web.properties:
sudo -u wildfly nano /opt/ejbca/conf/web.properties
Enter the following. Replace REPLACE_HTTPS_KEY_PASSWORD, REPLACE_TRUSTSTORE_PASSWORD and REPLACE_ADMIN_P12_PASSWORD with the matching passwords from 3.5, without quotes. Then save and exit.
httpsserver.hostname=ejbca-lab.test
httpsserver.dn=CN=ejbca-lab.test,O=PKI Lab
httpsserver.an=dnsName=ejbca-lab.test
httpsserver.tokentype=P12
httpsserver.password=REPLACE_HTTPS_KEY_PASSWORD
java.trustpassword=REPLACE_TRUSTSTORE_PASSWORD
superadmin.cn=SuperAdmin
superadmin.dn=CN=SuperAdmin,O=PKI Lab
superadmin.password=REPLACE_ADMIN_P12_PASSWORD
superadmin.batch=true
web.reqauth=true
httpserver.pubhttp=8080
httpserver.pubhttps=8442
httpserver.privhttps=8443
Note: No HSM setting is needed here. EJBCA detects PKCS#11 libraries at their standard paths, including nShield’s. For a library installed elsewhere, add
cryptotoken.p11.lib.<number>.nameandcryptotoken.p11.lib.<number>.filelines, as shown inconf/web.properties.sample.
3.7 Configure password encryption
Open cesecore.properties:
sudo -u wildfly nano /opt/ejbca/conf/cesecore.properties
Enter this line, replacing the placeholder with the password encryption key from 3.5, then save and exit:
password.encryption.key=REPLACE_PASSWORD_ENCRYPTION_SECRET
3.8 Restrict access to the files that hold secrets
Make web.properties and cesecore.properties readable by the wildfly user only:
sudo chmod 600 /opt/ejbca/conf/web.properties /opt/ejbca/conf/cesecore.properties
3.9 Build and deploy EJBCA
Build EJBCA and deploy ejbca.ear to WildFly. The build takes about a minute and ends with BUILD SUCCESSFUL.
sudo -u wildfly bash -c 'cd /opt/ejbca && \
JAVA_HOME=/usr/lib/jvm/java-21-openjdk-amd64 APPSRV_HOME=/opt/wildfly \
ant -q clean deployear'
Three messages in the output and the WildFly log look wrong but are normal:
- The banner says
EJBCA 9.3.7 Enterprise (working copy). You’re still building Community Edition: the Community source sets this label itself (app.edition.verbose=Enterpriseinsrc/internal.properties). - The build prints
database.url = jdbc:h2:…. EJBCA uses the datasource from 2.8 instead. - The WildFly log shows
Can not register org.cesecore.keys.token.p11ng.cryptotoken.Pkcs11NgCryptoToken. Community Edition uses the standard PKCS#11 token type instead.
Wait about 30 seconds, then confirm that WildFly has deployed EJBCA:
sudo -u wildfly /opt/wildfly/bin/jboss-cli.sh --connect --command='deployment-info'
Both ejbca.ear and mariadb-java-client.jar show the status OK:

3.10 Define the Management CA
ManagementCA issues EJBCA’s TLS server certificate and the SuperAdmin certificate. Open the install settings:
sudo -u wildfly nano /opt/ejbca/conf/install.properties
Enter the following, then save and exit:
ca.name=ManagementCA
ca.dn=CN=ManagementCA,O=PKI Lab
ca.tokentype=soft
ca.tokenpassword=null
ca.keytype=RSA
ca.keyspec=4096
ca.signaturealgorithm=SHA256WithRSA
ca.validity=3650
ca.policy=null
3.11 Initialise EJBCA
With WildFly running, run the installer. Run it once only. It creates ManagementCA, the TLS server certificate for ejbca-lab.test, and the SuperAdmin certificate and access rules:
sudo -u wildfly bash -c 'cd /opt/ejbca && \
JAVA_HOME=/usr/lib/jvm/java-21-openjdk-amd64 APPSRV_HOME=/opt/wildfly \
ant -q runinstall'
The installer creates ManagementCA:

3.12 Deploy the HTTPS keystores
Copy the HTTPS keystore and truststore into WildFly’s configuration:
sudo -u wildfly bash -c 'cd /opt/ejbca && \
JAVA_HOME=/usr/lib/jvm/java-21-openjdk-amd64 APPSRV_HOME=/opt/wildfly \
ant -q deploy-keystore'
Step 4: Set up the HTTPS listeners
4.1 Store the keystore passwords and configure TLS
Open the CLI:
sudo -u wildfly /opt/wildfly/bin/jboss-cli.sh --connect
Run these commands one at a time. :take-snapshot backs up the current configuration first. Replace REPLACE_HTTPS_KEY_PASSWORD with the HTTPS key password and REPLACE_TRUSTSTORE_PASSWORD with the truststore password from 3.5, and keep the quotes:
:take-snapshot

history --disable

/subsystem=elytron/credential-store=defaultCS:add-alias(alias=httpsKeystorePassword,secret-value="REPLACE_HTTPS_KEY_PASSWORD")

/subsystem=elytron/credential-store=defaultCS:add-alias(alias=httpsTruststorePassword,secret-value="REPLACE_TRUSTSTORE_PASSWORD")

history --enable
Configure the keystores, TLS contexts and listeners. Paste the whole block in one go:
batch

/subsystem=elytron/key-store=httpsKS:add(path="keystore/keystore.p12",relative-to=jboss.server.config.dir,credential-reference={store=defaultCS,alias=httpsKeystorePassword},type=PKCS12)

/subsystem=elytron/key-store=httpsTS:add(path="keystore/truststore.p12",relative-to=jboss.server.config.dir,credential-reference={store=defaultCS,alias=httpsTruststorePassword},type=PKCS12)

/subsystem=elytron/key-manager=httpsKM:add(key-store=httpsKS,algorithm="SunX509",credential-reference={store=defaultCS,alias=httpsKeystorePassword})

/subsystem=elytron/trust-manager=httpsTM:add(key-store=httpsTS)

/subsystem=elytron/server-ssl-context=httpspub:add(key-manager=httpsKM,protocols=["TLSv1.3","TLSv1.2"])

/subsystem=elytron/server-ssl-context=httpspriv:add(key-manager=httpsKM,trust-manager=httpsTM,need-client-auth=true,protocols=["TLSv1.3","TLSv1.2"])

/socket-binding-group=standard-sockets/socket-binding=httpspub:add(port=8442)

/subsystem=undertow/server=default-server/https-listener=httpspub:add(socket-binding=httpspub,ssl-context=httpspub,max-parameters=2048)

/subsystem=undertow/server=default-server/https-listener=https:write-attribute(name=ssl-context,value=httpspriv)

/subsystem=undertow/server=default-server/https-listener=https:write-attribute(name=max-parameters,value=2048)

run-batch
Note: Port 8442 (
httpspub) serves the public pages. Port 8443 (httpspriv) requires a client certificate issued by ManagementCA (need-client-auth=true).
Reload WildFly and exit the CLI:
:reload
quit
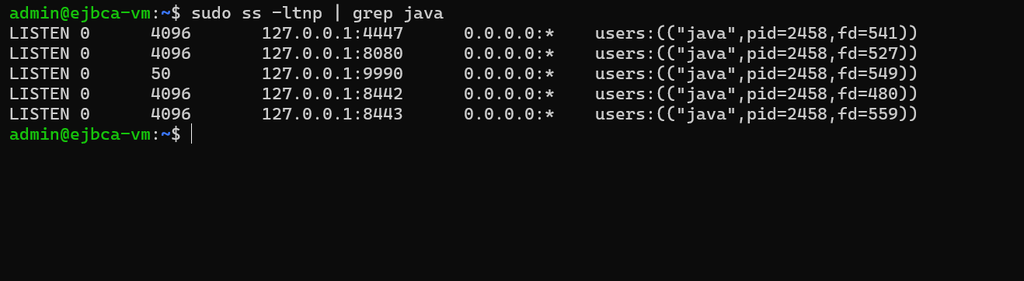
WildFly now listens only on 127.0.0.1, on ports 4447, 8080, 8442, 8443 and 9990:
Port 8442 serves the TLS certificate for ejbca-lab.test, issued by ManagementCA:

Step 5: Log in to AdminWeb
AdminWeb authenticates you with the SuperAdmin client certificate instead of a password. Your browser needs that certificate, and it must trust ManagementCA.
5.1 Export the certificates
Copy the SuperAdmin P12 to your Downloads folder, and export the ManagementCA certificate from the truststore:
sudo install -o "$USER" -g "$USER" -m 0600 \
/opt/ejbca/p12/superadmin.p12 "$HOME/Downloads/superadmin.p12"
sudo -u wildfly /usr/lib/jvm/java-21-openjdk-amd64/bin/keytool -exportcert -rfc \
-alias ManagementCA -keystore /opt/ejbca/p12/truststore.p12 -storetype PKCS12 \
-file /opt/ejbca/p12/ManagementCA.pem
When keytool asks Enter keystore password:, enter the truststore password from 3.5. Then copy the PEM file to Downloads:
sudo install -o "$USER" -g "$USER" -m 0644 \
/opt/ejbca/p12/ManagementCA.pem "$HOME/Downloads/ManagementCA.pem"
5.2 Import the certificates into your browser
Open your browser’s certificate manager. In Firefox, go to Settings → Privacy & Security → Certificates. In Chrome, go to Settings → Privacy and security → Security → Manage certificates. Then:
- Import
Downloads/ManagementCA.pemas a certificate authority, and trust it to identify websites. - Import
Downloads/superadmin.p12into your personal certificates, entering the SuperAdmin P12 password from 3.5 when prompted.
5.3 Open AdminWeb
Go to https://ejbca-lab.test:8443/ejbca/adminweb/ and select the SuperAdmin certificate when the browser asks for one. The EJBCA Administration page opens, logged in as SuperAdmin:
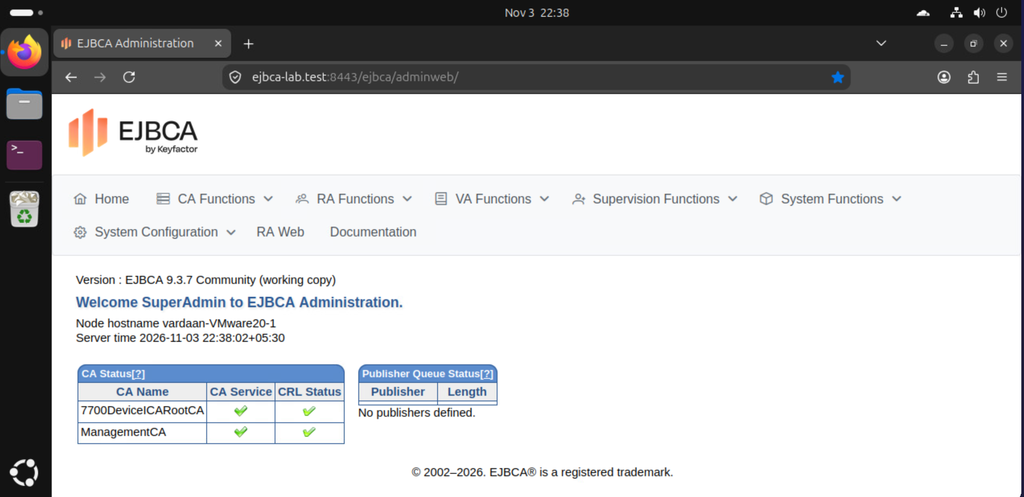
If the browser shows Secure Connection Failed instead, see T6.
Part 2: Integrate the nShield HSM
In Part 2, you connect the server to the nShield Connect HSM and give EJBCA access to its module-protected slot, so that CA keys are generated and used inside the HSM instead of being stored in the EJBCA database.
Step 6: Install the nShield software
6.1 Get the installation files
Place these in ~/Downloads on the server:
SecWorld_Lin64-13.9.3.iso.zip, from the nShield support portal.- A folder named
nshield-kmdatathat holds theworldfile and themodule_<ESN>files from/opt/nfast/kmdata/localon your RFS. If you don’t have access to the RFS, ask your HSM administrator for these files.
If the files are on another computer, copy them to the server with scp.
6.2 Extract the ISO
cd ~/Downloads
unzip SecWorld_Lin64-13.9.3.iso.zip
6.3 Mount the ISO and install Security World
Mount the ISO:
sudo mkdir -p /mnt/nshield
sudo mount -o loop,ro "$HOME/Downloads/SecWorld_Lin64-13.9.3.iso" /mnt/nshield
The ISO’s linux/amd64 folder holds eight archives:
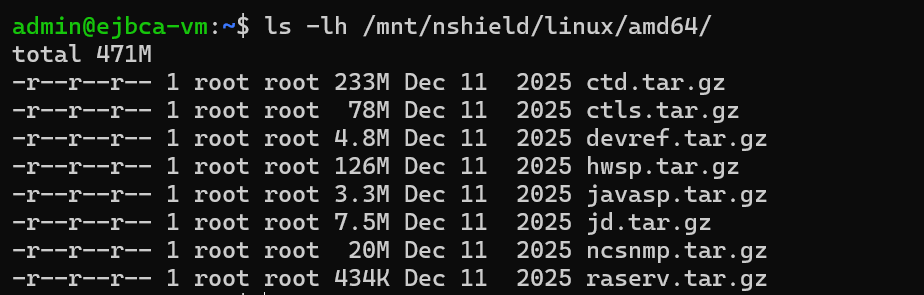
You need only two of them. Extract hwsp.tar.gz (hardware support) and ctls.tar.gz (core tools, including the PKCS#11 library), then run the installer:
cd /mnt/nshield/linux/amd64/
sudo tar -C / -xzf hwsp.tar.gz
sudo tar -C / -xzf ctls.tar.gz
sudo bash /opt/nfast/sbin/install
The installer ends with ---- Installation complete ---- and starts the hardserver. You can ignore these messages. They appear because no nShield card is installed in the server itself:
useradd: warning: the home directory /opt/nfast already exists.
No nCipher PCI nfp devices found.
No locally built nShield 5s drivers found for kernel 7.0.0-38-generic
nShield 5 sshadmin key backup failed. Continuing ...
Warning: Installed, but no directly attached hardware was found.
The hardserver is now running. enquiry shows it in operational mode, at version 13.9.3:
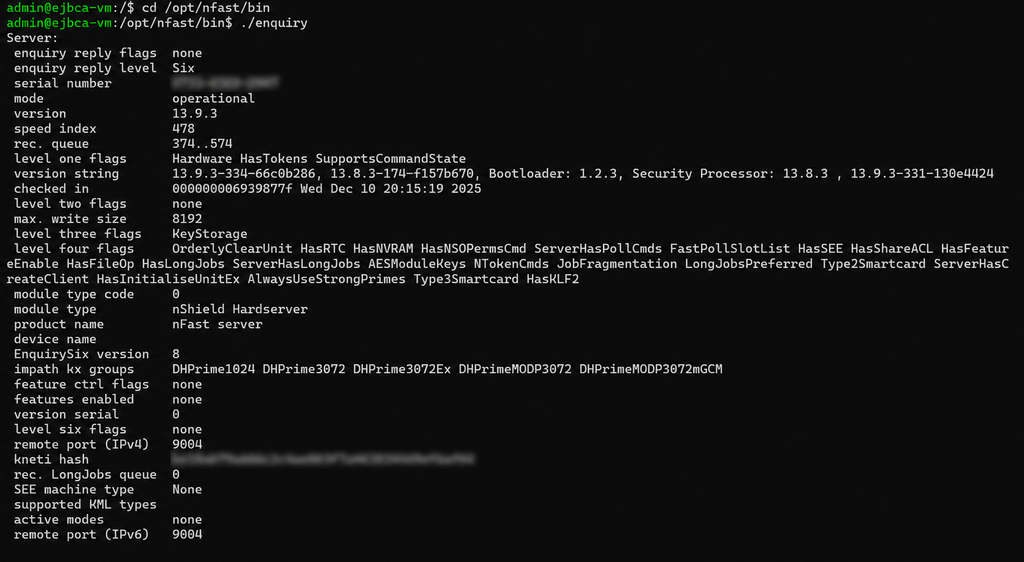
Unmount the ISO:
cd ~
sudo umount /mnt/nshield
Step 7: Enroll the server with the HSM
7.1 Read the HSM’s ESN and KNETI hash
cd /opt/nfast/bin
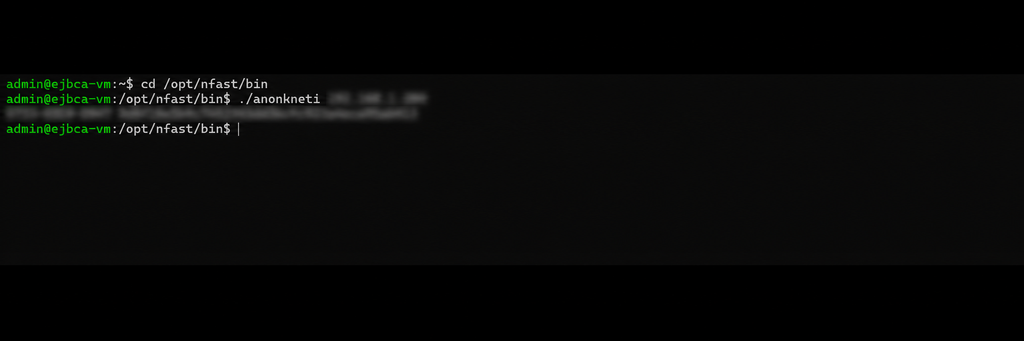
./anonkneti <HSM_IP>
The command prints one line with the ESN and the KNETI hash. Note both down; you need them in 7.2.
<ESN> <KNETI_HASH>
7.2 Enroll the server as an HSM client
Enroll the server with a privileged connection (-p), which EJBCA needs:
sudo ./nethsmenroll -p <HSM_IP>
At Is the above correct? (yes/no):, check that the ESN and HKNETI match the anonkneti output, then type yes. The command ends with OK configuring hardserver's nethsm imports.
Run enquiry to confirm the connection:
./enquiry
A new Module #1: block shows connection status OK:
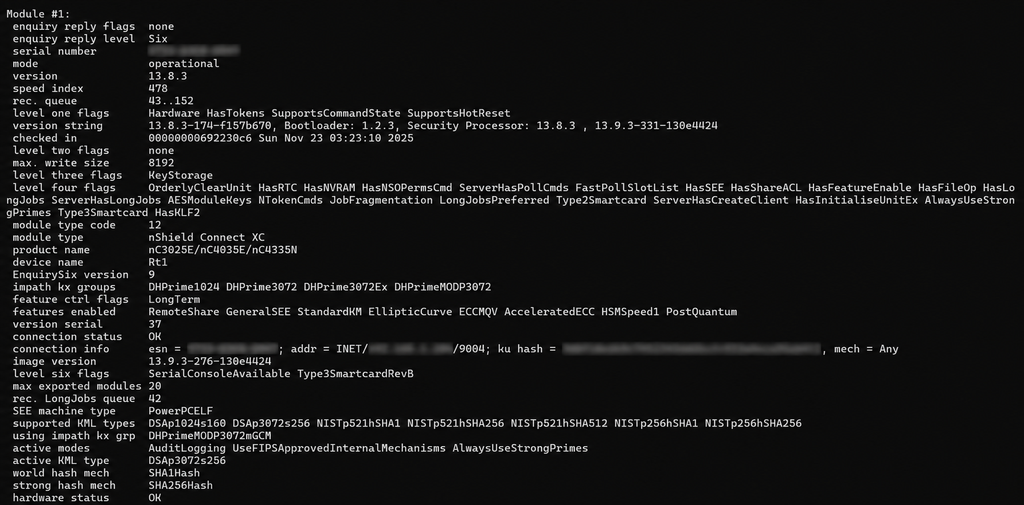
If it shows RemoteServerFailed, <us> (ServerAccessDenied) instead, see T1. Don’t continue until it shows OK.
Step 8: Give EJBCA access to the HSM
8.1 Install the Security World files
Copy the contents of nshield-kmdata (the /* matters) into /opt/nfast/kmdata/local, and restrict the folder to the nfast group:
sudo cp -r "$HOME/Downloads/nshield-kmdata/"* /opt/nfast/kmdata/local/
sudo chown -R nfast:nfast /opt/nfast/kmdata/local
sudo chmod 2770 /opt/nfast/kmdata/local
8.2 Let the wildfly user use the HSM
Add wildfly to the nfast group. WildFly picks up the new group when it restarts in 9.1.
sudo usermod -aG nfast wildfly
8.3 Configure the nShield PKCS#11 library
Open the library’s configuration file:
sudo nano /opt/nfast/cknfastrc
Replace everything in the file with the following, then save and exit:
CKNFAST_LOADSHARING=1
CKNFAST_FAKE_ACCELERATOR_LOGIN=1
CKNFAST_NO_SYMMETRIC=1
CKNFAST_NO_UNWRAP=1
CKNFAST_OVERRIDE_SECURITY_ASSURANCES=all
Step 9: Restart WildFly and verify the HSM integration
9.1 Restart WildFly
Restart WildFly so that it picks up the new group and library settings:
sudo systemctl restart wildfly
Wait about 60 seconds for EJBCA to start.
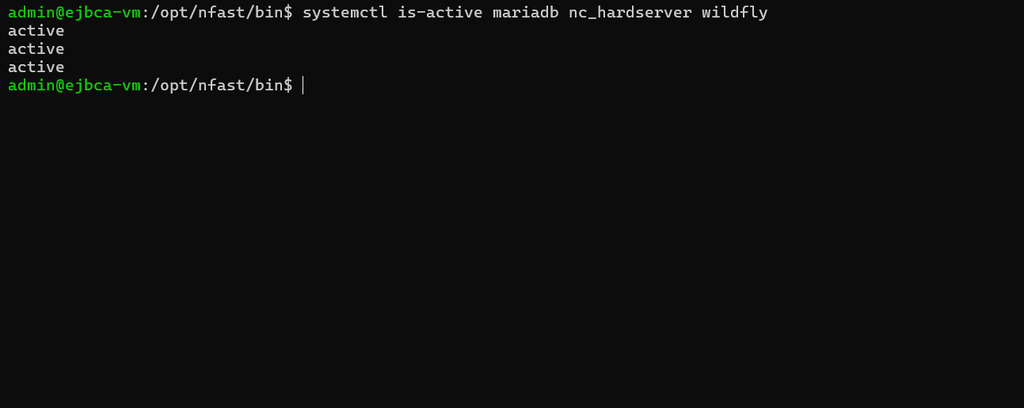
9.2 Check that the services are running
systemctl is-active mariadb nc_hardserver wildfly
Each of the three services reports active:
9.3 Check token access as the wildfly user
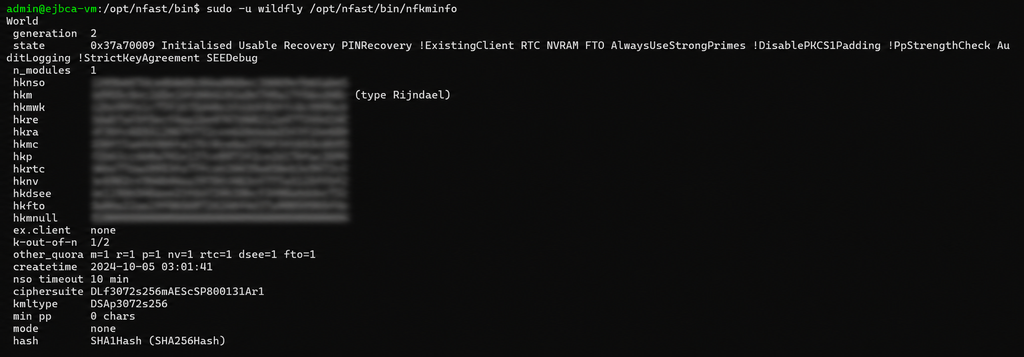
Run both checks as wildfly:
sudo -u wildfly /opt/nfast/bin/nfkminfo
sudo -u wildfly pkcs11-tool \
--module /opt/nfast/toolkits/pkcs11/libcknfast.so --list-slots
Both commands must succeed for the wildfly user:
nfkminfoshows noPermission denied, and World → state includesInitialised Usable.
pkcs11-toollists a slot whose token label isloadshared accelerator. This is the module-protected slot that EJBCA uses.
token label : loadshared accelerator
If the loadshared accelerator slot is missing, or you see an error such as CKR_FUNCTION_FAILED or Permission denied, see T2. If you see pkcs11-tool: command not found, see T3.
Step 10: Create a crypto token on the HSM
In AdminWeb, go to CA Functions → Crypto Tokens, click Create new…, and set:
- Name: a name for the token.
- Type: PKCS#11. (PKCS#11 NG is Enterprise-only, so it isn’t listed.)
- Auto-activation: tick Use.
- PKCS#11 : Library: nCipher.
- PKCS#11 : Reference Type: Slot/Token Label.
- PKCS#11 : Reference: loadshared accelerator.
- Authentication Code: any value. Module-protected keys have no PIN, so the library ignores what you enter.
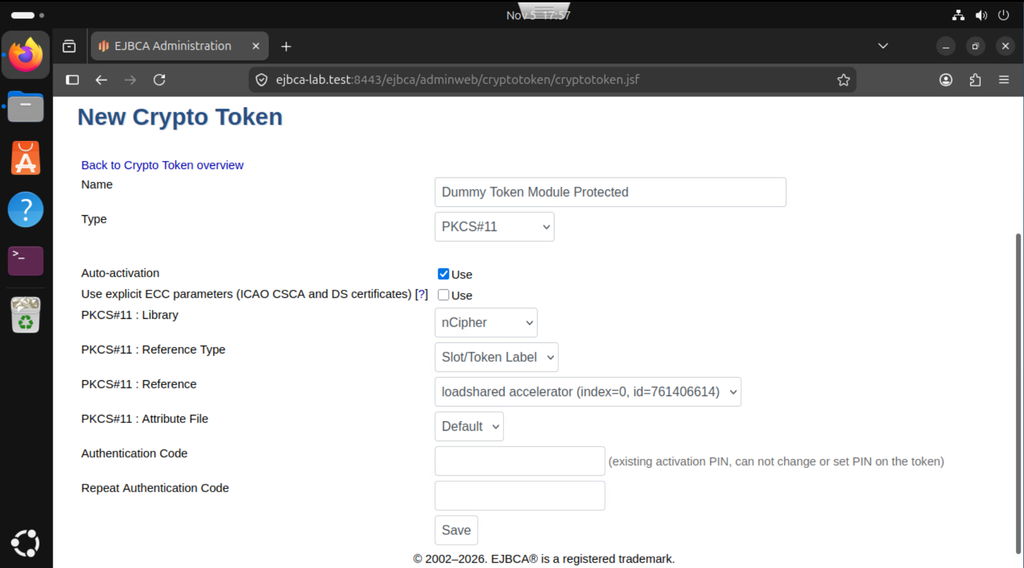
Click Save. You can now generate keys in the token and create CAs that use them.
You’re done when
- AdminWeb opens at
https://ejbca-lab.test:8443/ejbca/adminweb/as SuperAdmin (5.3). enquiryshowsconnection status OKfor Module #1 (7.2).mariadb,nc_hardserverandwildflyare all active (9.2).- The
wildflyuser can see theloadshared acceleratorslot throughpkcs11-tool(9.3). - The PKCS#11 crypto token on the HSM is saved in AdminWeb (Step 10).
Troubleshooting
T1 to T4 cover the HSM integration (Part 2). T5 and T6 cover Part 1.
T1. enquiry shows ServerAccessDenied after enrolling (7.2)
Symptom: enquiry shows these lines under Module #1:
enquiry reply flags Failed (or: Failed UnprivOnly)
connection status RemoteServerFailed, <us> (ServerAccessDenied)
Cause: The HSM hasn’t accepted the server’s IP address as a client yet. Re-enrolling or restarting the hardserver won’t fix this on its own.
Fix:
- Check the network path to the HSM, and note the server’s IP address:
nc -vz -w 5 <HSM_IP> 9004
hostname -I
If nc reports Connection to <HSM_IP> 9004 port [tcp/*] succeeded!, the network path is open. If it fails, check the network or firewall.

- Ask your HSM administrator to add the server’s IP address to the HSM’s client configuration as a privileged client.
- Once they confirm, enroll again.
-fupdates an HSM that the hardserver already knows. Keep-ptoo, or the connection is unprivileged (UnprivOnly).
cd /opt/nfast/bin
sudo ./nethsmenroll -p -f <HSM_IP>
./enquiry
When enquiry shows connection status OK, continue from 8.1.
T2. The slot is missing, or wildfly can’t open it
Symptom: The nCipher library or the loadshared accelerator token is missing when you create a crypto token, or the 9.3 checks fail.
Check that the library is at its standard path:
ls -l /opt/nfast/toolkits/pkcs11/libcknfast.so
Check that wildfly is in the nfast group:
sudo -u wildfly id
If nfast isn’t listed, run sudo usermod -aG nfast wildfly and restart WildFly.
If the group is right but the 9.3 checks still fail with errors like these, /opt/nfast/kmdata/local probably has the wrong permissions:
error: PKCS11 function C_Initialize failed: rv = CKR_FUNCTION_FAILED (0x6)
ERROR: cannot open kmdata file (/opt/nfast/kmdata/local/world): Permission denied
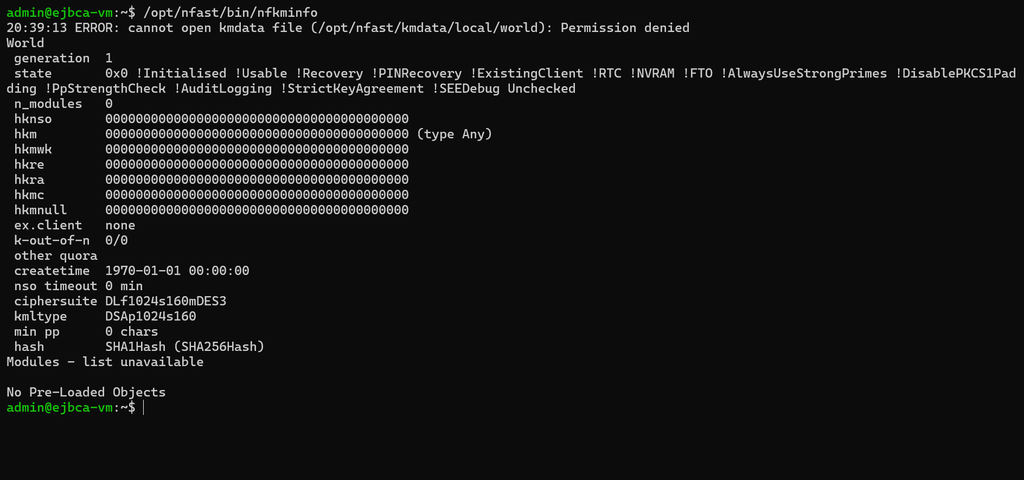
[IMAGE 15: ejbca-ce-nshield-hsm-ubuntu-15.png] Suggested alt text: nfkminfo failing with Permission denied when run without the nfast group
Check the path:
sudo namei -l /opt/nfast/kmdata/local/world
The local line should read drwxrws--- nfast nfast local, as in this example:
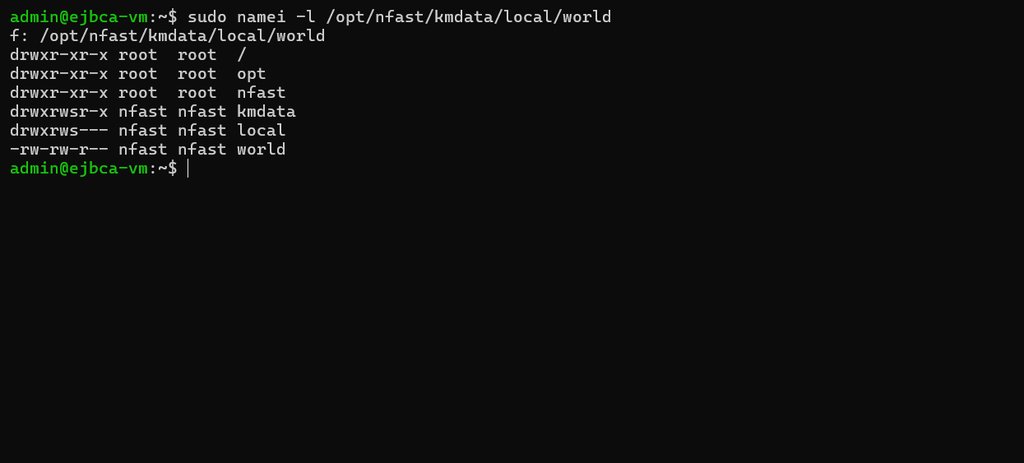
If it reads drwx------, fix it, re-run the checks, and restart WildFly:
sudo chmod 2770 /opt/nfast/kmdata/local
sudo -u wildfly /opt/nfast/bin/nfkminfo
sudo -u wildfly pkcs11-tool \
--module /opt/nfast/toolkits/pkcs11/libcknfast.so --list-slots
sudo systemctl restart wildfly
To see the PKCS#11 library’s own error, run:
sudo -u wildfly env CKNFAST_DEBUG=3 CKNFAST_DEBUGFILE=/dev/stderr \
pkcs11-tool --module /opt/nfast/toolkits/pkcs11/libcknfast.so --list-slots
To log the library’s activity from EJBCA itself, add CKNFAST_DEBUG=10 and CKNFAST_DEBUGFILE=/opt/nfast/log/p11.log to /opt/nfast/cknfastrc and restart WildFly. Remove both lines once you’ve finished, because the log grows quickly.
Note: After 8.1, your own user also gets
Permission deniedfromnfkminfounless you run it with sudo. That’s expected.
T3. pkcs11-tool: command not found
OpenSC isn’t installed. Install it, then repeat 9.3:
sudo apt install opensc
T4. CKR_TEMPLATE_INCONSISTENT when generating keys
Symptom: Creating a crypto token or generating a key pair in AdminWeb fails with CKR_TEMPLATE_INCONSISTENT (PKCS#11 code 0xD1).
Cause: The nShield PKCS#11 library rejects key templates that fail its security-assurance checks.
Fix: Make sure /opt/nfast/cknfastrc contains this line, with no # in front of it:
CKNFAST_OVERRIDE_SECURITY_ASSURANCES=all
Then restart WildFly with sudo systemctl restart wildfly, and compare the whole file with 8.3.
T5. jboss-cli says Timeout waiting for the system to boot
Symptom: Right after a start or restart, jboss-cli.sh --connect prints Failed to connect to the controller: Timeout waiting for the system to boot.
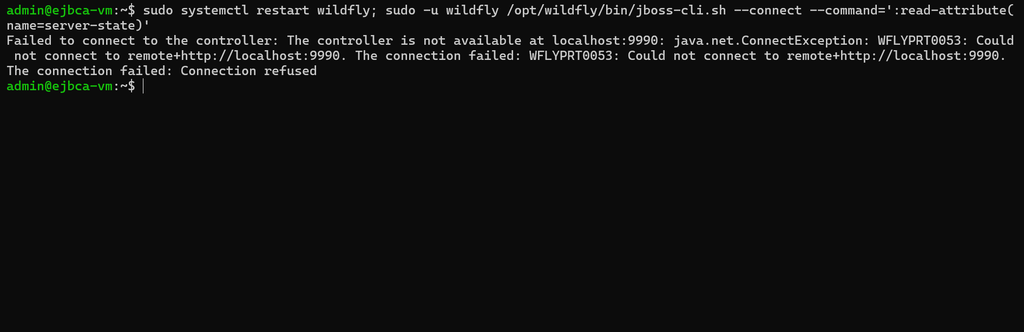
Cause: WildFly is still starting. With EJBCA deployed, startup takes longer.
Fix: Wait 30 to 60 seconds and run the command again. If it keeps failing, check the logs for the reason:
sudo journalctl -u wildfly -n 100 --no-pager
sudo tail -n 100 /opt/wildfly/standalone/log/server.log
T6. AdminWeb shows Secure Connection Failed
Symptom: The browser can’t open https://ejbca-lab.test:8443/ejbca/adminweb/ and shows a connection-failed page instead of a certificate prompt.
Cause: Port 8443 requires a client certificate, and the browser has none to offer. The SuperAdmin P12 hasn’t been imported, or it was imported into a different browser profile.
Fix: Import the SuperAdmin P12 as in 5.2, then reload the page.
Quick reference
| Task | Command |
|---|---|
| Status of the services | systemctl is-active mariadb wildfly (after Part 2, add nc_hardserver) |
| Restart WildFly (EJBCA) | sudo systemctl restart wildfly |
| WildFly server state | sudo -u wildfly /opt/wildfly/bin/jboss-cli.sh --connect --command=':read-attribute(name=server-state)' |
| Deployed apps | sudo -u wildfly /opt/wildfly/bin/jboss-cli.sh --connect --command='deployment-info' |
| WildFly log | sudo tail -f /opt/wildfly/standalone/log/server.log |
| PKCS#11 slots as wildfly | sudo -u wildfly pkcs11-tool --module /opt/nfast/toolkits/pkcs11/libcknfast.so --list-slots |
| HSM connection | /opt/nfast/bin/enquiry |
| Security World status | sudo -u wildfly /opt/nfast/bin/nfkminfo |
| Restart the nShield services | sudo /opt/nfast/sbin/init.d-ncipher restart |
Restart WildFly after you change the wildfly user’s groups or restart the nShield services, so that EJBCA reconnects to the HSM.
How Encryption Consulting can help
This guide gives you a working EJBCA Community Edition server with an nShield HSM behind it. Running it as production PKI takes more: a CA hierarchy and policies designed for your organisation, HSM configuration that meets your security and compliance requirements, tested backups and recovery, and automated certificate lifecycle management. Encryption Consulting can help at every stage.
- PKI Services: We assess, design and implement PKI, including CA hierarchy design and Certificate Policy and Certification Practice Statement (CP/CPS) development. Our support subscriptions then cover CA management, health checks, patching and audit preparation.
- HSM Services: Our HSM specialists assess, design, deploy and support HSMs from vendors including nShield, Thales and Utimaco, and integrate them with your PKI, cloud and enterprise applications.
- HSM-as-a-Service: If you’d rather not buy and run your own HSMs, get HSM-backed key protection that we host and maintain, including patching and upgrades.
- PKI-as-a-Service: If you’d rather not operate the CA at all, our managed PKI gives you a private PKI with automated enrollment through ACME and EST.
- CertSecure Manager: Once your CAs are issuing, CertSecure Manager discovers certificates across your public and private CAs and automates issuance and renewal through ACME, SCEP, EST and REST APIs, so certificates don’t expire unnoticed.
To discuss your PKI and HSM requirements, contact us.
Conclusion
You’ve installed EJBCA Community Edition 9.3.7 on Ubuntu 26.04, with WildFly as the application server and MariaDB as the database. AdminWeb requires the SuperAdmin client certificate, and EJBCA reaches the nShield Connect HSM through the nShield PKCS#11 library and the module-protected loadshared accelerator slot. The PKCS#11 crypto token you saved in Step 10 is ready for CA keys.
Next, generate keys in the token and create the CAs that use them. Our follow-on guide builds a two-tier post-quantum PKI with ML-DSA on this same server. Community Edition supports ML-DSA keys only in soft tokens, so that guide keeps its CA keys out of the HSM, but RSA and ECDSA CA keys can use the HSM token from this guide.
Before you run this server in production, back up the EJBCA database, the files in /opt/ejbca/conf and WildFly’s credential store, and make sure your RFS holds a current copy of the Security World. With those in place, you have an open-source PKI whose CA keys are generated and used inside the HSM.