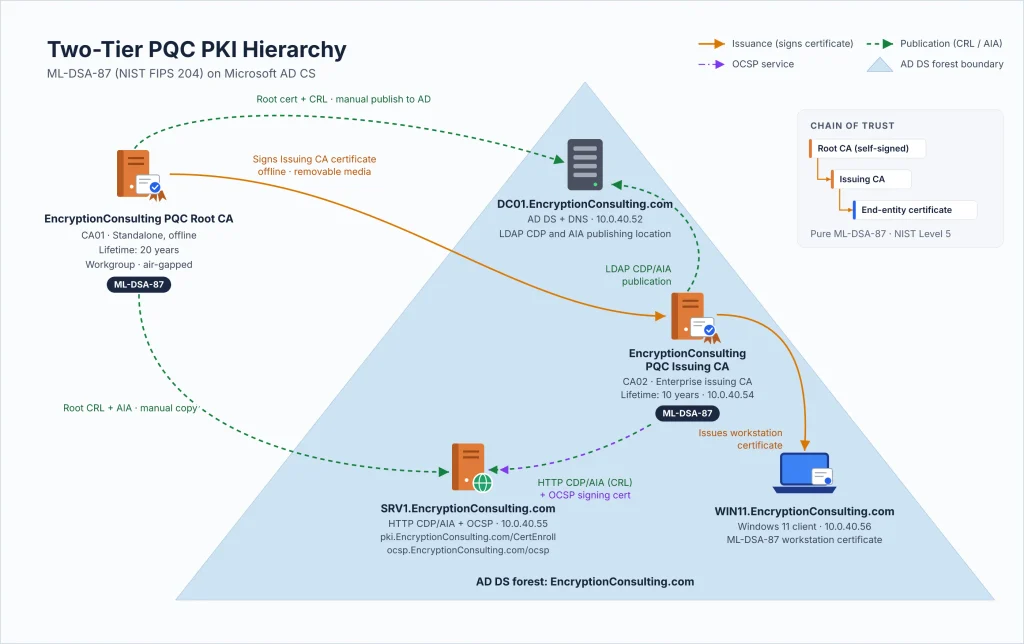
Why a two-tier hierarchy? In a two-tier PKI the Root CA is the trust anchor for everything below it, so it is kept offline and used only to sign the Issuing CA certificate and its own CRL. The Issuing CA is online and domain-joined, and it issues the day-to-day certificates. If the Issuing CA is ever compromised, you can revoke it from the Root CA and build a replacement without changing the trust anchor your clients already hold. This separation of duties is why two tiers is the usual starting point for enterprise PKI, and it is the model used throughout this guide.
There are five computers/machines involved in this two-tier PKI hierarchy lab using Microsoft Active Directory Certificate Services (AD CS), and every certificate in the hierarchy is signed with the NIST post-quantum signature algorithm ML-DSA (FIPS 204).
There is one domain controller (DC01) that is also running Active Directory-integrated Domain Name System (DNS). This computer will also provide the Lightweight Directory Access Protocol (LDAP) location for the CDP and the AIA point for the PQC PKI configuration.
One Standalone Offline Root CA (CA01) using ML-DSA-87.
One Enterprise Issuing CA (CA02) using ML-DSA-87.
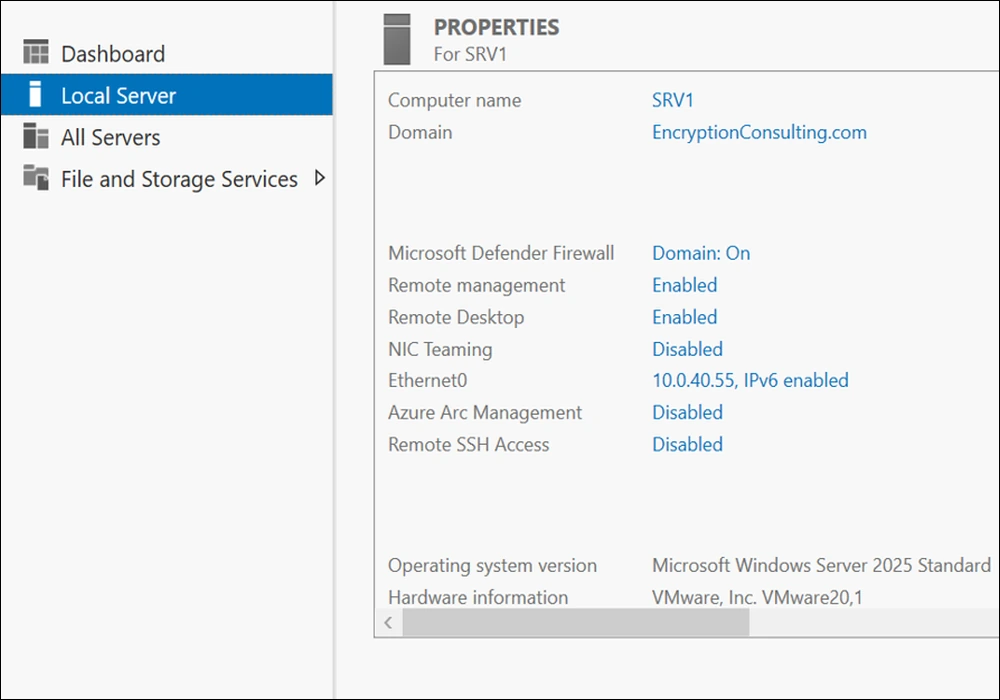
One Web Server (SRV1) (HTTP CDP/AIA and Online Responder) and
One Windows 11 Client computer (WIN11).
Virtual Machine
Roles
OS Type
IP Address
Subnet mask
Preferred DNS server
DC01.EncryptionConsulting.com
DC & DNS – LDAP CDP/AIA
Windows Server 2025
10.0.40.52
255.255.255.0
10.0.40.52
CA01
Standalone Offline Root CA (ML-DSA-87)
Windows Server 2025 + KB5087539 or later
NA
NA
NA
CA02.EncryptionConsulting.com
Enterprise Issuing CA (ML-DSA-87)
Windows Server 2025 + KB5087539 or later
10.0.40.54
255.255.255.0
10.0.40.52
SRV1.EncryptionConsulting.com
Web Server – HTTP CDP/AIA, Online Responder (OCSP)
Windows Server 2025 + KB5087539 or later
10.0.40.55
255.255.255.0
10.0.40.52
WIN11.EncryptionConsulting.com
Windows Client Computer
Windows 11 24H2/25H2 + KB5067036 or later
10.0.40.56
255.255.255.0
10.0.40.52
PQC design choices used in this lab
ML-DSA comes in three parameter sets. This lab uses ML-DSA-87 throughout for simplicity and CNSA 2.0 alignment. In production, a common pattern is ML-DSA-87 for long-lived root and issuing CA keys and ML-DSA-65 for short-lived, size-sensitive leaf and OCSP certificates. AD CS allows different parameter sets per CA. This guide uses pure ML-DSA; AD CS does not support the pre-hash HashML-DSA variant.
Parameter set
Public key
Private key
Signature
NIST security level
Used in this lab for
ML-DSA-44
1,312 bytes
2,560 bytes
2,420 bytes
Level 2
Not used
ML-DSA-65
1,952 bytes
4,032 bytes
3,309 bytes
Level 3
Not used
ML-DSA-87
2,592 bytes
4,896 bytes
4,627 bytes
Level 5
Root CA, Issuing CA, OCSP signing, WIN11 certificate
PQC deployment compared with traditional RSA PKI
What changes versus the classic RSA guide
PQC (ML-DSA) approach
Operating system
Windows Server 2025 with the 2026-05 security update (KB5087539) or later on every CA and on the Online Responder; Windows 11 24H2/25H2 client with KB5067036 or later.
Cryptographic provider
A CNG Key Storage Provider such as ML-DSA:87#Microsoft Software Key Storage Provider. Legacy CryptoAPI providers do not offer ML-DSA.
Hash algorithm and key length
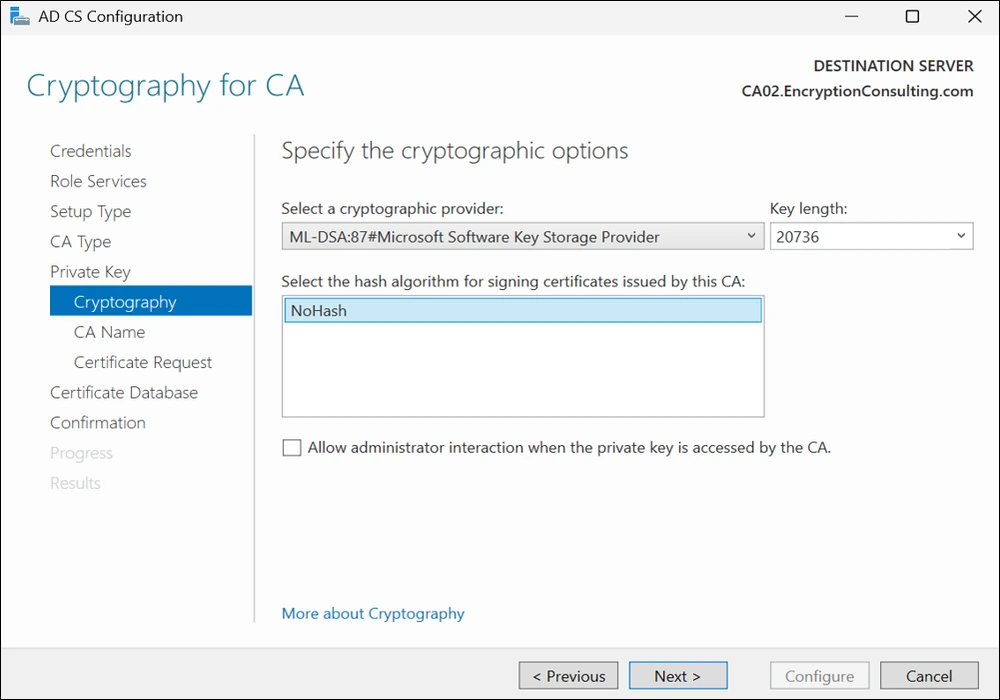
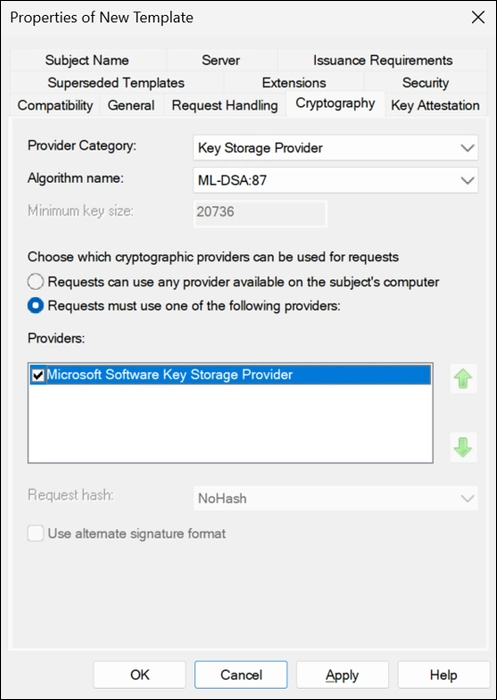
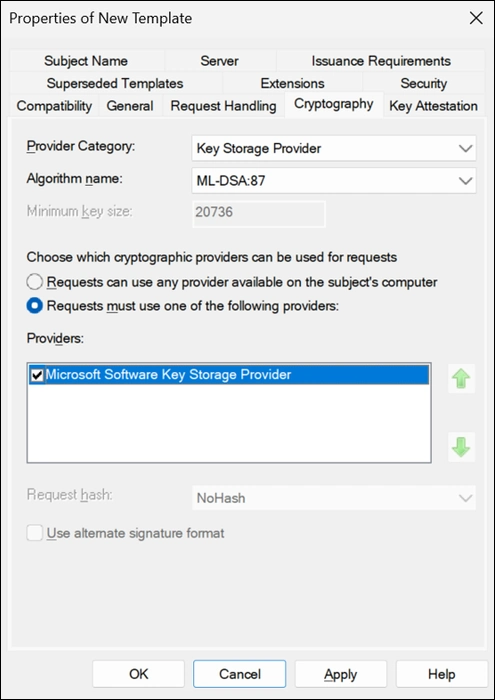
Hash algorithm is NoHash because ML-DSA hashes internally. The value 20,736 represents the public-key size in bits (2,592 bytes × 8); it is not a security-strength value and must not be compared with RSA-2048 or RSA-4096. ML-DSA-87 provides NIST Level 5 security, comparable to AES-256, and this value is fixed. For reference: ML-DSA-44 = 10,496 bits, ML-DSA-65 = 15,616 bits, and ML-DSA-87 = 20,736 bits.
Migration model
No in-place conversion of an existing CA. This is a new hierarchy built in parallel with any classical one.
Certificate templates
Duplicate the built-in template, set compatibility to Windows Server 2008 or later, use a Key Storage Provider, set Purpose to Signature, and select the ML-DSA algorithm.
Revocation
CRLs are signed with ML-DSA automatically, and OCSP responses are signed with an ML-DSA OCSP signing certificate.
PQC note: ML-DSA provides digital signatures; it does not provide encryption or key exchange. “Harvest now, decrypt later” is a confidentiality risk addressed by post-quantum key exchange in the communication protocol, such as TLS hybrid X25519MLKEM768, rather than by the PKI itself.
ML-DSA protects long-lived signed artifacts—such as CA certificates, code and firmware signatures, and signed documents—from future forgery. For a fully post-quantum PKI chain, ML-DSA should be used at every tier: the root CA, issuing CA, and leaf certificates. If the weakest signature in the chain can be forged, an attacker may create a certificate that appears trusted. The root’s key algorithm is important because it signs the issuing CA; trust in the root comes from its secure distribution, not from its self-signature.
Major Steps
There are eight major steps in this step-by-step guide as listed below (each includes several sub-tasks).
Prepare the Active Directory Environment and Supporting Services
Deploy the Offline Standalone Root CA
Configure the Offline Standalone Root CA
Prepare the Enterprise Issuing CA
Deploy the Enterprise Subordinate Issuing CA
Configure the Enterprise Subordinate Issuing CA
Deploy and Configure the Online Responder
Configure Certificate Enrollment and Validate the PQC PKI Hierarchy
Activity 1: Prepare the Active Directory Environment and Supporting Services
Task 1: Install a new forest by using Server Manager
To install the EncryptionConsulting.com forest:
Open the console for the platform hosting the lab, such as VMware, Hyper-V, or Azure. Start the DC01 virtual machine and sign in as DC01\Administrator.
Open Server Manager by pressing Win + R, typing servermanager, and pressing Enter.
In Server Manager, click Manage and then click Add Roles and Features.
On the Before You Begin page, click Next.
On the Select Installation Type page, click Role-based or feature-based installation.
On Server Selection, select a server from the server pool and click Next.
On the Select Server Roles page, select Active Directory Domain Services. Click Next.
If prompted by the Add Roles and Features Wizard, click Add Features and then click Next.
On the Features page, click Next.
On the Active Directory Domain Services page, click Next.
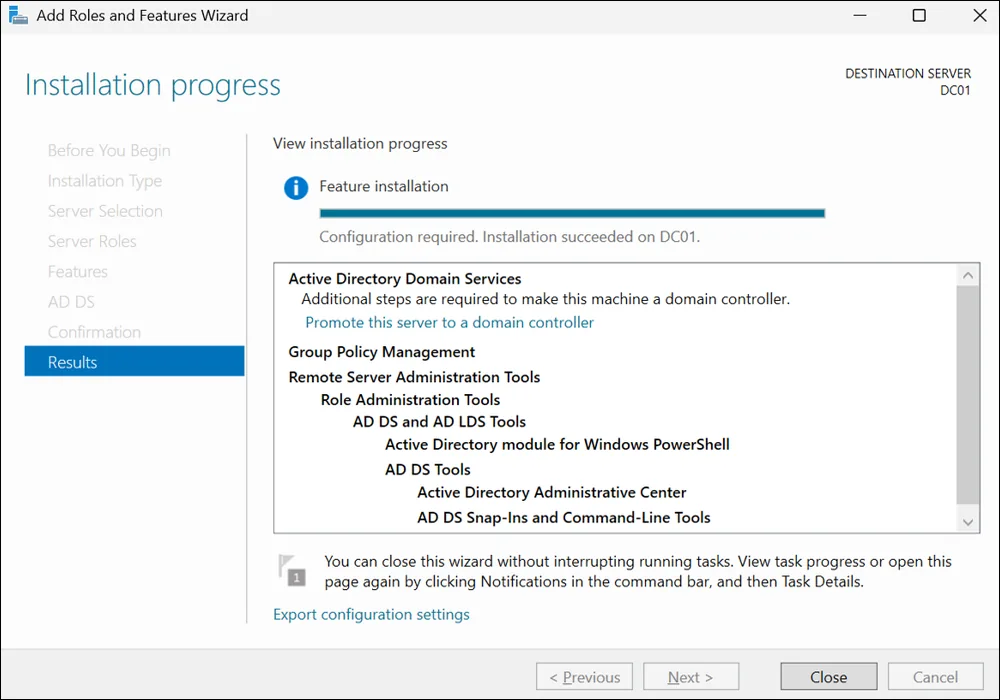
On the Confirm Installation Selections page, click Install.
When completed, click the hyperlink to Promote this server to a domain controller.
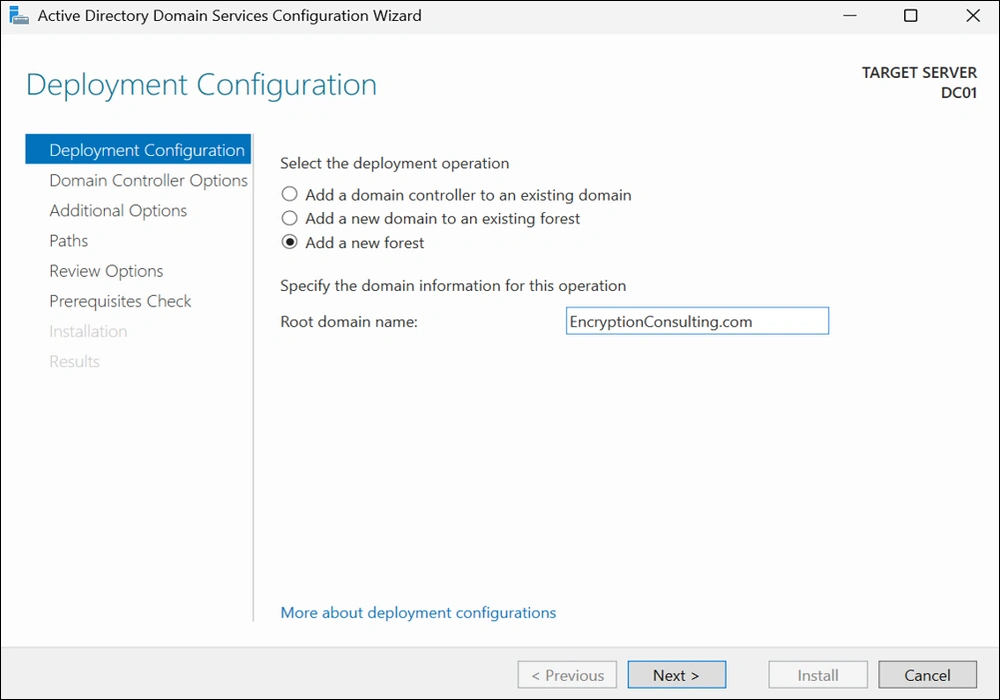
On the Deployment Configuration page, select Add a new forest. In Root domain name, type EncryptionConsulting.com, and then click Next.
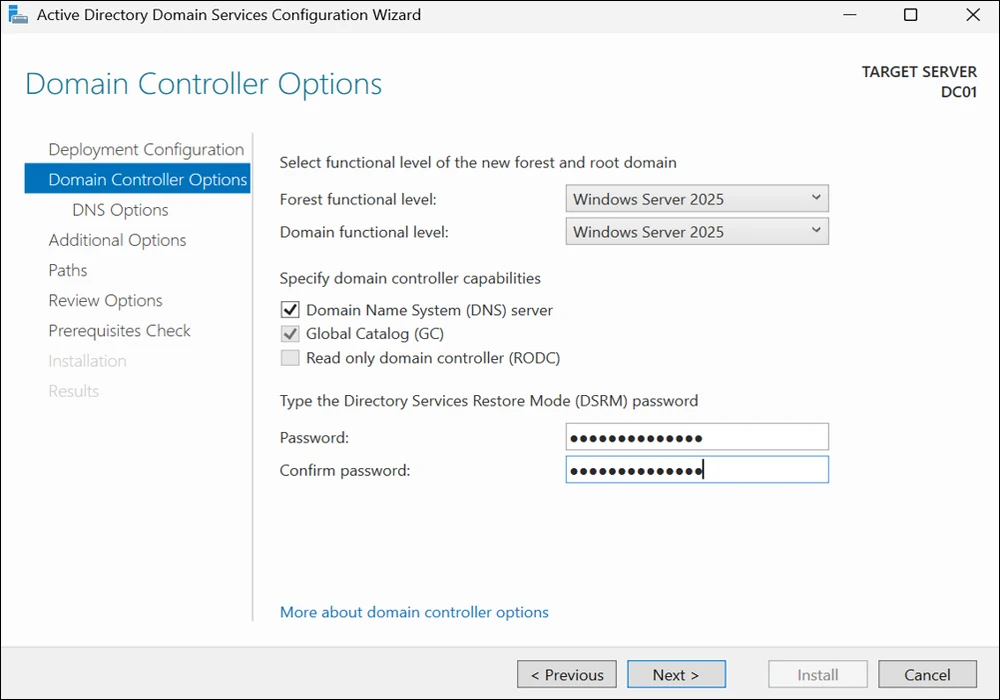
On the Domain Controller Options page, in the Forest functional level drop-down menu, select Windows Server 2025 and then click Next.
On the Directory Services Restore Mode (DSRM) password box, type and confirm the restore mode password, and then click Next. This password must be used to start AD DS in Directory Service Restore Mode for tasks that must be performed offline.
DNS server is selected by default so that your forest DNS infrastructure can be created during AD DS installation. In our scenario we are going to use Active Directory-integrated DNS so we have selected to install DNS.
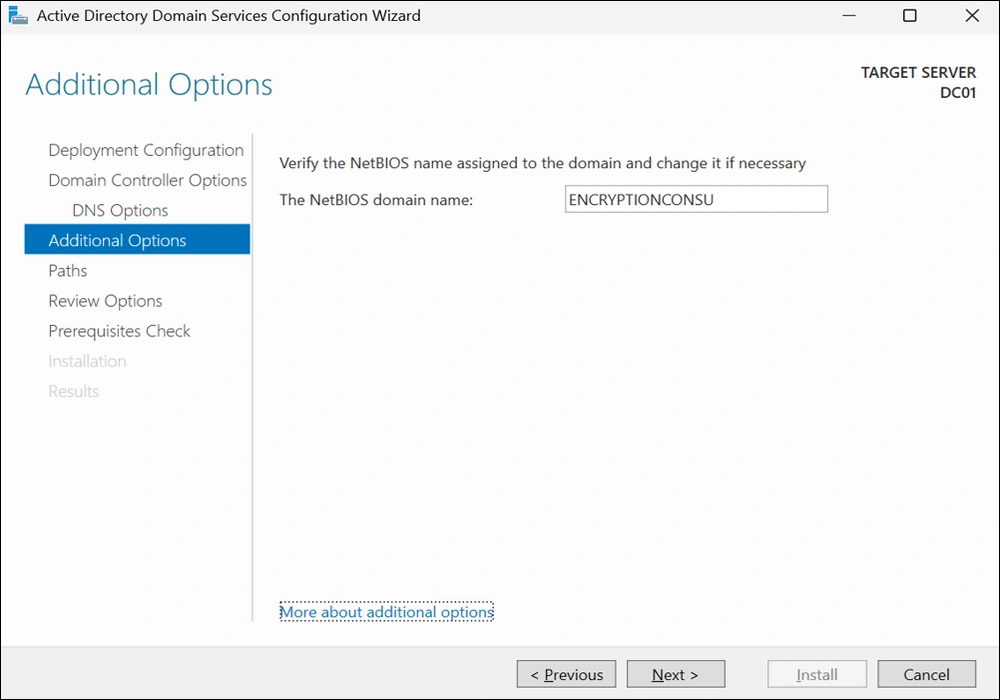
On the Additional Options page, click Next.
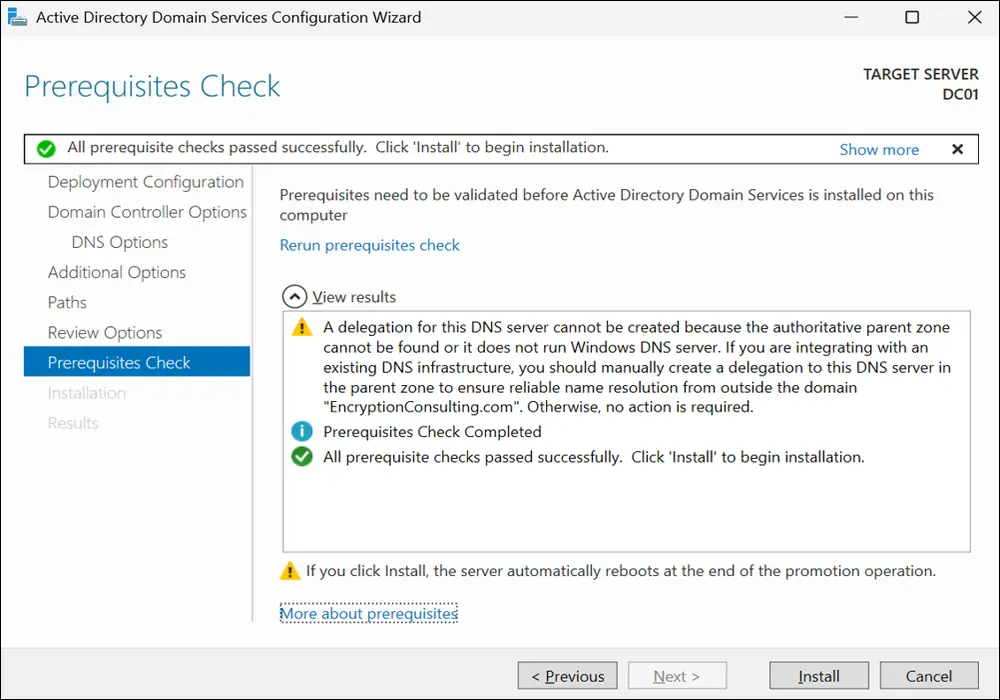
If no static IP address is assigned for the network adapter, a warning message appears advising you to set static addresses. The wizard also displays a message indicating that it cannot create a delegation for the DNS server. Click Yes to continue.
Enterprise PKI Services
Get complete end-to-end consultation support for all your PKI requirements!
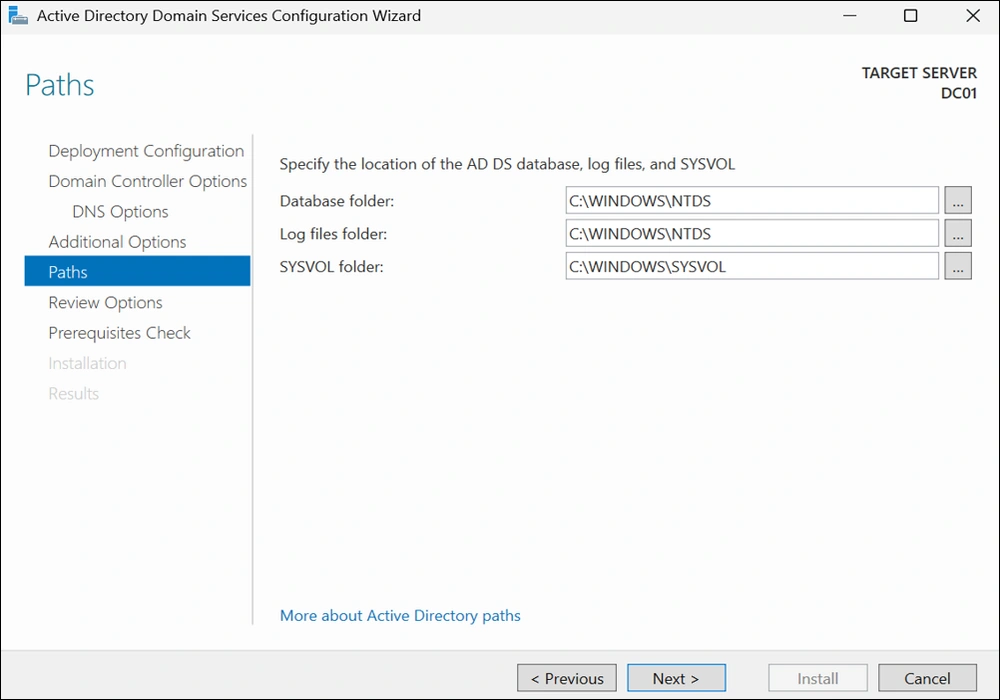
On the Location for Database, Log Files, and SYSVOL page, click Next.
On the Prerequisites Check page, review your selections and click Install to install Active Directory Domain Services.
Wait for some time until the installation completes and the system restarts.
Note: If you are using Active Directory-integrated DNS, the IP address for the Preferred DNS server for the first domain controller in the forest is automatically set to the loopback address of 127.0.0.1. This helps assure that the IP address of the first domain controller will be resolved in DNS even if the static IP address of the server is changed. If you prefer to configure the actual IP address of the DNS server rather than the loopback address, then replace it with 10.0.40.52 after the restart.
Task 2: HTTP Web Server: CDP and AIA Publication
Log on to SRV1 as the local administrator.
Click Start, type sysdm.cpl, and press ENTER. Click Change.
In Member of, select Domain, and then type EncryptionConsulting.com. Click OK.
In Windows Security, enter the User name and password for the domain administrator account. Click OK.
You should be welcomed to the Encryption Consulting domain. Click OK.
When prompted that a restart is required, click OK. Click Close. Click Restart Now.
Task 3: Install Web Server (IIS) Role
Log on to EncryptionConsulting.com as ENCRYPTIONCONSU\Administrator. (Ensure that you switch user to log on as ENCRYPTIONCONSU\Administrator.)
Open Server Manager.
Click Manage and then select Add Roles and Features.
On the Before You Begin page select Next.
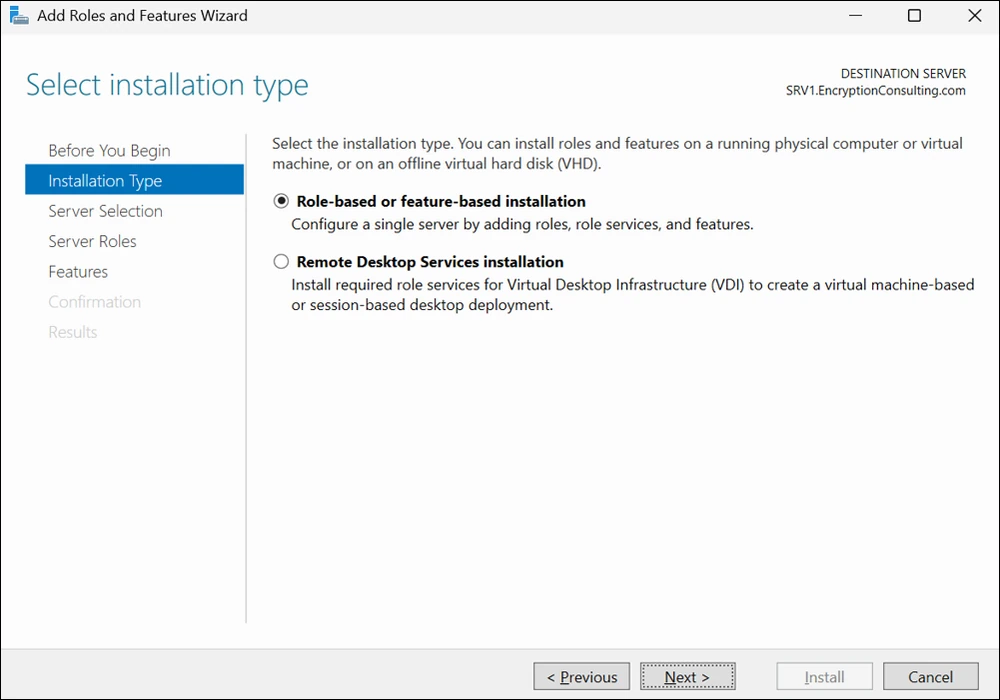
On the Select Installation Type page, select Role-based or feature-based installation.
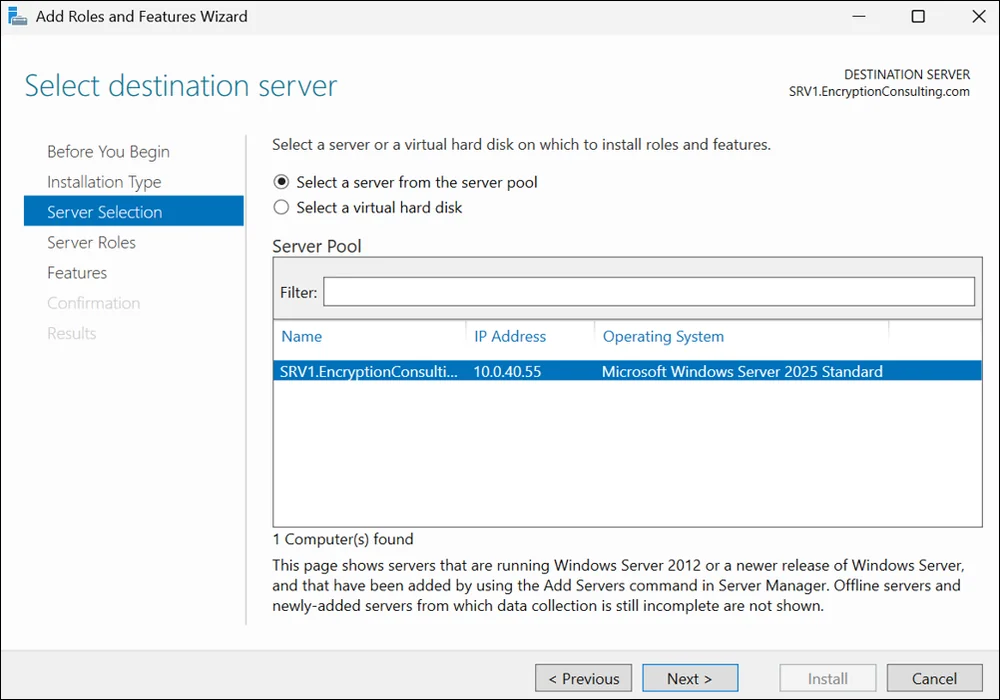
On Select Destination Server, select a server from the server pool, select SRV1.EncryptionConsulting.com, then click Next.
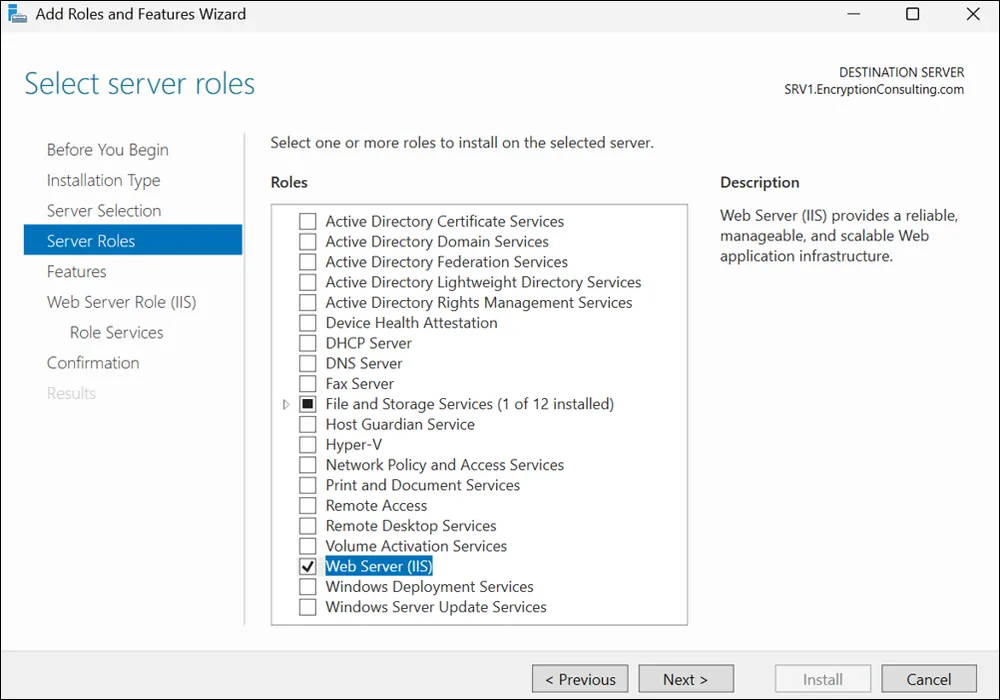
On the Select Server Roles page select Web Server (IIS) and then click Next.
On the Select features page, click Next.
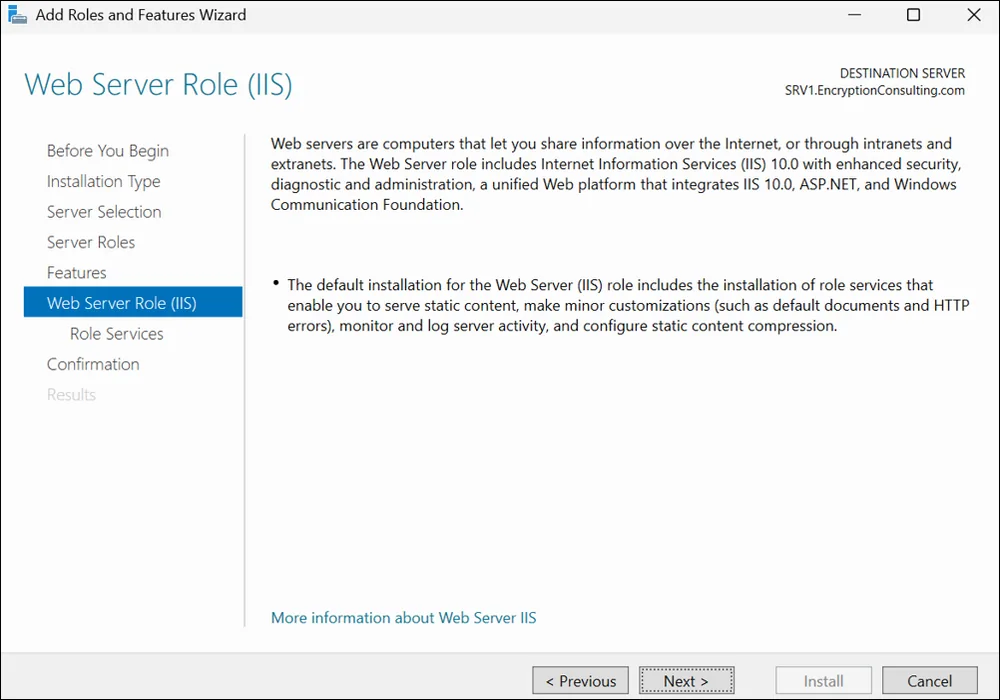
On the Web Server Role (IIS) page, click Next.
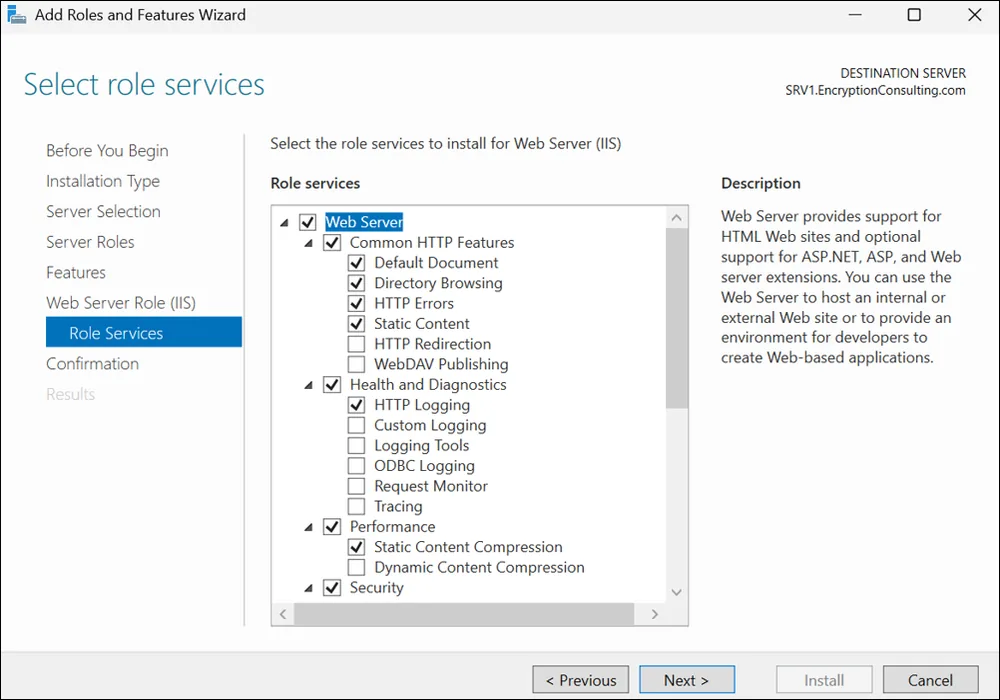
Leave the defaults on the Select Role Services page and then click Next.
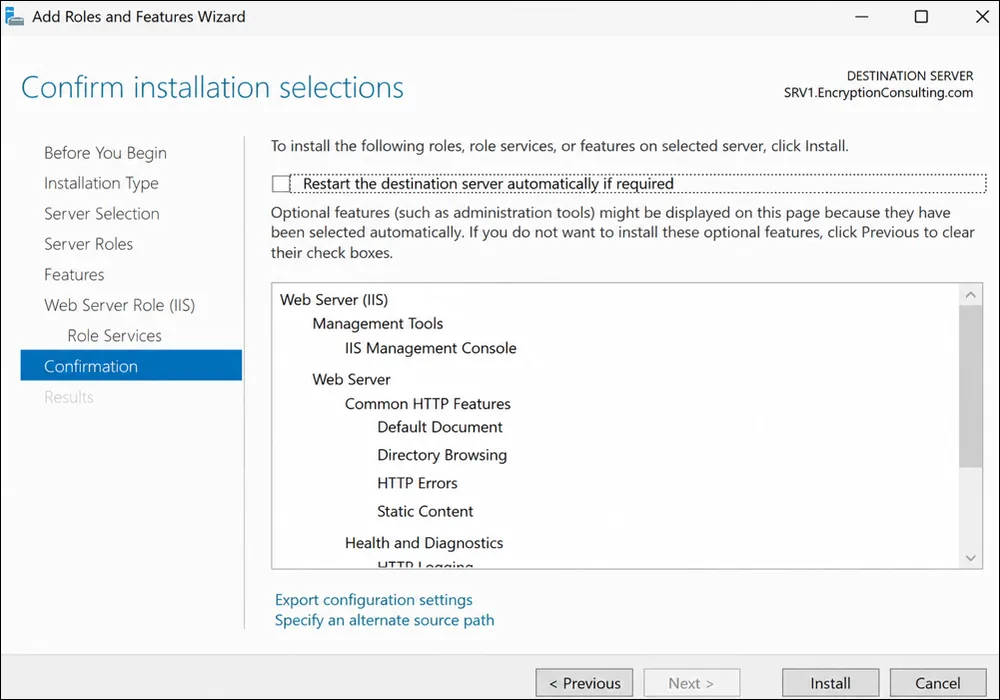
On the Confirm Installation Selections page, click Install.
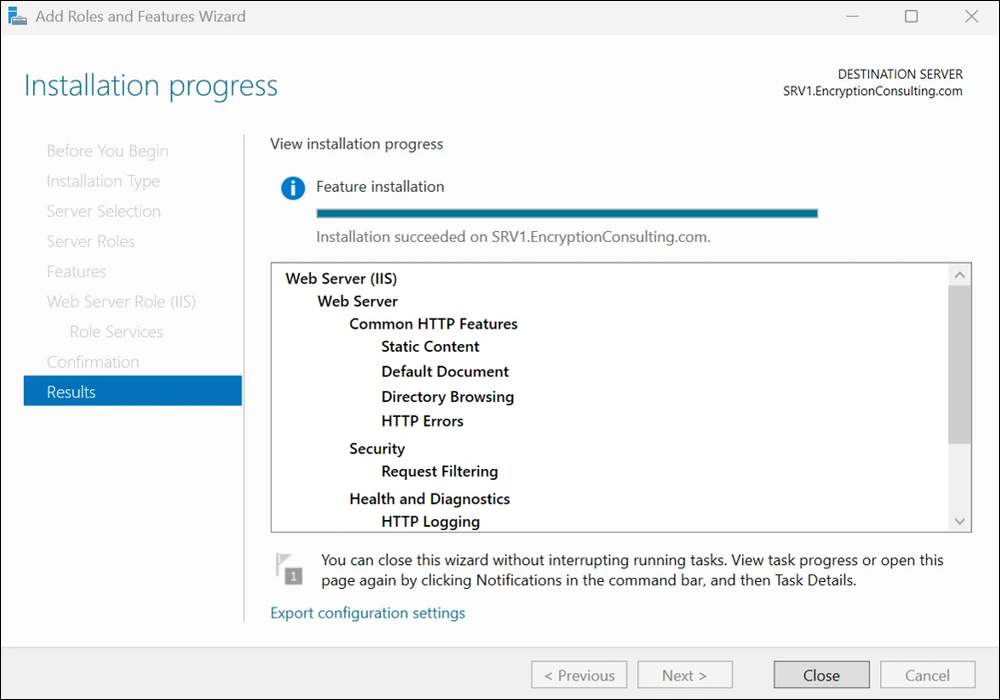
On the Installation Results page, click Close.
Task 4: Create CertEnroll Folder and grant Share & NTFS Permissions to Cert Publishers group
Why this permission is required: When CA02 is installed as an Enterprise CA, its computer account (CA02$) is automatically added to the Cert Publishers group. That membership does not by itself give CA02 access to SRV1. To let CA02 publish CRLs to the shared \\srv1\CertEnroll folder configured later in Activity 6, grant the Cert Publishers group Change permission on the share and Modify permission on the NTFS folder. Both the share and NTFS permissions must allow the group.
Log on to EncryptionConsulting.com as ENCRYPTIONCONSU\Administrator.
Click Start and select File Explorer (or Computer) and then go to the C: drive.
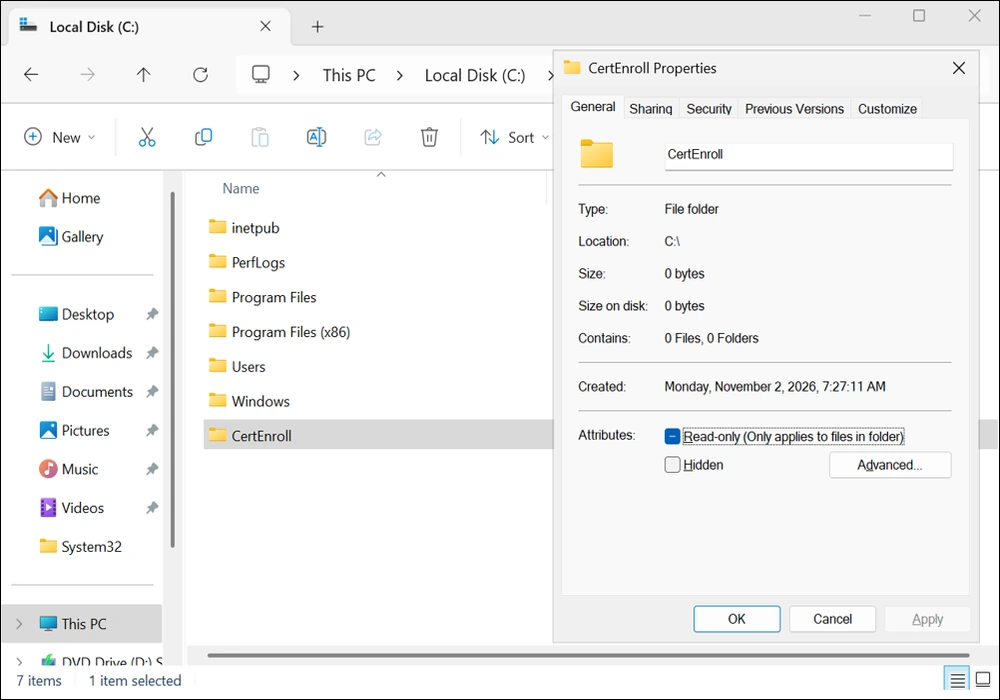
Create a folder called CertEnroll at the root of the C: drive.
Right-click on the CertEnroll folder and select Properties.
On the CertEnroll Properties page select the Sharing tab to configure share permissions.
Click on Advanced Sharing and then select Share this folder.
Click on Permissions and then click Add.
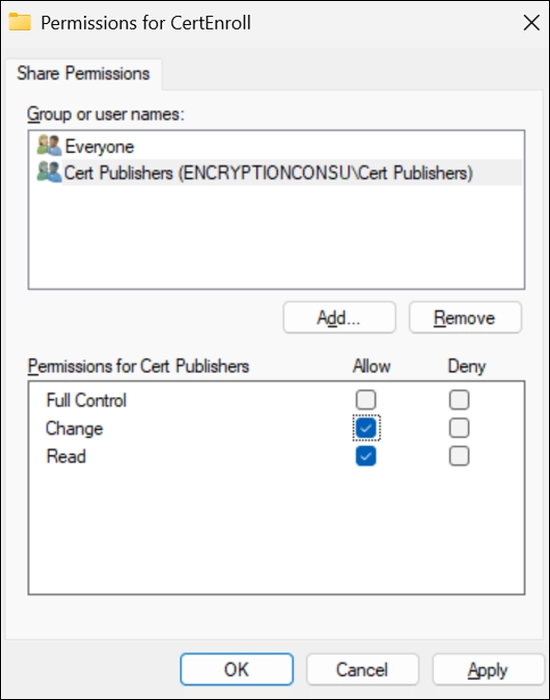
On Select Users or Groups page, in the Enter the object names to select, type ENCRYPTIONCONSU\Cert Publishers, and then click OK.
On the Permissions for CertEnroll dialog box, select the Cert Publishers group and then in the Allow column select Change permission. Click OK twice to go back to the CertEnroll Properties page.
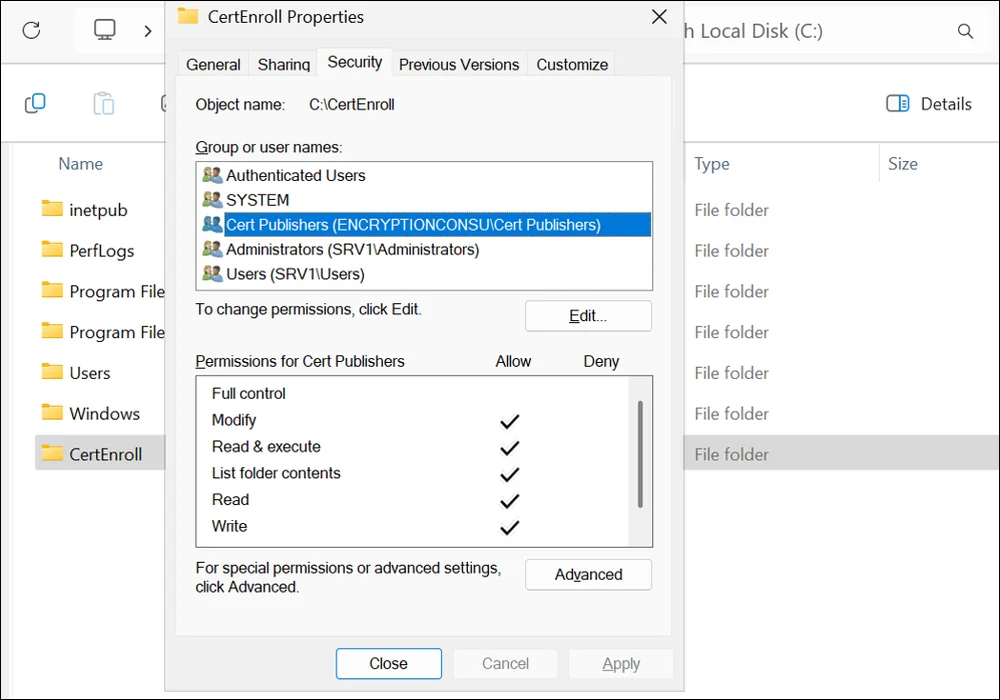
Select the Security tab and click Edit to configure NTFS permissions.
On the Permissions for CertEnroll page click Add.
On Select Users or Groups page, under Enter the object names to select, enter ENCRYPTIONCONSU\Cert Publishers, and then click OK.
On the Permissions for CertEnroll page highlight the Cert Publishers group, and then under the Allow column select Modify permission. Click OK.
On the CertEnroll Properties page, click OK.
Task 5: Create CertEnroll Virtual Directory in IIS
Ensure you are logged on to EncryptionConsulting.com as ENCRYPTIONCONSU\Administrator.
Open IIS Manager by pressing Win + R, typing inetmgr, and pressing Enter.
In Connections, expand SRV1 and then expand Sites.
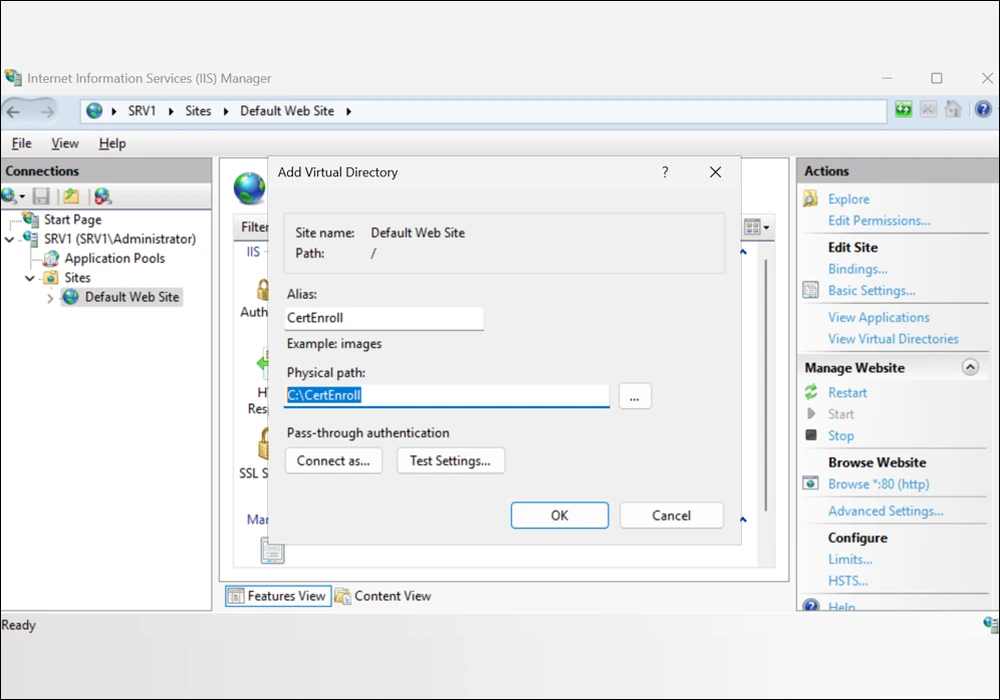
Right-click on Default Web Site and select Add Virtual Directory.
On the Add Virtual Directory page, in Alias, type CertEnroll. In Physical path, type C:\CertEnroll, and then click OK.
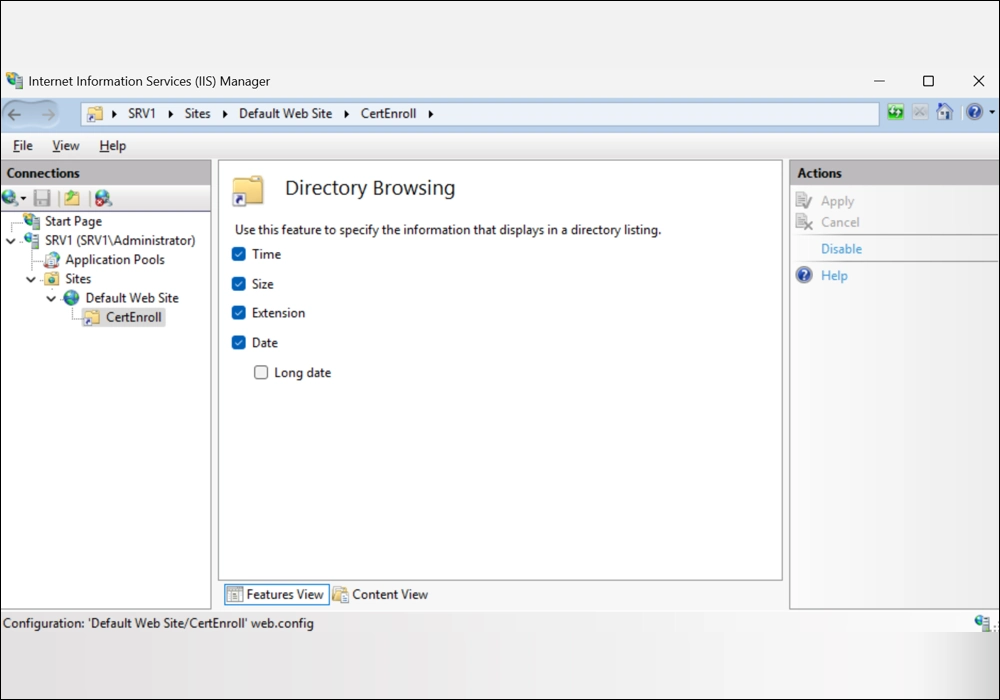
In the Connections pane, under Default Web Site, ensure the CertEnroll virtual directory is selected.
In the CertEnroll Home pane, double-click on Directory Browsing.
In the Actions pane click Enable.
Task 6: Enable Double Escaping on IIS Server
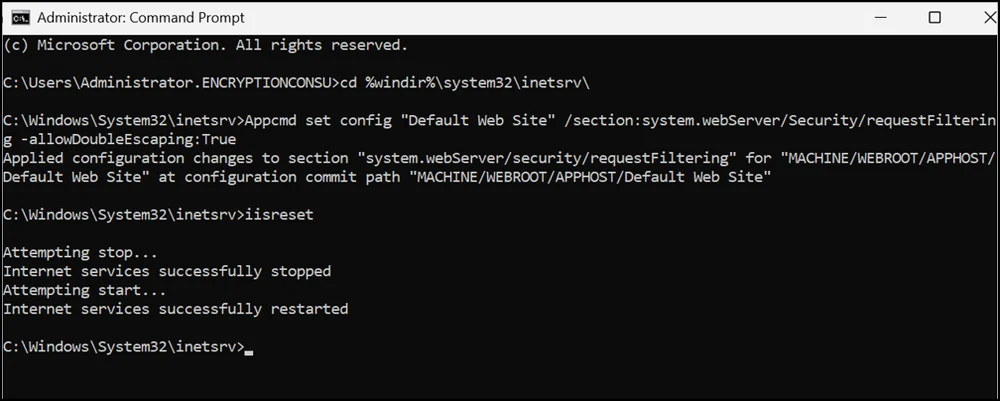
Why IIS double escaping is required: Delta CRL filenames may contain a plus sign (+), for example EncryptionConsulting PQC Issuing CA+.crl. IIS blocks this character in URLs by default. If double escaping is disabled, clients may receive an HTTP 404.11 error and fail to download the Delta CRL, which can affect certificate-revocation checks. Enabling this setting allows IIS to serve the Delta CRL files correctly.
Ensure you are logged on to EncryptionConsulting.com as ENCRYPTIONCONSU\Administrator.
Open an elevated Command Prompt. To do so, click Start, type cmd, right-click Command Prompt and select Run as administrator.
Then type the following and press ENTER:
cd %windir%\system32\inetsrv\
Type the following command and press Enter.
Appcmd set config "Default Web Site" /section:system.webServer/Security/requestFiltering -allowDoubleEscaping:True
Restart the IIS service. To do so, type iisreset and press ENTER.
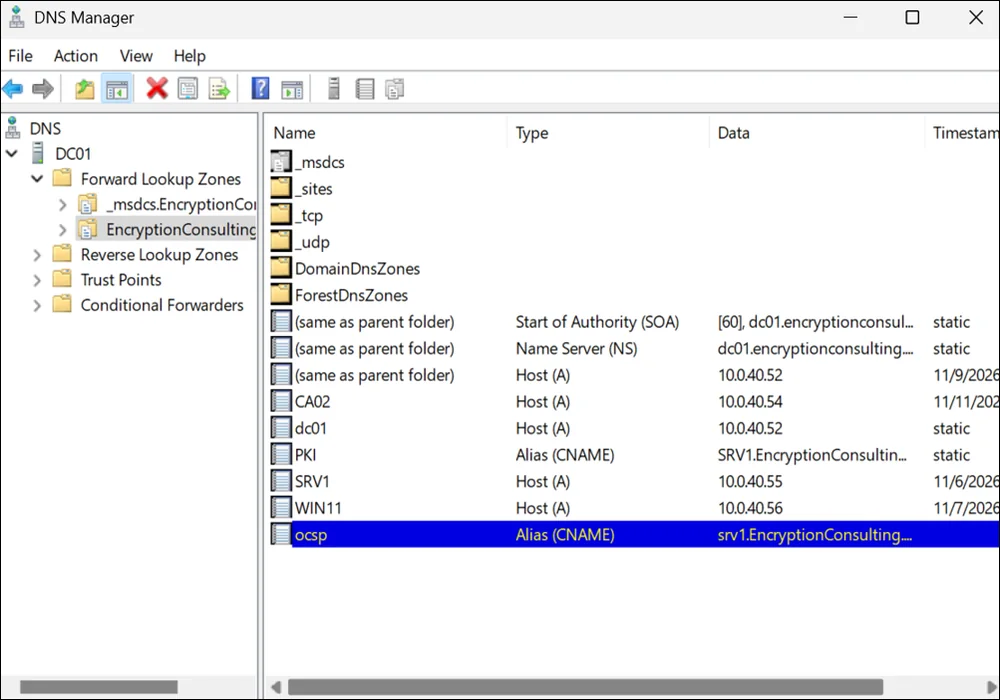
Task 7: Create CNAMEs (pki and ocsp) in DNS
Ensure that you are logged on to DC01 as ENCRYPTIONCONSU\Administrator.
Open the DNS Console by pressing Win + R, typing dnsmgmt.msc, and pressing Enter.
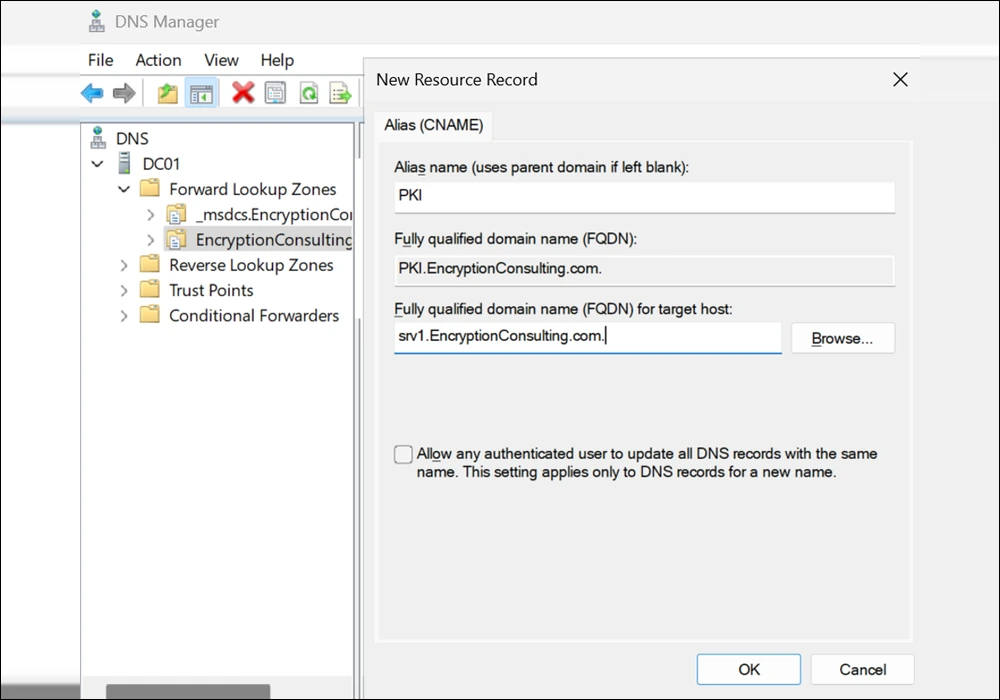
Expand Forward Lookup Zones, select and then right-click the EncryptionConsulting.com zone. Click New Alias (CNAME).
In Alias name (uses parent domain if left blank), type PKI. In the Fully qualified domain name (FQDN) for the target host field, type srv1.EncryptionConsulting.com. and then click OK.
Repeat steps 3 and 4 to create the OCSP alias. In Alias name, type ocsp. In the Fully qualified domain name (FQDN) for the target host field, type srv1.EncryptionConsulting.com. and then click OK.
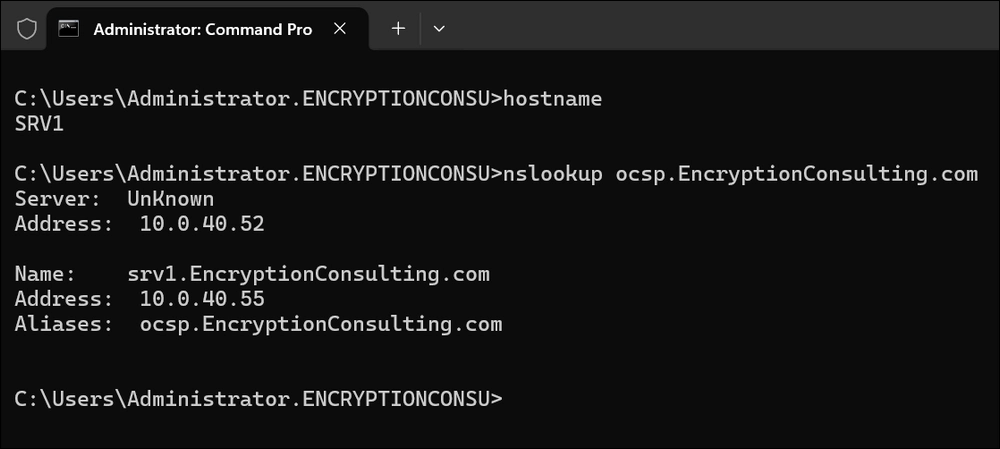
To verify that the new alias resolves, open a Command Prompt on SRV1 and run these commands. The first confirms the machine and the second checks the ocsp alias:
hostname
nslookup ocsp.EncryptionConsulting.com
Activity 2: Deploy the Offline Standalone Root CA
The standalone offline root CA should not be installed in the domain. As a matter of fact, it should not even be connected to a network at all. In this PQC lab the root CA key is an ML-DSA-87 key.
PQC Note: CA01 must run Windows Server 2025 with the 2026-05 security update (KB5087539) or later. Without it, the ML-DSA providers do not appear on the Cryptography for CA page. Because CA01 stays offline and is never connected to the network, download KB5087539 and the required Windows Server 2025 checkpoint .msu from the Microsoft Update Catalog on another machine, copy both packages to CA01 on removable media, install the checkpoint package first and then KB5087539 with DISM in the required servicing order, and restart. Do this before you add the AD CS role and before you disconnect the server.
The root private key anchors trust for every certificate below it, so keeping CA01 offline prevents attackers or malware from reaching the key. In a virtual machine, disconnect the virtual NIC after patching, power off CA01 between uses, and store the VM files in encrypted storage.
Task 1: Create a CAPolicy.inf for the standalone offline root CA
To create a CAPolicy.inf for the standalone offline root CA:
Log on to CA01 as CA01\Administrator.
Press Win + R, type notepad C:\Windows\CAPolicy.inf, and press Enter.
When prompted to create a new file, click Yes.
Type in the following as the contents of the file.
Click File and Save to save the CAPolicy.inf file under the C:\Windows directory. For ML-DSA, RenewalKeyLength must equal the fixed parameter-set value: 20736 for ML-DSA-87, 15616 for ML-DSA-65, or 10496 for ML-DSA-44. AlternateSignatureAlgorithm=0 affects RSA signature encoding only; it has no effect on ML-DSA.
Warning: Because this step opens C:\Windows\CAPolicy.inf directly in Notepad, use File → Save or press Ctrl+S and keep the filename unchanged. If you use Save As, set Save as type to All Files (*.*) and ensure the filename is CAPolicy.inf. Otherwise, Notepad may save it as CAPolicy.inf.txt, which AD CS will ignore. Verify the filename with:
dir C:\Windows\CAPolicy*
Close Notepad.
Task 2: Installing the Standalone Offline Root CA
To install the standalone offline root CA:
Confirm the computer name before installing AD CS. Press Win+R, type sysdm.cpl, and press Enter. Verify that the computer name is CA01. If it is different, rename the computer to CA01 and restart the server. The computer name is embedded in the CA configuration during installation and must not be changed afterward.
Log on to CA01 as CA01\Administrator.
Open Server Manager by pressing Win + R, typing servermanager, and pressing Enter.
Click Manage and then click Add Roles and Features.
On the Before You Begin page click Next.
On the Installation Type page, choose Role-based or feature-based installation, and then click Next.
On the Server Selection page, click Next.
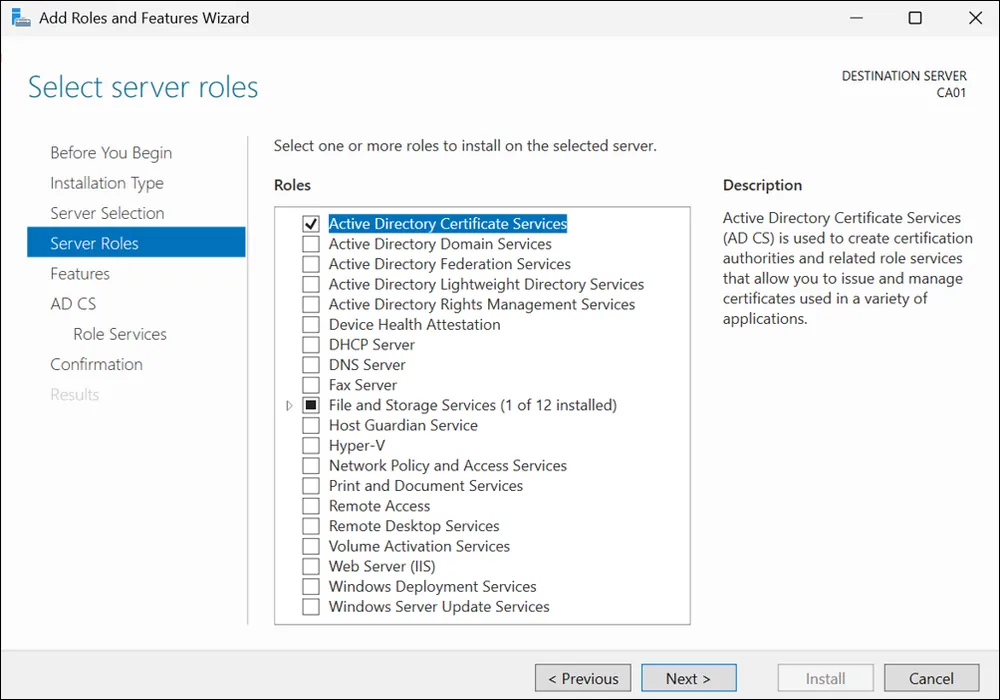
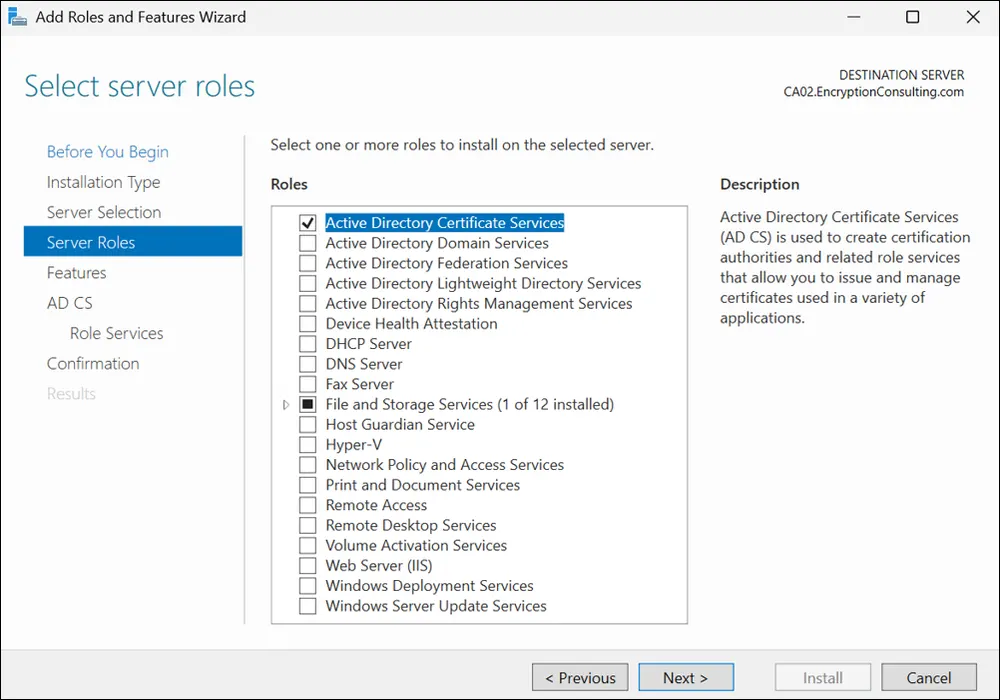
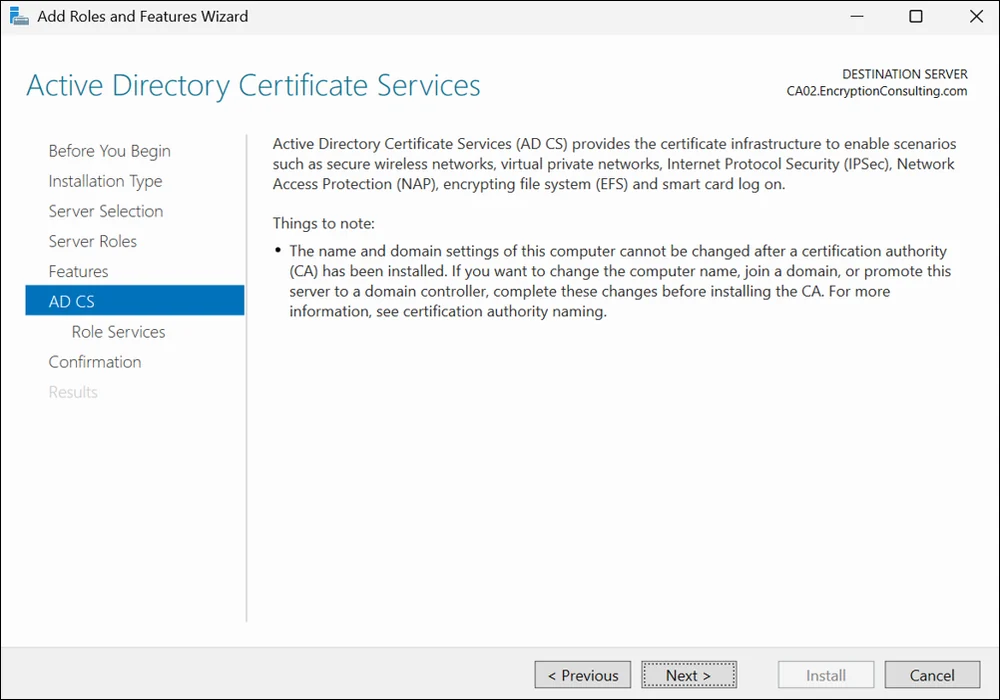
On the Select Server Roles page select Active Directory Certificate Services, and then click Next.
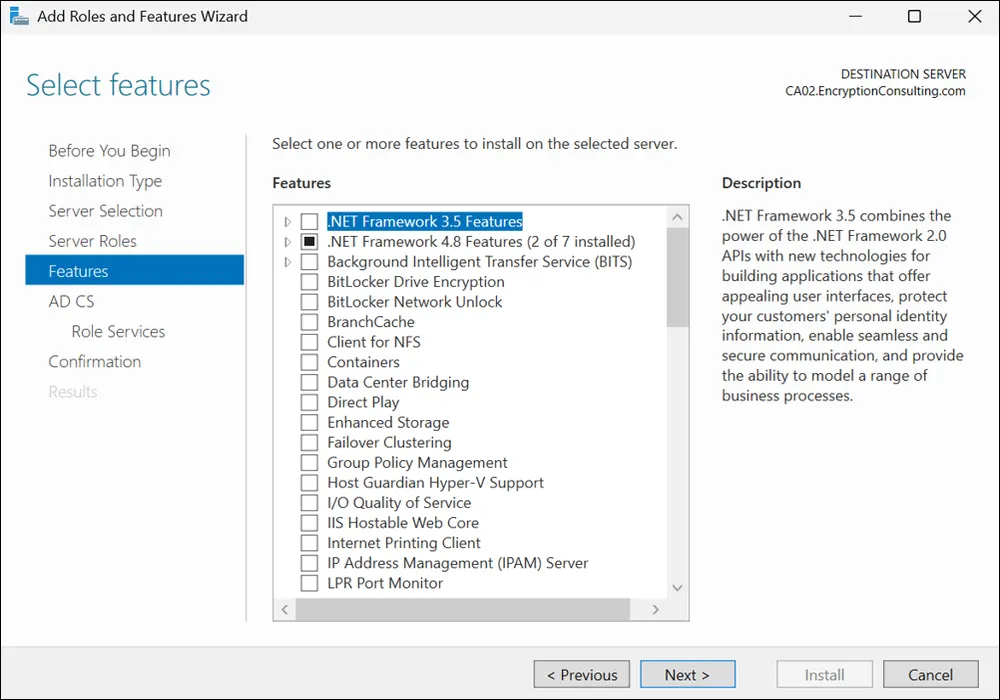
On the Select Features page, click Next.
On the Introduction to Active Directory Certificate Services page, click Next.
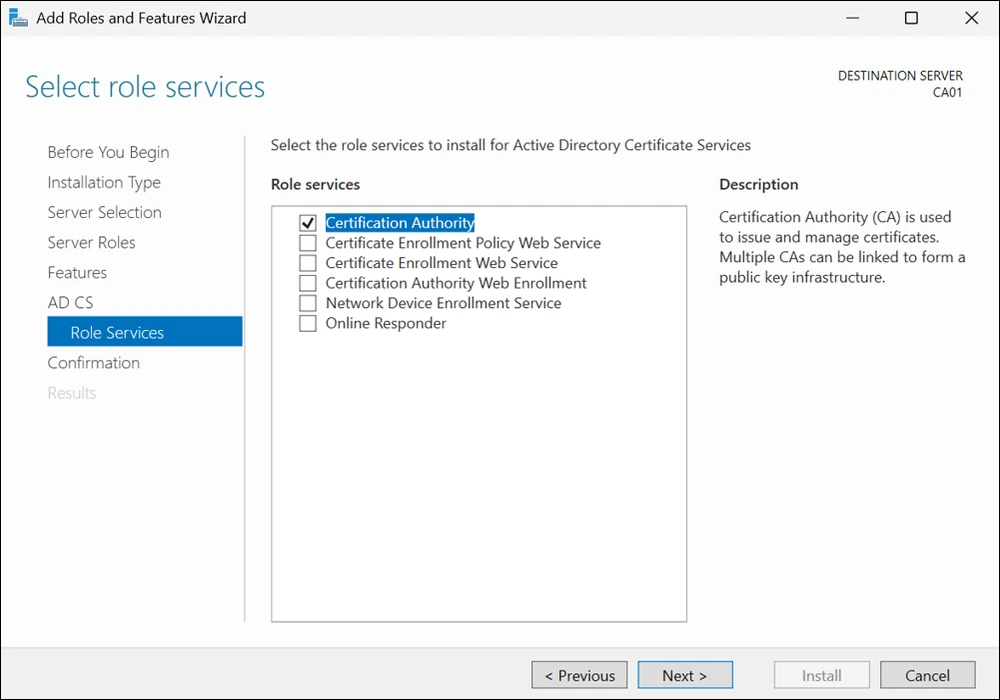
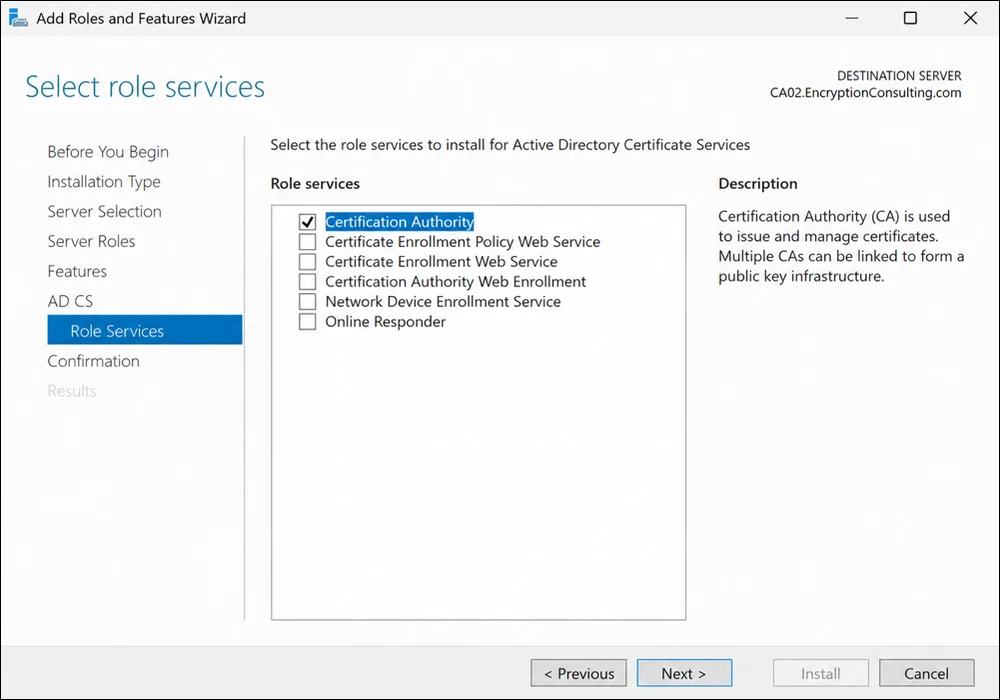
On the Select Role Services page, ensure that Certification Authority is selected, and then click Next.
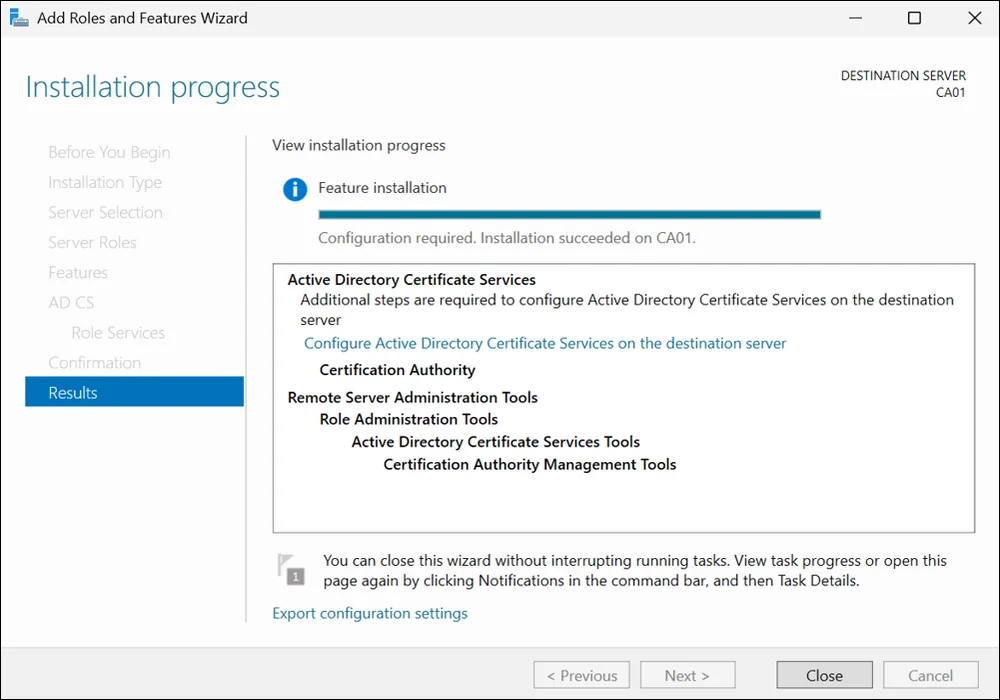
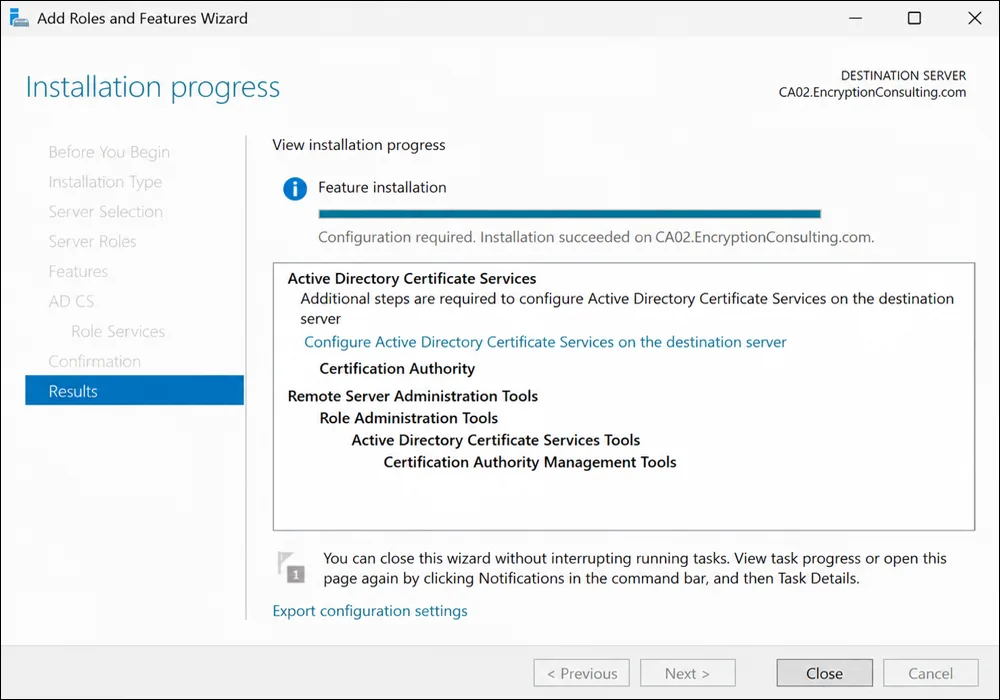
On the confirmation page, click Install.
Click Configure Active Directory Certificate Services on the destination server.
On the Specify Credentials to configure role services page, the credential should be CA01\Administrator, then click Next.
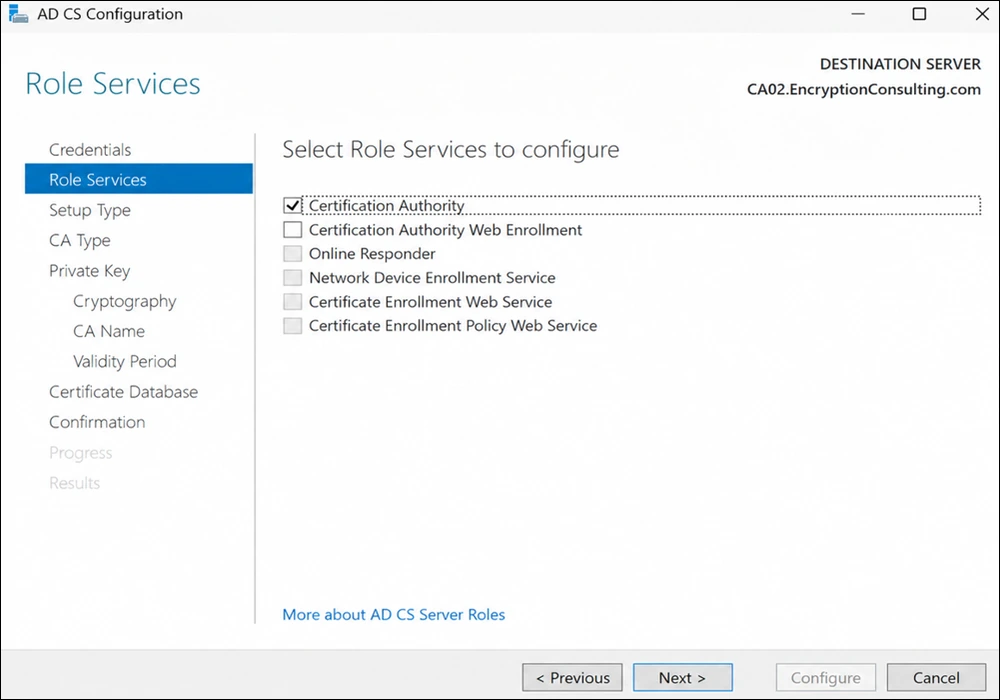
On the Select Role Services to configure page, choose Certification Authority, and then click Next.
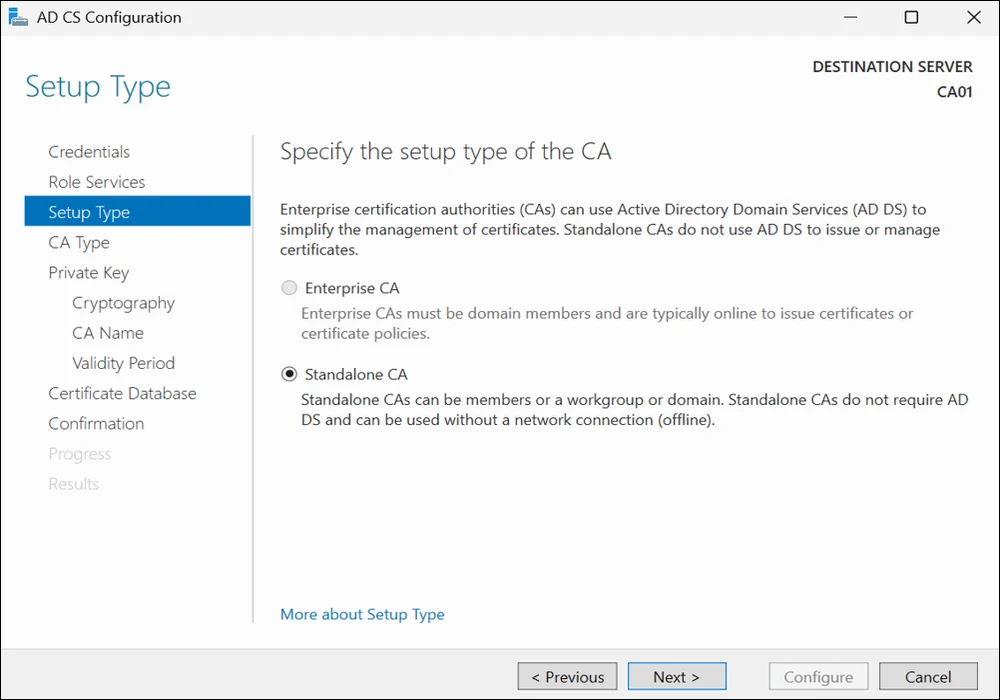
On the Specify Setup Type page, ensure that Standalone is selected, and then click Next.
Note: The Enterprise CA option is grayed out because the CA01 server is not joined to the Active Directory domain.
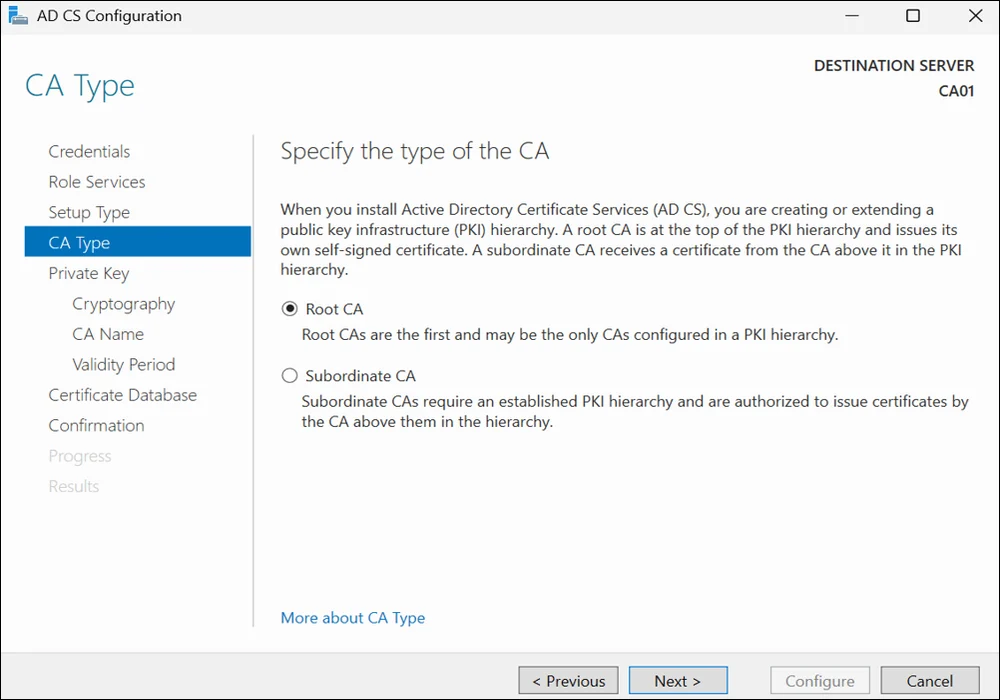
On the Specify CA Type page, ensure that Root CA is selected, and then click Next.
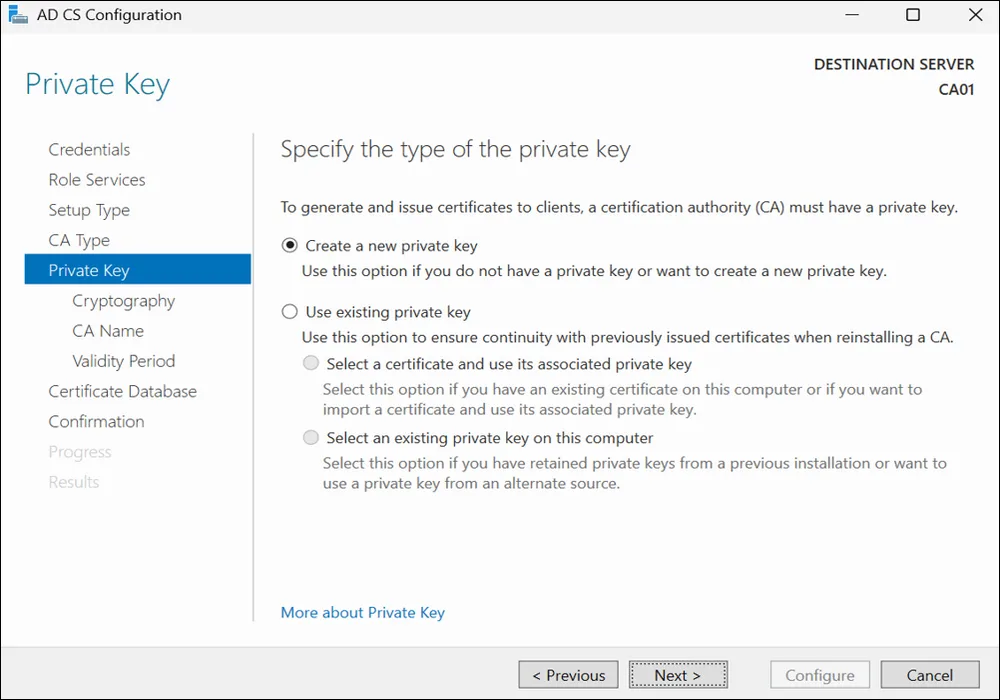
On the Private Key page, ensure that Create a new private key is selected, and then click Next.
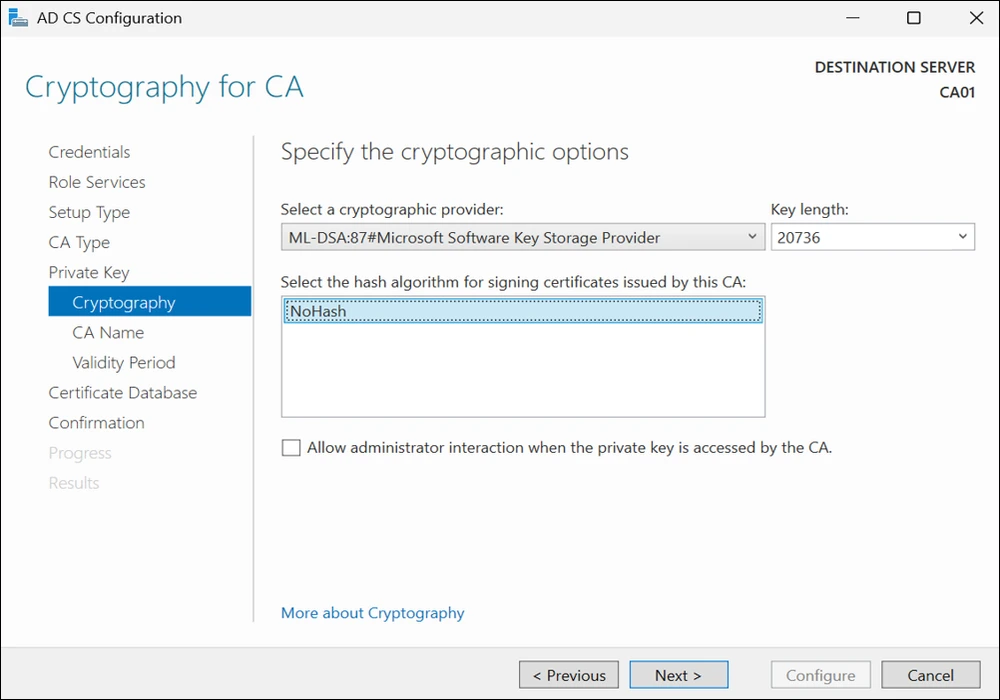
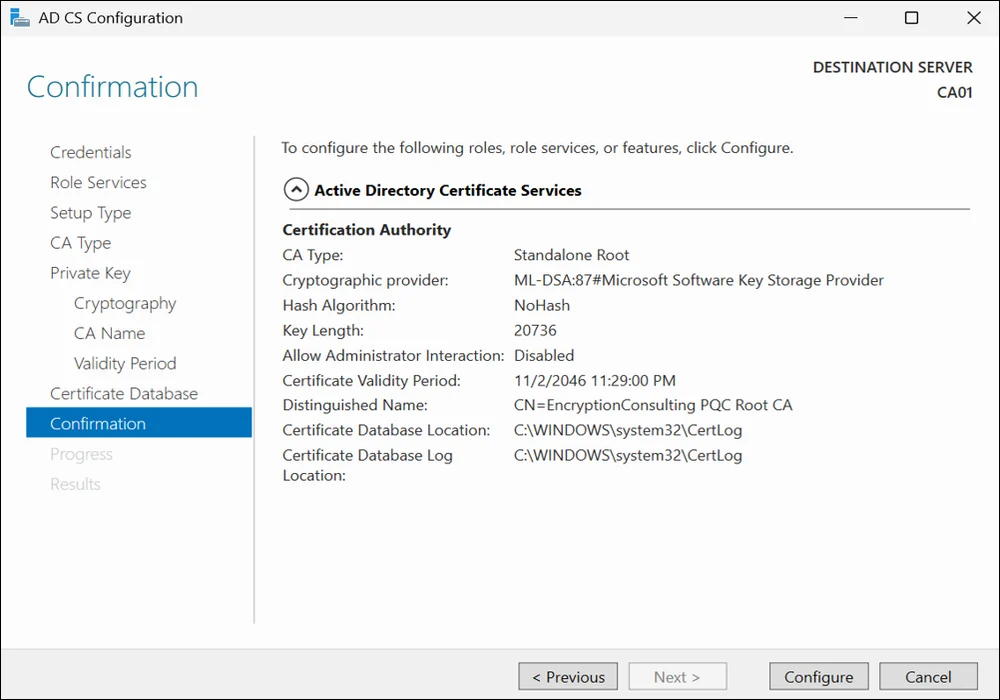
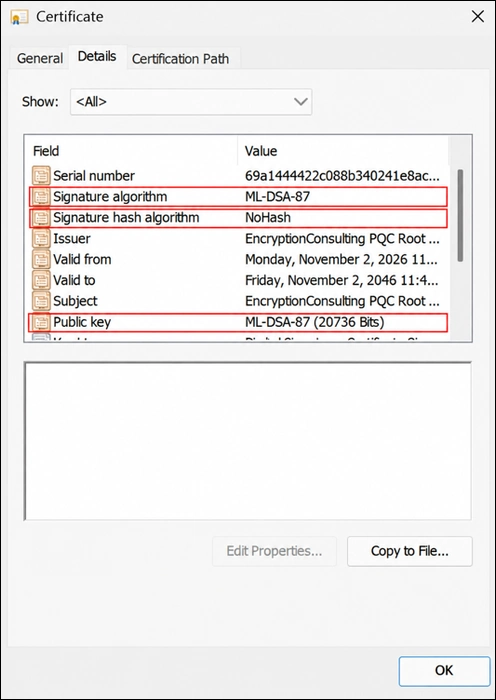
On the Cryptography for CA page, in Select a cryptographic provider, choose ML-DSA:87#Microsoft Software Key Storage Provider. Confirm that Key length shows 20736 and Hash algorithm shows NoHash, and then click Next.
PQC Note: In the classic guide this page was left at the defaults (an RSA provider). For PQC you must change the provider. ML-DSA is only available through CNG Key Storage Providers, and the hash algorithm is fixed to NoHash because ML-DSA handles hashing internally.
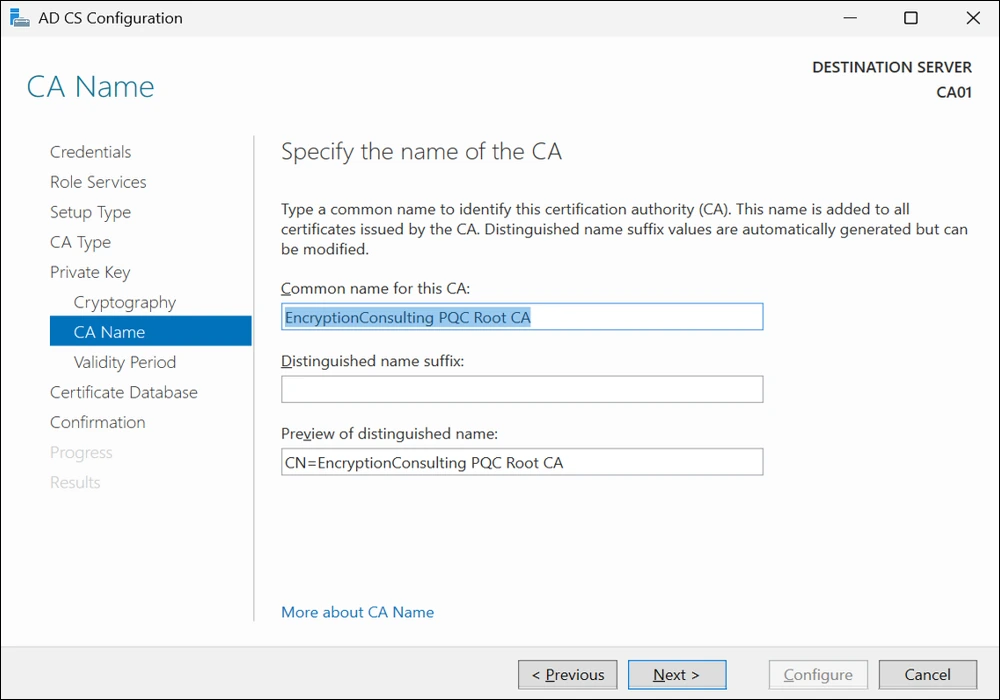
On the CA Name page, under Common name for this CA, clear the existing entry and type EncryptionConsulting PQC Root CA. Click Next.
Note: This lab does not configure a Distinguished Name (DN) suffix for the root CA. The DSConfigDN value set in Activity 3 refers only to the Active Directory Configuration partition used by the LDAP URLs; it is not part of the root certificate subject. If your production naming policy requires it, configure the suffix on the CA Name page of the AD CS configuration wizard, for example O=Encryption Consulting LLC, C=US.
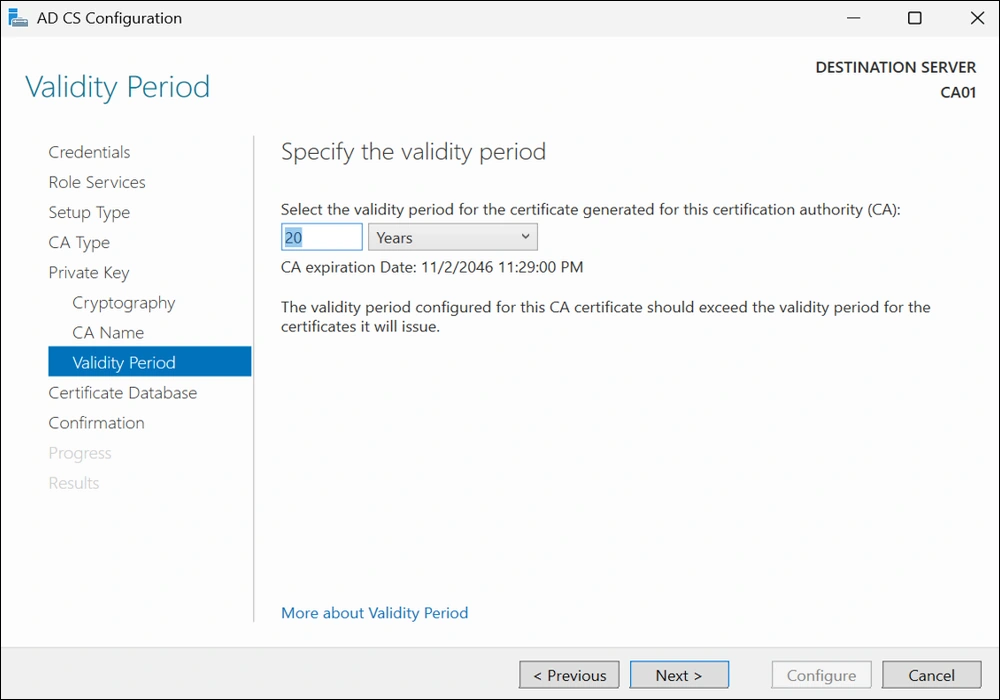
On the Validity Period page, under Select the validity period for the certificate generated for this CA, clear the existing entry and then type 20. Leave the selection box set to Years. Click Next.
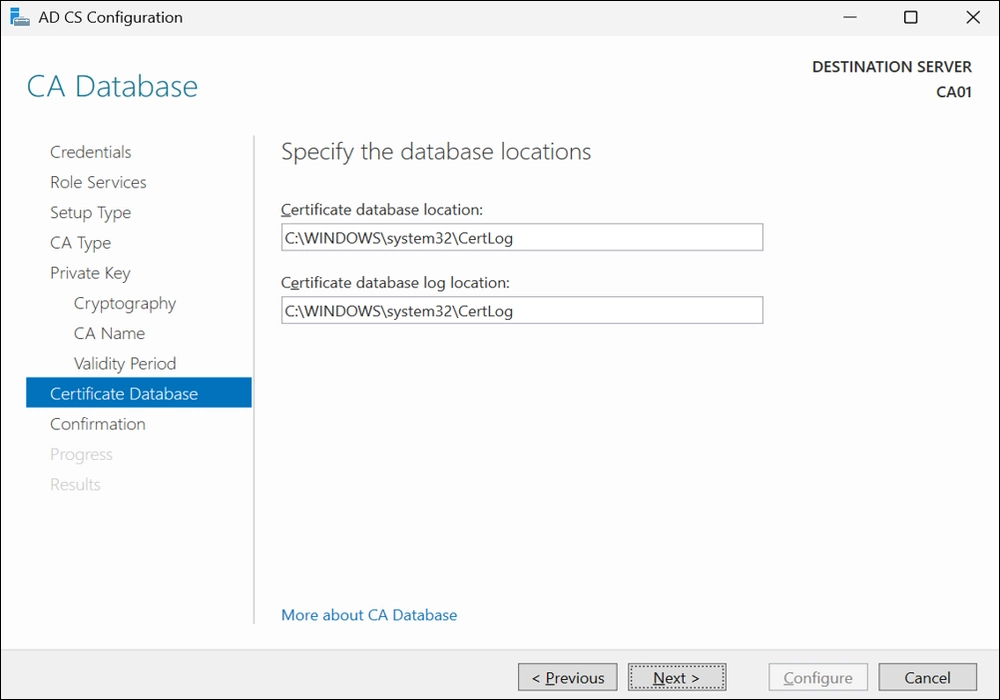
Keep the default settings on the CA Database page, and then click Next.
On the Confirmation page, review the settings, and then click Configure.
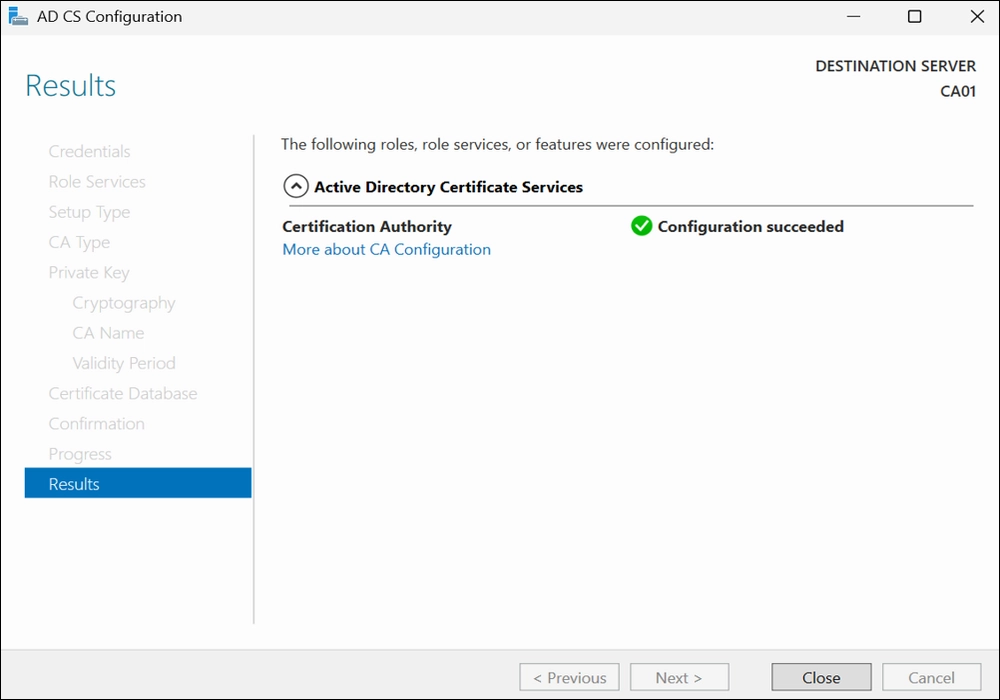
Review the information on the Results page to verify that the configuration is successful and then click Close.
Alternative:Configure the Root CA Using PowerShell
This alternative performs the same root CA installation using PowerShell. Before running these commands, complete Task 1 and confirm that the following file exists:
C:\Windows\CAPolicy.inf
Run the commands from an elevated PowerShell session. The -Force parameter suppresses the confirmation prompt during scripted installation.
The KeyLength value must match the selected ML-DSA parameter set:
Open the Certification Authority console (certsrv.msc).
Right-click the CA name, select Properties, and then on the General tab select View Certificate.
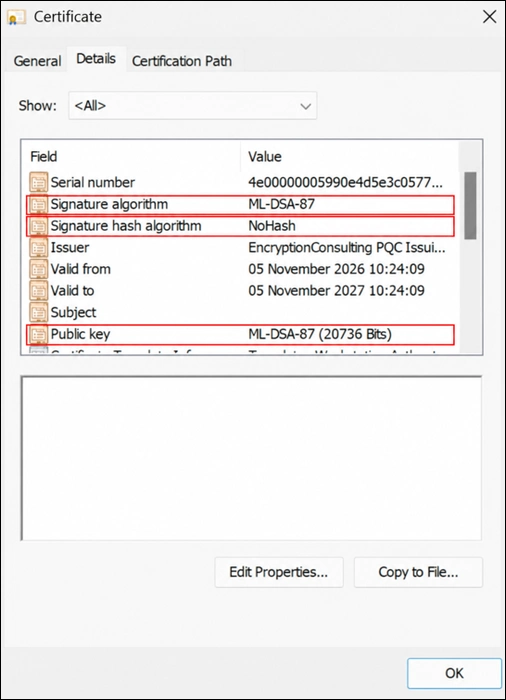
On the Details tab, confirm that Signature algorithm shows ML-DSA-87 and Public key shows ML-DSA-87 (20736 bits). Because the root certificate is self-signed, both fields use the same parameter set.
Activity 3: Configure the Offline Standalone Root CA
Ensure that you are logged on to CA01 as CA01\Administrator.
Open a command prompt. To do so, press Win + R, type cmd, and press Enter.
Why the DSConfigDN Value Must Be Configured Manually
CA01 is a standalone offline Root CA and is not joined to the EncryptionConsulting.com domain. Therefore, it cannot automatically discover the Active Directory Configuration partition. Configure CA\DSConfigDN manually so that the %6 variable in the LDAP AIA/CDP URLs expands to the correct directory path. This setting is used only to construct LDAP publication URLs; it does not define or modify the Root CA certificate subject.
To define the Active Directory Configuration Partition Distinguished Name, run the following command from an administrative command prompt:
Note: An offline Root CA publishes a new CRL only when you bring it online. A 12-hour overlap on a 52-week CRL leaves almost no margin if the renewal is late, so this guide uses a 2-week overlap. That gives you a window to start the root, publish a new CRL and distribute it before the old one expires.
To define Validity Period Units for all issued certificates by this CA, type the following commands and then press Enter. In this lab, the Enterprise Issuing CA should receive a 10-year lifetime for its CA certificate. To configure this, run the following commands from an administrative command prompt:
Validity-period rule: A CA cannot issue a certificate that remains valid beyond the CA’s own expiration date. In this lab, the 20-year Root CA issues the Enterprise Issuing CA certificate with a 10-year lifetime. The Issuing CA should issue leaf certificates for no more than half of its remaining validity period, allowing the CA to be renewed before any leaf certificate outlives it.
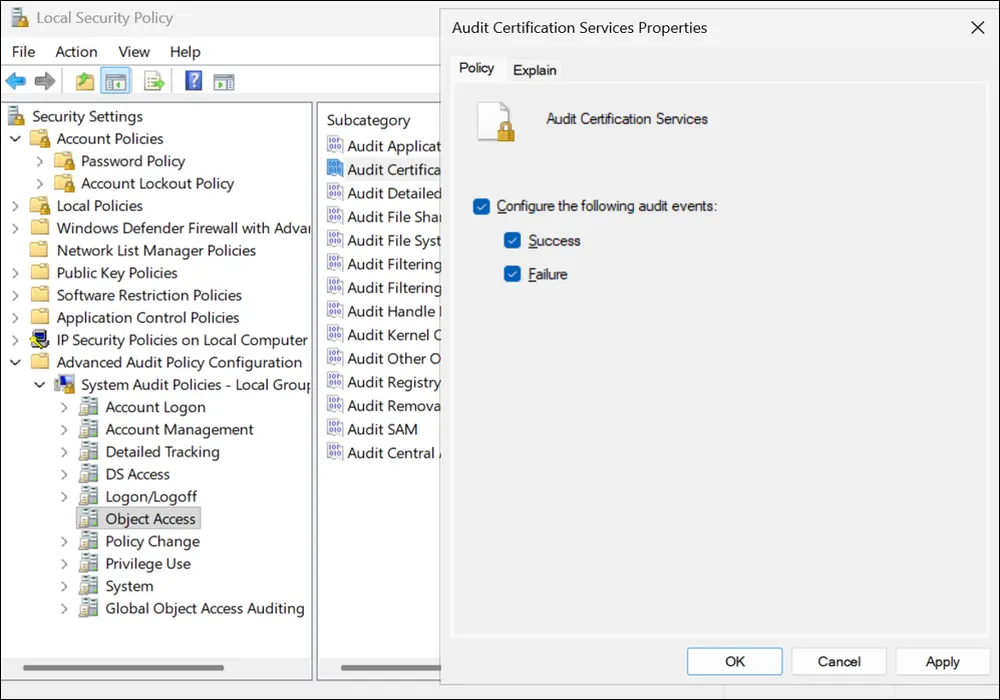
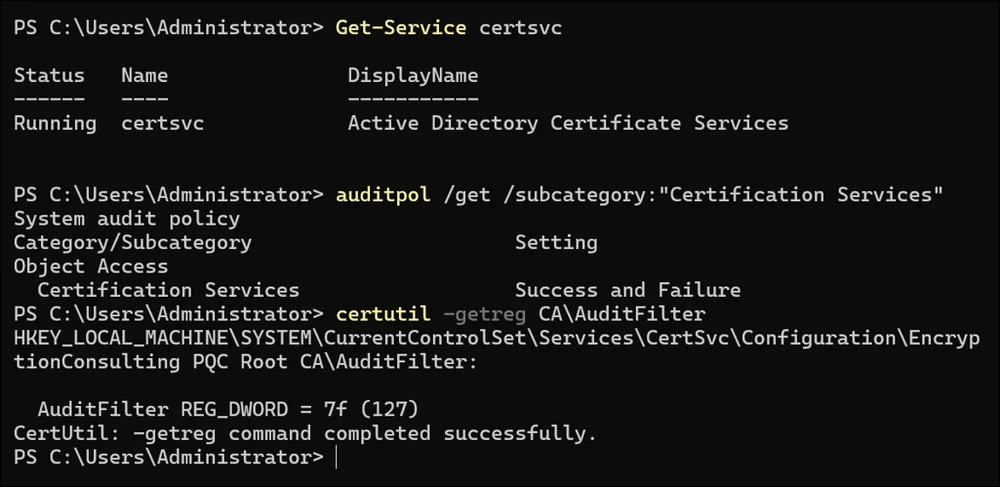
Configure Advanced Audit Policy for Audit Certification Services and enable both Success and Failure events. The following instructions describe how to use the Local Security Policy to enable object access auditing.
Double-click Audit Certification Services, select Configure the following audit events, and enable Success and Failure.
Close the Local Security Policy editor.
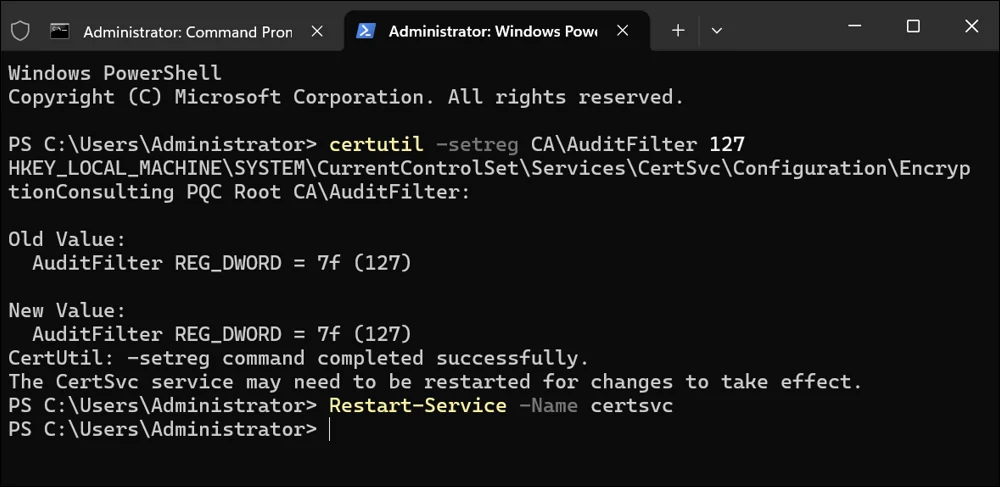
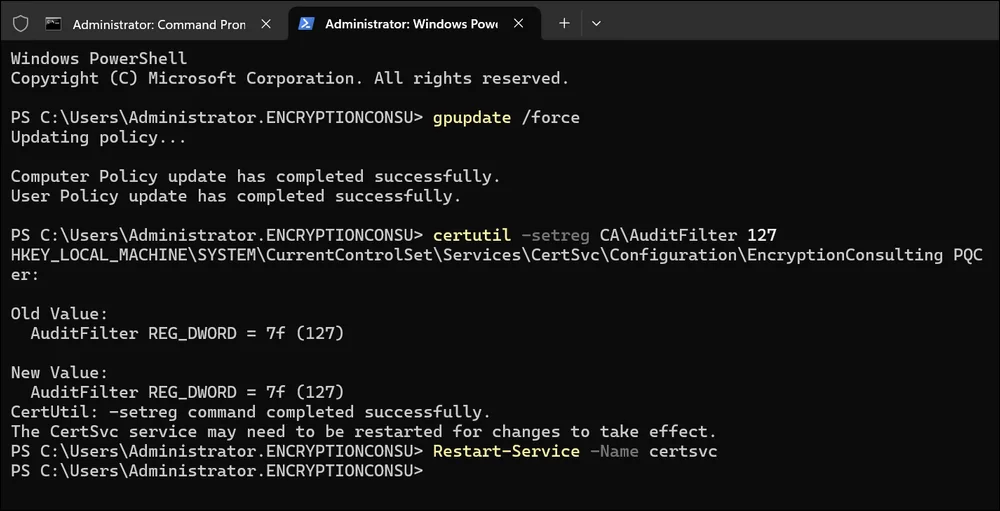
After enabling the Audit Certification Services subcategory, configure the AD CS audit filter. The Advanced Audit Policy controls Windows Security event generation, while AuditFilter selects the CA operations to audit. From an elevated PowerShell window on the CA, run:
There are multiple different methods for configuring the Authority Information Access (AIA) and certificate revocation list distribution point (CDP) locations. You can use the user interface (in the Properties of the CA object), certutil, or directly edit the registry. The AIA is used to point to the public key for the Windows Server certification authority (CA). The CDP is where the certificate revocation list is maintained, which allows client computers to determine if a certificate has been revoked.
On the Root CA in this lab, there will be three locations for the AIA and three locations for the CDP. The Issuing CA, configured in Activity 6, has three AIA locations at first (Activity 7 adds a fourth for OCSP) and four CDP locations.
Task 3: Configure the AIA
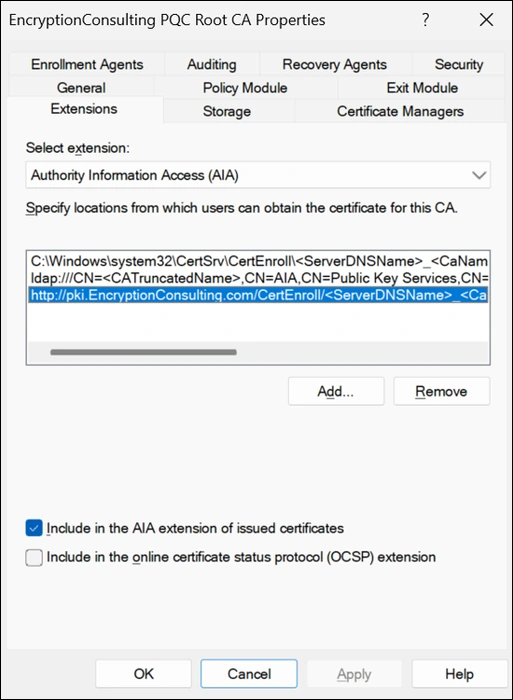
Using a certutil command is a quick and common method for configuring the AIA. When you run the following certutil command, you will be configuring a static file system location, a Lightweight Directory Access Protocol (LDAP) location, and an HTTP location for the AIA. The certutil command to set the AIA modifies the registry, so ensure that you run the command from a command prompt run as Administrator. Run the following command:
Reading the AIA and CDP strings. The number before each colon is a set of flags, and the % tokens are variables that AD CS fills in. AIA flags: 1 publishes the CA certificate to that location, 2 adds the URL to the AIA extension of issued certificates, 32 adds the OCSP URL. CDP flags: 1 publishes the CRL to that location, 2 adds the URL to issued certificates, 4 adds it to published CRLs so clients can find delta CRLs, 8 adds it to all CRLs and tells AD CS where to publish in Active Directory, 64 publishes delta CRLs to that location. Variables: %1 server DNS name, %2 server short name (for example CA01 or CA02), %3 CA name, %4 certificate name suffix, %6 configuration naming context, %7 truncated CA name, %8 CRL name suffix, %9 delta CRL suffix, %10 CDP object class, %11 CA object class.
After you have run that command, run the following command to confirm your settings:
certutil -getreg CA\CACertPublicationURLs
If you look in the registry, under the following path: HKEY_LOCAL_MACHINE\SYSTEM\CurrentControlSet\Services\CertSvc\Configuration\EncryptionConsulting PQC Root CA, you can confirm the CACertPublicationURLs by opening that REG_MULTI_SZ value. You should see the following:
You can also see this in the CA (certsrv) console. To open the console, press Win + R, type certsrv.msc, and press Enter. In the navigation pane, expand Certification Authority (Local). Right-click EncryptionConsulting PQC Root CA and then click Properties. On the Extensions tab, under Select extension, click Authority Information Access (AIA) and you will see the graphical representation of the AIA settings.
Task 4: Configure the CDP
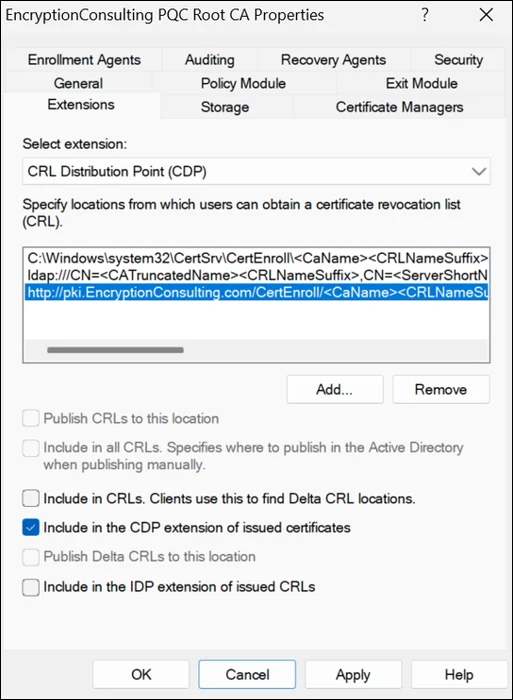
The certutil command to set the CDP modifies the registry, so ensure that you run the command from an administrative command prompt.
After you run that command, run the following certutil command to verify your settings:
certutil -getreg CA\CRLPublicationURLs
In the registry location: HKEY_LOCAL_MACHINE\SYSTEM\CurrentControlSet\Services\CertSvc\Configuration\EncryptionConsulting PQC Root CA you can open the REG_MULTI_SZ value and see the configuration of these values:
You can also see this in the CA (certsrv) console. To open the console, press Win + R, type certsrv.msc, and press Enter. In the navigation pane, ensure that Certification Authority (Local) is expanded. Right-click EncryptionConsulting PQC Root CA and then click Properties. On the Extensions tab, under Select extension, click CRL Distribution Point (CDP) and you will see the graphical representation of the CDP settings.
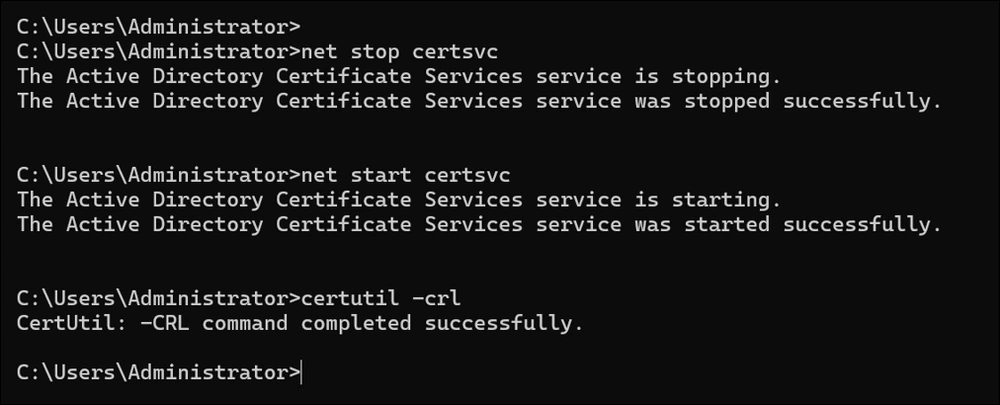
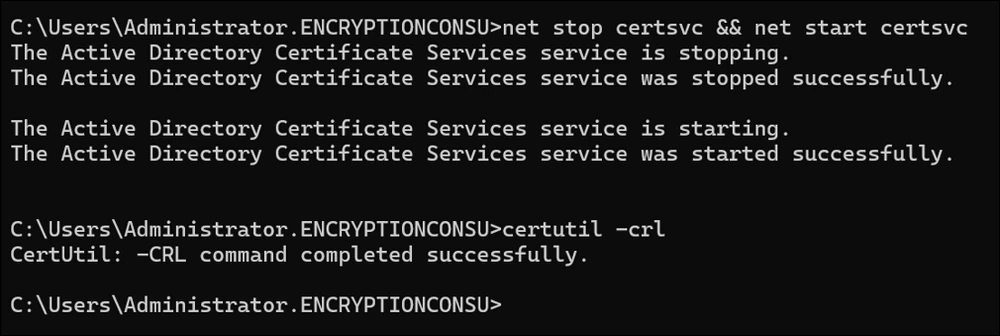
At an administrative command prompt, run the following commands to restart Active Directory Certificate Services and to publish the CRL:
net stop certsvc
net start certsvc
certutil -crl
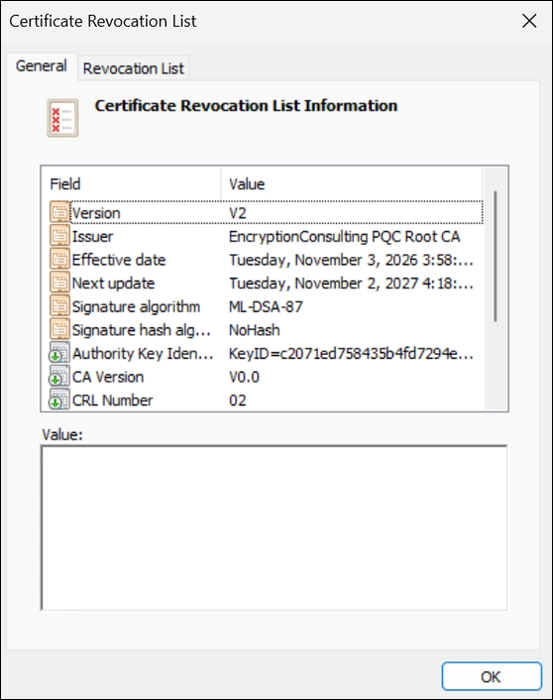
Verify that the CRL is signed with ML-DSA. Open C:\Windows\System32\CertSrv\CertEnroll, double-click the EncryptionConsulting PQC Root CA.crl file and open the General/Details tabs, or run the following command:
PQC Note: The CA automatically signs CRLs with ML-DSA; no additional configuration is required. An ML-DSA-87 signature adds 4,627 bytes (about 4.6 KB), making an empty Root CA CRL roughly 5 KB versus 1 KB for RSA-2048; per-entry revocation size is unchanged. ML-DSA certificates and chains are also larger—approximately 7–8 KB per leaf certificate and 20+ KB for a three-certificate chain—which matters for TLS, EAP-TLS/RADIUS, LDAP, and constrained devices.
Activity 4: Prepare the Enterprise Issuing CA
Task 1: Join CA02 to the domain
To join CA02 to the domain:
Log on to CA02 as the local administrator.
Click Start, type sysdm.cpl, and press ENTER. Click Change.
In the Computer name, type CA02 and then click OK.
When prompted that you need to restart the computer, click OK. Click Close. Click Restart Now.
After CA02 restarts, log on as a local administrator.
Click Start, type sysdm.cpl, and press ENTER. Click Change.
In Member of, select Domain, and then type EncryptionConsulting.com. Click OK.
In Windows Security, enter the User name and password for the domain administrator account. Click OK.
You should be welcomed to the EncryptionConsulting domain. Click OK.
When prompted that a restart is required, click OK. Click Close. Click Restart Now.
PQC Note: Install the 2026-05 security update (KB5087539) or later on CA02 before adding the AD CS role.
Task 2: Create CAPolicy.inf for Enterprise Issuing CA
Log on to EncryptionConsulting.com as ENCRYPTIONCONSU\Administrator. (Ensure that you switch user to log on as ENCRYPTIONCONSU\Administrator.)
Press Win + R, type notepad C:\Windows\CAPolicy.inf, and press Enter.
Note: The OID in this file is a placeholder taken from Microsoft’s sample lab. In production, replace it with an OID from your own organization’s registered arc so the issuance policy is unique to you. The URL must also resolve, because it is written into every certificate this CA issues. On SRV1, create a placeholder CPS file now:
echo Certification Practice Statement for the EncryptionConsulting PQC lab (placeholder text) > C:\inetpub\wwwroot\cps.txt
Then browse to http://pki.EncryptionConsulting.com/cps.txt from CA02 and confirm the text appears.
Click File and Save to save the CAPolicy.inf file under the C:\Windows directory. For ML-DSA, RenewalKeyLength must equal the fixed parameter-set value: 20736 for ML-DSA-87, 15616 for ML-DSA-65, or 10496 for ML-DSA-44. AlternateSignatureAlgorithm=0 affects RSA signature encoding only; it has no effect on ML-DSA.
Warning: Ensure that the CAPolicy.inf is saved as a .inf file. The file will not be used if it is saved with any other file extension.
Close Notepad.
Task 3: Publish the Root CA Certificate and CRL
Ensure you are logged on to CA01 as CA01\Administrator.
On CA01, copy the Root CA certificate and CRL from the CertEnroll folder to the removable media. In this lab, the removable media is assigned drive E:.
On CA02, insert the removable media and open an administrative Command Prompt. If Windows assigns a different drive letter, replace E: in both commands.
These commands publish two different objects to Active Directory. The RootCA target publishes the Root CA certificate to the Active Directory Certification Authorities and AIA containers, allowing domain members to receive and trust the Root CA through Group Policy. The CA01 target publishes the Root CA CRL under the CDP\CA01 container, allowing clients to locate the CRL during revocation checking.
To publish the EncryptionConsulting PQC Root CA Certificate and CRL to http://pki.EncryptionConsulting.com/CertEnroll, copy them to the \\SRV1.EncryptionConsulting.com\C$\CertEnroll directory. Run the following commands from an administrative command prompt:
Activity 5: Deploy the Enterprise Subordinate Issuing CA
Subordinate issuing CA on CA02.EncryptionConsulting.com. The issuing CA key is also an ML-DSA-87 key, and its certificate is signed by the ML-DSA-87 root.
Ensure that you are logged on to CA02.EncryptionConsulting.com as ENCRYPTIONCONSU\Administrator.
Open Server Manager.
Click Manage and then select Add Roles and Features.
On the Before You Begin page select Next.
On the Installation Type page, choose Role-based or feature-based installation, and then click Next.
On the Server Selection page, click Next.
On the Select Server Roles page select Active Directory Certificate Services, and then click Next.
On the Select Features page, click Next.
On the Introduction to Active Directory Certificate Services page, click Next.
On the Select Role Services page, select Certification Authority. If you see the Add Roles and Features Wizard, click Add Features. Click Next.
PQC Note: Do not select Certification Authority Web Enrollment. This guide uses the Certificates MMC for ML-DSA enrollment. Web Enrollment is unnecessary and can expose the CA to ESC8, an NTLM relay attack against the AD CS web enrollment interface, if it is configured insecurely. Microsoft ML-DSA guidance | Microsoft ESC8 guidance
On the confirmation page, review the details and click Install.
Click Configure Active Directory Certificate Services on the destination server.
On the Specify Credentials to configure role services page, the credential should be ENCRYPTIONCONSU\Administrator, then click Next.
On the Select Role Services to configure page, select Certification Authority and then click Next.
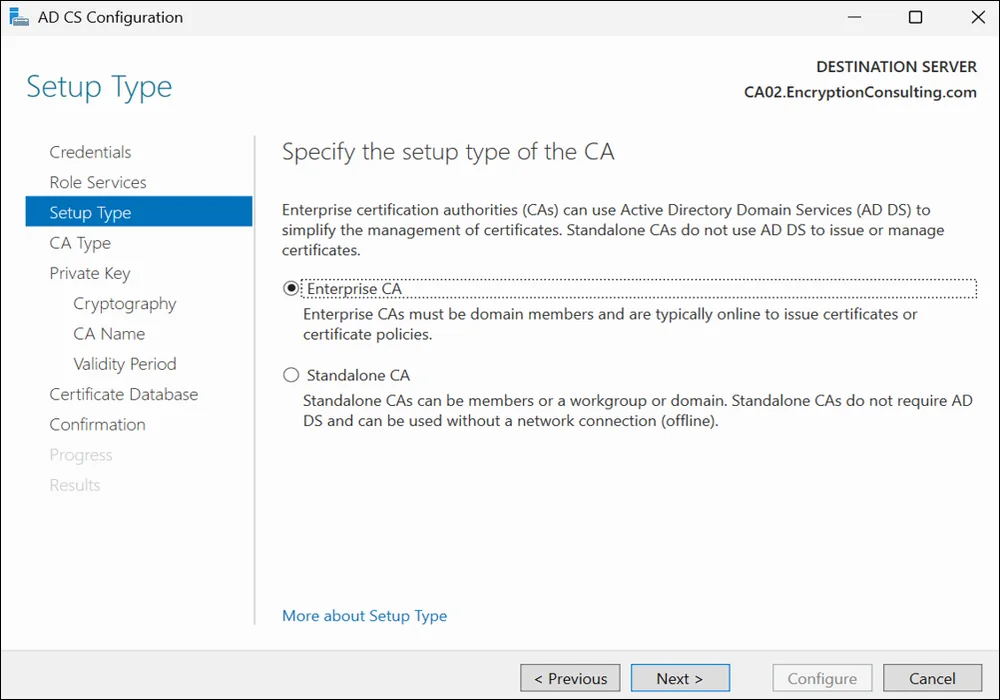
On the Specify Setup Type page, ensure that Enterprise CA is selected, and then click Next.
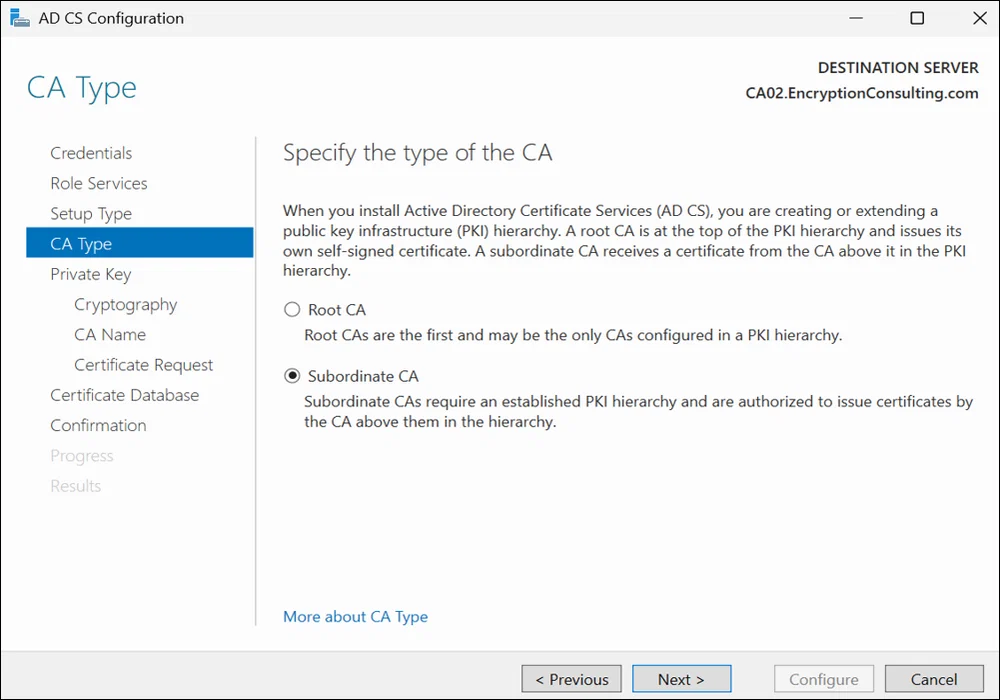
On the Specify CA Type page, select Subordinate CA and then click Next.
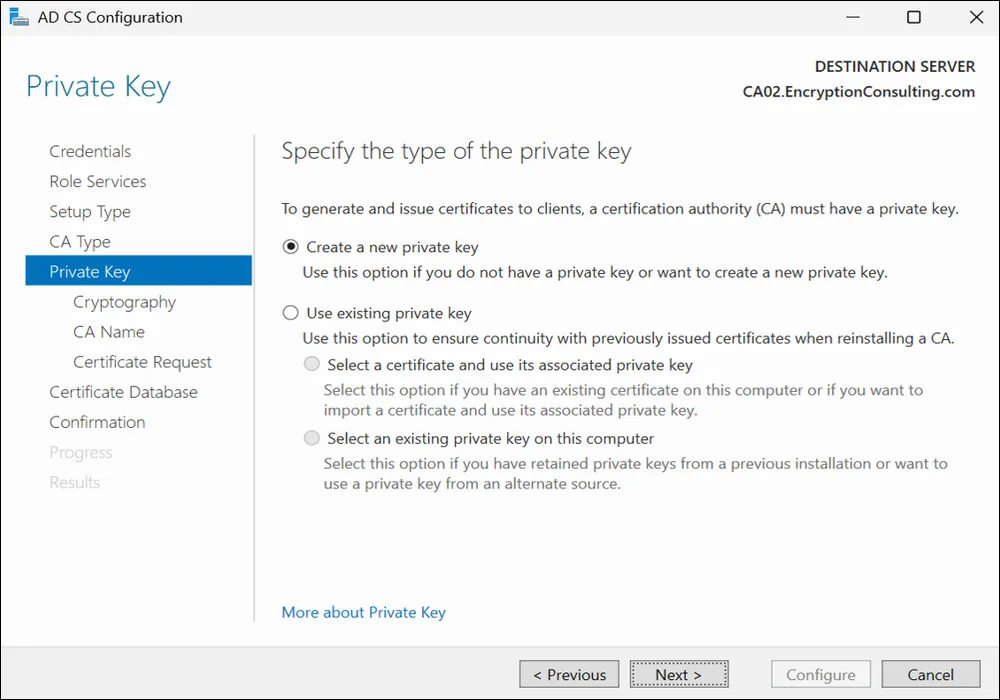
On the Private Key page, ensure that Create a new private key is selected, and then click Next.
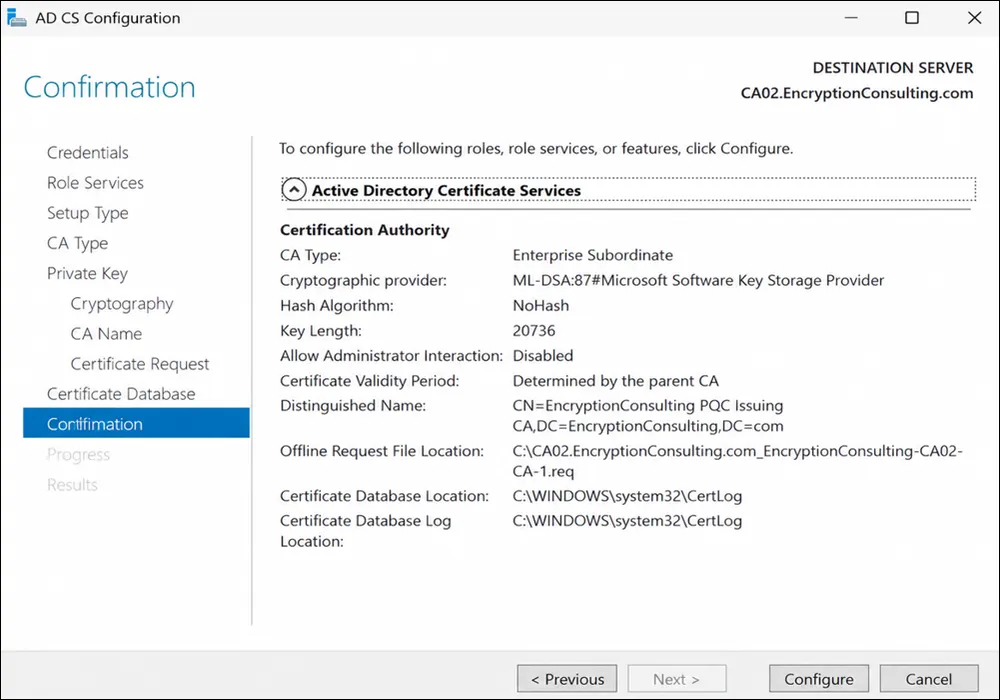
On the Cryptography for CA page, select ML-DSA:87#Microsoft Software Key Storage Provider. Confirm that Key length shows 20736 and Hash algorithm shows NoHash, then click Next.
PQC Note: This lab uses the same parameter set, ML-DSA-87, for the root and the issuing CA (Microsoft allows a different set per CA, but both tiers here are identical). Keep the whole chain on ML-DSA; a classical tier anywhere in the chain removes the post-quantum protection.
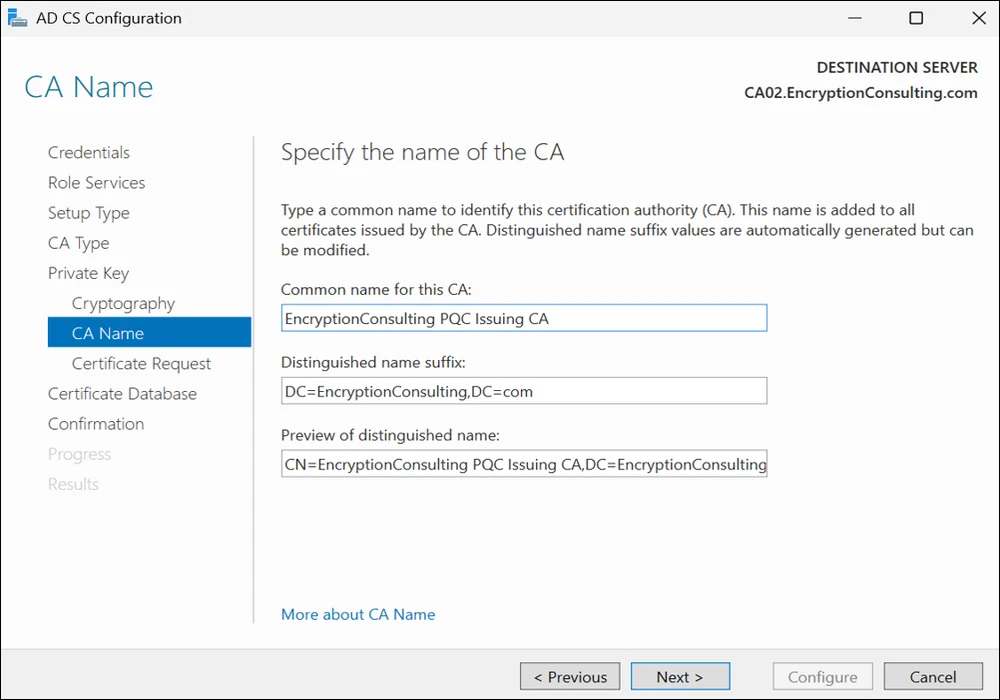
On the CA Name page, clear the existing entry for the Common name for this CA box, and enter EncryptionConsulting PQC Issuing CA, then select Next.
Note: Distinguished Name Suffix is automatically populated and should not be modified.
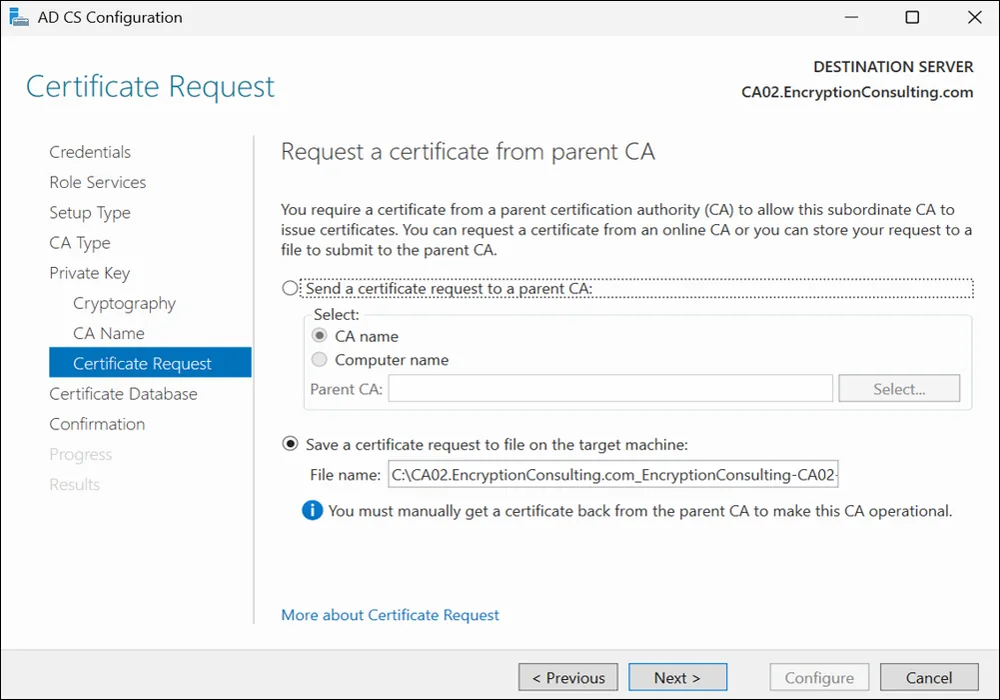
On the Certificate Request page, select Save a certificate request to file on the target machine then click Next.
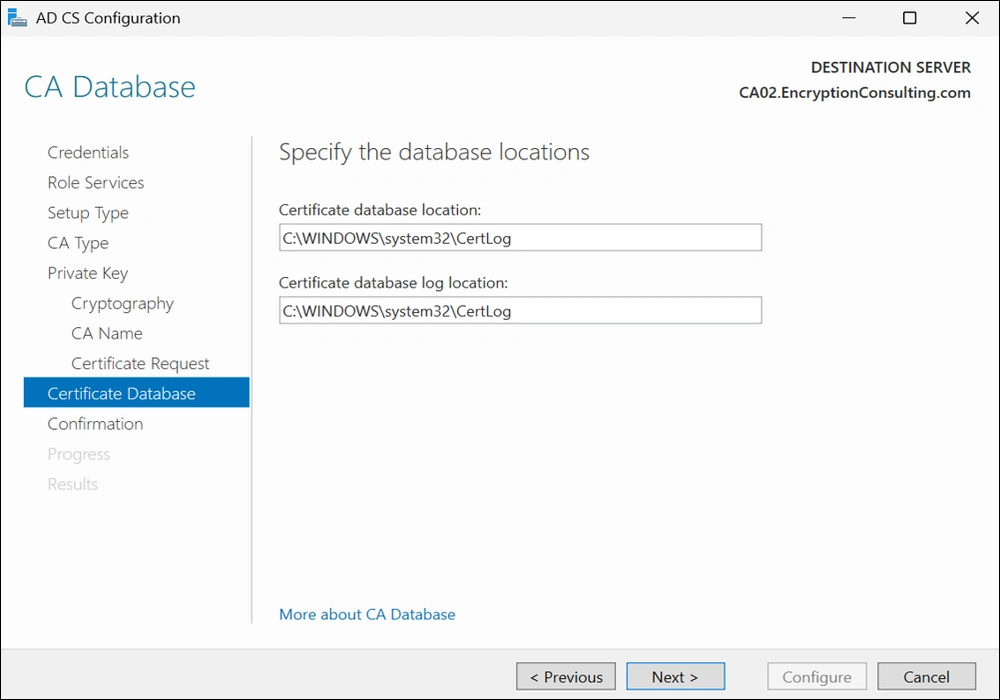
Leave the defaults on the CA Database page, and then click Next.
On the Confirmation page, click Configure.
Review the information on the Results page to verify that the configuration is successful and then click Close.
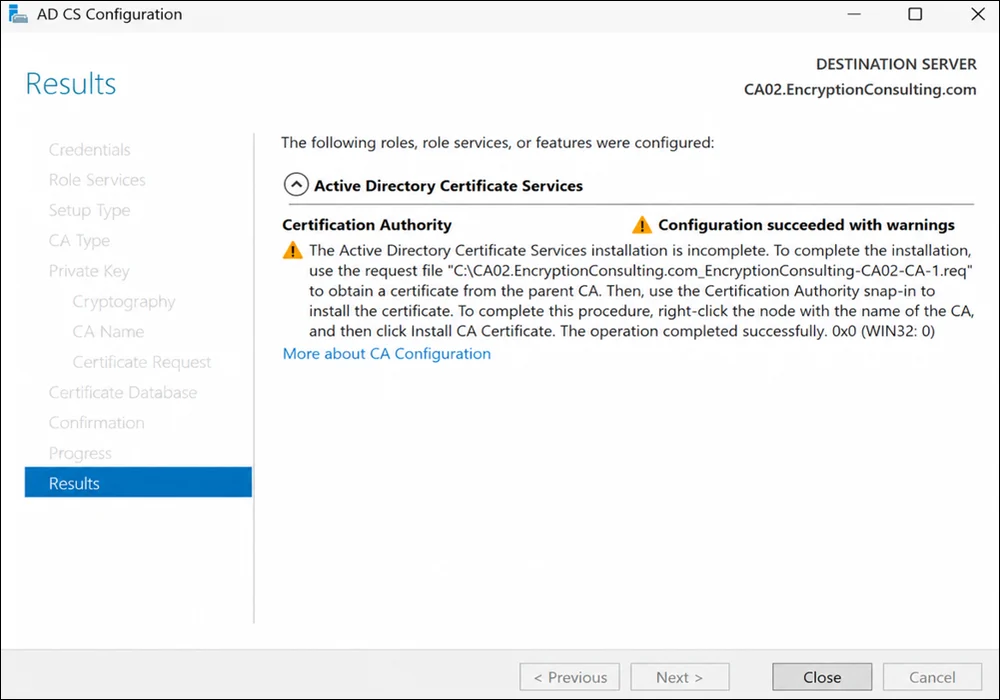
The following warning message is expected: “The Active Directory Certificate Services installation is incomplete. To complete the installation, use the requested file to obtain a certificate from the parent CA. Then, use the Windows Server Certification Authority snap-in to install the certificate. To complete this procedure, right-click the node with the name of the CA, and then click Install CA Certificate. The operation was completed successfully. 0x0 (WIN32: 0).”
Copy the certificate request file (saved at the root of C:\ with a name such as CA02.EncryptionConsulting.com_EncryptionConsulting-CA02-CA-1.req) to your removable media. Use the exact file name shown in the warning message. For example, if you want to copy to a drive with the letter E:, you would run the following command from a command prompt:
Note: Because the parent is an offline Root CA, the cmdlet cannot submit the request for you. -OutputCertRequestFile writes the request to the root of C:\ so you can copy it to CA01, submit it there and install the issued certificate on CA02, exactly as in the next task.
Task 1: Submit the Request and Issue EncryptionConsulting PQC Issuing CA Certificate
To submit the certificate request and issue the requested certificate:
Ensure that you are logged on to CA01 as CA01\Administrator. Place the removable media with the certificate request into CA01.
On CA01, open an administrative command prompt. Then, submit the request using the following command (assuming that E: is your removable media drive letter):
Why the request is pending: A standalone CA places submitted certificate requests in a Pending state by default rather than issuing them automatically. The CA administrator must review and manually approve each request. This deliberate approval step provides an important security control for an offline Root CA, ensuring that it issues certificates only for explicitly authorized subordinate CAs.
Note: Pay attention to the RequestID number that is displayed after you submit the request. You will use this number when retrieving the certificate.
In the Certification Authority List dialog box, ensure that EncryptionConsulting PQC Root CA is selected and then click OK.
Open the Certification Authority console by pressing Win + R, typing certsrv.msc, and pressing Enter.
In the certsrv [Certification Authority (Local)] dialog box, in the console tree, expand EncryptionConsulting PQC Root CA.
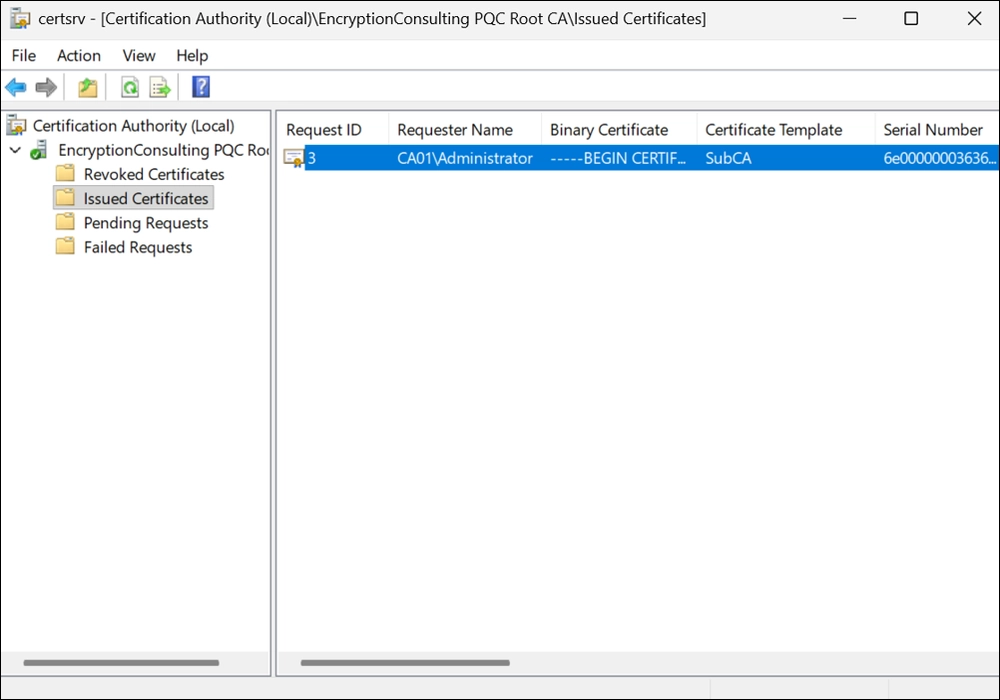
Click Pending Requests. In the details pane, right-click the request you just submitted, click All Tasks, and then click Issue.
After you click Issue, the request is removed from Pending Requests and appears under Issued Certificates.
Return to the administrative command prompt to accept the issued certificate by running the following command. Ensure that you substitute the appropriate drive letter of your removable media for E: as well as the correct RequestID for 3:
In the Certification Authority List dialog box, ensure that EncryptionConsulting PQC Root CA is selected and then click OK.
Task 2: Install the EncryptionConsulting PQC Issuing CA Certificate on CA02
To install the certificate and start the Certification Authority service on CA02:
Ensure that you are logged on to CA02.EncryptionConsulting.com as ENCRYPTIONCONSU\Administrator. Place the removable media with the issued certificate for CA02 into CA02.
Open the Certification Authority console.
In the Certification Authority console tree, right-click EncryptionConsulting PQC Issuing CA, and then click Install CA Certificate.
In the Select file to complete CA installation dialog, navigate to your removable media. Ensure that All Files (*.*) is selected, select the issued EncryptionConsulting PQC Issuing CA certificate, and click Open.
Tip: If installation fails with “The revocation server was offline” (0x80092013), the Root CA’s CRL is not reachable through the configured HTTP or LDAP CDP. Recheck the CRL copies from Activity 4, Task 3, and confirm that certutil -dspublish was completed successfully.
In the console tree, right-click EncryptionConsulting PQC Issuing CA, click All Tasks, and then click Start Service.
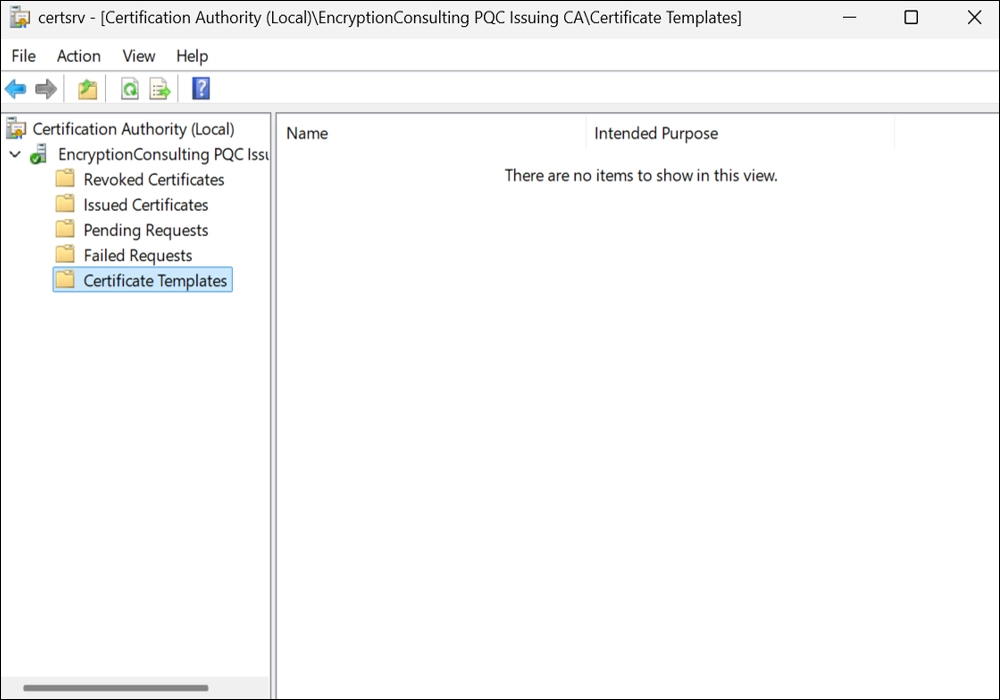
In the console tree, expand EncryptionConsulting PQC Issuing CA and then click Certificate Templates. Notice there are no certificate templates shown in the details pane. This is because the CAPolicy.inf specified not to install the default templates in the line LoadDefaultTemplates=0.
Verify that the issuing CA certificate uses ML-DSA:
In the Certification Authority console on CA02, right-click the CA name, select Properties, and then on the General tab select View Certificate.
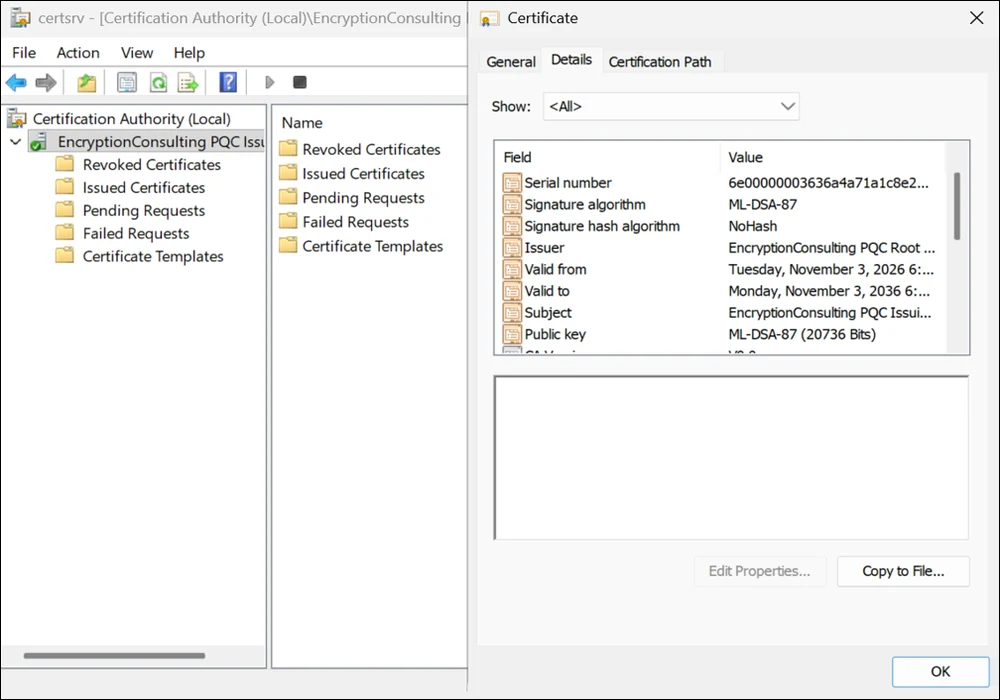
On the Details tab, confirm that Signature algorithm shows ML-DSA-87 (the root signed this certificate) and Public key shows ML-DSA-87 (the issuing CA key).
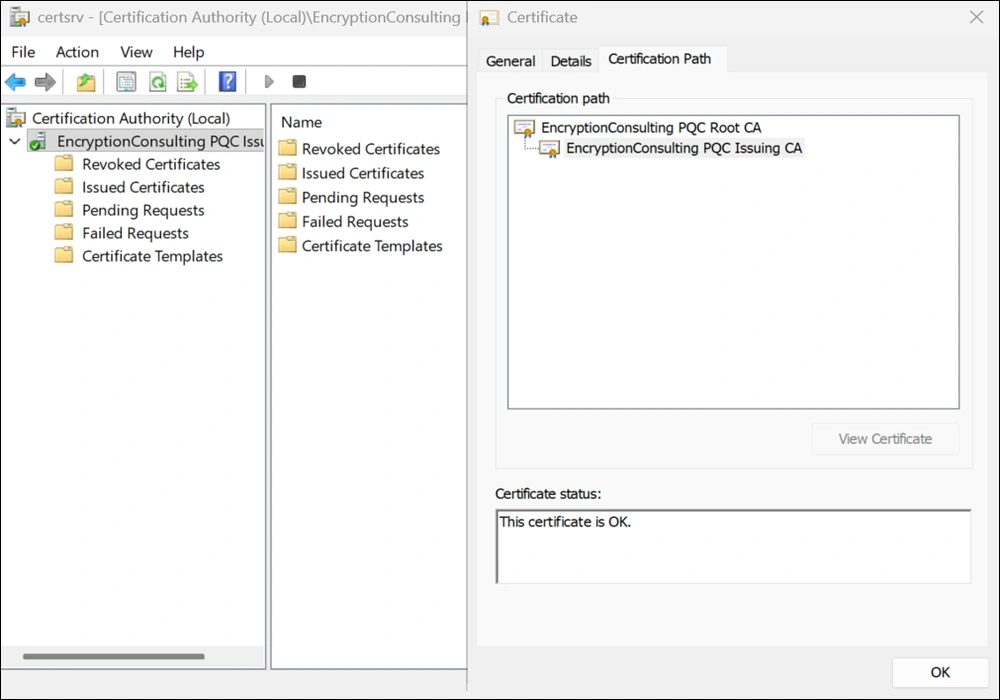
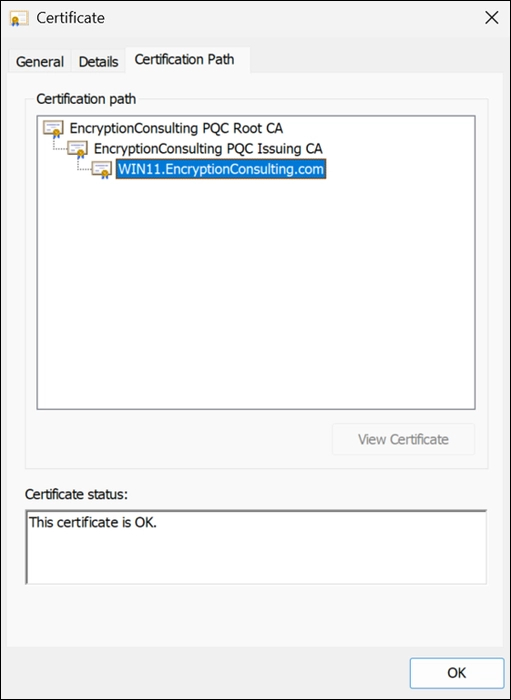
On the Certification Path tab, verify that the chain shows both the root CA and the issuing CA.
Activity 6: Configure the Enterprise Subordinate Issuing CA
There are multiple settings to configure to complete the installation of the issuing CA. These are similar to the tasks that were needed to complete the configuration of the root CA.
Task 1: Configure Certificate Revocation and CA Certificate Validity Periods
To configure certificate revocation and CA certificate validity periods:
Ensure that you are logged on to CA02.EncryptionConsulting.com as ENCRYPTIONCONSU\Administrator.
Configure the CRL and Delta CRL settings by running the following commands from an administrative command prompt:
An issued certificate’s lifetime is the shortest of the template validity, the CA’s registry limit, and the issuing CA’s remaining lifetime. The WIN11 certificate is valid for one year because its template specifies one year; this setting cannot extend it. Use a two-year maximum here instead of five years. For context, CA/Browser Forum public-TLS limits decrease to 200 days from 15 March 2026 and 47 days from 15 March 2029; these limits do not directly apply to this private AD CS lab.
Run the following commands from an administrative command prompt:
CA02 is a domain-joined Enterprise Issuing CA. Configure Advanced Audit Policy through a dedicated Group Policy Object.
On DC01, open Group Policy Management by running gpmc.msc.
In Group Policy Management, expand Forest > Domains > EncryptionConsulting.com. Right-click Group Policy Objects, select New, enter PKI – CA Auditing, and click OK.
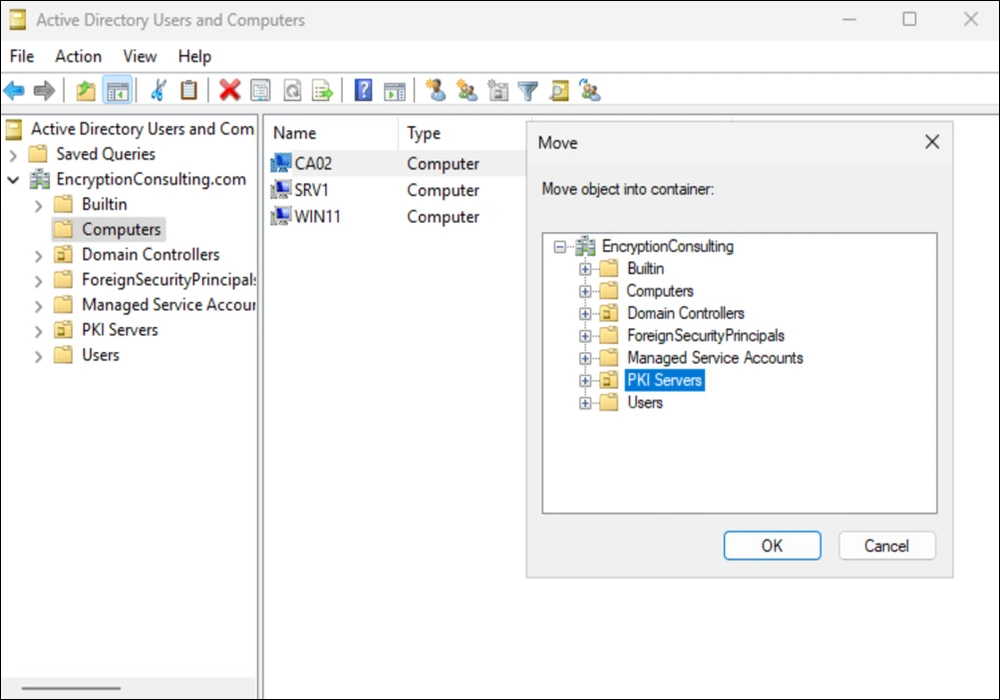
On DC01, open Active Directory Users and Computers by running dsa.msc. Expand EncryptionConsulting.com and check whether CA02 is listed in the Computers container.
If CA02 is listed there, create a new organizational unit named PKI Servers under EncryptionConsulting.com and move CA02 into that OU. If CA02 is already located in an OU, use that existing OU and do not move the computer account.
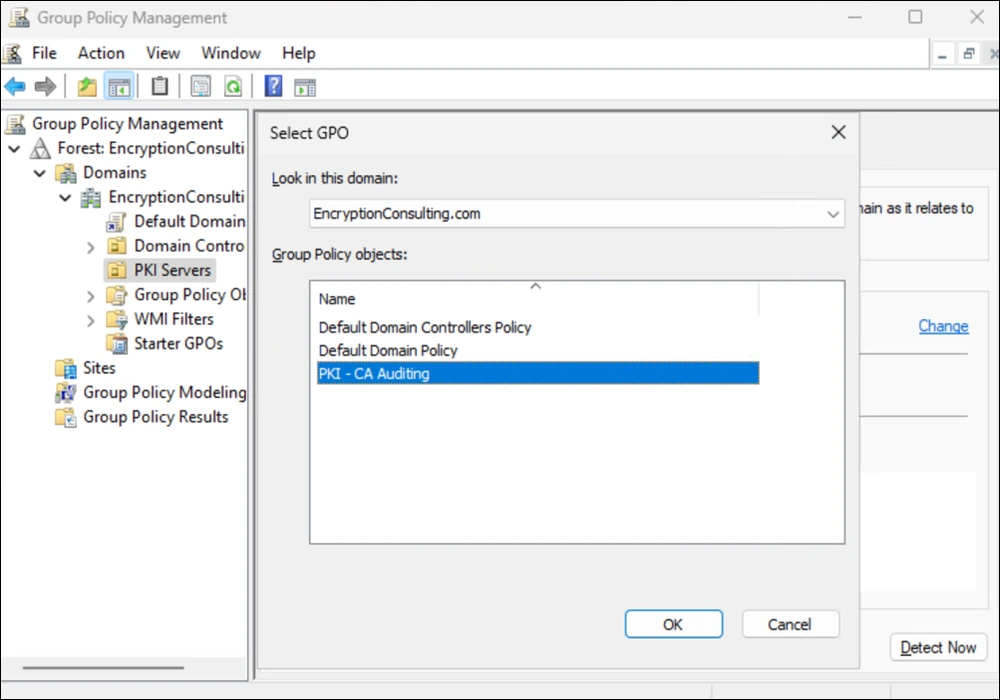
In DC01, open Group Policy Management by running gpmc.msc. Expand Forest > Domains > EncryptionConsulting.com, right-click the OU containing CA02, such as PKI Servers, select Link an Existing GPO, choose PKI – CA Auditing, and click OK.
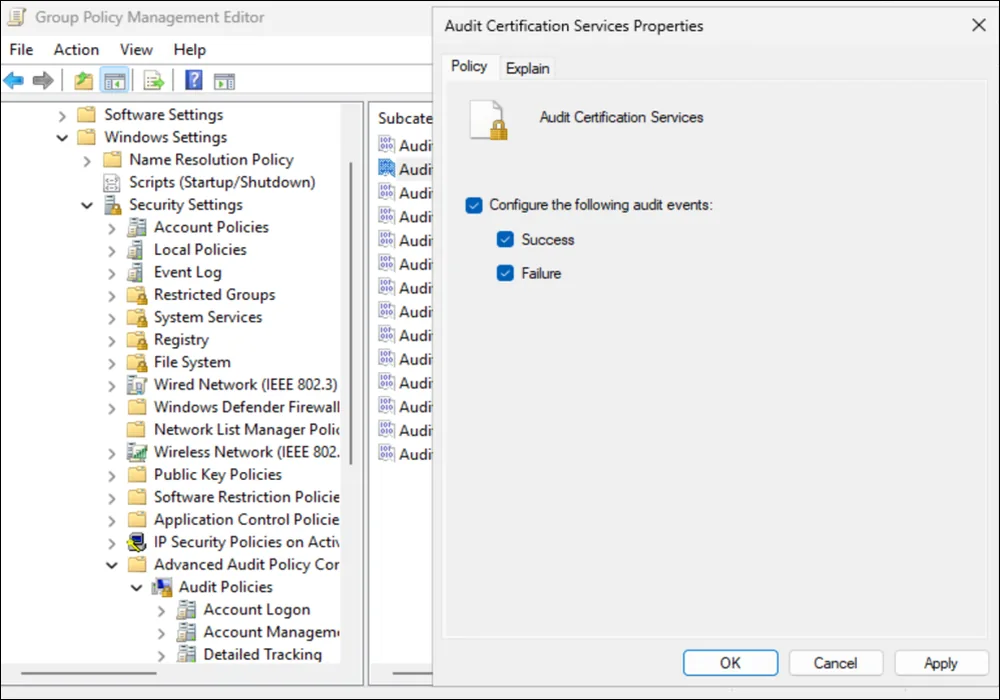
On DC01, Open Group Policy Management by running gpmc.msc. Expand Forest > Domains > EncryptionConsulting.com > Group Policy Objects. Right-click PKI – CA Auditing and select Edit. In the Group Policy Management Editor, navigate to:
Double-click Audit Certification Services, select Configure the following audit events, enable Success and Failure, and click Apply > OK.
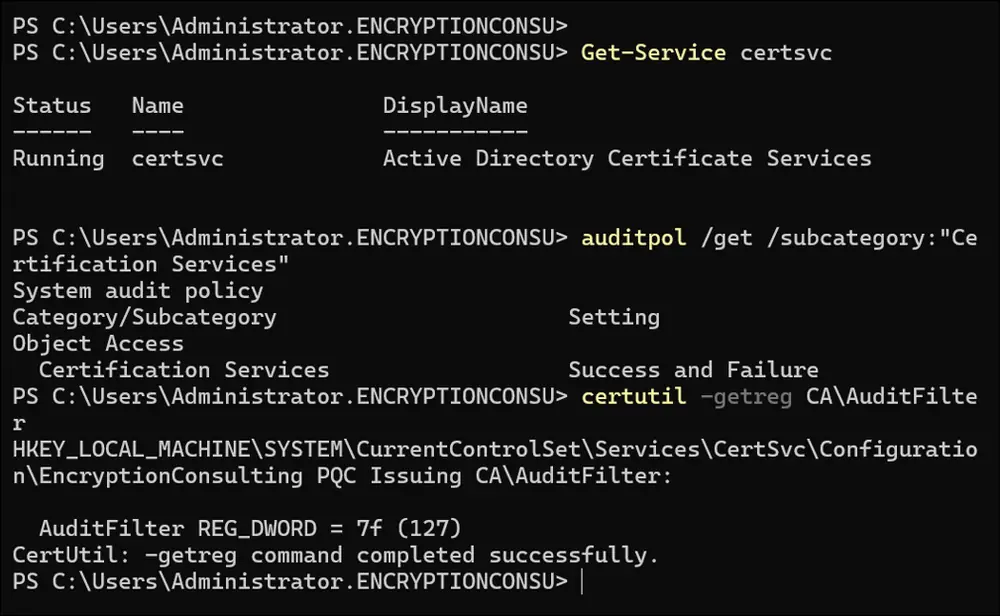
After enabling the Audit Certification Services subcategory, configure the AD CS audit filter. From an elevated PowerShell window on CA02, run and verify the configuration.
After you have run that command, run the following command to confirm your settings:
certutil -getreg CA\CACertPublicationURLs
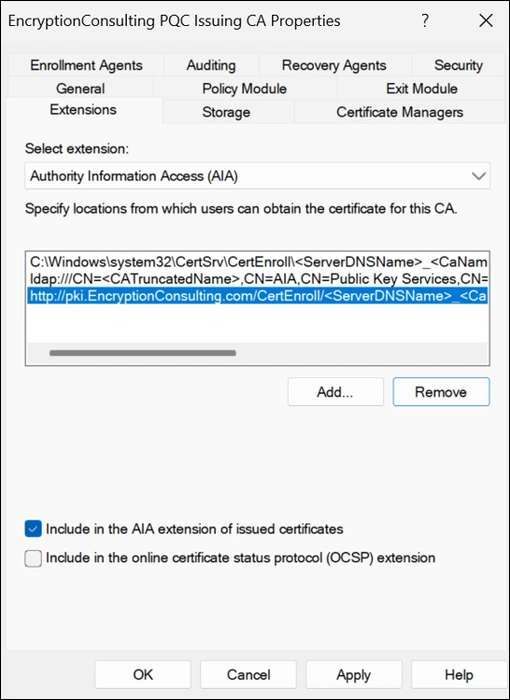
If you look in the registry, under HKEY_LOCAL_MACHINE\SYSTEM\CurrentControlSet\Services\CertSvc\Configuration\EncryptionConsulting PQC Issuing CA, you can confirm the CACertPublicationURLs by opening that REG_MULTI_SZ value. You should see three locations: the local CertEnroll folder, the LDAP path, and the HTTP URL. Activity 7 adds a fourth location, the OCSP URL. You can also check them in the CA console: right-click EncryptionConsulting PQC Issuing CA, click Properties, and on the Extensions tab select Authority Information Access (AIA).
From an administrative command prompt, run the following command to copy the EncryptionConsulting PQC Issuing CA certificate to the HTTP AIA location:
Note: This copy is manual because the Issuing CA’s AIA list has no \\srv1 publish entry. When the CA certificate is renewed, the file name gains a suffix such as (1) (the %4 variable), so the new file must be copied again. To avoid the manual copy, add 1:\\srv1.EncryptionConsulting.com\CertEnroll\%1_%3%4.crt to CACertPublicationURLs so CA02 publishes the certificate automatically.
Task 4: Configure the CDP
Run the following command from a command prompt run as Administrator:
Interpreting the CRL publication flags:
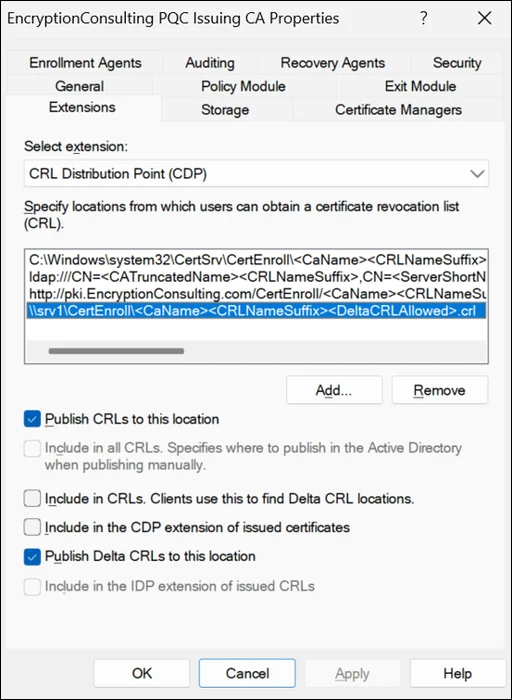
Each entry uses the format <flags>:<location>. 65: publishes base and delta CRLs locally, 79: publishes to LDAP and includes the location in the CDP, All CRLs, and Freshest CRL extensions, and 6: adds the HTTP location to the CDP and Freshest CRL extensions. The 65:\\SRV1… entry publishes CRLs to SRV1 over SMB, so the CA02 computer account requires Change/Modify permission through Cert Publishers. Run this command in cmd.exe, because the % substitution variables are not interpreted the same way in PowerShell.
After you run that command, run the following certutil command to verify your settings:
certutil -getreg CA\CRLPublicationURLs
In the registry location HKEY_LOCAL_MACHINE\SYSTEM\CurrentControlSet\Services\CertSvc\Configuration\EncryptionConsulting PQC Issuing CA you can open the REG_MULTI_SZ value and see the configuration of these values:
You can also see this in the CA (certsrv) console. Right-click EncryptionConsulting PQC Issuing CA, click Properties, and on the Extensions tab select CRL Distribution Point (CDP). You should see four locations: the local CertEnroll folder, the LDAP path, the HTTP URL, and \\srv1\CertEnroll.
At an administrative command prompt, run the following commands to restart Active Directory Certificate Services and to publish the CRL:
net stop certsvc && net start certsvc
certutil -crl
PQC Note: The issuing CA signs its base CRL and Delta CRL with ML-DSA-87. Check the CRL files in \\srv1\CertEnroll and note their size, since ML-DSA signatures (4,627 bytes for ML-DSA-87) are larger than RSA signatures.
Activity 7: Deploy and Configure the Online Responder
Task 1: Install the Online Responder Role Service on SRV1
Ensure that you are logged on to SRV1.EncryptionConsulting.com as ENCRYPTIONCONSU\Administrator.
Open Server Manager.
Click Manage, and then click Add Roles and Features.
On the Before You Begin page, select Next.
On the Select Installation Type page, select Role-based or feature-based installation and then click Next.
On the Server Selection page, click Next.
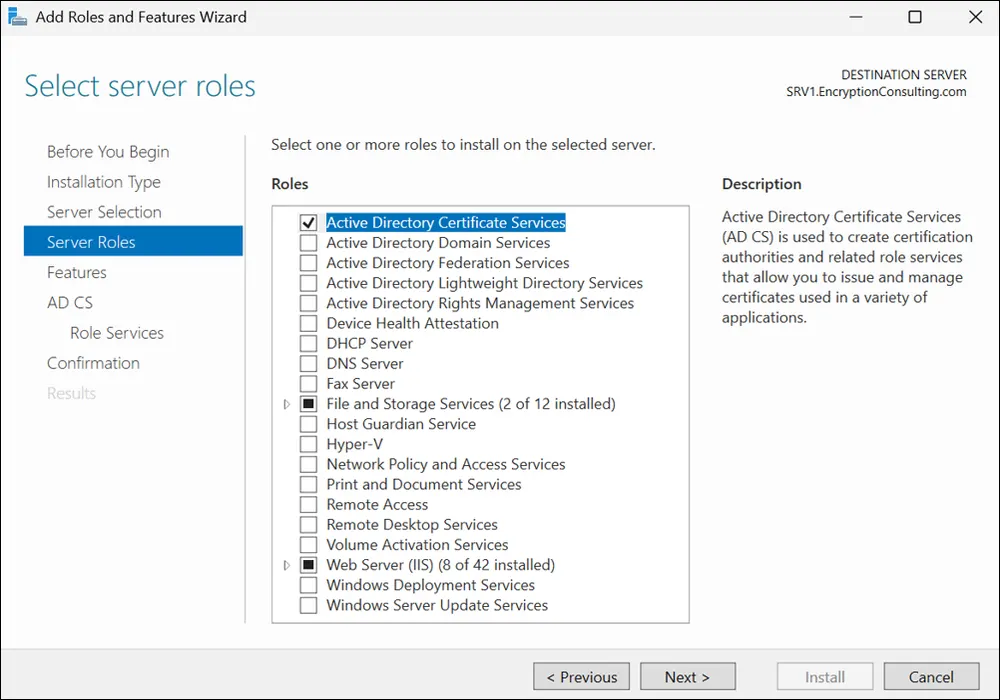
On the Select Server Roles page, select Active Directory Certificate Services and then click Next.
On the Features page, click Next.
On the Introduction to Active Directory Certificate Services page, click Next.
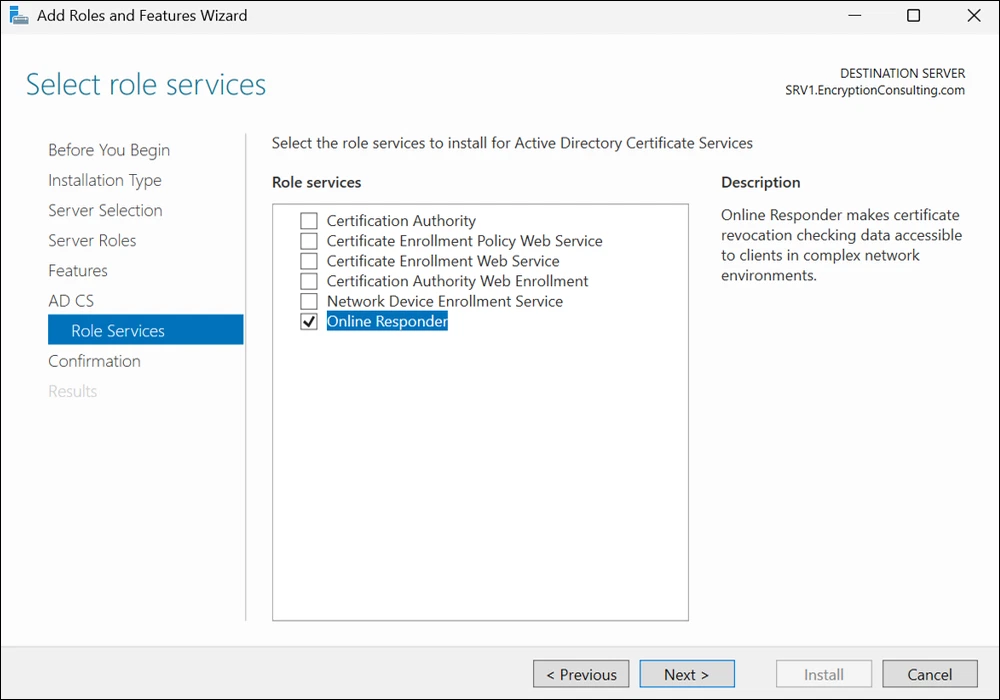
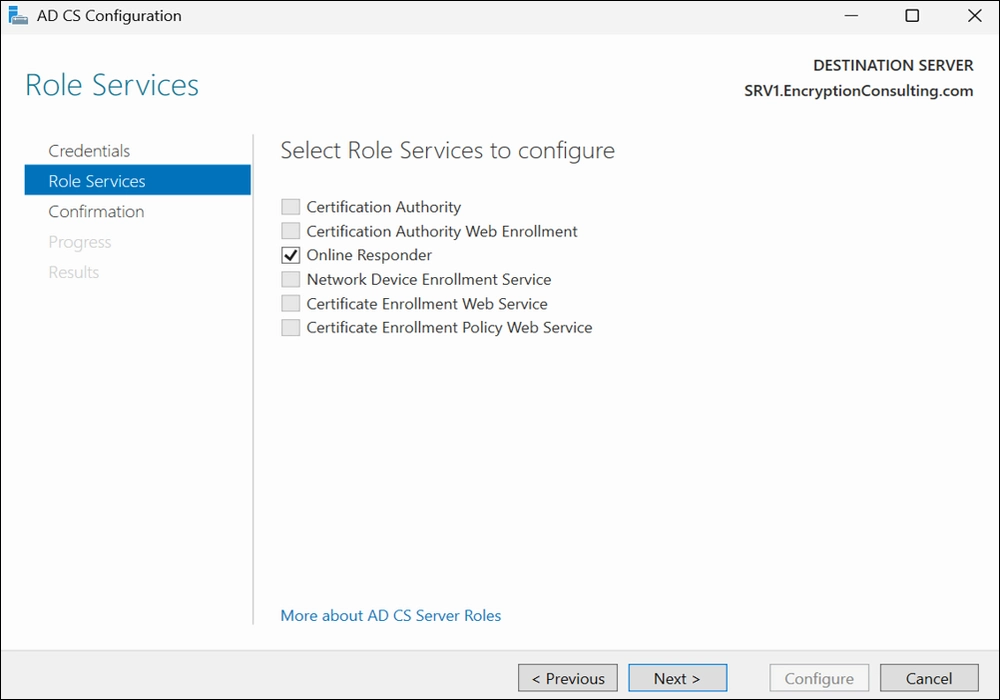
On the Select Role Services page, *clear* Certification Authority, and then select Online Responder. Click Next.
Note: You do not want to install a Certification Authority on SRV1.EncryptionConsulting.com, so you are clearing that checkbox.
If the Add features required for Online Responder page appears, click Add Features and then click Next. Then, on the Web Server Role (IIS) page, click Next.
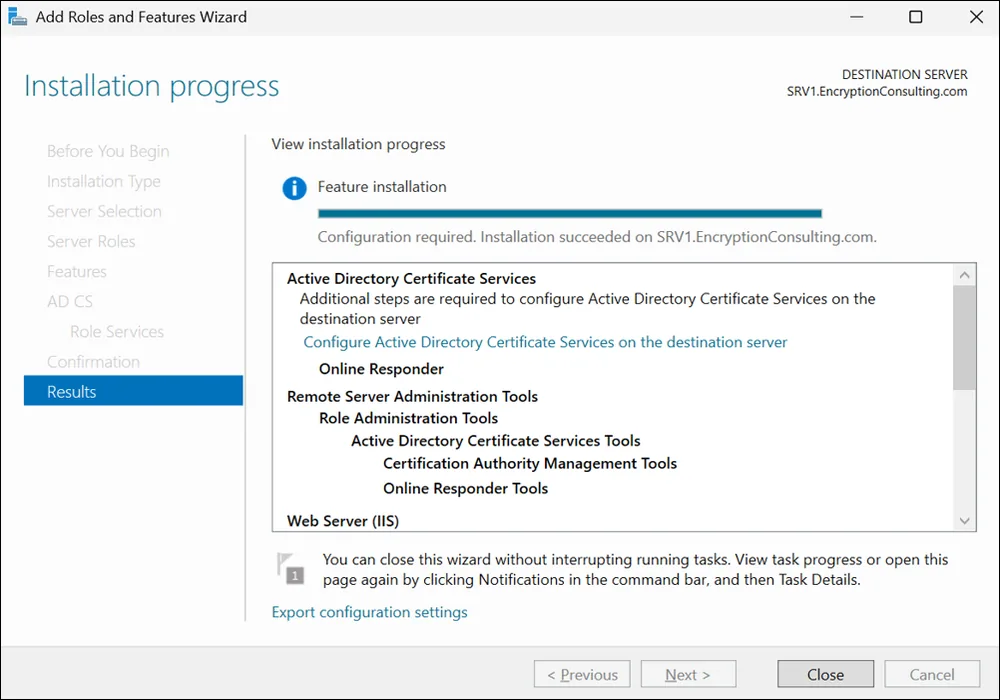
On the Confirm Installation Selections page, click Install. Click Close when the installation is complete.
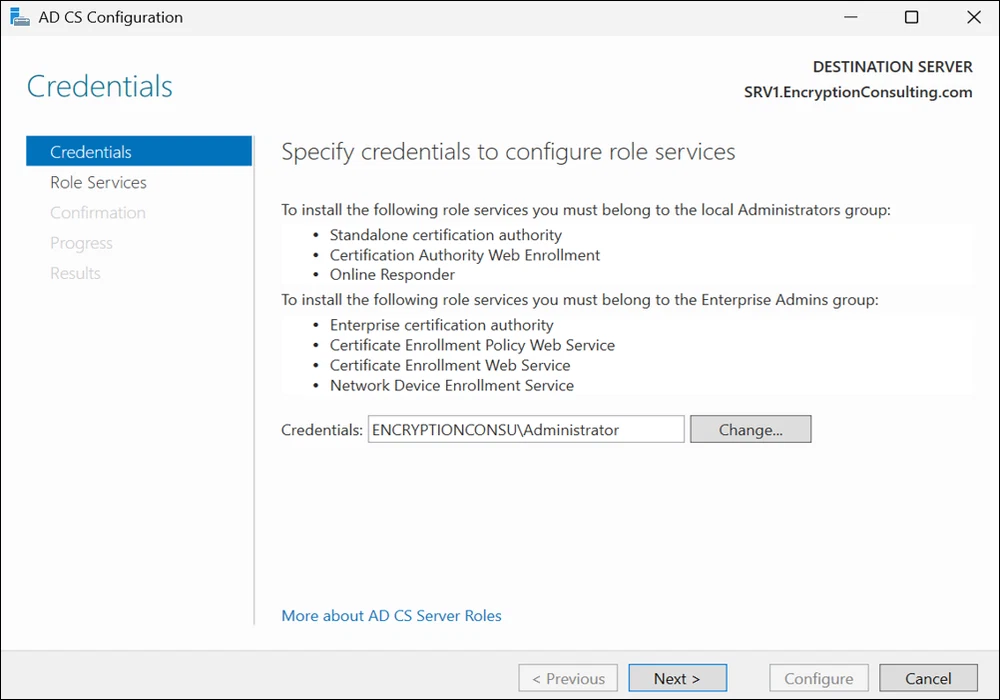
Click Configure Active Directory Certificate Services on the destination server. On the Credentials page, make sure ENCRYPTIONCONSU\Administrator is mentioned, then click Next.
On the Select Role Services to configure page, select Online Responder and click Next.
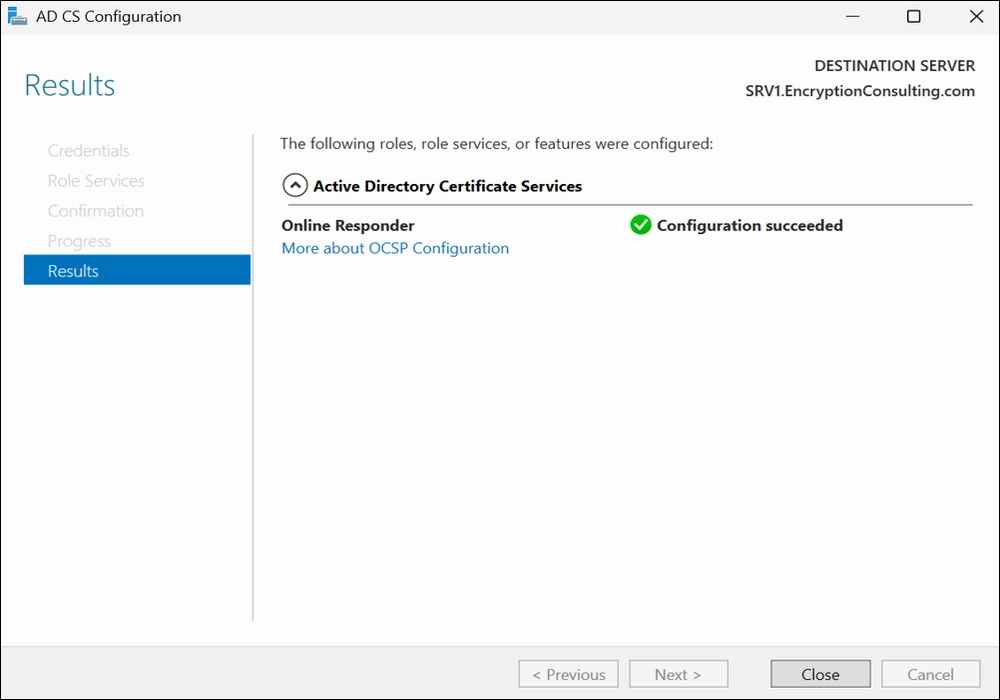
On the Confirmation page, verify the details and click Configure.
PQC Note: SRV1 must also have the 2026-05 security update (KB5087539) or later, because the Online Responder signs OCSP responses with an ML-DSA key.
Task 2: Add the OCSP URL to the EncryptionConsulting PQC Issuing CA
To add the OCSP URL to the EncryptionConsulting PQC Issuing CA:
Ensure that you are logged on to CA02.EncryptionConsulting.com as ENCRYPTIONCONSU\Administrator.
In the Certification Authority console, in the console tree, right-click EncryptionConsulting PQC Issuing CA, and then click Properties.
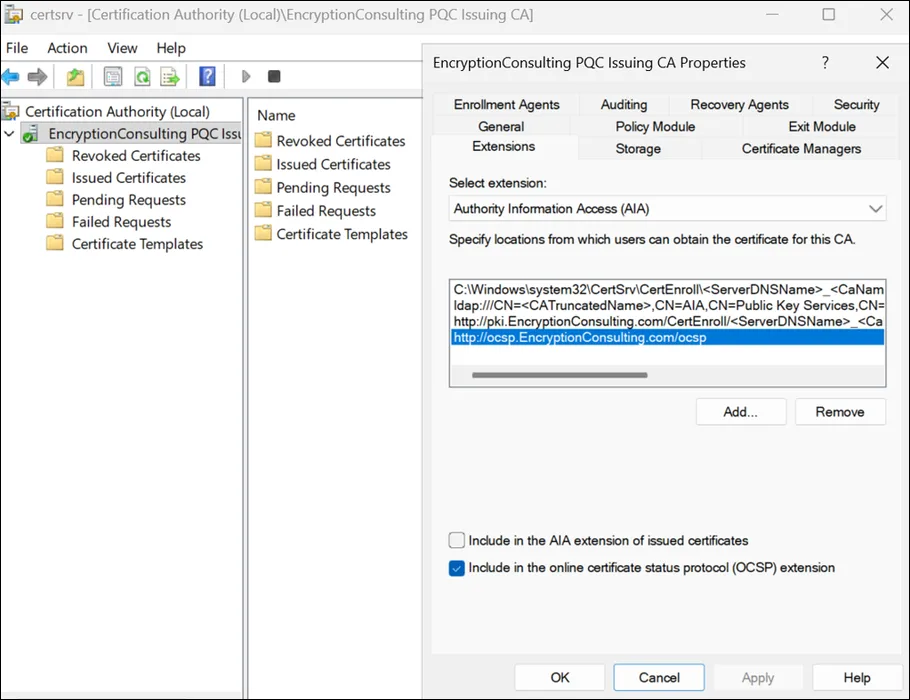
On the Extensions tab, under Select extension, select Authority Information Access (AIA), and then click Add.
In Location, type http://ocsp.EncryptionConsulting.com/ocsp, and then click OK.
Select Include in the online certificate status protocol (OCSP) extension.
Note: A common misconfiguration is to select both checkboxes in the Extensions tab, which is incorrect. Ensure that the Include in the online certificate status protocol (OCSP) extension checkbox is the only one selected.
Click OK. When prompted by the Certification Authority dialog box to restart Active Directory Certificate Services, click Yes.
Warning: The EncryptionConsulting PQC Issuing CA will now include the http://ocsp.EncryptionConsulting.com/ocsp URL as part of the Authority Information Access (AIA) extension in all newly issued, renewed or re-enrolled certificates. Certificates enrolled from the Issuing CA prior to this change will not have this URL.
Task 3: Configure and Publish the ML-DSA OCSP Response Signing Certificate on the EncryptionConsulting PQC Issuing CA
To configure the OCSP response signing certificate:
PQC Note: The classic guide used the built-in OCSP Response Signing template as it is. For PQC you duplicate the template so that it uses an ML-DSA key. The Online Responder then signs OCSP responses with ML-DSA, which keeps revocation checking post-quantum as well.
On CA02.EncryptionConsulting.com, ensure that you are logged on as ENCRYPTIONCONSU\Administrator.
In the Certification Authority console, ensure that the EncryptionConsulting PQC Issuing CA is expanded in the console tree.
Right-click on Certificate Templates and then click Manage. Certificate Templates Console opens and displays the certificate templates stored in Active Directory.
In the details pane (middle pane) right-click OCSP Response Signing and then click Duplicate Template.
OCSP template note: The built-in OCSP Response Signing template is already a Windows Server 2008 (version 3) template. Therefore, changing the compatibility settings is optional and is not required for this ML-DSA configuration. Microsoft’s ML-DSA OCSP procedure also skips this step.
OCSP signing certificates are intentionally short-lived; the default validity period is two weeks. The Online Responder renews them automatically. These certificates include the id-pkix-ocsp-nocheck extension, which tells clients not to perform revocation checking on the OCSP signing certificate itself.
On the General tab, set the template display name to OCSP Response Signing – ML-DSA. In the certificate-template wizard, select this display name. The underlying template name is OCSPResponseSigning-ML-DSA.
On the Cryptography tab, set Provider Category to Key Storage Provider, set Algorithm name to ML-DSA:87, and under Requests must use one of the following providers select Microsoft Software Key Storage Provider.
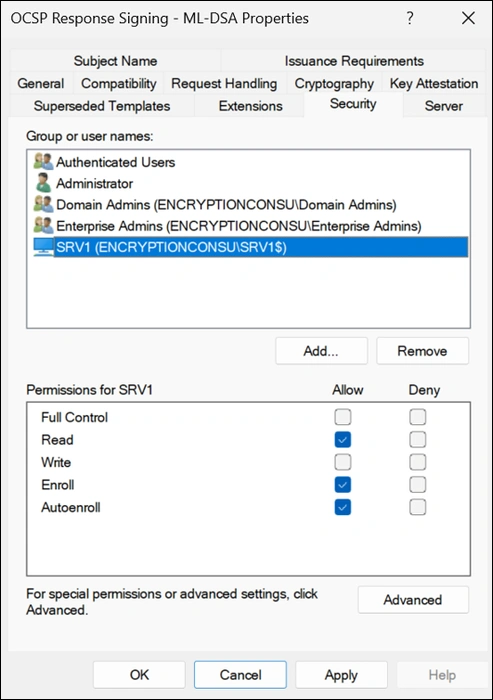
On the Security tab click Add. Click Object Types.
In the Object Types dialog box, select Computers and then click OK.
In Enter the object names to select, type SRV1 and then click Check Names. Click OK.
Ensure that SRV1 is selected and in the Allow column, ensure that the Read, Enroll and Autoenroll permissions are selected. Click OK.
Close the Certificate Templates console.
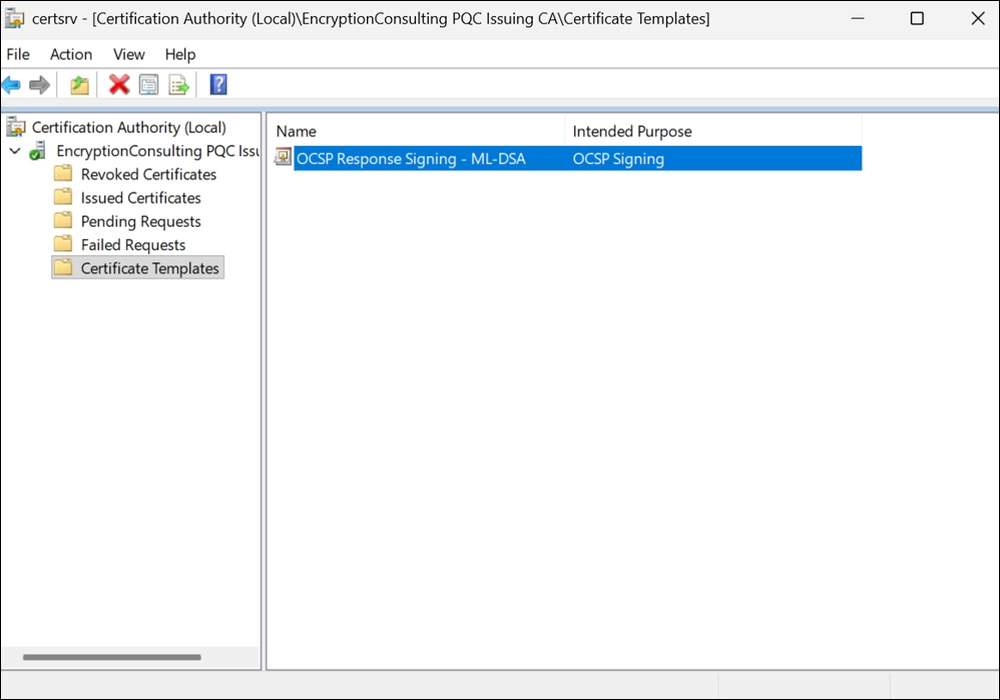
In the certsrv console, right-click Certificate Templates, then select New and then select Certificate Template to Issue.
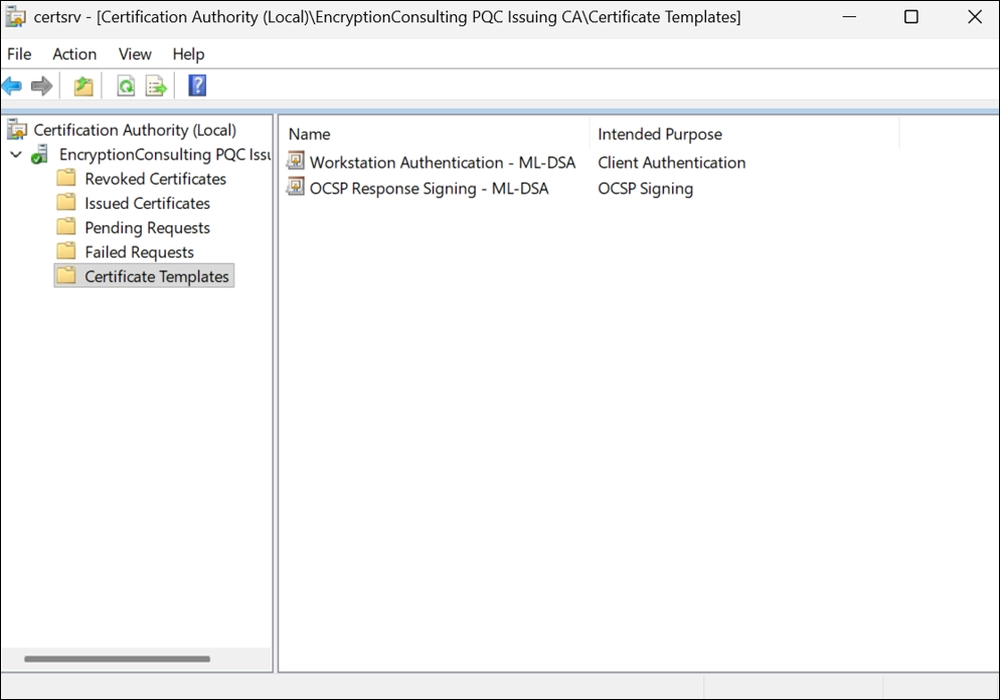
In the Enable Certificate Templates dialog box, click OCSP Response Signing – ML-DSA and then click OK.
Task 4: Configure Revocation Configuration on the Online Responder
To configure the revocation configuration:
On SRV1.EncryptionConsulting.com, ensure that you are logged on as ENCRYPTIONCONSU\Administrator.
Open Server Manager, navigate to Tools and click on Online Responder Management.
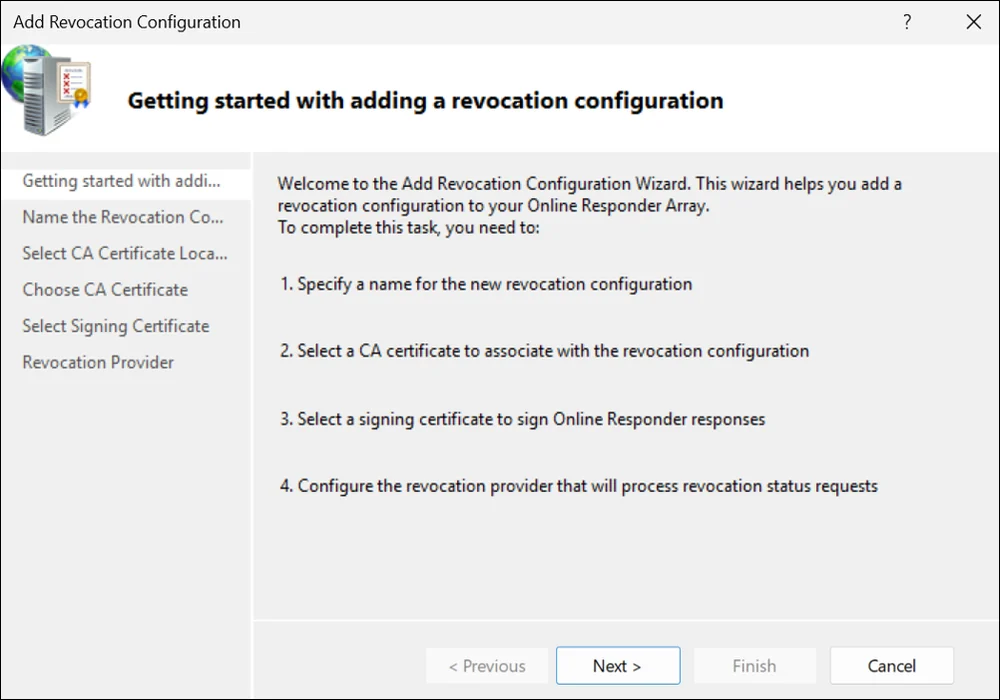
Right-click Revocation Configuration and then click Add Revocation Configuration.
On the Getting Started with Adding a Revocation Configuration page click Next.
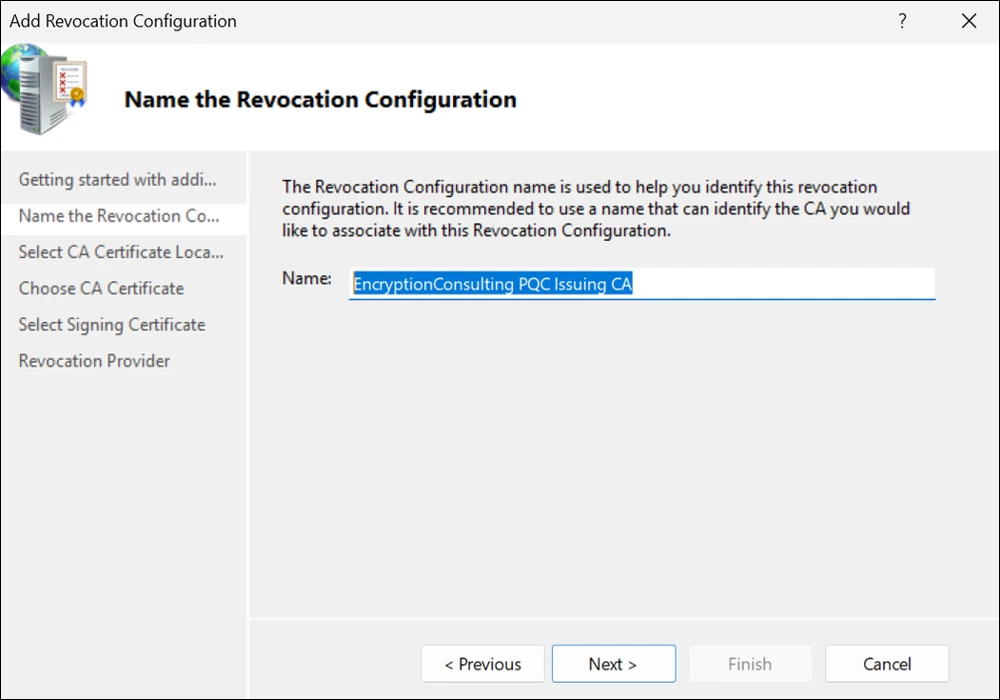
In Name, enter EncryptionConsulting PQC Issuing CA, and then click Next.
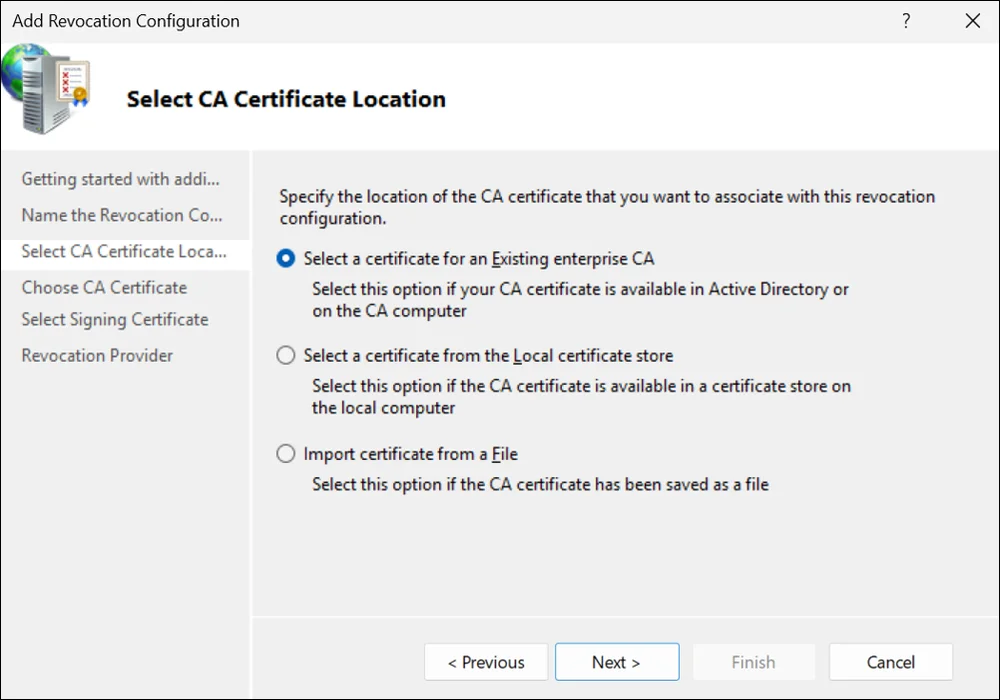
On the Select CA Certificate Location page ensure that Select a certificate for an Existing enterprise CA is selected, then click Next.
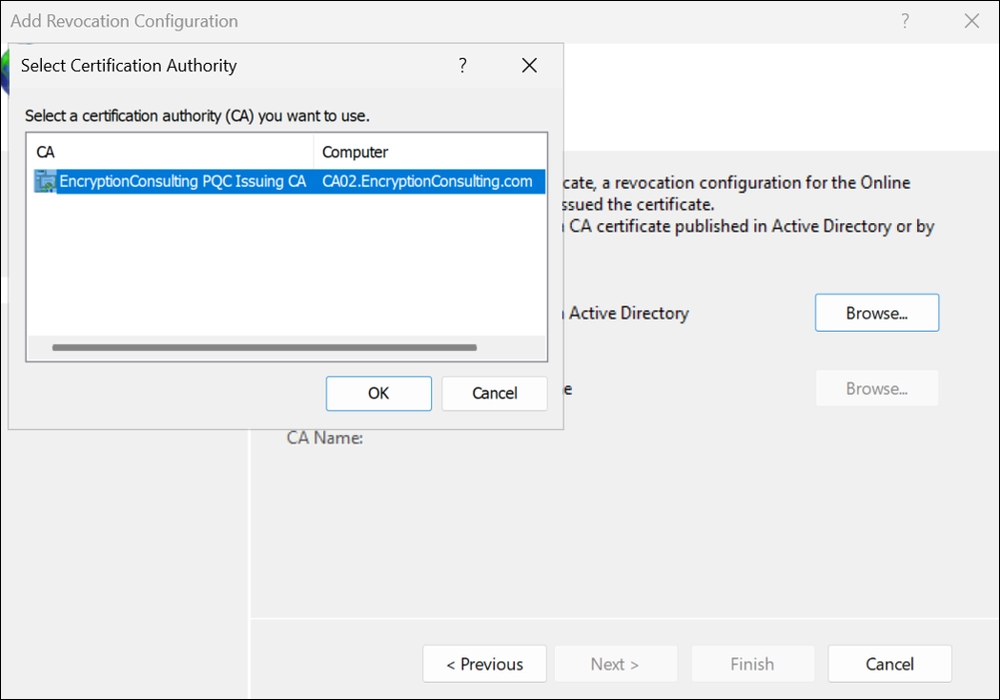
On the Choose CA Certificate page, browse to select CA02 (the EncryptionConsulting PQC Issuing CA) and click Next.
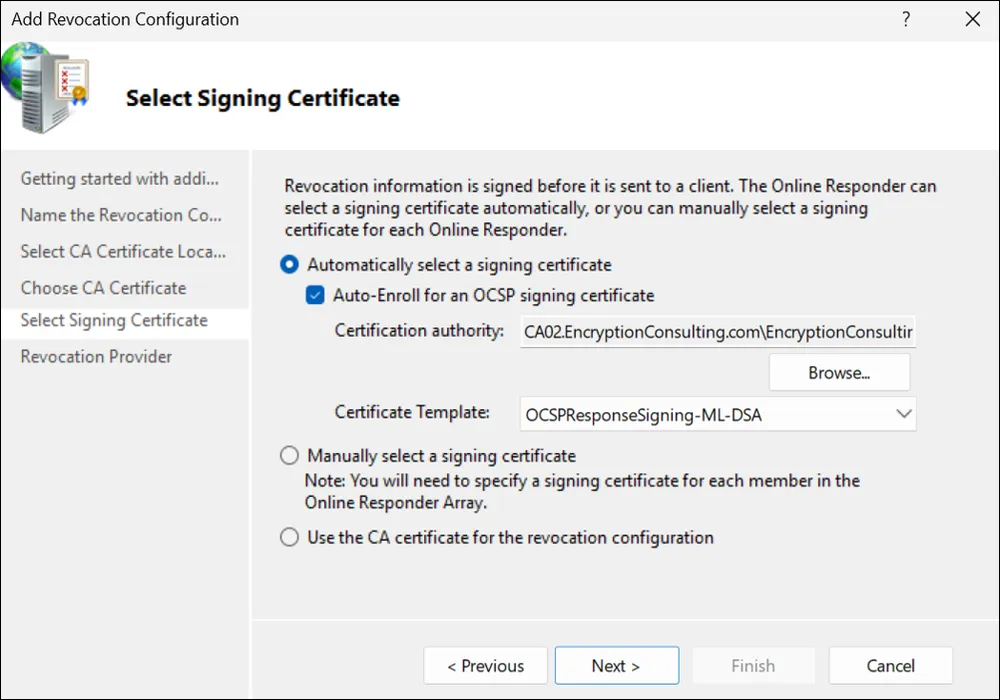
On the Select Signing Certificate page, ensure Automatically select a signing certificate and Auto-Enroll for an OCSP signing certificate are selected, and select the OCSP Response Signing – ML-DSA certificate template. Click Next.
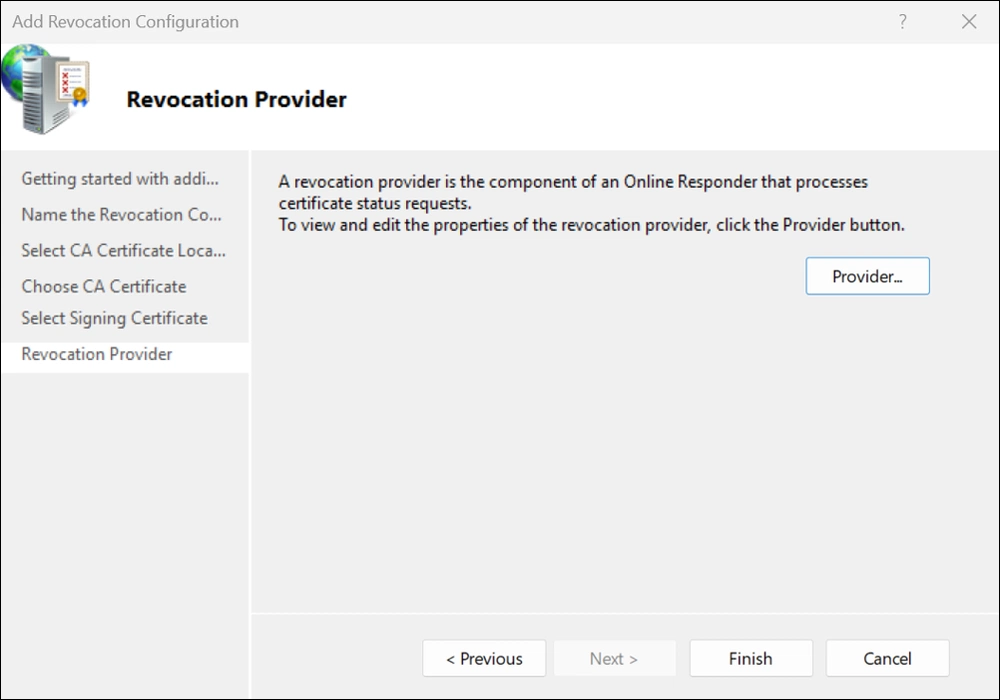
On the Revocation Provider page, click Provider.
Review the choices listed for the OCSP Responder to download CRLs in the form of LDAP and HTTP locations.
Note: Depending on your needs you could select either the LDAP or HTTP as your primary location for the OCSP Responder to download CRLs. You can change the order of the LDAP and HTTP URLs using Move Up or Move Down. Leave the defaults as they appear.
Clear the Refresh CRLs based on their validity periods check box. In the Update CRLs at this refresh interval (min) box, type 15 and then click OK. Click Finish.
Note: Modifying this setting to download CRLs at a faster rate than the CRL normal expiration makes it possible for the OCSP responder to rapidly download new CRLs rather than use the last downloaded CRL normal expiration date. Production needs may differ from the value chosen here.
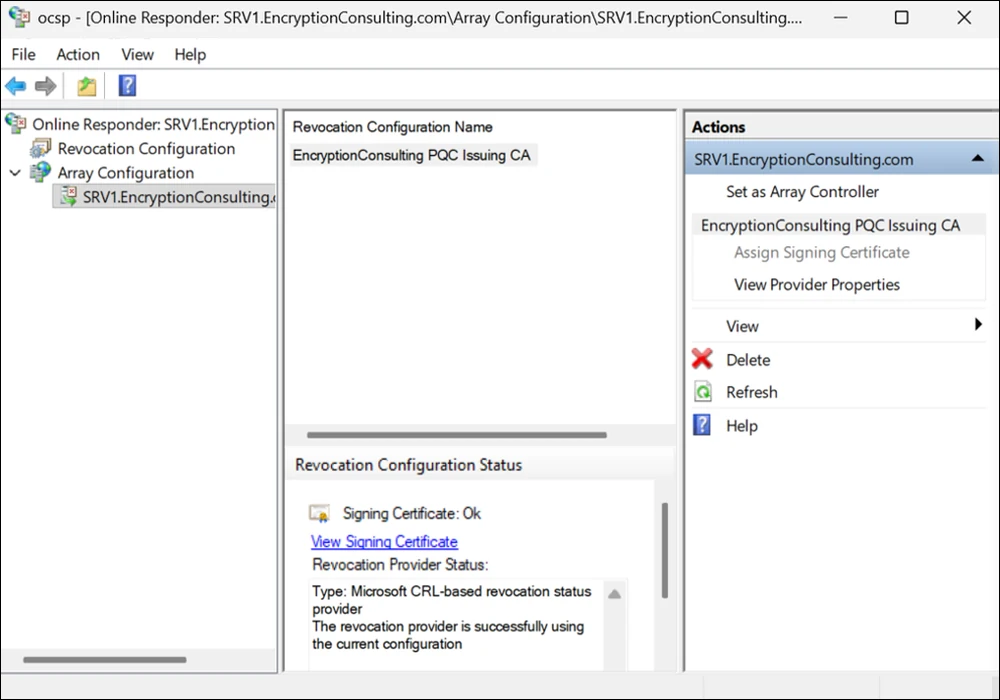
In the Online Responder Management console, expand Array Configuration and then click SRV1.
Review the Revocation Configuration Status in the middle pane to ensure there is a signing certificate present and the status reports as Working. The provider is successfully using the current configuration.
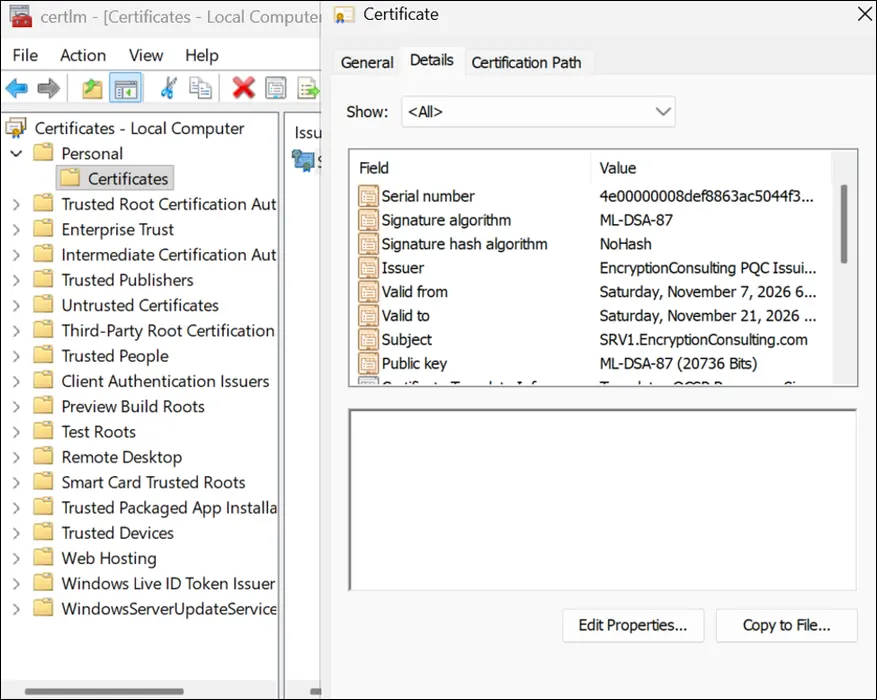
On SRV1, open certlm.msc, expand Personal > Certificates and confirm that the OCSP signing certificate was issued by the EncryptionConsulting PQC Issuing CA and shows ML-DSA-87 in the Signature algorithm field (signed by the issuing CA) and ML-DSA-87 in the Public key field on the Details tab.
Task 5: Configure Group Policy to Provide the OCSP URL for the EncryptionConsulting PQC Issuing CA
Optional task: All certificates in this lab were issued after the OCSP URL was configured, so they already contain the required OCSP information. You may skip this task. Perform it only when existing certificates do not contain the OCSP URL and re-enrollment is not practical.
Ensure you are logged on to DC01.EncryptionConsulting.com as ENCRYPTIONCONSU\Administrator.
Open an administrative command prompt and run the following commands:
Expand Forest > Domains > EncryptionConsulting.com. Right-click EncryptionConsulting.com, select Create a GPO in this domain, and Link it here, and name it PKI – PQC Trust and OCSP.
Right-click the new PKI – PQC Trust and OCSP GPO and select Edit. Do not modify Default Domain Policy.
Under Computer Configuration, expand Policies, expand Windows Settings, expand Security Settings, and then expand Public Key Policies.
Right-click Intermediate Certification Authorities, and then click Import.
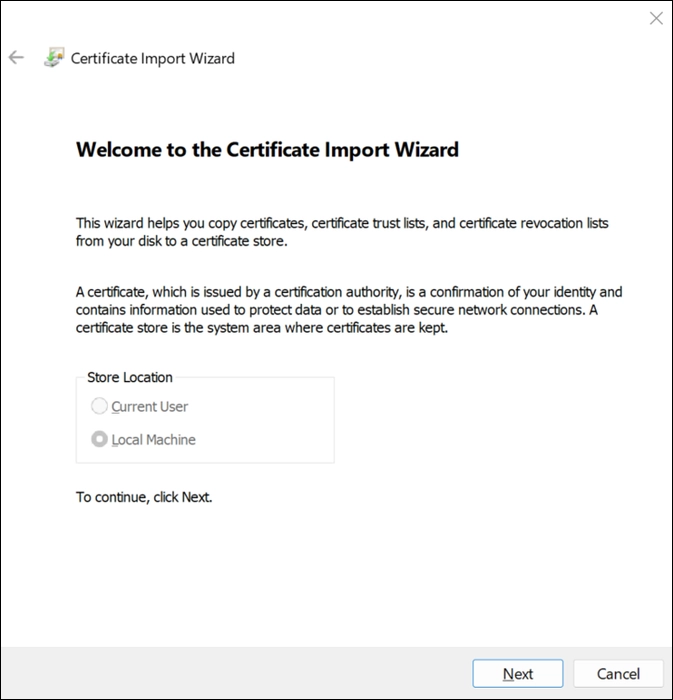
On the Welcome to the Certificate Import Wizard page, click Next.
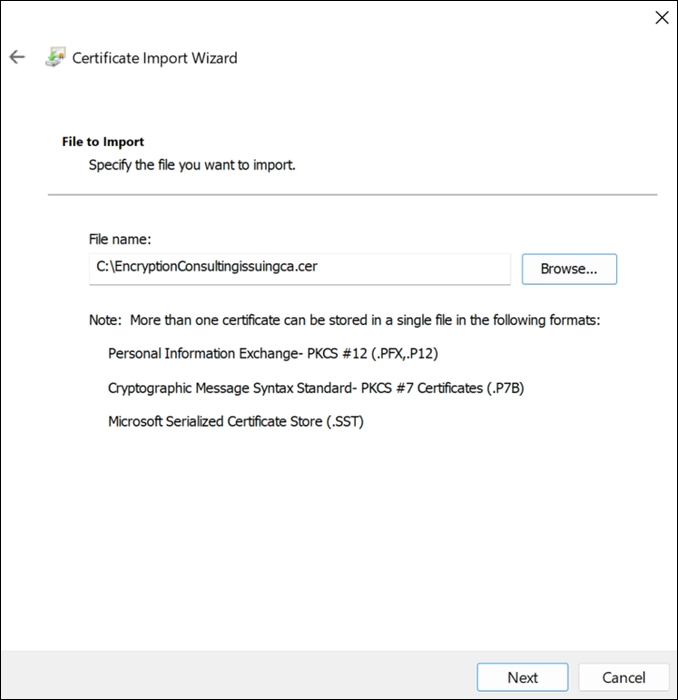
In the File name, type C:\EncryptionConsultingissuingca.cer, and then click Next.
On the Certificate Store page, click Next.
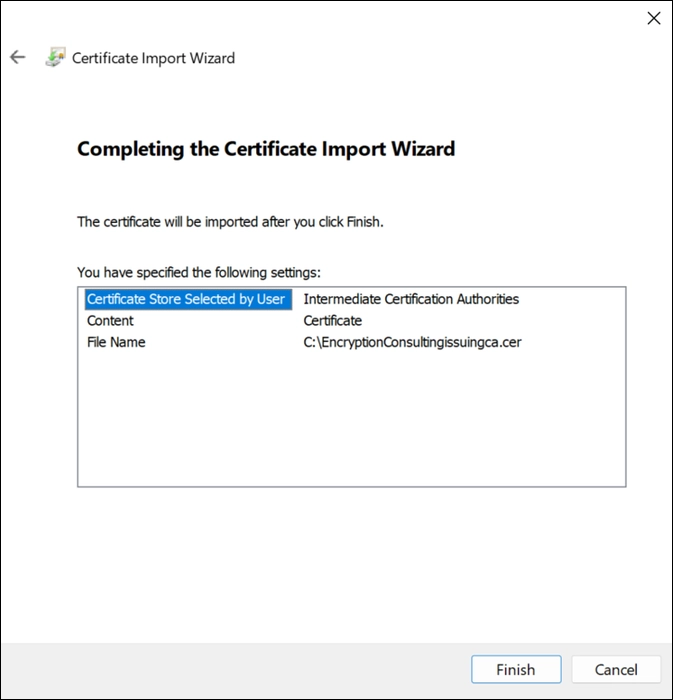
On the Completing the Certificate Import Wizard page, click Finish and then click OK.
In the console tree, select Intermediate Certification Authorities.
In the details pane, right-click the EncryptionConsulting PQC Issuing CA certificate, then click Properties.
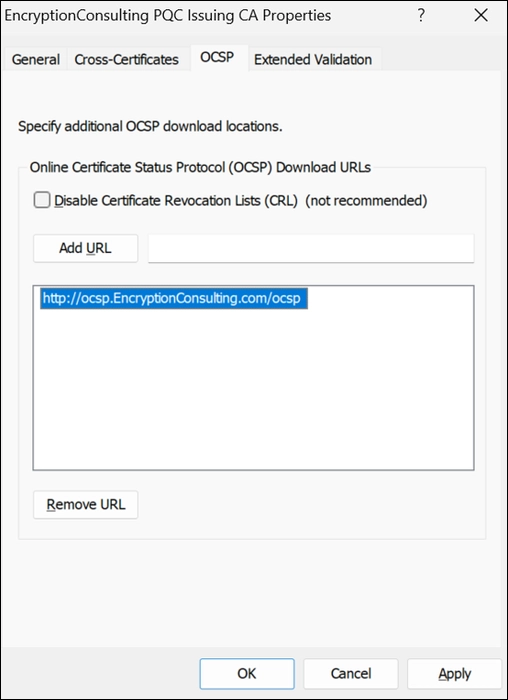
On the OCSP tab, in Add URL enter http://ocsp.EncryptionConsulting.com/ocsp, and then click Add URL. Click OK.
Close the Group Policy Management Editor and then close the Group Policy Management console.
Enterprise PKI Services
Get complete end-to-end consultation support for all your PKI requirements!
Activity 8: Configure Certificate Enrollment and Validate the PQC PKI Hierarchy
Task 1: WIN11
Log on to WIN11 as the local administrator.
Click Start, type sysdm.cpl, and press ENTER. Click Change. (Ensure the computer name is already set to WIN11, otherwise change it.)
In Member of, select Domain, and then type EncryptionConsulting.com. Click OK.
In Windows Security, enter the Username and password for the domain administrator account. Click OK.
You should be welcomed to the EncryptionConsulting domain. Click OK.
When prompted that a restart is required, click OK. Click Close. Click Restart Now.
PQC Note: The client must be Windows 11 24H2/25H2 with the 2025-10 non-security update (KB5067036) or later to enroll for ML-DSA certificates.
Task 2: Check PKI Health with Enterprise PKI
To use the Enterprise PKI console to check PKI health:
On CA02.EncryptionConsulting.com, ensure that you are logged on as ENCRYPTIONCONSU\Administrator.
Open Server Manager.
Run pkiview.msc from an administrative command prompt (or open Enterprise PKI from the Tools menu).
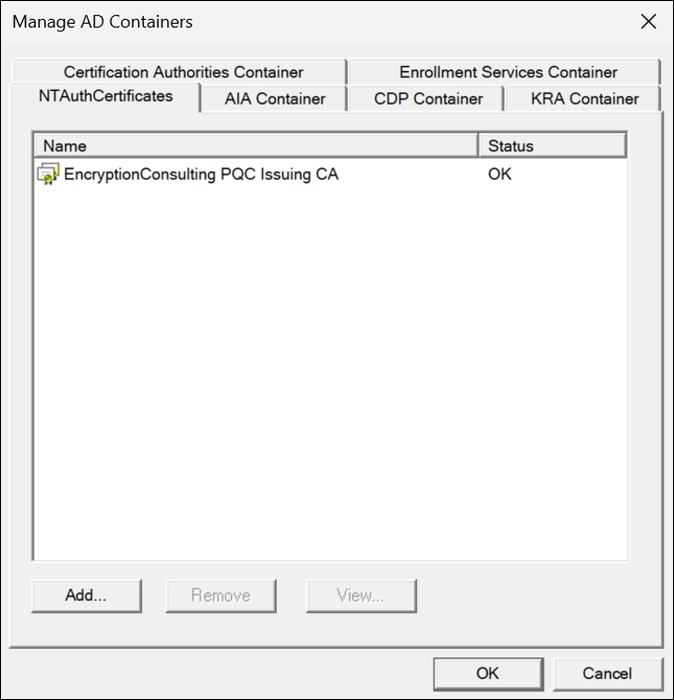
Right-click Enterprise PKI and then click Manage AD Containers.
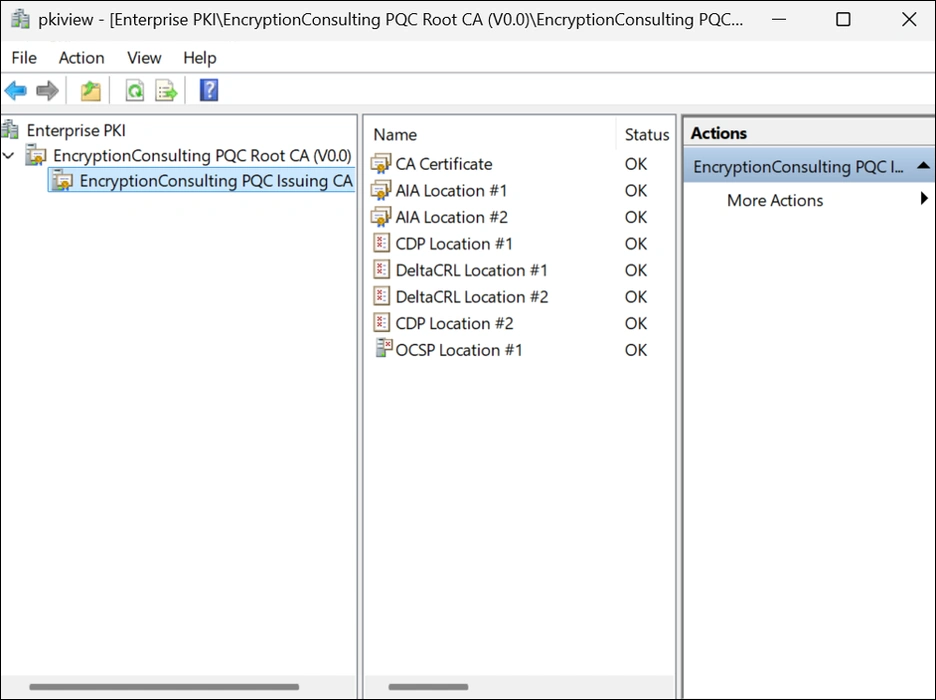
On the NTAuthCertificates tab, verify the EncryptionConsulting PQC Issuing CA certificate appears with a status of OK.
On the AIA Container tab, verify both the EncryptionConsulting PQC Root CA and the EncryptionConsulting PQC Issuing CA certificates are present with a status of OK.
On the CDP Container tab, verify EncryptionConsulting PQC Root CA base CRL, EncryptionConsulting PQC Issuing CA base and the Delta CRLs are present with a status of OK.
On the Certification Authorities Container, verify the EncryptionConsulting PQC Root CA certificate is present with a status of OK.
On the Enrollment Services Container, verify the EncryptionConsulting PQC Issuing CA certificate is present with a status of OK.
Task 3: Configure Certificate Distribution on the EncryptionConsulting PQC Issuing CA
To publish an ML-DSA certificate template for computers in the enterprise:
PQC Note: The classic guide enabled the built-in Workstation Authentication template. For PQC you duplicate the template so that the computer certificate uses an ML-DSA key and a signature-only purpose.
On CA02.EncryptionConsulting.com, ensure that you are logged on as ENCRYPTIONCONSU\Administrator.
In the Certification Authority console, ensure that EncryptionConsulting PQC Issuing CA is expanded. Right-click Certificate Templates and then click Manage.
Right-click Workstation Authentication and click Duplicate Template.
On the Compatibility tab, set Certification Authority to Windows Server 2008 or later and Certificate recipient to Windows Vista / Server 2008 or later.
On the General tab, set Template display name to Workstation Authentication – ML-DSA.
On the Request Handling tab, set Purpose to Signature.
Why this order matters: ML-DSA appears in the Algorithm name list only after the template compatibility is set to Windows Server 2008 or later and Purpose is set to Signature. If ML-DSA is not listed, verify these two settings first.
On the Cryptography tab, set Provider Category to Key Storage Provider, set Algorithm name to ML-DSA:87, and select Microsoft Software Key Storage Provider.
On the Extensions tab, confirm that Application Policies contain only Client Authentication (OID 1.3.6.1.5.5.7.3.2). Under Key Usage, verify that only Digital Signature is selected; Key Encipherment and Key Agreement must not be present.
On the Security tab, grant Read and Enroll permissions only to a dedicated test computer group, such as PQC-MLDSA-Test-Computers. Do not grant Enroll to Domain Computers during evaluation. Clients without KB5067036 or later may fail to enroll for this ML-DSA certificate.
Optional autoenrollment for larger deployments: On the template’s Security tab, also grant Autoenroll to PQC-MLDSA-Test-Computers. Then Create a dedicated GPO, such as PKI – ML-DSA Autoenrollment, and link it to the test computer OU. Navigate to Computer Configuration > Policies > Windows Settings > Security Settings > Public Key Policies > Certificate Services Client – Auto-Enrollment, enable the policy, and select the options to renew, update, and remove certificates automatically. Manual MMC enrollment is sufficient for this lab.
In the certsrv console, right-click Certificate Templates, select New and select Certificate Template to Issue.
In the Enable Certificate Templates dialog box, click Workstation Authentication – ML-DSA and then click OK.
Task 4: Obtain a Certificate Using WIN11 and Verify PKI Health
To obtain a certificate for WIN11 and verify PKI health:
Log in to WIN11.EncryptionConsulting.com as ENCRYPTIONCONSU\Administrator. (Ensure that you switch user to log on as ENCRYPTIONCONSU\Administrator.)
Click Start, type mmc, and then press ENTER.
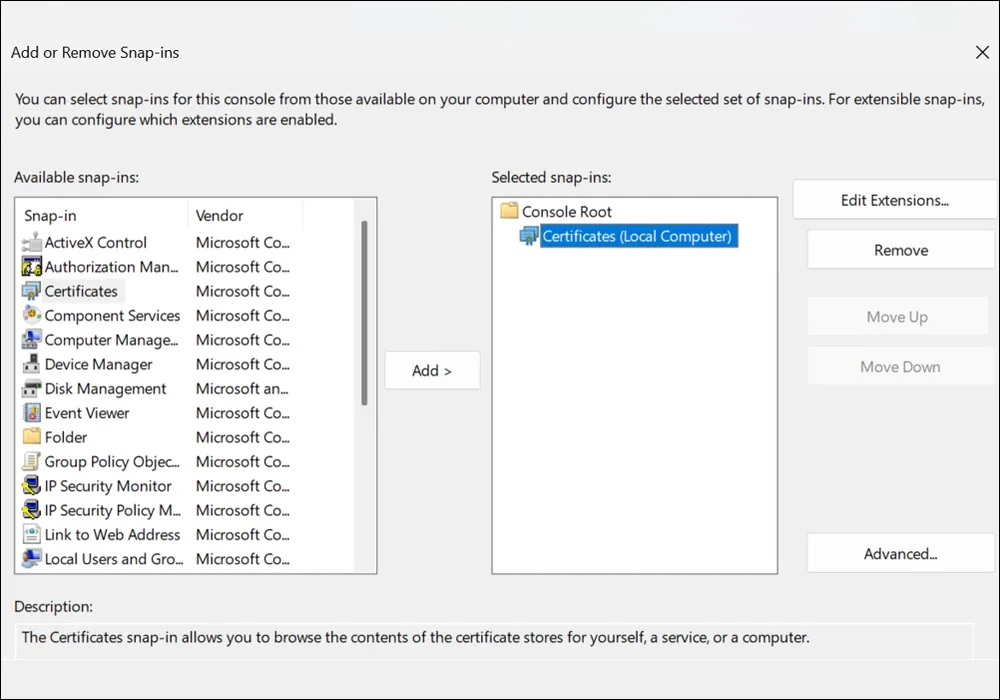
Click File, and then click Add/Remove Snap-in.
Click Certificates, then click Add. Select Computer account, and then click Finish. Click OK.
Expand Certificates, right-click Personal, click All Tasks, and then click Request New Certificate.
On the Before You Begin page, click Next.
On the Select Certificate Enrollment Policy page, click Next.
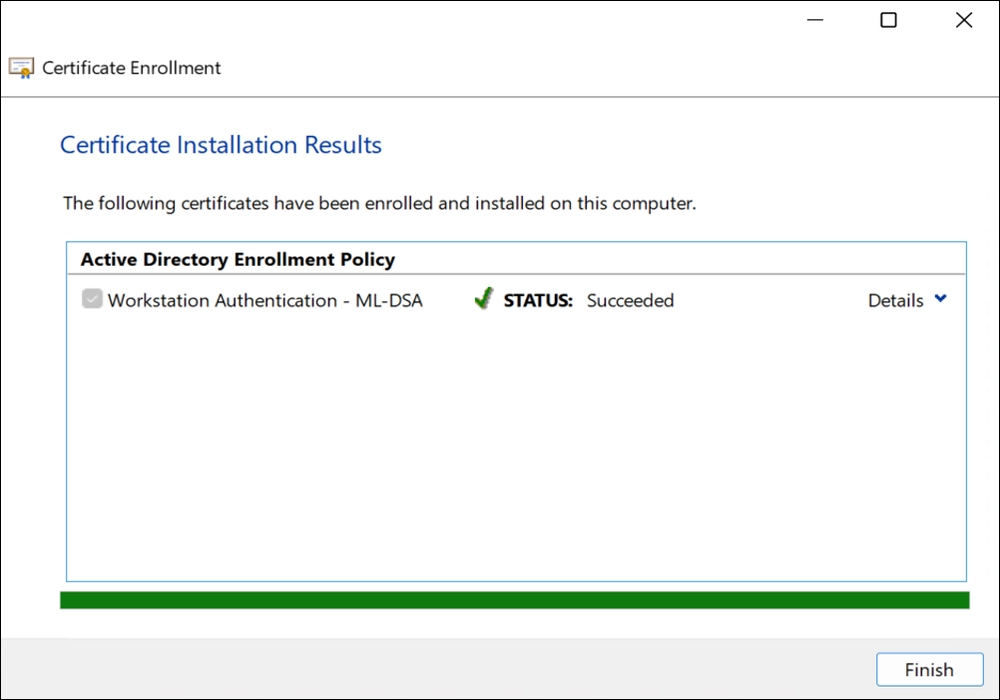
Select Workstation Authentication – ML-DSA, and click Enroll. When the certificate is enrolled, click Finish.
Before inspecting the certificate: The Subject field may appear blank. This is expected for the Workstation Authentication template because the computer identity is stored in the SAN DNS name. An empty Subject field does not indicate a problem.
In the console tree, expand Personal, and click Certificates. In the details pane, right-click the WIN11.EncryptionConsulting.com certificate, click All Tasks, and then click Export.
On the Welcome to the Certificate Export Wizard page, click Next.
On the Export Private Key page, click Next. (No, do not export the private key, selected by default.)
On the Export File Format page, click Next. [DER encoded binary X.509 (.CER) is the default selection.]
On the File to Export page, type C:\win11, and then click Next.
On the Completing the Certificate Export Wizard page, click Finish, and then click OK.
Open a command prompt and run the following commands: (To open a command prompt, click Start, type cmd, and then press ENTER.)
cd\
certutil -URL C:\win11.cer
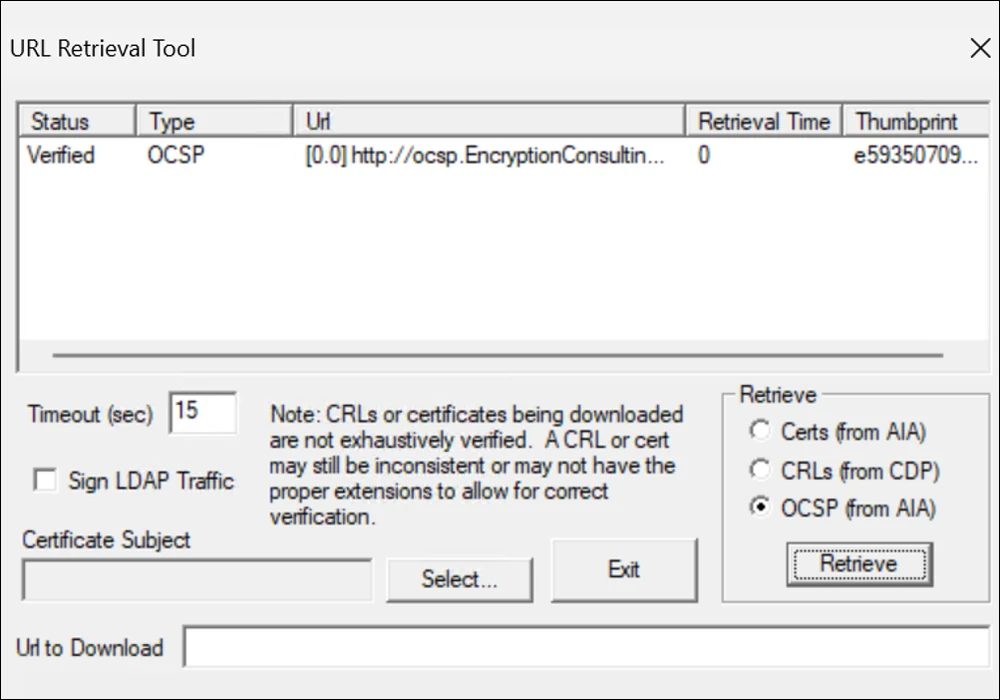
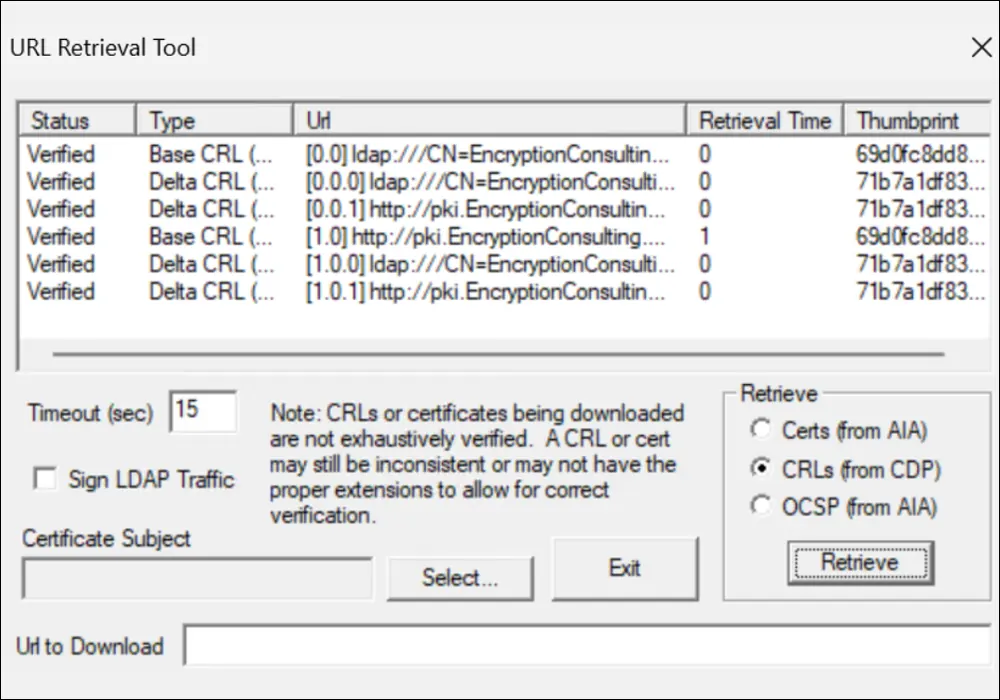
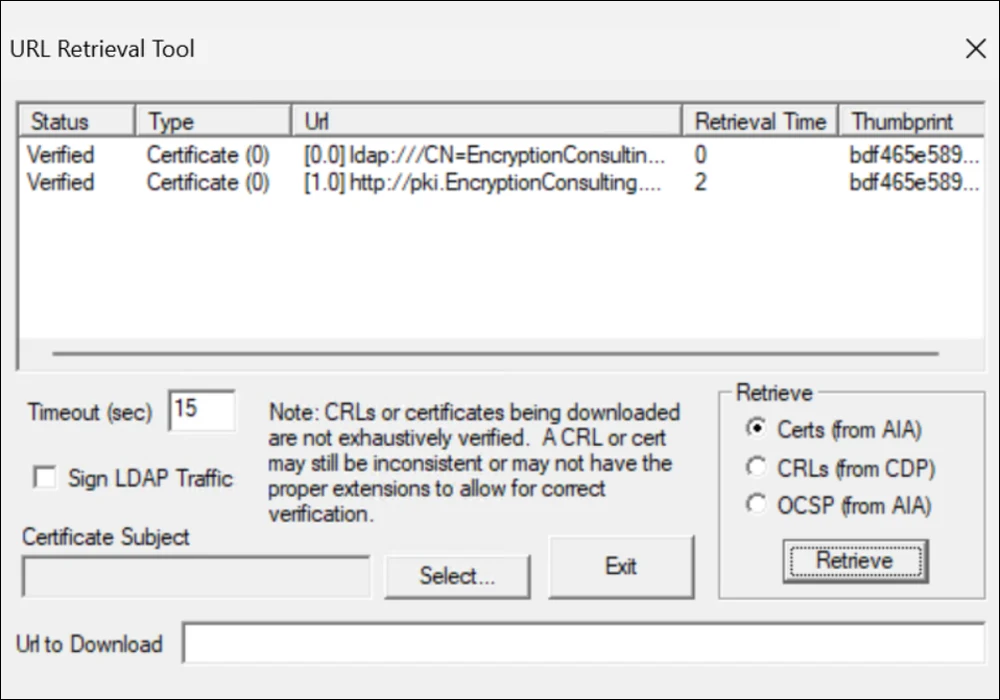
In the URL Retrieval Tool, perform the following steps, in the Retrieve section:
Select the OCSP (from AIA) option and click Retrieve. Confirm that it shows status as Verified.
Select the CRLs (from CDP) option and click Retrieve. Confirm that it shows status as Verified.
Select the Certs (from AIA) option and click Retrieve. Confirm that it shows status as Verified.
Click Exit to close the URL Retrieval Tool.
From an elevated Command Prompt, verify the WIN11 certificate:
certutil -verify -urlfetch C:\win11.cer
On CA02, open an elevated Command Prompt and export the issuing CA certificate:
Verify the certificate chain and root CRL retrieval:
certutil -verify -urlfetch C:\issuingca.cer
Confirm that the chain builds successfully and that the root CA CRL is retrieved through the configured CDP.
Negative revocation test: On CA02, open the Certification Authority console. Under Issued Certificates, right-click the WIN11 certificate, select All Tasks > Revoke Certificate, and complete the revocation.
Generate a new CRL:
certutil -crl
Wait 15 minutes for the Online Responder refresh, or restart the Online Responder service. Then verify the WIN11 certificate:
certutil -verify -urlfetch C:\win11.cer
The output should show Revoked through both OCSP and CRL.
The WIN11 certificate is now revoked, so request a new one before the next task. On WIN11, open the Certificates console (Computer account), right-click Personal → Certificates, click All Tasks → Request New Certificate, select Workstation Authentication – ML-DSA, and click Enroll. Use this new certificate in Task 5.
Task 5: Validate the PQC Chain End to End
Finally, confirm that every certificate in the hierarchy uses ML-DSA. Open each certificate, go to the Details tab and compare the Signature algorithm and Public key fields with the table below. Every certificate in this lab should show ML-DSA-87 in both fields.
Certificate
Signed by
Signature algorithm
Public key
DER size
EncryptionConsulting PQC Root CA
Self-signed
ML-DSA-87
ML-DSA-87
Approximately 7–8 KB
EncryptionConsulting PQC Issuing CA
PQC Root CA
ML-DSA-87
ML-DSA-87
Approximately 7–8 KB
OCSP signing certificate (SRV1)
PQC Issuing CA
ML-DSA-87
ML-DSA-87
Approximately 7–8 KB
WIN11 workstation certificate
PQC Issuing CA
ML-DSA-87
ML-DSA-87
Approximately 7–8 KB
PQC size impact: ML-DSA-87 certificates are typically 7–8 KB in DER format, compared with approximately 1–1.5 KB for RSA-2048 certificates. A three-certificate ML-DSA-87 chain can exceed 20 KB, which increases TLS handshake and network overhead.
WIN11 leaf certificate — ML-DSA-87 signature and public-key fields
WIN11 leaf certificate — trusted chain, status OK
Fully PQC Versus Hybrid PKI
This guide builds a fully post-quantum hierarchy. Every certificate from the root to the leaf is signed with ML-DSA, and AD CS issues pure ML-DSA certificates only. It does not issue composite or alternative-signature (hybrid) certificates. If some applications still need classical algorithms, there are four common ways to bridge the gap, and each has different security properties:
Parallel hierarchies. Run the ML-DSA hierarchy next to your existing RSA or ECDSA PKI and issue from each one where the application allows. This is a common migration pattern, but this guide builds and tests only the ML-DSA side; it does not deploy a parallel classical hierarchy.
Mixed-algorithm chain. A chain that mixes a classical CA with ML-DSA certificates is only as strong as its weakest signature. An attacker with a quantum computer can forge the classical link, so such a chain is not post-quantum safe.
Cross-certification. One hierarchy can certify the other so that clients that trust one root can validate certificates from the other. It adds path-building complexity, and the weaker algorithm in the path limits the security of the result.
Hybrid key exchange in TLS. Post-quantum protection of TLS traffic comes from the key exchange (for example, a hybrid of X25519 and ML-KEM) negotiated by the protocol, not from the certificate chain. It is configured on the application or server and is separate from this PKI.
For most organizations the practical path is to pilot the pure ML-DSA hierarchy with a defined group of systems, while production certificates stay on the classical hierarchy until the applications are proven.
Operations and Production Hardening
A working lab is only the start. Before you rely on this hierarchy for anything beyond testing, plan for the following:
Back up both CAs. On each CA, back up the CA database and private key (for example with certutil -backup), the registry settings and CAPolicy.inf. Store the Root CA backup offline.
Renew the Root CA CRL on schedule. The root is offline, so schedule a recurring task to start it, run certutil -crl, copy the new CRL to SRV1, publish it to Active Directory with certutil -dspublish, and shut the root down again. Set the reminder at least two weeks before the CRL expires.
Test revocation end to end. Revoke a test certificate, publish a new CRL with certutil -crl, and confirm with certutil -verify -urlfetch that both the CRL and the OCSP responder report it as revoked.
Enable autoenrollment. Grant Autoenroll to the PQC-MLDSA-Test-Computers group, then widen the scope once client compatibility is confirmed. Enable Certificate Services Client – Auto-Enrollment in Group Policy, so clients obtain and renew ML-DSA certificates without manual steps.
Protect CA keys in an HSM. In this lab the CA keys sit in the Microsoft Software Key Storage Provider. In production, protect the root and issuing CA keys in an HSM that supports ML-DSA.
Monitor expiry and CA health. Check pkiview.msc regularly and alert on certificate and CRL expiry. Use the organization’s approved certificate-management and monitoring process for discovery, renewal, and expiry alerts.
Planning Your Migration: Size, Compatibility and Timelines
Certificate and chain size. ML-DSA-87 has a 2,592-byte public key and a 4,627-byte signature, so one certificate is roughly 7 to 8 KB, against roughly 1 KB for RSA-2048 (an estimate; check your own certificates). A leaf and one intermediate certificate together are therefore around 15 KB, and CRLs and OCSP responses grow in the same way. Check web server, proxy, load balancer and CRL size limits before a rollout. ML-DSA-65 is a smaller option for leaf certificates.
Client compatibility. This guide was built on Windows 11 24H2/25H2 with KB5067036 or later and Windows Server 2025 with KB5087539 or later. NDES enrollment is not available. Independent testing by Richard Hicks of the May 2026 update reported that an HTTPS binding in IIS failed (error 0x80070520), that an RRAS/SSTP certificate could be assigned but the RemoteAccess service failed to start, and that Remote Desktop clients could not connect after the certificate was assigned to the RDP listener (error 0x904, extended error 0x7). The same testing found that code signing with an ML-DSA-44 certificate works. Test every workload that will use these certificates. Other operating systems, browsers, mobile devices and network appliances may not validate ML-DSA chains yet.
Standards timelines. The final NIST IR 8547 (October 2026) deprecates all quantum-vulnerable public-key algorithms, including RSA and elliptic-curve at every approved key size, after 2030 and disallows them after 2035. EO 14412 / OMB M-26-15 require PQC digital signatures on federal high-value assets and high-impact systems by 31 December 2031. The NSA’s CNSA 2.0 names ML-DSA-87, the parameter set used in this lab, for general digital signatures and sets category deadlines for exclusive use between 2030 and 2033. Software and firmware signing is the exception, because CNSA 2.0 specifies LMS or XMSS for it.
How Encryption Consulting Can Help
Building an ML-DSA hierarchy in a lab is one thing. Rolling post-quantum PKI out across a production environment, without breaking the applications and devices that depend on it, is another. That’s where we come in.
At Encryption Consulting, we help organizations move to post-quantum cryptography with a clear plan. Whether you need help with:
Assessing your quantum risk. Our PQC Advisory Services find where vulnerable algorithms live in your environment and build a phased migration roadmap.
Designing and deploying an ML-DSA PKI. Our PKI Services team can design and build a parallel post-quantum AD CS hierarchy next to your existing PKI, then test it against your real workloads.
Running PKI without the overhead.PKI-as-a-Service gives you a fully managed PKI, built and operated by our experts.
Monitor certificate inventory, renewal dates, and expiry alerts using the organization’s approved certificate-management process or tool.
Protecting CA keys. In production, evaluate HSMs with vendor-validated support for the algorithms and key types you use, so yourroot and issuing CA keys do not remain in software.
Every environment is different, so we work with your infrastructure, compliance requirements and timelines to make your move to post-quantum PKI smooth and secure.
Compatibility and Test Scope
Platform or component
Test scope
Status
Windows Server 2025 with KB5087539 or later
AD CS Root CA, Issuing CA, and Online Responder
Tested in this lab
Windows 11 24H2/25H2 with KB5067036 or later
ML-DSA certificate enrollment and chain validation
Tested in this lab
Linux/macOS with OpenSSL 3.5 or later
Certificate parsing and ML-DSA signature verification
Suitable for external testing; ML-DSA support was added in OpenSSL 3.5. OpenSSL documentation
Not validated in this lab. Confirm support for the specific product version and vendor firmware before deployment.
Microsoft documents the Windows Server and Windows client update requirements and warns that third-party applications, devices, and services may not recognize ML-DSA certificates. Microsoft Learn
Migration timeline: The final NIST IR 8547 (October 2026) deprecates all quantum-vulnerable public-key algorithms, including RSA and elliptic-curve at every approved key size, after 2030 and disallows them after 2035. The NSA CNSA 2.0 roadmap defines phased milestones, with exclusive use required between 2030 and 2033 depending on the system category. These timelines support migration planning but do not guarantee ML-DSA support across third-party products.
Conclusion
Post-quantum PKI is no longer just a future consideration. With ML-DSA support in Microsoft AD CS, organizations can begin building and testing quantum-resistant certificate infrastructures using familiar Windows PKI tools. This guide demonstrated how to deploy a two-tier ML-DSA-87 hierarchy, including certificate issuance, CRL publishing, and OCSP configuration, providing a foundation for evaluating post-quantum capabilities in a controlled environment.
However, deploying an ML-DSA hierarchy is only the first step toward a broader post-quantum migration. Organizations should begin by testing application compatibility, evaluating infrastructure requirements, and planning a phased transition alongside their existing classical PKI. With the right preparation and guidance, businesses can strengthen their cryptographic infrastructure today and prepare for the quantum computing challenges ahead.
Frequently Asked Questions
1. Can I convert my existing AD CS CA to ML-DSA?
No. ML-DSA doesn’t support in-place migration of existing CAs. Build a new ML-DSA hierarchy in parallel with your current one, then test post-quantum certificate issuance with a defined group of systems. This also lets you validate application compatibility without disrupting production certificates that are still issued by your classical CAs.
2. Which Windows versions support ML-DSA in AD CS?
AD CS servers need Windows Server 2025 with the 2026-05 security update (KB5087539) or later. That includes the root CA, the issuing CA and the Online Responder. Clients need Windows 11, version 24H2 or 25H2, with the 2025-10 non-security update (KB5067036) or later. Without these updates, the ML-DSA providers don’t appear in the configuration wizard.
3. Which ML-DSA parameter set should I choose?
AD CS supports ML-DSA-44, ML-DSA-65 and ML-DSA-87, at NIST security levels 2, 3 and 5. Higher levels give a larger security margin but produce bigger keys and signatures. Each CA can use a different set. This guide uses ML-DSA-87 throughout, but ML-DSA-65 is a common choice for leaf certificates where size matters.
This lab intentionally uses ML-DSA-87 for every certificate—Root CA, Issuing CA, OCSP signing, and WIN11—for simplicity and consistent CNSA 2.0-aligned testing. In a production environment, organizations may use ML-DSA-87 for long-lived CA keys and ML-DSA-65 for short-lived, size-sensitive leaf or OCSP certificates, subject to compatibility testing and security policy.
4. Does an ML-DSA PKI make my TLS connections quantum-safe?
Not completely. ML-DSA is a signature-only algorithm. It protects certificates, CRLs and OCSP responses from forgery by future quantum computers, but it doesn’t provide encryption or key exchange. Quantum-safe TLS also needs a post-quantum key exchange, such as ML-KEM, supported by the applications and protocols you use.
5. Why does the hash algorithm show “NoHash” for ML-DSA?
ML-DSA hashes the message internally as part of the signing process, so it doesn’t use an external hash algorithm like SHA-256. That’s why the Cryptography for CA page and the certificate templates show NoHash, and why each certificate’s Details tab shows NoHash as the signature hash algorithm.
6. How can clients enroll for ML-DSA certificates?
This guide enrolls ML-DSA certificates through the Certificates MMC snap-in, using templates set to a Key Storage Provider with the Purpose set to Signature. Enrollment through the Network Device Enrollment Service (NDES) isn’t available yet. Plan around that if you rely on NDES for devices.
7. Can AD CS issue hybrid or composite certificates?
No. AD CS issues pure ML-DSA certificates only. If you need to combine classical and post-quantum algorithms, run a parallel hierarchy, and use hybrid key exchange in TLS to protect traffic. The section Fully PQC Versus Hybrid PKI explains the trade-offs of each option.
8. Does AD CS support SLH-DSA, LMS, or XMSS?
Not in this configuration. AD CS supports ML-DSA, while LMS and XMSS are associated with firmware-signing use cases in CNSA 2.0. Verify current Microsoft support before making deployment decisions.
9. Can the CA private key be stored in an HSM?
Only if the HSM vendor provides a CNG Key Storage Provider that exposes compatible ML-DSA key-generation and signing support. Validate the exact firmware, KSP, and Windows Server version before deployment.
10. Does Windows TLS (Schannel) negotiate with ML-DSA certificates?
Do not assume support. Verify the exact Windows build, Schannel configuration, certificate type, and application scenario in a test environment before claiming that ML-DSA certificates work for TLS authentication.