This guide builds on our previous guide to setting up EJBCA Community Edition 9.3.7 on Ubuntu 26.04. On the same server, you set up a two-tier post-quantum PKI in which the Root CA and the Issuing CA both sign with ML-DSA-87, the post-quantum signature algorithm standardised in FIPS 204. You then issue an ML-DSA-87 TLS server certificate and verify it with OpenSSL, including its chain, CRLs and OCSP responses.
EJBCA Community Edition supports ML-DSA keys only in software (soft) crypto tokens. HSM-backed ML-DSA keys aren’t supported in Community Edition, so all CA keys in this guide stay in soft tokens.
The two-tier PKI architecture
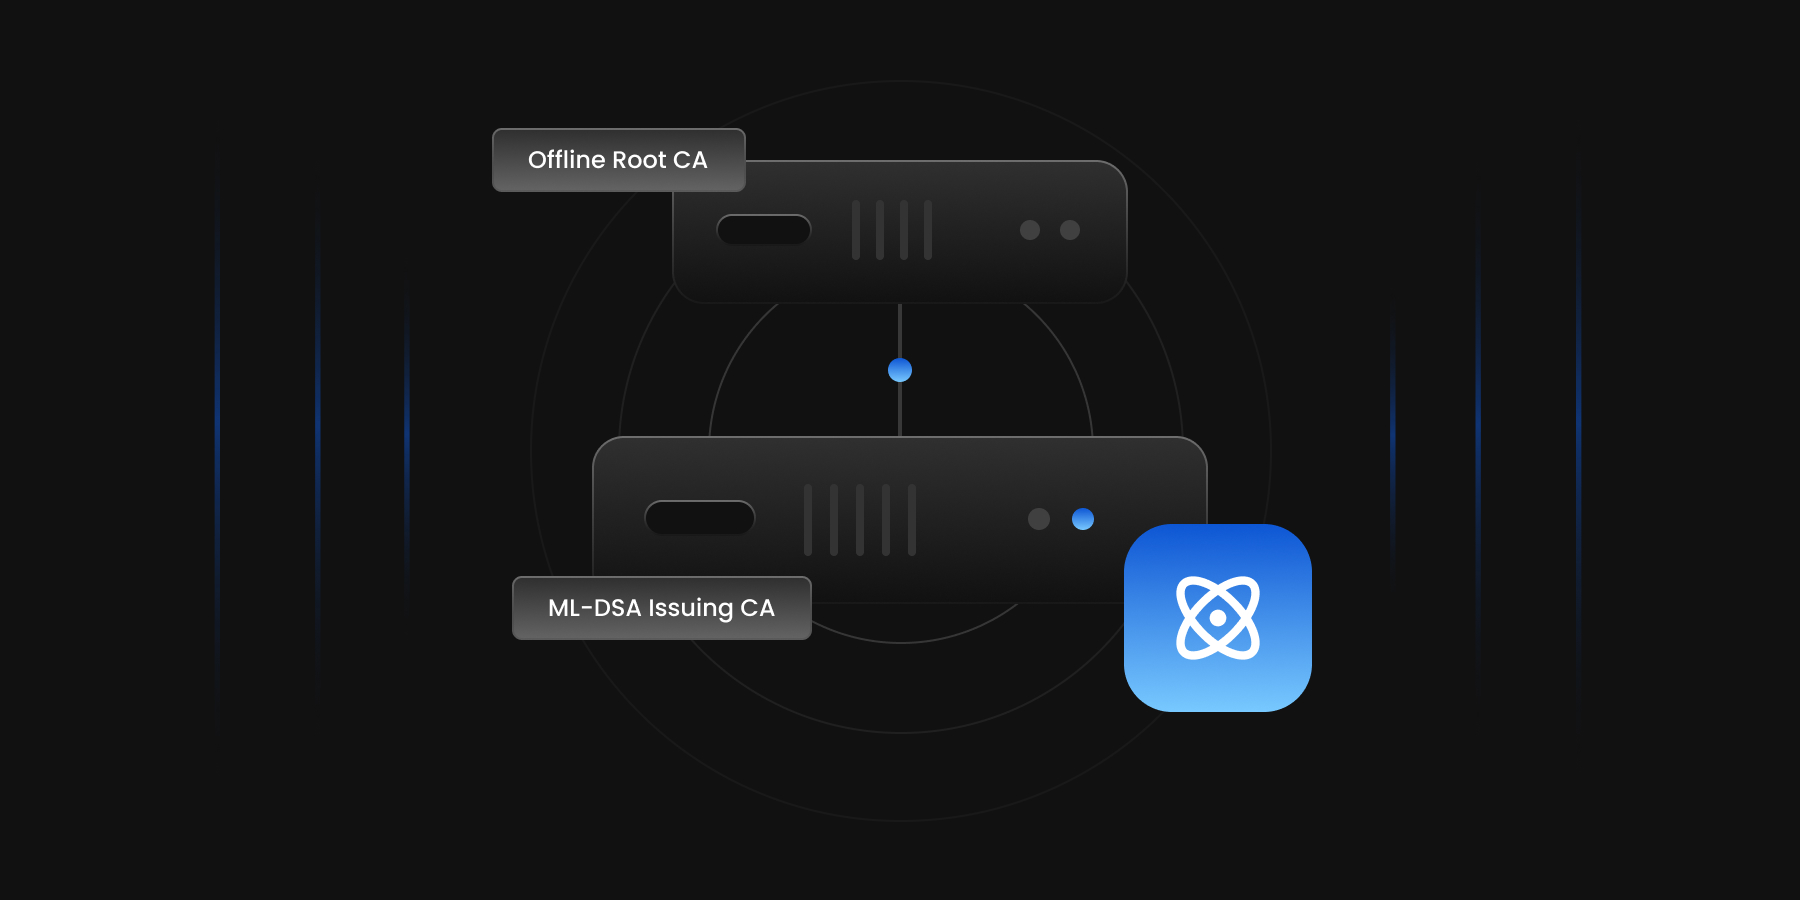
A two-tier PKI separates the CA that relying parties trust from the CA that issues certificates day to day.
The Root CA is the trust anchor. Its certificate is self-signed and is the only certificate that relying parties need to trust. It signs only the certificates of the CAs below it, their revocation status, and its own CRL.
The Issuing CA is signed by the Root CA. It issues certificates to end entities such as servers, users and devices, publishes their revocation status in its CRL, and answers OCSP queries about them.
In production, the Root CA runs on a standalone machine that stays offline and isn’t joined to any domain. It’s brought online only to sign an Issuing CA certificate or a new CRL.
Tier 1: Root CA
Tier 2: Issuing CA
Name in this guide
PQC-RootCA-G1
PQC-IssuingCA-G1
Signed by
Itself
The Root CA
Signs
Issuing CA certificates, its CRL, and OCSP responses about the Issuing CA
End-entity certificates, its CRL, and OCSP responses about end entities
Validity
30 years
15 years
New CRL
Every 6 months
Daily
In production
Offline
Online
Before you start
Prerequisites
Part 1 of the previous guide (Steps 1 to 5) completed: EJBCA Community 9.3.7 on Ubuntu 26.04, with AdminWeb opening at https://ejbca-lab.test:8443/ejbca/adminweb/ as SuperAdmin. Part 2 (the HSM integration) isn’t needed.
A browser on the Ubuntu server with the SuperAdmin certificate imported (step 5.2 of the previous guide). RA Web uses the same certificate.
A terminal on the Ubuntu server with OpenSSL 3.5 or later. The CRL and OCSP URLs resolve only on this server.
Names used in this guide
Item
Name
Working folder
~/pqc-lab
Root CA crypto token
PQC-RootCA-Token
Issuing CA crypto token
PQC-IssuingCA-Token
Root CA certificate profile
PQC-RootCA-MLDSA87
Issuing CA certificate profile
PQC-IssuingCA-MLDSA87
TLS server certificate profile
PQC-TLSServer-MLDSA87
End entity profile
PQC-TLSServer-EEP
Root CA
PQC-RootCA-G1, subject CN=PQC Root CA G1,O=PKI Lab
Issuing CA
PQC-IssuingCA-G1, subject CN=PQC Issuing CA G1,O=PKI Lab
TLS server certificate
pqc-web.ejbca-lab.test
Enterprise PKI Services
Get complete end-to-end consultation support for all your PKI requirements!
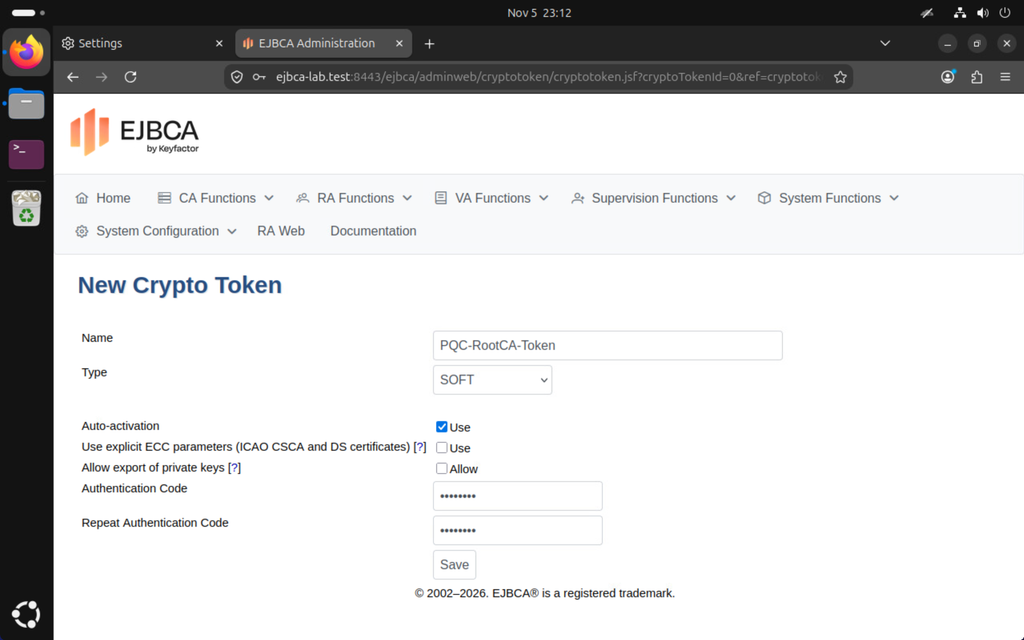
Authentication Code: a new code, different from the Root CA token’s. Save it in your password manager.
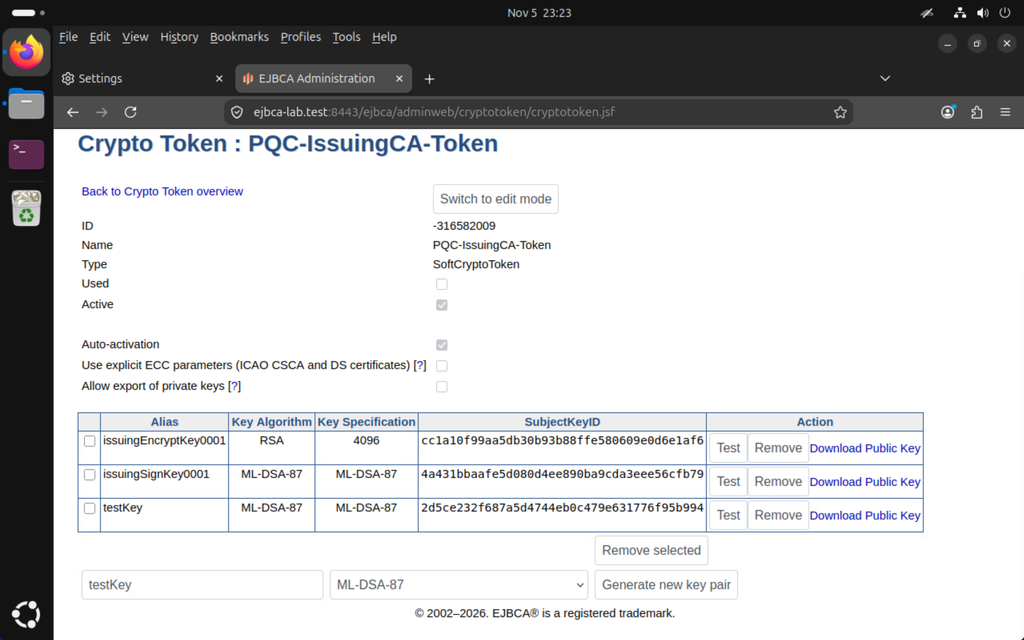
Keys:issuingSignKey0001 (ML-DSA-87), issuingDefaultKey0001 (RSA 4096) and testKey (ML-DSA-87)
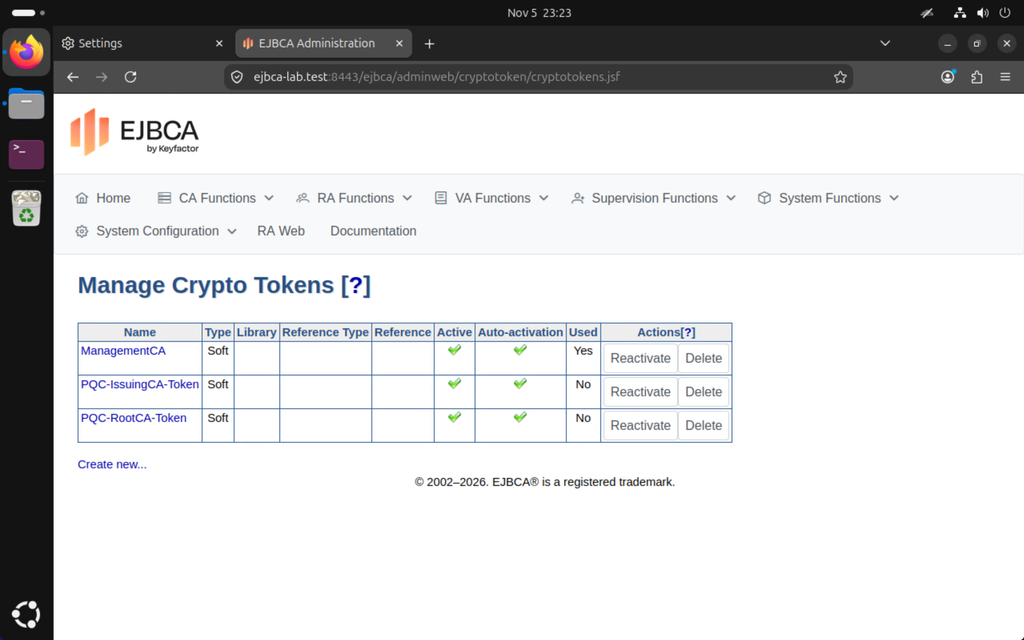
CA Functions → Crypto Tokens now lists both PQC tokens as active, alongside the ManagementCA token:
Step 2: Create the certificate profiles
Create one certificate profile for each CA and one for the TLS server certificate, each cloned from a built-in template.
2.1 Root CA profile
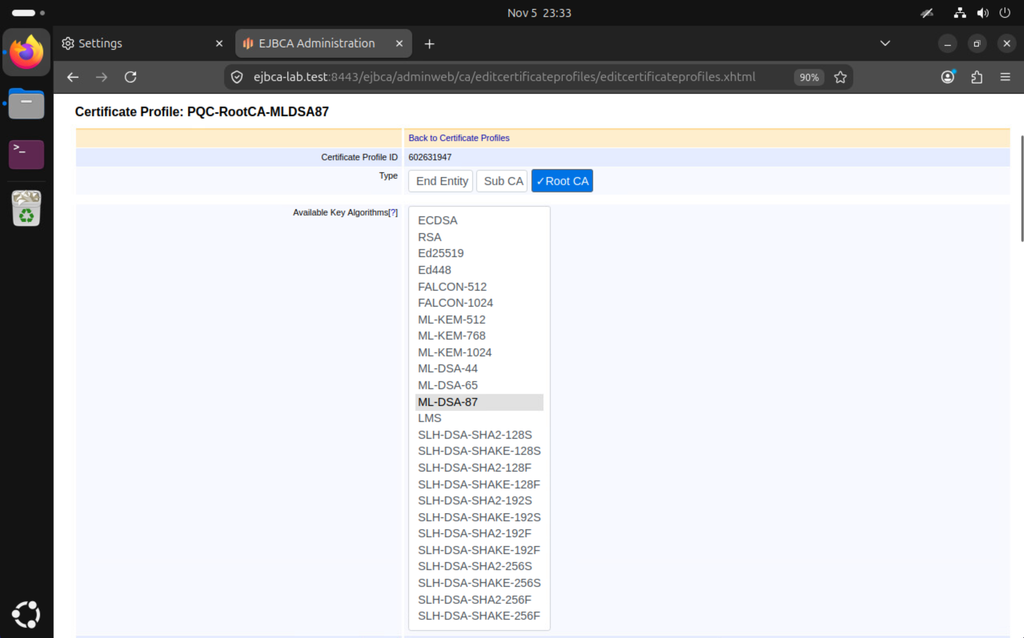
Go to CA Functions → Certificate Profiles, click Clone next to ROOTCA, enter PQC-RootCA-MLDSA87 and click Create from template. Then click Edit next to the new profile.
Available Key Algorithms: select ML-DSA-87 only. To deselect any other highlighted algorithm, hold Ctrl and click it. The Available ECDSA curves and Available Bit Lengths boxes then have nothing to select, which is expected.
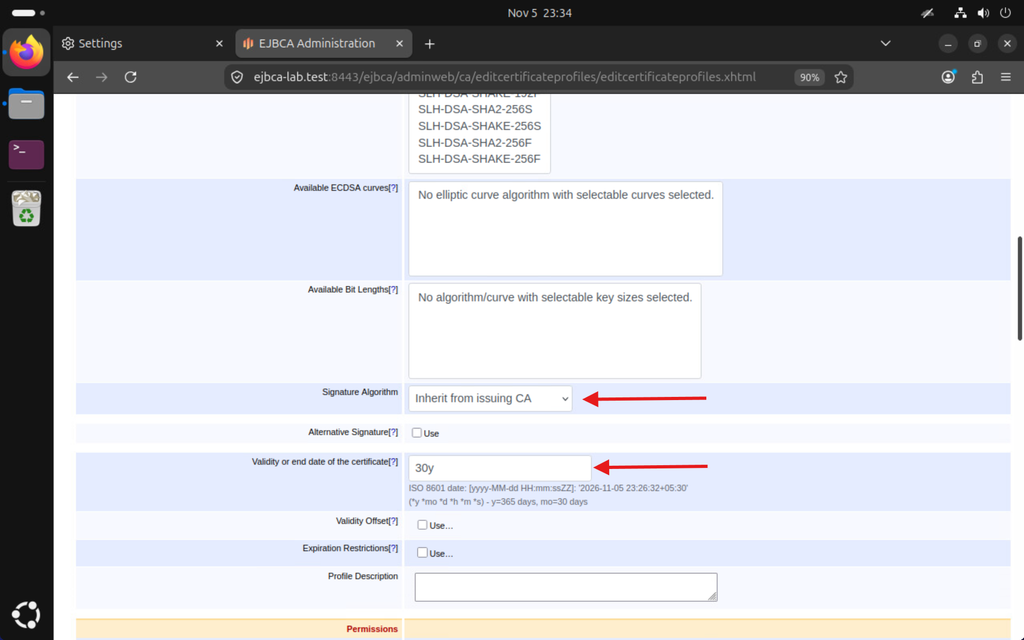
Signature Algorithm: leave Inherit from issuing CA, and leave Alternative Signature unticked. Set Validity or end date of the certificate to 30y.
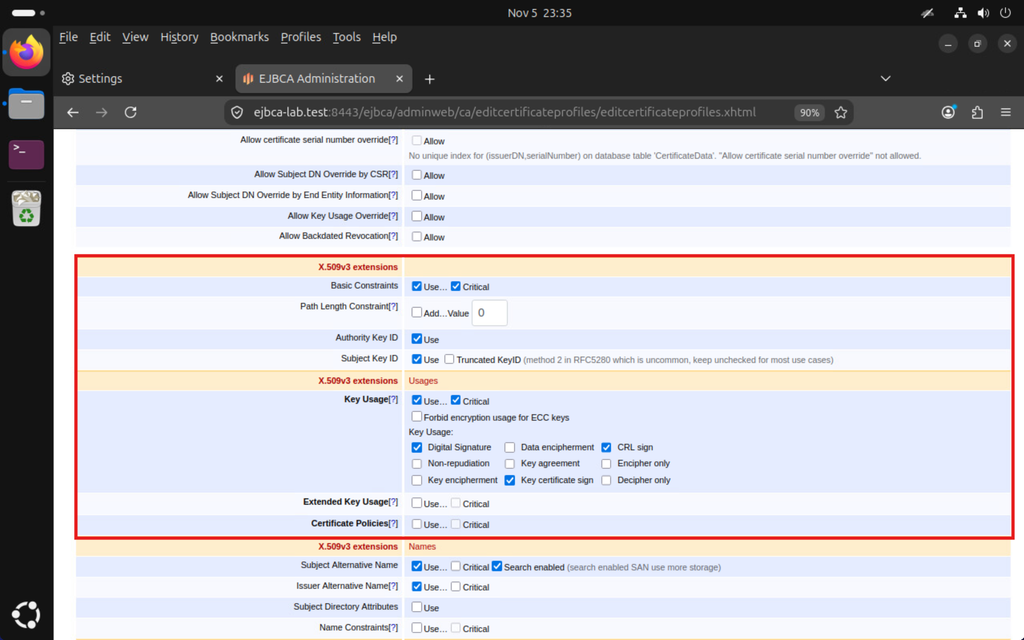
Key Usage: tick Use… and Critical, then select Digital Signature, Key certificate sign and CRL sign, and nothing else.
Extended Key Usage and Certificate Policies: leave unticked.
X.509v3 extensions – Validation data: leave CRL Distribution Points and Authority Information Access unticked.
Other Data: clear Use next to LDAP DN order, then click Save at the bottom of the page.
2.2 Issuing CA profile
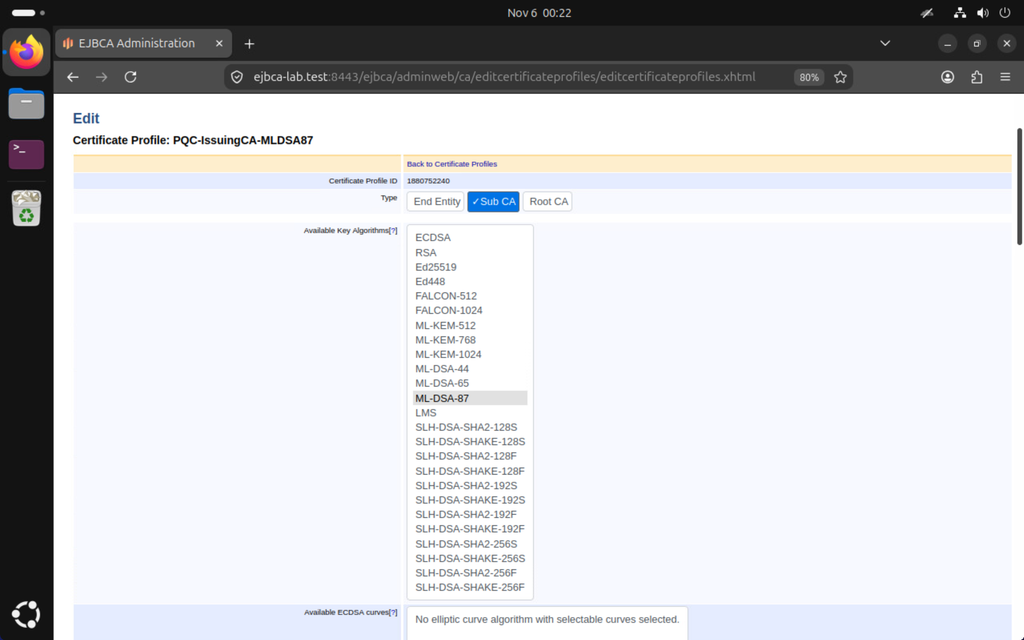
In CA Functions → Certificate Profiles, click Clone next to SUBCA, enter PQC-IssuingCA-MLDSA87, click Create from template, then click Edit.
Available Key Algorithms:ML-DSA-87 only, as in 2.1.
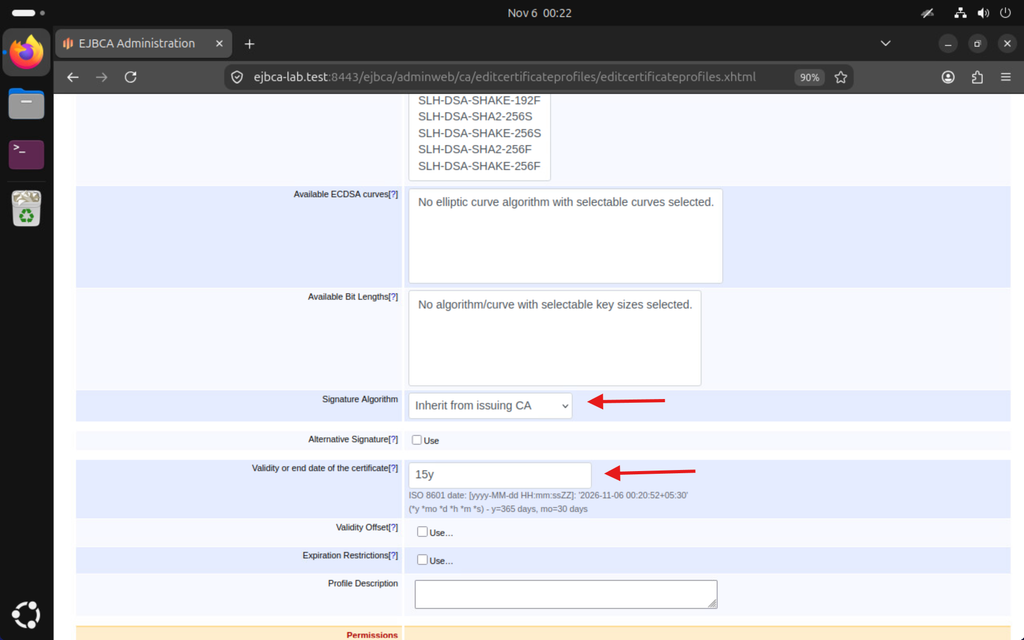
Signature Algorithm: leave Inherit from issuing CA. Set Validity or end date of the certificate to 15y.
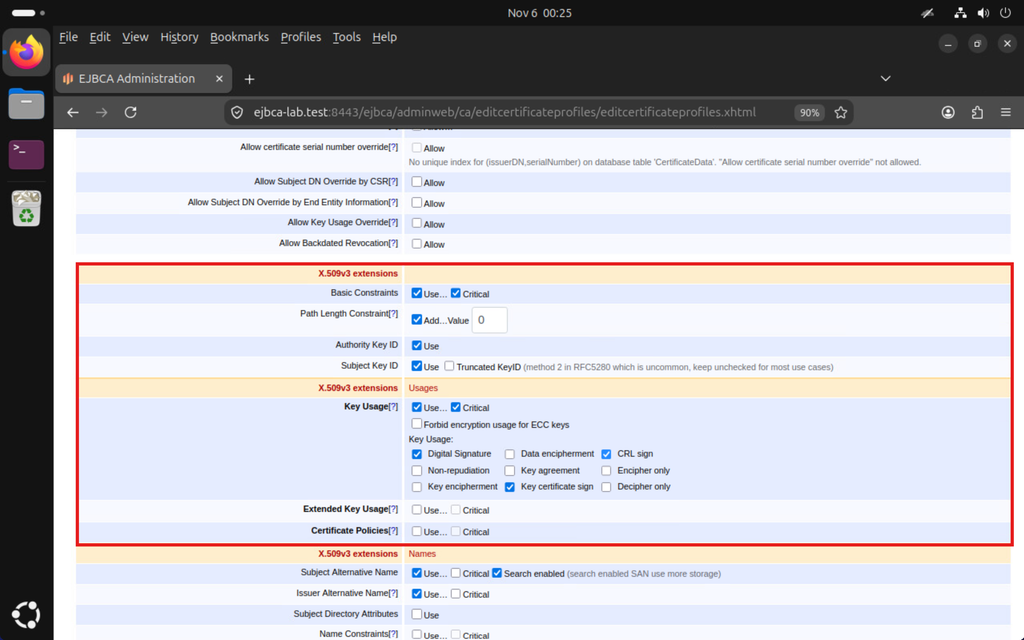
X.509v3 extensions:
Basic Constraints: keep Use… and Critical ticked. Tick Add… next to Path Length Constraint and leave the value at 0.
Key Usage: tick Use… and Critical, then select Digital Signature, Key certificate sign and CRL sign.
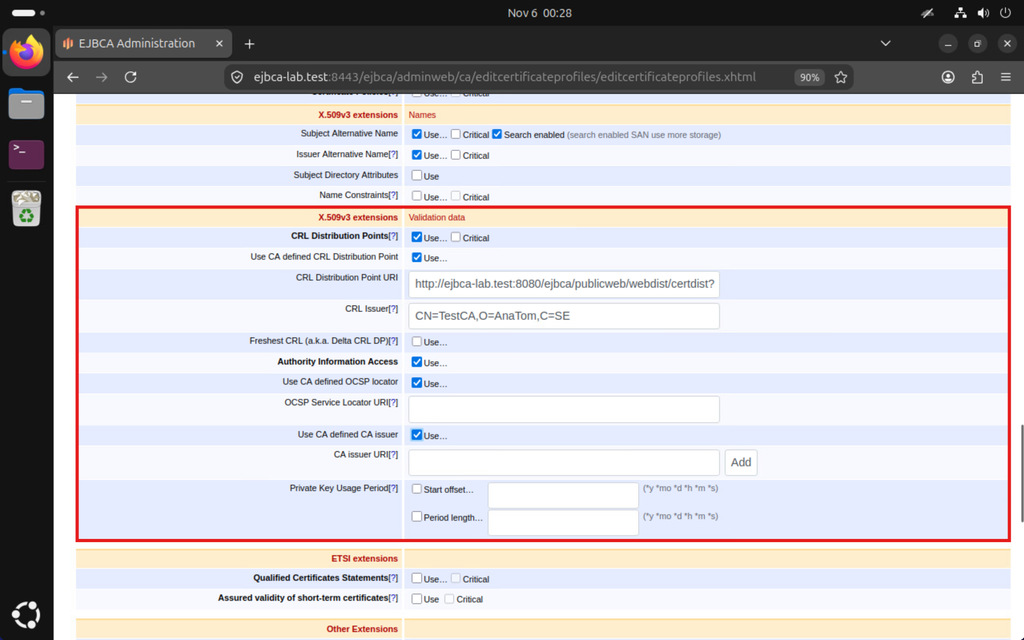
X.509v3 extensions – Validation data:
Tick Use next to CRL Distribution Points, then tick Use CA defined CRL Distribution Point.
Tick Use next to Authority Information Access, then tick Use CA defined OCSP locator and Use CA defined CA issuer.
Other Data: clear Use next to LDAP DN order, then click Save.
2.3 TLS server profile
In CA Functions → Certificate Profiles, click Clone next to SERVER, enter PQC-TLSServer-MLDSA87, click Create from template, then click Edit.
Available Key Algorithms:ML-DSA-87 only.
Signature Algorithm: leave Inherit from issuing CA. Set Validity or end date of the certificate to 1y.
X.509v3 extensions:
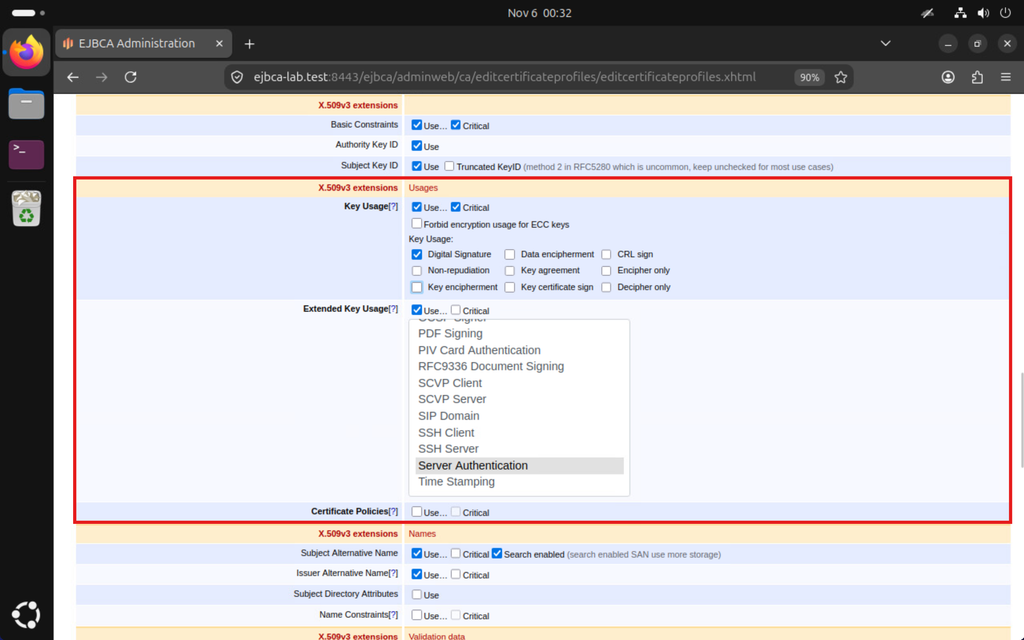
Key Usage: tick Use… and Critical, select Digital Signature, and clear Key encipherment. ML-DSA keys can’t encrypt, so RFC 9881 doesn’t allow Key Encipherment on an ML-DSA certificate.
Extended Key Usage: keep Server Authentication selected.
X.509v3 extensions – Names: keep Subject Alternative Name (Use and Search Enabled) ticked, and clear Issuer Alternative Name.
X.509v3 extensions – Validation data: as in 2.2, tick CRL Distribution Points with Use CA defined CRL Distribution Point, and Authority Information Access with Use CA defined OCSP locator and Use CA defined CA issuer.
Other Data: clear Use next to LDAP DN order, then click Save.
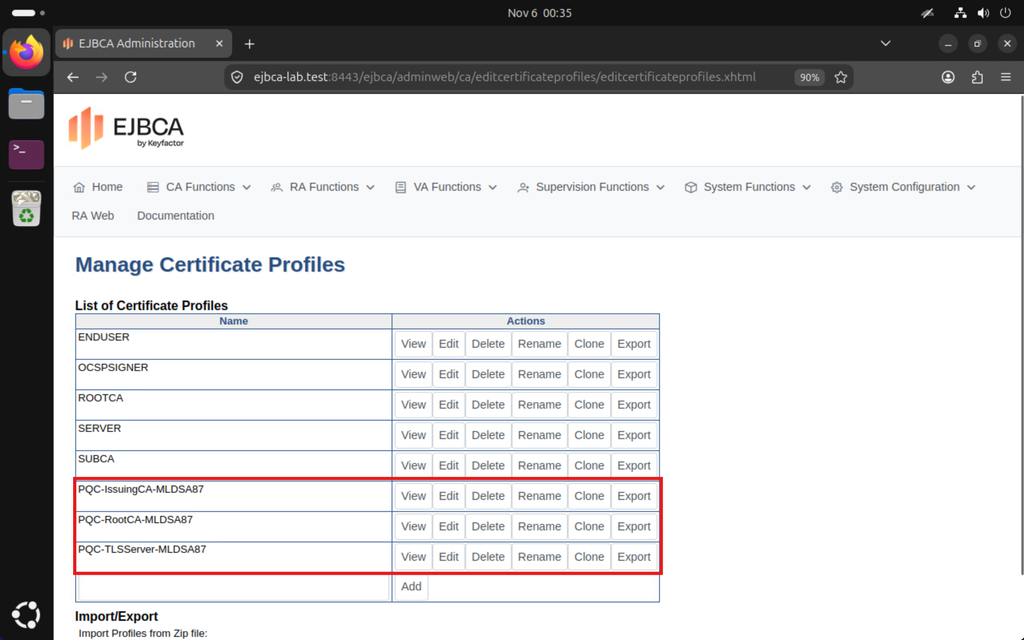
CA Functions → Certificate Profiles now lists the three PQC profiles alongside the built-in ones:
Step 3: Create the Root CA
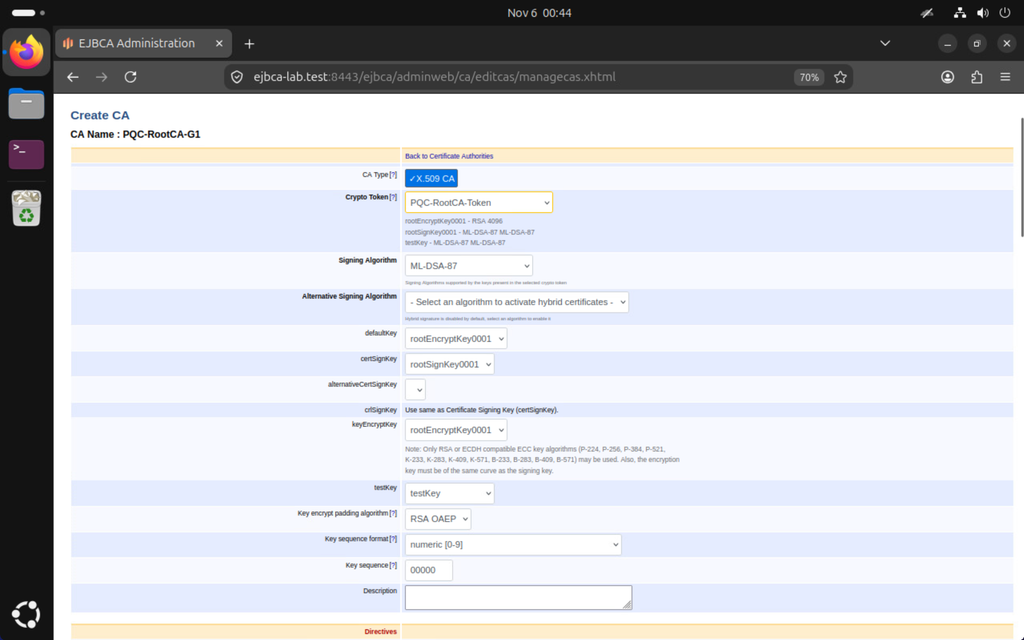
Steps 3.1 to 3.5 fill in the Create CA page from top to bottom. Click Create only in 3.6.
3.1 Create a new CA
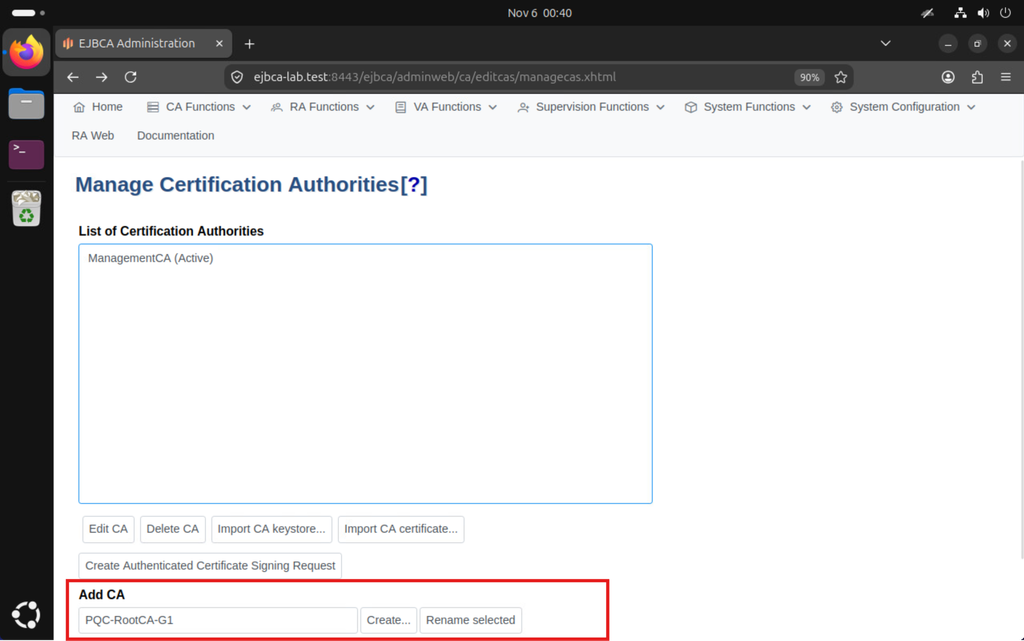
In AdminWeb, go to CA Functions → Certification Authorities. In the Add CA field, enter PQC-RootCA-G1 and click Create….
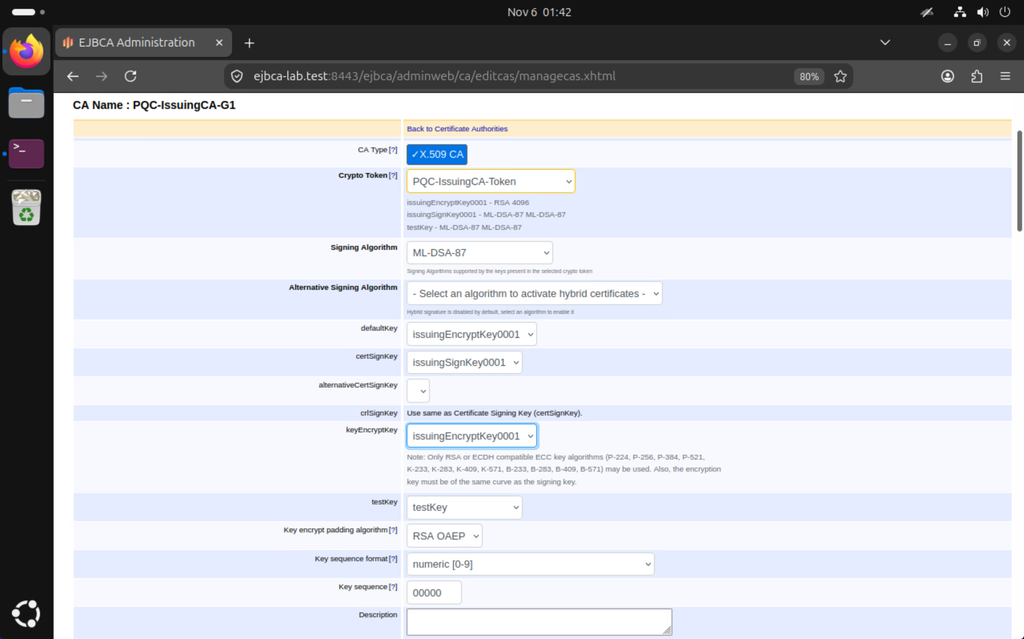
3.2 Choose the token, algorithm and keys
Field
Value
CA Type
X509
Crypto Token
PQC-RootCA-Token
Signing Algorithm
ML-DSA-87
defaultKey
rootDefaultKey0001
certSignKey
rootSignKey0001
keyEncryptKey
rootDefaultKey0001
testKey
testKey
Alternative Signing Algorithm
Leave empty
Make sure defaultKey and keyEncryptKey point to the RSA key.
3.3 Fill in the CA certificate data
Field
Value
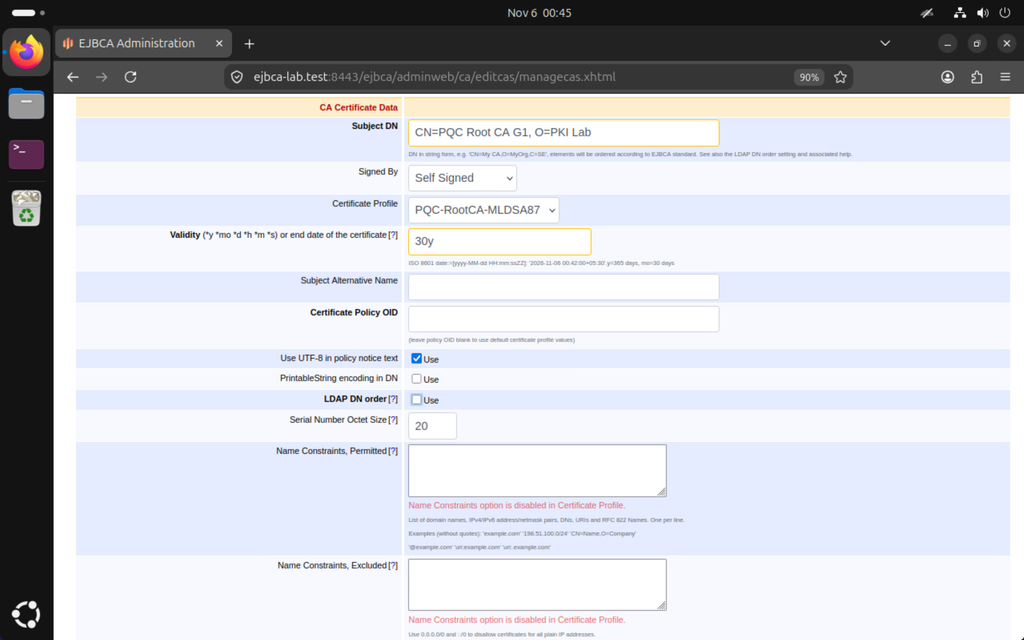
Subject DN
CN=PQC Root CA G1,O=PKI Lab
Signed By
Self Signed
Certificate Profile
PQC-RootCA-MLDSA87
Validity
30y
LDAP DN order
Clear Use
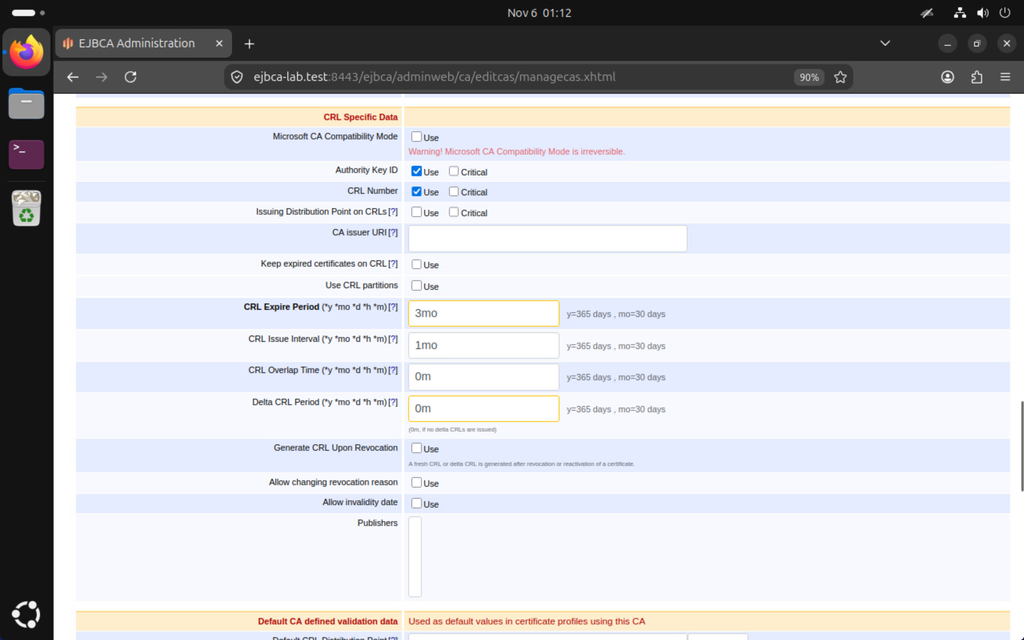
3.4 Set the CRL periods
Field
Value
CRL Expire Period
1y
CRL Issue Interval
6mo
CRL Overlap Time
0m
Delta CRL Period
0m (default)
Generate CRL Upon Revocation
Leave unticked
Note: For hardware identity certificates under DICE and SPDM, the expiry should be 99991231235959Z.
3.5 Set the validation URLs
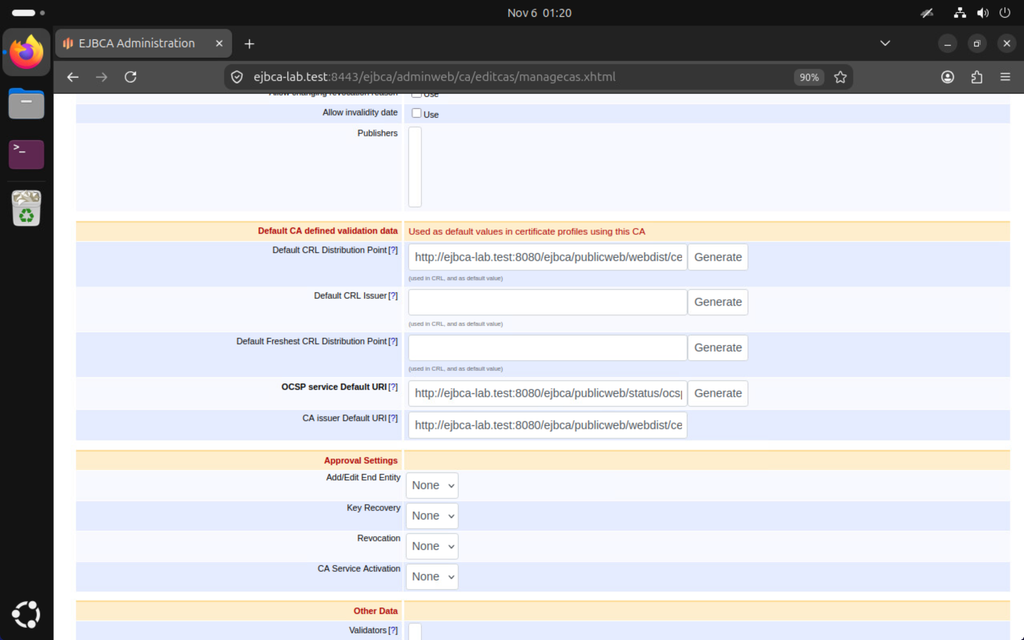
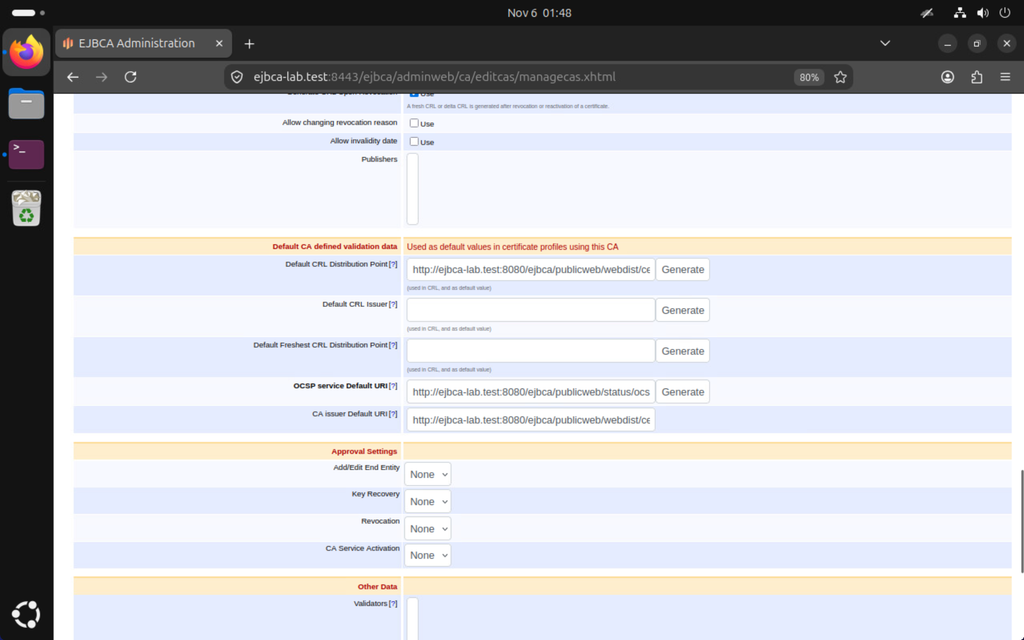
In the Default CA defined validation data section, fill in three fields:
Default CRL Distribution Point: click Generate.
OCSP service Default URI: click Generate.
CA issuer Default URI: there’s no Generate button, so build it from the CRL URL:
Copy the whole Default CRL Distribution Point value (Ctrl+A, Ctrl+C) and paste it into CA issuer Default URI.
If a URL shows localhost instead of ejbca-lab.test, replace the host by hand.
Note: These URLs point at EJBCA’s built-in public endpoints. If your organisation hosts its own CRL distribution point, OCSP responder or CA certificate repository, enter those URLs in the three fields instead. Each endpoint must serve this CA’s data: its CRL, its OCSP responses, or its DER-encoded CA certificate.
3.6 Create the CA
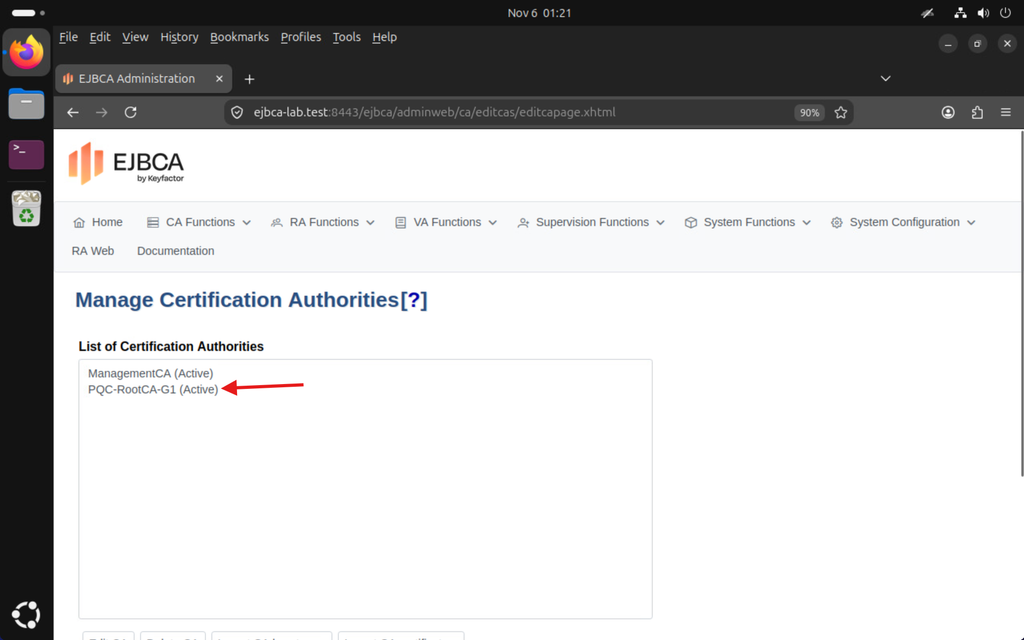
Click Create at the bottom of the page. PQC-RootCA-G1 appears in the Certification Authorities list with the status Active:
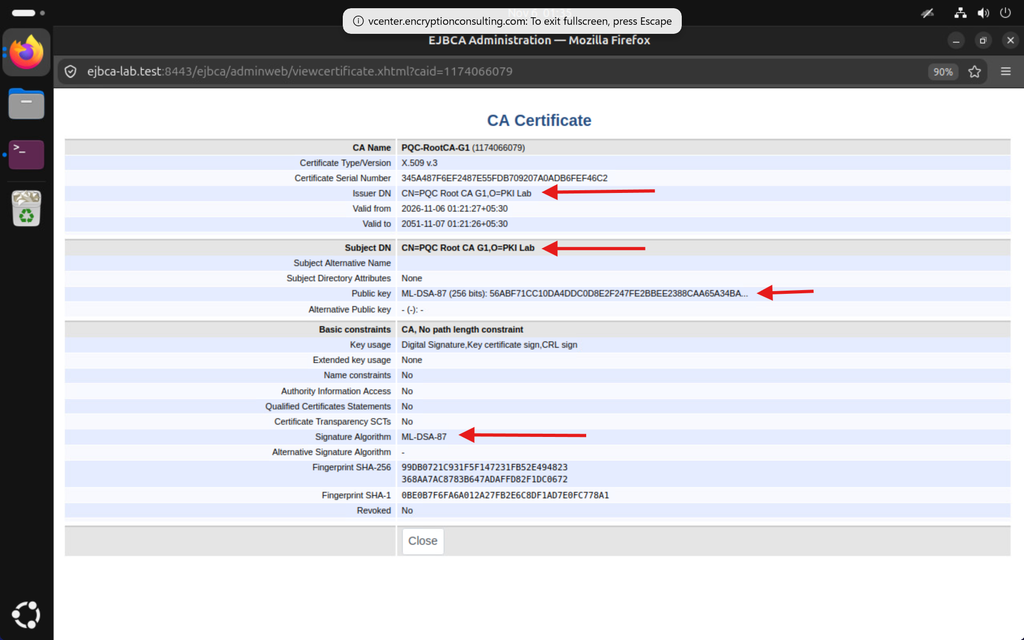
To view the new certificate, go to CA Functions → CA Structure & CRLs and click View Certificate under PQC-RootCA-G1. The issuer and subject are both CN=PQC Root CA G1,O=PKI Lab, and the public key and signature algorithm are both ML-DSA-87:
Step 4: Create the Issuing CA
Create the Issuing CA the same way, with its own token, profile and CRL settings, and with the Root CA as its signer.
4.1 Create a new CA
Go to CA Functions → Certification Authorities, enter PQC-IssuingCA-G1 in Add CA, and click Create….
4.2 Choose the token, algorithm and keys
Field
Value
CA Type
X509
Crypto Token
PQC-IssuingCA-Token
Signing Algorithm
ML-DSA-87
defaultKey
issuingDefaultKey0001
certSignKey
issuingSignKey0001
keyEncryptKey
issuingDefaultKey0001
testKey
testKey
Alternative Signing Algorithm
Leave empty
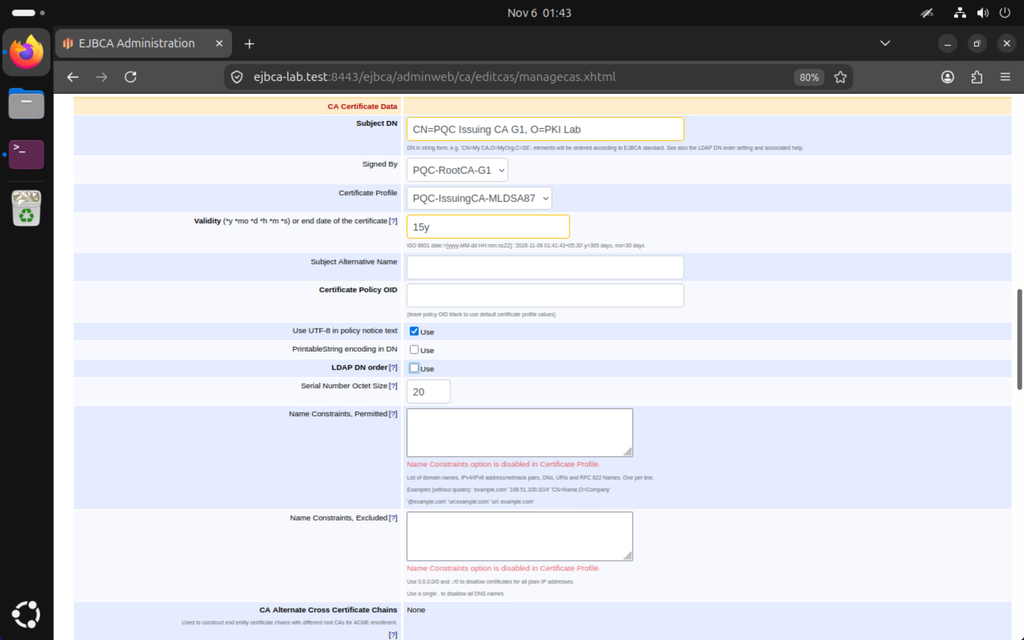
4.3 Fill in the CA certificate data
Field
Value
Subject DN
CN=PQC Issuing CA G1,O=PKI Lab
Signed By
PQC-RootCA-G1
Certificate Profile
PQC-IssuingCA-MLDSA87
Validity
15y
LDAP DN order
Clear Use
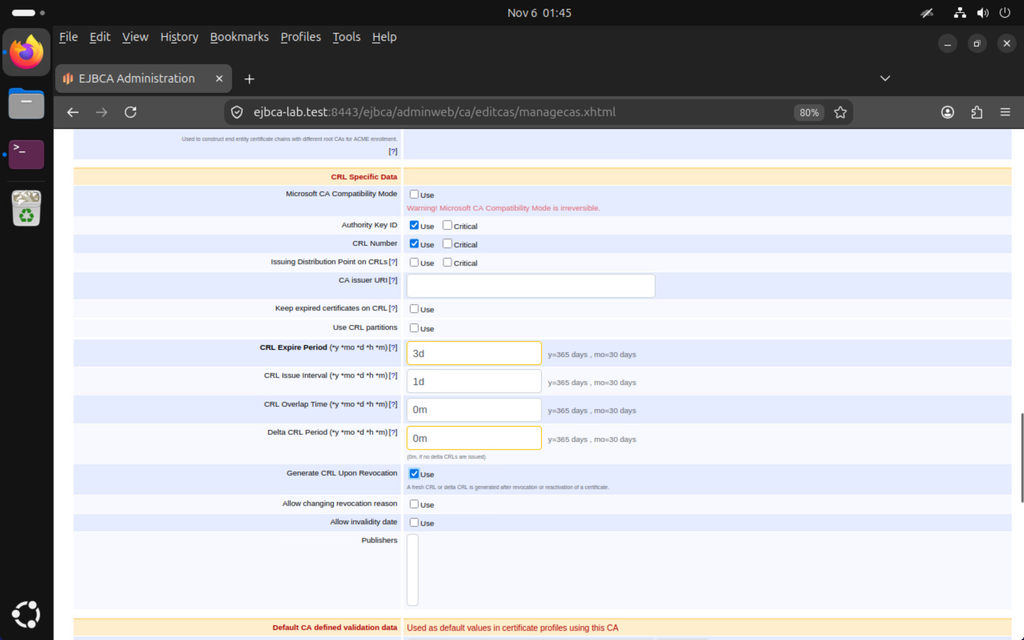
4.4 Set the CRL periods
Field
Value
CRL Expire Period
3d
CRL Issue Interval
1d
CRL Overlap Time
0m
Delta CRL Period
0m (default)
Generate CRL Upon Revocation
Tick
4.5 Set the validation URLs
Fill in the three fields as in 3.5: click Generate for Default CRL Distribution Point and OCSP service Default URI, then build CA issuer Default URI from the CRL URL by changing cmd=crl to cmd=iecacert and adding &level=0. To use your organisation’s own endpoints instead, see the note in 3.5.
4.6 Create the CA
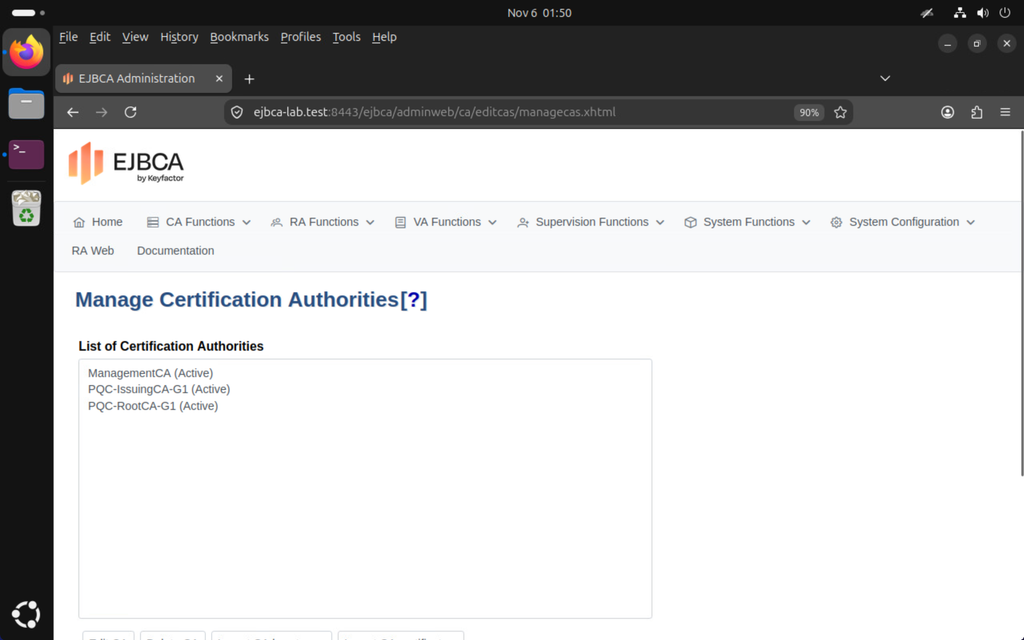
Click Create. PQC-IssuingCA-G1 appears in the Certification Authorities list with the status Active:
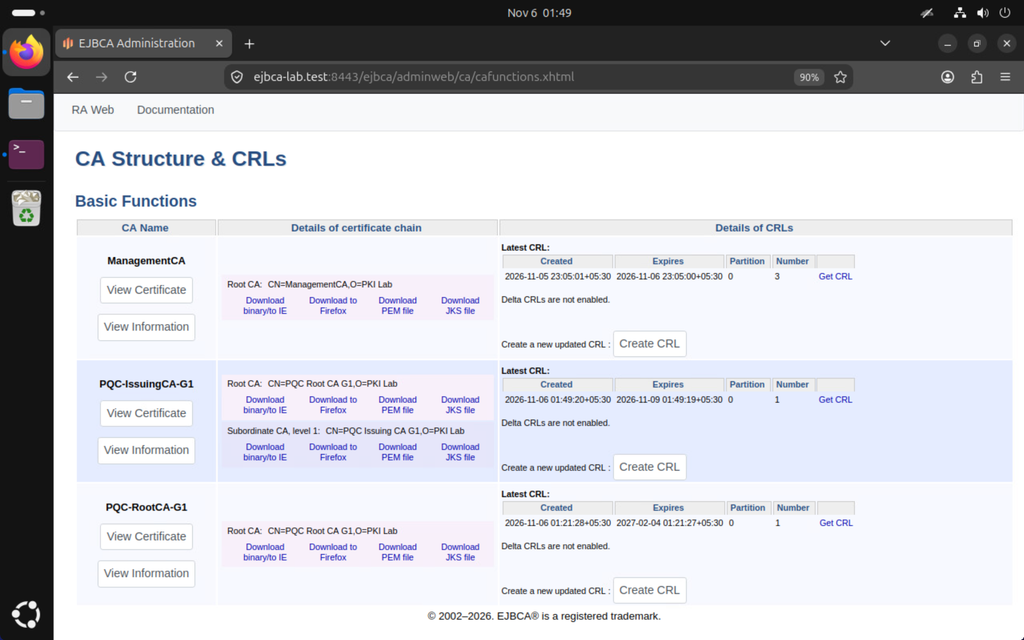
Under CA Functions → CA Structure & CRLs, PQC-IssuingCA-G1 appears under PQC-RootCA-G1:
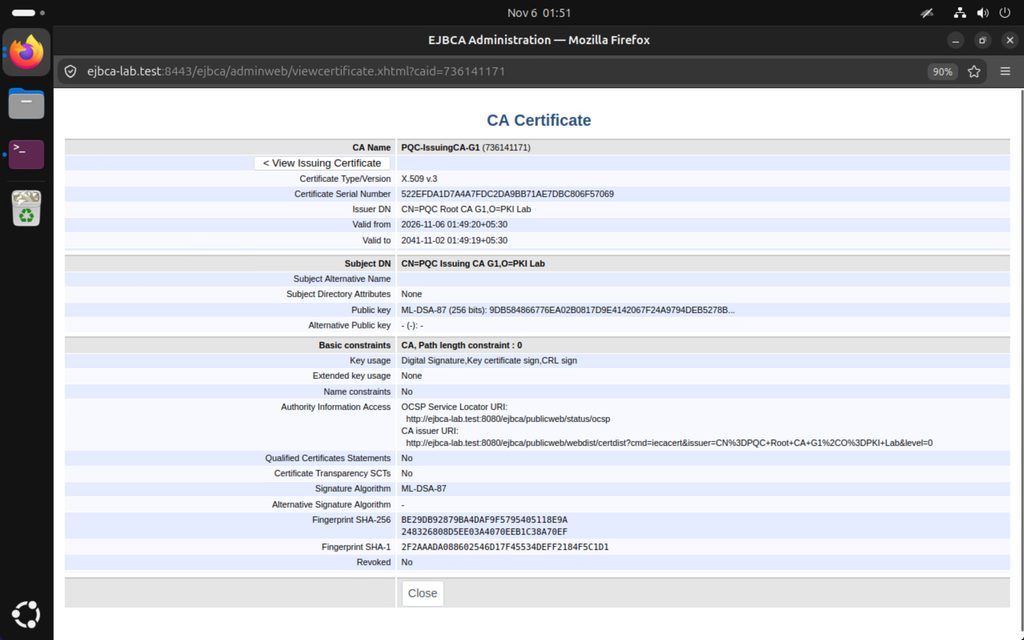
To view its certificate, go to CA Functions → CA Structure & CRLs and click View Certificate under PQC-IssuingCA-G1. The issuer is CN=PQC Root CA G1,O=PKI Lab, both algorithms are ML-DSA-87, Basic Constraints shows a path length of 0, and Authority Information Access holds the OCSP URL and the Root CA’s CA issuer URL:
If CRL Distribution Points or Authority Information Access is missing, see T3 before you issue any certificates.
Step 5: Publish CRLs on a schedule
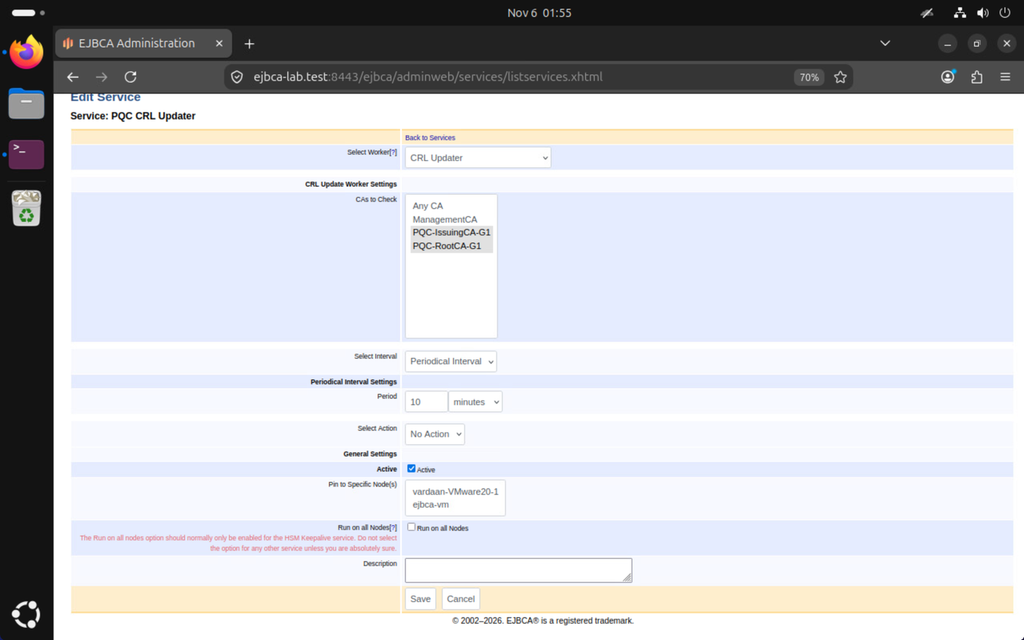
EJBCA issues CRLs on a schedule through a service. Add a CRL Updater service that checks both PQC CAs every 10 minutes and issues a new CRL whenever one is due:
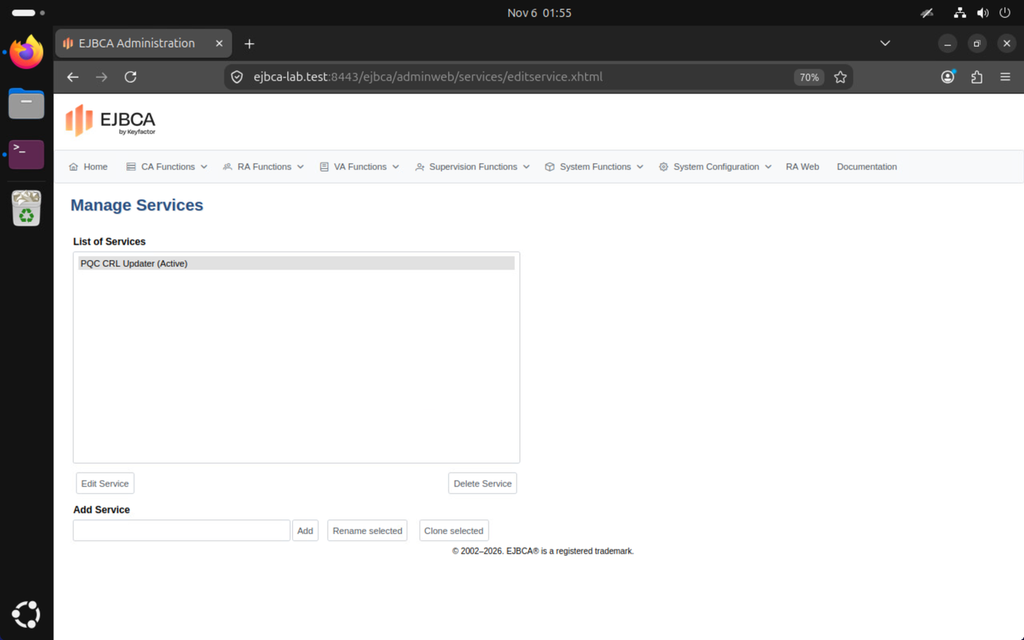
Go to System Functions → Services.
In Add Service, enter PQC CRL Updater and click Add.
Select the new service and click Edit Service.
Fill in the form:
Select Worker: CRL Updater
CAs to Check: PQC-RootCA-G1 and PQC-IssuingCA-G1. Hold Ctrl to select both.
Select Interval: Periodical Interval, every 10 minutes
Select Action: No Action
Active: ticked
Click Save.
Step 6: Issue an ML-DSA-87 TLS server certificate
6.1 Create the end entity profile
In AdminWeb, go to RA Functions → End Entity Profiles.
In Add Profile, enter PQC-TLSServer-EEP and click Add profile.
Select PQC-TLSServer-EEP and click Edit End Entity Profile.
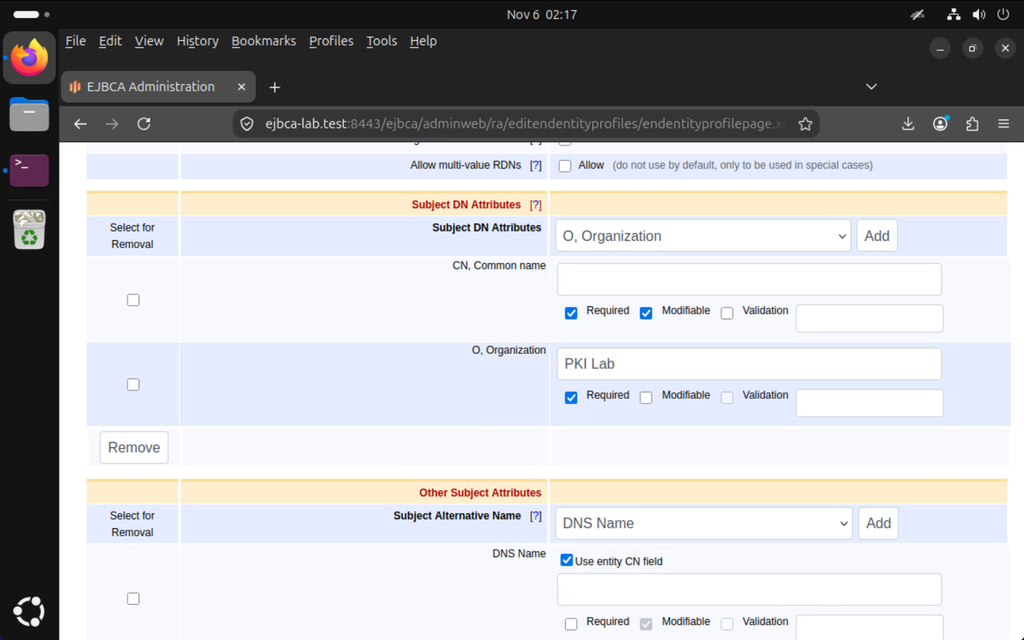
Set these fields, and leave the rest as they are:
Section
Field
Value
(top of page)
End Entity E-mail
Clear Use
Subject DN Attributes
CN, Common name
Required and Modifiable ticked (the default)
Subject DN Attributes
O, Organization
Add it from the attribute list. Value PKI Lab, Required ticked, Modifiable cleared
Other Subject Attributes
Subject Alternative Name
Add DNS Name, then tick Use entity CN field
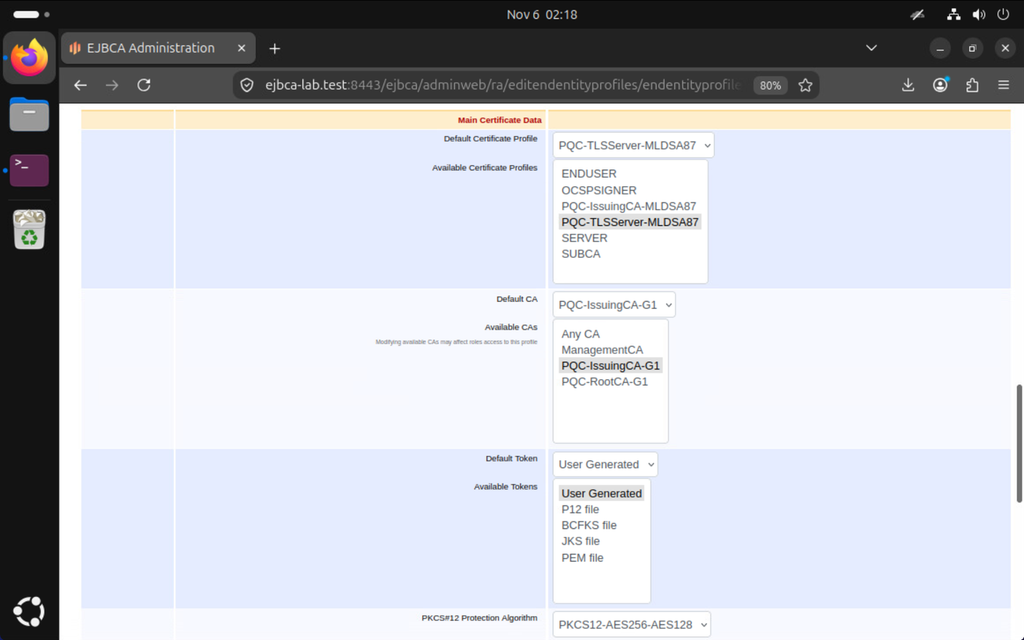
Main Certificate Data
Default Certificate Profile, Available Certificate Profiles
PQC-TLSServer-MLDSA87
Main Certificate Data
Default CA, Available CAs
PQC-IssuingCA-G1
Main Certificate Data
Default Token, Available Tokens
User Generated
Click Save.
6.2 Generate the server key and CSR
In the Ubuntu terminal, create the working folder, then generate an ML-DSA-87 key and a CSR in it:
Run every terminal command from here on in ~/pqc-lab.
Print the CSR and copy all of it, including the BEGIN and END lines:
cat pqc-web.csr
6.3 Submit the CSR in RA Web
In the browser, open RA Web at https://ejbca-lab.test:8443/ejbca/ra/. It uses the same SuperAdmin certificate as AdminWeb.
From the Enroll menu, choose Make New Request.
Certificate Type: PQC-TLSServer-EEP. The certificate profile and CA are filled in automatically.
Key-pair generation: Provided by user.
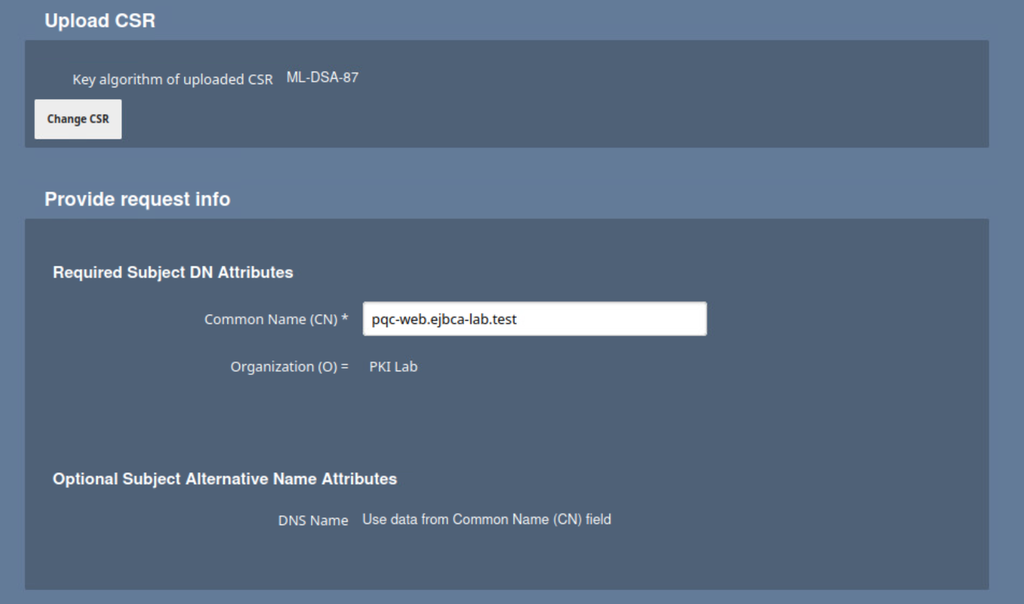
Paste the whole CSR into the text box and click Upload CSR. RA Web shows the key algorithm as ML-DSA-87 and fills in the subject from the CSR:
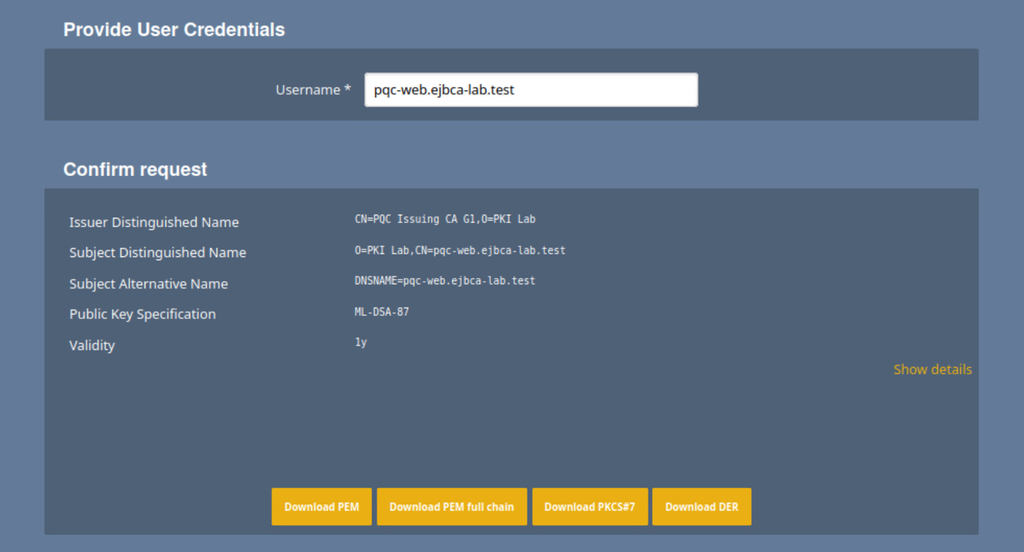
Under Provide User Credentials, set Username to pqc-web.ejbca-lab.test. If RA Web also asks for an enrollment code, enter any value; you won’t need it again.
Click Download PEM.
Copy the downloaded certificate from ~/Downloads to ~/pqc-lab, and rename it pqc-web.pem.
Step 7: Verify the PKI
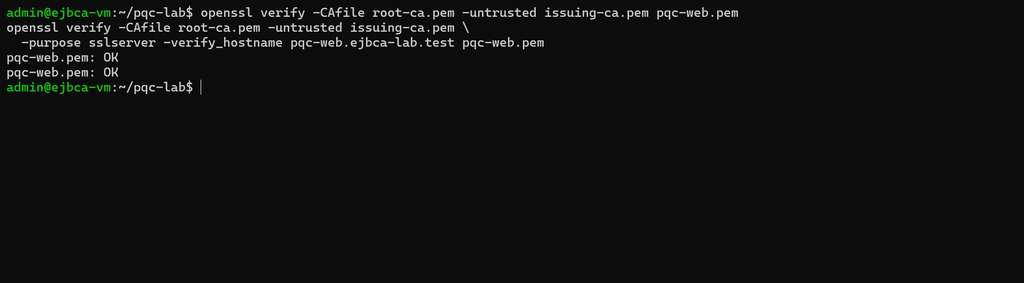
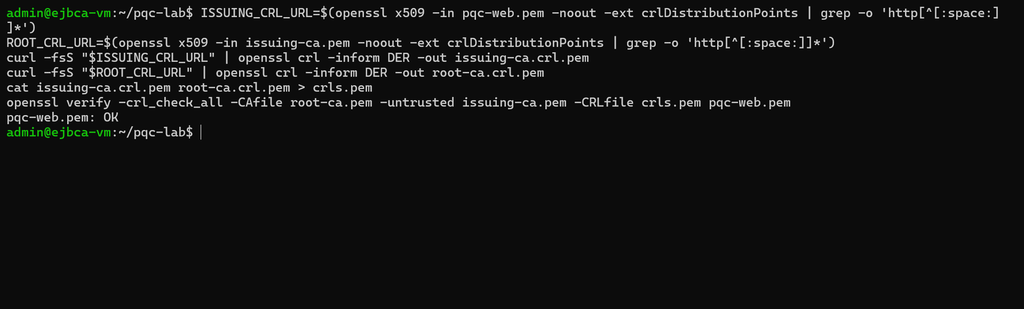
Finally, verify the whole hierarchy: the CRLs in AdminWeb, then the chain, CRLs and OCSP with OpenSSL. Run the terminal commands in ~/pqc-lab, in the same terminal session, because later commands reuse variables from earlier ones.
7.1 Check the CRLs in AdminWeb
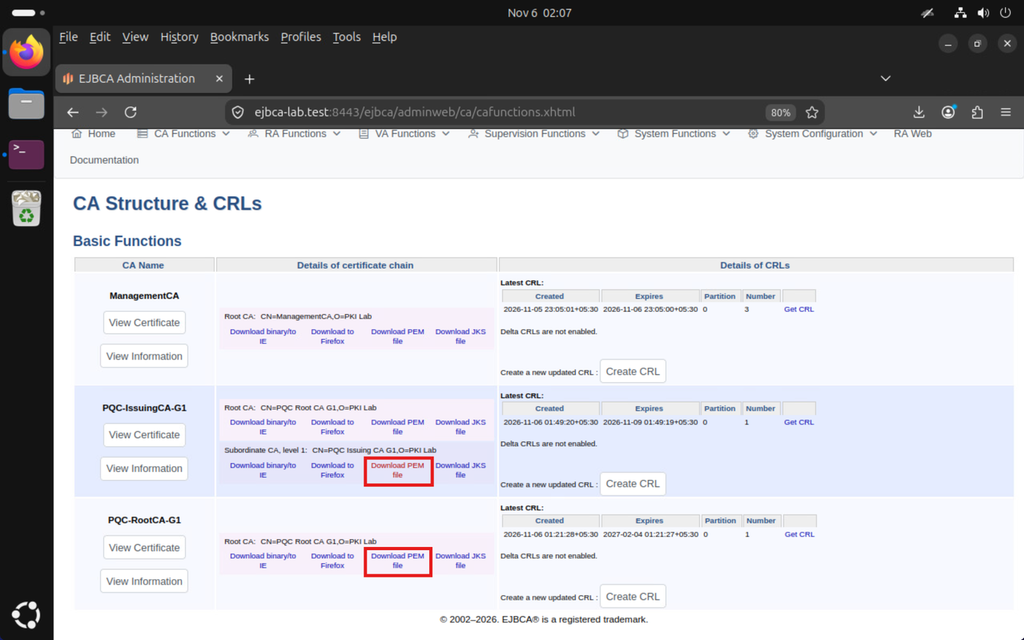
Go to CA Functions → CA Structure & CRLs. Under Latest CRL, PQC-RootCA-G1 and PQC-IssuingCA-G1 each list a CRL with its creation and expiry times. The Issuing CA’s CRL expires 3 days after it was created, and the Root CA’s 1 year after. If either CRL is missing or has expired, see T9.
7.2 Save both CA certificates
On the same page, click Download PEM file under PQC-RootCA-G1, then under PQC-IssuingCA-G1:
Copy both files from ~/Downloads to ~/pqc-lab, and rename them root-ca.pem (Root CA) and issuing-ca.pem (Issuing CA).
7.3 Inspect the leaf certificate
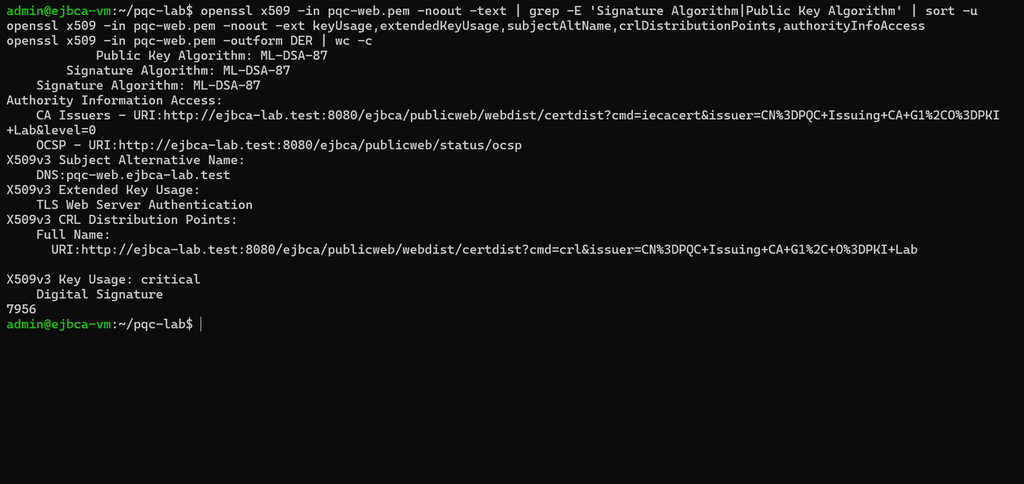
Check the algorithms, the extensions configured in Step 2, and the size of the certificate:
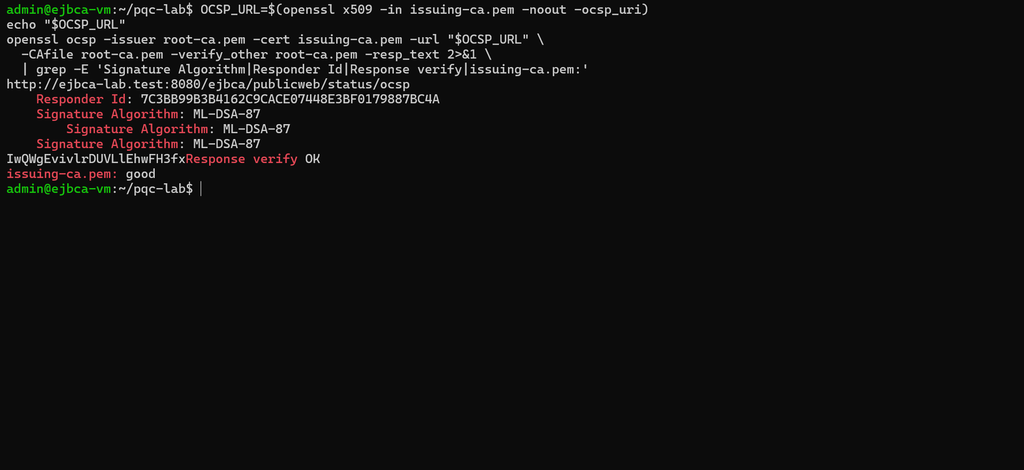
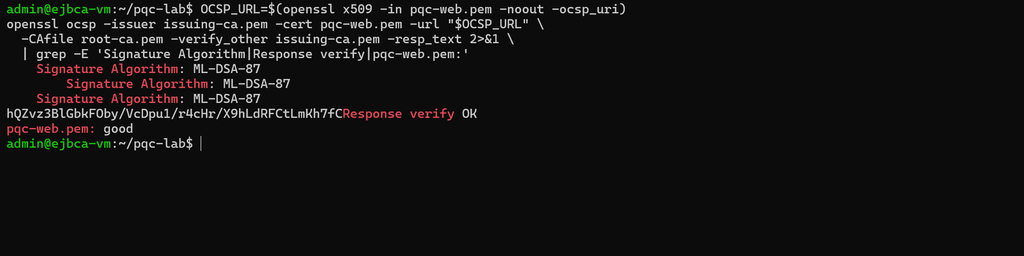
Expected: Signature Algorithm: ML-DSA-87 (it may appear more than once, for the response and for the included signer certificate), Response verify OK and pqc-web.pem: good.
7.8 Revoke the leaf and check again
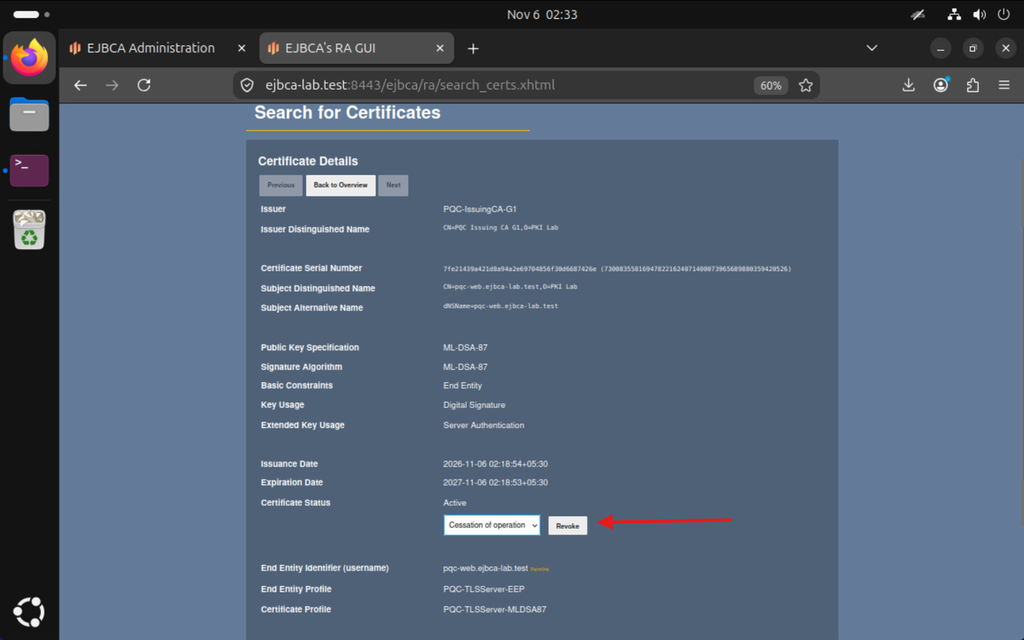
In RA Web, from the Search menu, choose Certificates and search for pqc-web. Open the certificate, choose Revoke, pick the reason Cessation of Operation, and confirm.
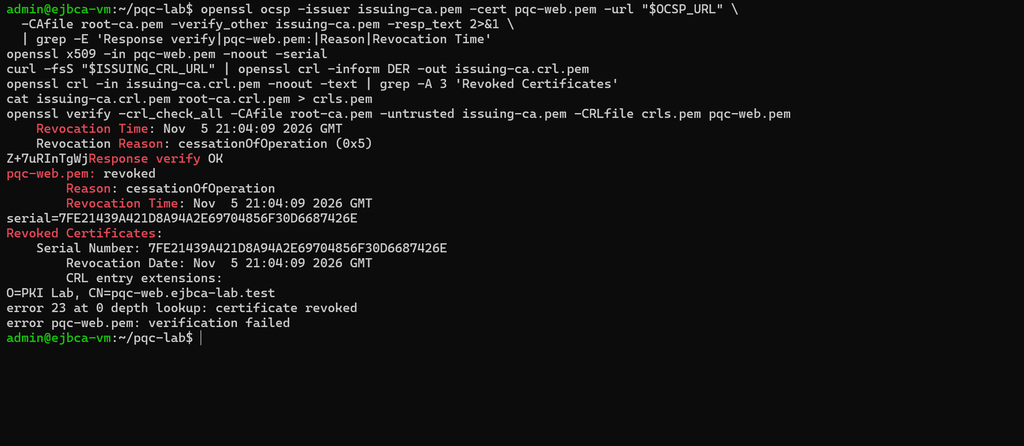
In the terminal, repeat the OCSP check, then fetch the new CRL and look for the leaf’s serial number:
OCSP: Response verify OK, pqc-web.pem: revoked, a revocation time, and the reason cessationOfOperation.
The CRL’s Revoked Certificates list contains the same serial number that openssl x509 -serial printed.
openssl verify now fails with certificate revoked.
You’re done when
PQC-RootCA-G1 and PQC-IssuingCA-G1 are active, both sign with ML-DSA-87, and the Issuing CA chains to the Root CA.
The PQC CRL Updater service is active, and both CRLs download from their distribution points and verify.
OCSP returns ML-DSA-87-signed responses that OpenSSL verifies.
The leaf certificate verified as good, then showed as revoked in both the CRL and OCSP after you revoked it.
Troubleshooting
T1. ML-DSA-87 isn’t in the Signing Algorithm list (3.2, 4.2)
Cause: EJBCA offers only the algorithms that the selected crypto token’s keys support. Either the wrong token is selected, the token is inactive, or the ML-DSA-87 key wasn’t generated.
Fix: Open CA Functions → Crypto Tokens. Check that the token is active and lists an ML-DSA-87 signing key. If not, activate the token with its authentication code, or generate the missing key as in 1.1. Then go back to the Create CA page and select the token again.
T2. EJBCA warns that the CA has no encryption key (3.2, 4.2)
Cause:defaultKey or keyEncryptKey points at an ML-DSA key, or the token has no RSA key. ML-DSA can’t encrypt.
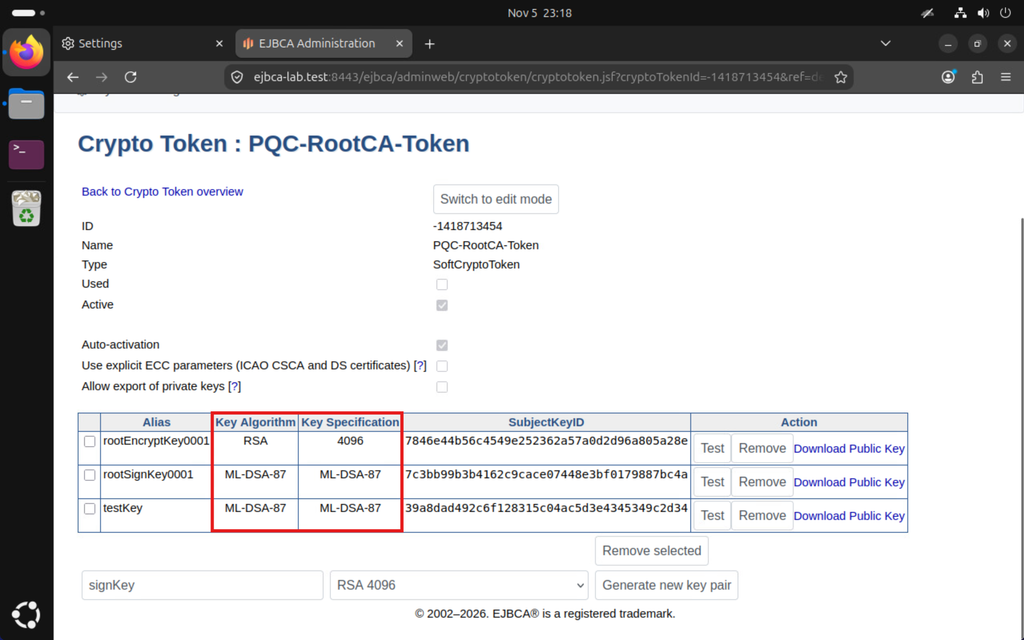
Fix: Generate the RSA 4096 key in the token if it’s missing (1.1, 1.2), then map defaultKey and keyEncryptKey to it.
T3. A certificate has no CRL Distribution Points or Authority Information Access (4.6, 7.3)
Cause: The certificate profile doesn’t use the “CA defined” values, or the issuing CA’s Default CA defined validation data is empty. For the Issuing CA certificate, that’s profile 2.2 and the Root CA’s URLs from 3.5. For the leaf, it’s profile 2.3 and the Issuing CA’s URLs from 4.5.
Fix: Correct the profile, and generate the URLs on the issuing CA’s Edit CA page. Then reissue the affected certificate. For the Issuing CA, open its Edit CA page and click Renew CA, keeping the current keys. For the leaf, repeat 6.2 and 6.3.
T4. RA Web rejects the CSR (6.3)
Cause: The CSR’s key algorithm isn’t in the certificate profile’s Available Key Algorithms, or the end entity profile points at a different certificate profile.
Fix: Confirm that openssl req -in pqc-web.csr -noout -text shows ML-DSA-87, that PQC-TLSServer-MLDSA87 allows only ML-DSA-87 (2.3), and that PQC-TLSServer-EEP uses that profile and PQC-IssuingCA-G1 (6.1).
T5. The leaf certificate shows Key Encipherment (7.3)
Cause: The profile still had Key encipherment selected when the certificate was issued. RFC 9881 doesn’t allow it on an ML-DSA certificate.
Fix: Clear it in PQC-TLSServer-MLDSA87 (2.3) and save. Then revoke the old leaf and issue a new one (6.2 and 6.3).
Symptom: OpenSSL reports an unknown algorithm or a signature verification failure.
Cause: OpenSSL is older than 3.5, usually because the commands ran on another computer.
Fix: Run the commands on the Ubuntu 26.04 server, where openssl version reports 3.5 or later.
T7. curl says Could not resolve host or Connection refused (7.5)
Cause: The CRL and OCSP URLs use ejbca-lab.test:8080. That name resolves only on the Ubuntu server, through the /etc/hosts entry from step 3.4 of the previous guide, and WildFly listens only on 127.0.0.1.
Fix: Run the command on the Ubuntu server. Check the name with getent hosts ejbca-lab.test, and WildFly with systemctl is-active wildfly.
T8. OCSP says Response Verify Failure, or the status is unknown (7.6, 7.7)
Cause: OpenSSL couldn’t find or trust the response signer, or the request named the wrong issuer.
Fix:-issuer must be the certificate of the CA that issued the certificate you’re checking. -verify_other must be the CA that signs the response, which is the same CA. -CAfile must be the Root CA. In 7.6, that means root-ca.pem for all three. In 7.7, it’s issuing-ca.pem for -issuer and -verify_other, and root-ca.pem for -CAfile. A status of unknown usually means the serial number isn’t one this CA issued.
T9. A CRL is missing or has expired, or the CRL number never changes (7.1)
Cause: The CRL Updater service is inactive or doesn’t include the CA, or the CA’s crypto token is inactive, so the CA can’t sign.
Fix: In System Functions → Services, edit PQC CRL Updater and check that both PQC CAs are selected and Active is ticked. In CA Functions → Crypto Tokens, make sure both PQC tokens are active. Then click Create CRL for each CA in CA Structure & CRLs to issue a fresh CRL straight away.
Enterprise PKI Services
Get complete end-to-end consultation support for all your PKI requirements!
Run ejbca.sh as the wildfly user, as shown. As your own user, it fails with CLI could not contact EJBCA instance.
How Encryption Consulting can help
This guide gets an ML-DSA hierarchy working in a lab. Taking post-quantum PKI into production raises questions a lab can’t answer: which systems still depend on RSA and ECDSA, whether your applications and devices can validate ML-DSA certificates, how to protect post-quantum CA keys in an HSM, and how to move an existing hierarchy to new algorithms without breaking trust. Encryption Consulting helps with each of these.
PQC Advisory Services: We assess your quantum risk, build an inventory of the cryptography you use, and turn it into a prioritised migration roadmap aligned with NIST and CNSA 2.0 guidance.
CBOM Secure: Discover where RSA, ECDSA and other quantum-vulnerable algorithms are used across your certificates, keys and applications, and export the results as a CycloneDX cryptographic bill of materials (CBOM).
PKI Services: Our PKI architects design and implement CA hierarchies, write the Certificate Policy and Certification Practice Statement (CP/CPS), and plan CA key migration, including running classical and post-quantum hierarchies side by side during the transition.
HSM Services: EJBCA Community Edition keeps ML-DSA keys in soft tokens. For production, we help you choose, deploy and integrate an HSM platform that generates and protects your post-quantum CA keys.
PKI-as-a-Service: If you’d rather not run your own CAs, our managed PKI supports ML-DSA certificate profiles and automated enrollment through ACME and EST.
PQC Center of Excellence: Try the PQC Playground, a hosted sandbox where you can stand up an ML-DSA Root CA and Issuing CA, then issue and validate quantum-safe certificates without building your own lab.
To plan your move to post-quantum PKI, contact us.
Conclusion
You now have a working two-tier post-quantum PKI on EJBCA Community 9.3. The Root CA and the Issuing CA both sign with ML-DSA-87, the CRL Updater service publishes CRLs for both, and the Issuing CA has issued an ML-DSA-87 TLS server certificate. OpenSSL verified the chain, both CRLs and the OCSP responses, then confirmed the revocation through both CRL and OCSP.
The lab also shows what changes with ML-DSA. A single ML-DSA-87 leaf certificate is more than 7,000 bytes, so expect larger TLS handshakes, CRLs and OCSP responses. Each CA still needs an RSA key for defaultKey and keyEncryptKey, because ML-DSA can only sign. And Community Edition keeps every key in a soft token, which is fine for testing but not for a production Root CA.
Before you use ML-DSA in production, test the clients that will rely on these certificates, because not every TLS library, browser or device accepts ML-DSA certificates yet. Keep the Root CA offline, protect CA keys in an HSM, and plan how your existing RSA and ECDSA hierarchies will migrate. A lab like this one is a low-risk place to find those gaps early.