
Published: April 2025 | Updated: August 2026
OpenSSL signing with PKCS#11 is the practice of using OpenSSL’s command-line interface to perform cryptographic signing operations while the actual private key stays inside a Hardware Security Module or token, never touching disk. A PKCS#11 wrapper bridges OpenSSL to the hardware, so familiar OpenSSL commands offload the signing itself to certified, tamper-resistant hardware.
Introduction
When it comes to securing digital communications or verifying the integrity of data, OpenSSL is one of the go-to tools for developers and security professionals. Whether you’re signing files, creating certificates, or verifying digital signatures, OpenSSL provides a flexible and powerful command-line interface to handle cryptographic operations.
But there’s a catch—by default, OpenSSL works with software-based keys stored on disk. While that may be fine for development or internal testing, it’s not ideal for production environments where the security of private keys is critical. This is where PKCS#11 steps in.
PKCS#11 is a standard API that lets software interact with cryptographic tokens like smart cards, USB tokens, and HSMs (Hardware Security Modules). These tokens are designed to store keys securely and perform operations like signing or encryption directly within the device—meaning your private key never leaves the hardware.
Now, integrating OpenSSL with a PKCS#11-compatible device isn’t always plug-and-play. That’s why we use a PKCS#11 wrapper, which acts as a bridge between OpenSSL and the hardware-backed cryptographic provider. The wrapper makes it possible to run familiar OpenSSL commands while offloading the actual signing operations to the HSM or token.
In this blog, I’ll walk you through how to perform OpenSSL-based signing using CodeSign Secure and Encryption Consulting’s PKCS#11 wrapper on both Ubuntu and Windows, covering setup, configuration, and execution. Whether you’re working in enterprise environments or building a secure signing process for your app, this setup will help you strengthen your cryptographic hygiene without a steep learning curve.
Ubuntu vs. Windows Setup: Quick Comparison
Before diving into the platform-specific steps, here’s how the two setups differ at a glance.
| Step | Ubuntu | Windows |
|---|---|---|
| Wrapper source | CodeSign Secure v3.02 Signing Tools section | CodeSign Secure v3.02 Signing Tools section |
| OpenSSL install | sudo apt install -y openssl libengine-pkcs11-openssl gnutls-bin xxd | Download the Win32 OpenSSL installer from slproweb.com |
| PKCS#11 engine | Ships with the distro package (libpkcs11.so, path varies by Ubuntu version) | Must be manually compiled from OpenSC’s libp11 via MSYS2 |
| Config file | openssl.conf, path set via the OPENSSL_CONF environment variable | openssl.cnf in C:\Program Files\Common Files\SSL |
| Sign command | openssl pkeyutl -engine pkcs11 -sign ... | openssl dgst -engine pkcs11 -keyform engine -sign ... |
OpenSSL PKCS11 – Ubuntu
Installation on Client System
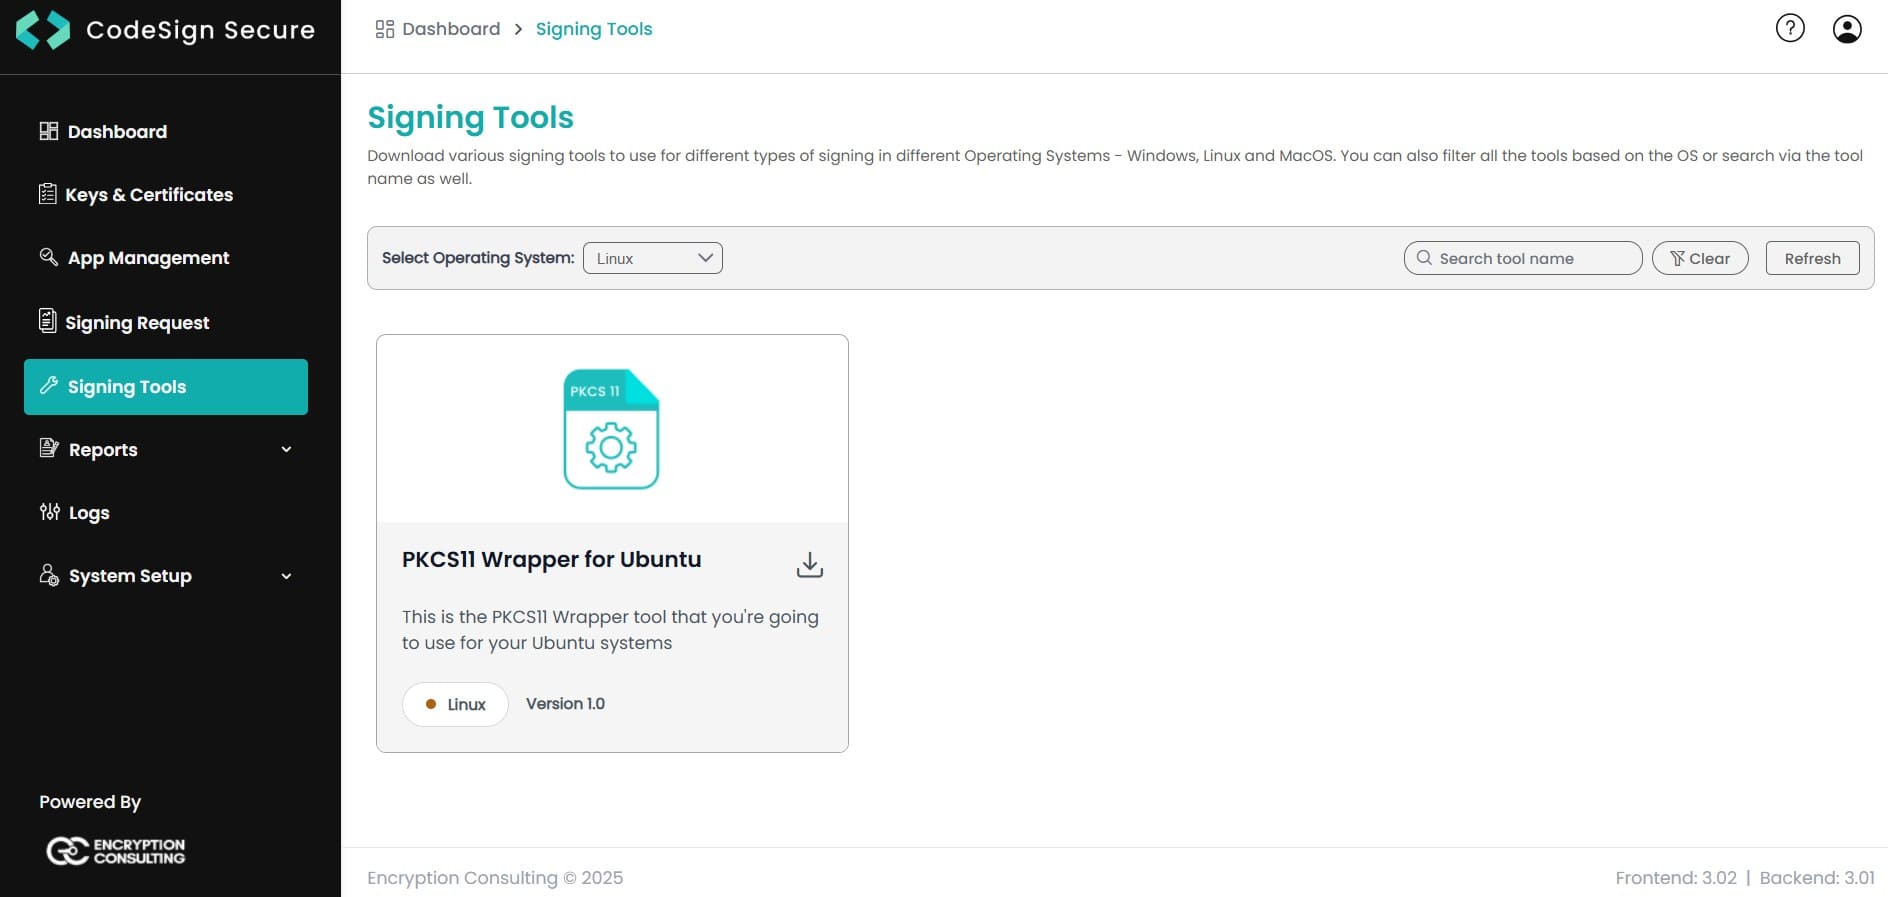
Step 1: Go to EC CodeSign Secure’s v3.02 Signing Tools section and download the PKCS11 Wrapper for Ubuntu.
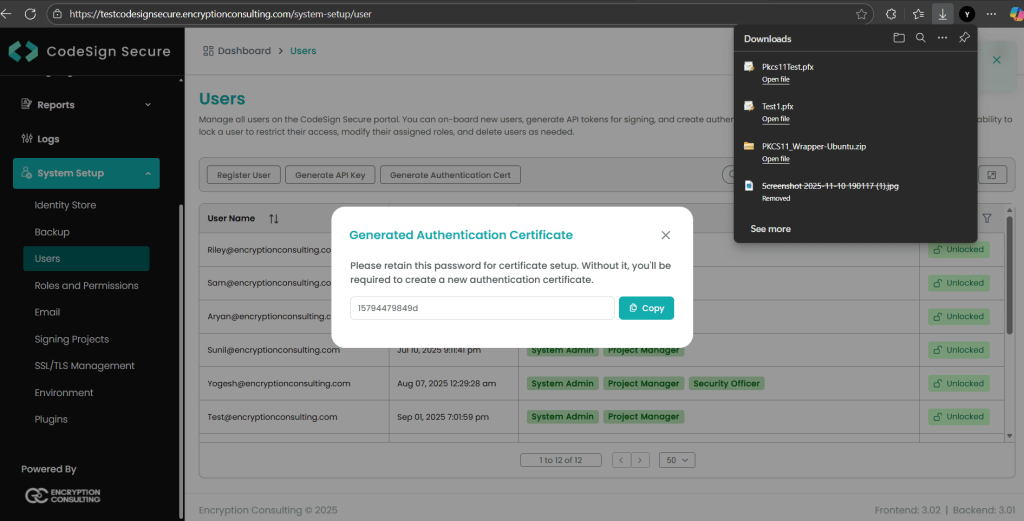
Step 2: After that, generate a P12 Authentication certificate from the System Setup > User > Generate Authentication Certificate dropdown.
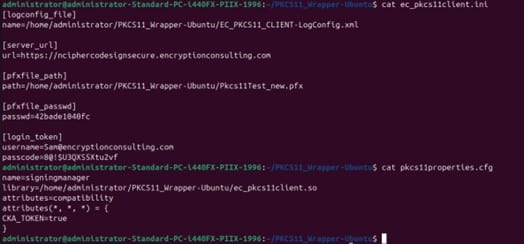
Step 3: Go to your Ubuntu client system and edit the configuration files (ec_pkcs11client.ini and pkcs11properties.cfg) downloaded in the PKCS11 Wrapper.
Prerequisites for the Ubuntu System
Now, let’s install some prerequisites in your client system to run the PKCS11 Wrapper.
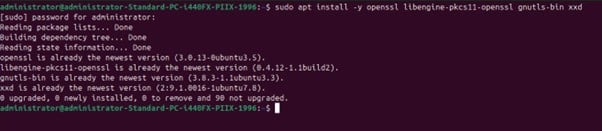
Step 1: Install OpenSSL:sudo apt install -y openssl libengine-pkcs11-openssl gnutls-bin xxd
Step 2: Create a config file for PKCS#11

Step 3: Enter the appropriate details in the config file:
openssl_conf = openssl_init
[openssl_init]
engines = engine_section
[engine_section]
pkcs11 = pkcs11_section
[pkcs11_section]
#Path to the OpenSSL PKCS11 Engine
dynamic_path = “<Path to libpkcs11.so>”
MODULE_PATH = “<Path to ec_pkcs11client.so>”
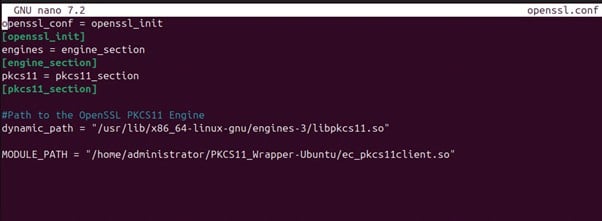
The ec_pkcs11client.so path depends on where you store the file.
The libpkcs11.so path depends on your Linux distribution and version:
- Ubuntu 18.04: /usr/lib/x86_64-linux-gnu/engines-1.1/libpkcs11.so
- Ubuntu 20.04: /usr/lib/x86_64-linux-gnu/engines-1.1/libpkcs11.so
- Ubuntu 22.04: /usr/lib/x86_64-linux-gnu/engines-3/libpkcs11.so
Step 4: Set the environment variable for openssl.conf file
export OPENSSL_CONF=<path to openssl.conf>

Perform Signing and Verification using PKCS11 Wrapper
Now that all the configurations and prerequisites have been installed. Let’s perform the signing operation first.
The signing command will look something like this (ensure you run this command only inside the folder where your PKCS11 Wrapper is installed):
openssl pkeyutl -engine pkcs11 -sign -in <path of the file you want to sign> -inkey “pkcs11:object=<private key alias>;type=private” -keyform engine -out <path of the Signed file>
For Example: openssl pkeyutl -engine pkcs11 -sign -in testfile.txt -inkey “pkcs11:object=CertEnrollTest;type=private” -keyform engine -out readme.sign.sha256
After successfully signing the file, let’s verify it using this command:
openssl pkeyutl -engine pkcs11 -verify -in <path of the file you want to sign> -inkey “pkcs11:object=<private key alias>;type=private” -keyform engine -sigfile <path of the Signed file>
For example: openssl pkeyutl -engine pkcs11 -verify -in testfile.txt -inkey “pkcs11:object=CertEnrollTest;type=private” -keyform engine -sigfile readme.sign.sha256

OpenSSL PKCS11 – Windows
Installation on Client System
Step 1: Go to EC CodeSign Secure’s v3.02 Signing Tools section and download the PKCS11 Wrapper for Windows.
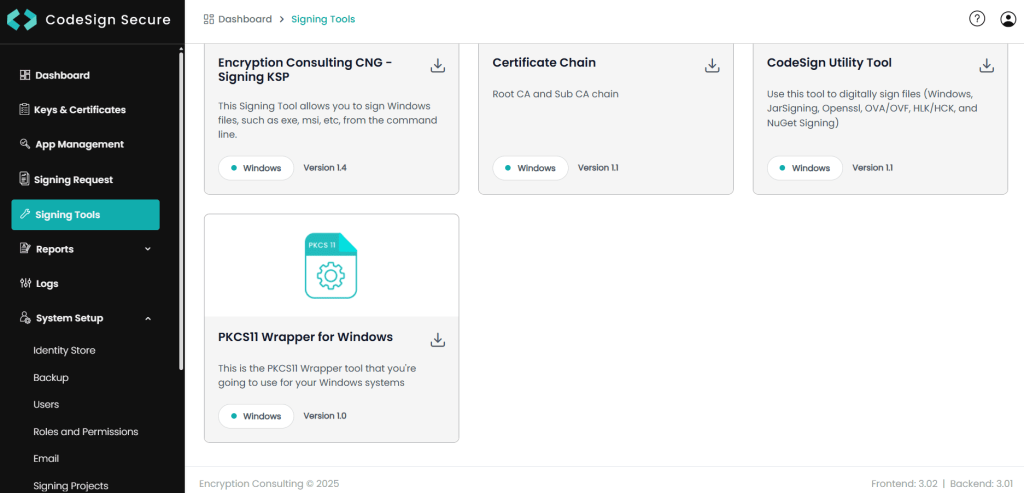
Step 2: After that, generate a P12 Authentication certificate from the System Setup > User > Generate Authentication Certificate dropdown.
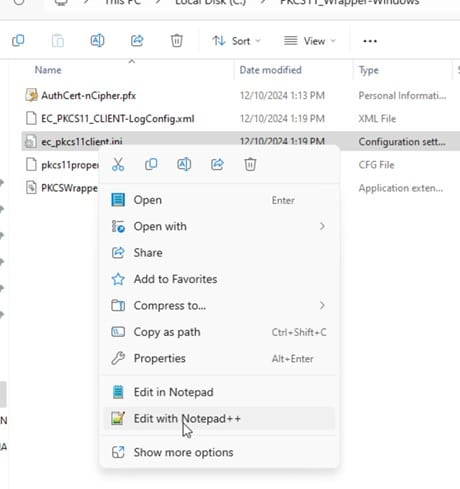
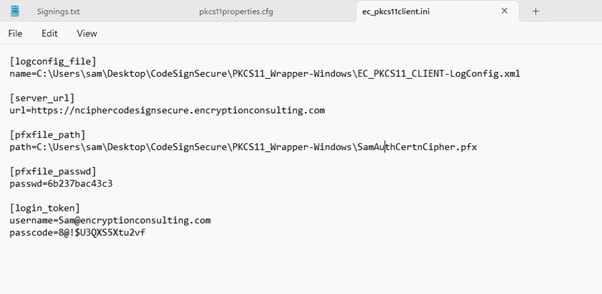
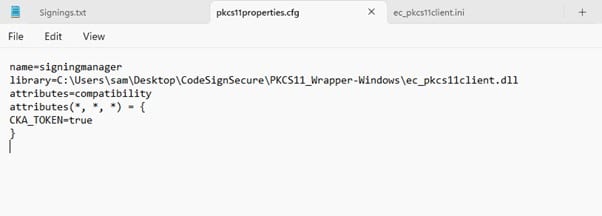
Step 3: Go to your Windows client system and edit the configuration files (ec_pkcs11client.ini and pkcs11properties.cfg) downloaded in the PKCS11 Wrapper.
Prerequisites for Windows System
Now, let’s install some prerequisites in your client system to run the PKCS11 Wrapper.
Step 1: Download and install OpenSSL on your system from here.

Step 2: Manually compile the OpenSSL PKCS#11 using these methods
- Download and install msys2-i686-*.exe from https://msys2.github.io/
- Start a MSYS2 MSYS console from the Start menu
Use this command:
pacman -S git pkg-config libtool autoconf automake make gcc openssl-devel git clone https://github.com/OpenSC/libp11.git cd libp11 autoreconf -fi ./configure –prefix=/usr/local make && make install
Step 3: In the configuration file (openssl.cnf) in the folder C:\Program Files\Common Files\SSL
Add these lines:
openssl_conf = openssl_init
[openssl_init]
engines = engine_section
[engine_section]
pkcs11 = pkcs11_section
[pkcs11_section]
#Path to the Compiled OpenSSL PKCS11 from OpenSC – libp11
dynamic_path = <Path to compiled libp11 pkcs11.dll>MODULE_PATH = <Path to ec_pkcs11client.dll>


Perform Signing and Verification using PKCS11 Wrapper
Now that all the configurations and prerequisites have been installed. Let’s perform the signing operation first.
The signing command will look something like this (ensure you run this command only inside the folder where your PKCS11 Wrapper is installed):
openssl dgst -engine pkcs11 -keyform engine -sign “pkcs11:object=<private key alias>;type=public” -sha256 -out <path of signed file> <path of file to sign>
For Example:
openssl dgst -engine pkcs11 -keyform engine -sign “pkcs11:object=CertEnrollTest;type=public” -sha256 -out test-signed.bin testfile.txt
After successfully signing the file, let’s verify it using this command:
openssl dgst -engine pkcs11 -keyform engine -verify “pkcs11:object=<private key alias>;type=public” -sha256 -signature <path of signed file> <path of file to sign>
For example:
openssl dgst -engine pkcs11 -keyform engine -verify “pkcs11:object=CertEnrollTest;type=public” -sha256 -signature test-signed.bin testfile.txt

Security Considerations
When you’re dealing with cryptographic operations—especially digital signing—the protection of your private keys is absolutely non-negotiable. A leaked or compromised private key is pretty much a worst-case scenario because it opens the door to impersonation, unauthorized access, and a whole lot of trust issues.
So, let’s talk about a few best practices to help keep your keys (and your reputation) safe:
- Never store private keys in plain files: It might be convenient, but storing private keys as flat files on disk (even with file system permissions) is risky. All it takes is a misconfigured backup system or a curious admin to accidentally expose them. This isn’t a theoretical risk: GitGuardian’s 2026 State of Secrets Sprawl report found 28.65 million new hardcoded secrets exposed on public GitHub in 2025 alone, a 34% year-over-year increase, and the median time for a team to actually remediate a leaked secret is 94 days, according to Verizon’s 2025 Data Breach Investigations Report, a gap attackers can exploit long before anyone notices. Instead, use secure key storage mechanisms—preferably hardware-backed.
- Use HSMs or secure tokens whenever possible: Hardware Security Modules (HSMs) and smart cards are built specifically for secure key storage. They don’t just store keys—they perform operations (like signing or decryption) inside the device, so the private key never actually leaves. This adds a strong layer of protection, especially against malware or insider threats.
- Lock down access to your PKCS#11 modules: Make sure only authorized users or services can talk to the PKCS#11 interface. Use PINs, role-based access, and proper auditing to prevent abuse. If your wrapper or HSM vendor supports logging, enable it—you’ll want a clear trail of who accessed what and when.
- Avoid leaving tokens unlocked: It’s tempting to script things and leave tokens unlocked to “keep things running,” but that’s risky. Instead, look into automated unlock mechanisms that still respect session isolation or tools that securely cache credentials for short durations with tight access controls.
- Validate what you’re signing: It sounds obvious, but make sure you’re not signing random or malicious files by accident. Build in sanity checks or use pre-signing verification steps to ensure only approved content goes through your signing flow.
At the end of the day, cryptographic tools are only as secure as the way they’re used. PKCS#11 gives you the power to offload critical operations to hardware—but you’ve still got to respect the basics: protect your keys, limit access, and always think one step ahead of an attacker.
Frequently Asked Questions
What is PKCS#11, and why does OpenSSL need a wrapper for it?
PKCS#11 is a standard API for talking to cryptographic tokens like HSMs and smart cards. OpenSSL doesn’t speak PKCS#11 natively for hardware-backed keys by default, so a wrapper acts as the bridge, letting familiar OpenSSL commands offload the actual signing operation to the hardware.
Does the private key ever leave the HSM when signing with OpenSSL and PKCS#11?
No. The HSM performs the signing operation internally and only returns the resulting signature. The private key itself is generated, stored, and used entirely inside the hardware, and is never exported in a usable form.
What’s the biggest difference between the Ubuntu and Windows setup for EC’s PKCS#11 wrapper?
On Ubuntu, the OpenSSL PKCS#11 engine ships with the distro’s package manager. On Windows, you have to manually compile it from OpenSC’s libp11 project using MSYS2, since there’s no equivalent pre-packaged engine available out of the box.
Why does the libpkcs11.so path differ between Ubuntu versions?
Ubuntu 18.04 and 20.04 use OpenSSL 1.1’s engine directory (engines-1.1), while Ubuntu 22.04 ships OpenSSL 3.x, which moved engines to the engines-3 directory. Pointing the config file at the wrong path is one of the most common setup failures.
What OpenSSL command actually performs the signing operation once PKCS#11 is configured?
On Ubuntu, it’s openssl pkeyutl -engine pkcs11 -sign with the key referenced via a pkcs11:object=... URI. On Windows, the equivalent is openssl dgst -engine pkcs11 -keyform engine -sign. Both offload the actual cryptographic operation to the HSM through the wrapper.
Is storing private keys as plain files on disk ever acceptable?
Not for production signing keys. Even with file system permissions, a plain-file key is one misconfigured backup or compromised account away from exposure. It may be tolerable for short-lived development or testing keys, but production and release signing keys should always live in an HSM or secure token.
How common are private key and credential theft incidents in code signing?
Common and growing. GitGuardian’s 2026 State of Secrets Sprawl report found 28.65 million new hardcoded secrets exposed on public GitHub in 2025 alone, a 34% year-over-year increase, and the median remediation time for a leaked secret is 94 days, per Verizon’s 2025 DBIR, leaving a long window for exploitation.
Which CodeSign Secure version currently ships this PKCS#11 wrapper?
CodeSign Secure v3.02, which also added native LMS and ML-DSA post-quantum signing, GPG2 integration, Debian/RPM package signing, and jsign/jarsigner support alongside the PKCS#11 wrapper.
What other signing tools does CodeSign Secure v3.02 support alongside the PKCS#11 wrapper?
Version 3.02 added GPG2 signing via PKCS#11, Debian (.deb) and RPM package signing, jsign for Windows binaries (EXE, MSI), and jarsigner for Java Archive (JAR) files, alongside native Fortanix HSM integration.
Conclusion
Signing with OpenSSL using PKCS#11 might seem a bit technical at first, but once you’ve set it up—on either Ubuntu or Windows—it’s a smooth and secure workflow. By integrating a PKCS#11 wrapper, you can shift sensitive signing operations away from the software layer and into secure hardware like HSMs or tokens. This not only protects your private keys but also helps you meet compliance standards and security best practices.
If you’re looking for a streamlined way to get started, EC’s PKCS#11 wrapper makes the integration process much simpler. It’s built to be reliable, cross-platform, and compatible with a wide range of HSMs—so you can focus more on securing your operations and less on dealing with low-level plumbing. In today’s threat landscape, protecting your keys is protecting your business. Whether you’re signing code, documents, or certificates, combining OpenSSL with a robust PKCS#11 wrapper like EC’s is a smart, future-proof move.
- Introduction
- Ubuntu vs. Windows Setup: Quick Comparison
- OpenSSL PKCS11 – Ubuntu
- OpenSSL PKCS11 – Windows
- Security Considerations
- Frequently Asked Questions
- What is PKCS#11, and why does OpenSSL need a wrapper for it?
- Does the private key ever leave the HSM when signing with OpenSSL and PKCS#11?
- What's the biggest difference between the Ubuntu and Windows setup for EC's PKCS#11 wrapper?
- Why does the libpkcs11.so path differ between Ubuntu versions?
- What OpenSSL command actually performs the signing operation once PKCS#11 is configured?
- Is storing private keys as plain files on disk ever acceptable?
- How common are private key and credential theft incidents in code signing?
- Which CodeSign Secure version currently ships this PKCS#11 wrapper?
- What other signing tools does CodeSign Secure v3.02 support alongside the PKCS#11 wrapper?
- Conclusion