Introduction
Software supply chain attacks aren’t just a theoretical risk anymore; they’re happening, and they’re hitting hard. Incidents like the SolarWinds breach and the Log4Shell vulnerability made it painfully clear that attackers are no longer just targeting your code; they’re going after everything that touches it, including the tools, libraries, and containers you rely on.
In this reality, signing and verifying container images isn’t a nice-to-have; it’s a must. If you’re pushing unsigned images or skipping signature checks during deployment, you’re leaving the door wide open for attackers to sneak in malicious code without you even noticing.
That’s where our CodeSign Secure comes in.
CodeSign Secure makes it easy to add digital signatures to your container images and verify them before they ever hit production. Whether you’re running a fast-moving CI/CD pipeline or managing hundreds of microservices, it helps you lock down your container supply chain without slowing anything down.
In the sections ahead, we’ll walk through how our CodeSign Secure fits into your workflow, how it secures your images with HSM-backed keys, and how you can enforce signature checks before anything gets deployed.
The Role of Code Signing in DevSecOps
DevOps is all about speed, pushing updates fast, automating everything, and keeping things moving. But with that speed comes risk. The faster you ship code, the more chances there are for something untrusted to slip through. That’s where DevSecOps comes in, baking security right into the process instead of tacking it on at the end.
One of the best ways to build that trust is with code signing. When you sign container images, you’re basically stamping them with a seal that says, “This came from us, and it hasn’t been messed with.” It’s a simple check that goes a long way in making sure what you’re running in production is exactly what you meant to build.
Our platform, CodeSign Secure, plugs into your CI/CD pipeline so signing isn’t a separate task; it’s just part of the build. Every image that gets built and pushed can be signed automatically. And before it gets deployed, it can verify the signature to make sure nothing was tampered with along the way.
It’s about putting security on autopilot. You shouldn’t have to choose between moving fast and staying secure with our platform; you get both.
Signing Container Images with CodeSign Secure
Before proceeding with image signing, Docker & CoSign (our CodeSign Secure’s CLI tool) need to be installed on that machine.
Please follow the steps mentioned below for installing Cosign
Installing CoSign
# binary
wget “https://github.com/sigstore/cosign/releases/download/v2.0.0/cosign-linux-amd64”
mv cosign-linux-amd64 /usr/local/bin/cosign
chmod +x /usr/local/bin/cosign
# rpm
wget “https://github.com/sigstore/cosign/releases/download/v2.0.0/cosign-2.0.0.x86_64.rpm”
rpm -ivh cosign-2.0.0.x86_64.rpm
# dkpg
wget “https://github.com/sigstore/cosign/releases/download/v2.0.0/cosign_2.0.0_amd64.deb”
dpkg -i cosign_2.0.0_amd64.deb
Installing and Setting up Python and Docker
sudo apt-get install docker.io
sudo apt-get install python-is-python3
sudo apt install python3-pip
sudo apt-get install python3-docker
sudo apt-get -y install python3-openssl
sudo apt-get install -y dbus-user-session
sudo apt-get install -y docker-ce-rootless-extras
If docker-ce-rootless-extras gives an error, follow the steps below:
sudo apt-get update
sudo apt-get install ca-certificates curl gnupg lsb-release
sudo mkdir -p /etc/apt/keyrings
curl -fsSL https://download.docker.com/linux/ubuntu/gpg | sudo gpg –dearmor -o /etc/apt/keyrings/docker.gpg echo “deb [arch=$(dpkg –print-architecture) signed-by=/etc/apt/keyrings/docker.gpg] https://download.docker.com/linux/ubuntu $(lsb_release -cs) stable” | sudo tee /etc/apt/sources.list.d/docker.list > /dev/null
sudo apt-get update
sudo apt-get install docker-ce-rootless-extras
Now you would need to log in to your Docker Hub account by running the command below
sudo docker login
Setting up Container Signing
- Download the Container Signing Tools from the CodeSign Secure portal.
- Go to folder SignImage.
-
Open the “ec-signer.conf” file and update the codesigning URL, the path of
your SSL Authentication certificate, and the password of the certificate.
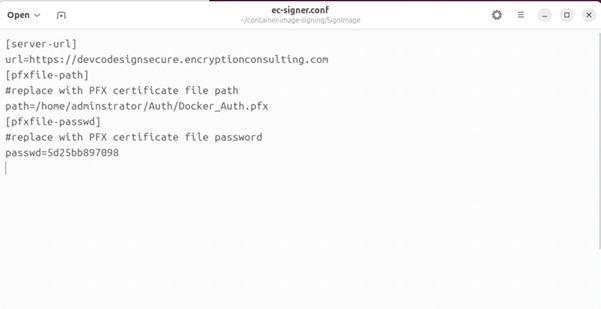
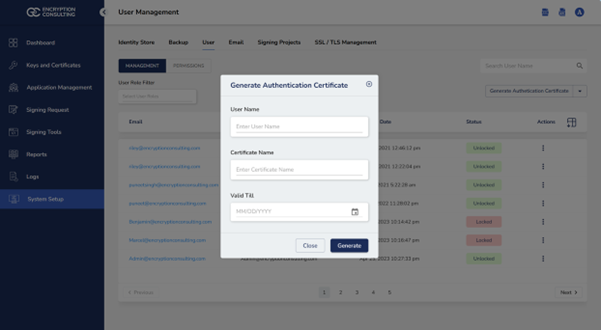
NOTE: The SSL Authentication Certificate and password can be generated from the CodeSignSecure portal.
- Open terminal
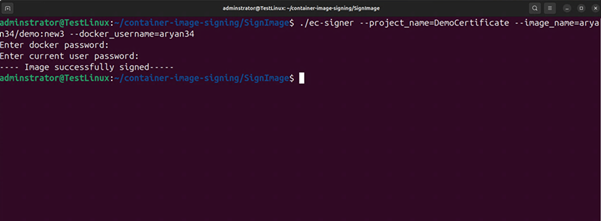
- Execute
./ec-signer –project_name=<certificate name> –image_name=<target container> –docker_username=<your docker username>
-
You will be prompted to provide the Docker Hub password and the root
privileges to the current user
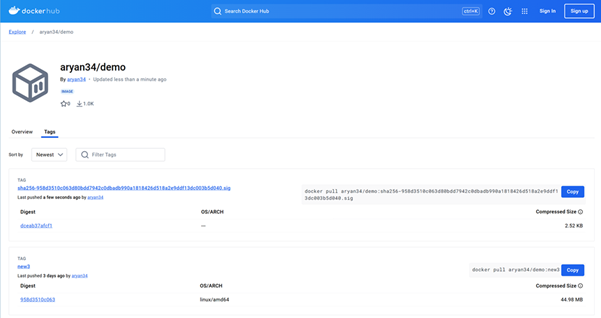
-
You will be able to see a new signature image on your Docker Hub account.
Verifying Container Image
Verification of Container Images will allow you to deploy only signed Docker images and reject unsigned ones. Kubernetes needs to be deployed to verify the container image signing.
Installing Kubernetes
Please follow the following command to install Kubernetes.
curl -sfL https://get.k3s.io | sh –
Creating Kubernetes Services
Before we can verify an image in a Kubernetes environment, the following services need to be deployed in the Kubernetes cluster
- Verify Image Service
- Image Validation Webhook Service
To create the Verify Image Service, follow the steps below:
- Go to the ../VerifyImage/image-verifier directory.
-
Create a Docker image with the name “verifyImage” using the Dockerfile
present in the folder
For example:
sudo docker build -t aryan34/demo:verifyImage
where “aryan34” is the Docker username and “demo” is the Docker Hub repository name.
-
Now push this image to your Docker Hub account
For example:
sudo docker image push aryan34/demo:verifyImage
where “aryan34” is the Docker username and “demo” is the Docker Hub repository name.
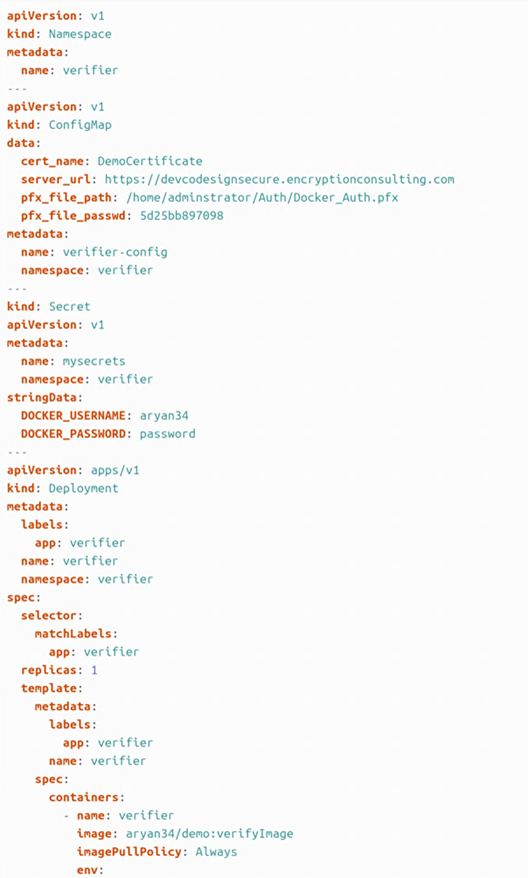
- Now open the validator-deploy.yaml file and update the following settings
- cert_name
- server_url
- pfx_file_path
- pfx_file_passwd
- DOCKER_USERNAME
- DOCKER_PASSWORD
- image (NOTE: Keep the image name as “verifyImage”. Only change the Docker username and repository name.)
-
Deploy the Image Verifier Service
sudo kubectl apply -f validator-deploy.yaml
To create the Image Validation Service, follow the steps below:
- Go to the ../VerifyImage/validating-webhook directory.
-
Create a Docker image with the name “image-validation-webhook” using the
Dockerfile present in the folder.
For example:
sudo docker build -t aryan34/demo:image-validation-webhook
Where “aryan34” is the Docker username and “demo” is the Docker Hub repository name.
-
Now push this image to your Docker Hub account
For example:
sudo docker image push aryan34/demo:image-validation-webhook
where “aryan34” is the Docker username and “demo” is the Docker Hub repository name.
-
Now deploy the webhook secrets and configuration yaml files.
sudo kubectl apply -f webhook-secret.yaml
sudo kubectl apply -f webhook-config.yaml
-
Now open the webhook-deploy.yaml file and update the following settings
- image (NOTE: Keep the image name as “image-validation-webhook”. Only change the Docker username and repository name.)
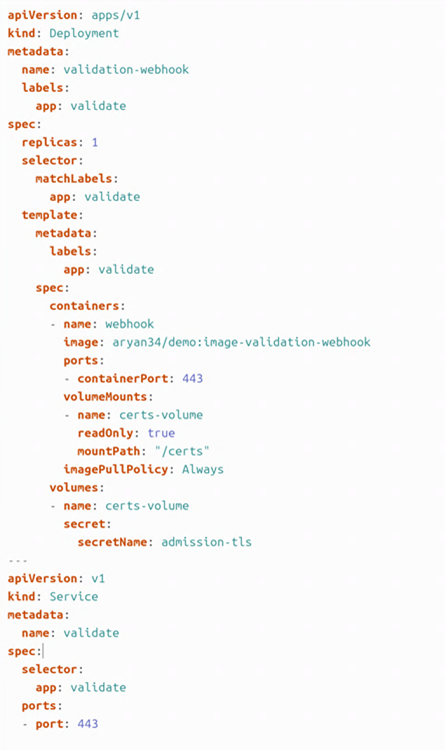
-
Deploy the Image Validation Webhook
sudo kubectl apply -f webhook-deploy.
-
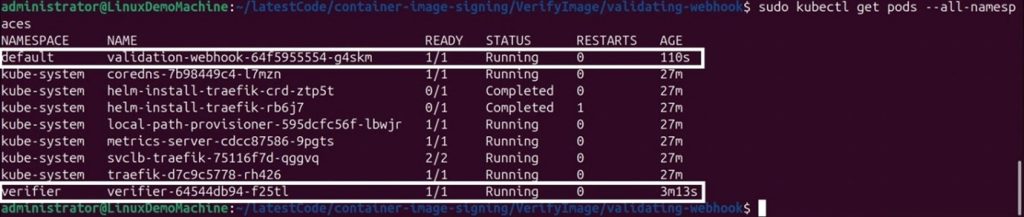
If the services are successfully deployed, when we execute the following
command –
sudo kubectl get pods -all-namespaces
We should get the following output –
Testing
If we try to deploy any container image that is not signed, the deployment will fail. We will only be able to deploy a signed image due to our verifier and validation Kubernetes services.
Deploying an Unsigned Image
We need to create a yaml file for the unsigned image
We have created a demo-deployment-unsigned.yaml file to deploy the unsigned aryan34/demo:notSigned image.
Here is a sample yaml file. Remember to change the Deployed service name (demo-deployment-unsigned), image name, and the port number.
apiVersion: apps/v1
kind: Deployment
metadata:
name: demo-deployment-unsigned
labels:
app: demo
spec:
replicas: 1  # Number of desired replicas
selector:
matchLabels:
app: demo
template:
metadata:
labels:
app: demo
spec:
containers:
- name: demo
image: aryan34/demo:notSigned  # unsigned demo image
ports:
- containerPort: 8997  # Port to expose
To deploy the unsigned image using Kubernetes, run the following command.
sudo kubectl apply -f demo-deployment-unsigned.yaml

Deploying a Signed Image
Here is a sample yaml file. Remember to change the Deployed service name (deployed-demo), image name, and the port number.
apiVersion: apps/v1
kind: Deployment
metadata:
name: demo-deployment
labels:
app: demo
spec:
replicas: 1  # Number of desired replicas
selector:
matchLabels:
app: demo
template:
metadata:
labels:
app: demo
spec:
containers:
- name: demo
image: aryan34/demo:new3  # signed demo image
ports:
- containerPort: 8999  # Port to expose
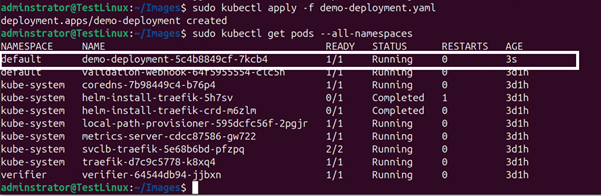
To deploy the signed image using Kubernetes, run the following command.
sudo kubectl apply -f demo-deployment.yaml
Now, if you check all the pods, you will see a demo-deployment service successfully running.
CodeSign Secure + SBOM: Ensuring Supply Chain Transparency
Knowing what’s inside your containers is just as important as knowing who built them. That’s where SBOMs (Software Bill of Materials) come in. They list out all the components in your container image, kind of like a nutrition label for your software.
With our CodeSign Secure, you can sign your SBOMs and attach them directly to your container images. That means anyone pulling your image can check both the image and the SBOM to confirm they’re legit and untouched.
Our platform supports popular SBOM formats like SPDX, so you’re covered no matter what tooling you’re already using. And the best part? You can enforce these checks. If an image shows up without a signed SBOM or if the SBOM doesn’t match what’s expected, you can block the deployment right there.
No SBOM? No deployment. Simple.
This gives you visibility into what’s running, and it helps catch issues before they turn into security problems later on.
CodeSign Secure and Post-Quantum Cryptography
Quantum computing isn’t here yet, but when it shows up, a lot of current encryption methods could be in trouble. Algorithms like RSA and ECC, which we rely on for signing today, won’t stand a chance against a powerful enough quantum machine.
That’s why our platform, CodeSign Secure, is ready now with support for LMS (Leighton-Micali Signature), one of the post-quantum algorithms recommended by NIST. LMS is designed to stay strong even if quantum computers become a real threat.
You can already start testing our platform with LMS to see how post-quantum signing fits into your pipeline. It works with HSMs that support LMS and integrates just like any other algorithm CodeSign Secure handles. No special tricks needed.
Looking ahead, we will keep adding support for more post-quantum algorithms as standards become finalized, including those from the NIST PQC competition. So, when the shift to quantum-safe signing becomes necessary, you won’t need to scramble; we’ll have you covered.
Enterprise-Grade Features
When you’re running code signing at scale, you need more than just a signature. You need control, visibility, and the flexibility to fit into how your team works.
- Role-Based Access Control & Auditing: Not everyone should be able to sign every image. With our CodeSign Secure’s RBAC, you can set up fine-grained permissions so only your release engineers can approve production builds, while developers get access to lower-risk environments. Every signing action is logged automatically, giving you a full audit trail of who signed what, when, and with which key.
- Central Dashboard for Signing Visibility: Gone are the days of hunting down logs across multiple CI jobs. Our platform’s dashboard brings all your signing events into one place, showing you at a glance which images have valid signatures, which keys they used, and any failed verifications. If something looks off, you’ll spot it right away and can click through for details.
- API-First Architecture for Custom Integrations: Want to hook our platform into your own tools or automate a custom workflow? All CodeSign Secure features are exposed via a well-documented REST API so you can script virtually anything to trigger a sign-and-push step in your bespoke CI tool, build internal reporting, or integrate with the security ticketing system you already use.
With these enterprise features, CodeSign Secure not only signs your images but also helps you manage and monitor every step of the process.
Conclusion
Supply chain threats aren’t going away, and ignoring them isn’t an option. But locking things down doesn’t have to slow you down. With our CodeSign Secure, you get a tool that fits right into your existing pipeline, adds strong security where it counts, and keeps you in control from build to deploy.
From signing container images and SBOMs to verifying them with HSM-backed keys and prepping for a quantum-safe future, our platform helps you check all the boxes, without adding friction for your team.
If you’re ready to take container security seriously without making your workflows more complicated, give our CodeSign Secure a try.