Skip to content

Step By Step Guide Of ADCS Two Tier PKI Hierarchy Deployment

Introduction and overview of the Test Lab

There are five computers/machines involved in this two-tier PKI hierarchy lab using Microsoft ADCS.

  1. There is one domain controller (DC01) that is also running Active Directory-integrated Domain Name Service (DNS). This computer will also provide the Lightweight Directory Access Protocol (LDAP) location for the CDP and the AIA point for the MSPKI configuration.
  2. One Standalone Offline Root CA (CA01).
  3. One Enterprise Issuing CA (CA02).
  4. One Web Server (SRV1) (HTTP CDP/AIA) and
  5. One Windows 10 (Win10) Client computer.
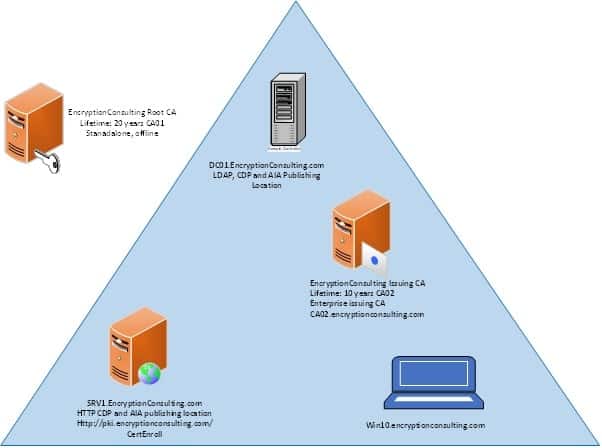
AD DS forest
AD DS forest – encryptionconsulting.com
Virtual Machine Roles OS Type IP Address Subnet mask Preferred DNS server
DC01.encryptionconsulting.com DC & DNS – LDAPCDP/AIA Windows Server 2019 192.168.1.10 255.255.255.0 192.168.1.10
CA01 Standalone Offline Root CA Windows Server 2019 NA NA NA
CA02.encryptionconsulting.com Enterprise Issuing CA Windows Server 2019 192.168.1.12 255.255.255.0 192.168.1.10
SRV1.encryptionconsulting.com Web Server – HTTP CDP/AIA Windows Server 2019 192.168.1.13 255.255.255.0 192.168.1.10
WIN10.encryptionconsulting.com Windows Client Computer Windows 10 192.168.1.14 255.255.255.0 192.168.1.10

Major Steps

There are eight major steps in this step-by-step guide as listed below (each includes several sub-tasks).

  1. Install the Active Directory Forest
  2. Prepare the webserver for CDP and AIA publication
  3. Install the standalone offline root CA
  4. Perform post-installation configuration steps on the standalone offline root CA
  5. Install Subordinate Issuing CA
  6. Perform the post-installation configuration on the subordinate issuing CA
  7. Install and configure the online responder
  8. Verify the MSPKI hierarchy health

Activity 1. Active Directory Forest

Task 1: Install a new forest by using Server Manager

To install the EncryptionConsulting.com forest:

  1. Go to Portal.azure.com and Log onto DC01 as DC01\Administrator.
  2. Open Server Manager. Select Start, click Administrative Tools and then click Server Manager.
  3. In the console tree, right-click Manage and then click Add Roles & Features
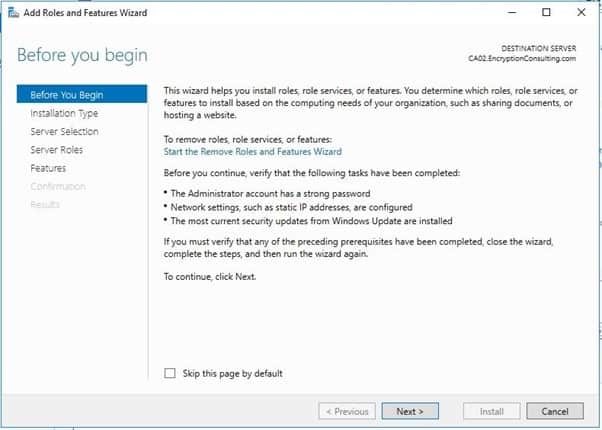
  4. On the Before You Begin page, click Next.
  5. On the Select Installation Type, click Role-Based or Feature-Based installation
  6. On Server Selection, select a server from the server pool and click on Then click Next
  7. On the Select Server Roles page, select Active Directory Domain Services. Click Next.
    1. If prompted by the Add Roles Wizard, click Add Required Features and then click Next.
  8. On the Features page, click next.
  9. On the Active Directory Domain Services page, click Next.
  10. On the Confirm Installation Selections page, click Install.
  11. When completed, click the hyperlink to Promote this server to a domain controller
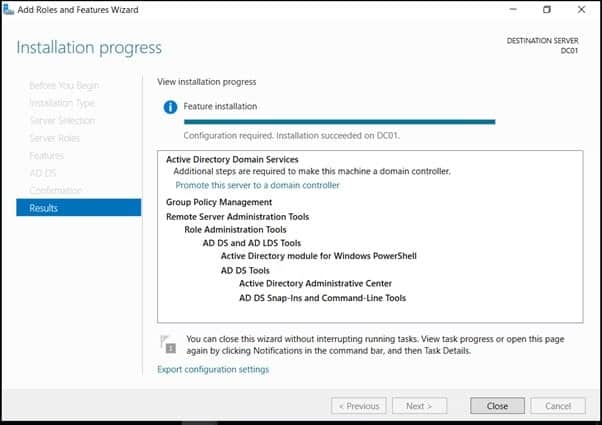
click Promote this server
  1. On the Welcome to the Active Directory Domain Services Installation Wizard page, click Next.
  2. On the Deployment Configuration page, select Add a new forest, Specify Forest Root Domain page, in FQDN of the forest root domain, type EncryptionConsulting.com, and then click Next.
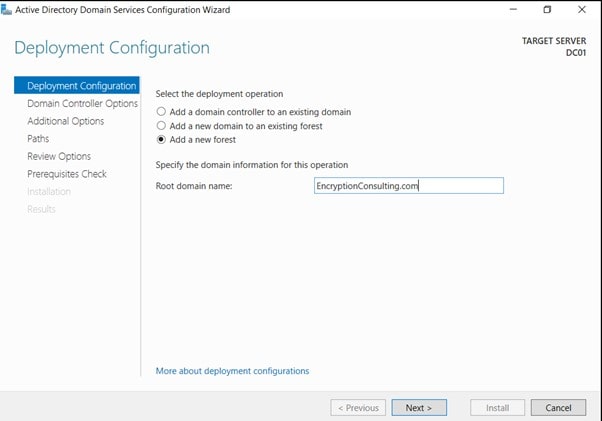
Deployment Configuration
  1. On the Set Forest Functional Level page, in the Forest functional level drop-down menu, select Windows Server 2016 and then click Next
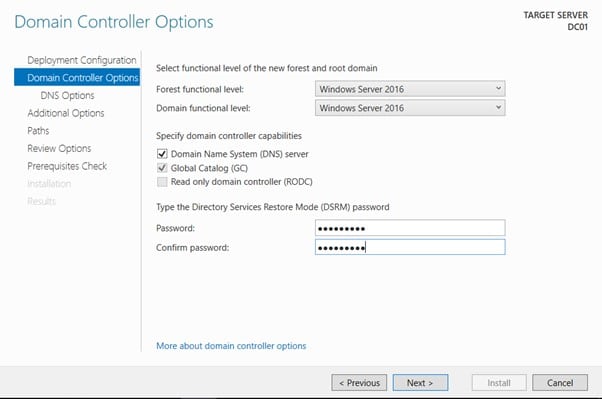
Set Forest Functional Level

On the Directory Services Restore Mode Administrator Password page, type and confirm the restore mode password, and then click Next. This password must be used to start AD DS in Directory Service Restore Mode for tasks that must be performed offline.

DNS server is selected by default so that your forest DNS infrastructure can be created during AD DS installation. In our scenario we are going to use Active Directory–integrated DNS so we have selected to install DNS

  1. On the Additional Options page, click Next.
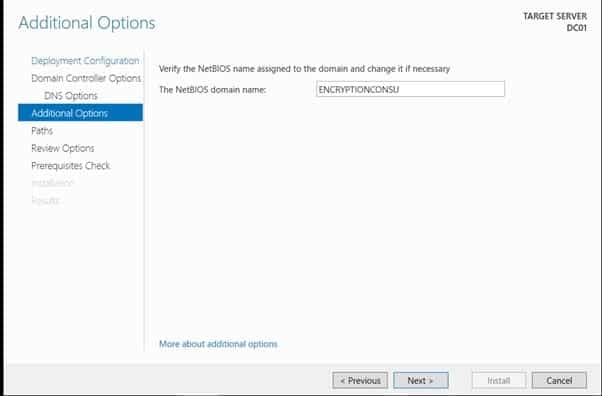
Additional Options page

If no static IP address is assigned for the network adapter, a warning message appears advising you to set static addresses.

The wizard displays a message indicating that it cannot create a delegation for the DNS server. Click Yes to continue.

Enterprise PKI Services

Get complete end-to-end consultation support for all your PKI requirements!

  1. On the Location for Database, Log Files, and SYSVOL page, click Next.
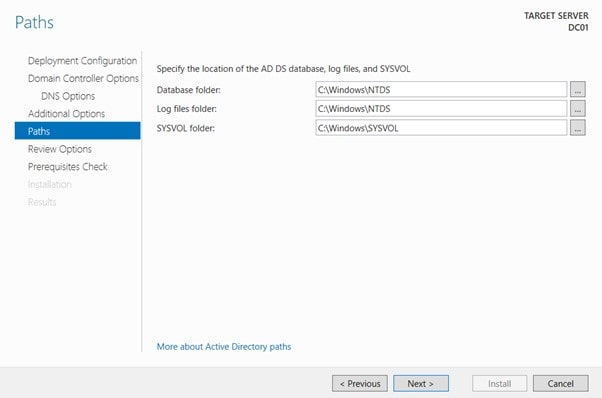
Location for Database, Log Files, and SYSVOL page
  1. On the Prerequisites Check page, review your selections and click install Active Directory Domain Services.
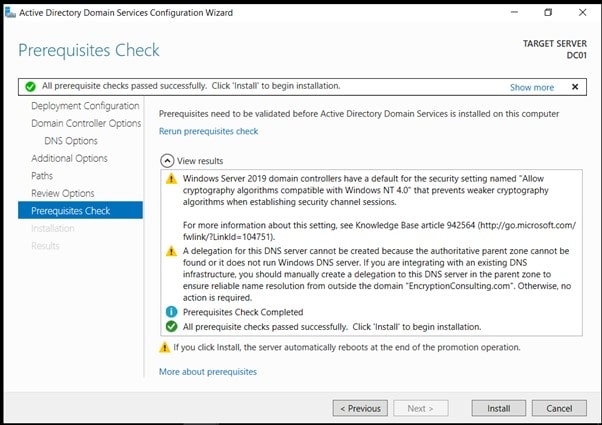
Prerequisites Check page
  1. Wait for some time until the installation completes and the system restarts.

NOTE: If you are using Active Directory-integrated DNS, the IP address for the Preferred DNS server for the first domain controller in the forest is automatically set to the loopback address of 127.0.0.1. This helps assure that the IP address of the first domain controller will be resolved in DNS even if the static IP address of the server is changed. If you prefer to configure the actual IP address of the DNS server rather than the loopback address, then replace it with 192.168.1.10 after the restart.

Task 2 : HTTP Web Server: CDP and AIA Publication

  1. Log on to SRV1 as the local administrator.
  2. Click Start, type sysdm.cpl, and press ENTER. Click Change.
  3. In Member of, select Domain, and then type EncryptionConsulting.com Click OK.
  4. In Windows Security, enter the User name and password for the domain administrator account. Click OK.
  5. You should be welcomed to the Encryption Consulting domain Click OK.
  6. When prompted that a restart is required, click OK. Click Close. Click Restart Now.
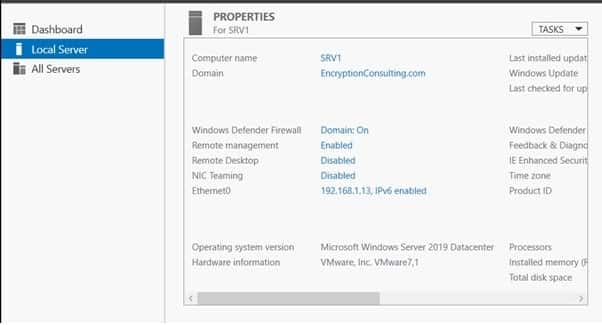
Active Directory local server

Task 3 : Install Web Server (IIS) Role

  1. Log on to EncryptionConsulting.com as Encryptionconsu\Administrator. (Ensure that you switch user to log on as Encryptionconsu\Administrator)
  2. Open Server Manager.
  3. Right-click on Roles and then select Add Roles.
  4. On the Before You Begin page select Next.
  5. On the Select Installation Type page, select Role-based or feature-based installation
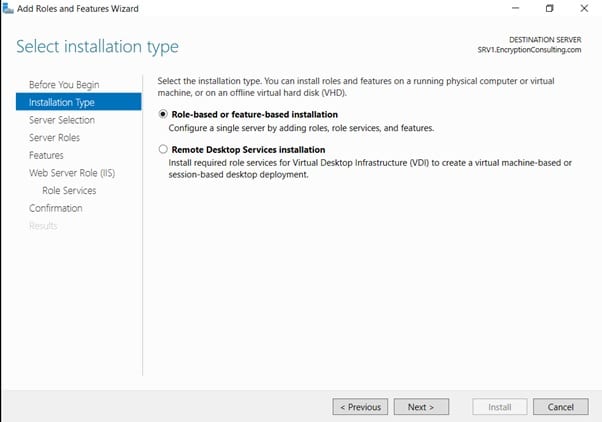
Select Installation Type page
  1. On Select Destination Server, select a server from the server pool and click on EncryptionConsulting.com, then click Next
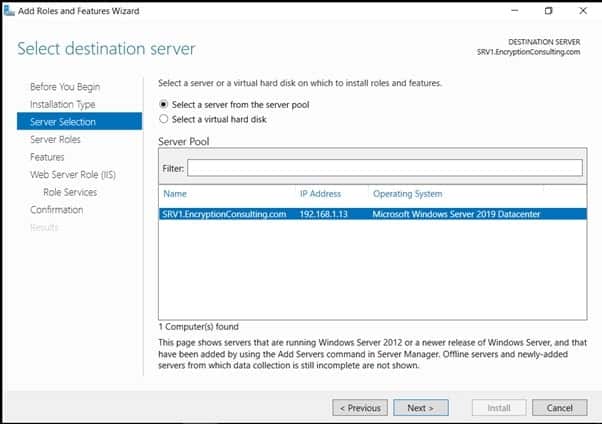
Select Destination Server
  1. On the Select Server Roles page select Web Server (IIS) and then click Next
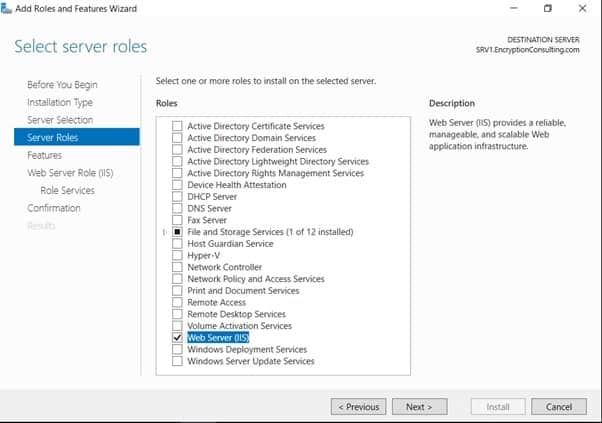
select Web Server (IIS)
  1. On the Select features page, click next
  2. On the Web Server (IIS) page, click Next
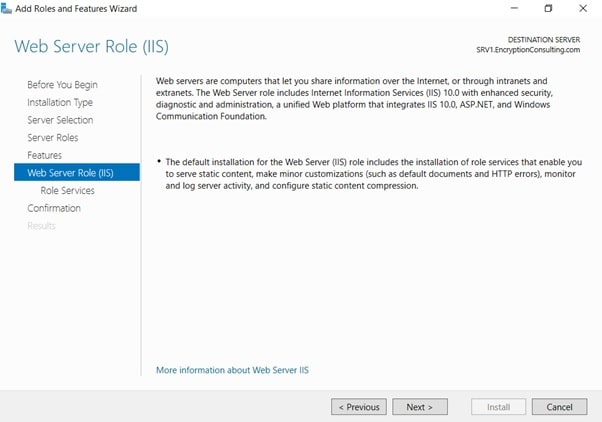
next on Web Server (IIS)
  1. Leave the defaults on the Select Role Services page and then click Next.
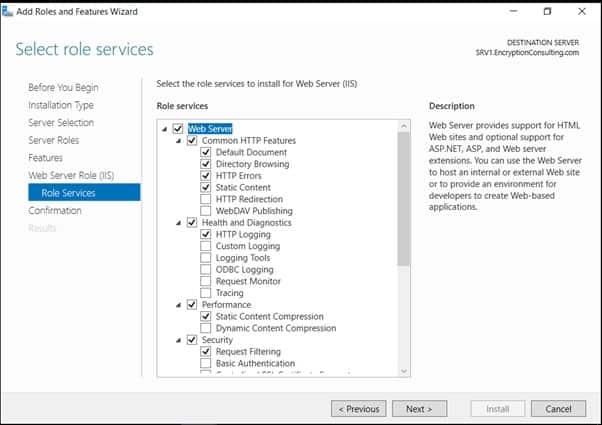
Select Role Services page
  1. On Confirm Installation Selections page, click Install.
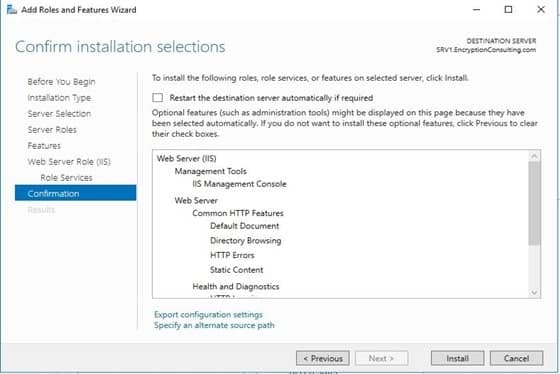
Confirm Installation Selections page
  1. On the Installation Results page, click Close
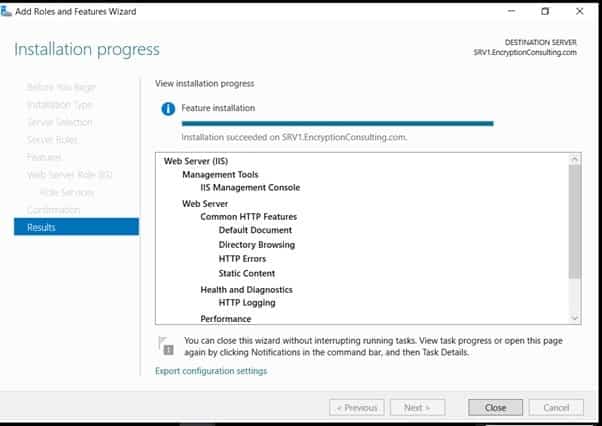
Installation Results page

Task 5 : Create CertEnroll Folder and grant Share & NTFS Permissions to Cert Publishers group

Your task is to share and configure the Share and NTFS permissions for the CertEnroll folder.

  1. Log onto EncryptionConsulting.com as Encryptionconsu\Administrator.
  2. Click Start and select Computer to open Windows Explorer and then go to C: drive
  3. Create a folder called CertEnroll at the root of C: drive
  4. Right-click on the CertEnroll folder and select Properties.
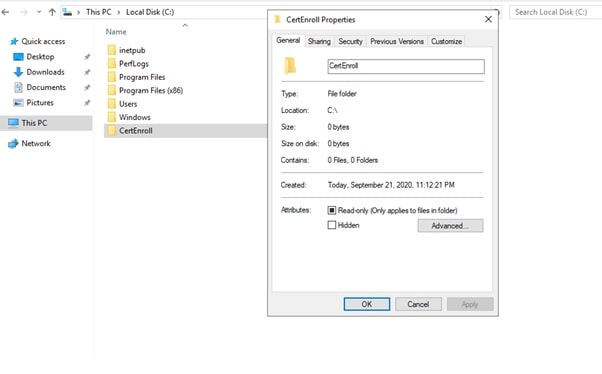
  1. On the CertEnroll Properties page select Sharing tab to configure share permissions.
  2. Click on the Advanced Sharing option and then select Share this folder.
  3. Click on Permissions and then click Add.
  4. On Select Users or Groups page, in the Enter, the object names to select, type Encryptionconsu\Cert Publishers, and then click
  5. On the Permissions for CertEnroll dialog box, select Cert Publishers group and then in the Allow column select Change permission. Click OK twice to go back to the CertEnroll Properties page.
  6. Select the Security tab and click Edit to configure NTFS permissions.
  7. On Permissions for CertEnroll page click Add.Windows
  8. On Select Users or Groups page, under the Enter the object names to select, enter Encryptionconsu\Cert Publishers, and then click OK.
  9. On the Permissions for CertEnroll page highlight, the Cert Publishers group, and then under the Allow column select Modify permission Click OK.
Cert Enroll Properties Cert Publishers
  1. On the CertEnroll Properties page, click OK.

Task 6 : Create CertEnroll Virtual Directory in IIS

  1. Ensure you are logged on to EncryptionConsulting.com as Encryptionconsu\Administrator.
  2. Click StartAdministrative Tools, and then select Internet Information Services (IIS) Manager.
  3. On the Connections, expand SRV1 and then expand Sites.
  4. Right-click on Default Web Site and select Add Virtual Directory.
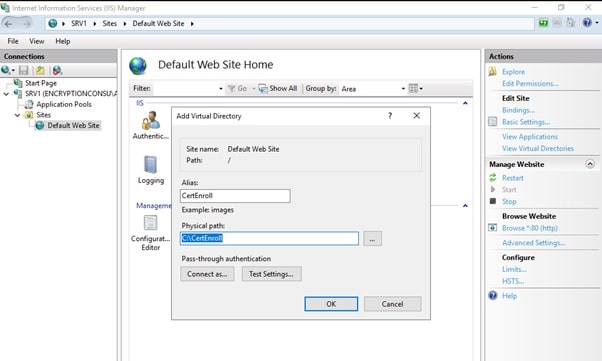
  5. On Add Virtual Directory page, in Alias, type CertEnroll. In the Physical path, type C:\Certenroll, and then click OK.
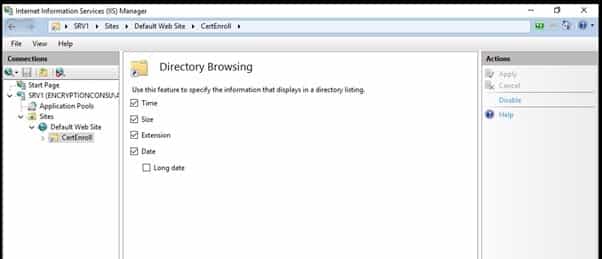
  1. In the Connections pane, under the Default Web Site, ensure the CertEnroll virtual directory is selected.
  2. In the CertEnroll Home pane, double-click on Directory Browsing.
  3. In the Actions pane click Enable.

Task 7: Enable Double Escaping on IIS Server

Allowing double escaping makes it possible for the webserver to host Delta CRLs.

  1. Ensure you are logged on to EncryptionConsulting.com as Encryptionconsu\Administrator.
  2. Open a Command Prompt. To do so, click Start, click Run, and then type cmd. Click OK.
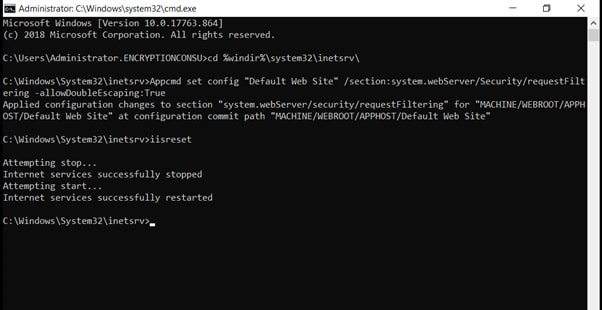
  3. Then type cd %windir%\system32\inetsrv\  and press ENTER.
  4. Type the following command and press Enter.

    Appcmd set config “Default Web Site” /section:system.webServer/Security/requestFiltering -allowDoubleEscaping:True

  5. Restart IIS service. To do so, type iisreset and press ENTER.
iisreset

Task 8: Create CNAME (pki.EncryptionConsulting.com) in DNS

  1. Ensure that you are logged on to EncryptionConsulting.com as Encryptionconsu\Administrator.
  2. Open the DNS Console. You can do so by clicking Start, click Run, and then type dnsmgmt.msc. Click OK.
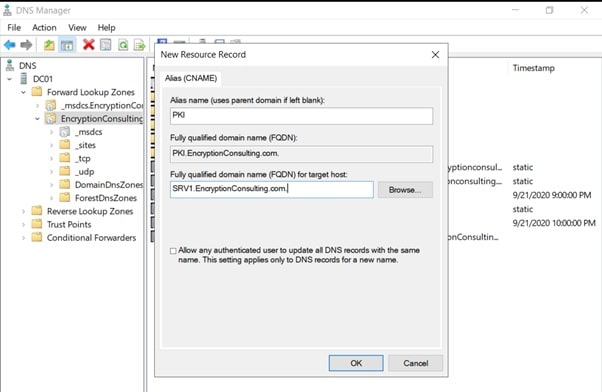
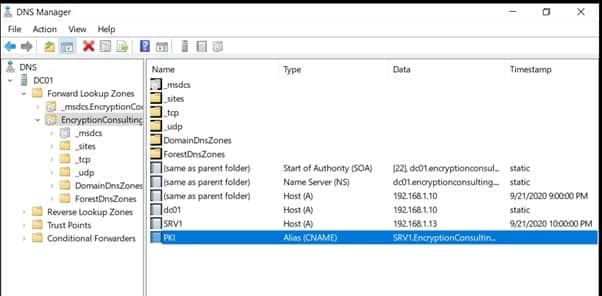
  3. Expand Forward Lookup Zones, select and then right-click EncryptionConsulting.com zone. Click New Alias (CNAME).
  4. In Alias name (uses parent domain if left blank), type PKI. In the Fully qualified domain name (FQDN) for the target host field, type EncryptionConsulting.com. and then click OK.

Note – Include the terminating “.” in the FQDN in the previous step. In a production environment, this alias can resolve to a load balancer that distributes requests to any number of web servers that contain the CA certificates and CRLs.
Activity 2: Install the Standalone Offline Root CA

The standalone offline root CA should not be installed in the domain. As a matter of fact, it should not even be connected to a network at all.

Task 1: Create a CAPolicy.inf for the standalone offline root CA

To create a CAPolicy.inf for the standalone offline root CA:

  1. Log onto CA01 as CA01\Administrator.
  2. Click Start, click Run, and then type notepad C:\Windows\CAPolicy.inf and press ENTER.
  3. When prompted to create a new file, click Yes.
  4. Type in the following as contents of the file.

    [Version]
    Signature="$Windows NT$"
    [Certsrv_Server]
    RenewalKeyLength=2048 ; recommended 4096
    RenewalValidityPeriod=Years
    RenewalValidityPeriodUnits=20
    AlternateSignatureAlgorithm=0
    

Click File and Save to save the CAPolicy.inf file under C:\Windows directory.

Warning CAPolicy.inf with the .inf extension. Type .inf at the end of the file name and select the options as described, the file will be saved as a text file and will not be used during CA installation.

  1. Close Notepad.

NOTE: Make sure you change the computer name as “CA01”. Windows > Run > sysdm.cpl > Change the computer name and restart the machine.

Task 2: Installing the Standalone Offline Root CA

To install the standalone offline root CA:

  1. Log onto CA01 as CA01\Administrator.
  2. Click Start, click Administrative Tools, and then click Server Manager.
  3. Right-click on Roles and then click Add Roles.
  4. On the Before You Begin page click Next.
  5. On the Installation Type page, choose Role-based or Featured based installation, and then click Next.
  6. On the server selection page, click next.
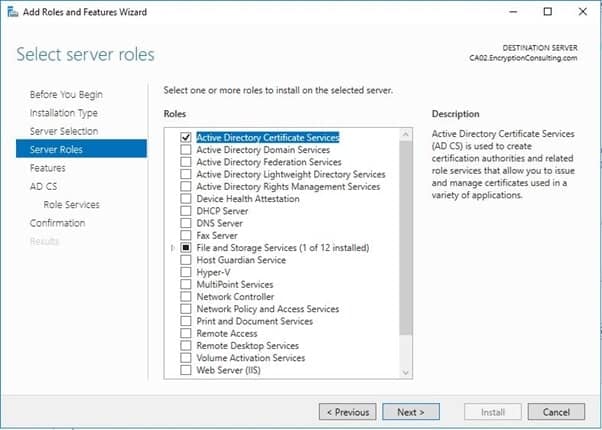
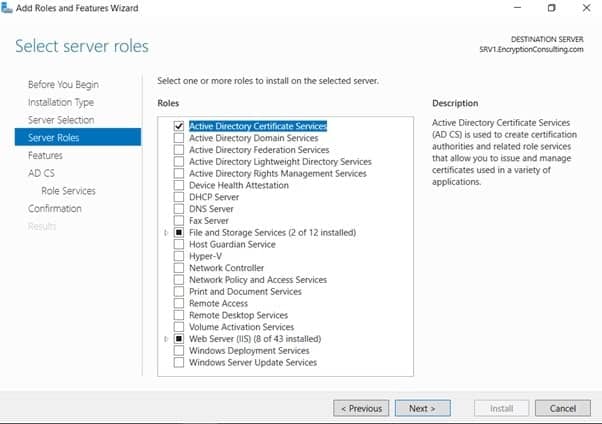
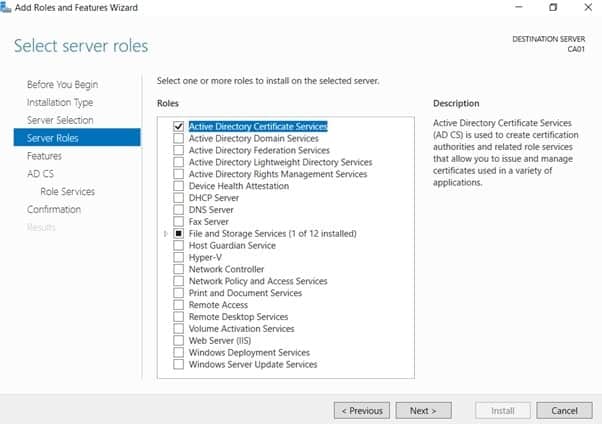
  7. On the Select Server Roles page select Active Directory Certificate Services, and then click Next.
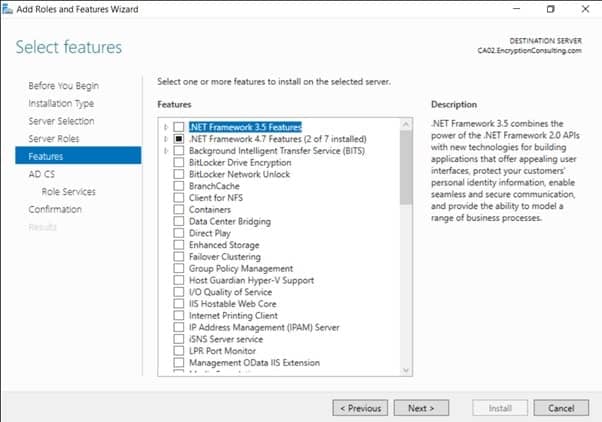
  1. On the select features page, click next.
  2. On the Introduction to Active Directory Certificate Services page, click Next.
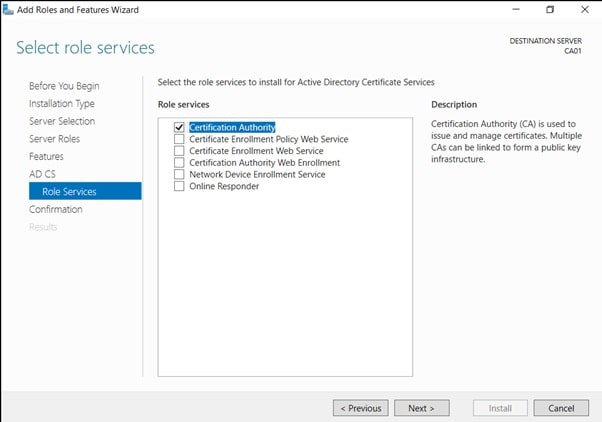
  3. On the Select Role Services page, ensure that Certification Authority is selected, and then Next.
  1. On the confirmation page, click install
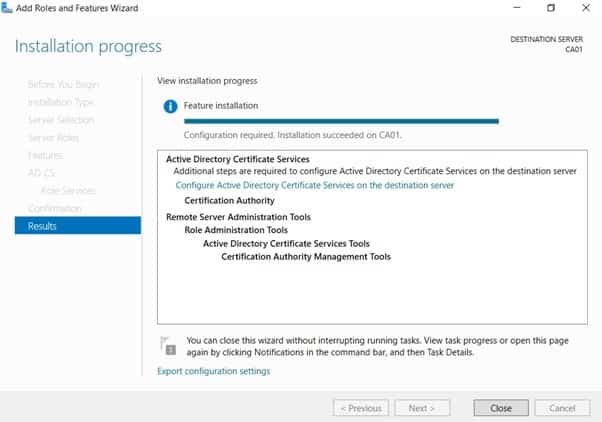
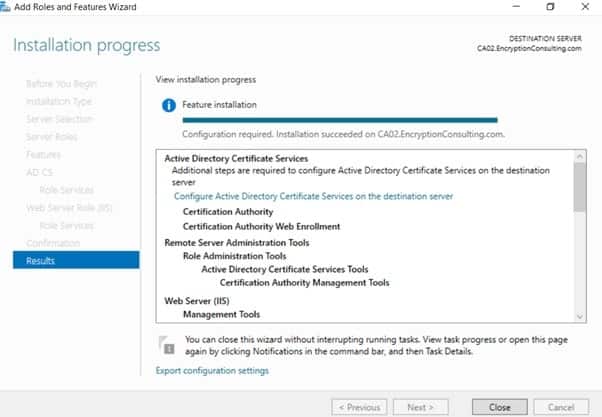
  1. Click on configure “Active Directory Certificate Services on the destination server”.
  2. On the Specify Credential to configure roles and services page, the credential should be CA01\Administrator, then click Next.
  3. On the Select Role, services to configure page, choose Certificate Authority, and then click Next.
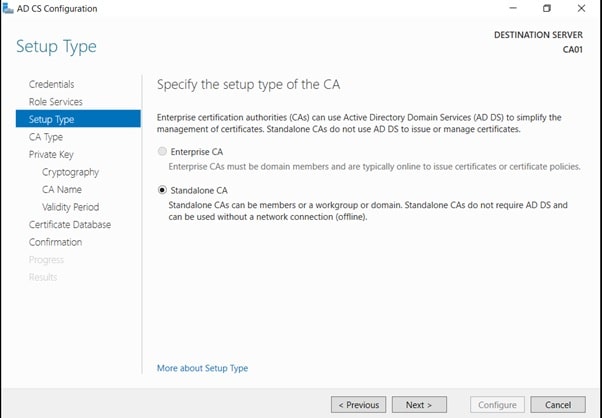
  4. On the Specify Setup Type page, ensure that Standalone is selected, and then click Next.
    • Note: Enterprise option is greyed out as CA01 server is not joined to Active Directory domain.
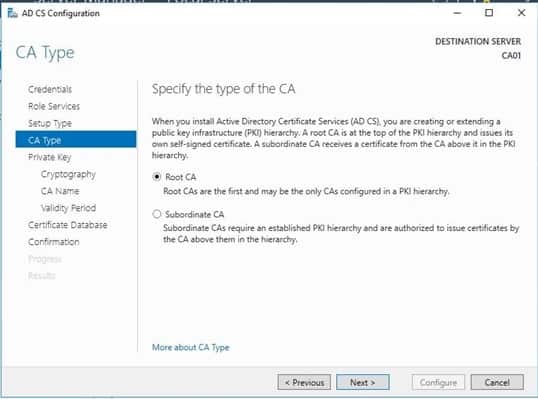
  1. On the Specify CA Type page, ensure that Root CA is selected, and then click Next.
  1. On the Set Up Private Key page, ensure that Create a new private key is selected, and then click Next.
  1. Leave the defaults on the Configure Cryptography for CA page, and then click Next.
    • Important: In a production environment, you would set the CSP, Hash Algorithm, and Key length to meet application compatibility requirements.
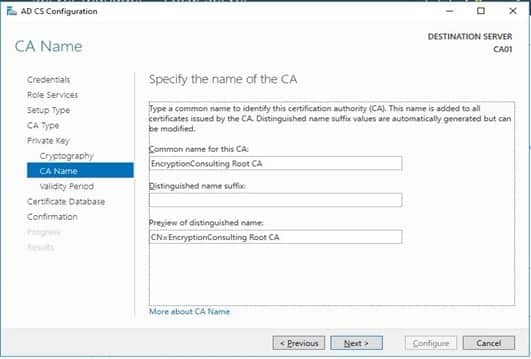
  1. On Configure CA Name page, under the Common name for this CA, clear the existing entry and type EncryptionConsulting Root CA. Click Next.
    • Note: A Distinguished Name Suffix is optional for a root CA. This will be configured in a later step.
ADCS CA Name
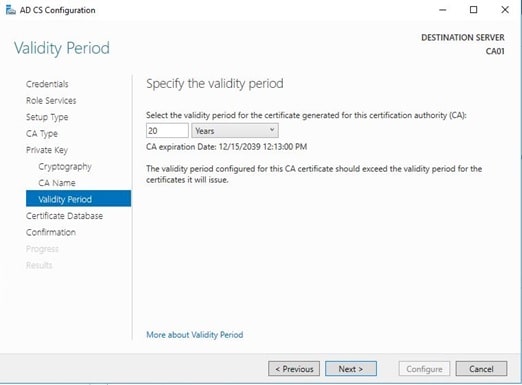
  1. On the Set Validity Period page, under Select validity period for the certificate generated for this CA, clear the existing entry and then type 20. Leave the selection box set to Years. Click Next.
  1. Keep the default settings on the Configure Certificate Database page, and then click Next.
ADSC Configuration CA Database
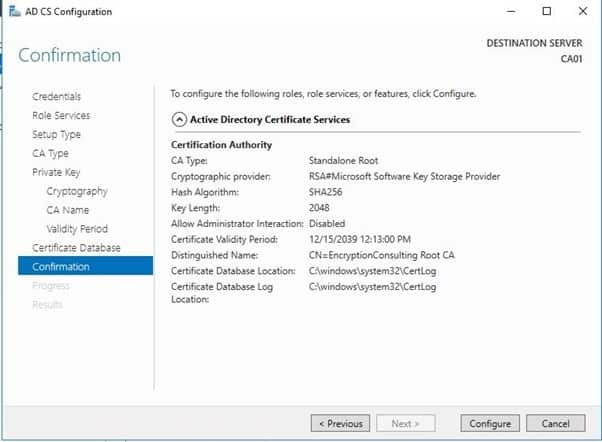
  1. On the Confirm Installation Selections page, review the settings, and then click Configure.
  1. Review the information on the Installation Results page to verify that the installation is successful and then click Close.

Activity 3: Perform Post Installation Configuration for Root CA

  1. Ensure that you are logged on to CA01 as CA01\Administrator.
  2. Open a command prompt. To do so, you can click Start, click Run, type cmd and then click OK.
  3. To define the Active Directory Configuration Partition Distinguished Name, run the following command from an administrative command prompt:
    • Certutil -setreg CA\DSConfigDN “CN=Configuration,DC=EncryptionConsulting,DC=com”
  4. To define CRL Period Units  and CRL Periods, run the following commands from an administrative command prompt:
    • Certutil -setreg CA\CRLPeriodUnits 52
    • Certutil -setreg CA\CRLPeriod “Weeks”
    • Certutil -setreg CA\CRLDeltaPeriodUnits 0
  5. To define CRL Overlap Period Units and CRL Overlap Period, run the following commands from an administrative command prompt:
    • Certutil -setreg CA\CRLOverlapPeriodUnits 12
    • Certutil -setreg CA\CRLOverlapPeriod “Hours”
  6. To define Validity Period Units for all issued certificates by this CA, type the following command and then press Enter. In this lab, the Enterprise Issuing CA should receive a 10-year lifetime for its CA certificate. To configure this, run the following commands from an administrative command prompt:
    • Certutil -setreg CA\ValidityPeriodUnits 10
    • Certutil -setreg CA\ValidityPeriod “Years”

Task 1: Enable Auditing on the Root CA

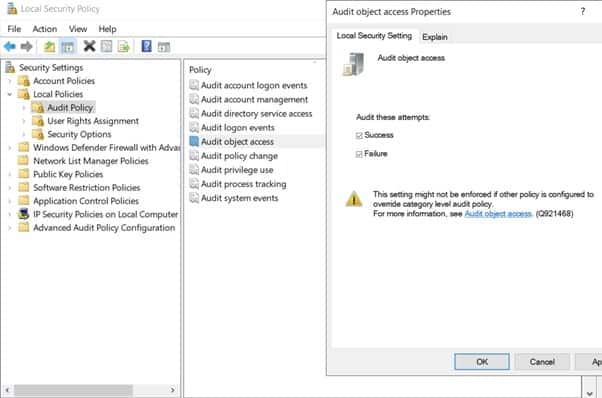
CA auditing depends on system Audit Object Access to be enabled. The following instructions describe how to use the Local Security Policy to enable object access auditing.

  1. Click Start, click Administrative Tools, and then select Local Security Policy.
  2. Expand Local Policies and then select Audit Policy.
  3. Double click Audit Object Access and then select Success and Failure then click OK.
  1. Close Local Security Policy editor.
  2. Enable auditing for the CA by selecting which group of events to audit in the Certificate Authority MMC snap-in or by configuring the AuditFilter registry key setting. To configure Auditing for all CA related events, run the following command from an administrative command prompt:

    Certutil -setreg CA\AuditFilter 127

Task 2: Configure the AIA and CDP

There are multiple different methods for configuring the Authority Information Access (AIA) and certificate revocation list distribution point (CDP) locations. You can use the user interface (in the Properties of the CA object), certutil, or directly edit the registry. The AIA is used to point to the public key for the windows server certification authority (CA). The CDP is where the certificate revocation list is maintained, which allows client computers to determine if a certificate has been revoked. In this lab there will be three locations for the AIA and four locations for the CDP.

Enterprise PKI Services

Get complete end-to-end consultation support for all your PKI requirements!

Task 3: Configure the AIA

Using a certutil command is a quick and common method for configuring the AIA. When you run the following certutil command, you will be configuring a static file system location, a lightweight directory access path (LDAP) location, and HTTP location for the AIA. The certutil command to set the AIA modifies the registry, so ensure that you run the command from a command prompt run as Administrator. Run the following command:

certutil -setreg CA\CACertPublicationURLs “1:C:\Windows\system32\CertSrv\CertEnroll\%1_%3%4.crt\n2:ldap:///CN=%7,CN=AIA,CN=Public Key Services,CN=Services,%6%11\n2:http://pki.EncryptionConsulting.com/CertEnroll/%1_%3%4.crt”

After you have run that command, run the following command to confirm your settings:

certutil -getreg CA\CACertPublicationURLs

If you look in the registry, under the following path: HKEY_LOCAL_MACHINE\System\CurrentControlSet\Services\CertSvc\Configuration\EncryptionConsulting Root CA, you can confirm the CACertPublicationURLs by opening that REG_MULTI_SZ value. You should see the following:

  1. C:\Windows\system32\CertSrv\CertEnroll\%1_%3%4.crt
  2. ldap:///CN=%7,CN=AIA,CN=Public Key Services,CN=Services,%6%11
  3. http://pki.EncryptionConsulting.com/CertEnroll/%1_%3%4.crt

You can also see this in the CA (certsrv) console. To open the console, click Start, click Administrative Tools, and then click Certification Authority. In the navigation pane, expand the Certificate Authority (Local). Right-click EncryptionConsulting Root CA and then click Properties. On the Extensions tab, under Select extension, click Authority Information Access (AIA) and you will see the graphical representation of the AIA settings.

Task 4: Configure the CDP

The certutil command to set the CDP modifies the registry, so ensure that you run the command from an command

certutil -setreg CA\CRLPublicationURLs “1:C:\Windows\system32\CertSrv\CertEnroll\%3%8%9.crl\n10:ldap:///CN=%7%8,CN=%2,CN=CDP,CN=Public Key Services,CN=Services,%6%10\n2:http://pki.EncryptionConsulting.com/CertEnroll/%3%8%9.crl”

After you run that command, run the following certutil command to verify your settings:

certutil -getreg CA\CRLPublicationURLs

In the registry location:  HKEY_LOCAL_MACHINE\SYSTEM\CurrentControlSet\Services\CertSvc\Configuration\EncryptionConsulting Root CA  you can open the REG_MULTI_SZ value and see the configuration of these values:

  1. C:\Windows\system32\CertSrv\CertEnroll\%3%8%9.crl

    10:ldap:///CN=%7%8,CN=%2,CN=CDP,CN=Public Key Services,CN=Services,%6%10

  2. http://pki.EncryptionConsulting.com/CertEnroll/%3%8%9.crl

You can also see this in the CA (certsrv) console. To open the console, click Start, click Administrative Tools, and then click Certification Authority. In the navigation pane, ensure that Certificate Authority (Local) is expanded. Right-click EncryptionConsultng Root CA and then click Properties. On the Extensions tab, under Select extension, click CRL Distribution Point (CDP) and you will see the graphical representation of the CDP settings.

At an administrative command prompt, run the following commands to restart Active Directory Certificate Services and to publish the CRL

net stop certsvc

net start certsvc

certutil -crl

Activity 4: Install Enterprise Issuing CA

Task 1: Join CA02 to the domain

To join CA02 to the domain:

  1. Log on to CA02 as the local administrator.
  2. Click Start, type sysdm.cpl, and press ENTER. Click Change.
  3. In the Computer name, type CA02 and then click OK.
  4. When prompted that you need to restart the computer, click OK. Click Close. Click Restart Now.
  5. After CA02 restarts, log on as a local administrator.
  6. Click Start, type sysdm.cpl, and press ENTER. Click Change.
  7. In Member of, select Domain, and then type EncryptionConsulting.com. Click OK.
  8. In Windows Security, enter the User name and password for the domain administrator account. Click OK.
  9. You should be welcomed to the EncryptionConsulting domain. Click OK.
  10. When prompted that a restart is required, click OK. Click Close. Click Restart Now.

Task 2: Create CAPolicy.inf for Enterprise Issuing CA

  1. Log onto EncryptionConsulting.com as ENCRYPTIONCONSU\Administrator. (Ensure that you switch user to log on as ENCRYPTIONCONSU\Administrator)
  2. Click Start, select Run, and then type notepad C:\Windows\CAPolicy.inf and press ENTER.
  3. When prompted to create a new file, click Yes.
  4. Type in the following as the content of the file.

    [Version]
    Signature="$Windows NT$"
    [PolicyStatementExtension]
    Policies=InternalPolicy
    [InternalPolicy]
    OID= 1.2.3.4.1455.67.89.5
    URL=http://pki.EncryptionConsulting.com/cps.txt
    [Certsrv_Server]
    RenewalKeyLength=2048
    RenewalValidityPeriod=Years
    RenewalValidityPeriodUnits=10
    LoadDefaultTemplates=0
    AlternateSignatureAlgorithm=0
    
  5. Click File and Save to save the CAPolicy.inf file under C:\Windows directory

    Important: Ensure that the CAPolicy.inf is saved as a .inf file. The file will not be used if it is saved with any other file extension.

  6. Close Notepad

Task 3: Publish the Root CA Certificate and CRL

  1. Ensure you are logged on to CA02. EncryptionConsulting.com as EncryptionConsulting\Administrator.
  2. Copy Root CA Certificate (CA01_EncryptionConsulting Root CA.crt) and Root CA CRL (EncryptionConsulting Root CA.crl) files from C:\Windows\System32\CertSrv\CertEnroll directory on CA01 internal server to removable media (A:).
  3. On CA02, to publish EncryptionConsulting Root CA Certificate and CRL in Active Directory, run the following commands at an administrative command prompt. Ensure that you substitute the correct drive letter of your removable media (for A:) in the commands that follow:

    certutil -f -dspublish “A:\CA01_EncryptionConsulting Root CA.crt” RootCA

    certutil -f -dspublish “A:\EncryptionConsulting Root CA.crl” CA01

  4. To publish EncryptionConsulting Root CA Certificate and CRL to http://pki. EncryptionConsulting.com/CertEnroll, copy EncryptionConsulting Root CA Certificate and CRL to \\srv1. EncryptionConsulting.com\C$\CertEnroll directory. Run the following commands from an administrative command prompt. Ensure that you substitute the correct drive letter of your removable media (for A:)

    copy “C:\CA01_EncryptionConsulting Root CA.crt” \\SRV1.EncryptionConsulting.com\C$\CertEnroll\

    copy “C:\EncryptionConsulting Root CA.crl” \\SRV1.EncryptionConsulting.com\C$\CertEnroll\

  5. To add EncryptionConsulting Root CA Certificate and CRL in CA02. com local store, run the following command from an administrative command prompt. Ensure that you substitute the correct drive letter of your removable media (for A:) in the commands that follow:

    • certutil -addstore -f root “A:\CA01_ EncryptionConsulting Root CA.crt”
    • certutil -addstore -f root “A:\EncryptionConsulting CA.crl”

Activity 5: Install Subordinate Issuing CA

Subordinate issuing CA on CA02. EncryptionConsulting com

  1. Ensure that you are logged on to CA02. EncryptionConsulting.com as EncryptionConsulting\ Administrator.
  2. Open Server Manager.
  3. Right-click Roles and then select Add Roles.
  4. On the Before You Begin page select Next.
Install Subordinate Issuing CA
  1. On the Installation Type page, choose Role-based or Featured based installation, and then click Next
  2. On the server selection page, click
  3. On the Select Server Roles page select Active Directory Certificate Services, and then click Next.
  1. On the Select features page, click Next.
  1. On the Introduction to Active Directory Certificate Services page, click Next.
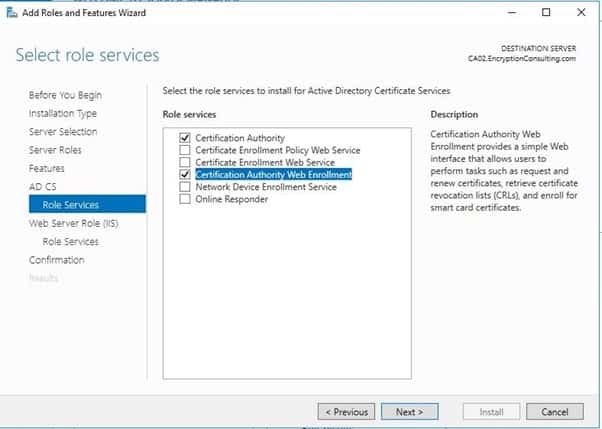
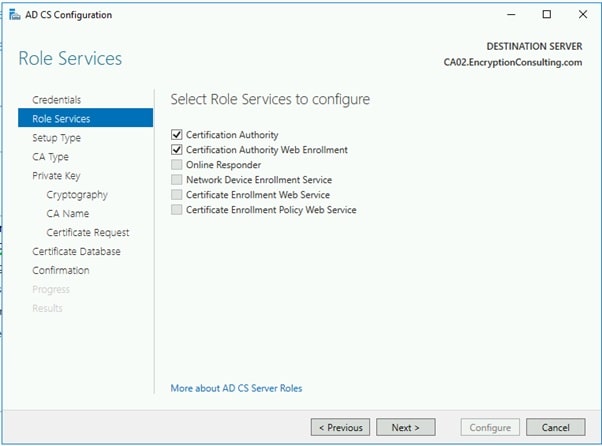
  1. On the Select Role Services page, select Certification Authority and Certification Authority Web Enrollment. If you see the Add Roles Wizard, click Add Required Role Services. Click Next.
  1. On the Web Server Role IIS page, click Next.
  2. Leave the Role Services as default and click Next.
  3. On the confirmation page, review the details and click Install.
  1. Click on “configure Active Directory Certificate Services on the destination server”.
  2. On the Specify Credential to configure roles and services page, the credential should be Encryptionconsu\Administrator, then click Next.
  3. On the Select Role services to configure page, select Certificate Authority and Certificate Authority Web Enrollment then click Next.
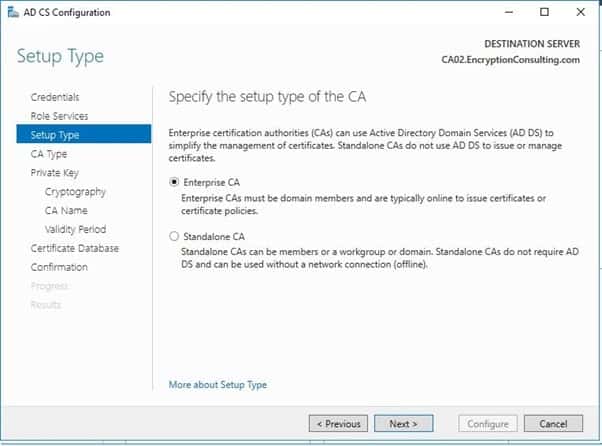
  1. On the Specify Setup Type page, ensure that Enterprise is selected, and then click Next.
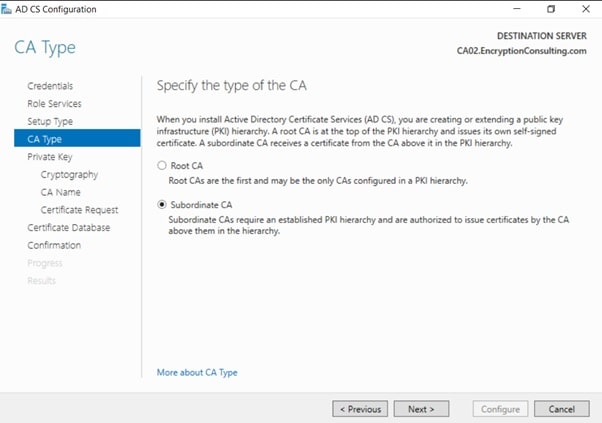
  1. On the Specify CA Type page, select Subordinate CA and then click Next
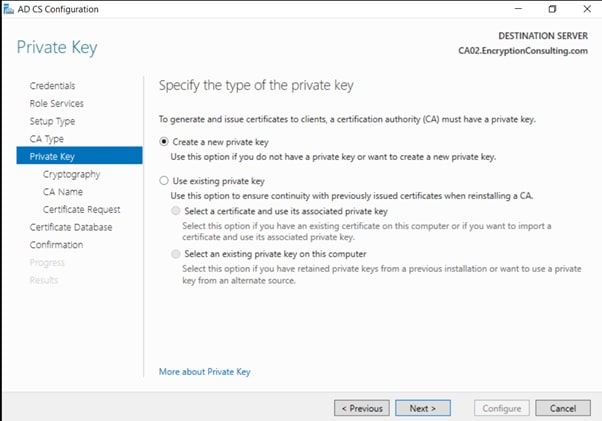
  1. On the Set Up Private Key page, ensure that Create a new private key is selected, and then click Next.
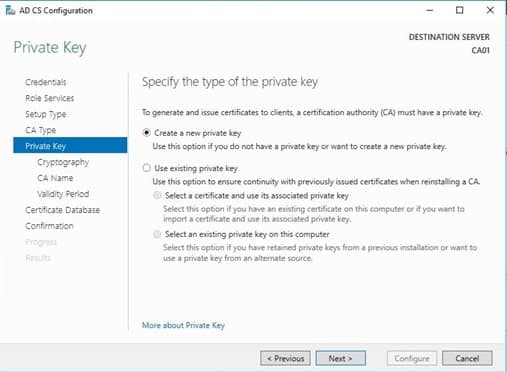
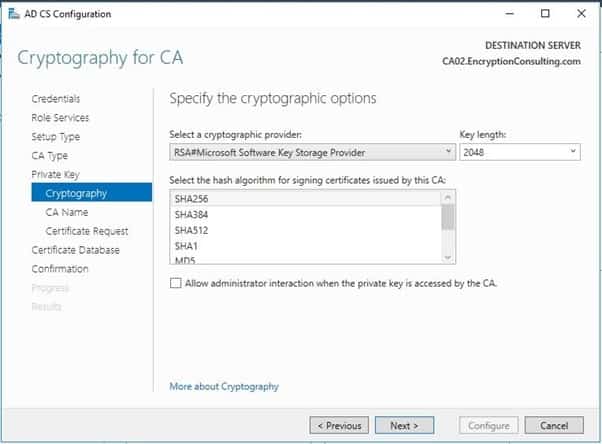
  1. Leave the defaults on the Configure Cryptography for CA page, then click Next.
    Important: When installing in a production environment, the CSP, Hash Algorithm and Key length selected must support application compatibility requirements.
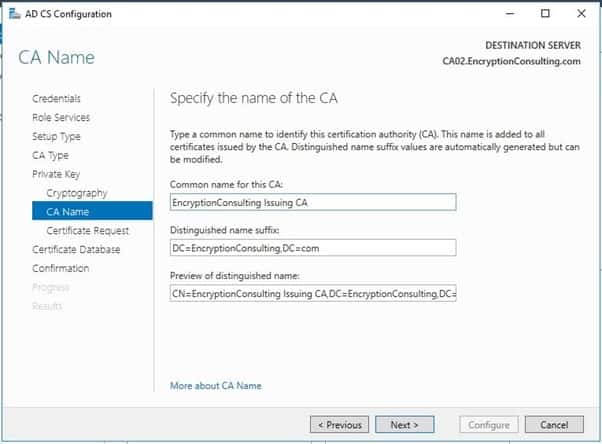
  1. On Configure CA Name page, clear the existing entry for the Common name for this CA box, and enter EncryptionConsulting Issuing CA, then select Next.

    Note – Distinguished Name Suffix is automatically populated and should not be modified.

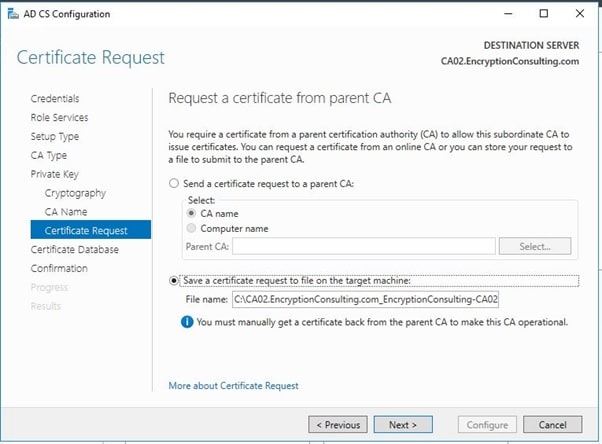
  1. On the Request certificate from a parent CA page, select Save a certificate request to file on the target machine option then click Next.
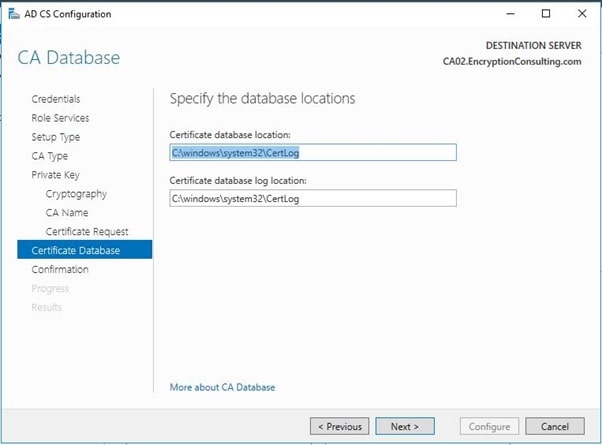
  1. Leave the defaults on the Configure Certificate Database page, and then click Next.
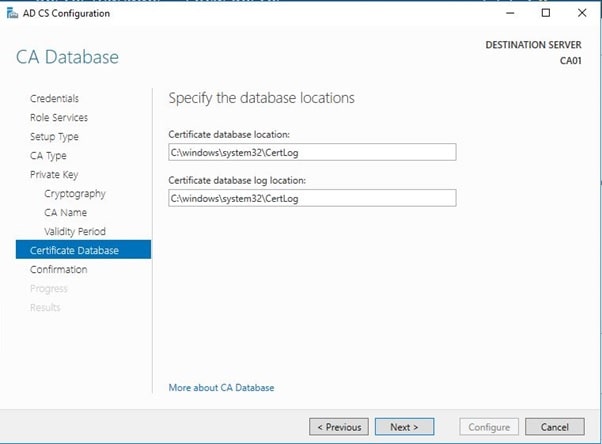
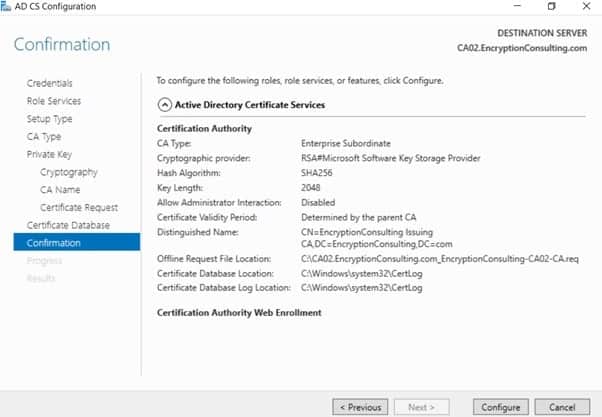
  1. On the Confirm Installation Selections page, click configure.
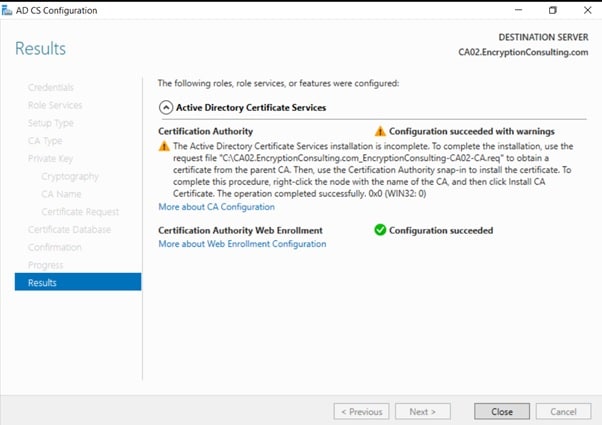
  1. Review the information on the Installation Results page to verify that the installation is successful and then click Close.
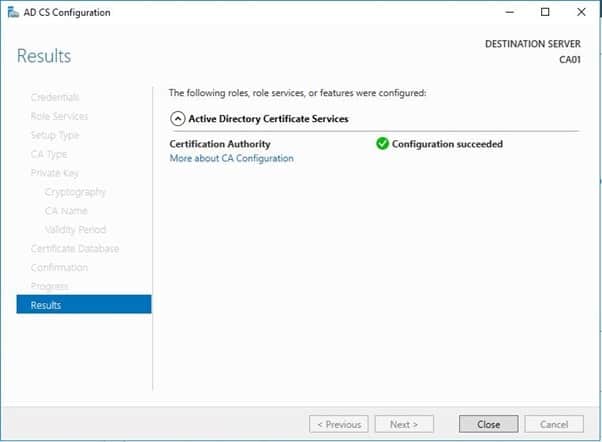
    • The following warning message is expected: “The Active Directory Certificate Services installation is incomplete. To complete the installation, use the requested file “C:CA02.EncryptionConsulting.com_EncryptionConsulting-CA02-CA.req” to obtain a certificate from the parent CA. Then, use the windows server Certification Authority snap-in to install the certificate. To complete this procedure, right-click the node with the name of the CA, and then click Install CA Certificate. The operation was completed successfully. 0x0 (WIN32: 0).”
  1. Copy C:\ CA02.EncryptionConsulting.com_EncryptionConsulting-CA02-CA.req to your removable media. For example, if you want to copy to a floppy disk drive using the drive letter A:, you would run the following command from a command prompt:

    • copy “C:\CA02.EncryptionConsulting.com_EncryptionConsulting-CA02-CA.req” A:\

Task 1: Submit the Request and Issue Encryption Consulting Issuing CA Certificate

To submit the certificate request and issue the requested certificate:

  1. Ensure that you are logged on to CA01 as CA01\Administrator. Place the removable media with the certificate request into CA01.
  2. On CA01, open an administrative command prompt. Then, submit the request using the following command (assuming that A: is your removable media drive letter):
    • certreq -submit “A:CA02.EncryptionConsulting.com_EncryptionConsulting-CA02-CA.req”
    • Note: Pay attention to the RequestID number that is displayed after you submit the request. You will use this number when retrieving the certificate.
  3. In the Certification Authority List dialog box, ensure that EncryptionConsulting Root CA is selected and then click OK
  4. Open the Certification Authority console. To do so, click Start, click Administrative Tools, and click Certification Authority.
  5. In the certsrv [Certification Authority (Local)] dialog box, in the console tree, expand EncryptionConsulting Root CA.
  6. Click Pending Requests. In the details pane, right-click the request you just submitted, click All Tasks, and then click Issue.
  1. Return to the administrative command prompt to accept the issued certificate by running the following command. Ensure that you substitute the appropriate drive letter of your removable media for A: as well as the correct RequestID for 2:
    • certreq -retrieve 2 “A:\ CA02.EncryptionConsulting.com_EncryptionConsulting-CA02-CA.crt”
  2. In the Certification Authority List dialog box, ensure that EncryptionConsulting Root CA is selected and then click OK.

Task 2: Install the Encryption Consulting Issuing CA Certificate on CA02

To install the certificate and start the windows server Certification Authority service on CA02:

  1. Ensure that you are logged on to CA02. EncryptionConsulting.com as EncryptionConsu\Administrator. Place the removable media with the issued certificate for CA02. EncryptionConsulting.com into CA02.
  2. Open the Certification Authority console.
  3. In the Certification Authority console tree, right-click EncryptionConsulting Issuing CA, and then click Install CA Certificate.
  4. In the Select file to complete CA installation, navigate to your removable media. Ensure that you are displaying All Files (*.*) and click the CA02.EncryptionConsulting.com_EncryptionConsulting-CA02-CA certificate. Click Open.
  5. In the console tree, right-click EncryptionConsulting Issuing CA, click All Tasks, and then click Start Service.
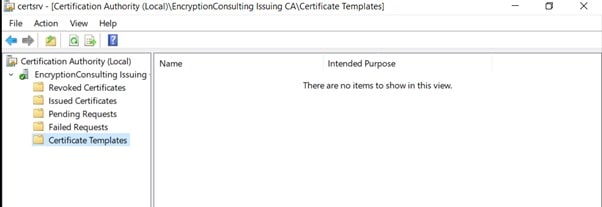
  6. In the console tree, expand EncryptionConsulting Issuing CA and then click Certificate Templates. Notice there are no certificates shown in the details pane. This is because the CAPolicy.inf specified not to install the default templates in the line LoadDefaultTemplates=0.

Activity 6: Perform Post Installation Configuration Tasks on the Subordinate Issuing CA

There are multiple settings to configure to complete the installation of the issuing CA. These are like the tasks that were needed to complete the configuration of the root CA.

Task 1: Configure Certificate Revocation and CA Certificate Validity Periods

To configure certificate revocation and CA certificate validity periods:

  1. Ensure that you are logged on to CA02. EncryptionConsulting.com as EncryptionConsu\Administrator.
  2. Configure the CRL and Delta CRL settings by running the following command from an administrative command prompt:

    • Certutil -setreg CA\CRLPeriodUnits 1
    • Certutil -setreg CA\CRLPeriod “Weeks”
    • Certutil -setreg CA\CRLDeltaPeriodUnits 1
    • Certutil -setreg CA\CRLDeltaPeriod “Days”
  3. Define CRL overlap settings by running the following command from an administrative command prompt:

    • Certutil -setreg CA\CRLOverlapPeriodUnits 12
    • Certutil -setreg CA\CRLOverlapPeriod “Hours”
  4. The default setting for the Validity Period is 2 years in the registry. Adjust this setting accordingly to meet your needs of entity certificate’s lifetime issued from EncryptionConsulting Issuing CA. It is recommended that you do not configure validity periods that are longer than half of the total lifetime of the EncryptionConsulting Issuing CA certificate, which was issued to be valid for 10 years. To limit issued certificates to 5 years, run the following commands from an administrative command prompt:

    • Certutil -setreg CA\ValidityPeriodUnits 5
    • Certutil -setreg CA\ValidityPeriod “Years”

Task 2: Enable Auditing on the Issuing CA

CA auditing depends on system Audit Object Access to be enabled. The following instructions describe how to use the Local Security Policy to enable object access auditing.

  1. Click Start, click Administrative Tools, and then select Local Security Policy.
  2. Expand Local Policies and then select Audit Policy.
  3. Double click Audit Object Access and then select Success and Failure then click OK.
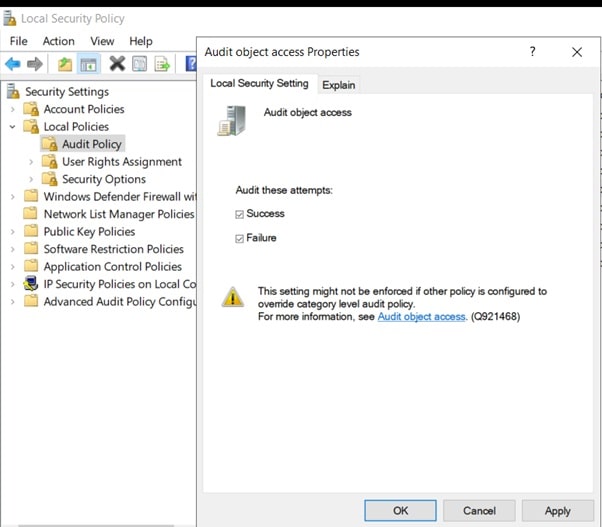
  1. Close Local Security Policy editor.
  2. Enable auditing for the CA by selecting which group of events to audit in the Certificate Authority MMC snap-in or by configuring the AuditFilter registry key setting. To configure Auditing for all CA related events, run the following command from an administrative command prompt:

    Certutil -setreg CA\AuditFilter 127

Task 3: Configure the AIA

Using a certutil command is a quick and common method for configuring the AIA. When you run the following certutil command, you will be configuring a static file system location, a lightweight directory access path (LDAP) location, and HTTP location for the AIA. The certutil command to set the AIA modifies the registry, so ensure that you run the command from a command prompt run as Administrator. Run the following command:

certutil -setreg CA\CACertPublicationURLs “1:C:\Windows\system32\CertSrv\CertEnroll\%1_%3%4.crt\n2:ldap:///CN=%7,CN=AIA,CN=Public Key Services,CN=Services,%6%11\n2:http://pki.EncryptionConsulting.com/CertEnroll/%1_%3%4.crt”

After you have run that command, run the following command to confirm your settings:

certutil -getreg CA\CACertPublicationURLs

If you look in the registry, under the following path: HKEY_LOCAL_MACHINE\System\CurrentControlSet\Services\CertSvc\Configuration\ EncryptionConsulting Issuing CA, you can confirm the CACertPublicationURLs by opening that REG_MULTI_SZ value. You should see the following:

  1. C:\Windows\system32\CertSrv\CertEnroll\%1_%3%4.crt
  2. ldap:///CN=%7,CN=AIA,CN=Public Key Services,CN=Services,%6%11
  3. http://pki.EncryptionConsulting.com/CertEnroll/%1_%3%4.crt

You can also see this in the CA (certsrv) console. To open the console, click Start, click Administrative Tools, and then click Certification Authority. In the navigation pane, expand the Certificate Authority (Local). Right-click EncryptionConsulting Root CA and then click Properties. On the Extensions tab, under Select extension, click Authority Information Access (AIA) and you will see the graphical representation of the AIA settings.

From an administrative command prompt, run the following command to copy the EncryptionConsulting Issuing CA certificate to the HTTP AIA location:

copy “c:\Windows\System32\certsrv\certenroll\CA02.EncryptionConsulting.com_EncryptionConsulting Issuing CA.crt” \\srv1.EncryptionConsulting.com\c$\certenroll\

Task 4: Configure the CDP

The certutil command to set the CDP modifies the registry, so ensure that you run the command from a command prompt run as Administrator. Run the following command:

certutil -setreg CA\CRLPublicationURLs “65:C:\Windows\system32\CertSrv\CertEnroll\%3%8%9.crl\n79:ldap:///CN=%7%8,CN=%2,CN=CDP,CN=Public Key Services,CN=Services,%6%10\n6:http://pki.EncryptionConsulting.com/CertEnroll/%3%8%9.crl\n65:\\srv1.EncryptionConsulting.com\CertEnroll\%3%8%9.crl”

After you run that command, run the following certutil command to verify your settings:

certutil -getreg CA\CRLPublicationURLs

In the registry location: HKEY_LOCAL_MACHINE\SYSTEM\CurrentControlSet\Services\CertSvc\Configuration\ EncryptionConsulting Issuing CA you can open the REG_MULTI_SZ value and see the configuration of these values:

  1. C:\Windows\system32\CertSrv\CertEnroll\%3%8%9.crl
  2. ldap:///CN=%7%8,CN=%2,CN=CDP,CN=Public Key Services,CN=Services,%6%10
  3. http://pki.EncryptionConsulting.com/CertEnroll/%3%8%9.crl
  4. \\srv1.EncryptionConsulting.com\CertEnroll\%3%8%9.crl

You can also see this in the CA (certsrv) console. To open the console, click Start, click Administrative Tools, and then click Certification Authority. In the navigation pane, ensure that Certificate Authority (Local) is expanded. Right-click EncryptionConsulting Root CA and then click Properties. On the Extensions tab, under Select extension, click CRL Distribution Point (CDP) and you will see the graphical representation of the CDP settings.

At an administrative command prompt, run the following commands to restart Active Directory Certificate Services and to publish the CRL.

net stop certsvc && net start certsvc

certutil -crl

Activity 7: Install and Configure the Online Responder Role Service

Task 1: Install the Online Responder Role Service on SRV1

    1. Ensure that you are logged on to SRV1. EncryptionConsulting.com as EncryptionConsu\Administrator.
    2. Open Server Manager.
    3. Right click on Roles, and then click Add Roles.
    4. On the Before You Begin page, then select Next.
    5. On the Select Installation type page, select Role-based or feature-based installation and then click Next.
    6. On the Server Selection page, click Next.
    7. On the Select Server Roles page, select Active Directory Certificate Services and then click Next.
  1. On the Features page, click Next.
  2. On Introduction to Active Directory Certificate Services page, click Next.
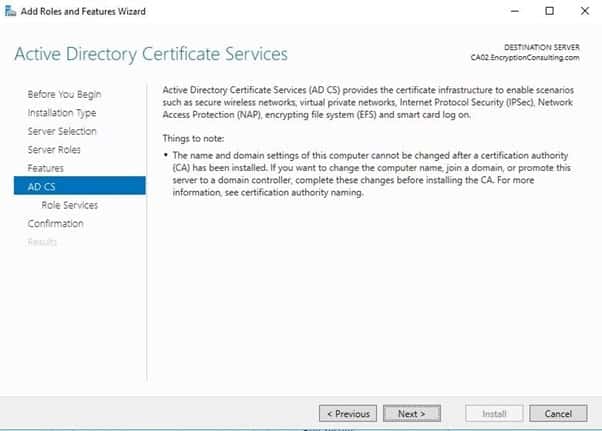
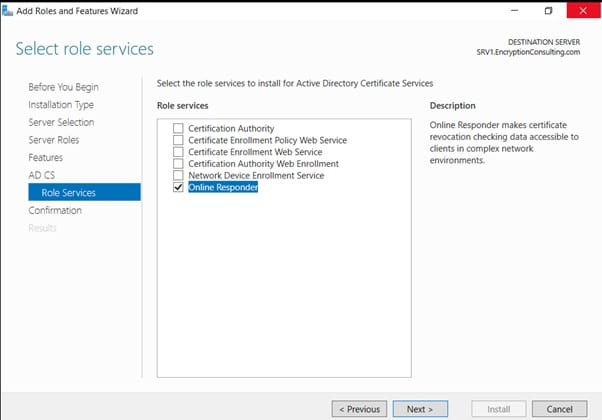
  3. On the Select Role Services page, clear the Certification Authority, and then select Online Responder. Click Next.
    • Note: You do not want to install a Certification Authority on SRV1.EncryptionConsulting.com, so you are clearing that checkbox.
    • If the Add role services and features required for Online Responder page appears, click Add Required Role Services and then click Next. Then, on the Web Server (IIS), click Next.
  1. On the Confirm Installation Selections page, click Install. Click Close when the installation is complete.
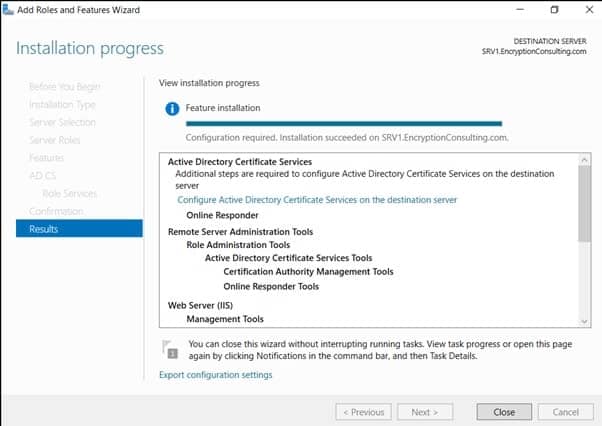
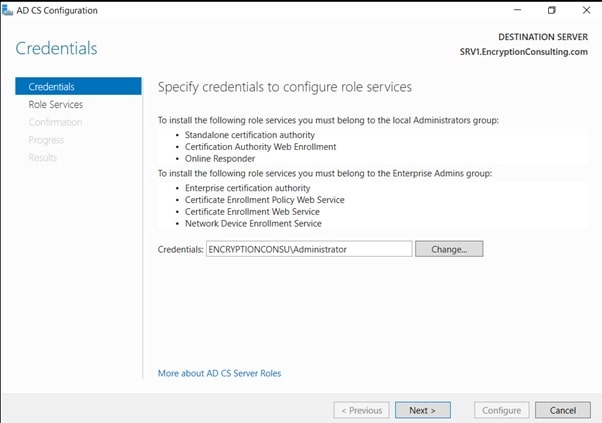
  1. Click on “Configure Active Directory Certificate Services on the destination server“, on the Credential Page, make sure Encryptionconsu\Administrator is mentioned, then click Next.
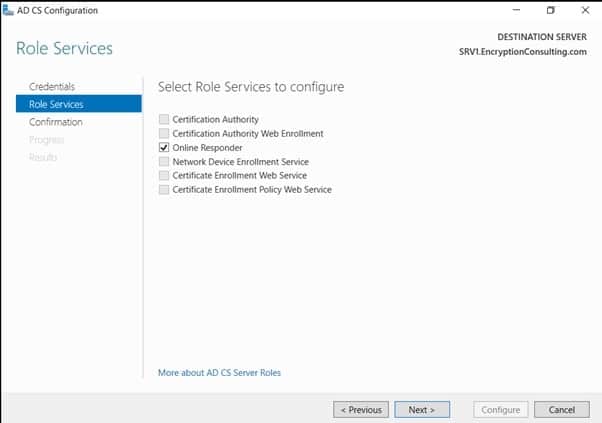
  1. On the Select Role, Services to configure page, select “online Responder” and click Next.
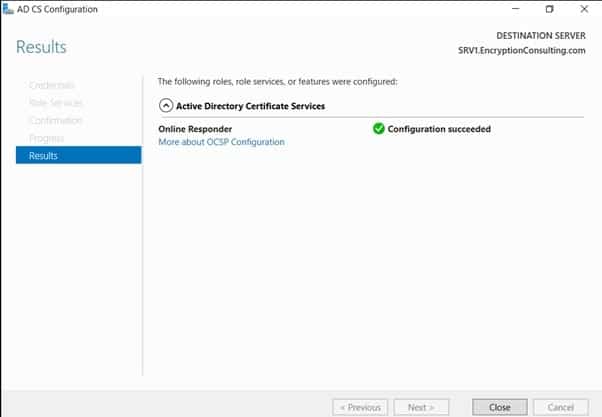
  1. On the confirmation page, verify the details and click Next.
Task 2: Add the OCSP URL to the Encryption Consulting Issuing CA

To add the OCSP URL to the EncryptionConsulting Issuing CA:

    1. Ensure that you are logged on to CA02. EncryptionConsulting.com as EncryptionConsu\Administrator
    2. In the Certification Authority console, in the console tree, right-click EncryptionConsulting Issuing CA, and then click Properties.
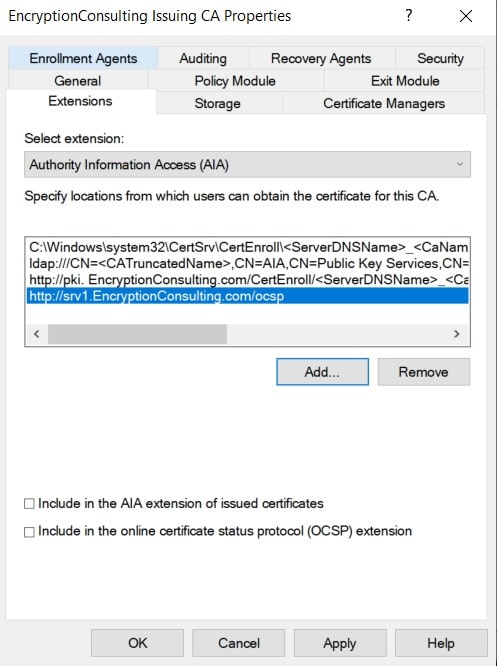
    3. On the Extensions tab, under Select extension, select Authority Information Access (AIA), and then click Add.
    4. In Location, type http://srv1.EncryptionConsulting.com/ocsp
    5. and then click OK.
    6. Select Include in the online certificate status protocol (OCSP) extension.
      • Note: A common misconfiguration is to select both checkboxes in the Extensions tab, which is incorrect. Ensure that Include in the online certificate status protocol (OCSP) extension checkbox is the only one selected.
  1. Click OK. When prompted by the Certification Authority dialog box to restart Active Directory Certificate Services, click Yes.

    Important: The EncryptionConsulting Issuing CA will now include http://srv1. EncryptionConsulting.com/ocsp URL as part of Authority Information Access (AIA) extension in all newly issued certificates issued or renewed or re-enrolled certificates. However, certificates enrolled from EncryptionConsulting Issuing CA prior to this change will not have this URL.

Task 3: Configure and Publish the OCSP Response Signing Certificate on the Encryption Consulting Issuing CA

To configure the OCSP response signing certificate:

  1. On CA02. EncryptionConsulting.com, ensure that you are logged on as EncryptionConsu\Administrator.
  2. In the Certification Authority console, ensure that the EncryptionConsulting Issuing CA is expanded in the console tree.
  3. Right-click on Certificate Templates and then click ManageCertificate Templates opens and displays the certificate templates stored in Active Directory.
  4. In the details pane (middle pane) right-click OCSP Response Signing and then click Properties.
  5. On the Security tab click Add. Click Object Types.
  6. In the Object Types dialog box, select Computers and then click OK.
  7. In Enter the object names to select, type SRV1 and then click Check Names. Click OK.
  8. Ensure that SRV1 is selected and in the Allow column, ensure that the Read and Enroll permissions are selected. Click OK.
  9. Close Certificate Templates MMC console.
  10. In certsrv console, right-click Certificate Templates, then select New and then select Certificate Template to Issue.
  11. In the Enable Certificate Templates dialog box, click OCSP Response Signing and the click OK.

Task 4: Configure Revocation Configuration on the Online Responder

To configure the revocation configuration:

  1. On SRV1.EncryptionConsulting.com, ensure that you are logged on as EncryptionConsu\Administrator.
  2. Open Server Manager navigate to Tools and click on “Online Responder Management“.
  3. Right-click Revocation Configuration and then click Add Revocation Configuration.
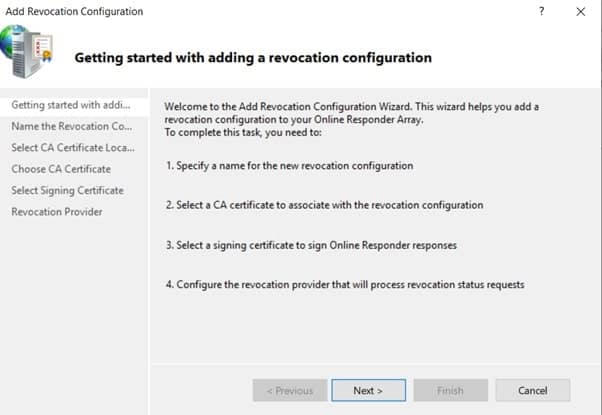
  4. On the Getting Started with Adding a Revocation Configuration page click Next.
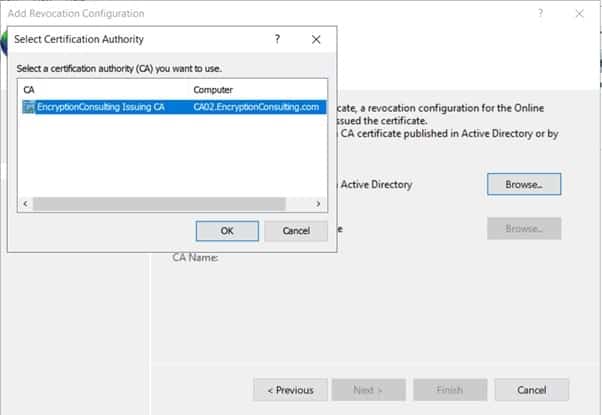
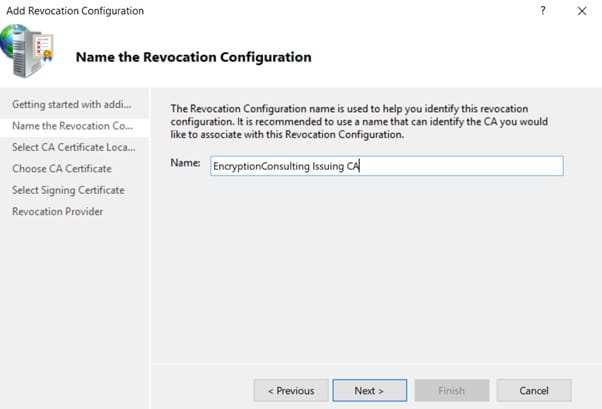
  1. In Name, enter EncryptionConsulting Issuing CA, and then click Next.
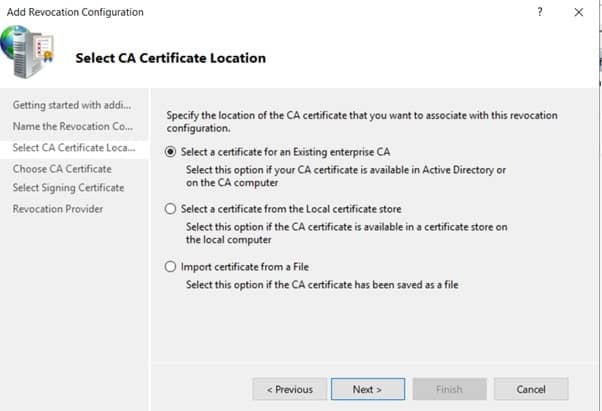
  1. On the Select CA Certificate Location page ensure that Select a certificate for an Existing enterprise CA is selected, then click Next.
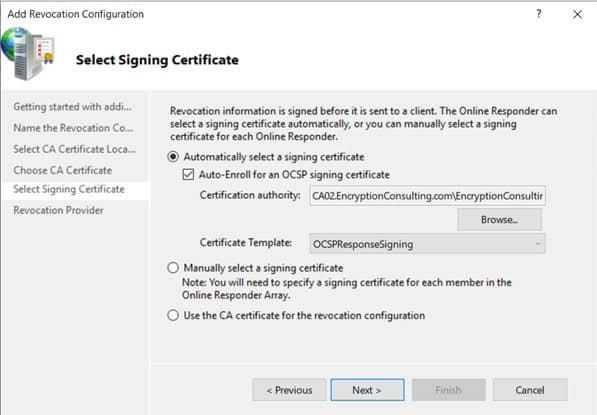
    1. Leave the defaults on the Select Signing Certificate page, and then click Next.
    1. On the Revocation Provider page, click Provider.
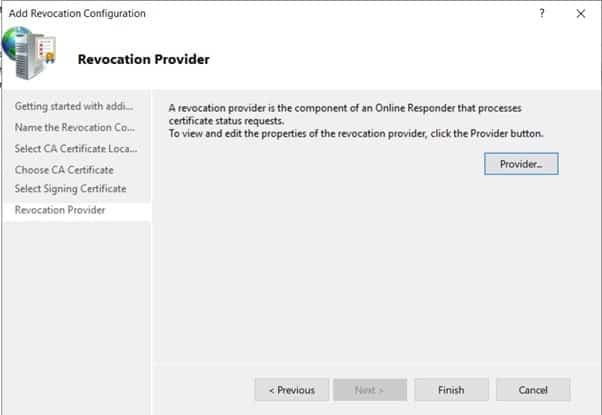
    1. Review the choices listed for OCSP Responder to down CRLs in the form of LDAP and HTTP locations.

      • Note: Depending on your needs you could select either the LDAP or HTTP as your primary location for OCSP Responder to download CRLs. You can change the order for LDAP and HTTP URLs using Move Up or Move Down Leave the defaults as they appear.
    2. Clear the Refresh CRLs based on their validity periods. In the Update, CRLs at this refresh interval (min) box, type 15 and then click OK. Click Finish.

      • Note: Modifying this setting to download CRLs at a faster rate than the CRL’s normal expiration makes it possible for the OCSP responder to rapidly download new CRLs rather than use the last downloaded CRL’s normal expiration date. Production needs may differ from the value chosen here.
    3. In the Certification Authority console, expand Array Configuration and then click SRV1.
    4. Review Revocation Configuration Status in the middle pane to ensure there is a signing certificate present and the status reports as OK. The provider is successfully using the current configuration.

    Task 5: Configure Group Policy to Provide the OCSP URL for the EncryptionConsulting Issuing CA

    This configuration would only be needed to allow existing certificate holders to take advantage of a new OCSP responder without having to re-enroll new certificates with the required OCSP URL added to them.

    1. Ensure you are logged on to DC01. EncryptionConsulting.com as EncryptionConsu\Administrator.
    2. Open an administrative command prompt and run the following commands:
      • cd\
      • certutil -config “ca02.EncryptionConsulting.com\EncryptionConsulting Issuing CA” -ca.cert EncryptionConsultingissuingca.cer
    3. Click Start, click Run, and then type gpmc.msc. Press ENTER.
    4. Expand Forest, expand Domains, expand EncryptionConsulting.com, and then expand Group Policy Objects.
    5. Right-click Default Domain Policy, then click Edit.
    6. Under Computer Configuration, expand Policies, expand Windows Settings, expand Security Settings, and then expand Public Key Policies.
    7. Right-click Intermediate Certification Authorities, and then click Import.
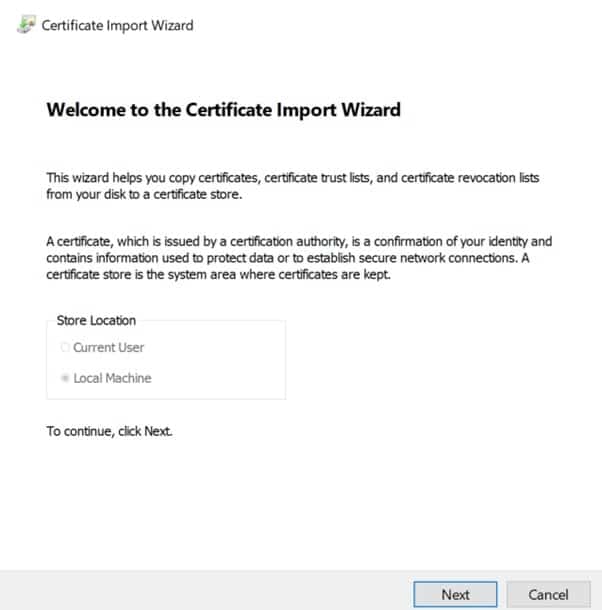
    8. On the Welcome to Certificate Import Wizard page, click Next.
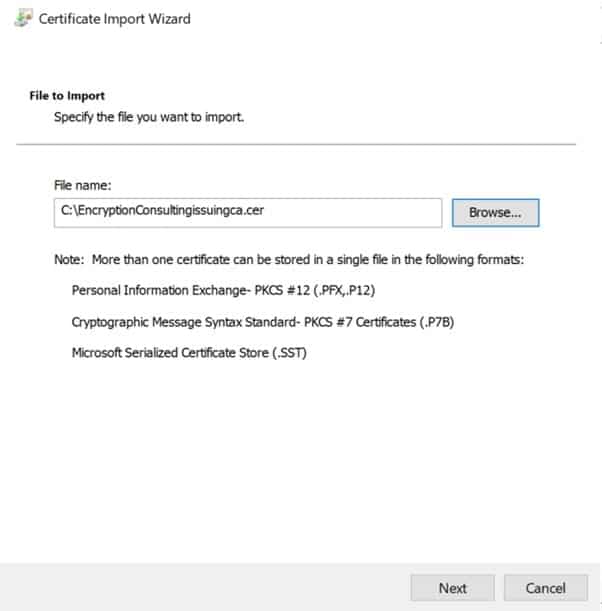
    1. In the File name, type C:\EncryptionConsultingissuingca.cer, and then click Next.
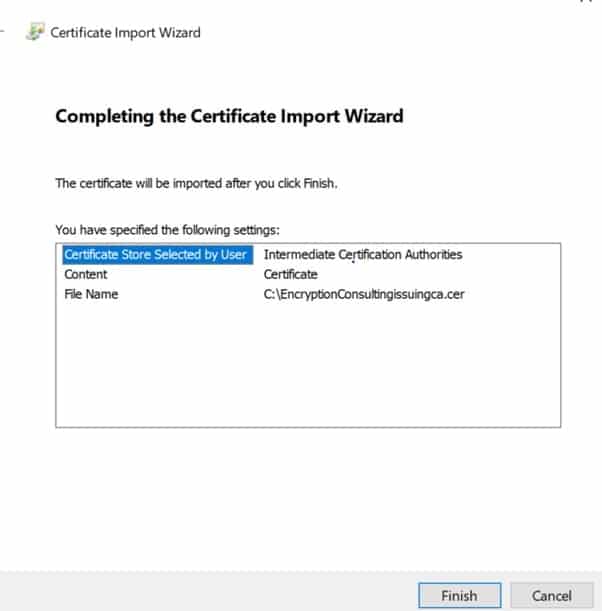
    1. On the Certificate Store page, click Next.
    2. On the Completing the Certificate Import Wizard, click Finish and then click OK.
    1. In the console tree, select Intermediate Certification Authorities
    2. In the details pane, right-click EncryptionConsulting Issuing CA certificate, then click Properties.
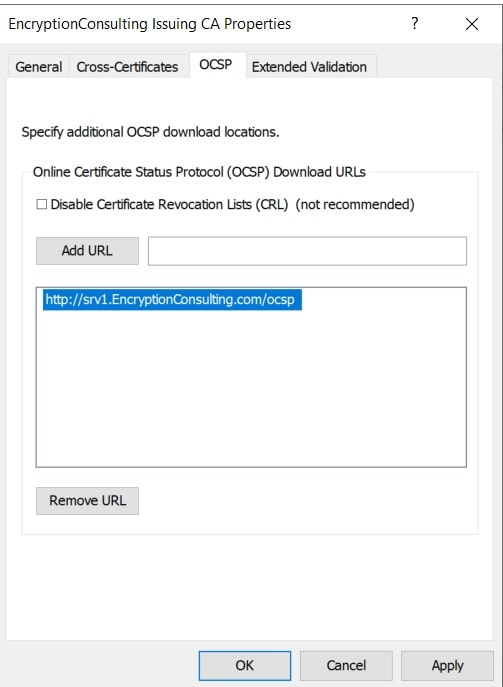
    3. On the OCSP tab, in Add URL enter http://srv1.EncryptionConsulting.com/ocsp, and then click Add URL. Click OK.
    1. Close the Group Policy Management Editor and then close Group Policy Management console.

    Enterprise PKI Services

    Get complete end-to-end consultation support for all your PKI requirements!

    Activity 8: Verify the MSPKI Hierarchy Health

    Task 1: Win10

    1. Log on to WIN10 as the local administrator.
    2. Click Start, type sysdm.cpl, and press ENTER. Click Change. (Ensure the computer name is already set to WIN10 – otherwise, change it)
    3. In Member of, select Domain, and then type EncryptionConsulting.com. Click OK.
    4. In Windows Security, enter the Username and password for the domain administrator account. Click OK.
    5. You should be welcomed to the EncryptionConsulting domain. Click OK.
    6. When prompted that a restart is required, click OK. Click Close. Click Restart Now.

    Task 2: Check PKI Health with Enterprise PKI

    To use the Enterprise PKI console to check PKI health:

    1. On CA02. EncryptionConsulting.com, ensure that you are logged on as EncryptionConsu\Administrator.
    2. Open Server Manager.
    3. In the console tree, under Roles and Active Directory Certificate Services, click Enterprise PKI.

      • Alternatively, you can run Enterprise PKI by running PKIView.msc from an administrative command prompt.
    4. Right-click Enterprise PKI and then click Manage AD Containers.
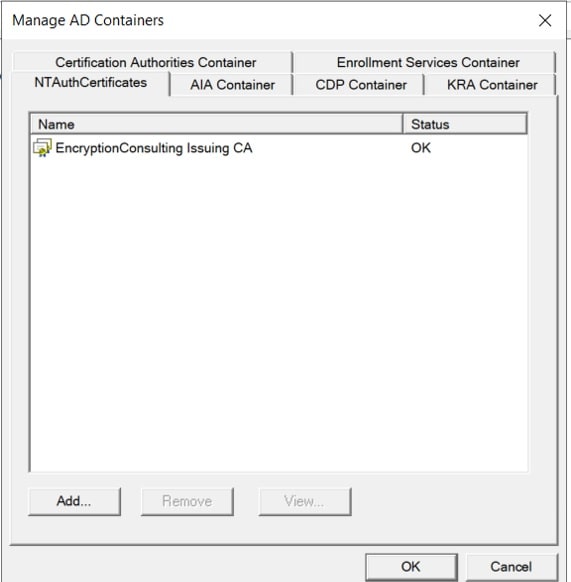
    1. On the NTAuthCertificates tab, verify the EncryptionConsulting Issuing CA certificate appears with a status of OK.
    2. On the AIA Container tab, verify both the EncryptionConsulting Root CA and the EncryptionConsulting Issuing CA certificates are present with a status of OK.
    3. On the CDP Container tab, verify EncryptionConsulting Root CA base CRLEncryptionConsulting Issuing CA base, and the Delta CRLs are present with a status of OK.
    4. On Certification Authorities Container, verify EncryptionConsulting Root CA certificate is present with a status of OK.
    5. On Enrollment Services Container, verify EncryptionConsulting Issuing CA certificate is present with a status of OK.

    Task 3: Configure Certificate Distribution on the Encryption Consulting Issuing CA

    To publish a certificate for computers in the enterprise:

    1. On CA02. com, ensure that you are logged on as EncryptionConsu\Administrator.
    2. In the Certification Authority console, ensure that EncryptionConsulting Issuing CA is expanded.
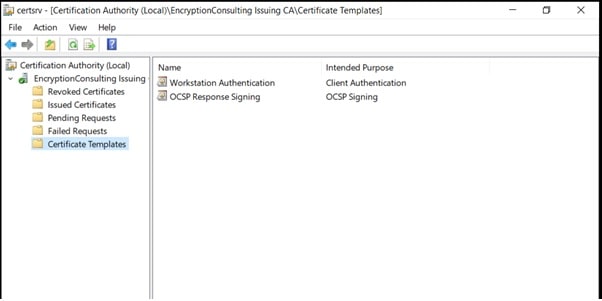
    3. Right-click Certificate Templates select New and select Certificate Template to Issue.
    4. On the Enable Certificate Templates dialog box, click Workstation Authentication, page and then click OK.
    Task 4: Obtain a Certificate Using WIN10 and Verify PKI Health

    To obtain a certificate for WIN10 and verify PKI health:

    1. Log into Win10. com as EncryptionConsu\Administrator. (Ensure that you switch user to log on as EncryptionConsu\Administrator)
    2. Click Start, type mmc, and then press ENTER.
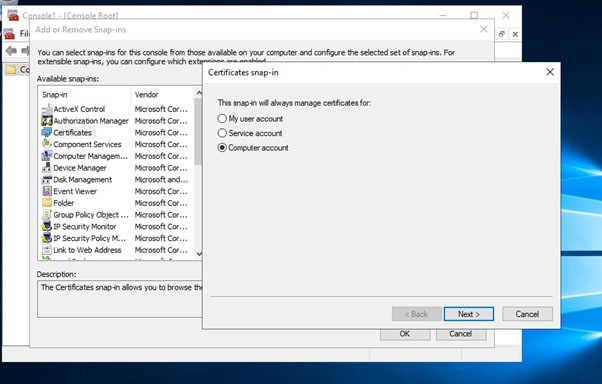
    3. Click File, and then click Add/Remove Snap-in.
    4. Click Certificates, then click Add. Select Computer Account, and then click Finish. Click OK.
    1. Expand Certificates, right-click Personal, click All Tasks, and then click Request New Certificate.
    2. On the Before you begin page, click Next.
    3. On the Select Certificate Enrollment Policy page, click Next.
    4. Select Workstation Authentication, and click Enroll. When the certificate is enrolled, click Enroll.
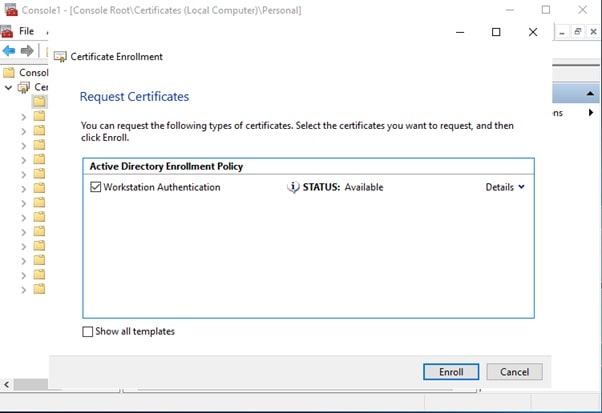
    1. In the console tree, expand Personal, and click Certificates. In the details pane, right-click the  EncryptionConsulting.com certificate, click All Tasks, and then click Export.
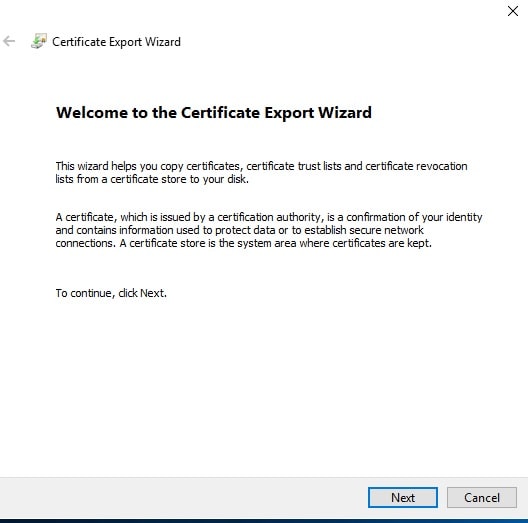
    2. On the Welcome to Certificate Export Wizard page, click Next.
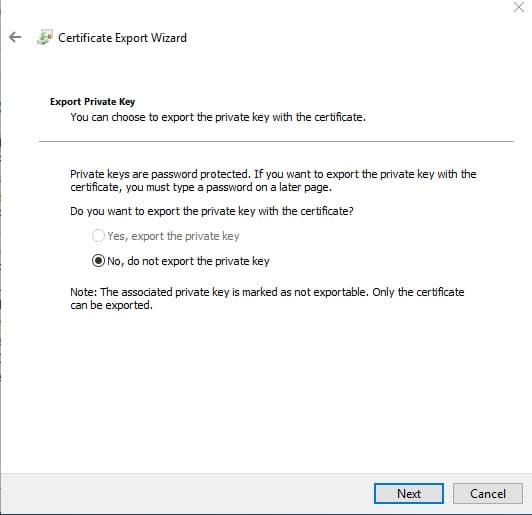
    1. On the Export Private Key, click Next. (No, do not export the private key selected by default).
    1. On the Export File Format page, click Next. [DER encoded binary X.509 (.CER) is the default selection].
    2. On the File to Export page, type C:\win10, and then click Next.
    3. On the Completing the Certificate Export Wizard page, click then Finish, and then click OK.
    4. Open a command prompt and run the following commands: (To open a command prompt, click Start, type cmd, and then press ENTER)

      • cd\
      • certutil -URL C:\win10.cer
    5. In the URL Retrieval Tool, perform the following steps, in the Retrieve section:

      • Select OCSP (from AIA) option and then click Retrieve. Confirm that it shows status as Verified.
      • Select CRLs (from CDP) option and then click Retrieve. Confirm that it shows status as Verified.
      • Select the Certs (from AIA) option and then click Retrieve. Confirm that it shows status as Verified.
    6. Click Exit to close the URL Retrieval Tool.
    7. From a command prompt run the following command to thoroughly verify certificate chain retrieval and revocation status.
      • certutil -verify -urlfetch c:\win10.cer
    8. Review the output and make sure all the chain retrieval and revocation status are successfully verified.


    Secure Software Development Framework To Ensure The Correctness Of The Code

    Software development lifecycle (SDLC) is a systematic process for developing software that ensures the quality and correctness of the code. It aims to produce high-quality software within the stipulated time and budget as per customers’ expectations. Each phase of SDLC has its own process and deliverables, which feed into the next phase. Some popular SDLC models include Waterfall, spiral, iterative, agile, etc.

    There are only a few SDLC models which explicitly address software security in detail. However, it is necessary to incorporate secure software development practices into each SDLC model. There are various reasons why organizations should plan to implement secure software development practices, which include:

    • To reduce the number of vulnerabilities in released software
    • To minimize the potential impact of the exploitation of undetected vulnerabilities
    • To address the root causes of vulnerabilities to prevent recurrences

    Vulnerabilities not only include bugs caused by coding flaws but also weaknesses caused by improper security configuration settings, incorrect trust assumptions, and out-of-date risk analysis.

    What is SSDF?

    National Institute of Standards and Technology (NIST) has developed a Secure software development Framework, also called SSDF, to strengthen software’s resistance to vulnerabilities. It doesn’t define any new terminologies but consolidates longstanding best-practice recommendations on secure software development. In SSDF, the emphasis is on identifying the best practices rather than on the tools, techniques, and mechanisms used to implement the same.

    As per NIST, the SSDF’s practices fall into four major categories:

    1. Prepare the Organization (PO)

      Organizations should ensure that their people, processes, and technology are prepared to perform secure software development at the organization level. Many organizations will also find some PO practices to apply to subsets of their software development, like individual development groups or projects.

    2. Protect the Software (PS)

      Organizations should protect all software components from tampering and unauthorized access.

    3. Produce Well-Secured Software (PW)

      Organizations should produce well-secured software with minimal security vulnerabilities in its releases.

    4. Respond to Vulnerabilities (RV)

      Organizations should identify residual vulnerabilities in their software releases and respond appropriately to address those vulnerabilities and prevent similar ones from occurring in the future.

    Enterprise Code-Signing Solution

    Get One solution for all your software code-signing cryptographic needs with our code-signing solution.

    Each practice definition includes the following elements:

    1. Practice

      The name of the practice and a unique identifier, followed by a brief explanation of what the practice is and why it is beneficial.

    2. Tasks

      One or more actions that may be required to carry out a practice.

    3. Notional Implementation Examples

      One or more notional examples of types of tools, processes, or other methods that could be used to help implement a task. No examples or combination of examples are required, and the stated examples are not the only feasible options. Some examples may not be applicable to certain organizations and situations.

    4. References

      Pointers to one or more established secure development practice documents and their mappings to a particular task. Not all references will apply to all instances of software development.

    NIST recommends weighing risk against cost, feasibility, and applicability when deciding which practices to implement.

    The SSDF is not a checklist; rather, it guides you to plan and implement a risk-based approach to secure software development.

    Advantages of SSDF:

    1. It can assist organizations in any sector or community, regardless of their size.
    2. It can be applied to software developed to support information technology (IT), industrial control systems (ICS), cyber-physical systems (CPS), or the Internet of Things (IoT).
    3. It can be integrated into any existing software development workflow and automated toolchain; however, it should not have a negative impact on the organizations that already have strong secure software development practices in place.
    4. It makes the practices broadly applicable, rather than being specific to particular technologies, platforms, programming languages, SDLC models, development environments, operating environments, tools, etc.

    Conclusion

    With NIST architecting SSDF, secure software development is quickly becoming a mandated priority on a large scale. If organizations adopt SSDF, it will help them remain protected from SDLC vulnerabilities and defend their software supply chains.

    References

    Secure Software Development Framework (SSDF) Version 1.1: Recommendations for Mitigating the Risk of Software Vulnerabilities

    PQC Standardization Project To Determine The Most Quantum-Safe Algorithms

    In an age where the idea of quantum cryptography is more than just a theory, organizations like the National Institute of Science and Technology (NIST) are looking for a way to standardize post-quantum cryptography algorithms. The NIST creates compliance standards, best practices, and regulations for cyber security. They work to provide a standardized framework for different encryption algorithms and methods to ensure the best possible security is in place within different organizations.

    Quantum cryptography is an asset that can be used in the coming years, but it can also cause a detriment to the security of organizations if they are not prepared. That is why the NIST has turned its sights to post-quantum cryptography standardization with its post-quantum cryptography (PQC) standardization project.

    What is the PQC standardization project?

    As previously mentioned, the NIST sets standards and best practices for cyber security that they suggest organizations follow. Quantum cryptography is a type of cryptography that has the potential to cause large issues in the cyber security community, as it will make the majority of cryptographic algorithms obsolete. The reason quantum cryptography can do this is that, with a powerful enough computer, algorithms that would usually take 10 years to crack could now take only weeks or days with quantum computing.

    This is the biggest reason the NIST has begun the PQC standardization project. The idea behind this project is to prepare organizations for quantum cryptography before it becomes a real threat. This would allow companies to have the proper encryption algorithms in place throughout the organization so that once quantum computing becomes possible to do, these attacks can be defended against. The types of encryption algorithms the PQC standardization project is working to standardize are quantum-safe algorithms. A quantum-safe algorithm is resistant to attacks from both classical computers, which are the types of computers we use today, and quantum computers.

    This allows private information stored on devices or in transit in organizations to be the most secure possible, as even a quantum computer will not be able to break a quantum-safe algorithm within hours or days.

    Determining the most quantum-safe algorithms

    Many times in the past, the NIST has done projects like the PQC standardization project where a number of algorithms are submitted to the project to see if they meet the criteria the best to be considered the standard for that type of cryptography. At the time of writing this, the NIST has just completed its 3rd round of selection for cryptographic algorithms. The finalists and alternative options are as follows:

    1. Key-Establishment Mechanism (KEM) Algorithms: Kyber, NTRU, SABER, and Classic McEliece
    2. Digital Signature Algorithms: Dilithium, Falcon, and Rainbow
    3. Alternative KEM Algorithms: BIKE, FrodoKEM, HQC, NTRUprime, and SIKE
    4. Alternative Digital Signature Algorithms: GeMSS, PICNIC, and SPHINCS+

    Once the current round ends, one or two of the KEM algorithms and one or two of the Digital Signature algorithms will be selected as quantum-resistant algorithms strong enough for standardization across the cyber security landscape. After completing the third round, NIST mathematicians and researchers will continue to look at other algorithms and newly emerging algorithms to see if they are powerful enough to be considered a part of the standardized group of quantum-resistant algorithms.

    Tailored Encryption Services

    We assess, strategize & implement encryption strategies and solutions.

    How can Organizations Prepare for the Future?

    Although the NIST has not yet released its list of recommended quantum-resistant cryptography algorithms, organizations can begin preparing themselves for quantum computers now. The following are a few different ways organizations can prepare for the future:

    1. Quantum Risk Assessment

      Performing a quantum risk assessment for your organization will give the security teams within your organization a good idea of where gaps exist in relation to quantum computing. A quantum risk assessment also helps create a list of applications that will be affected by the creation of quantum computers, thus providing the organization with a detailed list of applications that must be updated when moving to quantum-resistant algorithms. This will also help with the next step, identifying at-risk data.

    2. Identify at-risk data

      Identifying an organization’s data at risk is extremely important, even just relating to cyber security in general. Having data classification and identification systems in place in an organization is vital to keep track of data and ensure it is properly protected.

    3. Use cryptographically agile solutions

      The NIST has indicated that the use of crypto-agile solutions is a great way to begin the process of moving toward having quantum-safe security in place. Crypto-agility is the ability to switch between algorithms, primitives, and other encryption mechanisms without causing significant issues in the organization’s infrastructure.

    4. Develop an understanding of quantum computing and its risks

      By training employees on what to look out for in the future of quantum computing, and methods of becoming quantum-resistant, they will have a mindset that is already prepared for the post-quantum age.

    5. Track the NIST’s PQC Standardization Project

      By keeping track of the PQC Standardization Project, an organization can keep up to date on any changes to the quantum-resistant algorithms in the running and change to the selected algorithms when the time is right.

    Build The Basic Entities In The Chain Of Trust In Your Organization

    A Public Key Infrastructure (PKI) helps users to exchange data securely and provides data confidentiality, data integrity and end user authentication. PKI uses public-private keypair received from a trusted Certificate Authority. The certificate authority issues public key certificates that can be used to encrypt data or for digital signatures.

    A public key certificate is used to associate an identity with a public key. The entity that creates this association is known as the issuer of the certificate and the identity to whom the certificate has been issued is known as the subject of the certificate. When a user visits a secure website, the website sends an SSL/TLS certificate to the user’s browser. The user’s browser validates if the issuer of this certificate exists in its list of trusted Root Certificate Authorities.

    If the browser cannot find a match, it checks if any of the trusted Root Certificate Authority has signed the issuing CA certificate. The browser continues to validate the issuer of the certificate until it finds a trusted Root certificate, or it reaches the end of the trust chain. This chain of trust helps to prove that the certificate comes from a trusted source and the website the user is visiting is a secure website.
    A certificate chain is a chain of digital certificates, starting with an end entity certificate, one or more intermediate certificates and a root certificate.

    Basic Entities in the chain of trust

    There are three basic entities in the certificate chain of trust: Root CA Certificate, Intermediate CA Certificate, and end entity certificate.

    1. Root CA Certificate:

      The Root CA certificate is a self-signed X.509 certificate. This certificate acts as a trust anchor, used by all the relying parties as the starting point for path validation. The Root CA private key is used to sign the Intermediate CA certificates. If this certificate and its private key is compromised, then the entire certificate chain breaks down and all the certificates signed by this private key will be affected. Hence the Root CA private key must be securely generated and protected at all times. To protect Root CA certificates, intermediate CAs are placed between Root CA and end entities and Root CA never issues certificates to end entities directly. The operating systems, web browsers and custom applications come pre-installed with more than 100 trusted root CA certificates.
    2. Intermediate CA Certificates:

      The intermediate CA certificate sits between the Root CA certificate and the end entity certificate. There can be one or more intermediate CA certificates in the chain of trust. The intermediate CA certificate signs the end entity certificates. This provides an additional layer of security to the Root CA as it can be securely kept offline most of the times.
    3. End Entity Certificates:

      The end entity certificate is the server certificate that is issued to the website domain. When this server certificate is installed on the web server, the URL is changed to HTTPS. This indicates that the website is secure and uses encrypted connection. To receive a digital certificate, an end entity sends a Certificate Signing Request (CSR) to the Issuing CA (Intermediate CA). The CSR contains details about the end entity. The Issuing CA verifies that the information provided is correct and issues the certificate to the end entity.

    Tailored Encryption Services

    We assess, strategize & implement encryption strategies and solutions.

    Types of Trust Models

    Hierarchical Trust Model

    In the PKI hierarchical trust model, there is an offline Root CA and multiple online Issuing CAs. The multiple Issuing CAs are for high availability and load balancing. This is the most common chain validation process, and it moves in reverse. In this case the validation starts by checking the end entity certificate information against the intermediate certificate that issued the certificate and then checks the intermediate certificate information against the root certificate that issues this certificate.

    Web of Trust Model

    The web of trust model is an alternative to the hierarchical trust model. It is a decentralized trust model where users manage the trust at the individual key level. There is no certificate authority or a trusted root. Decentralized control of each key pair is the main difference from the hierarchical trust model. PGP (Pretty Good Privacy) uses this trust model.

    Certificate Path Validation

    Path validation is the process of verifying the integrity of the certificate chain, from the end entity to the Root CA. There are some certificate fields and extensions that are used in path validation. These fields are used to define the identity of the certificate and the links between certificates.

    1. Issuer Distinguished Name: The name of the issuer that signed the certificate.
    2. Subject Distinguished Name: The identity of the certificate holder.
    3. Public Key: The public key of the asymmetric keypair.
    4. Authority Key Identifier (AKI): The certificate extension that contains the key identifier that is derived from the public key in the issuer certificate.
    5. Subject Key Identifier (SKI): The certificate extension that contains the key identifier that is derived from the public key in the subject certificate.

    The subject of higher-level certificate is the issuer of the lower-level certificate in the chain. The client searches at different locations to find the certificate that matches the issuer DN in its own certificate. The Distinguished Name (DN) is used to find the certificates and the AKI and SKI values are used to determine if it is a correct certificate. If a certificate authority generates a new keypair, then the SKI value within the certificate should change.

    The DN of the certificate authority does not change during the rekey process. So, the AKI and SKI values ensure that correct certificate is selected to build the chain. When a client finds multiple trusted certification chains during the certificate chain building process, the best certification chain is selected by calculating each chain’s score. This score is based on the quantity and the quality of the information that the certificate path provides. If the score is the same for multiple chains, then the shortest chain is selected.

    Cross Certification

    Cross certification is the process of interconnecting two PKIs to build certificate chains. The two CAs involved in cross certification sign each other’s CA certificate to establish the relationship in both directions. After the two certificate authorities have established the trust, entities within the separate PKIs can interact with each other depending on the policies mentioned in the certificates.

    Certificate Stores

    1. Microsoft Certificate Store

      Microsoft operating system has built-in certificate stores for trust anchors. Microsoft uses the windows update service to publish trusted root certificates to the certificate stores. The Microsoft Root CA program validates and manages the eligibility for publication of root certificates.
    2. MAC OSX and Safari

      MAC OSX implements a certificate store. MACOSX certificate store is a combination of a certificate store and a password manager. By default, the system has two key chains known as login and system keychains. The user can create more key chains.
    3. Firefox and other Mozilla based browsers

      Mozilla includes a PKCS#11 module that contains trusted root certificates. The user cannot update this certificate store. A user can load additional trusted root CA certificates into the user database.
    4. OpenSSL

      OpenSSL stores trusted root CA certificates in unencrypted pem files. File system security is very important to protect these files.
    5. JAVA

      For JAVA, the trusted root CA certificates are stored in encrypted form at
      <JAVA path>/lib/security/cacerts.The user can update this certificate store.

    Conclusion

    The certificate chain of trust is a list of certificates from end entity to the trust anchors. It enables the receiver to verify that the sender and all intermediate certificates are trustworthy. By using certificate fields and extension values, Path validation verifies the integrity of the certificate chain, from the end entity to the Root CA.

    There are different certificate stores that are used to store trusted root certificates. Encryption Consulting is a customer-focused cyber security consulting firm providing services to various clients on implementing and managing PKI in their environments. To see how we can help your organization, visit our website at www.encryptionconsulting.com.

    The Seamless Framework For Personal Identity Verification

    Personal Identity Verification (PIV) is a NIST FIPS 201-2 security standard that establishes a framework for multi-factor authentication (MFA) using a smartcard. In simple words, PIV (Personal Identity Verification) can be stated as a multi-factor authentication solution that covers the entire identity lifecycle from identity proofing to secure credential issuance, physical access, and secure credential expiration.

    In a single line, Personal Identity Verification is an identity management framework.

    History

    The United States federal government ordered the production of a common identity credential in 2004. It was originally designed only for US federal government but is now widely used in commercial applications. The reason behind its widespread usage is the standard’s high-assurance identity proofing and ability to use multi-factor authentication for security purposes such as preventing fraud, improving privacy, etc.

    PIV Key Features

    PIV is an excellent choice for businesses that must adhere to government regulations or work in highly regulated areas.

    • Identity proofing
    • Lifecycle management
    • Advanced Use cases
    • Physical/ IT System Access

    Personal Identity Verification (PIV) Card

    A personal identity verification (PIV) card is a smart card issued by the United States government that contains the information needed to provide access to federal facilities and information systems and ensure acceptable levels of security for all federal applications.A personal identification verification card has unique technologies that security reader systems can use for various purposes. FIPS establishes precise standards for these cards, including cryptographic methods to encrypt sensitive data and types of security, such as passwords and biometrics systems, to validate cardholders’ identities. Other characteristics, such as four mandatory cryptographic keys and key sizes, are also specified in the PIV card guidelines.

    PIV Card Features

    PIV card encrypts data and validates identity to ensure

    1. Integrity: It means only the card owner can change the data present inside the card.
    2. Confidentiality: It represents only the cardholder can read and access the data present on the card.
    3. Authenticity: It guarantee’s the source of data present.
    4. Non-Repudiation: It means there can’t be any false data.

    With the PIV card, you may be more confident that all electronic communications, data storage, and retrieval will be more secured.

    Information Stored in PIV Card

    A PIV Card Application must include seven mandatory interoperable data elements and two conditionally obligatory data objects.Seven Mandatory elements consist of:

    • Card Capability Container
    • Card Holder Unique Identifier
    • X.509 Certificate  for PIV Authentication
    • X.509 Certificate for Card Authentication
    • Cardholder Fingerprints
    • Cardholder Facial Image
    • Security Object

    Whereas, If the cardholder possesses a government-issued email account at the time of credential issuance, two data objects are required:

    • X.509 Certificate for Digital Signature
    • X.509 Certificate for Key Management

    Enterprise PKI Services

    Get complete end-to-end consultation support for all your PKI requirements!

    PIV Authentication Mechanisms

    The primary objective of the PIV Card is to verify the cardholder’s identity with a system or person in charge of regulating access to a protected resource or facility. Various combinations of one or more of the validation processes outlined below may be used to achieve this aim.

    Card Validation

    This is the procedure for ensuring that a PIV Card is genuine. Card validation mechanisms include:

    • visual inspection of the PIV Card’s tamper-proofing and tamper-resistant characteristics
    • use of cryptographic challenge-response schemes with symmetric keys and,
    • use asymmetric authentication schemes to validate private keys embedded within the PIV Card.

    Credential Validation

    This is the procedure for authenticating the PIV Card’s numerous forms of credentials. Credential Validation mechanisms include:

    • visual inspection of PIV Card visual elements
    • verification of certificates on the PIV Card
    • verification of signatures on the PIV biometrics
    • Checking the expiration date and revocation status of the credentials on the PIV Card.

    Cardholder Validation

    This is the procedure for confirming that the PIV card is in possession of the person it was issued. Cardholder Validation mechanisms include:

    • presentation of a PIV Card by the cardholder
    • matching the visual characteristics of the cardholder with the photo on the PIV Card
    • matching the PIN provided with the PIN on the PIV Card and,
    • matching the live fingerprint samples provided by the cardholder with the biometric information embedded within the PIV Card.

    Alternative Options

    Two additional credentials have been defined to take advantage of the infrastructure created by the Federal government’s PIV program, but neither has received significant adoption.

    PIV-I: (Personal Identity Verification – Interoperability)

    It is a version of PIV with the same criteria as PIV. The US federal government needed a way to handle the identities and access of guest users, so it was proposed to be created.

    • Unlike PIV, no background checks are required, which directly impacts the level of suitability for access.
    • Follows Federal Bridge cross-certification certificate policies.
    • Origin: Federal CIO Council.

    CIV: (Commercial Identity Verification)

    CIV is a different protocol based on the PIV architecture, with the main distinction being that the standards are less stringent.

    • Follows the issuing organization’s policies.
    • Trusted credentials only within the issuing organization.
    • Origin: Smart Card Alliance Access Control Council

    Conclusion

    Personal Identity Verification (PIV) is a framework which is used to validate the identity. It was designed earlier for US federal government but is used widely now-a-days. The key features of PIV include identity proofing, lifecycle management and many more. PIV card is a smart card issued by US federal govt. which is used for validation purposes. It consists of many features such as confidentiality, integrity, non-repudiation etc. Basic personal Information are being stored in PIV Card. To protect PIV card various authentication mechanisms are used namely Card Validation, Credential Validation and Cardholder Validation. Though, with increasing use cases, new alternates of PIV are being discovered namely PIV-I and CIV which are yet to be widely recognized.

    References

    nvlpubs.nist.gov/nistpubs/specialpublications/nist.sp.800-73-4.pdf

    A Robust & Secure Transition To Quantum-Safe Cryptography

    Quantum computing is a field of study that focuses on the development of computer-based technologies centered around quantum theory principles. To perform specific computational tasks, quantum computing employs a combination of bits. All of this is done at a much higher efficiency than their traditional counterparts. The development of quantum computers represents a significant advancement in computing capability, with massive performance gains for specific use cases.

    Quantum bits, or qubits, can be in the state of both 1 and 0 simultaneously, which in turn provides much of the quantum computer’s processing power. Due to this, a fully functioning quantum computer could break the majority of classical encryption algorithms in days, and in some cases even hours.

    Quantum-safe cryptography

    Post-quantum cryptography, also known as quantum-safe cryptography, refers to research efforts aimed at identifying cryptographic primitives resistant to attacks from classical and quantum computers. The ultimate goal of these efforts is to find cryptographic algorithms that are not vulnerable to any cryptographic attacks by conventional or quantum computers, thereby allowing robust security of information assets in the post-quantum world.

    It is widely known that in the absence of quantum-safe cryptography, serious security issues will arise such as transmitted information through public channels could be vulnerable to eavesdropping, and encrypted data could be stored for later decryption considering the power of a quantum computer. Threats arising from quantum computing will target various sectors such as Finance and Healthcare owing to the monetary benefits majorly which can easily be derived from cryptographic vulnerabilities.

    The majority of the cryptographic hashes (such as SHA2, SHA3, BLAKE2), MAC algorithms (such as HMAC and CMAK), and key-derivation functions (bcrypt, Scrypt, Argon2) are basically quantum-safe and are slightly affected by quantum computing. Symmetric ciphers such as AES-256 and Twofish-256 are also considered to be quantum-safe. In this case the recommended key length is 256-bits or more.

    However, the widely used public-key cryptosystem which includes RSA, DSA, ECDSA, EdDSA, DHKE, ECDH, and ElGamal is quantum-broken.

    Tailored Encryption Services

    We assess, strategize & implement encryption strategies and solutions.

    The following table compares the effective key strength of some popularly used cryptographic algorithms in classical and quantum computers.

    Algorithm Key Length Effective key strength
    Classical computer Quantum computer
    RSA-10241024-bits80-bits0-bits
    RSA-20482048-bits112-bits0-bits
    ECC-256256-bits128-bits0-bits
    ECC-384384-bits256-bits0-bits
    AES-128128-bits128-bits64-bits
    AES-256256-bits256-bits128-bits

    Progress in Quantum-safe cryptography

    The possibility of a single quantum-safe algorithm suitable for all applications is quite unlikely. Many algorithms have been proposed till date but there is a large variation observed in the performance characteristics when compared with conventional public key cryptography as quantum safe algorithms use a larger key size therefore require a higher network bandwidth.

    The National Institute of Standards and Technology (NIST) has started a process to standardise quantum-safe algorithms for key agreement and digital signatures. Since 2016, the institute has been working on creating quantum-safe algorithms capable of resisting threats posed by the quantum computers. The field of candidate algorithms has been narrowed down and draft standards are expected to roll out in 2022-24.

    Migration to quantum-safe cryptography

    Transitioning to new cryptography is complicated and will take a significant amount of time and money. Fortunately, organisations have some time before quantum-computers are implemented on a large scale. As per NCSC, ‘Organisations that manage their own cryptographic infrastructure should factor quantum-safe transition into their long-term plans and conduct investigatory work to identify which of their systems will be high priority for transition.

    Priority systems could be those that process sensitive personal data, or the parts of the public-key infrastructure that have certificate expiry dates far into the future and would be hardest to replace.’Here, crypto-agility might play a key role for organisations in transiting to quantum-safe cryptography as it the ability of a security system to switch between algorithms and cryptographic primitives without impacting the rest of the infrastructure. It is important for corporate leaders to start planning now for a smooth transition to a quantum-resistant security.

    Conclusion

    We must recognise that quantum computing indeed poses a serious threat to conventional information security systems. Organisations are recommended to plan a robust and secure transition to quantum-safe cryptography to mitigate any quantum threats. It is advisable to follow security best practices until NIST quantum-safe standards are available.

    Self-Signed Certificates: What are they and why should you use them?

    In a time when keeping data and users secure on the Internet is so important, digital certificates have been used for a number of different purposes. Digital certificates are used for authentication, secure Internet connections, code signing, and more. This allows data-in-transit or data-at-rest to be protected from outside attackers. There are a number of different certificate types, but we will be taking a look at self-signed certificates today. The first question we have to answer is what exactly is a self-signed certificate?

    What is a Self-Signed Certificate?

    Depending on what the certificate is being used for, a self-signed certificate is a certificate signed by the same user or device using that certificate. This works for code being signed for internal use, or for an application being used by the creator, but not for software that is being used by external users. If an application or piece of software is being sent to external customers, then another type of certificate needs to be used. The reason for this is that a self-signed certificate will not be able to be verified when an external user attempts to use the software associated with that certificate.

    When a user runs an application or piece of software, the certificate that signed that code is authenticated by the Operating System. You have likely seen that a pop-up occurs when a new software or application is downloaded and run on your computer. This pop-up checks the identity of the publisher of the certificate associated with the software. Additionally, the certification path is checked in the certificate as well. All of these details are checked to authenticate the publisher of the software. If the identity of the publisher cannot be properly verified, then the software would likely be deemed unsafe to run by the user.

    Now, when using a self-signed certificate to sign software and applications, only the device which signed the certificate will be able to authenticate it. This is why self-signed certificates are not generally used for external software or applications. Instead, software publishers will use a Public Key Infrastructure with an external, and well-known, Root Certificate Authority which creates Certificate Authority generated (CA-generated) certificates. This allows the publisher to generate code signing certificates that can be recognized by any Operating System, thus authenticating the software sent to a customer and allowing them to trust that software or application enough to be downloaded and used on their device.

    Enterprise PKI Services

    Get complete end-to-end consultation support for all your PKI requirements!

    Pros and Cons

    When dealing with self-signed certificates, there are many pros and cons that should be looked at before creating these types of certificates. Some of these we have already touched on, and others we will take a look at now.

    Pros

    • Self-signed certificates are very easy to create, compared to other methods of certificate creation. There is no in-depth process, it is just the creation of a keypair and then the creation of the certificate itself. Other processes may require multiple steps and access to a Public Key Infrastructure (PKI) to create certificates.
    • Self-signed certificates are best utilized in test environments or for applications that just need to be privately recognized. Applications only for use within the organization they are created mainly use self-signed certificates.
    • Another reason that an organization may use self-signed certificates is that there is no reliance on another organization for the certificates to be issued or keys to be protected. Creating publicly verifiable certificates with a well-known PKI can require a lot of time for a certificate to be issued, causing hang-ups in the process of publishing and distributing software.

    Cons

    • The most obvious issue with utilizing a self-signed certificate for code signing applications and software is that the certificate will not be recognized outside of the organization. A self-signed signature is only recognized by the device it was signed on, or within the organization it was generated in.
    • Self-signed certificates are not easily tracked within an organization. This causes a multitude of issues, especially in the case of the compromise of a self-signed certificate. Since self-signed certificates can be created at any time from any device, the certificate may not be known to be compromised for a long period of time, allowing the threat actor to misuse the certificate to suit their needs.
    • Self-signed certificates can’t be revoked. With CA-generated certificates, it is simple to lookup the private keypair associated with a certificate, but that is not possible with self-signed certificates.

    Conclusion

    There are a number of different types of certificates available to users for purposes ranging from authentication and communication to code signing. These types of certificates tend to fall into two different categories, self-signed and CA-generated certificates. As previously mentioned, self-signed certificates are mainly used in test environments or for software and applications used exclusively within an organization. For this reason, we at Encryption Consulting suggest organizations looking to use certificates for code signing setup a PKI for their organization or work with a public PKI for code signing certificates. To learn how Encryption Consulting can help your organization create a strong and secure Public Key Infrastructure for use within your organization, visit our website at www.encryptionconsulting.com.

    Why 3DES or Triple DES is Officially Being Retired

    3DES is an encryption cipher derived from the original Data Encryption Standard (DES). 3DES was first introduced in 1998, the algorithm is primarily adopted in finance and other private industry to encrypt data-at-rest and data-in-transit. It became prominent in the late nineties but has since fallen out of favor due to the rise of more secure algorithms, such as AES-256 and XChaCha20. Although it will depreciate in 2023, it’s still implemented in some situations.

    About Triple DES or 3DES

    The Triple DES (often referred to as Data Encryption Algorithm (TDEA)) is specified in SP 800-6711 107 and has two variations, known as two-key TDEA and 108 three-key TDEA. Three-key TDEA is the stronger of the two variations.Below is the status of the 3DES algorithm used for encryption and decryption

    AlgorithmStatus
    Two-key TDEA EncryptionDisallowed
    Two-key TDEA DecryptionLegacy use
    Three-key TDEA EncryptionDeprecated through 2023Disallowed after 2023
    Three-key TDEA DecryptionLegacy use

    *Deprecated: you may use but must accept a specific risk

    *Disallowed: algorithm or key length not suitable for use anymore

    Three-key TDEA encryption and decryption

    Effective as of the final publication of this revision of SP 800-131A, encryption using three-key TDEA is deprecated through December 31, 2023, using the approved encryption modes. Note that SP 800-67 specifies a restriction on protecting no more than 220 data blocks using the same single key bundle. Three-key TDEA may continue to be used for encryption in existing applications but shall not be used for encryption in new applications. After December 31, 2023, three-key TDEA is disallowed for encryption unless specifically allowed by other NIST guidance. Decryption using three-key TDEA is allowed for legacy use.

    How is Triple DES/3DES applied?

    Triple DES is a type of encryption that employs three DES instances on the same plaintext. It employs a variety of key selection approaches, including the following:

    • all utilized keys are different in the first
    • two keys are the same and one is different in the second
    • and all keys are the same in the third.

    Difference between 3DES and DES

    DES is a symmetric-key algorithm that uses the same key for encryption and decryption processes. 3DES was developed as a more secure alternative because of DES’s small key length. 3DES or Triple DES was built upon DES to improve security. In 3DES, the DES algorithm is run three times with three keys; however, it is only considered secure if three separate keys are used.

    Triple DES/3DES is not secure?

    The Triple Data Encryption Algorithm (TDEA or 3DES) is being officially decommissioned, according to draught guidelines provided by NIST on July 19, 2018. According to the standards, 3DES will be deprecated for all new applications following a period of public deliberation, and its use will be prohibited after 2023.

    DES no longer used?

    The Data Encryption Standard, also known as DES, is no longer considered secure. While there are no known severe weaknesses in its internals, it is inherently flawed because its 56-bit key is too short. A German court recently declared DES to be “out-of-date and not secure enough,” and held a bank accountable for utilizing it.

    Tailored Encryption Services

    We assess, strategize & implement encryption strategies and solutions.

    AES replaced DES encryption

    One of the primary objectives for the DES replacement algorithm from the National Institute of Standards and Technology (NIST) was that it be efficient in both software and hardware implementations. (Originally, DES was only practical in hardware implementations.) Performance analysis of the algorithms was carried out using Java and C reference implementations. AES was chosen in an open competition that included 15 candidates from as many research teams as possible from around the world, and the overall amount of resources dedicated to the process was enormous.

    Finally, in October 2000, the National Institute of Standards and Technology (NIST) announced Rijndael as the proposed Advanced Encryption Standard (AES).

    Differences between 3DES and AES encryption?

    Both AES and 3DES, often known as triple-DES, are symmetric block ciphers. These are the current data encryption standards. Though the use of 3DES has become increasingly unpopular in recent years. Both have the same goals and objectives, yet there are a lot of similarities between them.

    Parameters of comparison3DESAES
    Key Length168 bits (k1, k2, and k3), 112 bits (k1 and k2)128, 192, or 256 bits
    Cipher TypeSymmetric block cipherSymmetric block cipher
    Block Size64 bits128 bits
    SecurityProven inadequateConsidered secure

    Reference

    nvlpubs.nist.gov/nistpubs/SpecialPublications/NIST.SP.800-131Ar2.pdf

    Protect The Confidentiality And Integrity Of Sensitive Information With GO-ITS 25.12

    The Government of Ontario Information Technology Standards (GO-ITS) provide guidelines, standards, and practices for the Ontario Public Service. It defines the requirements and best practices to protect the Government of Ontario’s computer systems and networks. GO-ITS 25.12 defines the requirements for the use of cryptography and its type and strength within the Government of Ontario.

    In the standard, the requirements associated must mean that the condition is mandatory, and the requirements related should imply that they are recommendations. These requirements apply to all the vendors, agencies, ministries, and third parties under contract with the Government of Ontario.

    Cryptographic Methods and Secure Key Management

    Cryptography is used to protect the confidentiality and integrity of sensitive information. The cryptographic algorithms that are used for these purposes are:

    1. Symmetric Encryption

      Symmetric Encryption involves using a single key for both encryption and decryption of the information. The key is shared between the entities through a secure channel. Symmetric encryption is primarily used to ensure confidentiality. The main advantages of symmetric encryption are speed and ease of understanding.

    2. Asymmetric Encryption

      Asymmetric encryption uses a unique key pair for each user. The keypair consists of a public key that is known to everyone and a private key that is never shared and must be kept secret. Asymmetric encryption is primarily used for digital signatures and key management within large groups of users.

    3. Hash Functions

      These are one-way functions that map a variable-length input to a fixed-length output string. Secure hash functions are primarily used to protect data integrity.

    The management of encryption keys is essential for the secure use of cryptographic techniques. Key management is the process of managing the encryption keys throughout their lifecycle, including secure generation, storage, distribution, use, and destruction.

    Tailored Encryption Services

    We assess, strategize & implement encryption strategies and solutions.

    Requirements of GO-ITS

    As per the standard, cryptographic material must be securely protected, including creation, storage, distribution, use, revocation, destruction, and recovery of keys. The requirements are subdivided as per different areas:

    Education and Training

    • Technical staff that develops, implements, or manages the systems must be aware of the cryptography requirements as per the standard.

    Information in Storage

    • Sensitive information should be encrypted in storage or stored operationally using secure hash functions.
    • Encrypted sensitive data stored for more than two years must be encrypted as per a high-risk environment.
    • If the responsibility of the encrypted data is transferred to another organization and the previous organization is no longer authorized, the data must be encrypted by the new organization with a new key.
    • Mobile devices such as smartphones, tablets, removable media, portable computers that are processing or storing sensitive data must encrypt the entire device storage.
    • If sensitive data is stored on desktop computers, the data must be encrypted.
    • Sensitive data must be encrypted at the column or data field/cell level before being written to a data repository.

    Communications Security

    • Sensitive information must be encrypted in transit using appropriate means.
    • The integrity of sensitive data must be verified using an approved message authentication code or digital signature. Digital signatures must use an accurate timestamp from a valid reference time source.

    Cryptography deployment

    • All cryptography applications must use a random number generator or pseudo-random number generator; check the validity of certificates and use only valid certificates.
    • Applications must securely delete decrypted information retained in the cache or temporary memory immediately after completing the related activity.
    • Applications that process and access sensitive data must undergo security testing and evaluation (STE) prior to implementation.

    Protection of cryptographic materials

    • Access to the cryptographic materials must be restricted to authorized users, applications, or services.
    • Cryptography keys must be protected as per the sensitivity of the information they are protecting.
    • Wherever possible, keys should be generated via a secure software module or a Hardware Security Module. For the generation of keys that protect sensitive information, the modules should be on-premises.

    Hardware Security Modules (HSMs)

    Hardware security modules are used for secure key generation, storage, and management of cryptographic keys.

    • HSMs must be compliant with FIPS 140-2 level 2.
    • If HSMs are storing highly sensitive information and are located off-premises, then they should be compliant with FIPS 140-2 level 3.
    • They must be deployed in a manner to reduce exposure to attacks.
    • They must be operated as per least privilege and segregation of duties principles.
    • They must be monitored and audited.
    • HSM firmware must be securely managed.

    Key Management

    • Key management procedures must be developed for all applications using cryptographic systems to protect sensitive data.
    • Key management procedures must address key generation, key assignment, key revocation, re-keying, key distribution, and key destruction.
    • Keys created for test purposes must not be used in a production environment, and production keys must not be used in a test environment.

    Recovery of encrypted information

    • Cryptographic services must have a secure mechanism to recover symmetric and asymmetric decryption keys to decrypt the encrypted data in storage.
    • Decryption keys must be recoverable after their expiration to enable decryption of data in archived backups.

    Symmetric algorithm modes of operation

    • The Electronic Code Book (ECB) mode of operation must not be used.
    • AES Galois/Counter Mode (GCM) should be used instead of CBC mode.
    • When using the GCM mode of operation, avoid repeating Initialization Vectors (IVs) with a given key or encrypting more than 264 blocks with a given key.

    Transport Layer Security

    • Internet browsers, applications, and systems must support TLS.
    • TLS 1.2 and 1.3 should be used.
    • The SSL protocol and early versions of TLS protocol must not be used as they are vulnerable to attacks.
    • TLS cipher suite algorithms must be selected as per the approved cryptographic algorithms and minimum key length.
    • Client or server connections that request the use of weaker protocols or a reduction in the strength of cryptographic systems must be denied.

    Emerging Threats

    Emerging technical threats that could pose a significant challenge to the existing cryptography must be addressed. Cryptographic agility, understanding interoperability requirements and relevant supply chains, asset management, and risk management are the best courses of action regarding potential threats against cryptography.

    Decrypt The Importance Of Key Management In Cryptography For Your Organization

    Cryptographic keys are a vital part of any security system. They do everything from data encryption and decryption to user authentication. The compromise of any cryptographic key could lead to the collapse of an organization’s entire security infrastructure, allowing the attacker to decrypt sensitive data, authenticate themselves as privileged users, or give themselves access to other sources of classified information. Luckily, proper Management of keys and their related components can ensure the safety of confidential information.

    Key management deals with the creation, exchange, storage, deletion, renewal of keys, etc. Key Management is putting certain standards in place to ensure the security of cryptographic keys in an organization.

    Types of Cryptographic keys:

    Cryptographic keys are grouped into various categories based on their functions. Let’s talk about a few types:

    1. Master Key

      The master key is used only to encrypt other subordinate encryption keys. The master key always remains in a secure area in the cryptographic facility (e.g., hardware security module), and its length will typically be 128 – 256 bits, depending on the algorithm used.

    2. The Key Encryption Key (KEK)

      When a secret key or data encryption is used, it must be “wrapped” with KEK keys to ensure the confidentiality, integrity, and authenticity of the key. The KEK is also known as the “key wrapping key” or the “key transport key.”

    3. The Data Encryption Key (DEK)

      Depending on the scenario and requirements, data may be encrypted with symmetric or asymmetric keys. In the case of symmetric keys, an AES key with a key length of 128-256 bits is typically used. A key length of 1024 – 4096 bits is generally used for asymmetric keys with the RSA algorithm. In simpler terms, you encrypt your data with data encryption keys.

    4. Root Keys

      The Root Key is the topmost key of your PKI hierarchy, which is used to authenticate and sign digital certificates. The Root Key usually has a longer lifetime than other keys in the hierarchy. The private portion of the root key pair is stored securely in a FIPS-140 2 level 3 compliant hardware security module.

    Key length and algorithm

    Choosing the right key length and algorithm is very important for the security of your cryptography environment. The key length of keys must be aligned with the key algorithm in use. For any keys (symmetric or asymmetric keys), the key length is chosen based on several factors:

    • The key algorithm being used
    • The required security strength
    • The amount of data being processed utilizing the key (e.g., bulk data)
    • The crypto period of the key

    Tailored Encryption Services

    We assess, strategize & implement encryption strategies and solutions.

    Importance of Key Management

    Key Management forms the basis of all data security. Data is encrypted and decrypted via encryption keys, which means the loss or compromise of any encryption key would invalidate the data security measures put into place. Keys also ensure the safe transmission of data across an Internet connection. With authentication methods like code signing, attackers could pretend to be a trusted service like Microsoft while giving victims malware if they steal a poorly protected key. Keys comply with specific standards and regulations to ensure companies use best practices when protecting cryptographic keys. Well-protected keys should only be accessible by users who need them.

    Key management systems are commonly used to ensure that the keys are:

    • Generated to the required key length and algorithm
    • Well protected (security architects generally prefer FIPS 140-2 complaint hardware security modules)
    • Managed and accessible only by authorized users
    • Rotated regularly
    • Deleted when no longer required
    • Audited regularly for their usage

    Centralized Key Management

    People often ask if it is mandatory to have a 3rd party key management solution to manage encryption keys centrally. As per my opinion, no, it is not compulsory, but it is good to have features for your organization. A centralized key management system offers more efficiency than application-specific KMS.

    The benefits of a centralized key management system:

    • Reduces operation overhead
    • Reduces costs with automation
    • With automation, it reduces the risk of human errors
    • Automated key update and distribution to any end-point
    • Provides tamper-evident records for proof of compliance
    • High availability and scalability
    • Meets regulatory compliance
    • Simplify your key management lifecycle

    Compliance and Best Practices

    Compliance standards and regulations ask a lot of key management practices. Standards created by the NIST and regulations, like PCI DSS, FIPS, and HIPAA, expect users to follow certain best practices to maintain the security of cryptographic keys used to protect sensitive data.

    The following are important practices to ensure compliance with government regulations and standards:

    • The most important practice with cryptographic keys is never hard-coding key values anywhere. Hard-coding a key into open-source code, or code of any kind, instantly compromises the key. Anyone with access to that code now has access to the key value of one of your encryption keys, resulting in an insecure key.
    • The principle of least privilege is that users should only have access to keys necessary for their work. This assures only authorized users can access important cryptographic keys while tracking key usage. If a key is misused or compromised, only a handful of people have access to the key, so the suspect pool is narrowed down if the breach was within the organization.
    • HSMs are physical devices that store cryptographic keys and perform cryptographic operations on-premises. For an attacker to steal the keys from an HSM, they would need to physically remove the device from the premises, steal a quorum of access cards required to access the HSM, and bypass the encryption algorithm used to keep the keys secure. HSMs on the Cloud are also a viable key management storage method. Still, there is always the chance that the Cloud Service Provider’s security fails, allowing an attacker to access the keys stored therein.
    • Automation is a widely practiced method of ensuring keys do not go past their crypto period and become overused. Other portions of the key lifecycle can be automated, like creating new keys, backing up keys regularly, distributing keys, revoking keys, and destroying keys.
    • Creating and enforcing security policies relating to encryption keys is another way many organizations ensure the safety and compliance of their key management system. Security policies provide the methods everyone within an organization follows and create another method of tracking who can and has accessed specific keys.
    • Separating duties related to key Management is another important practice for any organization. An example of separation of duties is that one person is assigned to authorize the new user’s access to keys, another distributes the keys, and a third person creates the keys. With this method, the first person cannot steal the key during the distribution phase or learn the value during the generation phase of the key lifecycle.

    How can Encryption Consulting help?

    At Encryption Consulting, we ensure your system meets compliance standards and protects data with the best possible methods. We perform encryption assessments, including key Management and cloud key lifecycle management. We also write weekly blogs that can help you find the best practices for your key management needs and learn more about the different aspects of data security.