Data transmission between devices on a particular network needs to be properly monitored and regulated for proper and secure communication. This transmission is carried out with a set of rules which is also known as a network protocol. SSH came into existence because earlier protocols like Telnet and rsh were not as secure and did not provide protection against malicious cyber-attacks. The desire for a more secure connection led to the creation of the SSH protocol.
What is SSH?
Secure Shell (SSH) is the network protocol that provides a secure way for two devices like computers to connect remotely. SSH employs encryption to ensure that attackers cannot interpret the connection or traffic between two connected devices. SSH consists of three different layers:
Transport Layer
This layer establishes safe and secure communication between client and server during transmission and after authentication. It oversees data decryption, encryption, protection, and integrity and helps speed up data exchange (by providing data compression and caching).
Authentication Layer
This layer communicates the supported authentication methods to the client and conducts the entire user authentication process.
Connection Layer
This layer manages the communication between the devices after the authentication succeeds and handles the opening and closing of communication channels.
Tailored Advisory Services
We assess, strategize & implement encryption strategies and solutions customized to your requirements.
SSH provides a layer of security for the data exchange between machines or devices. Some important use cases are:
Remote access
SSH ensures encrypted remote connections for both users and processes.
File transfer
SFTP is a secure file transfer protocol managed by SSH and provides a safe way to manipulate files over a network.
X11 Forwarding
Users can run server-hosted X applications from their client machines.
Port Forwarding
After mapping a client’s port to the server’s remote ports, SSH helps secure other network protocols like TCP/IP.
Tunneling
This is an encapsulation technique that provides secure data transfers. It is useful for accessing various business-sensitive online materials from unsecured networks.
How does SSH work?
If the user is using Linux or Mac, then using SSH is very simple, but for Windows users, utilizing an SSH client to open SSH connections is mandatory. The most typical and popular SSH client is PuTTY.
Mac and Linux users, a user needs to head over to their terminal program and needs to enter the following SSH command (which consists of 3 distinct parts):
ssh {user}@{host}
The SSH key command instructs or guides the user’s system to open an encrypted Secure Shell Connection. {user} refers to the account that the user wants to access. For example, a user may wish to access the root user, which is synonymous with the system administrator with any or complete rights to modify anything on the system. {host} represents the computer that the user wants to access, which can be an IP address or a domain name.
After hitting enter, the user will be prompted to enter the password for the requested account. If the entered password and credentials are correct, the user will be greeted with a remote terminal window.
When a client connects to a server over SSH, that machine can be controlled and used by a local device or computer. But the server was designated a TCP port through which it monitors the network and waits for clients to initialize this connection, but before that, it needs to pass the authentication process.
Conclusion
SSH is useful in diverse situations, and is also secure and lightweight, making it very popular. SSH communication is encrypted and cannot be easily interpreted by any unauthorized system.
In the modern world, Google Play App is widely used by developers to publish their applications with Google Android. However, when it comes to publishing it, a few nuances must be kept in mind for better security. One such is a self-signed certificate.
Self-signed certificates are generally not used in the TLS world (except for testing purposes). However, in codesigning, it is still used. Especially in the Android world, where the self-signed key is used for the “upload key .”Let’s explore how we securely generate the “upload key” but before it…
What is Upload Key?
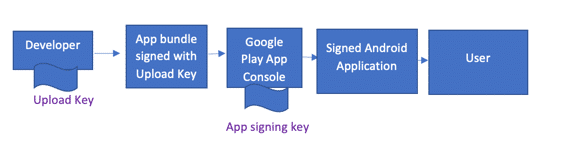
Upload key is the new method of uploading APKs (Android Package Kit) to Google Play App Signing for publishing it to users. The upload key establishes trust between your enterprise and Google to upload an Android bundle. The Android bundle must be signed using the upload key before uploading it to the Play Console. It is entirely different from the app signing key used to sign the android bundle for distribution.
Thus, Play App Signing uses two keys: the app signing key and the upload key. We will be referencing only the Upload Key for this article.
Below is a figure to illustrate the signing flow in Android:
Why use Upload Key?
If you continue using your app signing key for your releases, you run the risk that the key might leak due to human error. However, suppose you use a separate upload key for signing the binaries you produce on your machine.
In that case, even if the upload key is compromised, it cannot be used by a malicious third party to create APKs impersonating your own. As a result, using a separate upload key is considered a best practice.
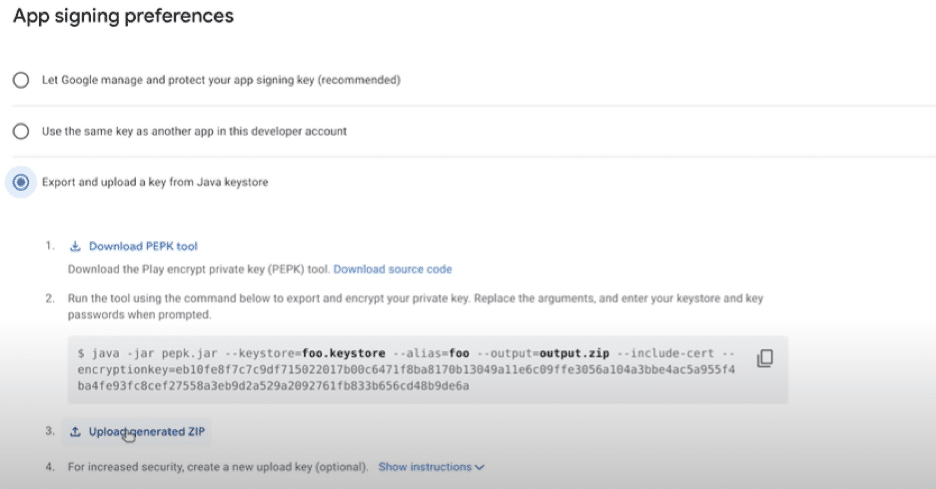
Always use the option “Export and Upload a key from Java Keystore” from a security point of view.
But how do we create an upload Key?
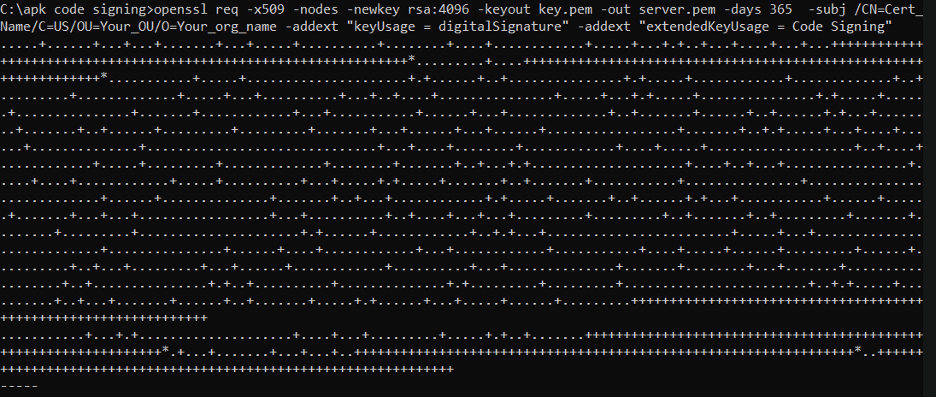
Self-signed certificates are used to generate an upload key. We will first discuss the simplistic way generally used to create a self-signed key via OpenSSL and later discuss the flaw and solution behind this approach:
A simplistic way to create a self-signed key via OpenSSL
Generation of Private Key
First, we create a private key. The below command creates a 4096-bit RSA private key (.key) with the OpenSSL command:
openssl genrsa -out upload.key 4096
If we want private key encrypted, add the -des3 option to the command.
openssl genrsa -des3 -out upload.key 4096
A side-effect of the pass-phrased private key is that Apache requires the passphrase each time the web server starts. Obviously, this is not always practical as the person entering the data isn’t always around to type in the passphrase, such as after a reboot or crash.
Enterprise Code-Signing Solution
Get One solution for all your software code-signing cryptographic needs with our code-signing solution.
You need a Certificate Signing Request (CSR) if you want your certificate signed. The CSR contains your public key and additional information (organization, country, etc.)
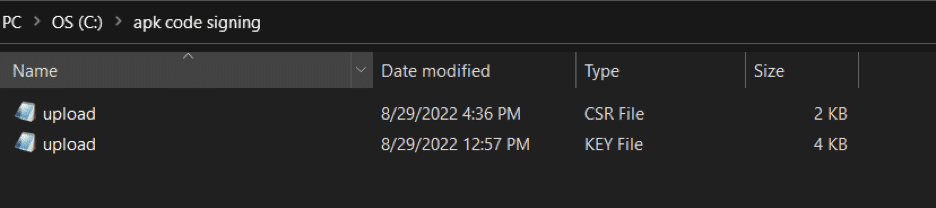
Let us create a CSR (upload.csr) from our existing private key:
openssl req -key upload.key -new -out upload.csr
Obtaining certificate from CSR and Key generated
Once the CSR and Private Key are generated, the next step is to create the certificate. The below command generates the certificate with 365 days validity:
The certificate received is in .crt format, having no private key, and we want a .pfx format (as it contains a private key) to sign files. We will use the below command to convert it into pfx:
Once the password is provided, .pfx file will be generated.
This pfx file is then supposed to sign the Android Bundle.
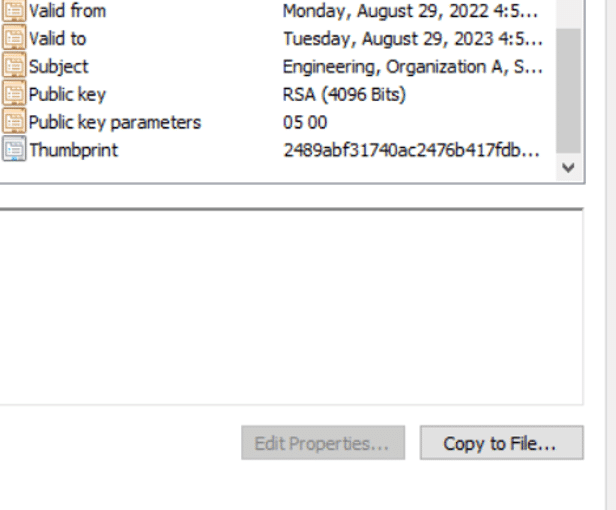
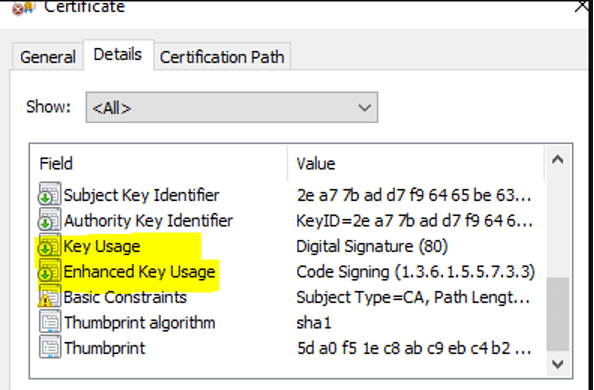
Sounds good, right? However, the files signed via this certificate are not accepted in Playstore. This is because the self-signed certificate does not contain Key Usage and Enhanced Key Usage extensions. To see this, open Certificates in the MMC (Microsoft Management Console) and load the Certificates snap-in. After opening the certificate, click the Details tab.
But, What are Key Usage Extensions?
Key usage (KU) extensions define the purpose of the public key contained in a certificate. A single key should be used for only one purpose.
How many Key Usage extensions are available, and which one should I choose?
The Simple Network Management Protocol (SNMP) is a networking protocol used in Internet Protocol networks to manage and monitor network-connected devices. The SNMP protocol is embedded in various devices such as routers, switches, servers, firewalls, etc., that can be accessed via their IP address. SNMP provides a standard mechanism for network devices to communicate management information within single and multi-vendor LAN or WAN environments. In the OSI model framework, it is an application layer protocol.
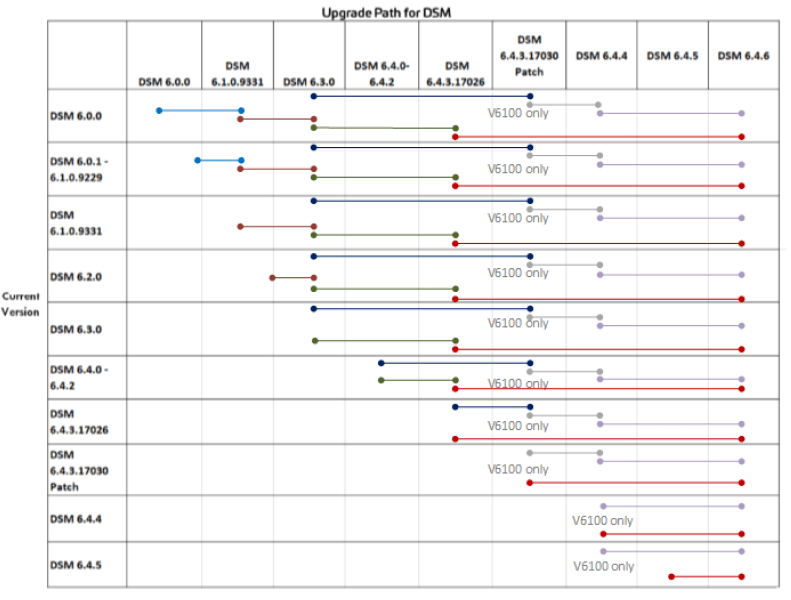
There are three versions of SNMP: SNMPv1, SNMPv2c, and SNMPv3. The DSM supports SNMP version 1 or 2.
Components of SNMP
The following are key components of SNMP through with it performs its basic tasks:
SNMP Agent
An SNMP agent is a software process that responds to SNMP queries to provide network node status and statistics. They are located locally and are linked to SNMP network devices from which they collect, store, and transmit monitoring data. When data is queried, it is sent to the designated SNMP manager.
SNMP Manager
It is also referred to as the SNMP server and is responsible for communicating with the SNMP agent-implemented network devices. The manager queries the agents, gets responses from them, sets variables, and acknowledges events from them.
Management information base (MIB)
This exists in the form of a text file (with extension .mib) and describes all data objects used by a specific device that can be queried or controlled using SNMP. Various managed objects within the MIB can be identified using Object Identifiers (Object ID or OID).
Object Identifier (OID)
There are two types of OIDs: Scalar and tabular. These are typically represented as a dotted list of integers. MIBs hierarchically organize every OID, which can be represented in a tree structure with individual variable identifiers for each OID.
Tailored Advisory Services
We assess, strategize & implement encryption strategies and solutions customized to your requirements.
The Vormetric DSM can be enabled as an SNMP agent and then monitored by SNMP servers using the available MIB objects. When the DSM receives an SNMP GET request (sent to port 7025 or 161) from an SNMP server, the DSM locates the OID entry in the MIB and returns its value to the SNMP server.
SNMP is enabled via the System > SNMP page on the Configuration tab. If the SNMP Access Control List (ACL) is empty, SNMP requests from any IP address will be acknowledged. If the
SNMP ACL is defined to allow only certain IP addresses or IP address blocks to go through; the DSM will only acknowledge requests from IP addresses specified in the SNMP ACL.
The community string is typically set to a factory default value of “public”. This string must be the same for all devices in the same group for SNMP monitoring to function. For security reasons, it is advised to change the community string from “public” to a custom value.
SNMP traps are currently not supported and cannot be configured on the DSM.
The following table represents Vormetric-specific OIDs that can be queried by an SNMP server and are present under the Vormetric MIB tab. These OIDs cannot be manually changed; however, those (sysContact and sysLocation) available under System Group MIB can be customized.
OID
Description
1.3.6.1.4.1.21513.1.0
Returns the version details of the DSM
1.3.6.1.4.1.21513.2.0
Returns the fingerprint of the current DSM deployment
1.3.6.1.4.1.21513.3.0
Returns the current date and time on the DSM
1.3.6.1.4.1.21513.5.0
Returns the agent type (FS, or Key agent), the license installation state (true or false) of each agent type, and, for each installed license, the license expiration date
1.3.6.1.4.1.21513.6.0
Returns the name of each node in a DSM HA cluster configuration.
1.3.6.1.4.1.21513.7.0
Returns disk usage information for each file system mounted on the DSM.
1.3.6.1.4.1.21513.8.0
Return DSMs process, memory, paging, I/O, and CPU usage information
Shell Script
Encryption Consulting recently developed a shell script for one of its customers leveraging the SNMP functionality of Vormetric DSM to automate the process of obtaining insights on the parameters mentioned above. It can be remotely executed from a Linux or Unix host and includes all the commands required to query the DSM using the OIDs provided.
Conclusion
Configuring SNMP in Vormetric DSM can help in its monitoring through an SNMP server. The available OIDs can enable the server to gather information about the DSM with regard to contact information, physical location, version number, fingerprint, server time, license and HA configuration, and disk and system usage information. However, the SNMP functionality must be enabled only with proper security measures, such as by using SNMP ACL to restrict access to the service
The current generation of TPMs (version 1.2) are chips that are usually surface mounted onto the motherboard of a PC or integrated into a custom PCB. The TPM process reports the state of the system, from the moment of power-on right through to the execution of applications on a modern graphical operating system.
Monitoring has limited uses but combined with access control for secrets based on state monitoring, it becomes easy to execute many security practices. For example, if a PC is booted into a state where only select apps are installed, the TPM could then grant access to data storage and encryption keys for secure email.
Additionally, the TPM can manage third-party connections, be it the owner of a device wanting to remotely manage it, or a device manufacturer giving it to an untrusted party. To support requirements for availability, and to guard against equipment failure, the TPM can manage the migration of data between trusted devices, and for use of third parties as privacy or migration brokers.
Upon creation of the data, it can be designated as either migratable or non-migratable, depending upon the protection model required.
In short, the TPM makes it easy for operating system designers to protect themselves from attackers who may have access to the physical computers in their environments (swapping out a hard drive for example).
A Cost-Effective Architecture
The TPM architecture and data format was designed to achieve the desired functionality. It can be difficult for companies to integrate the hardware for perhaps thousands of computers and other devices, but the TPM is a cheap encryption solution that can be easily implemented with aminor impact on a company’s budget.
For example, using entirely asymmetric encryption would be a more cost-effective option, even though a symmetric encryption algorithm such as a block cipher would be better suited. Therefore, a TPM need only contain an RSA modular exponentiation accelerator and not an implementation of AES or 3DES.
Obviously, it can store any of these key types, but instead, any symmetric keys are sealed to a configuration and released for use in a trustworthy OS configuration. This means that TPM internal data storage formats are limited by the maximum size of data that can be encrypted using RSA operations of a certain key length. As a result, the efficiency of asymmetric encryption is taken advantage of while still maintaining compatibility with symmetric encryption.
But how does the TPM deal with false key injection? as the public half of the storage key will be available to all. The ability to insert false keys may seem irrelevant (after all it cannot gain access to existing storage keys which govern protected content), but it is crucial as, without it, it would be possible to create a key that is designated as non-migratable (can never be removed from a specific TPM), and yet with a value known to the attacker. If a content provider were to issue content to be protected under this key, a breach would occur.
To solve this problem, every data structure in the TPM is signed with a “TPM Proof”, which in essence is a special secret hash that is matched with an existing root RSA Key in a special register.
So even though an attacker may access the public key, they cannot know the TPM Proof, which is needed to access data. Essentially, the asymmetric cryptosystem is converted into a symmetric one, with a composite key consisting of the private half of the root storage key and the TPM proof.
A TPM is usually programmed with high-functioning cryptographic hashing algorithms, most often using SHA-1. Using the Platform Config Register’s (PCR) values, the algorithm further encrypts the key and, in a way, “extends” the values to improve security. This also prevents the modification of data, key identification, and improved command chaining. Hashing command parameters together with the help of the TPM Proof secret value can be very useful when considering command chaining in a TPM, as it creates a 160-bit capability string that attackers cannot forge. This can cause major performance improvements for Third Party Migration for example, where the authentication and authorization certificate is produced by a third party and processed by the TPM.
This introduces some performance decreases for the sake of authentication since in order to protect from the possibility of malicious attacks in this situation, a migration certificate must be verified before each key is transferred.
This problem is solved by the TPM Proof, which can run a single check using the compatibility string, which can make things much faster.
The physical design of these chips is also a crucial factor for their security and cost-effectiveness. Since they were designed to be a cheap solution, even though the security of the system is well thought out, it does not protect against some attacks and protects against others.
One of the most significant weaknesses of the TPM platform is its physical vulnerability. Most TPMs used to be mountable and separable from motherboards, which raises a lot of questions about the security of a physically removable device, now they are usually mounted inseparably to the motherboard. Removing a soldered chip from a device might sound easy but it is up to the organization to put in place man traps, smart cards, and other security procedures to ensure only authorized persons have access to the physical machines. If a malicious person had access to the device, aside from removing it, not much else is possible; however, proposals have been made regarding other ways to trick TPMs.
Tailored Encryption Services
We assess, strategize & implement encryption strategies and solutions.
These different ways include using a simulation of reset, using dual-ported memory, or modification of bus signals. Soon new chip technologies will be released further improving security in this regard. But since hardware attacks are few and far between, the major focus remains on the software and firmware security of these devices, so sacrificing physical security isn’t necessarily so bad of an idea. Operating system integrity dominates proposed threat models when TPMs are deployed. Hardware state monitoring plus improved operating system security working in tandem can help prevent rootkit and Trojan Horse attacks.
The one area where the TPM architecture has gone out on a limb in the trade-off between cost and functionality is the area of privacy. Any sophisticated architectural features exist purely to enable online services to use TPMs without forcing the compromise of a user’s privacy. This operates through a system of pseudonymous identities that can be managed locally and registered with trusted third parties (authorized not to reveal a user’s identity).
An implementation of a zero-knowledge proving protocol is designed to allow a TPM to attest to a particular configuration without revealing this identity to anyone. This protocol is highly advanced and does not allow for any identifying information to be leaked and is a testament to the designer’s unwillingness to allow any compromises of privacy. Even though the device is on the cheaper end of the market, it can handle private operations as securely as can be.
The only caveat to be considered is that the inclusion of advanced architectural features does not necessarily mean that applications and systems will take advantage of these features – ultimately it will depend on whether the final online service provider is economically motivated to protect the user’s privacy, and has the services needed to run these advanced features.
TPM Application Space
Many modern laptops Trusted Platform Modules already integrated; however, the chip lies dormant by default and must be enabled (usually in the BIOS) before it can begin monitoring.
Since the average user will not need sophisticated security procedures, it is up to an organization or knowledgeable user to enable hardware monitoring. Once activated software such as Microsoft BitLocker disk encryption software, released with professional and enterprise versions of Windows, can be configured to use the TPM for secure storage of top-level cryptographic keys.
Whilst BitLocker has become generally the mainstream form of desktop encryption, the more ambitious functionality of the TPM such as remote attestation can only really be leveraged in tandem with a specially designed operating system. New releases of Windows could introduce newer functionality, but with that comes untested vulnerabilities. Simply put – if the trusted code has bugs, then the remote attestation proves nothing.
In order to make sense of remote attestation, an OS more akin to SE Linux is required. If OS could be created and a usable work environment for desktop computing developed, there would be many security safeguards. The platform could restrict installation to only approved software, using a predetermined list of allowed operations help to eliminate many avenues a virus could take. This is a commonly envisaged use case of the TPM – for helping system administrators of IT systems in large corporations keep users’ workstations locked down from unauthorized tampering. Be it a virus, or a seemingly harmless program installed by a user, strict administration is required to prevent breaches.
A new growing use case for TPMs is monitoring and securing mobile phone-embedded computers as their platforms increase in complexity. Interestingly while the push to secure the low-level software in the platform is undoubtedly aided by the TPM, user programmability and interactivity are not suffering so badly, as such features are migrating to higher and higher software layers, for instance, JavaScript and interactive web services – all of which will be supported on a modern mobile.
The success of the TPM secure microcontroller has largely been due to an open cooperative effort between major IT hardware and software players including Microsoft, Intel, Infineon, IBM, and Sun Microsystems. Encryption Consulting offers training to better understand the hardware and software components of these processes.
For example, building a PKI with machines using integrated TPMs is essential to a robust infrastructure for any company. But it is not necessarily large companies who will benefit the most, it is the availability of this hardware-assisted security to smaller companies and even individuals which is essential for the IT industry.
Conclusion
So, there is a bright future ahead both on the desktop and for embedded and ubiquitous computing using TPM technology, which can sustain secure key storage and further web development.
This established banking institution is a cornerstone of financial stability and trust, serving a broad clientele with a wide range of banking services. Known for its rigorous data protection protocols, the bank ensures the safety of personal and financial information through advanced encryption techniques and compliance with global banking security standards.
Despite these robust security measures, the institution faces challenges due to its infrastructure’s lack of hardware security modules (HSM). This gap in their security architecture prevented them from achieving the highest level of cryptographic operations security, posing potential risks in key management and data integrity. As a result, the bank was actively seeking solutions to integrate HSMs to enhance its security posture and continue to protect client assets effectively.
Challenges
Lack of complete administrative control
The organization had no autonomy over its cryptographic operations. Keys, access, and configuration tailored to specific requirements and security policies were mismanaged. In addition, they had no granular control over user permissions and access levels.
The organization couldn’t configure and customize cryptographic algorithms and protocols. Moreover, there were no comprehensive logging and audit trails for all administrative actions. There was also a lack of integration with existing identity and access management systems for seamless access control.
Low Performance
They did not have a robust infrastructure designed to handle high-volume cryptographic operations. Sub-optimized hardware and software configurations for maximum efficiency. In addition, they didn’t have Scalable architecture to accommodate growing demands. They lacked Load-balancing mechanisms to ensure equitable distribution of processing tasks.
Also, the organization lacked advanced caching mechanisms to minimize latency and improve response times. Moreover, the banking institution didn’t have Benchmarking and performance tuning capabilities to optimize system throughput.
Difficult HSM Management
The organization lacked intuitive user interfaces and management consoles for simplified operation. They did not have direct access to expert knowledge for efficient troubleshooting and guidance.
There was also a lack of flexible support plans tailored to diverse customer requirements and automated provisioning and deployment processes for rapid setup and configuration. They even lacked centralized management consoles for managing multiple HSM instances from a single interface and role-based access control to delegate management tasks to specific personnel.
Insecure Code Execution
There was no code isolation within the HSM environment to prevent unauthorized access. The organization also had insecure storage of cryptographic keys and sensitive data within the HSM. There was no real-time monitoring of code execution for anomalies or unauthorized access attempts. There was also a lack of hardware-based security features such as tamper resistance and physical protections, and compliance with industry standards and regulations for secure code execution was lacking.
Lack of Continuous Monitoring
There was no Real-time monitoring of cryptographic operations for anomalies or security breaches. There are no automated alerts or notifications for suspicious activities or deviations from normal behavior. It lacked Integration with Security Information and Event Management (SIEM) systems for centralized log analysis.
The organization lacked regular security audits and vulnerability assessments to identify potential weaknesses. There was no ongoing performance monitoring to ensure optimal system health and reliability. There was also a lack of proactive response mechanisms for addressing security incidents in real-time.
Customizable HSM Solutions
Get high-assurance HSM solutions and services to secure your cryptographic keys.
Using HSMs to sign, timestamp, and encrypt the contents will preserve the documents’ legitimacy and privacy. This eliminates the lack of belief in using electronic documents outside the organization’s boundaries.
Deploying an HSM provides a secure environment for storing and using the primary keys. This mitigates the challenge of safely storing the private key within a large organization.
By Deploying HSMs, Organizations have offered the highest level of security for the cryptographic keys used to encrypt client data. This enabled the provision of an effective cloud solution for the financial services industry.
Deploying HSMs as the Root of Trust for robust performance, availability, and scalability created a public key infrastructure built on top-of-the-line hardware with robust, flexible, and high-availability features.
Utilizing various layers of access control and hardened security with HSMs. This enables the processing of the new e-identity documents while shortening the processing time.
Impact
Using HSMs to sign, timestamp, and encrypt the contents will preserve the documents’ legitimacy and privacy. This led to swift and simple implementation and increased security without requiring development work.
Deploying an HSM provides a secure environment for storing and safely using primary keys. This ensures the safety of private key storage while ensuring flexibility and cost-effectiveness with fast implementation.
By Deploying HSMs, Organizations have offered the highest level of security for the cryptographic keys used to encrypt client data. It offers a productive cloud solution that has been audited and found to comply with all applicable regulatory obligations.
Deploying HSMs as the Root of Trust for robust performance, availability, and scalability helped provide the highest possible standards and was on time and under budget.
Utilizing various layers of access control, using hardened security with HSMs. This led to High performance, availability, and data throughput capabilities.
Conclusion
The adoption of HSM-as-a-service has markedly elevated the security framework of this banking institution, overcoming previous shortcomings in cryptographic operations and key management. By integrating HSMs, the bank has fortified its infrastructure, ensuring higher control, performance, and security across all cryptographic activities.
This solution has not only resolved administrative control and performance issues but has also established a robust, scalable environment for secure cryptographic operations. Consequently, the bank now enjoys enhanced data integrity and security, maintaining its commitment to protecting client assets while adhering to stringent industry standards. This strategic move underscores the institution’s dedication to continuous improvement and technological advancement in the face of evolving security challenges.
To overcome this, organizations need to deploy region-specific PKI infrastructure, which can be harder to maintain and introduces complexity to the whole infrastructure.
But using Azure, organizations can deploy a PKI infrastructure that can be operated worldwide with low latency and high availability.
In this article, we will be showing you how your own PKI architecture on Azure.
Note: If this is your first time deploying a PKI, I recommend following ADCS Two Tier PKI Hierarchy Deployment as it is a more straightforward approach and also touches the basics.
Prerequisites
An Azure account where we will create Virtual Machines and blob storage
A custom domain name
An offline Windows Server VM, which will be our Root CA
[NOTE: This is a test scenario. As such, CDP and AIA points may not match your requirements. Do use values that are appropriate as per your requirements.]
Preparing CDP and AIA points
We will create blob storage that will act as our CDP/AIA points for our PKI infrastructure. We will also associate it with our custom domain to redirect it to our blob.
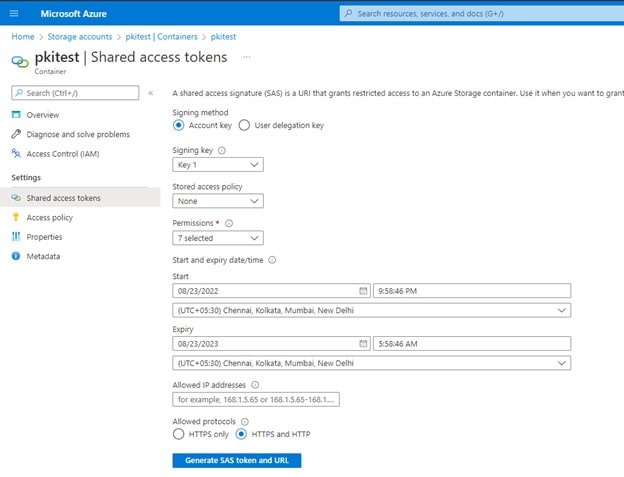
Creating Azure Blob Storage
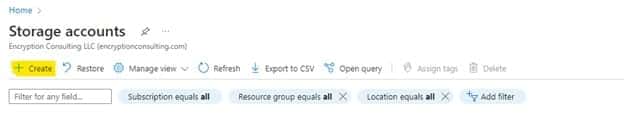
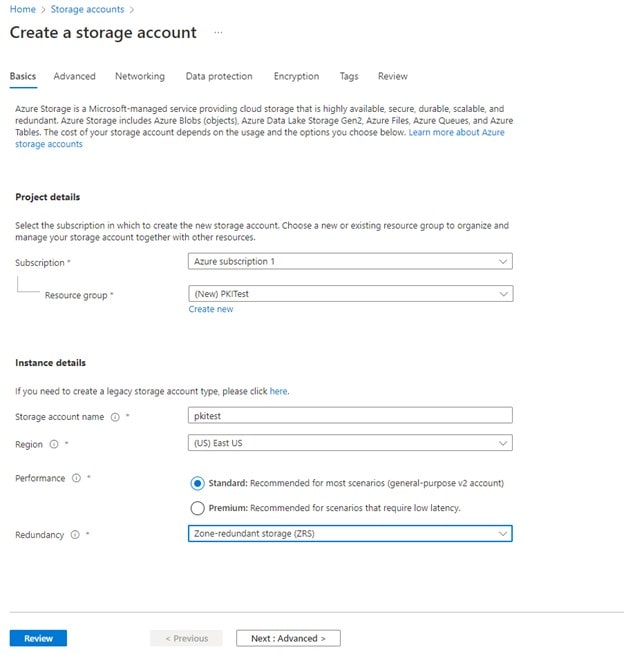
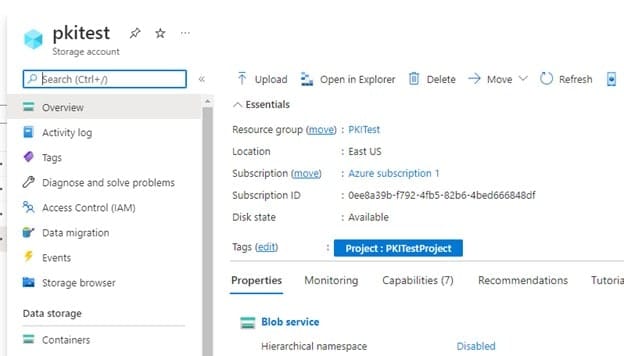
First, we would need to log into our Azure account and navigate to Storage Accounts
We will be creating a new storage account. So click Create on the top left corner.
Provide the necessary details on the basics. For Redundancy, I would recommend at least Zone-redundant Storage (ZRS)
On the Advanced tab, leave everything on default and click next
On the Networking tab, it is recommended to have public access from selected virtual networks and IP addresses and select the Virtual network where all the virtual machines will be deployed. If no virtual network exists, do create one.
On the Data Protection tab, click Next.
On the Encryption tab, leave everything default and click Next.
Provide relevant tags and click Next.
On the review tab, you can review everything looks good and click Create.
This will create the blob storage. Next, we will associate this blob storage with our custom domain and ensure it is accessible via HTTP.
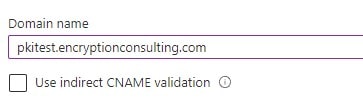
Mapping a custom domain to Azure Blog Storage
For this step, you would need a custom domain. Once you log in, you can navigate to DNS settings
In DNS settings, navigate to DNS records and enter a CNAME record.
Now we need to retrieve the hostname for your storage account. For this, we can navigate Settings > Endpoints on the left pane and copy the static website under Static Website. It should be something like https://pkitest.z13.web.core.windows.net (https://.z13.web.core.windows.net/)
Remove the https:// and additional /. It would look like pkitest.z13.web.core.windows.net, which is our hostname
Now in the DNS settings, for the hostname of the custom domain, provide pkitest and for the hostname, provide the hostname of the storage endpoint
Click to create a record
Navigate to Azure Storage account, click on Networking under Security + Networking and select Custom Domain on the tab above.
Provide the subdomain you created.
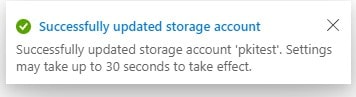
Click Save. After successful validation, you will get a validation notification
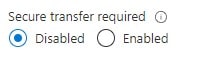
Disabling secure transfer required
For this blob being a CDP/AIA point, we need HTTP access to the blog, which is why we would need to turn off the secure transfer. If enabled, HTTP access would not be possible; our PKI wouldn’t be able to use this blob as CDP/AIA point.
Navigate to Configuration under Settings
Set Secure Transfer Required to Disabled
Click Save
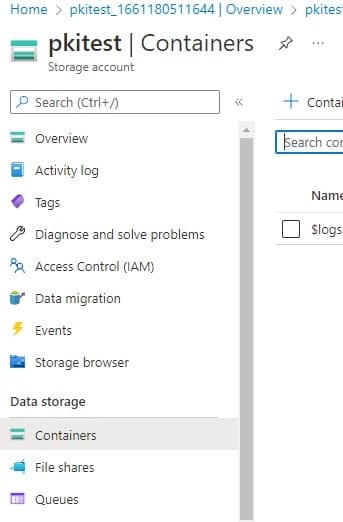
Testing Accessibility of Storage Account
This section will ensure our storage account is accessible via a custom domain.
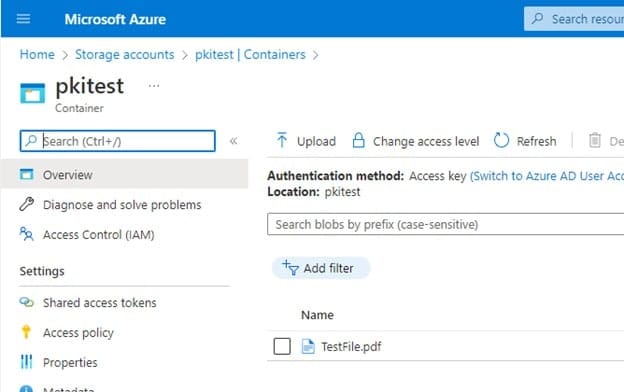
First, we would create a container and upload a file to it
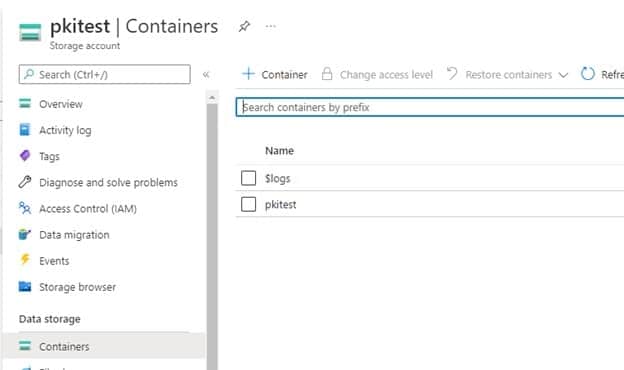
Navigate to Containers under Data Storage
On the top left corner, click
Provide the name, set public level access as a blob, and click Create
The container will be created
Click on the name and navigate inside it
On the top left corner, click
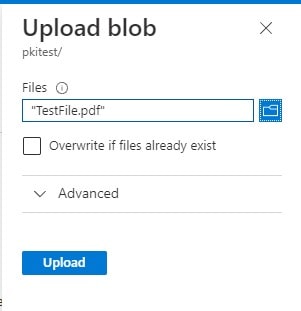
Select any file for testing (preferably a pdf or txt file)
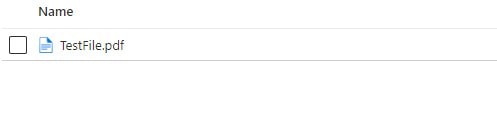
Click Upload, and once uploaded, it should be available in the container
Now, we will try to access the file using a custom domain. The URL should be
Ensure the file is opened in HTTP and it does display the file or downloads it
This concludes our section on preparing CDP and AIA points. Next, we will begin creating our PKI. Now you may delete the test file from the container as it would only contain the cert and CRLs.
Creating Domain Controller
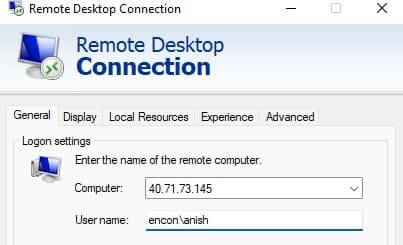
This Step-by-Step guide uses an Active Directory Domain Services (AD DS) forest named encon.com. DC01 functions as the domain controller.
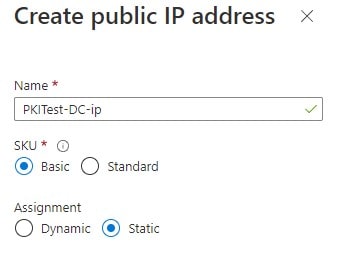
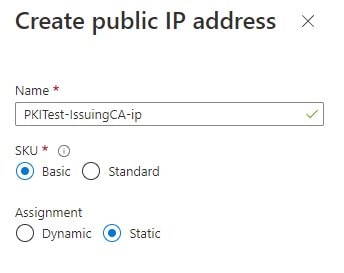
Firstly, we will deploy a VM on Azure. Ensure both the IPs are static.
While deploying, ensure,
VMs are deployed on the same Virtual Network
If deployed on the same region, ensure the subnet is the same
Public IP Address is static
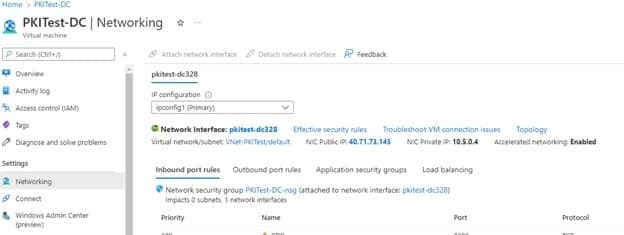
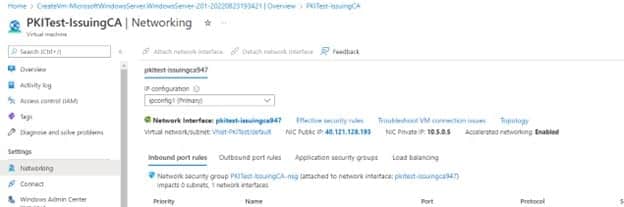
Once the VM is created, navigate to Networking under Settings and click on the Network Interface
Navigate to IP Configuration under settings
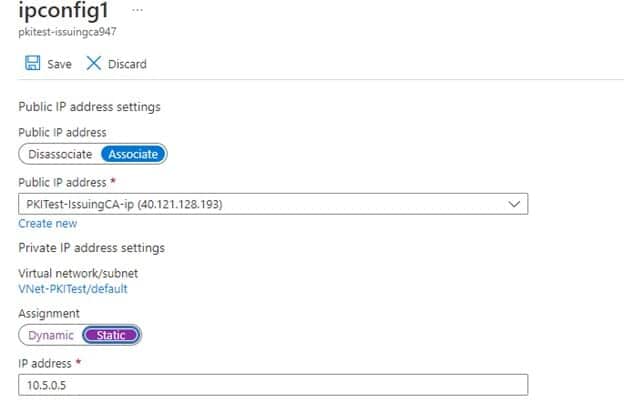
Click on ipconfig1 on the menu and change IP private settings to Static from Dynamic
Click Save and go back to the VM
Provide other parameters as per your requirement and create the VM.
Configuring Network
Once the VM is created, log in and follow the steps below
Login to DC01 as a local user
Click Start, type ncpa.cpl , and press ENTER
Click on Ethernet, and then click Properties under Activity
Double Click on Internet Protocol Version 4 (IPv4)
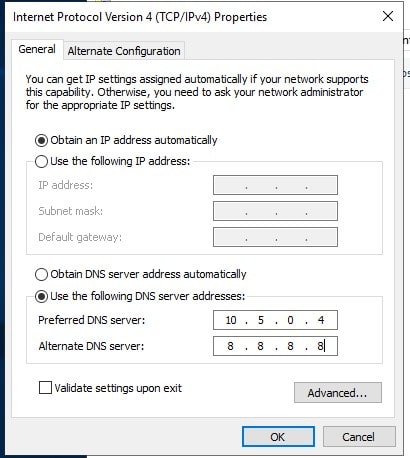
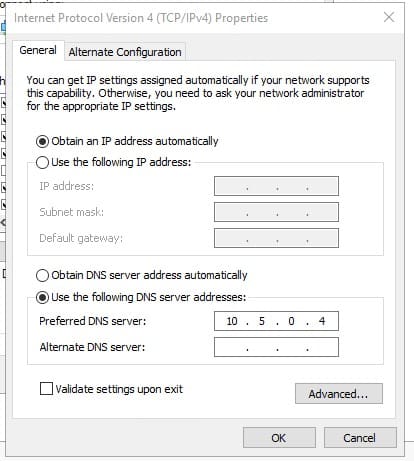
Only change the DNS Server Address, and provide the private IPv4 of DC01
For Alternate DNS, provide 8.8.8.8 or any other public DNS service you want.
Click OK and restart the VM from the Portal
Once Restarted, log in to DC01 as a local user
Click Start, type sysdm.cpl , and press ENTER
Changer PC name to DC01, and Restart Now when prompted.
Installing Active Directory Domain Services and Adding a new Forest
Open Server Manager. To do so, you can click the Server Manager icon in the toolbar or click Start, then click Server Manager.
Click Manage, and then click Add Roles and Features
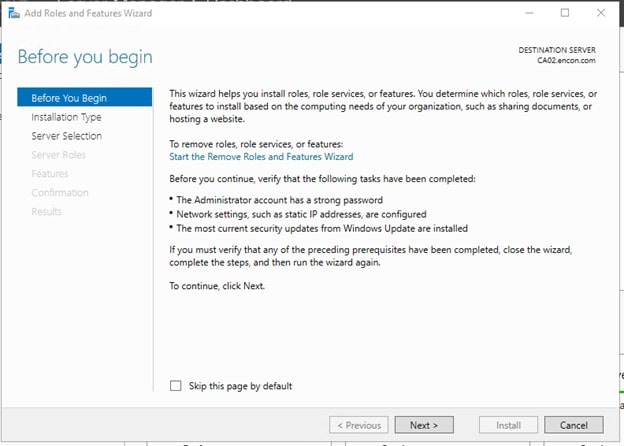
Before you Begin, click Next
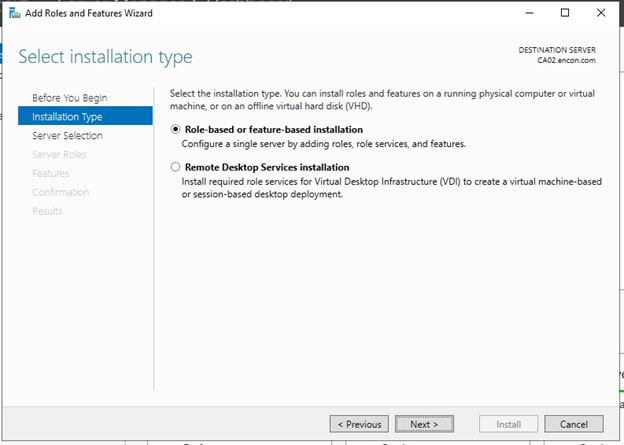
On Installation Type, click Next
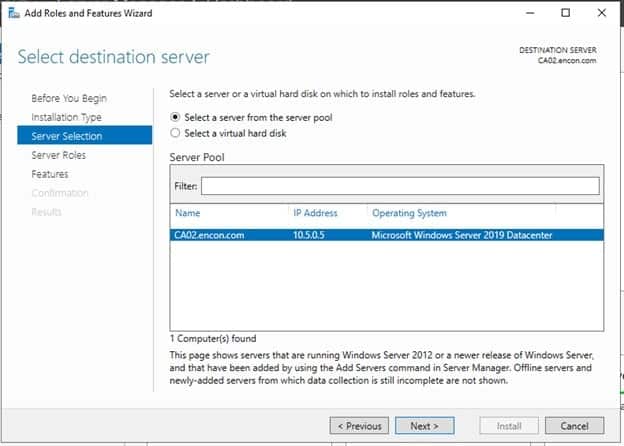
On Server Selection, click Next
On Server Roles, choose Active Directory Domain Services, click Add Features, and then click Next
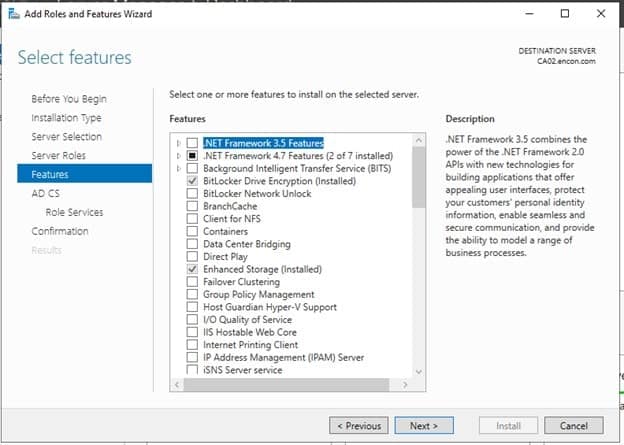
On Features, click Next
On AD DS, click Next
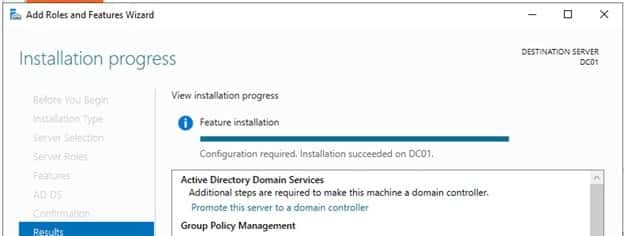
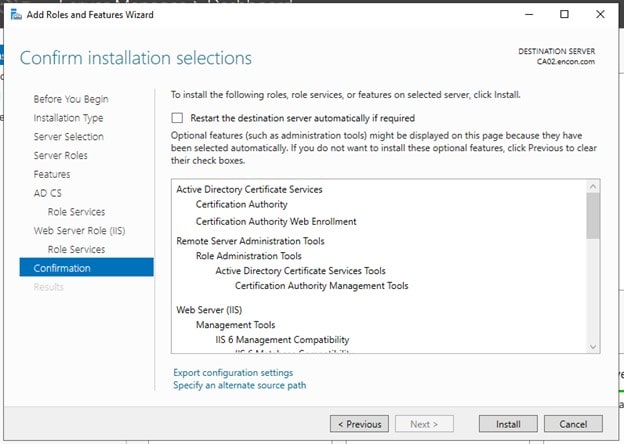
On Confirmation, click Install.
After installation, either
Click on Promote this server to a domain controller on Add Roles and Features Wizard
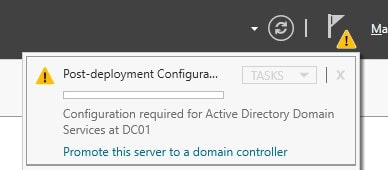
Or, click on Promote this server to a domain controller on Post Deployment Configurations in Notifications
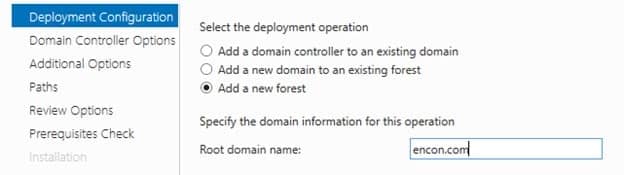
On Deployment Configuration, choose to Add a new forest and provide the root domain name (“encon.com”)
On Domain Controller options, provide Directory Services Restore Mode password and click Next
Under DNS options, click Next
Under Additional options, click Next
Under Paths, click Next
Under Review options, click Next
Under Prerequisites check, click Install
Once installed, the remote connection would be terminated.
Login to DC01 as encon\
DC01 is now ready
Creating Offline Root CA
The standalone offline root CA should not be installed in the domain. It should not even be connected to a network at all.
We will be creating this Root CA on-premises. I will create this on Proxmox, but you can use VMware or VirtualBox for this installation.
After installing Windows Server 2019, follow the steps below
Log onto CA01 as CA01\Administrator.
Click Start, click Run, and then type notepad C:\Windows\CAPolicy.inf and press ENTER.
Click File and Save to save the CAPolicy.inf file under C:\Windows directory. Close Notepad
Installing Offline Root CA
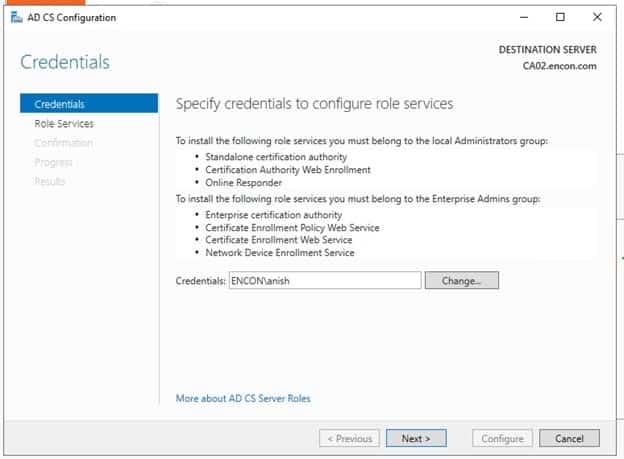
Log onto CA01 as CA01\Administrator.
Click Start, and then click Server Manager.
Click Manage, and then click Add Roles and Features
On the Before You Begin page, click Next.
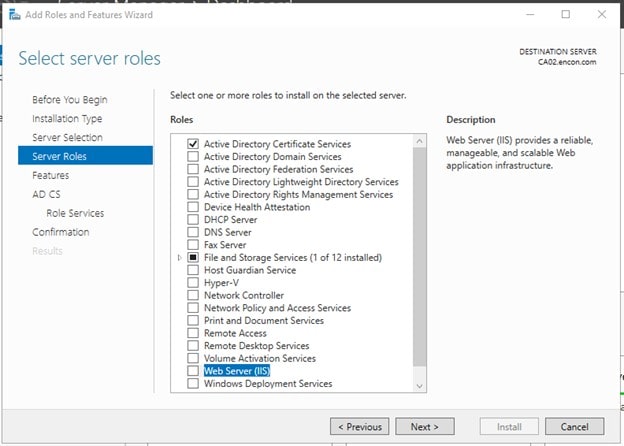
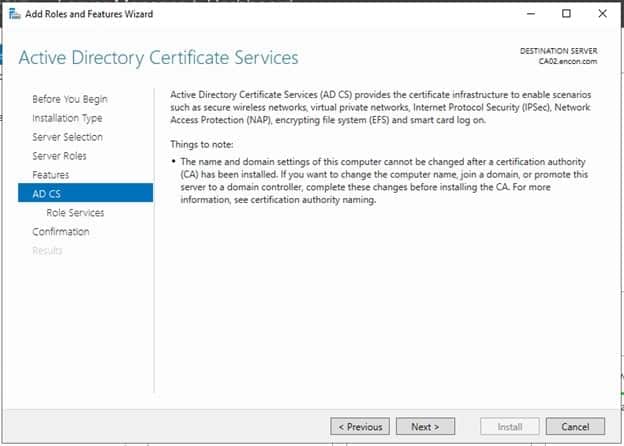
On the Select Server Roles page, select Active Directory Certificate Services, and then click Next.
On the Introduction to Active Directory Certificate Services page, click Next.
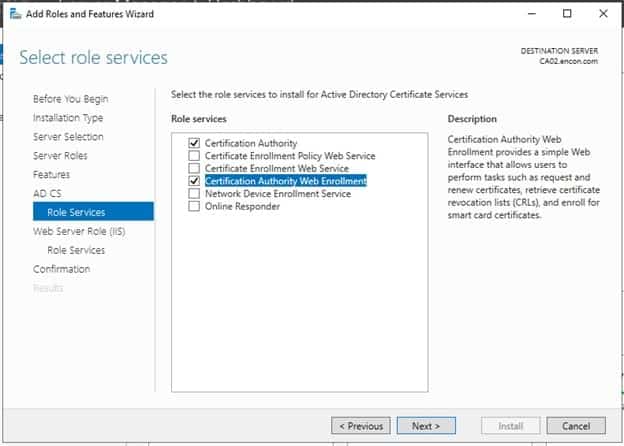
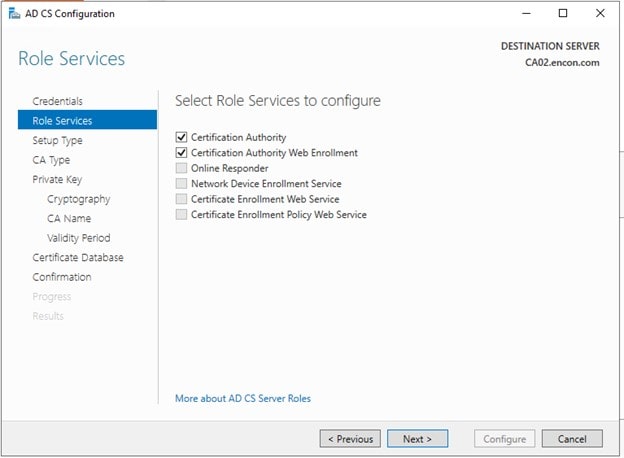
On the Select Role Services page, ensure that Certification Authority is selected, then Next.
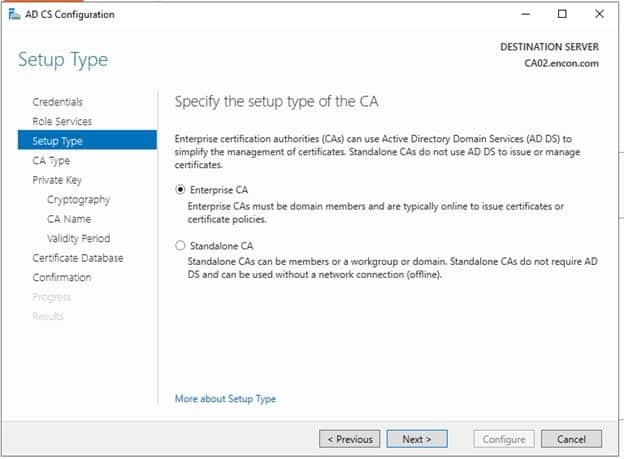
On the Specify Setup Type page, ensure that Standalone is selected, and then click Next.
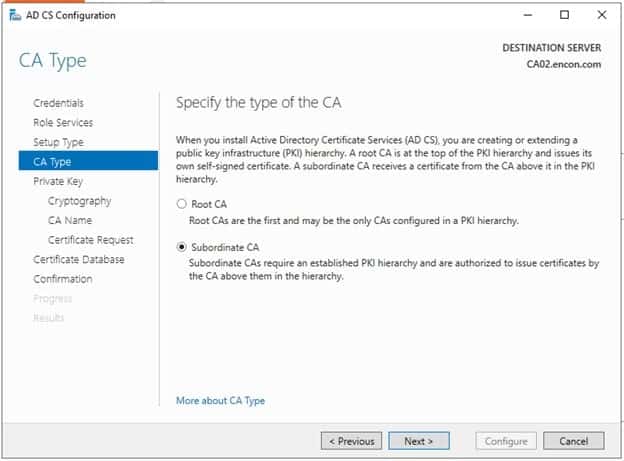
On the Specify CA Type page, ensure that Root CA is selected, and then click Next.
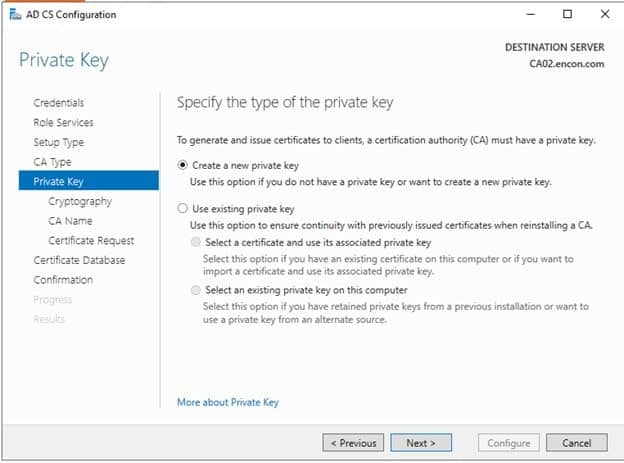
On the Set Up Private Key page, ensure that Create a new private key is selected, and then click Next.
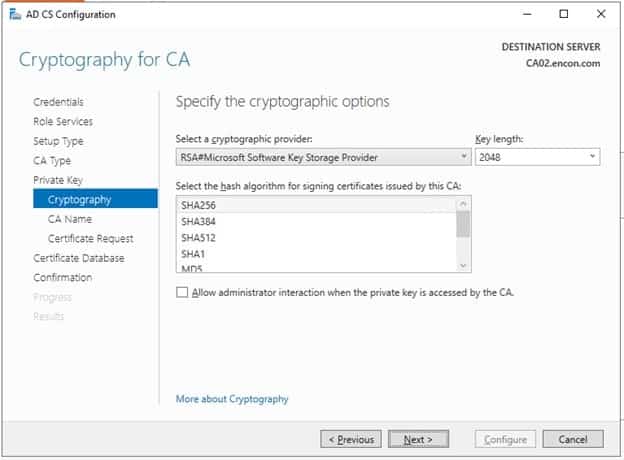
Leave the defaults on the Configure Cryptography for CA page, and click Next.
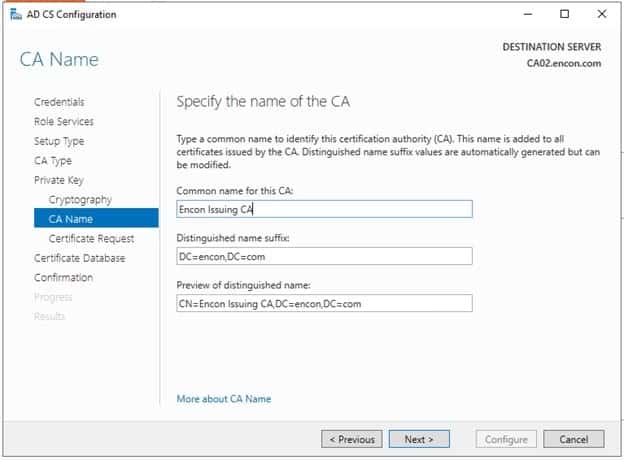
On Configure CA Name page, under the Common name for this CA, clear the existing entry and type Encon Root CA. Click Next.
On the Set Validity Period page, under Select validity period for the certificate generated for this CA, clear the existing entry and type 20. Leave the selection box set to Years. Click Next.
Keep the default settings on the Configure Certificate Database page, and click Next.
Review the settings on the Confirm Installation Selections page and then click Install.
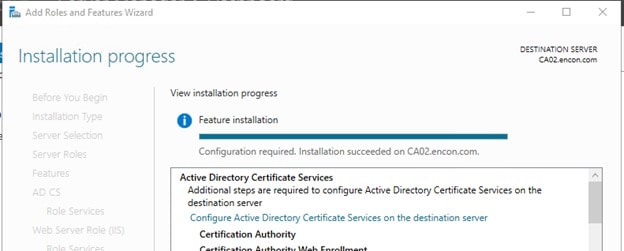
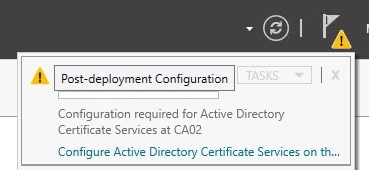
Review the information on the Installation Results page to verify that the installation is successful, and click Close.
Post Installation Configuration on Root CA
Ensure that you are logged on to CA01 as CA01\Administrator.
Open a command prompt. To do so, you can click Start, click Run, type cmd and then click OK.
To define the Active Directory Configuration Partition Distinguished Name, run the following command from an administrative command prompt
To define CRL Period Units and CRL Period, run the following commands from an administrative command prompt:
Certutil -setreg CA\CRLPeriodUnits 52
Certutil -setreg CA\CRLPeriod "Weeks"
Certutil -setreg CA\CRLDeltaPeriodUnits 0
To define CRL Overlap Period Units and CRL Overlap Period, run the following commands from an administrative command prompt:
Certutil -setreg CA\CRLOverlapPeriodUnits 12
Certutil -setreg CA\CRLOverlapPeriod "Hours"
To define Validity Period Units for all issued certificates by this CA, type the following command and then press Enter. In this lab, the Enterprise Issuing CA should receive a 20-year lifetime for its CA certificate. To configure this, run the following commands from an administrative command prompt:
Certutil -setreg CA\ValidityPeriodUnits 20
Certutil -setreg CA\ValidityPeriod "Years"
Configuration of CDP and AIA points
Multiple methods are configuring the Authority Information Access (AIA) and certificate revocation list distribution point (CDP) locations. The AIA points to the public key for the certification authority (CA). You can use the user interface (in the Properties of the CA object), certutil, or directly edit the registry. The CDP is where the certificate revocation list is maintained, which allows client computers to determine if a certificate has been revoked. This lab will have three locations for the AIA and four locations for the CDP.
Configuring AIA points
A certutil command is a quick and common method for configuring the AIA. The certutil command to set the AIA modifies the registry, so ensure that you run the command from a command prompt run as administrator. When you run the following certutil command, you will be configuring a static file system location, a HTTP location for the AIA, and a lightweight directory access path (LDAP) location. Run the following command:
Note: You need to modify the http address on the AIA location. For this scenario, our http container address was http://pkitest.encryptionconsulting.com/pkitest/, which can vary for you.
Configuring the CDP Points
The certutil command to set the CDP modifies the registry, so ensure that you run the command from a command
Note: You need to modify the http address on the CDP location. For this scenario, our http container address was http://pkitest.encryptionconsulting.com/pkitest/, which can vary for you.
At an administrative command prompt, run the following commands to restart Active Directory Certificate Services and publish the CRL
net stop certsvc && net start certsvc
certutil -crl
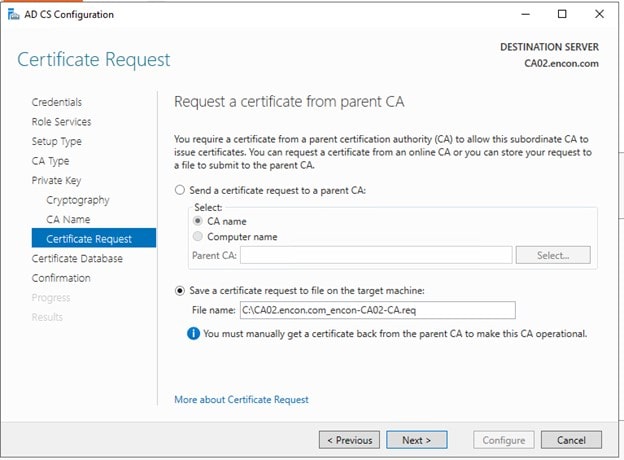
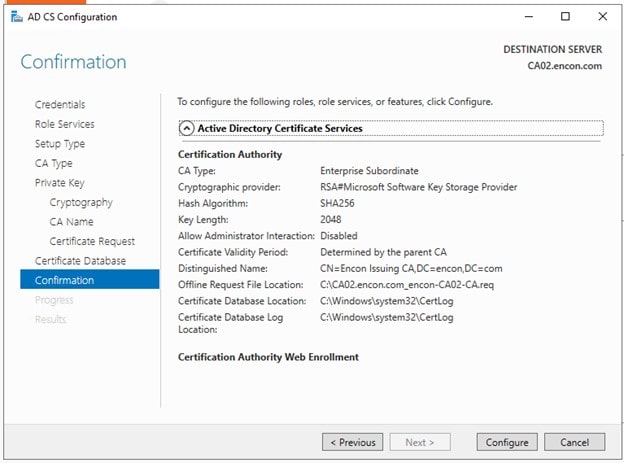
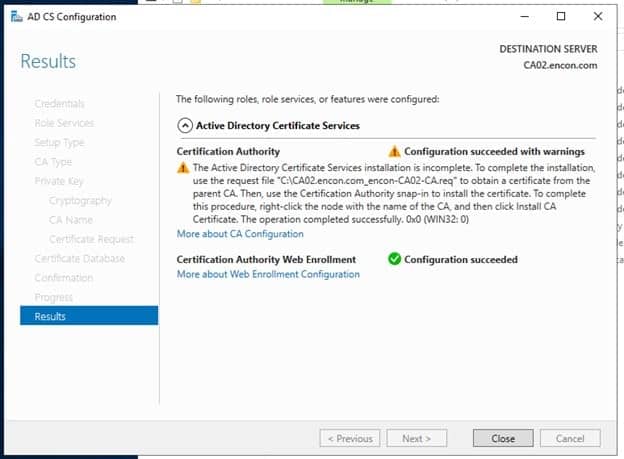
Creating Issuing CA
Enterprise CAs must be joined to the domain. Before you install the Enterprise Issuing CA (CA02), you must first join the server to the domain. Then you can install the Certification Authority role service on the server.
Firstly, we will deploy a VM on Azure. Ensure both the IPs are static.
While deploying, ensure,
VMs are deployed on the same Virtual Network
If deployed on the same region, ensure the subnet is the same
Public IP Address is static
Once the VM is created, navigate to Networking under Settings and click on the Network Interface
Navigate to IP Configuration under settings
Click on ipconfig1 on the menu and change IP private settings to Static from Dynamic
Click Save and go back to the VM
Provide other parameters as per your requirement and create the VM.
Enterprise PKI Services
Get complete end-to-end consultation support for all your PKI requirements!
Click on Ethernet, and then click Properties under Activity
Double Click on Internet Protocol Version 4 (IPv4)
Only change the DNS Server Address, and provide the private IPv4 of DC01 (if both belong to the same region), or provide the public IP address of DC01 (if they belong to different regions)
Click OK and restart the VM from the Portal
Once Restarted, log in to CA02 as a local user
Click Start, type sysdm.cpl, and press ENTER
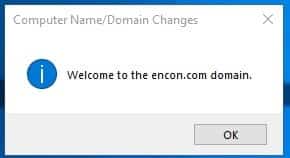
Changer PC name to CA02 and provide domain name in the domain. Provide credentials for DC01 and wait until you get a success message
Click on Restart Now when prompted.
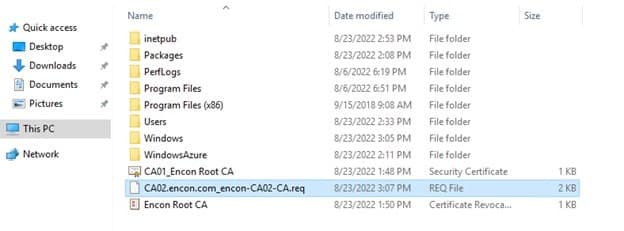
Creating CAPolicy in Issuing CA
Log onto CA01 as CA01\Administrator.
Click Start, click Run, and then type notepad C:\Windows\CAPolicy.inf and press ENTER.
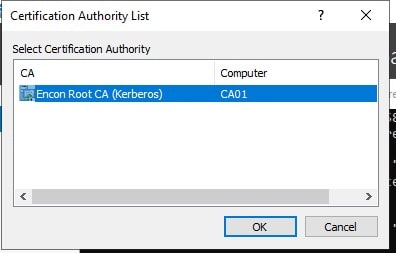
Select Root CA from the Certification Authority List
Once retrieved, the successful message is displayed
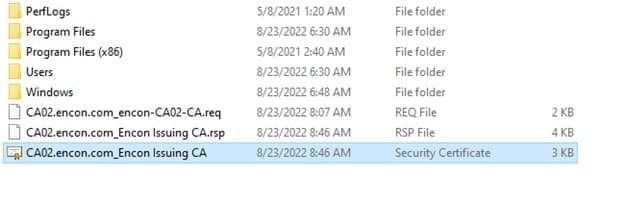
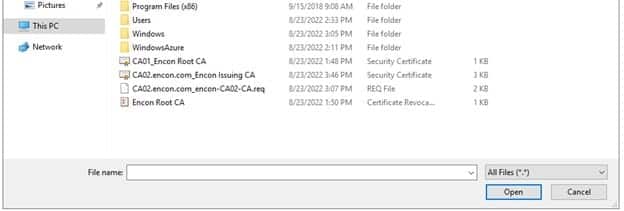
Copy the issued certificate from Root CA to CA02
Login to CA02 as an Encon user and copy the certificate to the C drive
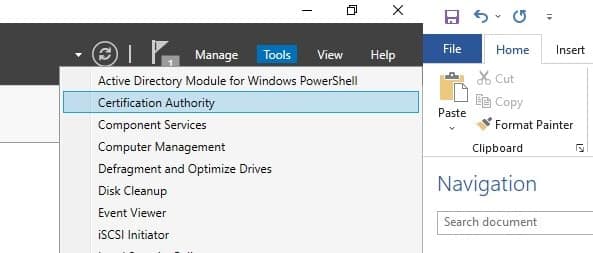
Open Certificate Authority from Tools in Server Manager
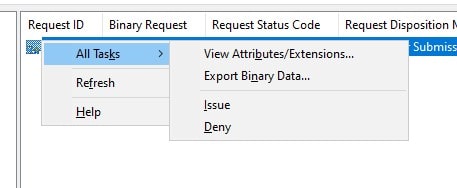
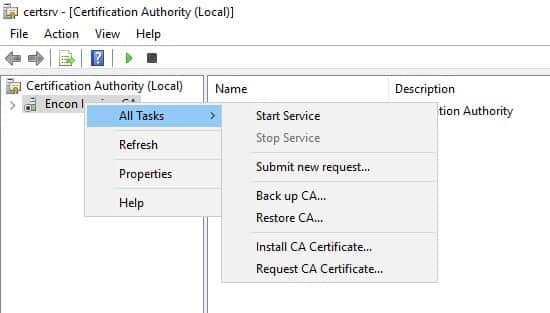
Right-click on Encon Issuing CA, click on All Tasks, and click Install CA Certificate
Navigate to C drive, and select All files beside File name until the copied certificate is visible
Select the issued certificate and click Open
Right-click on Encon Issuing CA, click on All Tasks, and click Start Service
Post Installation Configuration on Issuing CA
Ensure that you are logged on to CA02 as Encon User
Open a command prompt. To do so, you can click Start, click Run, type cmd and then click OK.
To define CRL Period Units and CRL Period, run the following commands from an administrative command prompt:
Certutil -setreg CA\CRLPeriodUnits 1
Certutil -setreg CA\CRLPeriod “Weeks”
Certutil -setreg CA\CRLDeltaPeriodUnits 1
Certutil -setreg CA\CRLDeltaPeriod “Days”
To define CRL Overlap Period Units and CRL Overlap Period, run the following commands from an administrative command prompt:
Certutil -setreg CA\CRLOverlapPeriodUnits 12
Certutil -setreg CA\CRLOverlapPeriod “Hours”
To define Validity Period Units for all issued certificates by this CA, type the following command and then press Enter. In this lab, the Enterprise Issuing CA should receive a 20-year lifetime for its CA certificate. To configure this, run the following commands from an administrative command prompt:
Certutil -setreg CA\ValidityPeriodUnits 5
Certutil -setreg CA\ValidityPeriod “Years”
Configuration of CDP and AIA points
Multiple methods are configuring the Authority Information Access (AIA) and certificate revocation list distribution point (CDP) locations. The AIA points to the public key for the certification authority (CA). You can use the user interface (in the Properties of the CA object), certutil, or directly edit the registry.
The CDP is where the certificate revocation list is maintained, which allows client computers to determine if a certificate has been revoked. This lab will have three locations for the AIA and three for the CDP.
Configuring AIA points
A certutil command is a quick and common method for configuring the AIA. The certutil command to set the AIA modifies the registry, so ensure that you run the command from a command prompt run as administrator.
When you run the following certutil command, you will be configuring a static file system location, a HTTP location for the AIA, and a lightweight directory access path (LDAP) location. Run the following command:
Note: You need to modify the http address on the AIA location. For this scenario, our http container address was http://pkitest.encryptionconsulting.com/pkitest/, which can vary for you.
Configuring the CDP Points
The certutil command to set the CDP modifies the registry, so ensure that you run the command from a command
Note: You need to modify the http address on the CDP location. For this scenario, our http container address was http://pkitest.encryptionconsulting.com/pkitest/, which can vary for you.
Also, as per the CDP point, the CertEnroll folder will exist inside the pkitest container in Azure Blob. This is because the folder will be recursively copied from the CertSrv folder to the blob storage
At an administrative command prompt, run the following commands to restart Active Directory Certificate Services and publish the CRL
net stop certsvc & &net start certsvc
certutil -crl
Enterprise PKI Services
Get complete end-to-end consultation support for all your PKI requirements!
Uploading Certificates and CRLs to the Blob storage
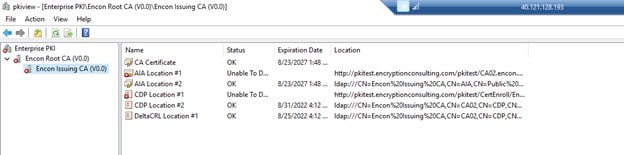
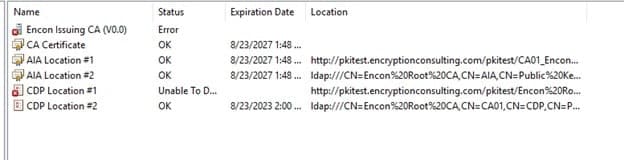
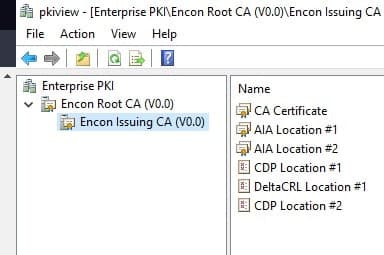
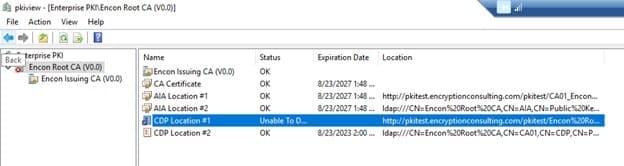
Per our CDP and AIA points, the certificates would be available at the blob storage in Azure. If we run PKIView.msc at Issuing CA, we will run into errors where the certificates or CRLs are not found
To resolve this, we need to upload
Root CA certificates
Root CA CRL
Issuing CA Certificates
Issuing CA CRLs will be uploaded using a script we will run next.
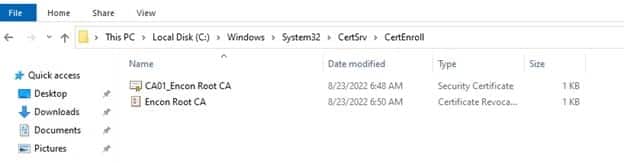
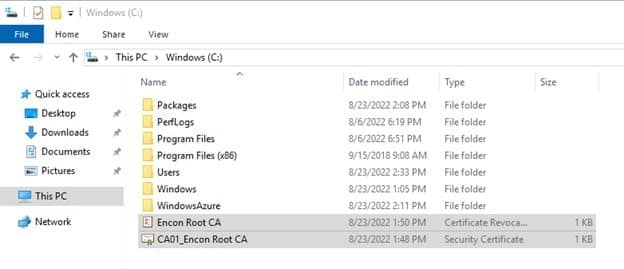
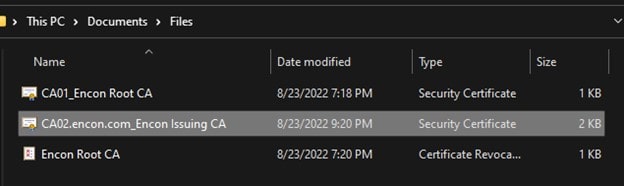
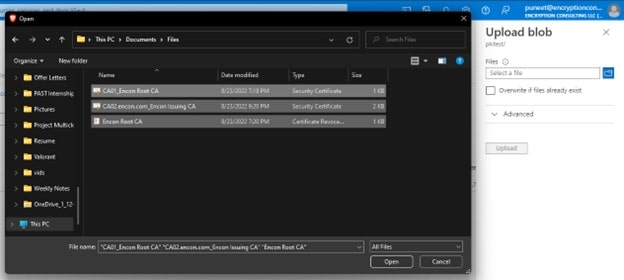
To upload the files, copy them from their respective machines and keep them handy on your host machine. You can find these files at C:\Windows\System32\certsrv\CertEnroll on both Root CA and issuing CA.
Note: Do not copy the CRLs of Issuing CA.
Once copied, follow the steps below
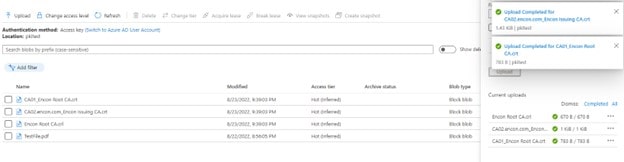
Navigate to the storage account, and click on the pkitest you created
Click on Containers under Data Storage
Click on the pkitest folder
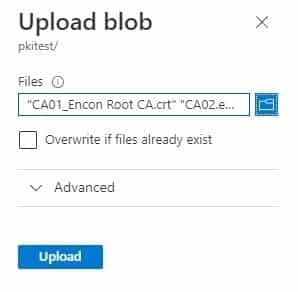
Click on Upload on the top left
Click on the browse icon and select all the files that need to be uploaded and click Open
Check to Overwrite if files already exist and then click Upload
After uploading, all the files should be available
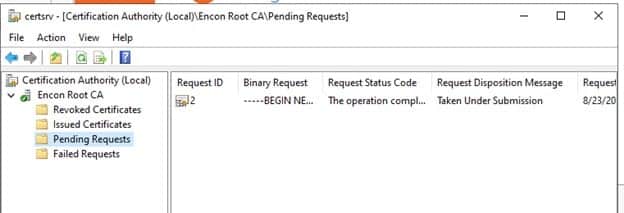
Once the files are uploaded, navigate to CA02 and open PKIView.msc again. Now CDP points of Root and Issuing CA should be available, but the AIA point would still show an error as we didn’t copy those files to the pkitest folder
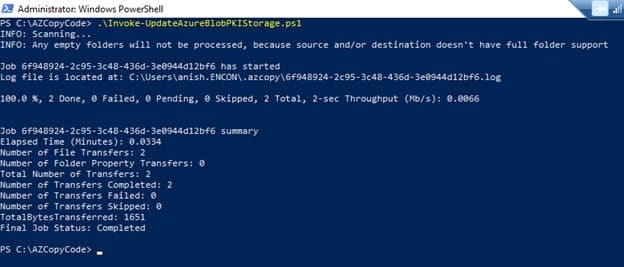
Script to copy Issuing CA CRLs
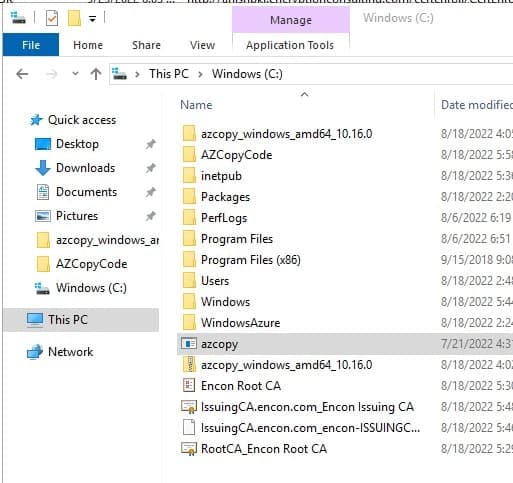
Before we begin, we need to download AzCopy. Once downloaded, extract the app into C:\ to be accessible. We will be using this location on our script. Change the script’s path if you intend to store the application in a different location.
Now you would also need a folder to store the code. I would recommend creating a folder on C drive as AZCopyCode. Download the script from below and store it there. We would need to make some changes to make it work.
Note: This code was initially created by dstreefkerk. As per Windows Server 2022, this code does work. I have made some changes and fixed a few bugs.
If you try opening this on the browser, it would still give an error as there is a trailing %20 at the end, indicating a space at the end. To resolve this, CDP and AIA points need to be changed on Root CA, and the issuing CA needs to be recreated again.
Automating the script
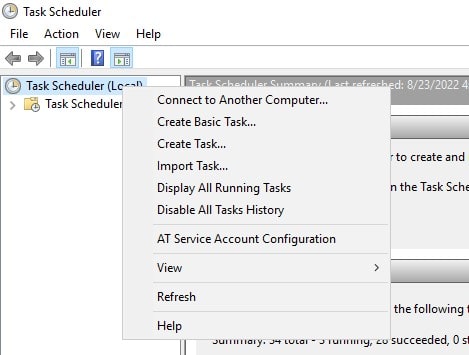
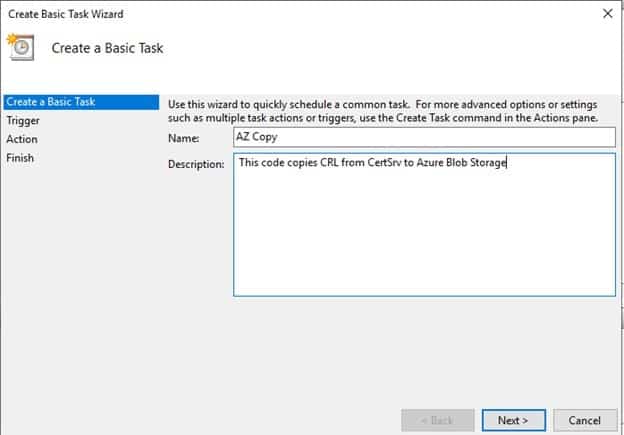
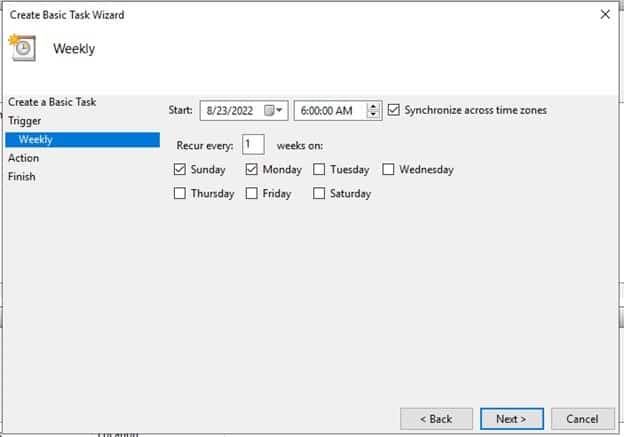
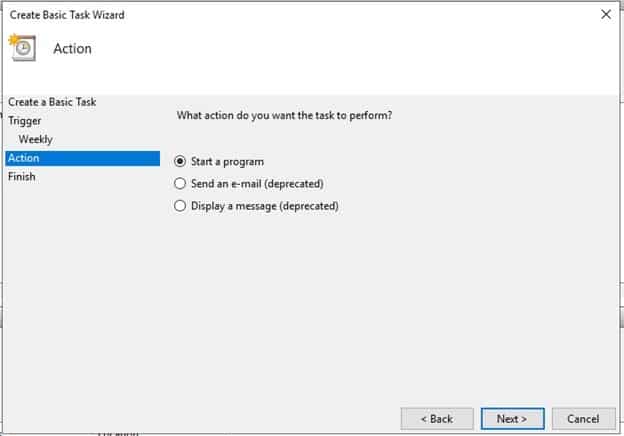
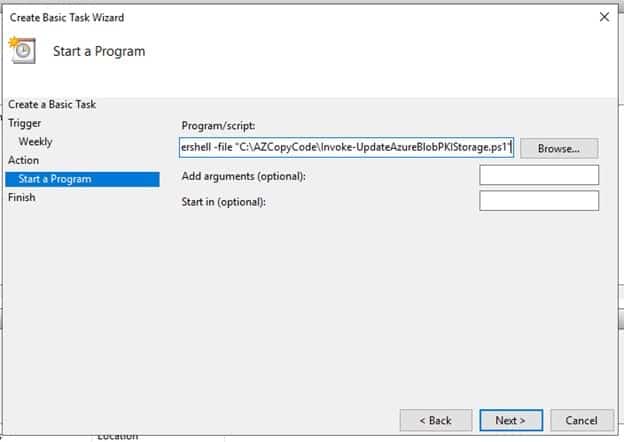
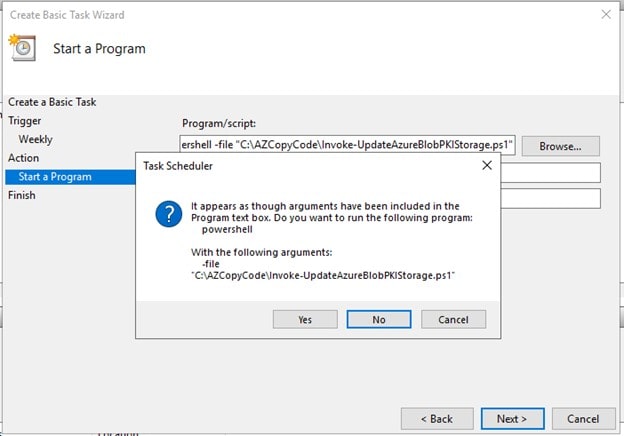
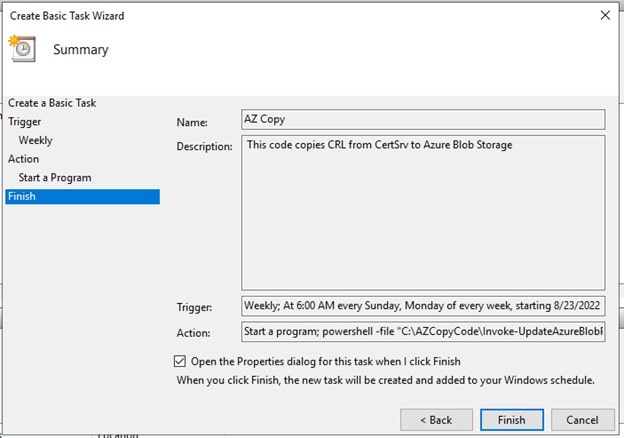
We would automate this script using Task Scheduler to run this script every week. You can tweak this as per your requirements.
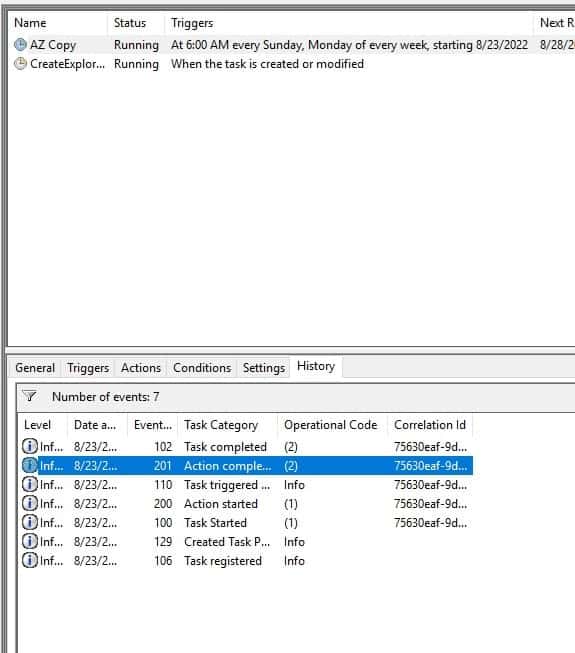
Open Task Scheduler
Left click on Task Scheduler (local) and click on Create a Basic Task
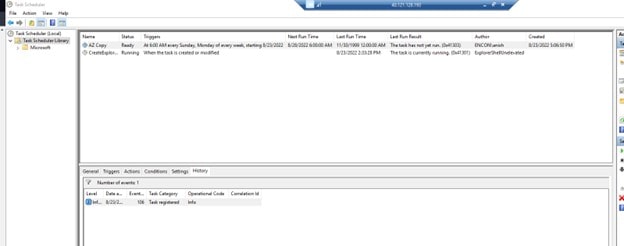
Once completed, AZ Copy should be available in Task Scheduler Library.
Right Click AZ Copy and click Run
Refresh and check History Tab. Action Completed should appear in History
Conclusion
This concludes our AD CS installation with Azure Blob Storage. It is easier to manage, but we also achieve high availability using Azure’s Blob Storage. This will help organizations create PKI that can be operational worldwide with minimal latency and high performance no matter where you are. If you face any issues, do remember to reach out to [email protected]
TheLuna PED is an authentication device to permit access to the administrative interface of the PED-authenticated HSM. Multi-factor (PED) authentication is only available with the Luna S series. The PED client and server are software components that allow the HSM PED to communicate via a Transmission Control Protocol/Internet Protocol (TCP/IP) network. The PED server resides on the host computer where a remote-capable Luna PED is USB connected. The PED server client resides on the system hosting the HSM, which can request PED services from the PED server through the network connection. Once the data path is established and the PED and HSM communicate, it creates a common data encryption key (DEK) used for PED protocol data encryption and authenticates each other. Sensitive data in transition between a PED and HSM is end-to-end encrypted.
Understanding What a PED Key is and Does
A PED is an electrically programmed device with a USB interface embedded in a molded plastic body for ease of handling. Specifically, a PED Key is a SafeNet iKey authentication device model 1000 with FIPS configuration. In conjunction with PED 2 or PED 2 Remote, a PED Key can be electronically imprinted with identifying information, which it retains until deliberately changed. A PED Key holds a generated secret that might unlock one or more HSMs.
That secret is created by initializing the first HSM. The secret can then be copied (using PED 2.x) to other PED Keys for backup purposes or to allow more than one person to access HSMs protected by that secret. The secret can also be copied to other HSMs (when those HSMs are initialized) so that one HSM secret can unlock multiple HSMs. The HSM-related secret might be the access control for one or more HSMs, the access control for Partitions within HSMs, or the Domain key that permits secure moving/copying/sharing of secrets among HSMs that share a domain.
The PED and PED Keys are the only means of authenticating and permitting access to the administrative interface of the PED-authenticated HSM. They are the first part of the two-part Client authentication of the FIPS 140-2 level 3 compliant SafeNet HSM with the Trusted Path Authentication. PED and PED Keys prevent key-logging exploits on the host HSM. The authentication information is delivered directly from the hand-held PED into the HSM via the independent, trusted-path interface. Users do not type the authentication information on a computer keyboard, and the authentication information does not pass through the computer’s internals, where malicious software could intercept it.
The HSM or Partition does not know PED Key PINs, the PIN and secret are stored on the PED key. The PIN is entered on the PED and unlocks or allows the secret, stored on the PED key, to be presented to the HSM or Partition for authentication. The PED does not hold the HSM authentication secrets. The PED facilitates the creation and communication of those secrets, but the secrets themselves reside on the portable PED Keys. An imprinted PED Key can be used only with HSMs that share a particular secret, but PEDs are interchangeable.
Customizable HSM Solutions
Get high-assurance HSM solutions and services to secure your cryptographic keys.
PED Keys are generated with a specific role in mind. These are determined when certain events take place on the HSM. Using these roles, a quorum of M of N PED Keys can be created, where M is the number of keys necessary to complete run a command as that role and N is the total number of keys created. The following roles are the types of roles that can be created on a Luna HSM:
Security Officer – SO
The first actions with a new SafeNet HSM involve creating an SO PIN and imprinting an SO PED Key. A PED PIN (an additional, optional password typed on the PED touchpad) can be added. SO PED Keys can be duplicated for backup and shared among HSMs by imprinting subsequent HSMs with an SO PIN already on a PED Key. The SO identity is used for further administrative actions on the HSMs, such as creating HSM Partition users and changing passwords, backing up HSM objects, and controlling HSM Policy settings. It is recommended that a quorum of 3/7 be used with Blue keys.
Partition User or Crypto Officer
HSM Partition User key. This PED Key is required to login as the HSM Partition Owner or Crypto Officer. It is needed for Partition maintenance, creation, and destruction of key objects, etc. The local portion of the login is necessary to permit remote Client (or Crypto User) access to the partition. A PED Key Challenge (an additional, optional password typed in LunaCM) can be added. Black User PED Keys can be duplicated and shared among HSM Partitions using the “Group PED Key” option. It is recommended that a quorum of 3/7 be used with Black keys.
Crypto User
The Crypto User has restricted read-only administrative access to application partition objects. The challenge secret generated by the Crypto User can grant client applications restricted, sign-verify access to partition objects. It is recommended that a quorum of 3/7 be used with Gray keys.
Key Cloning Vector (KCV) or Domain ID key
This PED Key carries the domain identifier for any group of HSMs for which key-cloning/backup is used. The red PED Key is created/imprinted upon HSM initialization. Another is created/imprinted with each HSM Partition. A cloning domain key carries the domain (via PED) to other HSMs or HSM partitions to be initialized with the same domain, thus permitting backup and restore among (only) those containers and tokens. The red Domain PED Key receives a domain identifier the first time it is used, at which time a random domain is generated by the HSM and sent to both the red Domain key and the current HSM Partition. Once imprinted, that domain identifier is intended to be permanent on the red Domain PED Key – and on any HSM Partitions or tokens that share its domain. Any future operations with that red Domain PED Key shall copy that domain onto future HSM Partitions or backup tokens (via PED) so that they are able to participate in backup and restore operations. Red PED Keys can be duplicated for backup or multiple key copies. It is recommended that a quorum of 3/7 be used with Red keys.
Remote PED
Audit Key
The audit is an HSM role that takes care of audit logging under independent control. The audit role is initialized and imprints a white PED Key without the need for the SO or another role. The Auditor configures and maintains the audit logging feature, determining what HSM activity is logged and other logging parameters, such as rollover period, etc. The purpose of the separate Audit role is to satisfy certain security requirements while ensuring that no one else – including the HSM SO – can modify the logs or hide any actions on the HSM. The Audit role is optional until initialized.
PED Key Management Best Practices
Number of off-site full sets
Does the organization intend to use common authentication for many Luna HSMs? There is no limit. The authentication secret on a single blue SO PED Key, for example, can be used with as many HSMs as they like. However, if the organization wishes to limit the risk of compromising a common blue PED Key, they will need to have groups of HSMs with a distinct blue PED Key for each group. Each time the organization initializes, the HSM (via the PED) allows them to “Reuse an existing keyset” – make the current HSM part of an existing group that is unlocked by an already-imprinted PED Key (or an already-imprinted M of N keyset) – or to use a fresh, unique secret generated by the current HSM.
Number of HSMs per group
That will tell the organization the number of groups and how many different blue PED Keys they need. Now double that number, at least, to allow off-premises backup copies to be kept in secure storage if one is lost or damaged. In most cases, the contents of an HSM are of some value, so at least one backup per blue PED Key must exist. If the organization has only one blue PED Key for a group of HSMs, and that PED Key is lost or damaged, the HSMs of that group must be re-initialized (all contents lost) and a new blue PED Key imprinted.
One for One
The organization might prefer a separate blue SO PED Key containing a distinct/unique Security Officer authentication secret for each HSM in their system. No single blue PED Key can unlock more than one HSM in that scenario. The number of blue keys they need is the number of HSMs. Now double that number to have at least one backup of each blue key.
Many for One or M of N (Recommended)
Does the organization’s security policy allow them to trust its personnel? Perhaps the organization wishes to spread the responsibility – and reduce the possibility of unilateral action – by splitting the SO authentication secret and invoking multi-person authentication. Choose the M of N option so that no single blue PED Key is sufficient to unlock an HSM. Two or more blue PED Keys (their choice, up to a maximum of 16 splits of each SO secret) would be needed to access each HSM. Distribute each split to a different person, ensuring that no one person can unlock the HSM.
Partition BLACK PED Keys
Each HSM can have multiple partitions. The number depends upon their operational requirement and the number the organization purchased, up to the product maximum per unit per HSM. Each partition requires authentication – a black PED Key.
The organization has all the same options for the blue SO PED Key(s) – the organization shall have at least one backup per primary black PED Key. The organization might have multiple partitions with a unique authentication secret; therefore, each would have a unique PED Key. Or, the organization might elect to group their partitions under common ownership so that groups of partitions (on one or more HSMs) might share black PED Keys.
As with the SO secret, the organization can also elect to split the partition black PED Key secret by invoking the M of N option (when prompted by the PED for “M value” and “N value” – those prompts do not appear if the organization chose to “Reuse an existing keyset” at the beginning of the partition creation operation).
Domain RED PED Keys
Each HSM has a domain. Each HSM partition has a domain. That domain is carried on a red PED Key and must be shared with another HSM if the organization wishes to clone the HSM content from one to another, for example, when making a backup.
Domains must match across partitions for the organization to clone or back up their partitions or assemble HSM partitions into an HA group.
For the red PED Keys, the organization can make arrangements regarding uniqueness, grouping, M of N (or not), etc.
Other PED Keys
The organization might have orange PED Keys if they are using the Remote PED option (orange Remote PED Keys (RPK) containing the Remote PED Vector (RPV)). The organization might have white PED Keys if they invoke the Audit role Audit role option (white Audit PED Keys containing the authentication for the Auditor, who controls the audit logging feature). The organization can invoke M of N, or not, as they choose, which affects the number of orange or white PED keys that they must manage.
Orange Remote PED Keys and white Audit PED Keys can be shared/common among multiple HSMs and PED workstations, just like all other PED Key colors.
All other PED Key roles allow them to overwrite any key (any color) with a new secret. A warning is given if a key is not blank, but the organization can choose to overwrite or pause. At the same time, the organization finds an empty or outdated key (“outdated” in this case means a previously imprinted PED Key that they have made irrelevant by re-initializing an HSM or deleting/re-creating a partition, or other activities that make the secret contained on a particular PED Key no longer relevant; PED Keys do not “age” and become invalid during their service life – only deliberate action on an HSM would cause the secret on a PED Key to become invalid).
With all of the above in mind, it is not possible to suggest one “correct” number of PED Keys for their situation. It depends upon the choices that the organization makes at several stages. In all cases, we repeat the recommendation to have at least one backup in case a PED Key (any color) is lost or damaged.
If someone has spent enough time in an IT environment, he/she is more than likely to come across the term SSH keys. SSH (Secure Shell) keys are an access credential that is used in the SSH protocol for modern Infrastructure-as-a-Service platforms like AWS, Google Cloud, and Azure.
What are SSH keys?
SSH keys are of various sizes, while the most popular choice is an RSA 2048-bit encryption. It is comparable to a whooping 617-digit-long password. Generating an SSH key pair differs for various Operating systems. On Windows, a user can generate it by downloading and using an SSH client like PuTTY, while on Mac and Linux systems, it is possible using a terminal window.
SSH keys are always available in pairs, which consist of a public key and a private key. There are three different types of keys, depending on Who or What possesses these keys:
User key
If the private and public keys remain with the user, then this set of SSH keys is referred to as User Keys.
Host key
If the private and public keys are on the remote system, then that key pair will be referred to as Host keys.
Session key
This type of key is used when a large amount of data is to be transmitted, and those are needed to be encrypted.
How does SSH Key Authentication work?
After the successful generation of a key pair, the user will be prompted to enter the SSH username and the IP address of the remote system. Now, this specified username, and the protocol will tell the remote server which public key is needed to authenticate the user. After that, the remote server will use the already available public key to encrypt a challenge message that is sent back to the client, which is decrypted using the private key on the user’s system.
After this process, when the message has been decrypted, it is then combined with a previously gathered session ID and later sent back to the server. Only if this message matches with the server, does the client get authenticated and access to the remote server is given. The most important thing is to make sure that these SSH keys are properly managed.
Tailored Advisory Services
We assess, strategize & implement encryption strategies and solutions customized to your requirements.
There are several millions of SSH keys in use to grant access to various digital assets, mainly by Fortune 500 companies. So, an effective SSH key management system would go a long way in reducing security risks. There are various options to gain control over SSH keys in development as well as production environments. This means the user has to manage the SSO provider, a directory service, and various system management solutions.
Risks associated with SSH Keys
There are many risks or vulnerabilities involving SSH keys, but some vulnerabilities are critical and should not be ignored:
SSH Key tracking troubles
A large enterprise may have more than one million SSH keys, and it is practically impossible to keep track of or manage each key. This scenario occurs, because end users can create new SSH keys or
duplicate them without much hassle, unlike certificates or passwords. Once a large number of SSH keys are gathered, it becomes tough to track these credentials when development servers are migrated to production environments or when
an employee leaves that organization without changing their key. These unaccounted SSH keys can provide attackers with long-term privilege access to corporate resources. Sometimes, these attackers can even have a permanent network
of entry by impersonating the user with the actual SSH key.
Sharing SSH keys is Trouble
For efficiency, SSH keys are often shared or duplicated across employees or servers. Because of this duplication, a single SSH key can have multiple instances granting access to all the machines of an
enterprise. This may make users’ jobs easier, but it also makes attackers’ lives easier in long term. SSH Key duplication creates complicated, many-to-many private-public keys which reduces security, as it’s difficult to rotate and
revoke without the same appropriate key fingerprint. Key sharing is dangerous because it reduces audibility and nonrepudiation.
Static SSH Keys
It is not an easy task of rotating more than one million SSH keys. Many IT administrators rarely change or re-distribute keys for the fear that a critical component or employee may miss something. These factors
lead to a surge of static SSH keys, which in a way leads attackers to compromise an unchanged key, use it or move laterally through the organization, and gain access to critical or sensitive assets.
Embedded SSH Keys
SSH keys are frequently embedded inside an application or script, this makes changing them much more difficult as the code and embedded keys have a certain level of coordination to prevent system outrages. This
may lead to backdoors for attackers, through these embedded SSH keys in applications, code, and scripts.
Weak SSH configuration
SSH client and server implementations like OpenSSH include a few specific configuration parameters which IT administrators miss. Opting for default settings such as port forwarding increases the security
risks a great deal.
Security vulnerabilities of SSH
There are a few vulnerabilities related to security measures like:
Brute force and malware attacks
Attackers target SSH keys to gain lateral movement within an enterprise, launch brute force attacks, and malware attacks by creating backdoors.
SSH session hijacking and unauthorized access
Attackers can hijack a user’s SSH session by exploiting the trusted communication established between multiple systems. This is done by hijacking or gaining unauthorized access to the
user’s socket. That is why it is better to avoid default configurations, as those compromise the privileged user access.
Mitigate SSH security attacks
Although there are many vulnerabilities related to SSH key management, there are also ways to prevent those:
Discover and map keys
User needs to discover SSH servers, certificates, and private keys which have the authorization to grant SSH access. Frequent network scans and using discovery tools to locate and maintain the centralized pathway are also critical. Also, it is important to map the key-user relationship.
Control SSH keys and access
It is better to implement SSH key management policies and practices to generate new keys and remove unused keys. The user can leverage directory services to assign the required levels of clearance to access the SSH credentials.
Disable root login
The root is the primary user account while enabling complete access to any UNIX-based systems. Attackers target this root login to gain unlimited access to critical systems.
Conclusion
If the IT administrators maintain proper audit trails to ensure that all keys in use adhere to policies, this may lead to transparency and proper modifications can be done for key generation and rotation.
Encryption and Decryption are the two most essential steps for successful communication. To transmit sensitive or confidential information, secrecy and privacy should be assured by a system. Before diving into Encryption and Decryption, let’s first learn about Cryptography.
What is Cryptography?
Cryptography is used to secure and protect data units during communication. It is an efficient step to prevent an unauthorized person or a group of unknown users from accessing or using sensitive information or data. Encryption and decryption are the two most common and essential functionalities of cryptography. The idea here is simple, to convert a normal message/data (plaintext) into a encrypted message so that it cannot be attacked in middle (man-in-the-middle attack). This encrypted message then decoded to the original message/data through decryption.
What is meant by Encryption?
Encryption is the process of transforming the original information into an unrecognizable form. Although it is unrecognizable, yet does not lose it’s original data but rather encrypted in a logical way so that the owner can decrypt it back to it’s original form. Now, this new message is entirely different from the original message using various algorithms like:
Triple DES
Triple-DES algorithm was designed to replace the official and original Data Encryption Standard (DES) Algorithm. This algorithm uses three individual 56-bit keys, and their total key length adds up to 168 bits, but a more accurate key strength would be 112-bits. Obviously it outperforms the original Data Encryption Standard (DES) algorithm because imagine encrypting data 3 times which makes it more efficient and faster as compared to DES.
3 unique keys are generated at first. These keys are of 56-bit each known as a key bundle. It follows a pattern of Encrypt-Decrypt-Encrypt(EDE) i.e first key(K1) will encrypt message, second key(k2) will decrypt message, third key(K3) will again encrypt message for the last time. However there are 8 possible patterns or modes of triple DES which are DDD, DDE, DED, DEE, EDD, EDE, EED, EEE
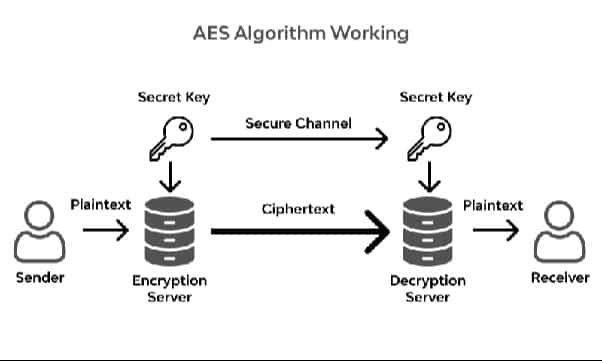
AES
The Advanced Encryption Standard (AES) is the algorithm that many standard organizations most trust as it is much stronger than DES and triple DES. This encryption algorithm is developed by National Institute of Standards and Technology (NIST). It also uses keys of 192 and 256 bits for high-level encryption purposes. AES is a block cipher i.e in this encryption algorithm the input or message to be passed is already decided to be of a fixed size and thus it produces a ciphertext of same size.
For more understanding and how actually this AES algorithm works, please refer to our detailed article on AES here.
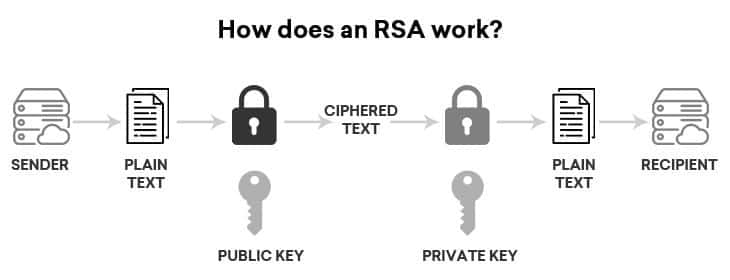
RSA
Rivest-Shamir-Adleman (RSA) is a public-key encryption algorithm and is the standard for sending encrypted data over the internet. It is considered an asymmetric algorithm because it uses a pair of keys – a public key to encrypt a message and a private key to decrypt it.
If the public key is used for encryption, the private key must be used to decrypt the data. This is perfect for sending sensitive information across a network or Internet connection, where the recipient of the data sends the data sender their public key. The sender of the data then encrypts the sensitive information with the public key and sends it to the recipient. Since the public key encrypted the data, only the owner of the private key can decrypt the sensitive data. Thus, only the intended recipient of the data can decrypt it, even if the data were taken in transit.
The other method of asymmetric encryption with RSA is encrypting a message with a private key. In this example, the sender of the data encrypts the data with their private key and sends encrypted data and their public key along to the recipient of the data. The recipient of the data can then decrypt the data with the sender’s public key, thus verifying the sender is who they say they are. With this method, the data could be stolen and read in transit, but the true purpose of this type of encryption is to prove the identity of the sender.
Tailored Advisory Services
We assess, strategize & implement encryption strategies and solutions customized to your requirements.
Decryption converts an encrypted or encoded message into a readable form and can be understood by the user or system. This process is performed manually by using keys to unencrypted text to the original data. The same algorithm with the same key (in the case of symmetric only) can be used for both encryption-decryption operations.
Why use Encryption and Decryption?
There are various reasons for using these processes, but a few important reasons are:
Protects Data
It helps to protect confidential and sensitive data like passwords or other credentials. Let’s assume the worst scenario where the system got breached, now in that case the encrypted data will be unreadable for the attacker as it will need a corresponding decryption key to decode data, hence reducing the risk of exposing confidential data.
Maintains Data Integrity
It helps maintain the integrity of users’ data, as data won’t constantly change and can be frequently verified. By using techniques like digital signatures or hash functions, organizations can verify that data has not been altered during transmission or storage.
Prevents Data Alteration
Sometimes attacker can alter your data in middle, however Decryption tools ensure that the original data being sent over does not alter. Among different methods, one is where a hash function can compare the original data with the received data, identifying any tampering.
Prevents Plagiarism and IP address
Whether it’s software code, research, or creative content, encryption can ensure that only authorized individuals or systems have access to these assets, making it more difficult for competitors or malicious actors to steal and misuse the content.
Facilitates Secure Network Communication
When data is encrypted, an attacker intercepting the network cannot easily access the information without the decryption key. This is particularly important for secure communication between servers, devices, or applications (e.g., HTTPS, VPNs). It prevents man-in-the-middle attacks, where attackers try to capture and manipulate data during transmission.
Protects Personally Identifiable Information (PII) and Protected Health Information (PHI)
Helps protecting sensitive personal information such as PII and PHI. These include names, addresses, social security numbers, medical records, and more. When PII/PHI data is encrypted, it remains secure even if unauthorized users gain access to it, safeguarding against data breaches and ensuring compliance with data protection regulations like HIPAA, GDPR, and CCPA.
Types of Keys used in Encryption and Decryption
Symmetric key encryption algorithms use duplicate cryptographic keys for both plaintext encryption and ciphertext decryption.
Asymmetric key encryption uses two different pairs of keys for encryption. A public key is available to the public, while a secret key is only made available to the receiver of the message, which in turn boosts security.
Public key encryption is based on two pairs of keys. These keys are used to encrypt messages for a receiver.
Private key may or may not be a part of the public/private asymmetric key pair. It can also be used in asymmetric encryption, as users can use the same key to encrypt and decrypt data.
Pre-Shared Key (PSK) is a shared secret that was previously shared between the two parties by using some secure channel before officially using it.
Difference between Encryption and Decryption
Encryption
Decryption
It is a process of converting standard readable data into an unreadable form to prevent unauthorised access to data.
It is a method of converting unreadable or coded data into its original form.
When data is supposed to be sent between two different machines, it is encrypted using a secret key automatically.
The data receiver automatically converts the data from code to its original form.
The sender sends the data to the destination.
The receiver receives the data and then converts the following.
An employee sends essential information to their superiors.
The superior or manager receives crucial confidential information from employees.
The same algorithm having the same key is used for encryption-decryption processes.
A single algorithm is used for encryption and decryption using a pair of keys.
To transform humanly readable and understandable messages into obscure and incomprehensible forms to prevent interpretation by an attacker.
It converts a hidden message into an understandable form for the user and the system.
Conclusion
Cryptography is used to secure and protect data, and encryption-decryption is two critical processes. Encryption methods help users protect their confidential information like passwords and so on. But decrypting these coded messages to be readable is also an important step. Decryption is a process of conversion of encrypted data back to it’s original form, indicating that the data has been successfully sent to it’s targeted receiver. However methods like hash function checks the originality of data if somehow any data breach occurs in middle.
Upgrading Vormetric Data Security Manager (DSM) can seem relatively straightforward, but if something goes wrong, the data can be lost or can get corrupted. This article does not provide the steps you would need to upgrade, but rather would provide what organizations need to be careful about, a few technical and non-technical points that you may not find in the upgrade guide.
This article will highlight all the steps you need to be careful about and a few details you might be curious about.Readers can use this article as a checklist or a base to develop a plan for upgrading their DSM. Every DSM upgrade can be different and unique to the organization, so it would be best if the organization gets some outside consultation to get the best planning for their environment.
Planning
Everything starts with good planning, and the DSM upgrade is no different. A full scan of the current environment is vital to assess any future roadblocks or challenges you might face.
Keeping a note of all the agents along with their agent versions and guardpoints When you upgrade the DSM, you can check the list of all the agents available and if all the guardpoints are up or not. If something doesn’t match as expected, you may need to troubleshoot them before proceeding. Agent versions can also highlight if you have any agents in the environment which are incompatible with the DSM version you desire to upgrade.
A compatibility matrix will help you determine which agents are compatible and which need to be upgraded. You can also develop an upgrade path that you would need. Thales has defined an upgrade path that must be followed if you desire a particular version. For example, if you upgrade to 6.2 from 5.3, you cannot directly upgrade to 6.2 without upgrading to the intermediate version 6.0.0.
Production cutover
Many organizations looking forward to upgrading should already have a production DSM working in their environment. They would not like to upgrade their existing production DSM, instead would use another DSM to upgrade and conduct pilot testing before switching to the new DSM as the production DSM. Organizations should plan the cutover accordingly.
Planning can ensure the following steps are smooth and DSM can be upgraded to the desired version without hiccups.
Upgrading DSMs
Planning can help soothe the upgrade, but upgrading a production DSM can expose challenges you might not have expected. Some of the challenges we have faced are:
Cutting over from old DSM to new DSM without agent registration
Upgrading DSM to a particular version where agents remain compatible
Configuring HA cluster with DSMs being on different subnets
Upgrading DSMs can also take time, and without proper planning of cutover, the production can also face downtime. But with adequate planning, DSM cutover can be seamless with no downtime.
Organizations should prepare exhaustively for upgrading DSMs as a wrong move can cost them terabytes of unobtainable data.
Migrating to CTMs can come with a unique wave of challenges where some organizations might be concerned with the availability of policies, keys, usersets, process sets, and other configurations that may already exist in their DSM. Other concerns organizations may have can be:
Policies, keys, user sets, and process sets migration
Migration of hosts
High Availability configuration
Downtime and system disruption
Data Loss
If organizations are already on DSM 6.4.5 or 6.4.6, they can migrate to CipherTrust Manager and restore the following objects:
Agent Keys, including versioned keys and KMIP accessible keys
Most Key Management Interoperability (KMIP) keys except KMIP-accessible agent keys
Keys associated with CipherTrust Cloud Key Manager (CCKM), including key material as a service (KMaaS) keys.
DSM hostname and host configuration
When customers migrate, we recommend exhaustive pilot testing to ensure the migration goes smoothly without data loss. Customers should also conduct a cleaning session of the DSM where all decommissioned servers and users are removed before migrating to CipherTrust Manager. If customers migrate from DSM to CTM, agents running VTE agents (below version 7.0) would need to be upgraded to CipherTrust Transparent Encryption before upgrading so that migration can be seamless.
Enterprise Code-Signing Solution
Get One solution for all your software code-signing cryptographic needs with our code-signing solution.
Better Key Management capabilities with KMIP key material – integrates policy, logging, and management – bringing simplified and richer capabilities to KMIP
Supports CTE agents (renamed from VTE agents) from version 7.0
New API for better automation
Even though these improvements are for the CTM platform as a whole, there are also some specialized improvements organizations may want to consider:
Password and PED Authentication
Similar to S series Luna HSM, Thales provides the choice of password and Pin Entry Device (PED) as authentication mechanisms for CTM. This can provide improved security but is only available for k570 physical appliances.
Multi-cloud deployment is also possible where customers can deploy on multi-cloud such as AWS, Azure, GCP, VMWare, HyperV, Oracle VM, and more. They can also form hybrid clusters of physical and virtual appliances for high-availability environments.
Conclusion
Upgrading to DSMs can be challenging and require thorough planning and troubleshooting, but migrating to CTMs can be another level, as CTMs are a different product. If organizations opt to migrate, they would need to develop new runbooks, standard operation procedures (SOPs), and architecture and design documents. With two years remaining to reach the end of life, organizations should plan if they plan to migrate to CTM or if they would want to explore other options.
Encryption Consulting can help customers plan and also help in upgrading and migrating their existing DSMs. Being a certified partner with Thales and supporting Vormetric customers with their implementations and upgrading for years, Encryption Consulting can help plan a full-fledged migration to CipherTrust Manager.
Encryption Consulting can also provide gap assessments and pre-planning to ensure customers do not face any data loss or serious challenges that would lead to downtime or other production issues. Contact us for more information.