Getting a CMSCEPSetup::Install failure with error code 0x80070003 during NDES setup is one of the most frustrating Active Directory Certificate Services errors. This guide walks you through exactly why it happens and how to fix it, step by step.
What is NDES and Why Does it Fail?
Network Device Enrollment Service (NDES) is a role service within Active Directory Certificate Services (AD CS) that enables network devices, such as routers, firewalls, and mobile devices, to obtain digital certificates automatically. NDES implements the Simple Certificate Enrollment Protocol (SCEP), a widely adopted standard used by mobile device management (MDM) platforms such as Microsoft Intune, Cisco ISE, and others to automate certificate enrollment for non-domain-joined devices, enabling them to securely request and receive certificates from a Certificate Authority (CA).
NDES acts as a bridge between these non-domain devices and the CA, ensuring they can authenticate and communicate securely within the organization.
As NDES operates at the intersection of IIS, Active Directory, and the Certificate Authority, its installation is highly sensitive to configuration order, service account permissions, and the existing system state. Even a minor misconfiguration in any of these components can cause the setup process to fail, often resulting in cryptic errors such as 0x80070003 (ERROR_PATH_NOT_FOUND).
Understanding Error 0x80070003 (ERROR_PATH_NOT_FOUND)
The full error message you’ll see in the AD CS configuration wizard is:
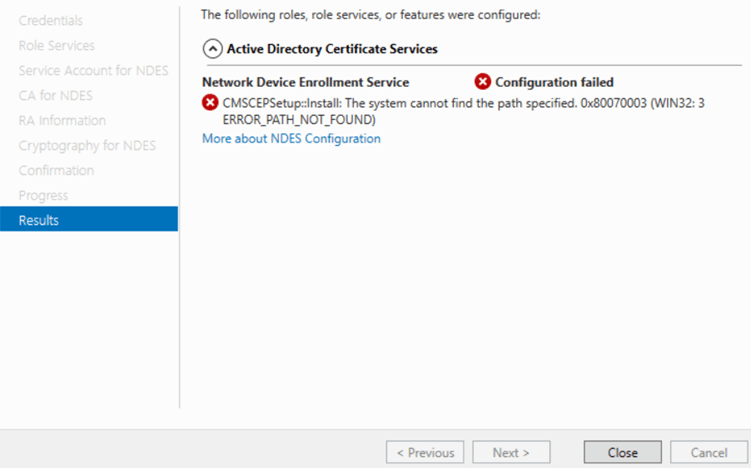
CMSCEPSetup::Install: The system cannot find the path specified.
0x80070003 (WIN32: 3 ERROR_PATH_NOT_FOUND)
The Win32 error code 0x80070003 translates directly to ERROR_PATH_NOT_FOUND — meaning the installer tried to access a file system path or registry location that simply doesn’t exist on the machine.
The component failing is CMSCEPSetup, the SCEP setup module responsible for configuring IIS virtual directories, registering the CA connection, and writing the necessary registry entries. When it can’t find the expected path, it aborts the entire NDES installation.
Root Causes of the CMSCEPSetup::Install Error
1. IIS Not Installed or Misconfigured
NDES depends heavily on IIS. On Windows Server 2025 in particular, even after removing the IIS role, the inetpub folder and associated registry keys may persist in a broken state. If IIS is then re-added on top of this residual state, CMSCEPSetup fails to locate expected paths.
2. Incorrect or Unreachable CA Path
If the CA name is misspelled, the CA server is offline, or the selected CA type is incompatible, the setup cannot resolve the required paths for RA certificates.
3. Leftover Registry Keys from a Previous Failed Install
Stale MSCEP registry keys from prior failed installs cause conflicts when the installer tries to write new values.
4. NDES Service Account Permission Issues
The service account must be a local administrator, have “Log on as a service” rights, and hold Read and Enroll permissions on the CEP Encryption and Exchange Enrollment Agent certificate templates.
5. Missing Certificate Templates
NDES requires the CEP Encryption and Exchange Enrollment Agent (Offline request) templates to be published on the CA. If missing, the installer fails to locate required enrollment paths.
Step-by-Step Fix Guide
The steps below provide a clean method for removing the damaged components and properly rebuilding the NDES configuration.
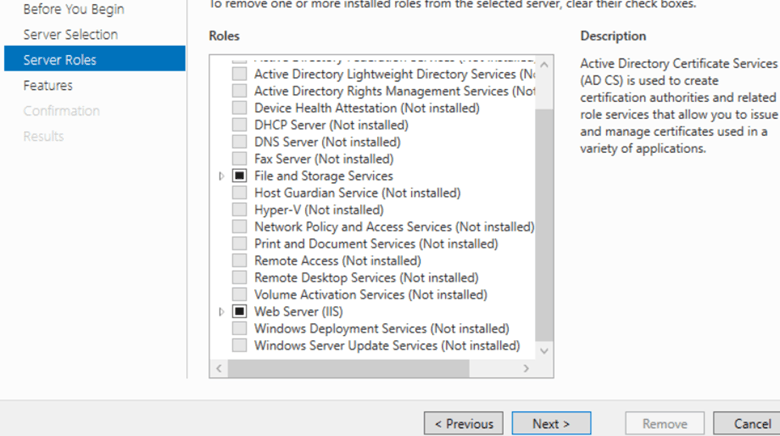
Step 1: Completely Remove IIS
Start by fully removing the Web Server (IIS) role from the server.
-
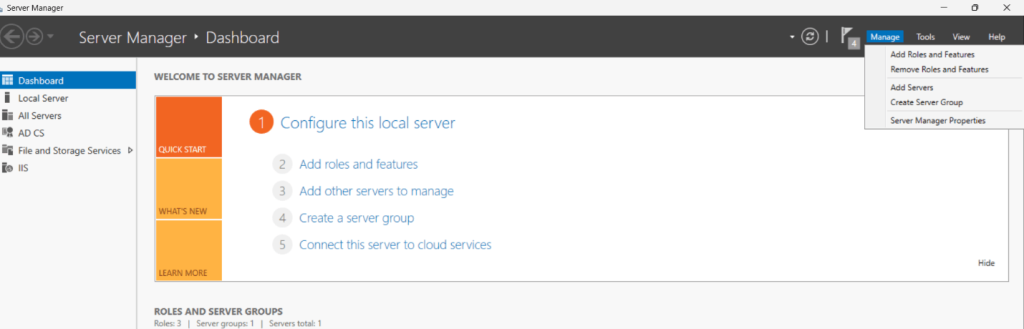
Open Server Manager and go to Manage & Remove Roles and Features.
-
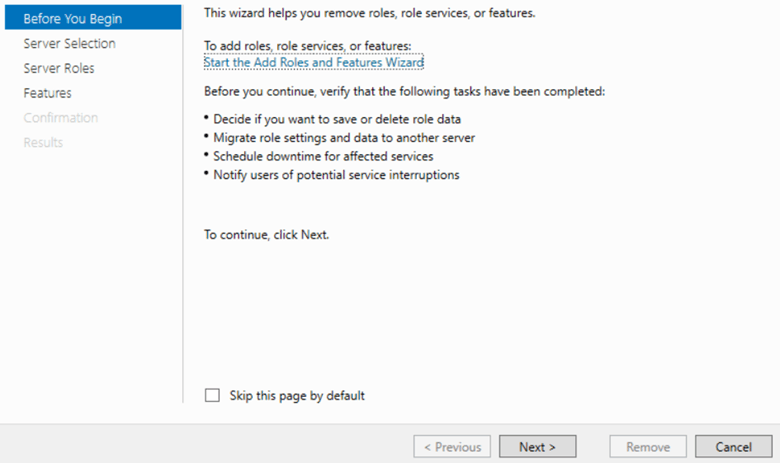
The Remove Roles and Features Wizard will open. Click Next on the Before You Begin screen.
- On the Server Selection page, ensure the correct server is selected, then click Next.
- On the Server Roles page:
- Locate Web Server (IIS).
-
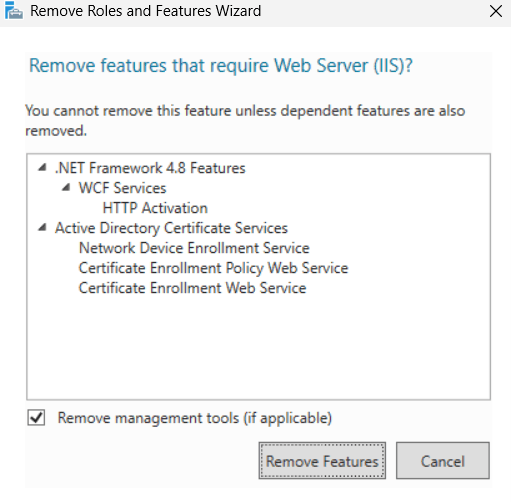
Uncheck the box next to Web Server (IIS).
-
When prompted, click Remove Features to remove all dependent IIS components.
Click Next through the remaining pages (Features, Confirmation).
- On the Confirmation page:
-
(Optional) Check Restart the destination server automatically if required.
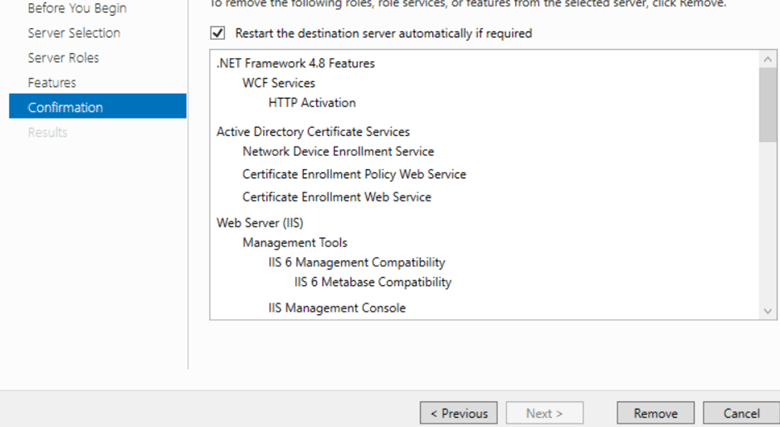
- Click Remove.
- Wait for the removal process to complete.
- Once finished, do not restart immediately (as per your cleanup sequence).
- Proceed to the next steps (registry check and inetpub cleanup).
Note: You can also remove IIS with PowerShell:
Remove-WindowsFeature -Name Web-Server -IncludeManagementTools
Do not restart the server yet. The IIS content folder will be deleted in the next steps.
Step 2: Check the IIS Path in the Registry
Before restarting, open Registry Editor (regedit) and review the IIS installation path to confirm which folder is being used.
Navigate to:
HKEY_LOCAL_MACHINE\SOFTWARE\Microsoft\InetStp
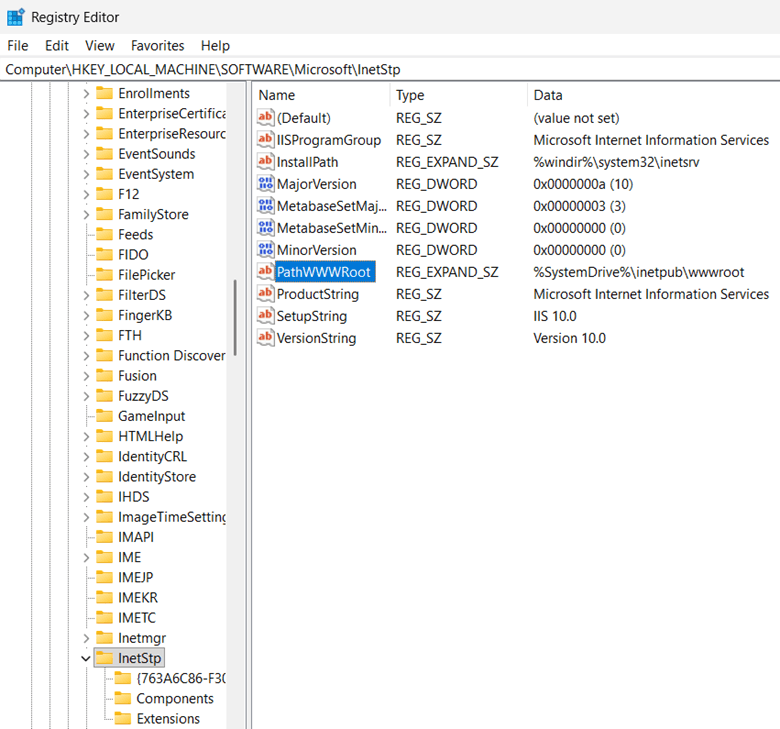
Check the value of PathWWWRoot. In most cases, it will point to:
C:\inetpub\wwwroot
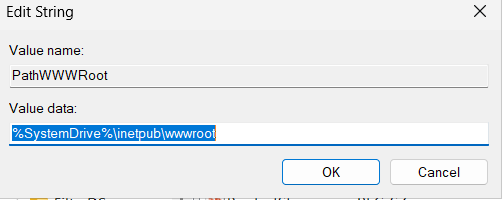
Also review this key for lingering IIS service state:
HKEY_LOCAL_MACHINE\SYSTEM\CurrentControlSet\Services\W3SVC
If the InetStp or W3SVC keys still exist after removing IIS, it usually means IIS did not clean up properly. This leftover state is often the reason NDES setup fails.
Step 3: Restart the Server and Delete the inetpub Folder
Now restart the server. This restart is necessary because Windows Server 2025 may continue holding file locks on IIS folders even after the IIS role has been removed.
After the server comes back online, delete the entire inetpub folder from C: drive.
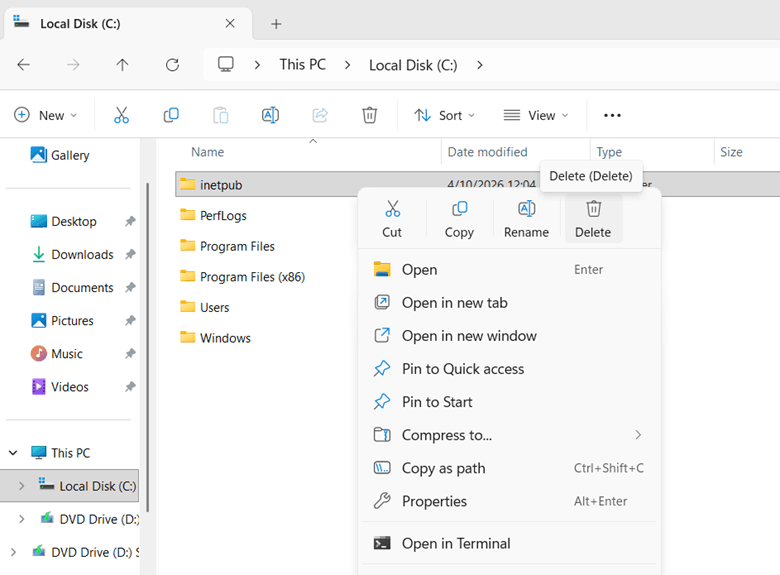
PowerShell command:
Remove-Item -Path "C:\inetpub" -Recurse -Force
Why the restart is required?
On Windows Server 2025, file handles related to IIS are not always fully released immediately after role removal. If you try to delete the inetpub folder before restarting, you may receive errors such as file in use or access denied.
Step 4: Remove Any Previous NDES Installation and Clean the MSCEP Registry
If NDES was previously installed or partially configured, remove the role service and delete the stale MSCEP registry data. To remove the old MSCEP registry key, follow the steps below:
- Open the registry editor
- Go to path- HKLM:\SOFTWARE\Microsoft\Cryptography\MSCEP
- Delete the MSCEP key, if present
Step 5: Remove Any Previous NDES Installation and Clean the MSCEP Registry
Before rerunning the NDES configuration, ensure the service account is correctly configured across local server, IIS, and Certificate Authority.
5.1 Verify Local Administrator Access
- Log in to the NDES server.
- Open Computer Management or press Win + R → type compmgmt.msc.
- Navigate to: Local Users and Groups > Groups.
- Open the Administrators group.
- Click Add and verify the NDES service account is listed.
- If not present, add: DOMAIN\NDES_ServiceAccount.
5.2 Verify IIS_IUSRS Group Membership
- NDES relies on IIS, so the account must have access to IIS worker processes.
- Open Computer Management.
- Navigate to: Local Users and Groups > Groups.
- Open IIS_IUSRS.
- Ensure the NDES service account is a member.
- If not, click Add and add the service account.
5.3 Verify Certificate Template Permissions
- Open Certification Authority (certsrv.msc) on the CA server.
- Right-click Certificate Templates → Manage.
- For each required template (e.g., CEP Encryption, Exchange Enrollment Agent (Offline request)), verify permissions.
- To check permissions:
- Right-click template → Properties.
- Go to Security tab.
- Ensure the NDES service account has:
- ✔ Read
- ✔ Enroll
- If missing, click Add.
- Add the service account.
- Grant Read and Enroll permissions.
5.4 [Optional] Verify “Log on as a Service” Right
- Press Win + R → type secpol.msc.
- Navigate to:
- Local Policies > User Rights Assignment.
- Open Log on as a service.
- Ensure the NDES service account is listed.
- If missing, click Add User or Group.
- Add the service account.
- Apply and save.
Step 6: Publish Required Certificate Templates on the CA
- On the issuing CA, open the Certificate Authority console.
- Go to: Certificate Templates > New > Certificate Template to Issue.
- Publish the following templates:
- CEP Encryption
- Exchange Enrollment Agent (Offline request)
- These templates are required for NDES to complete its configuration successfully.
Step 7: Publish Required Certificate Templates on the CA
- Once IIS has been fully removed and cleaned up, reinstall it with all features required by NDES.
-
Open Server Manager > Add Roles and Features, then install NDES along with Web Server (IIS) and ensure the following components are included:
- ASP.NET 4.x
- Windows Authentication
- IIS 6 Management Compatibility
- Required Application Development features
Step 8: Publish Required Certificate Templates on the CA
After completing the IIS cleanup, removing any stale NDES configuration, verifying the service account, and publishing the required certificate templates, the next step is to run the NDES configuration wizard again.
This step is where you reconnect the NDES role to the Certificate Authority and define the service account and cryptographic settings that NDES will use.
- Log in to the NDES server with an account that has the required administrative privileges.
- Open Server Manager.
- In the top-right corner, click the yellow notification flag.
- From the notification menu, select Configure Active Directory Certificate Services on the destination server. This will launch the Active Directory Certificate Services Configuration Wizard.
- On the Credentials page, confirm that the account shown has sufficient permissions to perform the configuration.
- The account used should typically be a Domain Administrator or another account with the necessary rights to configure AD CS role services.
- Click Next.
- On the Role Services page, select Network Device Enrollment Service. Ensure only the intended role service is checked.
- Click Next.
- When prompted, enter the service account that NDES will run under in the format: DOMAIN\serviceaccount.
- Enter and confirm the password for this account.
- Double-check that the username is spelled correctly and belongs to the intended domain.
- Click Next.
- On the CA for NDES page, click Select and choose the correct issuing CA from the list. Verify connection details if prompted.
- Click OK, then click Next.
- Verify the cryptographic settings:
- The correct cryptographic provider is selected.
- The key length meets your organization’s security requirements and industry best practices.
- If using an HSM-backed provider, ensure the HSM software and provider are installed and functioning correctly.
- Review all configuration selections on the Confirmation page.
- Ensure all details are correct before clicking Configure.
- Once the configuration finishes, the wizard will display a Results page.
How to Verify a Successful NDES Installation?
- Open a browser on the NDES server and navigate to http://localhost/certsrv/mscep/mscep.dll. You should see an SCEP capabilities response page.
- In IIS Manager, confirm the CertSrv application and mscep virtual directory exist under Default Web Site.
- Open Services (services.msc) and confirm Network Device Enrollment Service is running.
- In Event Viewer, check for Event ID 6 from source MSCEP, which confirms successful startup.
- Confirm C:\inetpub\wwwroot was recreated cleanly by IIS during the fresh install.
How can Encryption Consulting Help?
Encryption Consulting has extensive experience delivering end-to-end PKI solutions for enterprise and government clients. We provide both professional services and our automation platform (CertSecure Manager) to ensure your PKI is secure, resilient, and future-ready.
1. PKI Services
End-to-end advisory, design, and implementation services to help organizations build, modernize, and govern secure Public Key Infrastructure environments.
2. Project Planning
We assess your cryptographic environment, review PKI configurations, dependencies, and requirements, and consolidate findings into a structured, customer-approved project plan.
3. CP/CPS Development
In the next phase, we will develop Certificate Policy (CP) and Certification Practice Statement (CPS) aligned with RFC#3647. These documents are customized to your organization’s regulatory, security, and operational requirements.
4. PKI Design and Implementation
We design and deploy resilient PKI infrastructures, including offline Root CAs, issuing CAs, NDES servers, HSM integration, etc., depending on the customer’s needs. Deliverables include PKI design document, build guides, ceremony scripts, and system configurations. Once deployed, we conduct thorough testing, validation, fine-tuning, and knowledge transfer sessions to empower your team.
5. Business Continuity and Disaster Recovery
Following the deployment, we develop and implement business continuity and disaster recovery strategies, conduct failover testing, and document operational workflows for the entire PKI and HSM infrastructure, supported by a comprehensive PKI operations guide.
6. Ongoing Support and Maintenance
After implementation, we offer a subscription-based yearly support package that provides comprehensive coverage for PKI, CLM, and HSM components. This includes incident response, troubleshooting, system optimization, certificate lifecycle management, CP/CPS updates, key archival, HSM firmware upgrades, audit logging, and patch management.
This approach ensures your PKI infrastructure is not only secure and compliant but also scalable, resilient, and fully aligned with your long-term operational and regulatory goals.
CertSecure Manager
CertSecure Manager by Encryption Consulting is a certificate lifecycle management solution that simplifies and automates the entire lifecycle, allowing you to focus on security rather than renewals.
Automation for Short-Lived Certificates: With ACME and 90-day/47-day TLS certificates becoming the standard, manual renewal is no longer a practical option. CertSecure Manager automates enrolment, renewal, and deployment to ensure certificates never expire unnoticed.
Seamless DevOps & Cloud Integration: Certificates can be provisioned directly into Web Servers and cloud instances, and they integrate with modern logging tools like Datadog, Splunk, ITSM tools like ServiceNow, and DevOps tools such as Terraform and Ansible.
Multi-CA Support: Many organizations utilize multiple CAs (internal Microsoft CA, public CAs such as DigiCert and GlobalSign, etc.). CertSecure Manager integrates across these sources, providing a single pane of glass for issuance and lifecycle management.
Unified Issuance & Renewal Policies: CertSecure Manager enforces your organization’s key sizes, algorithms, and renewal rules consistently across all certificates, not just automating renewals with multiple CAs, but ensuring every certificate meets your security standards every time.
Proactive Monitoring & Renewal Testing: Continuous monitoring, combined with simulated renewal/expiry testing, ensures you identify risks before certificates impact production systems.
Centralized Visibility & Compliance: One consolidated dashboard displays all certificates, key lengths, strong and weak algorithms, and their expiry dates. Audit trails and policy enforcement simplify compliance with PCI DSS, HIPAA, and other frameworks.
If you’re still wondering where and how to get started with securing your PKI, Encryption Consulting is here to support you with its PKI Support Services. You can count on us as your trusted partner, and we will guide you through every step with clarity, confidence, and real-world expertise.
Conclusion
On Windows Server 2025, the CMSCEPSetup::Install: ERROR_PATH_NOT_FOUND (0x80070003) error is most commonly caused by a residual IIS state that persists after role removal. The fix requires fully removing IIS, restarting the server, deleting the inetpub folder, and clearing leftover IIS registry keys before reinstalling IIS and running the NDES wizard again.
On earlier Windows Server versions, the issue usually comes down to missing IIS features, incorrect CA configuration, stale MSCEP registry keys, or service account permissions. Work through the steps in order and use Event Viewer to pinpoint any remaining missing paths.