Skip to content

Why is CertSecure Manager the Ultimate Choice for ACME Protocol Automation?

Scalability and automation are critical for modern enterprises, especially in certificate management. With cyber threats evolving and computational advancements highlighting the need to secure digital assets, certificate management has become a cornerstone of cybersecurity strategy. The shift toward shorter certificate validity periods, such as Google’s proposal for 90-day certificates, exposes the inefficiencies of manual processes. According to the 2023 State of Machine Identity Report, 77% of organizations faced at least two certificate-related outages in the past two years due to expired certificates. Untracked or “shadow” certificates can cost millions annually due to unplanned expirations (GlobalSign), underscoring the need for robust automation.

The ACME Protocol (Automated Certificate Management Environment) addresses this by automating certificate issuance and renewal, reducing human error and administrative overhead. However, CertSecure Manager by Encryption Consulting elevates ACME’s capabilities, offering an enterprise-grade solution tailored for modern organizations. With features like compliance enforcement, real-time monitoring, and seamless integration, CertSecure Manager ensures automated, secure, and reliable certificate management.

In this blog, we’ll explore how CertSecure Manager’s ACME integration helps your organization achieve seamless certificate lifecycle management (CLM).

Let’s understand the ACME Protocol

The Automated Certificate Management Environment (ACME) protocol, created by the Internet Security Research Group (ISRG) and popularized by Let’s Encrypt, is an open standard defined in RFC 8555. It was introduced to automate interactions between Certificate Authorities (CAs) and clients, streamlining the process of certificate issuance, validation, renewal, and revocation. The principal objective was to eliminate manual intervention and simplify the complexities of maintaining secure digital certificates for public key infrastructure (PKI), such as managing domain validations and handling multi-step certificate renewals.

ACME Workflow

Key Concepts of ACME

  1. Certificate Request Initiation

    The certificate issuance process begins with the ACME client initiating a Certificate Signing Request (CSR) to the ACME server. This step forms the foundation of the ACME protocol workflow and ensures that the requestor’s intent and requirements are clearly communicated to the issuing authority.

    How it Works

    1. Generating the Key Pair
      • The ACME client generates a public-private key pair if not already available
      • The private key is securely stored by the client, while the public key forms part of the CSR.
    2. Creating the CSR: The CSR includes essential details about the certificate request, such as:
      • Public Key: Used for encrypting data and verifying the identity of the certificate owner.
      • Subject Information: Contains the fully qualified domain names (FQDNs) for which the certificate is requested (e.g., example.com).
      • Optional Attributes: This may include organization details if the certificate type supports it.
    3. Sending the Request
      • The CSR is transmitted to the ACME server using a secure HTTPS connection.
      • The ACME client signs the CSR with its account key to ensure authenticity and integrity.

    Considerations

    1. Validation-Ready CSR: The CSR is structured in a way that facilitates seamless validation through ACME-supported challenges (e.g., HTTP-01, DNS-01).
    2. Secure Communication: The ACME protocol mandates secure connections for CSR submission, protecting the data from interception or tampering.

    Key Features

    1. Domain Coverage: Ensure that all intended domain names are included in the CSR, especially if the certificate is for multiple domains (SAN certificate).
    2. Key Strength: Use strong cryptographic algorithms (e.g., RSA 2048-bit or ECC) to generate the key pair, adhering to security best practices.
    3. Account Key Management: The account key used to sign the CSR must be securely stored to prevent unauthorized certificate requests.
  2. Domain Validation Challenges

    The ACME server issues validation challenges to verify domain ownership or control. These challenges are essential to ensure that the entity requesting the certificate has legitimate control over the domain. Based on publicly available information from the ACME protocol (RFC8555, section 9.7.8) and Let’s Encrypt documentation, the ACME protocol supports several types of validation challenges:

    HTTP-01 Challenge

    1. Overview: The ACME client places a token in a specific file on the webserver to prove domain ownership.
    2. How it works:
      • The ACME client receives a token and a URL path from the ACME server.
      • The client creates a file containing the token and places it at the specified URL path on the web server.
      • The ACME server makes an HTTP request to the URL to verify the presence of the token.
      • If the token is found and matches the expected value, the domain is validated.
    3. Use Case: Suitable for web servers that can easily serve static files.
      Pros Cons
      1. Easy to automate without in-depth knowledge of a domain’s DNS or server configuration.

      2. Works well with off-the-shelf web servers.

      3. Enables hosting providers to issue certificates for domains CNAMEd to them.
      1. Not suitable if the ISP blocks port 80, which can be a problem for residential ISPs (though rare).

      2. Cannot be used to issue wildcard certificates.

      3. Manual configuration is required on multiple web servers if you have a distributed setup, ensuring the file is available on all servers.
    4. Considerations: The HTTP-01 challenge can only be completed via port 80 (HTTP). This restriction ensures greater security and simplifies the process, though it might be an obstacle if your network or server environment has specific restrictions.

    DNS-01 Challenge

    1. Overview: The ACME client proves domain ownership by adding a TXT record in the DNS for the domain.
    2. How it works:
      • The ACME server generates a token and sends it to the ACME client.
      • The client creates a DNS TXT record for the domain, with the token as the value.
      • The ACME server queries the DNS record to verify the presence of the token.
      • If the TXT record is found and the token matches the expected value, the domain is validated.
    3. Use Case: Ideal for scenarios where DNS records can be easily updated, such as when using DNS providers with API support. Also, it is best for scenarios requiring wildcard certificates or when a web server is not used for validation.
      Pros Cons
      1. Can be used to issue wildcard certificates, unlike the HTTP-01 challenge.

      2. Works well in environments with multiple web servers.

      3. Ideal if you cannot open port 80, as it relies on DNS rather than HTTP.
      1. It requires DNS provider API access to automate the creation of DNS records, which might not be available with all DNS providers.

      2. Storing DNS API credentials on your server can be a security risk, so it’s recommended to use narrowly scoped API keys or manage them from a separate, secure server.
    4. Considerations: DNS propagation times can vary between DNS providers, potentially causing delays in validation. Some providers offer APIs to check DNS propagation status, which can help streamline this process.

    TLS-SNI-01 (Deprecated)

    1. Overview: This challenge used a TLS handshake to validate domain control, but it has been deprecated due to security issues.
    2. How it works:
      • The ACME server initiated a TLS handshake on port 443 with a special Server Name Indication (SNI) header.
      • The token was placed in the server’s certificate associated with that SNI.
      • If the correct certificate was presented during the handshake, domain validation was successful.
    3. Considerations: The TLS-SNI-01 challenge was part of the initial ACME standard but has since been deprecated due to security concerns. It worked by performing a TLS handshake on port 443 (HTTPS) and looking for a specific Server Name Indication (SNI) header that contained the validation token. The TLS-SNI-01 challenge was disabled in March 2019, as it was deemed insufficiently secure.

    TLS-ALPN-01 Challenge

    1. Overview: The ACME server provides a token that the client must present during a TLS handshake using the ALPN (Application-Layer Protocol Negotiation) extension.
    2. How it works:
      • The ACME client receives a token from the ACME server.
      • The client configures the webserver to respond to a specific TLS request with the token using the ALPN extension.
      • The ACME server initiates a TLS handshake with the web server and checks for the presence of the token.
      • If the token is presented correctly, the domain is validated.
    3. Use Case: Suitable for environments where HTTP and DNS challenges are not feasible, such as reverse proxies or TLS termination points, and the web server supports ALPN.
      Pros Cons
      1. Works even if port 80 is unavailable.

      2. Validation occurs entirely at the TLS layer, which is useful for environments where managing HTTP is difficult.

      3. Avoids the need for HTTP-based validation while ensuring secure certificate issuance
      1. Not widely supported by popular web servers like Apache or Nginx now. Only a few tools and servers, like Caddy, currently support it.

      2. Like the HTTP-01 challenge, if you have multiple servers, each must respond with the same content for validation to pass.

      3. Cannot be used for wildcard domains.
    4. Considerations: Ideal for large hosting providers or reverse proxies that need to perform host-based validation purely over TLS.
  3. Authorization and Certificate Issuance

    Once the validation challenges are completed successfully, the ACME protocol proceeds with domain authorization and certificate issuance. This ensures that certificates are issued only to entities with legitimate control over the domain.

    How it Works

    1. Domain Authorization:
      • After the ACME client successfully completes the validation challenge, the ACME server verifies that the entity requesting the certificate has met the necessary criteria for domain control.
      • The server updates its records to authorize the domain for certificate issuance.
    2. Certificate Issuance:
      • The ACME client submits a Certificate Signing Request (CSR) to the ACME server, which includes the public key and desired domain names.
      • The ACME server evaluates the CSR against the validated domains and confirms compliance with its policies.
      • If approved, the ACME server issues the requested certificate in the desired format (e.g., PEM or CER).

    Key Security Features

    1. Trust Validation: The process ensures that only entities that have proven domain control can obtain certificates, reducing risks of certificate mis-issuance.

    Considerations

    1. Certificates issued by the ACME server are often short-lived (e.g., 90 days for Let’s Encrypt), emphasizing the need for efficient renewal processes.
    2. Organizations must ensure secure storage of private keys used in the CSR to avoid potential compromises.

    Benefits

    1. The Security Authorizations involved in the ACME workflow drastically minimize the risk of domain impersonation or fraud.
    2. Overall, ACME streamlines and simplifies the certificate issuance process by automating the validation-to-issuance workflow.
  4. Automated Certificate Renewals

    ACME protocol mandates certificates are automatically renewed before expiry, mitigating risks of outages or lapses in security. Manual renewals can take up to 2 hours per server (CPO Magazine), while automation ensures continuity. Thus automation is crucial for maintaining continuous security without manual intervention. While automation reduces manual effort, organizations need to monitor logs or alerts to ensure renewals occur as expected. Additionally, Each renewal may involve generating a new private key, emphasizing the need for secure key handling practices.

While ACME provides a strong foundation for automated certificate management, it has its own limitations when used in isolation. Natively, ACME lacks advanced features such as centralized management, detailed reporting, compliance tracking, and seamless integration with existing IT infrastructure. These limitations can pose challenges for organizations that require a more comprehensive and scalable solution. Therefore, to utilize and enhance the capabilities of ACME, there must be a proper CLM solution that integrates with the ACME workflow. That is where CertSecure Manager comes into play.

Certificate Management

Prevent certificate outages, streamline IT operations, and achieve agility with our certificate management solution.

How CertSecure Manager Redefines ACME Integration

At Encryption Consulting, we’ve amplified the power of ACME with the robust capabilities of CertSecure Manager. As a CLM solution, it goes beyond just a standard implementation, offering a seamless and comprehensive certificate management experience.

Strengths of CertSecure Manager’s ACME Workflow

  1. Scalability and Flexibility: From single domains to complex multi-application infrastructures, CertSecure Manager scales effortlessly, ensuring organizations of all sizes can achieve efficient certificate management.
  2. Comprehensive Certificate Authority (CA) Support: CertSecure Manager integrates seamlessly with both public CAs, such as DigiCert and Entrust, and private CAs, including Microsoft PKI and EJBCA, providing organizations with diverse options.
  3. Customizable Certificate Templates: Our platform allows organizations to define and enforce specific requirements, ensuring compliance with industry standards and internal policies.
  4. Enhanced Security: By leveraging the ACME protocol’s cryptographic validation methods, CertSecure Manager ensures secure communication between the client and the CA.
  5. Centralized Management: CertSecure Manager provides an intuitive dashboard for monitoring, renewing, and revoking certificates across environments, from IoT devices to cloud applications.
  6. Automation Beyond Issuance: CertSecure Manager automates not only certificate issuance but also deployment across platforms like Apache, IIS, and load balancers such as F5, reducing downtime and human error.

Transforming ACME Limitations into Strengths

Although ACME revolutionized certificate automation, out‑of‑the‑box clients like Certbot leave gaps when it comes to enterprise requirements. CertSecure Manager fills those gaps with purpose‑built enhancements, turning potential challenges into competitive advantages:

Custom Attributes for Compliance and Reporting

Ever find yourself manually tagging certificates for billing, audits or regulatory reports? With CertSecure Manager, you define your custom fields once—billing codes, audit flags, whatever you need—and they flow through every issuance automatically. No more spreadsheets, no more late‑night reconciliation.

Legacy Infrastructure Compatibility

Your critical apps may still live on older platforms that don’t “speak” ACME. Rather than embarking on a costly rip‑and‑replace, CertSecure Manager quietly translates ACME calls into your existing CA protocols. You get full automation without touching legacy stacks.

Expanded Certificate Support

Modern security teams juggle S/MIME for secure email, code‑signing for software releases, device certificates for IoT—and each usually means a separate process. CertSecure Manager extends ACME to cover them all under one roof, giving your engineers a unified, script‑friendly interface.

Enhanced Workflow Management

Certificate sprawl isn’t just inconvenient; it’s a risk. Our interactive dashboards show you pending approvals, renewal errors, and usage trends in real time. You can enforce role‑based approvals or set automated escalations—so nothing slips through the cracks.

Flexible CA Integration

Vendor lock‑in may not make headlines—until you need to switch providers. CertSecure Manager lets you plug in any CA—public, private, or hybrid—side by side. Rebalance your issuance load, add a new root authority, or swap providers entirely, all without rewriting your automation.

Best Practices for Certificate Management

To fully leverage CertSecure Manager’s capabilities and align with industry best practices for certificate lifecycle management (CLM), your organization can rely on its robust automation and centralized control to enhance security and compliance (GlobalSign). The following best practices, seamlessly supported by CertSecure Manager, which helps mitigate risks, prevent outages, and maintain a strong security posture.

Best PracticeDescription
Create CLM PolicyDefine usage, roles, and CAs for consistency.
Use Centralized PlatformCertSecure Manager offers visibility and control across environments.
Conduct Weekly ScansDetect shadow certificates to prevent outages.
Automate ProcessesUse ACME and CertSecure Manager for issuance, renewal, and deployment.
Enable AlertsGet real-time notifications for expirations and compliance issues.

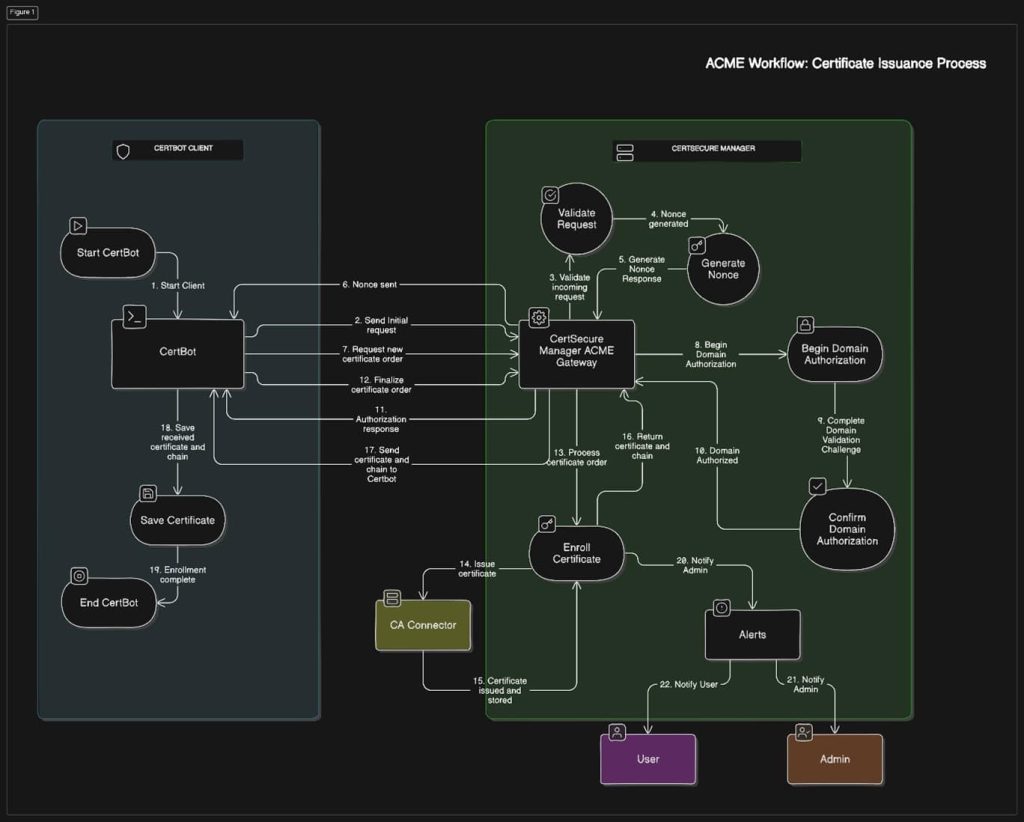
Real-World Use Case of CertSecure Manager with ACME

Let’s break down the ACME workflow with CertSecure Manager:

  1. Certificate Request: An ACME client, such as Certbot, initiates a request. CertSecure Manager acts as the ACME Gateway, validating the request and generating a nonce (unique token) to secure the session.
  2. Domain Authorization: CertSecure Manager facilitates domain validation using DNS or HTTP challenges, ensuring only authorized domain owners proceed.
  3. Certificate Issuance: After validation, CertSecure Manager coordinates with the CA to issue the certificate, which is securely processed and made available for deployment.

This seamless process is supported by real-time notifications and detailed reporting features, ensuring transparency and control at every step. For a comprehensive walkthrough, watch our YouTube demo showcasing CertSecure Manager’s ACME workflow in real-world scenarios.

Driving Innovation with CertSecure Manager

As industry leaders push for shorter certificate validity periods, manual processes become impractical. CertSecure Manager’s automated solutions significantly reduce the risks of expired certificates, ensuring compliance and operational continuity. By transforming ACME’s potential into real-world efficiency, CertSecure Manager empowers businesses to meet evolving demands. Below are the key advantages of CertSecure Manager, aligned with industry best practices:

Error-Free Automation for Consistent Lifecycle Management

CertSecure Manager automates the certificate renewal process, eliminating human error and reducing the operational burden of manual interventions. Industry best practices, such as those outlined in the NIST SP 800-57 guidelines for key management, emphasize automation to ensure consistent and secure cryptographic operations. By streamlining renewals, CertSecure Manager saves significant time—potentially hours per server—while maintaining accuracy across all deployments.

  • Alignment with Best Practices: Automation supports the principle of least privilege and minimizes human involvement, as recommended by OWASP’s guidelines for secure certificate management. This reduces the risk of misconfigurations that could lead to outages or vulnerabilities.
  • Impact: Ensures certificates are renewed on time, preventing disruptions and maintaining trust in digital infrastructure.

Robust Compliance Through Reporting and Alerts

CertSecure Manager’s comprehensive reporting and real-time alert systems ensure organizations stay compliant with regulatory and industry standards, such as PCI-DSS, GDPR, and ISO/IEC 27001. These standards mandate continuous monitoring and documentation of security controls. The platform’s actionable insights and timely notifications enable proactive adherence to security policies, simplifying audit preparation and compliance validation.

  • Alignment with Best Practices: ISO/IEC 27001 emphasizes the need for ongoing monitoring and evidence of compliance. CertSecure Manager’s centralized dashboard and automated reports align with this by providing clear, auditable records of certificate status and lifecycle events.
  • Impact: Reduces compliance-related overhead and ensures uninterrupted alignment with internal and external mandates.

Proactive Security with Automated Lifecycle Management

By automating the entire certificate lifecycle—from discovery to revocation—CertSecure Manager minimizes risks associated with expired, mismanaged, or compromised certificates. The CA/Browser Forum’s Baseline Requirements advocate for proactive certificate management to prevent vulnerabilities, such as those exploited in privilege escalation or man-in-the-middle attacks. CertSecure Manager’s proactive approach enhances system resilience by addressing potential threats before they materialize.

  • Alignment with Best Practices: The CA/Browser Forum and NIST SP 1800-16 stress timely renewals and revocation processes to limit exposure. CertSecure Manager’s automation ensures certificates are never overlooked, supporting a zero-trust security model by maintaining valid and secure credentials.
  • Impact: Strengthens organizational security posture, allowing teams to focus on strategic threat prevention rather than reactive fixes.

Certificate Management

Prevent certificate outages, streamline IT operations, and achieve agility with our certificate management solution.

Why CertSecure Manager Stands Out

CertSecure Manager extends the capabilities of the ACME protocol by incorporating advanced features tailored to meet the complex requirements of enterprise environments. By addressing challenges such as short validity periods and the need for enhanced security management, CertSecure Manager ensures a seamless and secure certificate lifecycle.

  • Optimized for Short Validity Periods: CertSecure Manager fully automates certificate renewals, ensuring uninterrupted operations even with certificates that expire every 90 days. This automation eliminates the risk of lapses and significantly reduces the operational overhead associated with frequent manual renewals.
  • Granular Access Controls for Secure Management: The solution offers robust role-based access control (RBAC) mechanisms, enabling your organization to create tailored workflows and assign permissions based on roles and responsibilities. This ensures that only authorized personnel can access or manage sensitive certificate processes, bolstering security at every level.
  • Enterprise-Grade Integration for Enhanced Security: CertSecure Manager seamlessly integrates with leading security tools like Tenable and Qualys, offering unparalleled visibility into certificate-related risks. These integrations enable proactive risk identification and mitigation, empowering your organization to maintain a strong and resilient security posture.

Conclusion

As digital security evolves, so must the tools and protocols that safeguard it. CertSecure Manager’s enhanced ACME functionality represents not just a response to industry trends but a forward-thinking approach to security and efficiency. With cutting-edge automation and compliance tools, CertSecure Manager equips businesses to stay ahead in an ever-changing landscape. To discover how CertSecure Manager can revolutionize your certificate lifecycle management strategy, contact us today for a personalized demo or visit our website to learn more.

Most Common SSL/TLS Attacks and How CLM Helps Mitigate Them

SSL/TLS are encryption protocols that authenticate and protect communication between any two entities, such as clients, servers, or interconnected systems over the internet.  SSL stands for Secure Socket Layer and is the predecessor of TLS, i.e., Transport Layer Security, although the terminologies are used interchangeably today. Any mention of SSL/TLS or just SSL usually translates to the latest version of TLS. 

SSL/TLS uses both asymmetric and symmetric encryption to protect the confidentiality and integrity of data in transit. Asymmetric encryption is used to establish a secure session between a client and a server, and symmetric encryption is used to exchange data within the secured session.   

Now, cyber security threats continue to evolve, and attackers are constantly finding new ways to exploit vulnerabilities in encryption protocols. A recent study by Enterprise Management Associates found that 80% of SSL/TLS certificates are vulnerable to attacks. Given the sheer number of certificates used by the top 1 million websites, this is a serious concern. The study identified three primary root causes of these vulnerabilities: 

  • Expired certificates (6 million)

    Organizations often overlook certificate renewals, leading to sudden outages and security risks. 

  • Self-signed certificates (9 million)

    These lack proper validation from trusted Certificate Authorities (CAs), making them susceptible to spoofing and impersonation attacks.

  • Outdated protocols

    Many organizations still use TLS 1.2 and older versions instead of adopting TLS 1.3, which offers improved security and performance.

Weak cipher suites, outdated TLS versions, and man-in-the-middle (MITM) attacks pose significant risks to a secure communication. With all this in mind, the following versions have been officially discontinued and should no longer be used: 

  1. SSL 2.0 and SSL 3.0

    These were found to be highly insecure due to vulnerabilities in their encryption methods, making them susceptible to various attacks, namely man-in-the-middle and padding oracle attacks. As a result, multiple standards and guidelines have prohibited their use: 

    • NIST SP 800-52 Rev. 2 explicitly prohibits SSL 2.0 and SSL 3.0 in federal systems.  
    • PCI DSS v3.2.1 enforces the removal of SSL and mandates a transition to TLS 1.2 or higher for payment security.  
  2. TLS 1.0 and TLS 1.1

    Deprecated due to weaknesses in cipher suites and key exchange mechanisms, failing to provide adequate security in modern digital communications.  

    • NIST SP 800-52 Rev. 2 mandates the use of TLS 1.2 or higher, prohibiting TLS 1.0 and TLS 1.1.
    • PCI DSS v3.2.1 requires financial institutions to completely disable TLS 1.0/1.1 and move to stronger encryption. 
    • HIPAA Security Rule aligns with TLS 1.2+ for safeguarding electronic Protected Health Information (ePHI).

To ensure secure communication, it is recommended that organizations transition to TLS 1.2 or higher, configure strong cipher suites, and follow best practices for encryption. In the later part of the blog, we are going to explore the security risks associated with outdated SSL/TLS versions and the necessary mitigation strategies. 

Understanding common SSL/TLS attacks and their potential impact on the business is essential for developing a control & security strategy. In the next sections, we will explore major SSL/TLS threats, their technical breakdowns, and effective mitigation techniques, including how Certificate Lifecycle Management (CLM) solutions can help organizations proactively defend against these risks. 

Common SSL/TLS Attacks and Their Technical Breakdown 

SSL/TLS Downgrade Attacks

SSL/TLS downgrade attacks trick web servers and clients into using older, insecure versions of the protocol. Then, they exploit weaknesses in outdated cryptographic algorithms, allowing them to intercept sensitive data in transit. These attacks are particularly dangerous in environments where legacy systems still support deprecated versions like SSL 3.0, TLS 1.0, and TLS 1.1. 

Modern protocols, such as TLS 1.2 and TLS 1.3, offer stronger security, but many servers and organizations still allow older versions for backward compatibility. Attackers force a connection downgrade, exposing the communication to vulnerabilities present in outdated encryption mechanisms. 

Following are the common downgrade attacks: 

  1. FREAK Attack (Factoring RSA Export Keys) 
    •  FREAK exploits the export-grade cryptographic restrictions imposed during the 1990s, which limited RSA key sizes to 512-bit or lower.
    • Attackers force a server-client connection to use these weak RSA moduli. 
    • Once downgraded, attackers can brute force the encryption within a few hours and decrypt the session. 
    • In 2015, FREAK was discovered affecting millions of websites, including those run by major tech companies like Apple and Google.
    • Steps to mitigate 
    • Disable export cipher suites in the server’s SSL/TLS configuration. 
    • Ensure the server supports TLS 1.2+ with strong cipher suites. 
  2. POODLE Attack (Padding Oracle on Downgraded Legacy Encryption) 
    • POODLE exploits SSL 3.0’s flawed padding in CBC-mode ciphers.  
    • Attackers force a TLS fallback to SSL 3.0, then manipulate padding bytes to decrypt sensitive information. 
    • This attack allows them to steal login credentials, session cookies, and other encrypted data. 
    •  Discovered by Google researchers in 2014, POODLE impacted several major websites, forcing them to disable SSL 3.0 entirely. 
    • Steps to mitigate: 
    • Disable SSL 3.0 completely on web servers and clients. 
    • Enforce TLS 1.2 or TLS 1.3 for all secure connections. 
    • Enable TLS_FALLBACK_SCSV to prevent forced downgrades. 

To protect against SSL/TLS downgrade attacks, organizations should disable legacy protocols by removing support for SSL 2.0, SSL 3.0, TLS 1.0, and TLS 1.1, as these outdated versions pose significant security risks. Compliance frameworks such as NIST SP 800-52 Rev. 2, PCI DSS v4.0, and HIPAA mandate the use of TLS 1.2 or higher, making it compulsory for organizations to upgrade their security policies accordingly.  

Additionally, organizations must adopt strong cipher suites by preferring AES-GCM, ChaCha20-Poly1305, and ECDHE key exchange, while completely avoiding weak encryption mechanisms such as RC4, DES, 3DES, and MD5-based hashing. 

SSL Stripping 

SSL Stripping is a man-in-the-middle (MITM) attack where an attacker downgrades a secure HTTPS connection to an insecure HTTP connection without the user realizing it. This allows attackers to intercept and manipulate sensitive information such as login credentials, payment details, and personal data before it reaches the intended website. 

When users visit a website, modern browsers automatically attempt to upgrade the connection from HTTP to HTTPS to ensure secure communication. However, attackers in an SSL stripping attack interfere with this process, forcing the victim’s browser to communicate over unencrypted HTTP instead. 

How Hackers Bypass Encryption 

  1. Intercepting the Initial HTTP Request

    Many websites still allow HTTP connections and rely on proxy to upgrade to HTTPS. Attackers sit in the middle of the communication, monitoring the initial HTTP request before the redirect occurs. Instead of allowing the redirect to HTTPS, they strip out the upgrade request and keep the victim on an unencrypted HTTP session.

  2. Acting as a Middle Proxy

    The attacker establishes an HTTPS connection with the website on behalf of the victim. However, they maintain a separate HTTP connection between themselves and the victim’s browser. This gives attackers full visibility into the communication while the victim remains unaware of the downgrade.

  3. Stealing and Modifying Data

    Since HTTP traffic is unencrypted, attackers can capture login credentials, payment details, and session cookies. They can also inject malicious scripts or modify website content before relaying it to the victim.

Techniques Used in SSL Stripping 

  1. ARP Poisoning (Address Resolution Protocol Spoofing)

    Attackers use ARP spoofing to manipulate the victim’s network, making their machine act as the gateway. This allows them to redirect all traffic through their route, enabling SSL stripping. ARP poisoning is commonly used in public Wi-Fi networks, where attackers can easily intercept traffic.

  2. DNS Spoofing

    Attackers modify DNS responses, tricking the victim into connecting to a malicious server instead of the legitimate website. The fake server then strips HTTPS, forcing the victim into an insecure session.

Steps to Mitigate

  1. Implement HSTS (HTTP Strict Transport Security)
    • HSTS forces browsers to always use HTTPS, even if an attacker tries to downgrade the connection.
    • Configure the web server to send the Strict-Transport-Security header with a long expiration time (max-age=31536000 for one year).
  2. Disable HTTP and Enforce HTTPS
    • Redirecting HTTP to HTTPS is not enough attackers can strip the redirect in such case.
    • Completely disable HTTP connections on web servers by enforcing HTTPS-only settings.
  3. Enable Secure Cookies and Headers
    • Use Secure and HttpOnly flags on cookies to prevent session hijacking.
    • Implement Content Security Policy (CSP) and Referrer Policy headers to reduce the risk of script injection.

Quantum Computing Threat to TLS 

Traditional encryption schemes, including RSA, ECC (Elliptic Curve Cryptography), and Diffie-Hellman key exchanges, rely on the difficulty of solving certain mathematical problems—such as factoring large numbers and computing discrete logarithms—that classical computers cannot efficiently solve. However, with the rise of quantum computers, these encryption methods face an existential threat. 

Quantum computers leverage Shor’s Algorithm, which can efficiently break RSA and ECC, thus making the most of today’s TLS encryption mechanisms obsolete. This is a pressing issue for organizations relying on TLS 1.2 and TLS 1.3, as both versions currently depend on RSA or ECC-based key exchanges and signatures. Without a post-quantum transition plan, all encrypted communications today may be retroactively decrypted in the future through a “harvest now, decrypt later” attack. 

NIST’s PQC Standards and Their Mitigating Recommendations

To address this quantum threat, organizations must transition to Post-Quantum Cryptography (PQC) NIST i.e., National Institute of Standards and Technology has now finalized three PQC standards, with an additional one in progress, to replace vulnerable cryptographic mechanisms.
 

Standard Algorithm Name Use Case 
FIPS 203 ML-KEM (CRYSTALS-Kyber) Key Encapsulation (TLS Key Exchange) 
FIPS 204ML-DSA (CRYSTALS-Dilithium) Digital Signatures (Authentication) 
FIPS 205SLH-DSA (Sphincs+) Digital Signatures (Backup Standard) 
FIPS 206 (Upcoming)FN-DSA (FALCON) Digital Signatures (Optimized for Small Signatures) 

Steps to Mitigate

To mitigate the risks posed by quantum computers, organizations should begin the migration to quantum-safe TLS using the following strategy: 

    Conduct a Cryptographic Inventory & Impact Assessment
    • Identify all TLS certificates, key exchange mechanisms, and digital signatures in use across your infrastructure.
    • Assess systems that rely on RSA, ECC, or other vulnerable cryptographic methods.
    • Implement a PQC assessment to better understand your crypto inventory.
    Implement Hybrid TLS (Classical + PQC Algorithms)
    • Hybrid approaches allow TLS to combine classical encryption (RSA/ECC) with PQC algorithms, providing a transition period before fully migrating to PQC.
    • Cloud providers like AWS, Google Cloud, and Microsoft Azure are already experimenting with PQC-enabled TLS connections.

Quantum computers present an imminent threat to traditional encryption, particularly affecting TLS-based security mechanisms that protect online transactions, communications, and sensitive data. NIST’s finalized PQC standards (ML-KEM, ML-DSA, and SLH-DSA) provide a clear roadmap for securing TLS in the quantum era. Organizations must begin proactively transitioning to quantum-resistant encryption, by taking these steps now, businesses can future-proof their security and stay ahead of emerging threats. 

How CLM Helps in Mitigating SSL/TLS Attacks

 As we have seen, modern security threats exploit vulnerabilities in SSL/TLS implementations, taking advantage of weak encryption protocols, expired or misconfigured certificates, and poor cryptographic management. Without a structured approach to certificate lifecycle management, organizations face significant risks, including downtime, data breaches, and compliance failures. 

This is where Certificate Lifecycle Management (CLM) solutions come into play. A well-implemented CLM framework ensures proper issuance, renewal, monitoring, and governance of digital certificates, reducing attack surfaces and enhancing cryptographic security. CertSecure Manager, an CLM solution by Encryption Consulting, exemplifies this by offering automated certificate renewal and expiry alerts, enforcement of modern TLS protocols, secure key management with HSM integration, and real-time visibility into certificate inventory. It also supports Zero Trust TLS inspection, post-quantum crypto agility, and policy-based enforcement of best practices—ensuring organizations stay ahead of evolving SSL/TLS threats while maintaining operational resilience and compliance. 

The table below maps common SSL/TLS attacks to CLM features and pillars, detailing how CLM solutions help mitigate these risks: 

Attack CLM FeatureCLM PillarHow It Helps
Man-in-the-Middle (MITM) Zero Trust & TLS Inspection, TLS 1.2/1.3 Enforced Governance Implements Zero Trust principles, ensuring all entities are verified. TLS 1.2/1.3 enforcement prevents older protocol exploitation. 
SSL Stripping HSTS & OCSP Stapling Alerts & Monitoring Ensures HTTPS enforcement with HSTS and OCSP stapling, preventing forced downgrade to HTTP. 
TLS Downgrade (POODLE, BEAST) TLS 1.2/1.3 Enforced Governance Mandates TLS 1.2/1.3 use, eliminating vulnerabilities in outdated versions like POODLE and BEAST. 
Certificate Spoofing & Forgery Strong Key Management Inventory Secures private keys from unauthorized access, preventing attackers from forging valid certificates. 
Expired/Reused Certificates Automated Certificate Renewal, Monitoring & Alerts Alerts & Monitoring Automatically renews expiring certificates, avoiding outages and unauthorized use of expired certs. 
Private Key Compromise Strong Key Management Inventory Ensures secure storage and access controls for private keys, preventing compromise. 
Weak Cipher Suites TLS 1.2/1.3 Enforced, Strong Key Management Governance Enforces strong cipher suites and key management policies, eliminating the risk of weak encryption. 
Quantum Threat Quantum-Ready Crypto, Cryptographic Agility Integrations Supports migration to post-quantum cryptography, ensuring resilience against future quantum threats. 

Certificate Management

Prevent certificate outages, streamline IT operations, and achieve agility with our certificate management solution.

Conclusion 

As cyber threats continue to evolve, SSL/TLS security remains a critical component of protecting digital communications. Man-in-the-Middle (MITM) attacks, SSL stripping, TLS downgrade exploits, certificate forgery, and even the threat of quantum computing highlight the vulnerabilities organizations face when encryption is not properly managed. Weak cipher suites, expired certificates, and poor cryptographic governance further increase the risk of data breaches and service disruptions. 

Thus, a proactive approach to SSL/TLS security is essential for mitigating these risks and ensuring compliance with industry standards such as NIST, PCI DSS, and HIPAA. Organizations must adopt modern cryptographic best practices, including enforcing TLS 1.2/1.3, disabling weak protocols, implementing certificate renewal automation, and integrating post-quantum cryptographic solutions. A CLM solution helps organization in automating certificate issuance, renewal, and revocation, enforcing strong key management policies, and ensuring visibility into certificate inventory, Thus, helping organizations mitigate SSL/TLS threats while reducing operational complexities.  

By proactively securing SSL/TLS infrastructure, businesses can future proof their encryption strategies, protect sensitive communications, and maintain trust in their digital ecosystem. 

GPG2, Debian, and RPM Signing with PKCS#11 Library on Ubuntu

Imagine downloading an app and feeling good about it because it has a digital seal of approval from a trustworthy developer. This seal means that the software is legitimate and hasn’t been altered by anyone with bad intentions. For developers, it’s a great way to build trust and show they take security seriously. For users, it offers reassurance that the app won’t harm their devices. This whole process of adding a digital seal or signature to an app is known as code signing.

Now, let’s understand how Encryption Consulting’s PKCS11 Wrapper can help you achieve GPG2, Debian, and RPM Signing with faster speed and better efficiency.

NOTE: To perform Debian and RPM signings, you will still need to configure and set up GPG on your machine.

GPG2

GPG2, or GNU Privacy Guard 2, is a free, open-source implementation of the OpenPGP standard designed to provide powerful encryption and signing capabilities. Available on platforms like Ubuntu, it enables users to encrypt data and communications, ensuring confidentiality while also allowing digital signatures to verify authenticity.

By implementing GPG2 signing with Encryption Consulting’s PKCS11 Wrapper on Ubuntu, you can ensure the authenticity and integrity of your digital assets, mitigating risks associated with unauthorized access or tampering.

Configuration of PKCS#11 Wrapper on Ubuntu

Prerequisites

Before we look into the process of signing using GPG2 and our PKCS11 Wrapper in Linux (Ubuntu) machine, ensure the following are ready:

  • Ubuntu Version:Ubuntu version 22.04 or later (tested environment is Ubuntu 24.02)  

Now, we need to be logged in as the root user before we move forward with GPG2 signing.

sudo su

Login as root

To set up PKCS#11 Wrapper, you will need to run the following commands and install some dependencies and packages on your Ubuntu machine:

  • sudo apt-get install curl 
  • sudo apt-get install liblog4cxx12 

Installing EC’s PKCS#11 Wrapper 

Step 1: Go to EC CodeSign Secure’s v3.02’sSigning Tools section and download the PKCS#11 Wrapper for Ubuntu.  

code signing tools

Step 2: After that, generate a P12 Authentication certificate from the System Setup > User > Generate Authentication Certificate dropdown.

P12 Certificate

Step 3: Go to your Ubuntu client system and edit the configuration files (ec_PKCS#11client.ini and PKCS#11properties.cfg) downloaded in the PKCS#11 Wrapper. 

Edit config file

Step 4: Add the environment variable for the pkcs11 client library

Run the below command to open the bashrc file

nano ~/.bashrc

add env variable

Now add the EC_INI_FILE_PATH variable with the path of the .ini at the end of the bashrc file, like:

export EC_INI_FILE_PATH=/home/aryan/pkcs11-client/ec_pkcs11client.ini

Export ini file

Press Ctrl+X, then enter Y, and then press Enter to save.

Step 5: Reload the environment variables

source ~/.bashrc

Reload env variable

Step 6: Check whether the variable has been set correctly

echo $ EC_INI_FILE_PATH

Recheck variable

NOTE: If you can’t see the file location from echo commands, open a new terminal and try again.

GPG2 Setup

GPG2 stands out as a vital tool for organizations aiming to protect their data and communications while boosting operational effectiveness in a Ubuntu machine.

Installing Gnupg (version 2.5.4) package 

Step 1: Check the default version of gnupg in your ubuntu machine.

sudo apt-cache policy GnuPG

check version

If the 2.5.4 version is present in your system, you can run the below command and go to the next section:

sudo apt install gnupg

Since this version is not present, you would need to perform the following steps:

Step 2: Install the required build tools and dependencies for the gnupg package.

sudo apt install build-essential bzip2 libassuan-dev libgcrypt20-dev libgpg-error-dev libksba-dev libnpth0-dev

install required build tools

Step 3: Download the 2.5.4 version of gnupg using the below command

wget https://www.gnupg.org/ftp/gcrypt/gnupg/gnupg-2.5.4.tar.bz2

Download gnupg

Step 4: Extract the Archive

tar -xjvf gnupg-2.5.4.tar.bz2

Extract Archive

Step 5: Go to the newly created gnupg-2.5.4 directory

cd gnupg-2.5.4

Gnupg Directory

Step 6: Run the configure file

./configure

Run config file

If this release of GnuPG requires some newer shared libraries that you have installed, the output of the configure command will tell you, as shown in the image below:

Config file output

The above output of the configure command tells us we need to build and install the latest version of the libgpg-error, libgcrypt, and libassuan libraries.

Step 7: Install the additional dependencies for GPG2

1. Install the libgpg-error version from the link provided as the configure command output

wget https://gnupg.org/ftp/gcrypt/gpgrt/libgpg-error-1.51.tar.bz2

Install libgpg-error

Extract the archive

tar xf libgpg-error-1.51.tar.bz2

Extract the archive

Go to the newly created libgpg-error-1.51 directory

cd libgpg-error-1.51/

libgpg-error directory

Run the configure file

./configure

Run Config
Run Config

Run the make command

make

make command

Install the package

sudo make install

install make package

Update the system’s dynamic linker cache using the below command:

sudo ldconfig

update linker cache

Go back one directory (../gnupg-2.5.4) to install other libraries

cd ..

previous directory

2. Install the libgcrypt version from the link provided as the configure command output

wget https://gnupg.org/ftp/gcrypt/libgcrypt/libgcrypt-1.11.0.tar.bz2

install libgcrypt

Extract the archive

tar xf libgcrypt-1.11.0.tar.bz2

extract Archive

Go to the newly created libgcrypt-1.11.0 directory

cd libgcrypt-1.11.0/

libgcrypt Directory

Run the configure file

./configure

Run config of libgcrypt Directory

Run the make command

make

make command

Install the package

sudo make install

Install package

Update the system’s dynamic linker cache using the below command:

sudo ldconfig

Update linker cache command

Go back one directory (../gnupg-2.5.4) to install other libraries

cd ..

one directory back

3. Install libassuan version from the link provided as the configure command output

wget https://gnupg.org/ftp/gcrypt/libassuan/libassuan-3.0.0.tar.bz2

Install libassuan

Extract the archive

tar xf libassuan-3.0.0.tar.bz2

Extract libassuan archive

Go to the newly created libassuan-3.0.0 directory

cd libassuan-3.0.0/

libassuan directory

Run the configure file

./configure

Run libassuan config

Run the make command

make

libassuan make command

Install the package

sudo make install

libassuan install package

Update the system’s dynamic linker cache using the below command:

sudo ldconfig

libassuan update linker cache

After installing all the libraries as directed by the original GnuPG configure command result, change back to the GnuPG release directory,

cd ..

go back one directory

Step 8: Run the configure file from the gnupg-2.5.4 directory

./configure

Run config file from gnupg

Check the output of the above command

Check Output

Step 7: Repeat the installation process for the remaining additional dependencies for GPG2.

1. Install libksba version from the link provided as the configure command output

wget https://gnupg.org/ftp/gcrypt/libksba/libksba-1.6.3.tar.bz2

install libksba

Extract the archive

tar xf libksba-1.6.3.tar.bz2

Extract libksba archive

Go to the newly created libksba-1.6.3 directory

cd libksba-1.6.3/

go to libksba directory

Run the configure file

./configure

Run libksba config
Run libksba config

Run the make command

make

run libksba make command

Install the package

sudo make install

libksba install package

Update the system’s dynamic linker cache using the below command:

sudo ldconfig

libksba update linker cache

Go back one directory (../gnupg-2.5.4)

cd ..

go back from libksba

Step 9: Run the configure file again from the gnupg-2.5.4 directory

./configure

run configure from gnupg

Check the output of the above command

output from configure run

Since there is no error of the package version, we can move forward with the installation

Step 10: Run the make command

make

run make command

Step 11: Install the package

sudo make install

install the package

Step 12: Check whether gpg has been installed correctly or not

gpg –version

gpg version check

Step 13: Check whether gpg-agent has been installed correctly or not

gpg-agent –version

gpg-agent version check

Enterprise Code-Signing Solution

Get One solution for all your software code-signing cryptographic needs with our code-signing solution.

Installing Gnupg-pkcs11-scd (version 0.11.0) package

Step 1: Check the default version of gnupg-pkcs11-scd in your ubuntu machine

sudo apt-cache policy gnupg-pkcs11-scd

default version of gnupg-pkcs11-scd

If the required version, 0.11.0, is installed on your machine, run the below command:

sudo apt install gnupg-pkcs11-scd

Otherwise, you would need to perform the following steps:

Step 2: Install the required build tools and dependencies for gnupg-pkcs11-scd package.

sudo apt install libpcsclite-dev libssl-dev pkg-config libpkcs11-helper1-dev

required build tools

Step 3: Download the required package

wget https://github.com/alonbl/gnupg-pkcs11-scd/releases/download/gnupg-pkcs11-scd-0.11.0/gnupg-pkcs11-scd-0.11.0.tar.bz2

Download the required package

Step 4: Extract the Archive

tar xf gnupg-pkcs11-scd-0.11.0.tar.bz2

Extract the Archive gnupg-pkcs11-scd

Step 5: Go to the newly created gnupg-pkcs11-scd-0.11.0 directory

cd ./gnupg-pkcs11-scd-0.11.0/

got to gnupg-pkcs11-scd-0.11.0

Step 6: Run the configure file

./configure

run configure file

Check the output of the above command

check output command

Since there is no error of package version, we can move forward with the installation

Step 7: Run the make command

make

make command run

Step 8: Install the package

sudo make install

sudo make install command

Step 9: Update the system’s dynamic linker cache using the below command:

sudo ldconfig

update system's dynamic linker cache

Step 10: Check whether gnupg-pkcs11-scd has been installed correctly or not

gnupg-pkcs11-scd –version

check gnupg-pkcs11-scd version

Create the Gnupg Directory and Environment Variables

Step 1: Check whether /root/.gnupg directory exists or not in your system

ls -ld /root/.gnupg

check directory existance

If not, then use the below command to make the directory

mkdir /root/.gnupg

make directory command

Step 2: Add the environment variables for GPG Agent and Gnupg-pkcs11 socket directory.

Open the bashrc file using the below command

nano ~/.bashrc

add env for gpg agent

Paste the below commands as per the file locations in your system, at the end of the file, like:

export GPG_AGENT_INFO=/root/.gnupg
export GNUPG_PKCS11_SOCKETDIR=/root/.gnupg/

run export command

Press Ctrl+X, then enter Y, and then press Enter to save.

Step 3: Reload the bashrc file

source ~/.bashrc

Reload the bashrc file

Step 4: To Check these variables, run:

echo $GPG_AGENT_INFO

echo $GNUPG_PKCS11_SOCKETDIR

check variable

If you can’t see the file location from echo commands, open a new terminal and try again.

Create the Configuration Files

1. Create a gnupg-pkcs11-scd.conf file in /root/.gnupg directory

Run the following command to create/edit the file

nano /root/.gnupg/gnupg-pkcs11-scd.conf

create or edit the file.jpg

Modify and configure the file as per the below command and your system’s file locations:

verbose
debug-all
providers ec
provider-ec-library /home/aryan/pkcs11-client/ec_pkcs11client.so

configure file

Press Ctrl+X, then enter Y, and then press Enter to save.

2. Create a gpg-agent.conf file in /root/.gnupg directory

Run the following command to create/edit the file

nano /root/.gnupg/gpg-agent.co

Create a gpg-agent.conf file

Modify and configure the file as per the below command and your system’s file locations:

verbose
debug-all
log-file /tmp/gpg-agent.log
scdaemon-program /usr/local/bin/gnupg-pkcs11-scd
pinentry-program /usr/bin/pinentry

Modify and configure the file.

Press Ctrl+X, then enter Y, and then press Enter to save.

3. Create a gpg.conf file in /root/.gnupg directory

Run the following command to create/edit the file

nano /root/.gnupg/gpg.conf

Create a gpg.conf file

Modify and configure the file as per the below command and your system’s file locations:

use-agent
#log-file /tmp/gpg.log

NOTE: you can uncomment the line (by removing the # symbol) to generate a gpg.log file

use-agent command

Press Ctrl+X, then enter Y, and then press Enter to save.

4. Create a pkcs11-scd.conf file in /root/.gnupg directory

Run the following command to create/edit the file

nano /root/.gnupg/pkcs11-scd.conf

Create a pkcs11-scd.conf file

Modify and configure the file as per the below command and your system’s file locations:

module /home/aryan/pkcs11-client/ec_pkcs11client.so

Modify and configure the file ec_pkcs11client

Press Ctrl+X, then enter Y, and then press Enter to save.

5. Create a scdaemon.conf file in /root/.gnupg directory

Run the following command to create/edit the file

nano /root/.gnupg/scdaemon.conf

Create a scdaemon.conf file

Add the below command to this file

disable-ccid

disable-ccid command

Press Ctrl+X, then enter Y, and then press Enter to save.

Start the GPG Agent

Step 1: To check if gpg-agent is running on your ubuntu machine

ps -aef | grep gpg

check gpg-agent running

If any agent is already running, you will need to kill that instance and start a new one.

Step 2: To kill an instance of the agent, use the following command with the changes to the PID number (number after the “root” user in the above image) as per your machine

kill -9 134028

kill an instance

kill -9 136706

kill an instance

Step 3: Start a new gpg agent

sudo gpg-agent –verbose –debug-level advanced –daemon

Start a new gpg agent

Step 4: Check again that only one gpg-agent is running on your ubuntu machine

ps -aef | grep gpg

one gpg-agent

Retrieve and Import the Keys and Certificates into GPG2

Step 1: Reload the agent

gpg-connect-agent << EOF
> RELOADAGENT
> EOF

Reload the agent

Step 2: Retrieve card status:

gpg –debug-all –card-status

Retrieve card status

Step 3: Get the key friendly names and certificates

gpg-connect-agent << EOF
> SCD LEARN
> EOF

key friendly names and certificates

Step 4: Copy the required KEY FRIENDLY Id

You can compare the respective CKA_ID of the key you want to use for signing from CodeSign Secure portal and copy the KEY FRIENDLY Id.

Copy KEY FRIENDLY Id

Step 5: Import key into GPG 2

gpg –expert –full-generate-key

Import key

This command will ask you for various inputs to properly import and set the permissions for the key in your machine.

First, it will ask you to select a number from the list. You will need to enter 13 as the key was already created from CodeSign Secure portal.

select a number

Then, you will need to enter the KEY FRIENDLY Id that you had taken from earlier steps.

enter the KEY FRIENDLY Id

It will then ask you to confirm the permissions for this key. Type “Q”.

confirm the permissions

Now, you will need to set the key expiry date in your system. The default selection is “key does not expire.”

set the key expiry date

Finally, it will prompt you to enter the key identification details for easier system access. Provide the name and email address for that key and confirm your settings by entering “O.”

enter the key identification details

Your key will successfully get imported into GPG2 and now can be used for signing.

key successfully get imported into GPG2

NOTE: Now you have GPG2 set up and installed on your machine.

To perform GPG2 Signing, go to the section (GPG2 Signing and Verification)

To perform Debian Signing, go to the section (Additional Steps for Debian Signing and Verification)

To perform RPM Signing, go to the section (Additional Steps for RPM Signing and Verification)

Enterprise Code-Signing Solution

Get One solution for all your software code-signing cryptographic needs with our code-signing solution.

GPG2 Signing and Verification

Step 1: List all the keys available for GPG2 signing

gpg –list-keys

List all the keys

Step 2:  Copy the pub key ID for the key you want to use for signing.

Copy the pub key ID

Step 3: Look for the file that you will sign using the key we just imported into GPG2.

Look for the file

Step 4: Run the signing command

gpg –sign –default-key <PUB Key ID> <File Path that needs to be signed>

A sample command is provided below

gpg –sign –default-key 8A361E0C157B120C20595E738311968FA5629A34 /home/aryan/pkcs11-client/testfile

signing command

It has successfully generated a signature file (testfile.gpg).

Step 5: Run the verification command

gpg –verify <Generated Signature Path>

A sample command is provided below

gpg –verify /home/aryan/pkcs11-client/testfile.gpg

verification command

Additional Steps for Debian Signing and Verification

Debian signing relies on GPG2 (GNU Privacy Guard) keys, so before proceeding, you will need to install and set up GPG2 on your system.

Step 1: List all the keys available for GPG2 signing

gpg –list-keys

keys available

Step 2:  Copy the pub key ID for the key you want to use for signing.

pub key ID

Step 3: Mention the pub key ID in the gpg.conf file that we created earlier.

Open the gpg.conf using the below command:

nano /root/.gnupg/gpg.conf

gpg.conf file

This should be the content in inside this file.

content in inside this file

Now, add the respective pub key ID as the default key at the end of the file, like:

default-key 8A361E0C157B120C20595E738311968FA5629A34

respective pub key ID

Press Ctrl+X, then enter Y, and then press Enter to save.

Step 4: Install the Debian package utility using the below command

sudo apt-cache policy dpkg-sig

Debian package

If the above gives an error or returns an empty output, refer to the below steps to download and install dpkg-sig package

1. Download dpkg-sig package

wget https://old-releases.ubuntu.com/ubuntu/pool/universe/d/dpkg-sig/dpkg-sig_0.13.1+nmu2ubuntu1_all.deb

Download dpkg-sig

2. Install the package

sudo apt install ./dpkg-sig_0.13.1+nmu8~noble_all.deb

Install dpkg-sig

3. Check whether dpkg-sig has installed correctly in your system

dpkg-sig

dpkg-sig has installed

Step 5: Locate the Debian file, which you need to sign using the key that you had set in the gpg.conf file as the “default key.”

Locate the Debian file

Step 6: Run the Signing Command

dpkg-sig –sign builder <File Path you want to sign>

A sample command is provided below:

dpkg-sig –sign builder /home/aryan/pkcs11-client/testsample.deb

dpkg-sig Signing Command

Additional Steps for RPM Signing and Verification

Step 1: Install the rpm package on your machine

sudo apt install rpm

Install the rpm package

Step 2: Check whether rpm has been installed correctly

rpm –version

rpm has been installed

Step 3: Install gnupg2 package

sudo apt install gnupg2

Install gnupg2

Step 4: Check whether gpg2 has installed correctly

gpg2 –version

gpg2 has installed correctly

Step 5: List all the keys available for GPG2 signing

gpg –list-keys

keys available for GPG2 signing

Step 6:  Copy the set pub key uid name for the key you want to use for signing.

pub key uid name

Step 7: Export the respective key to a file with the pub key uid name as per your setup, like:

gpg –export -a “Test1” > ~/RPM-GPG-KEY

Export the respective key

Step 8: Import this file into RPM

rpm –import ~/RPM-GPG-KEY

Import file into RPM

Step 9: Create a .rpmmacros file, which will tell the RPM package which GPG key to use for signing.

nano ~/.rpmmacros

Create a .rpmmacros file

Modify the ~/.rpmmacrors with file locations as per the paths set in your ubuntu machine and the required pub key uid name that we got from Step 5 in this section

%_gpg_name Test1
%_signature gpg
%_gpg_path /root/.gnupg/
%__gpgbin /usr/bin/gpg2
%__gpg_check_password_cmd /bin/true

Modify the rpmmacrors with file locations

Press Ctrl+X, then enter Y, and then press Enter to save.

Step 10: Locate the RPM file that you need to sign using the key we just imported into RPM.

Locate the RPM file

Step 11: Run the signing command

rpm –verbose  –addsign <File Path to be signed>

A sample command is provided below:

rpm –verbose  –addsign /home/aryan/pkcs11-client/RPMsample.rpm

rpm signing command

Step 12: Run the verification command

rpm –verbose –checksig  <File Path which was signed>

A sample command is provided below:

rpm –verbose –checksig /home/aryan/pkcs11-client/RPMsample.rpm

Conclusion

Encryption Consulting’s PKCS#11 setup for GPG2, Debian, and RPM signing on Ubuntu makes it easy and secure for organizations to use this powerful tool. Also, with the improved key management and security features from our code signing solution, CodeSign Secure, users can confidently protect their sensitive data, which makes it a great asset for organizations of all sizes.

CodeSign Secure enhances this integration by offering features like Hardware Security Module (HSM) support, detailed audit trails, and adherence to security best practices to ensure compliance and accountability, safeguarding signing keys, and maintaining trust. Together, these tools provide a comprehensive solution that optimizes signing processes, boosts operational efficiency, and strengthens security for organizations and users.

Everything You Need to Know About NIS2 Compliance

The Network and Information Systems (NIS), a European Union (EU) directive, was established in July 2016. This directive was proposed by the European Commission (EU) and aimed to enhance the level of cybersecurity across the member states of the EU. It focused on strengthening the collaboration between the member states and the organizations while aligning with cybersecurity measures. Its scope is comprised of two categories: Operators of Essential Services (OES) and certain Digital Service Providers (DSPs).

However, due to a lack of accountability and dependency on individual member states’ choices, the European Commission announced its plan of action to replace the NIS directive with a more secure framework, along with the incorporation of stronger requirements.

Therefore, on January 16, 2023, the Directive (EU) 2016/1148 (NIS 1) was replaced by the Directive (EU) 2022/2555, known as NIS 2.

Key Changes in the NIS2 Directive    

“NIS2,” the newer version of NIS, establishes stricter cybersecurity requirements for the various organizations in the EU member states, with a deadline of October 17, 2024. Its aim is to strengthen cybersecurity and resilience for critical infrastructure and digital service providers in the EU. 

The major changes introduced in the NIS2 directive to establish a greater level of cybersecurity in the ever-evolving technological space are as follows:  

1. Extension of scope  

The NIS2 expands its scope from seven sectors to eighteen based on the impact they have on the economy and society, along with their interconnectedness and their level of digitalization.   

The scope includes all medium and large-sized organizations in the selected sectors based on organization size in terms of the number of employees and revenue generated.  

NIS2

2. New categorizations

NIS2 removes the NIS distinction between the Operators of Essential Services (OES) and certain Digital Service Providers (DSPs). Rather, organizations are now classified based on importance and are therefore divided into two categories, namely: ‘essential’ and ‘important.’  

By April 17, 2025, these essential and important entities must be registered. The Member States of the EU must find them and enable them to register themselves. This implies that entities must figure out whether they fall under the scope mentioned in the NIS2 directive.

NIS2

3. Introduction of accountability management  

NIS2 introduced the concept of accountability and states that the management of the organizations in scope will be responsible for the level of security they possess. This includes the conduction of risk assessments, the establishment of security policies, information system security, incident handling, business continuity, and supply chain security. Therefore, the members of the management team of an organization are responsible for complying with the cybersecurity risk management requirements.

4. Introduction of fines  

The NIS2 directive provides the authorities with the power to enforce fines on organizations that fail to comply with the NIS2 directive. The details of the fines imposed are as follows: 

Entity TypeMaximum Fine (€)Maximum Fine (% of Worldwide Annual Turnover)
Essential EntitiesAt least €10,000,000At least 2%
Important EntitiesAt least €7,000,000At least 1.4%

5. Incident reporting  

NIS2 introduces stricter requirements for the process of incident reporting, including the detailing of the reports. The organization that experiences a cybersecurity incident must not only report it to the local Computer Security Incident Response Team (CSIRT) but also notify the customers if they are impacted by it.   

In case of ‘significant incidents,’ the entity must notify the customers in phases, including an ‘early warning’ within 24 hours of discovering the incident.   

6. The creation of the Computer Security Incident Response Team (CSIRT) platform

This platform was developed to enhance collaboration among the EU Member States when they deal with cybersecurity incidents.   

The European Vulnerability Disclosure Database was created by the European Union Agency for Cybersecurity (ENISA), which acts as a central repository to share information about the identified cybersecurity vulnerabilities, thereby warning the Member States to enhance their security posture accordingly.  

7. Enhancing Cybersecurity in Supply Chains  

This key change impacts many suppliers who are not in the scope of the NIS 2 directive but provide services to an entity that falls under the scope. It states that the entities are solely responsible for the level of cybersecurity in their supply chain, including handling cybersecurity risks.   

NIS1 vs. NIS2: What’s the Difference?  

CategoryNIS1NIS2
EnforcementNo clearly defined fines or strict enforcement mechanisms.Introduces financial penalties:  Up to €10M or 2% of annual global revenue for essential entities. Up to €7M or 1.4% for important entities.
CollaborationIncluded a Cooperation Group and a network of CSIRTs (Computer Security Incident Response Teams).Strengthens the role of CSIRTs by making them more proactive in incident response and offering guidance and feedback. Enhances cooperation by developing vulnerability policies and sector-specific risk guidelines and improving threat intelligence sharing.
ReportingLacked strict timelines for reporting security incidents. Reporting formats and procedures varied.Establishes clear deadlines for security warnings, notifications, and reports. Standardizes reporting procedures to ensure consistency across entities.
AccountabilityDid not explicitly assign responsibility to senior management for cybersecurity risks. Supply chain risks were not directly addressed.Requires senior leadership (e.g., board members) to supervise cybersecurity risk management, ensuring accountability at the highest level. NIS2 holds the organizations responsible for risks arising from third-party suppliers.

What are the cryptographic requirements in the NIS 2?  

The NIS 2 directive ensures that the requirements stated by it for the organizations are always fair and there is no irregularity. Therefore, the requirements for larger organizations indicate their role in society, and smaller organizations are not disproportionally affected by it.  

Therefore, NIS2 mandates that the various essential and important entities must meet the minimum number of requirements. Similar to the above-mentioned four focus areas of this directive, the following measures will provide you with an overview of the minimum requirements areas of this directive. These include:  

  • Risk assessments and security policies for information systems.

  • Policies and procedures for evaluating the effectiveness of security measures.

  • Policies and procedures for the use of cryptography and, when relevant, encryption.

  • A plan for handling security incidents.

  • Security around the procurement development and operation of systems. This means having policies for handling and reporting vulnerabilities.

  • Cybersecurity training and practice for basic computer hygiene.

  • Security procedures for employees with access to sensitive or important data, including policies for data access. Affected organizations must also have an overview of all relevant assets and ensure that they are properly utilized and handled.

  • A plan for managing business operations during and after a security incident. This means that backups must be up to date. There must also be a plan for ensuring access to IT systems and their operating functions during and after a security incident.

  • The use of multi-factor authentication, continuous authentication solutions, voice, video, and text encryption, and encrypted internal emergency communication when appropriate.  

  • Security around supply chains and the relationship between the company and direct suppliers. Companies must choose security measures that fit the vulnerabilities of each direct supplier. Companies must then assess the overall security level of all suppliers.

Here are the key articles mentioning encryption standards and cybersecurity measures under the NIS2 directive. 

Tailored Advisory Services

We assess, strategize & implement encryption strategies and solutions customized to your requirements.

The Key Aspects of NIS2:  Article 20, 21 & 23 

Articles 20, 21 & 23 act as the key pillars of the NIS2 directive, covering areas of Governance, Risk Management, and Incident Reporting, respectively. An organization complying with the requirements stated under these articles has enhanced cybersecurity resilience. Let us explore these articles in detail. 

Article 20

Article 20 of the NIS 2 directive focuses on the Governance aspect of the management bodies of the member states. It aims to ensure that the management of both essential and important entities practice cybersecurity measures. It states that they need to approve and supervise cybersecurity measures so that their organizations achieve the requirements. And, if they fail to do so, they will be held responsible.   

Additionally, the following points must be noted to ensure that your organizations align with the requirements stated in this article.   

  • Management teams must undergo cybersecurity training to gain knowledge and understand cyber risks and the best practices they must follow to create a secure infrastructure.

  • Employees working in various essential and important entities must also be provided with specialized training to enable them to identify risks and assess cybersecurity risk-management practices.

However, the liability of public officials and government employees will be decided by each country’s national laws rather than this specific regulation. To simplify, management bodies of private essential and important entities will be held accountable for cybersecurity failures, but rules for public institutions such as government agencies differ. 

Article 21

This article focuses on the cybersecurity risk management practices to be followed by both entities, important and essential. It states that organizations must implement strong security measures to protect their infrastructure from cyber threats, ranging from networks to information systems. These measures must be in accordance with the latest technology, relevant standards, and the level of risk faced by that organization. Furthermore, various factors must be considered, such as the organization’s size, exposure to risks, and the impact they may have.   

The article also outlines specific practices to achieve a greater level of security across the organization. These include risk incident policies, backup management, business continuity plans, and cybersecurity training. Also, entities must assess their supply chains to identify vulnerabilities, including the suppliers’ cybersecurity practices and secure development procedures, and ensure they follow strong cybersecurity practices.   

Article 21 has mandated the following measures for the organization to adhere to the NIS 2 directive. These are as follows:  

  1. Policies on risk analysis and information system security.

  2. Incident handling.

  3. Business continuity, such as backup management, disaster recovery, and crisis management.

  4. Supply chain security, including security-related aspects concerning the relationships between each entity and its direct suppliers or service providers.

  5. Security in network and information systems acquisition, development, and maintenance, including vulnerability handling and disclosure.

  6. Policies and procedures to assess the effectiveness of cybersecurity risk-management measures.

  7. Basic cyber hygiene practices and cybersecurity training.

  8. Policies and procedures regarding the use of cryptography and, where appropriate, encryption.

  9. Human resources security, access control policies, and asset management.

  10. The use of multi-factor or continuous authentication and secured voice, video, text, and emergency communication systems within the entity, as appropriate.

Article 23

Article 23 of the NIS2 directive covers Reporting Obligations in a detailed manner. It states that the Member States are responsible for reporting to the Computer Security Incident Response Teams (CSIRTs) about cybersecurity incidents that may impact the organization’s services or could cause financial or reputational damage.   

To align with the requirements of Article 23, organizations should consider the following key aspects:  

  • An early warning must be provided within 24 hours of the incident to spread awareness and notify within 72 hours. Thereafter, a detailed and final report must be submitted within a month, including the description of the incident that took place, its severity, impact, etc.

  • In case one single incident affects multiple countries, then the information must be shared across them effectively for improved coordination. 

  • Authorities who deal with these reports must also respond quickly and provide the necessary feedback and guidance.

  • Every three months, the EU cybersecurity agency ENISA will save and analyze the incident data to improve cybersecurity policies.

The Key Focus Areas of the NIS2 Compliance   

The NIS 2 directive includes the addition of requirements for the four key areas of your organization, namely, management, proper reporting to the authorities, strategies for risk management, and establishing plans for business continuity.  

Let us explore them in detail.  

1. Management

It is the sole responsibility of the members of the organization to be aware of the requirements established by the directive. It states that the management must identify the cyber risks of the organization and address them to comply with the requirements. If they fail to do so, it may result in penalties for the management and even a temporary ban from management roles. 

2. Proper incident reporting

This requirement states that organizations must have established plans to ensure that in case of incidents, they are reported directly to the concerned authorities. 

  • An early warning, i.e., “within 24 hours,” a warning must be reported stating a cybersecurity incident has happened.

  • An initial assessment must be provided along with all the relevant details of the incident within 72 hours.

  • A final report is to be provided to the authorities within one month, which outlines all the details of the incident that took place, its cause, and the actions taken by the organization to mitigate it. This report also includes the severity and the consequences of the incident and the type of threat that led to the incident.

3. Strategies for risk management

This requirement mandates the implementation of technical, operational, and organizational measures to manage risks across the organization’s infrastructure. These include the establishment of risk analysis policies, enhanced network security, incident handling, access controls, improved supply chain security, and policies regarding the use of cryptography. It states that cybersecurity risks should be managed based on the type of risks faced, considering factors such as the entity’s size, exposure to risks, and potential incident severity.  

4. Establishment of plans for business continuity

Organizations must establish strategies to achieve business continuity in the case of cyber incidents. These plans must include the creation of an incident response team, procedures to be followed in case of emergency, and backups for system recovery.   

Steps to achieve NIS2 compliance  

Compliance is not just about meeting the requirements set by the directive but also strengthening your resilience against growing and evolving cybersecurity threats. Therefore, organizations aligning with NIS 2 not only meet the requirements but also enhance their overall security posture.  

To prepare itself to achieve NIS2 compliance, an organization must follow a step-by-step approach. This approach broadly consists of six steps, which are as follows:  

1. Identifying cybersecurity risks

This step refers to the identification of various cybersecurity risks in the critical infrastructure of your organization, generally carried out by the Chief Information Security Officer (CISO). The NIS2 directive mandates the establishment of effective measures to mitigate risks and manage them, as well as the implementation of appropriate procedures, technologies, and systems to identify risks and mitigate them accordingly.  

2. Evaluation of your security posture

Evaluation of security posture refers to the process of reviewing the existing policies and technologies to assess how effective the strategies of your organization are to mitigate risks. It also includes identifying vulnerabilities, followed by an in-depth analysis to understand their impact.  

3. Protect privileged access

The privileged users in your organization are the main targets for unauthorized access to sensitive data, leading to data breaches and even causing service disruptions. To prevent this, NIS2 recommends the minimization of privileged access, implementation of access controls such as continuous authentication, and maintenance of access logs to detect threats and respond to incidents effectively.  

4. Strengthen your ransomware defenses

To strengthen your organization’s ransomware defenses, employees must be educated about phishing attacks, and there must be secure established processes for data backup. This also includes hardening endpoints through access controls and network segmentation to enhance resilience and ensure that the organization is able to recover quickly from various cybersecurity attacks.  

5. Adopt a zero-trust strategy

Traditional security measures are ineffective for cloud services and hybrid models. Therefore, the adoption of a zero-trust strategy is a must, as it assumes that risks can be from any of the users and devices. For this, authentication processes must be implemented for every entity, such as user identity, device type, location, and access frequency. This ensures that the security of all the systems and the sensitive data across the organization is enhanced.  

6. Inspect software supply chain

This step ensures that the entire lifecycle of software development, ranging from code creation to deployment and distribution, is inspected and secured. This includes enforcement of strict identity and access management for secure source code and conducting automated security procedures. 

Tailored Encryption Services

We assess, strategize & implement encryption strategies and solutions.

Impact of NIS2 on Businesses 

The NIS2 directive establishes stricter security requirements that impact businesses and industries across the EU. To comply with the requirements of this directive, organizations must enhance their overall security posture, introduce risk management strategies, and establish smooth incident reporting mechanisms. The following are the risks of non-compliance and the benefits of complying with it.   

Risks of non-compliance

Failure to meet NIS 2 requirements results in ineffective cyber resilience, therefore increasing the possibility of the occurrence of cyber incidents in your organization. Without effective security measures in place, the possibility of breaches, ransomware attacks, and data leaks increases. This would result in organizations facing high recovery costs, regulatory fines, and legal complications.  

Additionally, this handling of financial overhead could lead to a loss in revenue and affect the organization’s reputation. Furthermore, security breaches can result in operational downtimes, causing a reduction in productivity and impacting its long-term success.  

Benefits of compliance

An organization complying with the NIS 2 directive establishes operational stability and ensures the protection of critical data across its infrastructure. By implementing this proactive security measure, you can lower the risks of cyber threats such as data breaches and ransomware attacks.   

Complying with NIS2 allows an organization to be digitally safe, ensuring that its infrastructure, supply chains, and critical data remain protected. Therefore, by aligning its requirements with the NIS 2 directive, an organization not only protects its operations but also enhances customer trust.  

What happens if you don’t comply with NIS2?  

If an organization fails to comply with the NIS2 directive’s requirements, it may face serious consequences. Let us learn more about it.  

1. Financial penalty

Organizations failing to comply with the requirements of the NIS 2 directive will have to face huge penalties according to the category they belong to.   

  • Essential companies: Entities belonging to this type fine up to €10 million euro or 2% of their global annual revenue.

  • Important companies: Entities belonging to this type of k fines for up to €7 million euro or 1.4% of their global annual revenue.

2. Legal complications

In addition to fines, if an organization fails to comply with the NIS 2 directive, the members of the management team of that organization will be held responsible for not adhering to the requirements and may face legal action against them.  

3. Loss of trust

Non-compliance may also lead to a loss of trust from customers, partners, and even stakeholders, resulting in reputational damage to the organization. 

How can EC help?  

The NIS2 directive was established to enhance cybersecurity practices across the various critical sectors, and the first crucial step to achieve and maintain NIS2 compliance is an in-depth risk assessment and gap analysis. Our encryption advisory services include thorough audits and assessments to identify the gaps in various processes that can expose your organization to compliance risks. Here’s how we can assist you:   

1. In reviewing existing policies of your organization’s infrastructure

This involves identifying your current encryption abilities and understanding whether any limitations exist in your systems or not. We also examine your overall security to ensure that we have a complete image of your infrastructure, considering the various use cases associated with your organization.  

2. To assess gaps and identify vulnerabilities

This includes identifying gaps in your existing policies against the industry standards to ensure adherence to security and compliance requirements. For this, we conduct workshops for discussions about your current applications, encouraging collaboration among team members to gather valuable insights. Additionally, we created an assessment questionnaire to fetch important information about your encryption practices. Therefore, through this evaluation, we identify existing data encryption capabilities and identify specific domains for improvement.  

3. In implementing the roadmap

After the successful completion of the assessment, we will provide you with an in-depth report which consists of summaries of our findings and recommendations for each of them. This report lays out a strategy to implement the necessary capabilities to ensure that you are well-prepared to enhance your encryption practices. Also, our roadmap will aid you in adhering to the industry standards and aligning with the best practices to enhance data protection and help you align according to your compliance requirements. 

Conclusion

The NIS2 Directive is a key element in the European Union’s action to strengthen cybersecurity and protect its essential services. It lays down a clear guideline for member states, builds collaboration, and focuses on securing the supply chain within the region.

For organizations, NIS2 is more than just a regulation. Rather, it is an opportunity for organizations to improve how they manage cyber risks. Adopt strong risk management practices, prepare for incident response, and build solid governance frameworks. Businesses will not only protect their systems but also establish customer trust and contribute to a safer digital environment.

It may be overwhelming to learn about and comply with these new requirements, but the good news is that you won’t have to do it alone. Contact our team to get started today.

Overcoming CipherTrust Manager Hurdles: 10 Reasons to Seek Support

CipherTrust Manager by Thales is a powerful tool for managing encryption keys, enforcing security policies, and ensuring regulatory compliance. However, handling it efficiently requires deep expertise, ongoing maintenance, and strategic oversight. Without proper support, organizations risk security gaps, operational disruptions, and compliance failures. Here are ten reasons why having dedicated CipherTrust Manager support is essential for your organization.

ciphertrust platform diagram

Discover the Top 10 Reasons:

The following are the top 10 reasons how an organization can benefit from external support in managing CipherTrust Manager.

1. Complex Setup and Configuration

Deploying CipherTrust Manager is not just about installing the software, it requires precise configuration to align with your organization’s security architecture. Incorrect setup can lead to vulnerabilities, inefficient key management, and integration issues with existing infrastructure. A well-configured deployment ensures seamless encryption key handling and optimized performance from day one.

Tailored Encryption Services

We assess, strategize & implement encryption strategies and solutions.

2. Integration with Existing Systems

CipherTrust Manager needs to integrate with various applications, cloud environments, and hardware security modules (HSMs). Compatibility issues can lead to operational inefficiencies and security gaps. Proper support ensures smooth integration with minimal disruptions, allowing your organization to continue its operations securely and efficiently. According to Global Encryption Trends Report of 2025, key management adoption rates have surged from 45% in 2020 to 75% in 2024, reflecting a 31% increase post-pandemic.

3. Continuous Maintenance and Updates

Encryption and security landscapes evolve constantly, and CipherTrust Manager must stay up to date to protect against emerging threats. Regular updates, patches, and performance optimizations are necessary but can be time-consuming and complex. Dedicated support ensures your system is always updated with the latest security enhancements and running at peak efficiency.

4. Compliance and Regulatory Challenges

Regulations like GDPR, PCI DSS, NIS2, and the Cyber Resilience Act require strict data protection measures. Managing encryption keys and policies within regulatory frameworks demands expertise. Dedicated CipherTrust Manager support helps your organization implement best practices, audit readiness, and compliance maintenance without added stress. Non-compliance leads to hefty fines, reputational damage, and loss of consumer trust.

5. Disaster Recovery and Business Continuity

In the event of a cyberattack or system failure, regaining access to encrypted data is critical. A well-prepared disaster recovery plan ensures operations resume quickly with minimal data loss. Expert support assists in creating, testing, and maintaining business continuity strategies to prevent prolonged downtime. A perfect disaster recovery plan includes high availability, failover, failback, regular testing, and rapid recovery mechanisms to minimize disruptions.

6. Proactive Threat Detection and Risk Mitigation

Threats like unauthorized key access, misconfigurations, and security breaches can compromise sensitive data. According to the Global Encryption Trends Report of 2025 by Encryption Consulting, $ 4.9M was the average cost of a data breach in 2024.  Without active monitoring and risk assessments, vulnerabilities can go unnoticed until it’s too late. Proactive support ensures continuous monitoring, swift threat detection, and immediate remediation to minimize security risks.

7. Performance Optimization for High-Volume Environments

CipherTrust Manager handles thousands of cryptographic transactions per second. Without proper tuning, performance bottlenecks can slow down encryption processes, affecting critical applications. Expert support ensures optimal performance and scalability, allowing your encryption infrastructure to keep up with business demands.

8. Internal Resource Limitations

Managing CipherTrust Manager in-house requires significant expertise and dedicated personnel. IT teams already balancing multiple security initiatives may struggle to allocate the necessary time and focus. External support alleviates this burden, allowing internal teams to prioritize core business initiatives without compromising security.

Tailored Encryption Services

We assess, strategize & implement encryption strategies and solutions.

9. Expertise in Troubleshooting and Issue Resolution

Technical issues with CipherTrust Manager can disrupt security operations. Without in-depth expertise, resolving these issues can take longer, increasing downtime and exposure to risks. Expert support provides rapid diagnosis and resolution, ensuring minimal disruptions to business operations.

10. Scalability for Future Growth

As businesses expand, their encryption and key management needs evolve. Scaling CipherTrust Manager to accommodate growth requires careful planning and execution. Support services help design scalable architectures, ensuring your encryption infrastructure remains efficient and secure as your organization grows.

How Encryption Consulting Can Help

Maximize the capabilities of CipherTrust Manager with our expert support services. Our specialists provide round-the-clock assistance for seamless management, day-to-day operations, and rapid issue resolution. Our team of seasoned professionals ensures your CipherTrust Manager deployment is optimized, secure, and aligned with your business needs. We offer:

  • Installation and Configuration: Fine-tuning CipherTrust Manager to meet your organization’s specific requirements for maximum efficiency.
  • Ongoing Maintenance and Updates: Keeping your system secure and up to date with the latest patches and optimizations.
  • Integration Assistance: Ensuring CipherTrust Manager works seamlessly across your cloud and on-premise environments.
  • Security Audits and Risk Mitigation: Identifying vulnerabilities and implementing best practices to strengthen your security posture.
  • On-Demand Training: Empowering your team with the knowledge to manage CipherTrust Manager effectively and avoid misconfiguration.

Why Choose Our Support Services?

  • Expertise You Can Trust: Our specialists have years of experience handling even the most complex CipherTrust Manager environments.
  • Proactive Monitoring and Fast Resolution: We don’t just respond to issues—we anticipate and address them before they become problems.
  • 24/7 Availability: Security threats don’t wait, and neither do we. Our support team is available 24/7 to assist you.
  • Compliance-Driven Approach: We help you maintain regulatory compliance by implementing the industry’s best practices in key management.
  • Flexible Service Models: Whether you need ongoing support, periodic health checks, or one-time optimization, we tailor our services to your specific needs.

Conclusion

CipherTrust Manager is a critical component of a robust security infrastructure, but managing it effectively requires specialized expertise. By partnering with dedicated support services, organizations can enhance security, ensure compliance, and optimize performance while freeing internal teams to focus on strategic initiatives. Investing in expert CipherTrust Manager support is not just about reducing operational burdens—it’s about securing your organization’s future.

Your “Latest” Guide to PQC Readiness

NIST launched the Post-Quantum Cryptography project in 2016, inviting global cryptography experts to submit algorithms resistant to both classical and quantum attacks. By the deadline, 69 algorithms had been submitted and released for open evaluation. Today, NIST has released the first five quantum-safe algorithms.

The importance of using the selected NIST algorithms can be depicted by Dustin Moody’s remarks: “There is no need to wait for future standards,” he said. “Go ahead and start using these three. We need to be prepared in case of an attack that defeats the algorithms in these three standards, and we will continue working on backup plans to keep our data safe. But for most applications, these new standards are the main event.” 

Even though we don’t have powerful quantum computers today, it is important to start working on post-quantum encryption now. The reason is that changing encryption across the world takes a long time, often 10 to 20 years. Businesses need time to update their systems and ensure that everything continues to function smoothly with the new encryption methods. If we wait until quantum computers are ready, it might be too late to protect our sensitive data.

Cheers to Progress! NIST Finalizes the Fifth Quantum-Safe Algorithm

On March 11, 2025, the National Institute of Standards and Technology (NIST) announced the selection of HQC (Hamming Quasi-Cyclic) as the latest addition to its suite of post-quantum cryptography (PQC) standards. This decision underscores NIST’s commitment to enhancing cybersecurity measures against the emerging threats posed by quantum computing.

HQC is not intended to take the place of ML-KEM, which will remain the recommended choice for general encryption, said Dustin Moody, a mathematician who heads NIST’s Post-Quantum Cryptography project. 

“Organizations should continue to migrate their encryption systems to the standards we finalized in 2024,” he said. “We are announcing the selection of HQC because we want to have a backup standard that is based on a math approach different from ML-KEM. As we advance our understanding of future quantum computers and adapt to emerging cryptanalysis techniques, it’s essential to have a fallback in case ML-KEM proves to be vulnerable.”

Why Was HQC Selected After the Fourth Round? HQC was chosen as the fifth post-quantum cryptography (PQC) standard after the fourth round of NIST’s evaluation. While its encapsulation keys are approximately 41–47% larger than those of BIKE, and its ciphertexts are about three times larger, NIST prioritized factors beyond just key and ciphertext sizes.

Let’s understand the PQC algorithms in detail:

NIST Post-Quantum Cryptographic Algorithm Standards and Guidelines

NIST Special Publication (SP) 800-131A, IR 8457, IR 8454 provides a set of rules from NIST that helps U.S. government agencies decide which cryptographic methods (algorithms and key lengths) are safe to use for protecting sensitive but unclassified information.

This means organizations will get a step-by-step plan on:

  • Which encryption methods will no longer be safe
  • When they should switch to new, quantum-resistant algorithms
  • How to make the transition smoothly without security risks

Since quantum computers will eventually break today’s encryption, NIST is working on new quantum-resistant algorithms. As part of this transition, NIST will update SP 800-131A with clear guidelines on when and how to switch to these new algorithms.

NIST traditionally uses bit-length security strengths (like 128-bit, 192-bit, and 256-bit) to describe how secure an algorithm is against classical attacks. However, with post-quantum cryptography (PQC), security is measured in broader categories instead of fixed bit-lengths.

Each security category is based on a reference primitive, a well-understood cryptographic function that serves as a baseline for evaluating how resistant an algorithm is to different attack methods. Instead of focusing only on bit-lengths, these categories provide a more practical and flexible way to measure security against quantum threats. The following tables in the document provide a breakdown of the vulnerable algorithms that organizations might recognize in their cryptographic infrastructure right now and which quantum-safe algorithms would come in place, showing how they compare to traditional security strengths.

Post-quantum digital signature algorithms

Whether anyone believes quantum computers are powerful enough to crack encryption is 10 or 100 years away is irrelevant. When ciphers are deprecated, they become everyone’s problem and must be replaced.

The following table highlights the algorithms that need to be transitioned to quantum-resistant alternatives to ensure long-term security.

Digital Signature AlgorithmParameterTransition
ECDSA [FIPS186]≥ 128 bits of security strengthDisallowed after 2035
EdDSA [FIPS186]≥ 128 bits of security strengthDisallowed after 2035
RSA [FIPS 186]≥ 128 bits of security strengthDisallowed after 2035

Organizations may continue using these algorithms and parameter sets as they migrate to the post-quantum signatures identified in following table.

Digital Signature Algorithm Parameter Sets Security Strength Security Category Private Key Size (bytes) Public Key Size (bytes)
ML-DSA [FIPS204]   ML-DSA-44 128 bits 2 2560 1312
ML-DSA-65 192 bits 3 4032 1952
ML-DSA-87 256 bits 5 4896 2592
SLH-DSA [FIPS205] SLH-DSA-SHA2-128[s/f] 128 bits   1   64   32  
SLH-DSA-SHAKE-128[s/f]
SLH-DSA-SHA2-192[s/f] 192 bits   3   96   48  
SLH-DSA-SHAKE-192[s/f]
SLH-DSA-SHA2-256[s/f] 256 bits   5   128   64  
SLH-DSA-SHAKE-256[s/f]
LMS, HSS [SP800208]   With SHA-256/192 192 bits 3 64 60
With SHAKE256/192 3
With SHA-256 256 bits 5
With SHAKE256 5
XMSS, XMSSMT [SP800208] With SHA-256/192 With SHAKE256/192 192 bits 3 1373 64

Key Encapsulation Mechanism

The following table highlights the algorithms that need to be transitioned to quantum-resistant alternatives to ensure long-term security.

Digital Signature AlgorithmParameterTransition
Finite Field  DH and MQV [SP80056A]≥ 128 bits of security strengthDisallowed after 2035
Elliptic Curve DH and MQC [SP80056A]≥ 128 bits of security strengthDisallowed after 2035
RSA [SP80056B]≥ 128 bits of security strengthDisallowed after 2035

Here are the post-quantum algorithms, including ML-KEM and HQC

Digital Signature Algorithm Parameter Sets Security Strength Security Category Private Key Size (bytes) Public key size
ML-KEM [FIPS203] ML-KEM-512 128 bits 1 1632 800
ML-KEM-768 192 bits 3 2400 1184
ML-KEM-1024 256 bits 5 3162 1568
HQC
[NIST IR45]
HQC-128 128 bits 1 2249 40
HQC-192 192 bits 3 4522 40
HQC-256 256 bits 5 7245 40

NIST determined that HQC would provide a good complement to ML-KEM since it is based on a different underlying security problem and still retains reasonable performance characteristics for general applications. The only other fourth-round candidate that could potentially serve this purpose was BIKE, which relies on code-based assumptions like those of HQC. Compared to BIKE, HQC has larger public key and ciphertext sizes but cheaper key generation and decryption.

Please note that NIST plans to issue a draft standard incorporating the HQC algorithm in about a year, with a finalized standard expected in 2027.

Quantum-Readiness Roadmap

As of today, most critical assets, systems, and applications within an organization use cryptographic methods like RSA and ECC for securing digital signatures, software updates, and data protection. However, once Quantum Computers become powerful enough, they will be able to break these cryptographic algorithms. This is why organizations need to identify and replace these vulnerable cryptographic methods with Post-Quantum Cryptography (PQC).

Why is the Quantum-Readiness Roadmap important?

Organizations might not even be aware of all the places where public-key cryptography is being used in their systems, applications, and supply chains. If they don’t have a list (inventory) of vulnerable systems, they won’t know where to start the migration to PQC.

To fix this, organizations need to:

  • Cryptographic Discovery: Identify systems and applications that rely on quantum-vulnerable cryptography.
  • Cryptographic Inventory: Engage with vendors to understand where encryption is used inside products they buy.
  • Data Classification: Prioritize which systems need urgent updates based on their importance and risk.

Now, let’s discuss each step in detail:

Cryptographic Discovery

Cryptographic discovery is the process of finding out where and how cryptography is being used in an organization’s IT and OT (Operational Technology) systems. Organizations can use automated tools to scan for quantum-vulnerable algorithms in:

  • Network protocols (to check if encrypted communication is at risk).
  • Applications and software (to check if software updates are using weak encryption).
  • Development pipelines (to find cryptographic dependencies in the codebase).

However, some cryptography might be hidden inside products, making it difficult to detect. In such cases, organizations should ask vendors for details.

Cryptographic Inventory

A cryptographic inventory is a list of all quantum-vulnerable cryptographic assets in an organization. It should include:

  • Where cryptographic algorithms are used?
  • What kind of data do they protect?
  • How long the data needs to remain secure (e.g., sensitive government data might need security for decades)?
  • Which systems, protocols, and services rely on these cryptographic protections?

This inventory helps organizations plan for a smooth transition to PQC by identifying and addressing risks before quantum computers become a real threat.

Data Classification in the Quantum Era

Data classification means categorizing data based on its sensitivity and criticality. For quantum readiness, organizations should:

  • Identify high-risk sensitive data that, if decrypted in the future, could cause harm.
  • Categorize data based on security requirements and how long it needs to stay protected.
  • Map cryptographic inventory with existing asset management systems (like Identity and Access Management, Endpoint Detection, etc.).

By doing this, organizations can prioritize where PQC migration needs to happen first.

PQC Advisory Services

Prepare for the quantum era with our tailored post-quantum cryptography advisory services!

Hybrid Approach- Bridge Between Classical and Post-Quantum Cryptography

PQC-classical hybrid Protocols are transitional cryptographic solutions that use both quantum-resistant and traditional (quantum-vulnerable) cryptographic algorithms together in key establishment or digital signatures.

These hybrid solutions are typically designed to remain secure if at least one of the component algorithms is secure. 

To put it simply, traditional locks (classical cryptography) might become weak over time, so you may decide to install smart locks (post-quantum cryptography – PQC) as well. But there’s a problem with not all doors and users being ready for smart locks yet. So, the best possible approach is to use both locks together for now, ensuring that if one fails, the other still provides security.

This is exactly what hybrid cryptographic protocols do in the transition to post-quantum cryptography (PQC). Hybrid cryptographic protocols combine quantum-resistant and quantum-vulnerable algorithms when generating digital signatures or establishing encryption keys.

Hybrid Key-Establishment Techniques

Two different key-establishment methods work together, and the final key is secure as long as at least one method remains strong.

  • Part 1 is generated using a classical method, which could become weak in the future (ECDH)
  • Part 2 is generated using PQC, designed to be quantum safe (ML-KEM)

Hybrid Digital Signature Techniques

A hybrid digital signature (also called a composite signature) is a cryptographic technique where two or more digital signatures are applied to a single message. This ensures that the verification of the message requires all signatures to be validated successfully.

  • Part 1: A classical digital signature algorithm (e.g., RSA or ECDSA).
  • Part 2: A post-quantum digital signature algorithm (e.g., ML-KEM).

A current TLS cipher suite, such as TLS_ECDHE_RSA_WITH_AES_256_GCM_SHA384, when progresses to a post-quantum cipher, might look like TLS_KYBER_DILITHIUM_WITH_AES_256_GCM_SHA384.

Major Use cases that will be affected by post-quantum cryptography (PQC)

Post-quantum cryptography (PQC) will gradually impact various use cases that rely on asymmetric cryptography, as quantum threats directly target public key cryptography. Preparing for the quantum era starts with analyzing which systems and processes will be affected by PQC. This involves identifying and defining the impacted use cases, such as the following examples:

Code Signing

Purpose: Digitally signing software to verify its authenticity and prevent tampering.

Why it matters: Devices that install and execute software must validate these signatures.

Quantum risk: If devices remain in use for a long time and their signature verification systems can’t be updated, they must be designed to support quantum-resistant signatures now to ensure long-term security.

User and Machine Authentication

Purpose: Verifying identities to control access to systems using asymmetric cryptographic protocols.

Quantum risk: Unlike encryption (which faces the “harvest now, decrypt later” threat), authentication systems are safe until quantum computers can break current algorithms.

Action needed: Organizations must upgrade systems, PKI, and hardware tokens to support quantum-resistant authentication before quantum computers arrive.

Network Security Protocols

Purpose: Secure data transmission via protocols like TLS and VPNs using asymmetric cryptography.

Quantum risk: Key establishment (encryption keys) are vulnerable to “harvest now, decrypt later.” Authentication (identity verification keys) can be transitioned later but will eventually need quantum-resistant replacements.

Next steps: Organizations need a strategic migration plan to secure network protocols against quantum threats.

Email and Document Signing & Encryption

Purpose: Email encryption (S/MIME), encrypts emails and files for secure transmission, ensuring the integrity and authenticity of digital communications.

Quantum risk: Email encryption is vulnerable to “harvest now, decrypt later”, meaning adversaries could store encrypted emails today and decrypt them once quantum computers are available.

Action needed: Organizations should transition encryption and signing mechanisms to quantum-safe alternatives as soon as possible.

The road to Q-day!

According to National Security Memorandum 10 (NSM-10), the U.S. government aims to complete the shift to quantum-resistant cryptography by 2035. This transition is necessary because quantum computers could break current encryption methods.

However, not all systems will switch to PQC at the same time. Some, especially those handling long-term confidential data, may need to transition sooner. Others, due to technical limitations, may take longer. NIST recognizes these challenges and will support organizations through this shift while ensuring that critical systems stay protected.

While this timeline is a prediction, advancements in quantum computing could accelerate it. Preparation is key, organizations must start transitioning to quantum-safe cryptography today to stay ahead of the threat.

  • 2024-2026: Regulatory bodies like NIST will finalize and standardize the first quantum-resistant algorithms. Soon after, certified cryptographic libraries will begin implementing them.
  • 2027-2029: A major industry push will take place as vendors start integrating NIST-approved algorithms into products and security protocols. Global standardization bodies will follow suit.
  • 2030-2033: Q-Day arrives—experts predict that Cryptographically Relevant Quantum Computers (CRQCs) will be capable of breaking today’s encryption, making post-quantum cryptography (PQC) a necessity.

How Encryption Consulting’s PQC Advisory Can Help?

  • Validation of Scope and Approach: We assess your organization’s current encryption environment and validate the scope of your PQC implementation to ensure alignment with industry best practices.
  • PQC Program Framework Development: Our team designs a tailored PQC framework, including projections for external consultants and internal resources needed for a successful migration.
  • Comprehensive Assessment: We conduct in-depth evaluations of your on-premise, cloud, and SaaS environments, identifying vulnerabilities and providing strategic recommendations to mitigate quantum risks.
  • Implementation Support: From program management estimates to internal team training, we provide the expertise needed to ensure a smooth and efficient transition to quantum-resistant algorithms.
  • Compliance and Post-Implementation Validation: We help organizations align their PQC adoption with emerging regulatory standards and conduct rigorous post-deployment validation to confirm the effectiveness of the implementation.

Conclusion

The transition to post-quantum cryptography is no longer a distant consideration—it is a necessary step for ensuring long-term data security in a rapidly evolving technological landscape. With NIST finalizing the fifth PQC algorithm, organizations must take proactive measures to adopt quantum-resistant cryptographic standards. Whether it’s securing sensitive communications, protecting financial transactions, or ensuring the authenticity of digital signatures, the time to prepare is now. As quantum threats grow, those who act early will be best positioned to safeguard their critical system against future cryptographic vulnerabilities.

Your Guide to DORA Compliance 

Introduction to DORA

Cybercriminals are hitting financial institutions harder than ever, with cyber threats increasing at an alarming rate. According to IBM, in 2023, the average cost of a data breach in the financial industry was reported to be $5.90 million, and it surged to $6.90 million in 2024. On top of that, a report published by Trend Micro revealed that the banking sector ranked as the No. 1 industry for detected ransomware attacks in 2023. As financial institutions become more interconnected and reliant on digital infrastructure, the risks continue to grow. This evolving threat landscape made it clear that a stronger, standardized approach to cybersecurity and operational resilience is essential. That’s why DORA was introduced. 

The Digital Operational Resilience Act (DORA) is a European Union regulation that is designed to strengthen both the operational resilience and regulatory compliance of financial institutions against Information and Communication Technology (ICT) risks. Financial institutions rely heavily on ICT systems for their digital infrastructure, networks, and data management. However, if these systems are not managed effectively, they can become vulnerable entry points for cyber threats, operational failures, and third-party risks. A security breach or operational disruption could expose sensitive data, interrupt critical services, and ultimately jeopardize financial stability. 

To avoid this, DORA establishes a comprehensive framework for managing, mitigating, and reporting ICT-related incidents. This framework ensures that financial institutions not only meet regulatory requirements but are also well-equipped to withstand, respond to, and recover from cyber threats and operational disruptions. 

DORA provides clear and consistent rules for operational resilience across the EU, primarily focusing on: 

  • Mitigating the risks posed by increasing vulnerabilities due to the growing interconnectivity within the financial sector. 
  • Ensuring that dependencies on third-party service providers are effectively managed, safeguarding the stability and security of financial operations.
  • Addressing the new risks that arise from the growing use of digital financial services. 
  • Establishing a unified supervisory framework across the EU to ensure consistent oversight and resilience within the financial sector. 

Who Must Comply with DORA?

DORA applies to a broad range of financial entities, including banks, insurance companies, investment firms, payment service providers, crypto-asset service providers, and ICT service providers that support these financial institutions.  

As of January 2025, Article 2 of the DORA regulation specifies the following 21 categories of in-scope entities:   

  1. Credit institutions 
  2. Payment institutions, including those exempted under the Directive (EU) 2015/2366
  3. Account information service providers  
  4. All electronic money institutions  
  5. Investment firms  
  6. Crypto asset service providers  
  7. Central securities depositories  
  8. Central counterparties  
  9. Trading venues  
  10. Trade repositories  
  11. Alternative investment fund managers  
  12. Management companies  
  13. Data reporting service providers  
  14. Insurance and reinsurance undertakings  
  15. Insurance intermediaries, reinsurance intermediaries, and ancillary insurance intermediaries  
  16. Institutions for Occupational Retirement Provision  
  17. Credit rating agencies  
  18. Administrators of critical benchmarks
  19. Crowdfunding service providers  
  20. Securitization repositories  
  21. ICT third-party service providers 

Notably, DORA’s scope extends beyond traditional financial entities to include Information and Communication Technology (ICT) third-party service providers. These are firms that offer digital services to financial institutions, such as cloud service providers, software vendors, data analytics companies, and managed service providers. The inclusion of these service providers highlights the critical role they play in the infrastructure of the financial sector and the risks that come with dependency on them. 

Under DORA, ICT third-party service providers must:  

  • Cooperate with financial entities for regular resilience testing.
  • Notify the financial entities about any ICT-related incidents or disruptions.
  • Maintain business continuity plans to ensure service delivery during unforeseen events.
  • Comply with EU privacy and confidentiality requirements to protect sensitive data.

By encompassing both financial institutions and their critical ICT service providers, DORA aims to create a strong and unified approach to operational resilience across the EU’s financial sector.  

DORA Timeline

DORA was first proposed on September 24, 2020, and later approved by the European Parliament and Council on November 24, 2022. It was officially published in the EU Journal on December 27, 2022, and came into effect on January 16, 2023. Financial entities and third-party service providers were given two years to familiarize themselves with DORA’s requirements and achieve compliance before full enforcement began on January 17, 2025. 

Now that the deadline has passed, organizations must ensure that they are fully compliant with DORA’s requirements, conduct regular resilience testing, and continuously monitor their ICT risk management frameworks to avoid penalties and operational disruptions.  

Core Pillars of DORA

DORA is built on five key pillars that strengthen the digital resilience of financial institutions, and they are: 

  1. ICT Risk Management

    As outlined in Chapter II, ICT Risk Management is a fundamental pillar of DORA. It ensures that financial entities take a structured and proactive approach to identify, assess, and mitigate technology-related risks. By enforcing continuous monitoring, timely risk assessments, and adaptive response strategies, DORA enhances resilience against cyber threats and operational disruptions.

    Financial institutions must implement the following measures to enhance ICT risk management:

    • Set up a dedicated ICT risk management team to oversee risks, monitor service providers, document risk exposure, and regularly assess ICT-related dependencies.
    • Implement real-time threat detection, continuity planning, and recovery measures to ensure swift incident response.
    • Strengthen digital resilience by identifying vulnerabilities and cyber threats, reviewing past incidents to determine root causes, and implementing necessary improvements.
    • Have a structured crisis communication plan to ensure clear internal coordination and timely external notifications in case of disruptions.
  2. ICT-Related Incident Reporting

    Chapter III, ICT-related incident management, classification, and reporting, lays out a standardized approach for detecting, classifying, and reporting ICT incidents, ensuring financial institutions stay ahead of potential threats.

    Under DORA, financial entities need structured processes to track incidents, assess their impact, and notify the right people—both internally and externally. Internally, that means quickly identifying issues and keeping all relevant teams updated. Externally, it involves timely reporting to regulators and, in cases like data breaches, notifying affected customers.

    To comply with DORA, financial institutions must adhere to the following guidelines:

    • Establish a structured process for detecting, managing, and reporting ICT incidents, including logging all ICT incidents and major cyber threats for tracking and future analysis.
    • Investigate and classify incidents based on severity, considering affected customers, service disruptions, data loss, downtime, and financial impact. Document root causes, take corrective actions to prevent recurrence, and maintain early warning systems and response plans to limit damage and ensure quick recovery.
    • Report serious ICT incidents to regulatory authorities when they disrupt critical operations or pose security risks.
  3. Digital Operational Resilience Testing

    DORA mandates that financial institutions regularly test their ICT risk management frameworks to assess their ability to withstand cyber threats and operational disruptions. According to Chapter IV – Digital Operational Resilience Testing, financial entities must perform regular risk-based testing, including vulnerability assessments and scenario-based testing, to identify weaknesses and implement corrective measures. These tests must be conducted by independent internal or external parties.

    To strengthen digital resilience, financial institutions must take the following actions:

    • Have a structured, risk-based resilience testing program as part of their ICT risk management framework to assess readiness for ICT incidents, identify weaknesses, and ensure timely corrective actions.
    • Establish clear procedures for prioritizing and addressing issues, with internal validation to track remediation efforts.
    • Conduct resilience testing for critical ICT systems annually, and for high-risk organizations, perform advanced threat-led penetration testing (TLPT) at least every three years as required by regulators.
  4. Management of ICT Third-Party Risk

    DORA imposes strict requirements on financial institutions to manage risks associated with ICT service providers, with Chapter V specifically focusing on ICT third-party risk management. It ensures that financial entities thoroughly assess third-party providers before entering agreements, ensuring they meet security and regulatory compliance. Contracts must clearly define service scope, quality expectations, monitoring requirements, and termination clauses.

    To comply with DORA, financial institutions must implement the following measures:

    • Develop a clear vendor risk management strategy and maintain a register of all ICT providers, documenting their roles in critical or important functions for regulatory review.
    • Report new ICT service agreements to regulators annually and provide advance notice for contracts involving critical services.
    • Adopt a risk-based approach for audits, inspections, and monitoring of ICT providers.
    • Evaluate the difficulty of replacing ICT providers, explore other alternatives before entering contracts, and assess risks related to vendor insolvency or data protection regulations.
  5. Information and Intelligence Sharing

    Chapter VI promotes the sharing of information and threat intelligence amongst the EU financial community. By fostering collaboration, financial institutions can enhance awareness, strengthen threat detection, and build more effective defense strategies against cyber risks.

    To ensure secure and effective information sharing, financial institutions must adhere to the following guidelines: 

    • Facilitate threat intelligence sharing to enhance awareness, limit cyber threats, and improve detection and response strategies.
    • Participate in secure and trusted communities of financial institutions for cyber intelligence exchange.
    • All exchanges must follow strict confidentiality, data protection, and competition rules to safeguard sensitive business information.
    • Establish formal agreements outlining participation terms, including the involvement of authorities and third-party ICT providers.
    • Notify regulators about their participation in such arrangements.

Together, these five pillars create a strong foundation for financial institutions to navigate ICT risks, ensuring resilience against cyber threats and operational disruptions. By emphasizing proactive risk management, continuous testing, and secure collaboration, DORA enhances the financial sector’s ability to safeguard critical operations and maintain regulatory compliance. 

Enterprise PKI Services

Get complete end-to-end consultation support for all your PKI requirements!

Role of Cryptography in DORA

Cryptography plays a fundamental role in the Digital Operational Resilience Act (DORA) by protecting the digital infrastructure, data, and communication systems of financial institutions. As the financial sector becomes more dependent on Information and Communication Technology (ICT), the importance of cryptographic measures in ensuring the confidentiality, integrity, and availability of critical data cannot be overstated. DORA outlines specific obligations related to cryptographic controls to mitigate risks associated with cybersecurity threats and operational disruptions. 

  1. Article 6 – Encryption and Cryptographic Controls

    DORA mandates that financial institutions establish a formal policy for encryption and cryptographic controls to protect financial and customer data. This includes:

    • Article 6.2(a) – Encryption of data at rest and in transit to prevent unauthorized access.
    • Article 6.2(b) – Rules for the encryption of data in use, where necessary. If not possible, data in use shall be processed in a separate and protected environment or with equivalent measures to ensure confidentiality, integrity, authenticity, and availability.
    • Article 6.2(c) – Encryption of internal network connections and external communications to secure sensitive data exchanges.
    • Article 6.2(d) – Strong cryptographic key management to regulate the use, storage, and lifecycle of cryptographic keys (referring to Article 7).
    • Article 6.4 – Periodic updates to cryptographic technology to ensure resilience against evolving cyber threats.
  2. Article 7 – Cryptographic Key Management

    Proper management of cryptographic keys is critical for preventing unauthorized access, data breaches, and operational risks. DORA requires financial institutions to:

    • Article 7.1 – Manage cryptographic keys throughout their entire lifecycle, including generation, renewal, storage, backup, transmission, and destruction.
    • Article 7.2 – Implement strict access controls to protect cryptographic keys from unauthorized access, modification, or loss throughout their lifecycle.
    • Article 7.3 – Develop key replacement mechanisms in case of compromise or damage.
    • Article 7.4 – Maintain a register of all cryptographic certificates and certificate-storing devices for critical ICT assets.
    • Article 7.5 – Ensure timely renewal of cryptographic certificates to maintain security.
  3. Article 9 – Secure Authentication and Access Controls

    DORA reinforces the need for secure authentication methods and controlled access to ICT assets using cryptographic security measures. Financial institutions must:

    • Article 9.4(a) – Develop an information security policy to safeguard data authenticity, integrity, and confidentiality.
    • Article 9.4(c) – Enforce strict access controls, limiting physical and logical access to information assets and ICT assets to only authorized users.
    • Article 9.4(d) – Implement strong authentication mechanisms based on recognized standards, including cryptographic key protection.

The Cost of Non-Compliance

Failing to comply with DORA isn’t just a regulatory issue—it comes with serious financial and reputational risks. Financial institutions and third-party service providers (TPSPs) that don’t meet DORA’s requirements can face hefty fines and other penalties.  

Here’s what non-compliance could mean:  

For Financial Entities:  

  • Fines of up to two percent of total annual worldwide turnover or average daily worldwide turnover. 
  • Individuals could be fined up to €1,000,000 for failing to comply. 

For Third-Party Service Providers (TPSPs):  

  • Critical TPSPs can face fines of up to €5,000,000.
  • Individuals within these providers may be fined up to €500,000. 
  • If a financial entity fails to report a major ICT-related incident or threat, the ESAs can also impose a fine. 

Organizations that fail to meet the requirements of DORA not only face significant penalties but also risk damaging their reputation and losing customer trust.  

Who Will Oversee DORA Compliance?

DORA will be enforced by various EU regulatory bodies. National Competent Authorities (NCAs) in each EU member state will play a key role in overseeing compliance at a local level.  

At the European level, three major regulatory agencies will be involved: 

  • European Banking Authority (EBA)
  • European Securities and Markets Authority (ESMA) 
  • European Insurance and Occupational Pensions Authority (EIOPA) 

These regulators will have the authority to oversee and enforce compliance with DORA, ensuring that financial entities meet the required resilience obligations. They can conduct audits and inspections to assess adherence, impose fines and penalties on organizations that fail to comply, and directly monitor ICT third-party service providers to ensure they implement the necessary risk management, security, and operational resilience measures as required by DORA.  

How can EC help?

At Encryption Consulting (EC), we specialize in providing tailored encryption assessments to help organizations achieve compliance with regulatory requirements such as DORA, HIPAA, and GDPR, as well as industry standards like NIST and PCI-DSS. Our process begins with evaluating your current infrastructure against established standards, allowing us to identify any gaps in your security measures. From there, we provide a roadmap that outlines the steps needed to achieve compliance effectively. Here’s how we can assist you:    

We start with a review of your existing policies. This involves identifying your current encryption capabilities and understanding any limitations in your systems. We also examine your overall security setup to ensure we have a complete picture of your environment, taking into account various use cases relevant to your organization. 

Next, we assess the gaps in your current policies. This includes identifying gaps in your existing policies against industry standards to ensure adherence to security and compliance requirements. We also conduct workshops to facilitate discussions about your current applications, encouraging collaboration among team members to gather valuable insights. Additionally, we create an assessment questionnaire designed to capture important information about your encryption practices. Through this evaluation, we identify existing data encryption capabilities and pinpoint specific areas for improvement. 

Once the assessment is complete, we transition into the implementation phase with a detailed roadmap. We provide a comprehensive report summarizing our findings and recommendations for each finding. This report serves as a foundational guide for implementing necessary encryption enhancements. Our roadmap aligns your processes with industry standards, strengthens data security, and ensures compliance. 

By choosing our encryption assessment services, you take a proactive step towards strengthening your organization’s compliance with relevant standards. We guide you through the process, ensuring your strategies are both effective and aligned with your business goals. 

Conclusion

Digital operational resilience is no longer an option; it has become a necessity, and that is why DORA was introduced. It outlines a clear framework for managing ICT risks, enhancing incident response, and securing third-party dependencies. Effective ICT risk management, proactive incident response, and rigorous resilience testing are not just about regulatory compliance—they are essential for maintaining stability in an increasingly digital world. By integrating DORA’s principles into daily operations, firms can strengthen their defenses, protect customer trust, and stay ahead of evolving threats. 

The Essential Role of Hardware Security Modules (HSMs) in Public Key Infrastructures (PKI)

Public Key Infrastructure (PKI) is fundamental to secure digital communications, authentication, and encryption across networks. At the heart of PKI security lies the Hardware Security Module (HSM), a specialized device designed to safeguard cryptographic keys. As cyber threats become more sophisticated, organizations must reinforce their security strategies with robust key management solutions. HSMs play a critical role in ensuring PKI reliability, strengthening encryption protocols, and maintaining compliance with regulatory standards. This article delves into the significance of HSMs in PKI environments and explores how they enhance security, scalability, and operational efficiency.

The Critical Role of PKI in Digital Security

PKI provides a structured framework for managing digital certificates and cryptographic keys, enabling secure communication between entities. It is widely used to protect sensitive data, establish digital signatures, and facilitate encrypted transactions. PKI relies on asymmetric encryption, utilizing a public and private key pair to authenticate and encrypt communications.

Organizations across industries leverage PKI for various security applications, including:

  • Securing websites through SSL/TLS certificates
  • Encrypting email communications
  • Enabling digital signatures for document authentication
  • Protecting access control mechanisms in enterprise environments

While PKI is a powerful security mechanism, its effectiveness depends on the secure storage and management of private keys. Unauthorized access or compromise of these keys can lead to significant security breaches. This is where HSMs come into play, offering a dedicated solution for safeguarding cryptographic assets.

What is a Hardware Security Module (HSM)?

An HSM is a specialized hardware device designed to generate, store, and manage cryptographic keys within a secure, tamper-resistant environment. It provides a high level of security by ensuring that cryptographic operations occur in a controlled setting, reducing the risk of unauthorized key access or exposure.

Key features of HSMs include:

  • Tamper Resistance: Built-in security mechanisms detect and respond to physical and logical tampering attempts.
  • Strong Key Protection: Keys never leave the HSM in an unencrypted state, minimizing the risk of compromise.
  • Regulatory Compliance: HSMs meet stringent security standards such as FIPS 140-2, Common Criteria, and eIDAS.
  • High Performance: Optimized for handling cryptographic operations efficiently, ensuring minimal latency for security-sensitive applications.

HSMs can be deployed in various forms, including on-premises hardware, virtual appliances, or cloud-based solutions. Their adaptability makes them a crucial component in securing digital assets and cryptographic workflows.

How HSMs Strengthen PKI Security

Secure Key Generation and Storage

HSMs generate cryptographic keys within a secure environment, ensuring they remain protected from unauthorized access. Unlike software-based key storage solutions, which are susceptible to malware attacks, HSMs provide a dedicated and isolated environment, reducing potential vulnerabilities.

Ensuring Cryptographic Integrity

The integrity of encryption processes relies on the proper handling of keys throughout their lifecycle. HSMs facilitate key management functions, including key rotation, renewal, and revocation, ensuring the longevity and security of cryptographic assets.

Tamper-Resistant Architecture

HSMs are designed to detect and respond to unauthorized access attempts. If tampering is detected, the module can trigger protective measures such as erasing stored keys and preventing malicious actors from extracting sensitive information.

Regulatory Compliance and Certification

Organizations operating in highly regulated industries must comply with security frameworks like GDPR, PCI DSS, and HIPAA. HSMs meet stringent security standards, providing a validated solution for regulatory compliance. Deploying an HSM helps organizations meet audit requirements while maintaining strong data protection measures.

Scalability for Enterprise Security

As organizations grow, their security infrastructure must scale accordingly. HSMs support enterprise expansion by offering seamless integration with PKI architectures. Whether deployed on-premises or in a cloud environment, HSMs provide the flexibility needed to adapt to evolving security requirements.

The Role of HSMs in Certificate Lifecycle Management

Managing digital certificates efficiently is crucial to maintaining a secure PKI environment. HSMs streamline certificate lifecycle processes by facilitating:

  • Automated certificate issuance and renewal
  • Secure key storage for certificate authorities (CAs)
  • Protection of signing and encryption operations
  • Controlled access to cryptographic materials

By incorporating HSMs into certificate management workflows, organizations can minimize operational risks and enhance the security of digital transactions.

Customizable HSM Solutions

Get high-assurance HSM solutions and services to secure your cryptographic keys.

HSM vs. Software-Based Key Storage: A Comparison

AspectHaardware Security Module (HSM)Software-Based Key Storage
SecurityProvides a dedicated, tamper-resistant hardware environment to safeguard cryptographic keys. Prevents unauthorized access and mitigates exposure to cyber threats.Keys are stored in general-purpose storage, making them more susceptible to theft, malware, and insider threats.
Key ProtectionEnsures that cryptographic keys never leave the secure boundary of the device in an unencrypted form.Keys are often stored in software files, which can be extracted or manipulated if the system is compromised.
ComplianceMeets stringent security standards such as FIPS 140-2, Common Criteria, and eIDAS, ensuring regulatory compliance.May lack certification for high-security environments, making compliance more challenging.
Tamper ResistanceEquipped with physical and logical tamper detection mechanisms that erase or lock access to keys if unauthorized attempts are detected.No built-in tamper protection, leaving keys vulnerable to attacks and unauthorized modifications.
PerformanceOptimized for handling cryptographic operations efficiently, reducing latency in encryption, decryption, and signing processes.Performance depends on the host system’s resources, which may result in slower cryptographic operations.
Access ControlImplements strict authentication mechanisms, such as multifactor authentication, to restrict key access to authorized users only.Often relies on operating system-based permissions, which may be bypassed if security measures are not properly enforced.
Deployment FlexibilityAvailable as physical devices, virtual appliances, or cloud-based solutions, allowing seamless integration with various infrastructures.Can be deployed quickly but lacks the dedicated security protections of a hardware-based solution.
Long-Term ViabilityProvides a more future-proof approach by ensuring secure cryptographic operations and adaptability to evolving security standards.May require frequent updates and additional security measures to address emerging threats.

Cloud-Based HSM Solutions: A Modern Approach

The increasing adoption of cloud services has led to the emergence of cloud-based HSM solutions. These solutions offer the same security benefits as traditional hardware-based HSMs while providing greater flexibility and accessibility. Cloud-based HSMs integrate seamlessly with cloud-native applications, ensuring that cryptographic operations remain protected even in distributed environments.

Advantages of cloud-based HSMs include:

  • Reduced Hardware Costs: No need for on-premises infrastructure
  • Scalability: On-demand resource allocation to accommodate business growth
  • Simplified Management: Centralized control over cryptographic keys
  • Enhanced Compliance: Meets regulatory requirements for cloud security

Cloud-based HSMs are ideal for businesses looking to modernize their PKI infrastructure while maintaining strong security controls.

Challenges and Best Practices for HSM Deployment

While HSMs provide robust security benefits, organizations must consider certain challenges when integrating them into their infrastructure.

Potential Challenges:

  • Implementation Complexity: Proper configuration and integration require technical expertise.
  • Cost Considerations: Initial investments in hardware and maintenance can be significant.
  • Access Control Management: Ensuring that only authorized users can access cryptographic keys is crucial.

Best Practices for HSM Deployment:

  1. Define Clear Security Policies: Establish guidelines for key management, access control, and usage policies.
  2. Ensure Proper Configuration: Regularly review and update HSM configurations to align with security best practices.
  3. Monitor and Audit Usage: Implement logging and auditing mechanisms to detect anomalies and potential threats.
  4. Integrate with PKI Infrastructure: Ensure seamless integration with existing PKI components to maximize security effectiveness.
  5. Leverage Cloud HSMs for Agility: If on-premises solutions are not feasible, consider cloud-based HSMs for scalability and ease of management.

Conclusion

HSMs play a pivotal role in securing PKI environments by providing robust key management, strong encryption, and regulatory compliance. As cyber threats continue to evolve, organizations must prioritize HSM deployment to safeguard their digital assets effectively. Whether deployed on-premises or in the cloud, HSMs remain an indispensable component of modern cybersecurity strategies. By leveraging these secure modules, organizations can ensure the integrity, confidentiality, and trustworthiness of their PKI-based operations, paving the way for a secure digital future.

LMS Signing: Future-Proofing Digital Security in the Quantum Era

Leighton-Micali Signature (LMS) is a digital signature scheme designed to keep our data safe in a world where quantum computers might break traditional encryption. Unlike the classic RSA or ECC algorithms that rely on complex math, LMS uses a hash-based approach, making it super resilient against quantum attacks. The cool thing? It’s a stateful signature scheme, meaning it tracks usage to maintain security, which is both its strength and a bit of a challenge.

The Importance of Post-Quantum Cryptography (PQC)

Why does this matter? Well, quantum computing isn’t just sci-fi anymore; it’s real, and it’s coming fast. Once it’s here, the encryption we rely on today could crumble like a cookie. That’s where PQC steps in, offering quantum-resistant algorithms to keep our digital world safe. LMS is one of these champions, providing a robust alternative for everything from code signing to securing firmware updates.

Real-world Applications and Relevance

So, where does LMS actually fit in? Think of IoT devices, satellite communications, and critical infrastructure—systems that require long-term security and can effectively manage cryptographic state tracking to prevent key reuse. It’s also a great choice for low-power devices where heavy-duty encryption might not be feasible. With NIST’s stamp of approval, LMS is not just theoretical—it’s already finding its way into enterprise security strategies.

Overview of Hash-Based Signature Schemes

Hash-Based Signatures

Imagine your digital signature is like a lock on a door. Traditional locks (like RSA or ECC) are super strong until someone shows up with a quantum key that opens them in seconds. That is where hash-based signatures come in. Instead of relying on common math, these signatures use cryptographic hash functions, which are like super-secure fingerprinting for data. Since quantum computers struggle with cracking hash functions, hash-based signatures are a solid defense against future quantum threats.

Stateful vs. Stateless

When it comes to hash-based signatures, there are two main flavors: stateful and stateless.

  • Stateful Signature Schemes (e.g., LMS, XMSS): Think of these as a punch card at your favorite coffee shop. Each time you sign something, you need to use the next slot on the card. If you lose track and reuse a slot, the security can break. This makes state management super important but also a bit tricky.
  • Stateless Signature Schemes (e.g., SPHINCS+): Now, imagine you could get a fresh punch card every time without keeping track. That’s what stateless schemes offer- no need to manage the state. They’re more flexible but often at the cost of larger signatures and more computational overhead.

So, why bother with stateful options like LMS? Well, they tend to be more efficient and lightweight, which is great for scenarios where memory and processing are limited, like in IoT devices or embedded systems.

Deep Dive into LMS (Leighton-Micali Signature) Scheme

How LMS Works

Alright, let’s get into the nitty-gritty of LMS without making it feel like a math lecture. LMS is a hash-based digital signature scheme, meaning it relies on cryptographic hash functions to generate and verify signatures. The key idea? It organizes keys in a tree structure (called a Merkle tree) where each node is a hash of its child nodes. The root of the tree acts as the public key, and each leaf represents a one-time signature (OTS).

Here’s a simplified step-by-step view of how LMS works:

  1. Key Generation
    1. A tree is built using hash functions, with OTS keys at the leaves.
    2. The root hash is used as the public key.
  2. Signature Generation
    1. A message is signed using one of the OTS keys at a leaf.
    2. To verify the signature, a verifier needs the OTS key and the authentication path (hashes leading to the roots).
  3. Verification
    1. The verifier reconstructs the tree path and checks if the computed root matches the public key.
    2. If it does, then the signature is legit.

The tricky part? State Management – Since each OTS key can only be used once, you have to track which ones have been used to avoid security risks.

LMS vs. XMSS

Now, you must be wondering: If LMS is so great, why do we need it? Good question! Both LMS and XMSS (Extended Merkle Signature Scheme) are stateful hash-based signature schemes, but they have some key differences:

FeatureLMSXMSS
StandardizationNIST-approved (SP 800-208)NIST-approved (SP 800-208)
FlexibilityMore scalable, can handle larger treesMore rigid but provides better security protocols
Signature SizeSlightly largerMore compact signatures
PerformanceFaster for signing and verificationSlightly slower but more optimized for smaller trees
State ManagementNeeds careful tracking of used OTS keysIt needs state tracking but supports forward security.

When to use LMS?

  • If you need fast signature verification (e.g., firmware signing, IoT devices).
  • If you require large-scale signing with lower computation costs.

When to use XMSS?

  • If you prioritize compact signatures over speed.
  • If your use case demands better security guarantees.

Both LMS and XMSS are great choices, but LMS often wins in real-world deployments due to its simplicity and scalability. That’s why organizations like the NSA and NIST are recommending LMS for post-quantum cryptographic applications, especially where efficiency is key.

State Management in LMS

Why Does State Matter in LMS?

Alright, so here’s the thing: LMS is a stateful signature scheme, which means every time you sign something, you have to keep track of which one-time signature (OTS) key was used. If you accidentally reuse a key (even once), your security is compromised – an attacker can extract your private key and forge signatures. This is not good.

Think of it like a ticket system at a deli counter – each customer (signature) gets a unique number, and once it’s used, it’s gone. If you hand out the same ticket twice, the system breaks. That’s why proper state management is crucial when using LMS.

How to Prevent State-Tracking Mistakes?

Since losing track of state can be catastrophic, here are some best practices to keep things secure and efficient:

  1. Use a Reliable Storage Mechanism
    • Store the current state counter in non-volatile memory (so it doesn’t reset if your system crashes).
    • Avoid using local files, if possible; prefer HSMs (Hardware Security Modules).
  2. Atomic Updates to Prevent Key Reuse
    • Update the state before generating the signature, not after (to avoid signing twice due to crashes).
    • Implement a crash-recovery mechanism to detect inconsistencies.
  3. Hardware-Based Solutions
    • Many modern HSMs and TPMs (Trusted Platform Modules) support secure key state management, ensuring that keys cannot be reused accidentally.
    • Cloud-based hardware security services (like AWS Cloud HSM) can also provide state tracking with audit logs.
  4. Use Redundant Backups (but carefully)
    • Keep a backup of the state in a separate secure storage location.
    • Be extra cautious, as restoring a backup without verifying the current state can still lead to key reuse.
  5. Implement Fail-Safes in Software
    • Add software-based safeguards to check if a key has been used before signing.
    • If possible, integrate logging and alerting mechanisms that notify System Admins if something seems off.

Standardization and Compliance

LMS in NIST’s Special Publication 800-208

When it comes to cryptographic standards, the NIST (National Institute of Standards and Technology) is like the referee in a championship game; they make the rules, and everyone follows. In Special Publication 800-208, NIST officially approved LMS as a stateful hash-hash signature scheme for securing digital signatures in a post-quantum world.

Why did LMS make the cut?

  • Quantum-safe: Resistant to attacks from quantum computers.
  • Lightweight: Works well for low-power and embedded devices.
  • Efficient: Faster signature generation and verification compared to some other PQC alternatives.

This approval means LMS is now recognized as a legitimate option for organizations looking to future-proof their security. If you’re dealing with firmware signing, IoT security, or satellite communications, it’s time to start thinking about migrating to LMS.

NSA’s CNSA 2.0

If NIST’s approval wasn’t enough, the NSA (National Security Agency) also threw its weight behind LMS. In CNSA 2.0 (Commercial National Security Algorithm Suite), the NSA specifically recommends adopting LMS and XMSS for certain high-security applications starting in 2025.

So, what does this mean in simple terms?

  • If your organization handles classified data, national security, or crucial infrastructure, expect to be strongly encouraged (or required) to adopt LMS/XMSS soon.
  • The move is part of a broader shift to post-quantum cryptography as governments prepare for the eventual rise of quantum computing threats.

With both NIST and the NSA backing LMS, it’s no longer just experimental technology. It is becoming a mandatory security measure in certain industries.

PQC Advisory Services

Prepare for the quantum era with our tailored post-quantum cryptography advisory services!

Implementation Considerations

So, you’re convinced LMS is the future – great! But how do you actually implement it without breaking everything? Well, transitioning to post-quantum cryptography (PQC) isn’t as simple as flipping a switch. There are some real challenges you’ll need to tackle.

Challenges in Migrating to LMS (or any PQC Algorithm)

  1. State Management is a Headache
    • Unlike traditional signatures (like RSA or ECC), LMS is stateful, meaning you must track which one-time signature (OTS) keys have been used.
    • If you mess up state tracking, then it’s game over. A single key reuse can break security, making state management the biggest technical hurdle.
  2. Compatibility with Legacy Systems
    • Most existing infrastructures were built around RSA/ECC, so switching to LMS means ensuring that software, firmware, and hardware can handle it.
    • LMS signatures are larger than RSA/ECC signatures, so you need to make sure storage and bandwidth constraints aren’t an issue.
  3. Lack of Widespread Tooling and Support
    • While LMS is standardized, it’s not as widely supported as traditional cryptographic algorithms.
    • Many software libraries and security solutions haven’t yet fully integrated PQC, so some custom development might be needed.

Integrating LMS into Existing Systems

  1. Use Hybrid Cryptography (for a Smooth Transition)
    • Instead of immediately replacing RSA/ECC, run LMS in parallel for a while.
    • This lets you test LMS without breaking compatibility with older systems.
  2. Leverage Hardware Security Modules (HSMs) for Key and State Management
    • HSMs are your best bet for secure key storage and automatic state tracking.
    • Modern HSMs (like nCipher, Thales, or Utimaco) are starting to support LMS and ensure that keys can’t be reused accidentally.
  3. Update PKI and Signing Workflows
    • If your organization relies on PKI (Public Key Infrastructure), you’ll need to adjust how you issue and manage certificates. You can leverage our Certificate Lifecycle Management tool, CertSecure Manager, for this task.
    • LMS works differently from traditional certificate-based systems, so expect some changes in key lifecycle management.
  4. Optimize Performance and Scalability
    • LMS is faster than some other PQC algorithms, but the signature size and key management overhead can still impact performance.
    • Ensure your system can handle the additional storage and processing power needed for managing a large number of signatures.

Migrating to LMS isn’t something you can do overnight. But with HSM integrations, hybrid cryptography, and careful state management, you can future-proof your security without disrupting your current systems. The key is to start planning now so that when the quantum era arrives, you’re ready to implement it.

How can Encryption Consulting LLC help you navigate the LMS Transition?

Alright, we’ve covered a lot, like what LMS is, why it matters, and how organizations need to start thinking about post-quantum security now rather than later. But let’s be real: Implementing LMS (or any PQC algorithm) isn’t a walk in the park. That’s where we come in.

At Encryption Consulting, we take the complexity out of quantum-proofing your security. Whether you need help with:

  • Integrating LMS into your existing systems without breaking everything.
  • Setting up state management properly so you never risk key reuse.
  • Deploying LMS in HSMs for top-tier protection.
  • Complying with NSA’s CNSA 2.0 and NIST PQC guidelines before the deadlines hit.

We know that every organization is different, so we don’t just throw generic solutions your way. Instead, we work with your specific security infrastructure, industry requirements, and risk profile to make sure your transition to PQC is smooth, efficient, and, most importantly, secure.

Conclusion

Quantum threats aren’t some far-off sci-fi scenarios. They are coming, and the organizations that prepare now will be the ones that stay ahead. If you want to future-proof your security with LMS and other PQC solutions, let’s talk. Encryption Consulting is here to help because when quantum computers show up, you don’t want to be scrambling.

Encryption Consulting Announces Partnership with DigiCert for Public Certificates 

Encryption Consulting, a leading provider of applied cryptography services and solutions, is pleased to announce its partnership with DigiCert, a global leader in digital trust. This collaboration enables Encryption Consulting to offer DigiCert’s trusted public certificates, ensuring organizations benefit from secure, reliable, and compliant digital identity solutions.

With this partnership, Encryption Consulting strengthens its commitment to delivering best-in-class certificate lifecycle management and PKI services and its certificate management solution, CertSecure Manager. Customers can now seamlessly acquire and manage DigiCert’s public certificates while leveraging Encryption Consulting’s expertise in secure implementation, compliance, and automation. 

“We are excited to partner with DigiCert to provide businesses with robust and scalable public certificates,” said Puneet Singh, Principal at Encryption Consulting. “This partnership enhances our ability to support organizations in securing their digital infrastructure with trusted certificates.” 

For more information, reach out to us at [email protected]

About Encryption Consulting

Encryption Consulting is a trusted leader in cybersecurity, specializing in applied cryptography. With a mission to simplify complex certificate lifecycle management challenges, Encryption Consulting provides innovative solutions and expert services to organizations worldwide.

Media Contact:

Surbhi Singh

Senior Marketing Consultant

[email protected]