Skip to content

How CertSecure Manager Revolutionized Certificate Management in the Retail Sector

What was once a luxury slowly becomes a necessity. In the early 2000s, digital certificates were considered a luxury. Still, in recent times, with growing regulations and cybersecurity threats, digital certificates have become a necessity to provide identity to users, computers, resources, and more. With every entity of an organization requiring a certificate to access, function, and operate, managing such a huge volume of certificates becomes one of the significant challenges.

In this case study, we talk about one such organization, a retail giant in the US with stores all across the country. As an industry disruptor, it needed to assess and change its operation to make the organization’s size manageable.

For smaller organizations, this can be done manually where the certificate requirement is less than 1000, but for larger organizations with their own set of policies and procedures, ensuring all certificates are compliant with the regulations while also being complicit with their internal policies all the while ensuring all certificates are active with 0 downtime and outages due to mismanagement becomes challenging. This problem only grows with the organization until it becomes unmanageable.

For this reason, certificate lifecycle management solutions like CertSecure Manager provide organizations with a unique, customized solution that can assist with their needs and requirements.

The Challenges

Being one of the big players in the retail sector, the organization had many challenges that other organizations faced, but it also faced some unique challenges. Some of the common challenges include:

  1. Managing Issuance

    To manage a large organization’s demand for certificates, these organizations need many Certification Authorities to issue certificates and provide them on time. However, managing different Certification Authorities with their procedures and maintaining different handbooks with different training for employees slowly become an inconvenience.

    A typical organization of this scale will have over 20+ domains (or forests) with at least two certification authorities (CAs) on major forests, one Cloud CA, and one public CA. This accumulates to 5 or more CAs.

  2. Outdated Microsoft PKI Processes

    Microsoft PKI remains one of the widely used on-premises private PKIs. However, with little to no advancements in certificate issuance processes using web enrollment, users who require certificates have to have different processes that require the help of other personnel. Meanwhile, with no REST API support, DevOps also finds it challenging to ensure that certificates are obtained on time.

  3. Alerts

    With certificates regularly expiring, administrators have to stay alert and vigilant to ensure no certificates remain expired on their applications/servers. Without proper alert mechanisms in place, administrators sometimes miss renewing critical certificates, which can often lead to outages.

With other organizations also facing the above issues, our customer had some unique requests we wanted to address. These requests arise from the challenges this organization faces and want a solution that caters to their needs. They are as follows:

  1. Domain Validation

    The customer had a lot of domains (50+) within their network, and with huge volumes of certificate requests pooling in, the customer wanted a way to weed out domains that are not explicitly whitelisted. The organization wanted certain domains to be authorized, and if any user requests certificates for domains that are not among the whitelisted ones, they should be auto-rejected.

    This will help reduce human errors, which can lead to outages due to improper domain names. This will also improve security as users cannot request certificates for other domains, helping them with the organization’s impersonation issues.

  2. Wildcard certificates

    Similar to the previous one, the organization also wanted to reject any requests.

  3. CA Restrictions

    The customer also wanted some CAs to be restricted and inaccessible to everyone. This primarily includes any public CAs, as certificates issued by these CAs have associated costs. These restricted CAs should only be accessible to a subset of people within the organization.

  4. Departmental Compartmentalization

    With multiple departments within the organization, the stakeholders wanted us to segregate users into different departments to ensure easier certificate management.

    This will also ensure that certain departments can access certain Certification Authorities. For example, the customer did not want the development team to have access to CAs used by the production team. This may lead to co-mingling of certificates, which can confuse the process of identifying the certificates that are being used.

  5. DevOPS

    The customer also had challenges pertaining to the DevOPS team, which needed Rest API access to request and obtain certificates.

These challenges and wishlists drove the organization’s efforts to find the proper solution for its needs. The challenges created significant issues in its operational capabilities and hindered its capacity to grow.

Certificate Management

Prevent certificate outages, streamline IT operations, and achieve agility with our certificate management solution.

Solution

When the customer approached us with these challenges, we had to spend significant time assessing and understanding their unique stance. Each organization has its processes and procedures, and we wanted to ensure we understand that before catering to their needs. With CertSecure Manager solving primarily all of their issues, we also found a few more areas where we can help the organization improve. The solutions that we focused on were as follows:

  1. Always Accessible

    With stores and offices spread out across the nation, we wanted to connect all of the resources and ensure any personnel working from home can also maintain access to CertSecure.

    This provided the organization with two options: Cloud and SaaS. Since the customer wanted to retain control with minimal latency, the cloud deployment was chosen to connect their whole infrastructure and give access to users outside of the network.

  2. Pooling of CAs

    With multiple Certification Authorities, we provided the customer with a single pane of glass to view and control the certificates. All Certification Authorities are connected and synced with the environment using CA Connectors.

    This allows customers to issue, revoke, and renew certificates from one portal, which reduces training time and compresses the processes and procedures the organization has to follow. This also enables newer protocols like Rest APIs, ACME, EST, and more for the DevOPS and IoT team.

  3. RBAC

    With a large user base, the organization wanted to provide minimal control to the registered users. The principle of least privilege is applied with varied roles and granular access control, ensuring users only get the permissions determined by the organization.

  4. Integration and Alerts

    Organizations can now connect their CertSecure manager with Teams, ServiceNow, and email to ensure they get regular alerts. These alerts consist of certificates expiring in the upcoming week and provide useful insights about their organization. CertSecure Manager also provides reports that can be used for data analysis to better understand and manage their infrastructure.

  5. Policy Module

    CertSecure Manager has a unique policy module that can restrict CSR re-usage and wildcard certificates. This will restrict and auto-reject any certificate requests that violate the policy. This also includes domain validation, where organizations have to whitelist domains. If certificate requests are made for domains that are not whitelisted, they are rejected automatically.

  6. Workflow

    Organizations can restrict CAs and templates for a particular CA. This will restrict any certificate requests and will need explicit approval before issuance. Only users with explicit approval permission can approve these requests.

  7. Departments

    CertSecure Manager enables different departments and segregates the user base accordingly. Each department has its own PKIAdmin, which can oversee and manage all resources and users belonging to that department. There are also global PKIAdmins who have access to all departments and can oversee and access all resources throughout the organization.

  8. Organization details

    With human error still prevalent, the organization wanted proper certificate tagging. The organization can provide options for pre-existing organization details like city, state, country code, department, and so on. Users cannot use any values that the administrators do not provide.

  9. Automation

    CertSecure Manager provides the option of Renewal Agents, which can be configured with servers like IIS, Apache, and Tomcat, load balancers like F5, or custom applications. These agents ensure that the certificates used are active and auto-renewed prior to expiration, helping organizations with their processes without any human intervention.

These features not only helped the organization with its needs but also improved its processes. When submitting a CSR, users can view its properties in the web portal itself without relying on OpenSSL or third-party websites.

Conclusion

In conclusion, CertSecure Manager’s comprehensive features, tailored solutions, and focus on automation and security have significantly improved certificate lifecycle management for organizations in the retail sector, addressing key challenges and providing a scalable, efficient, and secure platform for managing digital certificates.

What you need to know about PKCS#11 ?

Public-key Certificate Standards (PKCS) is a group of cryptographic standards that provide guidelines and application programming interfaces (APIs) for using cryptographic methods.

It seems too overwhelming for any person trying to start with PKCS. Let’s try to simplify things here; PKCS lays the infrastructure for the basic grounds of information exchange using PKI. It is a set of standards that uses cryptography to secure certificates and establish a secure PKI. PKI is all about the implementation of PKCS.

PKCS is a family of 15 standards, each addressing unique solutions.

  • PKCS #1: RSA Cryptography Standard
  • PKCS #2 and #4: Incorporated into PKCS #1 (no longer exist)
  • PKCS #3: Diffie-Hellman Key Agreement Standard.
  • PKCS #5: Password-based Cryptography Standard
  • PKCS #6: Extended-Certificate Syntax Standard.
  • PKCS #7: Cryptographic Message Syntax Standard
  • PKCS #8: Private-Key Information Syntax Standard
  • PKCS #9: Selected Object Classes and Attribution Types.
  • PKCS #10: Certification Request Syntax Standard
  • PKCS #11: Cryptographic Token Interface Standard (Cryptoki).
  • PKCS #12: Personal Information Exchange Syntax Standard
  • PKCS #13: Elliptic Curve Cryptography Standard.
  • PKCS #14: Pseudo-random Number Generation.
  • PKCS #15: Cryptographic Token Information Format Standard

Enterprise PKI Services

Get complete end-to-end consultation support for all your PKI requirements!

This blog will cover more about PKCS #11 and help you become familiar with it.

PKCS #11 is a cryptographic token interface standard that specifies an API (Application Programming Interface) called Cryptoki. Cryptoki is a platform-independent API that defines cryptographic tokens. Cryptographic tokens are the devices such as Hardware Security Modules (HSM), Smart cards, or any other cryptographic embedded device.

Cryptoki specifies API to devices that hold cryptographic information and are capable of carrying out cryptographic functions.

Cryptoki defines the most commonly used cryptographic object types (RSA keys, X.509 certificates, DES/Triple DES keys, etc.) and all the functions needed to use, create/generate, modify, and delete those objects.

The intended audience for Cryptoki is the devices with single-user access. Cryptoki isolates an application from the details of the cryptographic device. Cryptoki is cryptography oriented and focuses gravely on cryptography leaving non-cryptographic functions to other interfaces.

PKCS specifications are defined for both binary and American Standard Code for Information Interchange data types.

Importance of PKCS

Every industry running in the current scenario is dependent on PKCS. Constant efforts are put into integrating PKCS standards into the infrastructure of every possible running industry presently. Companies in sectors such as healthcare, education, and even government unwittingly subscribe to these standards when they incorporate various SaaS solutions and cloud-based infrastructure decisions into their systems. 

At an individual level, every website and application accessed from a personal device is also subject to PKCS standards. It makes sense, considering how much personal information flows into an online shopping, dating app, or even our all-time favourite navigator-Google Maps.

Reasons that make PKCS so crucial

  • Security

    Consider the modern-day scenario where it’s a very astronomical chance to find any device that isn’t connected to the internet. Being connected to the internet comes with its own risks of increased cyber-attacks. According to the Cost of a Data Breach 2022 Report by IBM, the average cost of a data breach in the United States is $9.44 million, which indeed is a very hefty sum. PKCS ensures that communication on the internet goes smoothly and ensures the integrity of the communication.

  • Interoperability

    The most significant advantage of using PKCS is the ability to securely allow various hardware and software forms to communicate without many development overheads. This makes it easier to explore different solutions and vendors. It also works well in the current cloud-driven infrastructure models.

  • Compliance

    With so much private and sensitive data doing the rounds, governing bodies across all industries have created regulations to control how this data is transmitted and stored. Encrypted data is usually the first mandate in all these regulations.

  • Versatility

    New devices and exceptional hardware capabilities are surfacing every day. The concept of stand-alone hardware is moot now, with every device recording or transmitting some form of data.

    The Internet-of-things (IoT) has caught on, with data constantly being uploaded and used to make operations more efficient. An architecture that complies with the PKCS standards makes it easier to adapt these new technologies without necessarily uprooting the sections of the existing system .

Conclusion

The use of PKCS#11 and the PKCS family for the safe and secure establishment of communication over the internet. PKCS family is providing the necessary stepping stones for encrypted services and the basis of PKI. Without the integration of PKCS in industry infrastructure there is no safe communication on the internet. PKCS provides us with advantages of security, compliance, versatility and interoperability which is much needed. 

Finding the Industry-First Software Supply Chain Security Toolkit

We are in an age where digital signature represents the mark of authenticity; seeing the world grow at such a rapid pace today, every single thing needs verification on the internet, be it any source code, script, key pair, or any sort of utility item that a third party offers. All the content we see on the internet needs authenticity before using it. It needs to be checked before it is used, and that mark is provided by Code Signing.

The mark which we are talking about is the main point of attraction of code signing, it is the unique hash value which is calculated before the software code is delivered. Software or utility service is stamped with a digital signature and a hash value to compare whether the received service is from the original author or is tampered with by malicious threat actors.

Now coming to Software supply chain security. The whole, SDLC, software development life cycle’s steps or the activities that interact with applications or otherwise contribute to their development is referred to as the software supply chain

Software supply chain security is the process of protecting the elements, processes, and procedures used in the development and distribution of software that covers developer techniques, development tools, interfaces, third-party and proprietary code, deployment strategies, infrastructure, and interfaces.

These security-related tasks fall under an organization’s purview, as does showing consumers evidence of such efforts. 

How can Code Signing help with mitigating Software supply chain attacks?

The main concept of code signing is focused on the integrity of the code, ensuring that the piece of code being delivered to the customer is from the original author. The software’s author signs the code whenever they make changes, ensuring no action is unauthorized.

That means anything being delivered to you comes with a hash released from the author, a key, and a digital certificate to always authenticate first before use. 

Code signing is also helpful when working in a team environment. You can use code signing as you exchange source code throughout the SDLC to ensure double authentication, prevent attacks, and even prevent namespace conflicts.

Enterprise Code-Signing Solution

Get One solution for all your software code-signing cryptographic needs with our code-signing solution.

Code signing follows a three-step process

  • Creating a unique public-private key
  • Hashing
  • Decryption and Verification
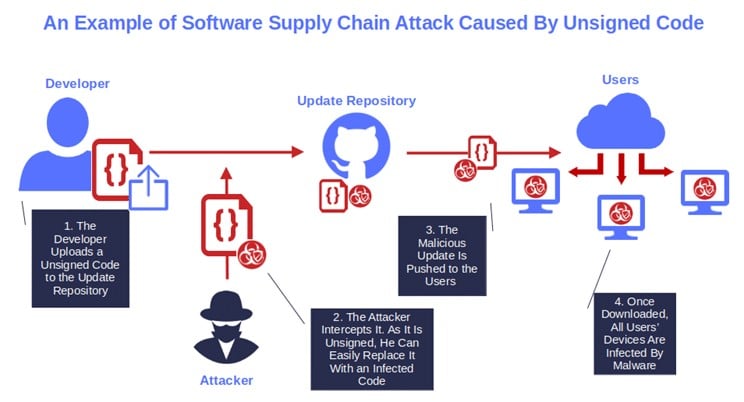
Software Supply Chain Attack

Recent Software Supply Chain Attacks

SolarWinds

Software supply chain threats first gained attention after the SolarWinds hack. Hackers were able to access Orion, the company’s IT monitoring system, which is utilized by over 30,000 businesses, including municipal, state, and federal authorities.

Through an Orion software update, the hackers were able to spread backdoor malware.

So, what happened here?

The malware could not only access system data and function alongside normal SolarWinds operations, evading even antivirus software, but also the hackers could access and impersonate the victims’ accounts and users.

From the time the hackers originally broke into the system in September 2019 until the time the incident was first discovered or reported publicly in December 2020, the perpetrators stayed undetected. 

You can see the detailed video explaining the attack on our YouTube channel by following the link below –

Kaseya

IT management software provider Kaseya stated it had been the target of a supply chain assault because of a flaw in its VSA software which hackers took advantage of in July 2021.

The attackers targeted multiple managed service providers (MSPs) and their clients, subsequently identified as REvil, who utilized the vulnerability to launch ransomware operations.

Hackers could access computers via a false update by breaching the VSA server, which is used to distribute a variety of automated IT chores and applications

According to Kaseya, a total of 1,500 firms were impacted by the hack, of which about 60 were its clients.

Later, Kaseya also declared that it hadn’t paid the hacker’s alleged $70 million ($50 million) ransom.

Log4j

Millions of systems were placed in danger by the vulnerability known as Log4Shell that affected Log4j, a Java-based logging application, towards the end of 2021.

Log4j is an open-source program created by the Apache Software Foundation that logs diagnostic data about systems and relays it to users and administrators to keep things operating properly.

However, the Log4Shell vulnerability in December 2021 gave hackers access to networks, allowing them to steal data, discover logins and passwords, and launch other malicious software.

Furthermore, many people and businesses were exposed to attacks due to the widespread use of Log4j. 

Log4j vulnerability was given CVE-2021-44832, an RCE vulnerability affecting instances of Log4j 2 in instances where an attacker has permission to modify the logging configuration file and can, in turn, construct a malicious configuration using a JDBC Appender.

CodeSign Secure: A helping hand

Our organization offers a robust and reliable solution- CodeSign secure. Our solution is different because CodeSign Secure helps customers stay ahead of the curve by providing a secure Code Signing solution with tamper-proof storage for the keys and complete visibility and control of Code Signing activities.

Key feature that marks us ahead area: –

  • Support for customized workflows of an “M of N” quorum with multi-tier support of approvers
  • The command line signing tool provides a faster method to sign requests in bulk.
  • Robust access control systems can be integrated with LDAP and customizable workflows to mitigate risks associated with granting wrong access to unauthorized users, allowing them to sign code with malicious certificates.
  • Validation of code against up-to-date antivirus definitions for viruses and malware before digitally signing it will mitigate risks associated with signing malicious code.

Conclusion

Code Signing is very crucial for the current day scenarios as piracy and the level of threat posed by the malicious actors to internet is too gigantic and it costs millions of dollars upon the compromise of organisation.

We’re providing a platform for creating/generating, and importing certificates to an organization, documents (env – Windows, Linux, Jar signing, and doc signing) are signed with private key and verified with the respective certificate. Proper and detailed logging feature with an extensive GUI representation (statistical analysis). Management of tools is one of the key advantages of CodeSign Secure.

Prevention is always better than cure, preventing the malicious actors from taking control over personal and client data is always better than disaster recovery. Our organisation helps people with preventing the disaster before it happens.

How to sign ClickOnce manifests with Visual Studio

When a program, script, or macro is downloaded, a popup window asking, “Are you sure you want to run this?” will appear during installation or execution. or “Do you want to let the next program affect this computer?” Code signing is being used in this popup. Code signing tools are crucial because they distinguish between legitimate software and malicious or rogue code.

Code signing is a procedure that verifies the legitimacy of the author and the originality and authenticity of digital information, particularly software code. It also ensures that the information is not malicious code. Additionally, it guarantees that this information has not been altered, falsified, or canceled after being digitally signed.

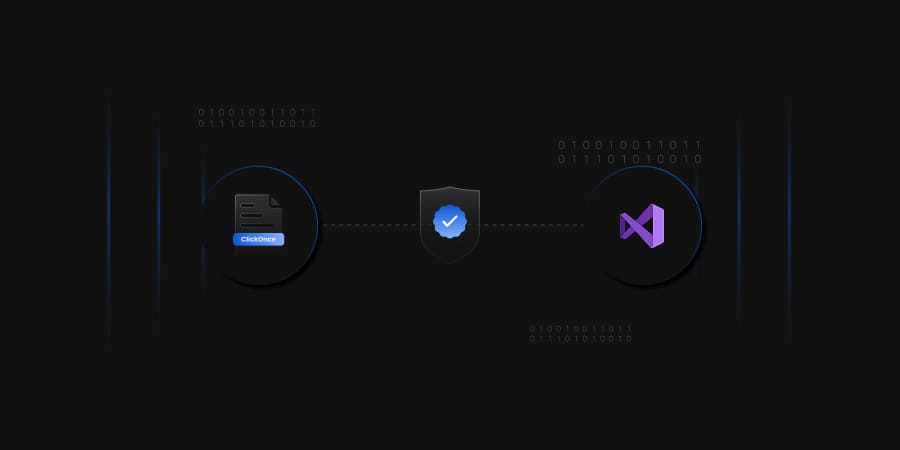
 Your projects developed in Visual Studio with Visual Basics and Visual C# can be published and updated using ClickOnce. ClickOnce is a Microsoft technology used to deploy and update Windows desktop applications over the internet. It allows developers to publish their applications on a web server or network file share and make them available to users via a single click without any complex installation or configuration process.

While you publish your project using ClickOnce, you can sign ClickOnce manifests using a certificate. This will help prove the legitimacy of your application, and this process is called Code signing. Codesigning with ClickOnce provides several security features to ensure that the application and its updates are downloaded from a trusted source and that users are protected against potential security threats. It adds an extra layer of security to your application and can help increase user trust.

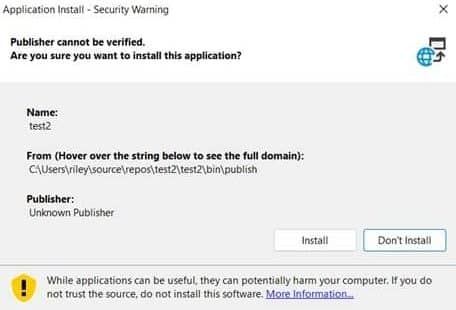
When you publish your project using ClickOnce without codesigning, such application when run by the user, a dialogue box is often prompted with a security warning.

ClickOnce without codesigning

But no such warnings are prompted when you Sign ClickOnce manifests with a code signing certificate.

Encryption Consulting has a CodeSigning solution, “CodeSign Secure,” which can help you with tamper-proof storage for the keys and complete visibility and control of Code Signing activities. The private keys of the code-signing certificate can be stored in an HSM to eliminate the risks associated with stolen, corrupted, or misused keys.

This solution provides a tool and certificate for signing ClickOnce manifests. You will have to install and configure the tool and follow the steps below to proceed.

Enterprise Code-Signing Solution

Get One solution for all your software code-signing cryptographic needs with our code-signing solution.

  1. Install and Configure the tool (SigningKSP)
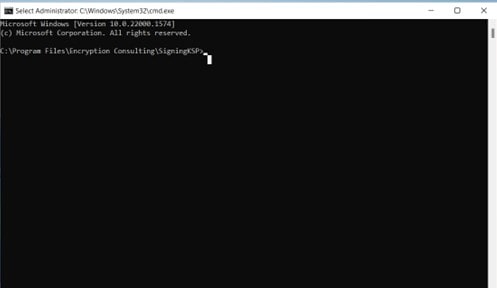
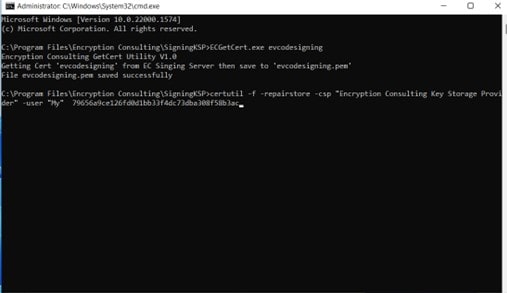
  2. From the command prompt, reach the directory where ECGetCert.exe is located.

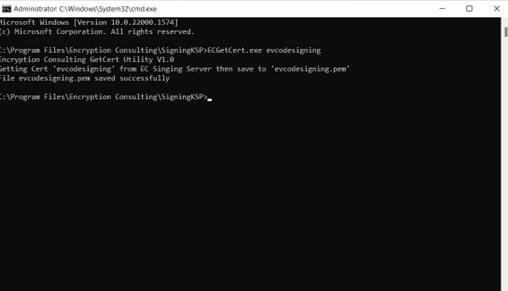
    evcodesigning
  3. Run the command: ECGetCert.exe evcodesigning Here, evcodesigning is the certificate name that we are using for the codesigning purpose.

    This command will save evcodesigning.pem (certificatename.pem) file in the same directory

    Configure the tool (SigningKSP)
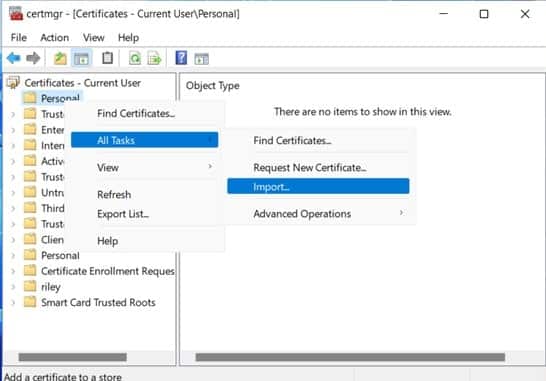
  4. Open certmgr.msc and navigate to Personal -> certificates. If there is no certificate folder, right-click on personal -> All Tasks -> Import
    cert certificates
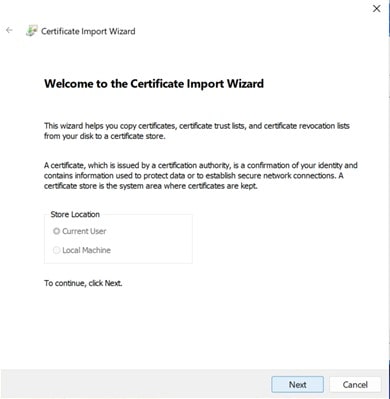
  5. A Certificate import wizard Opens. Click on next; the store location here is, by default, the current user.

    Certificate import wizard
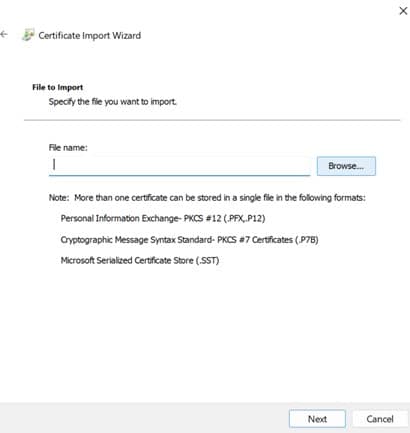
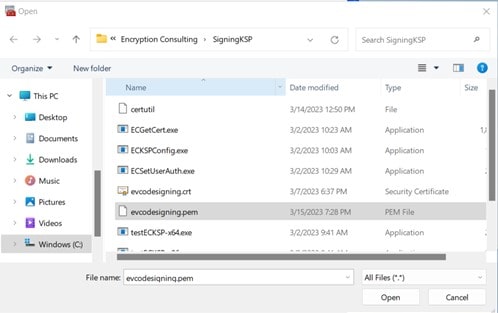
  6. On the next page, browse for the certificate. It should be saved in the same directory where EGGetCert. Exe is located. From there, select evcodesigning.pem (certificatename.pem). If you can’t see the file select all files at the bottom instead of X.509 certificate. Once the certificate is selected, click next.

    EGGetCert
    X.509 certificate
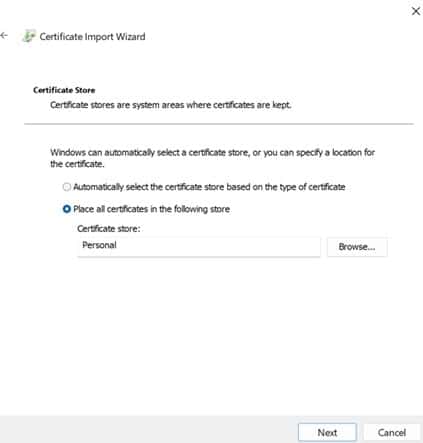
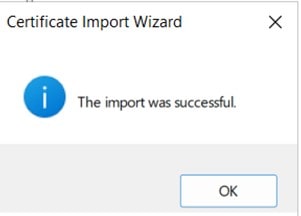
  7. On the other page, ensure that “Place all the certificates in the following store” is selected. Under that, the Certificate store is set to Personal. Click on next and then Click on Finish. You’ll see a dialogue box saying the import was successful.

    Certificate store
    certificate import
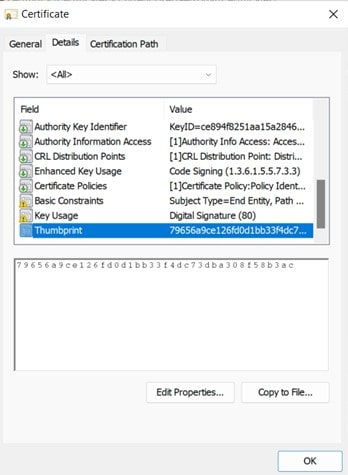
  8. Once the certificate import is done, you need the thumbprint value of your certificate. Click on Personal -> Certificates -> and then the imported certificate. Navigate to “Details” and scroll down to thumbprint. You can copy the value.

    certificate details

    Return to the command prompt. Run the following command. Ensure that you place the Thumbprint of your certificate in your command.

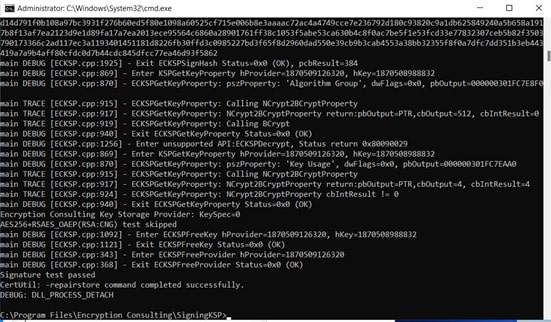
    certutil -f -repairstore -csp “Encryption Consulting Key Storage Provider” -user “My” 79656a9ce126fd0d1bb33f4dc73dba308f58b3ac

    Key Storage Provider
    ClickOnce Publish
  9. Once the command runs, navigate to the project in Visual Studio that you want to publish with ClickOnce.

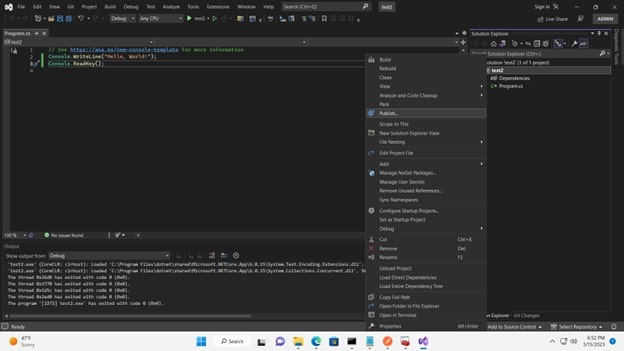
  10. In the Solution Explorer, Right Click on your project and navigate to Publish. Click on it.

    ClickOnce publish
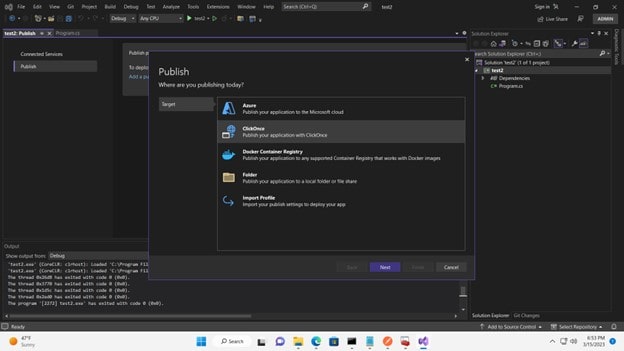
  11. A new dialogue box opens. Select ClickOnce and click on Next.

    ClickOnce Publish today
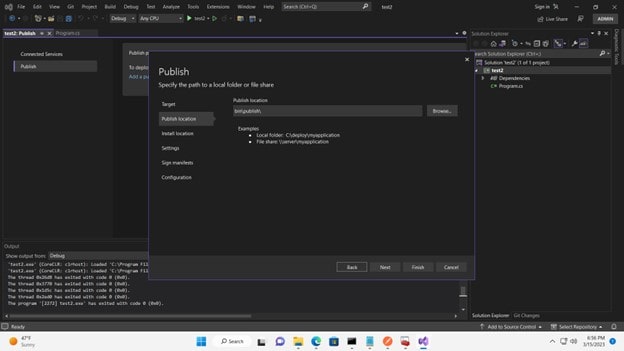
  12. On the next page, choose a publish location or leave the default bin\publish and click Next.

    leave the default bin
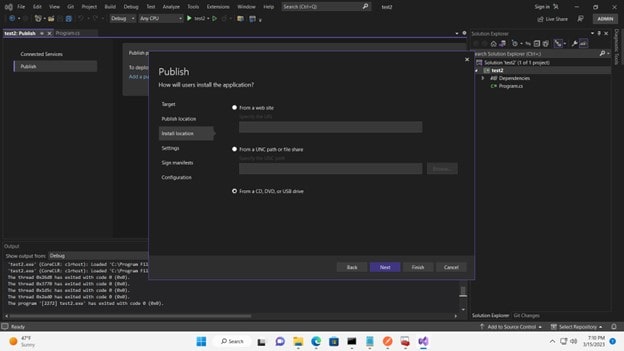
  13. You can choose the Install Location as per your choice or leave the default. Click on Next.

    Install Location
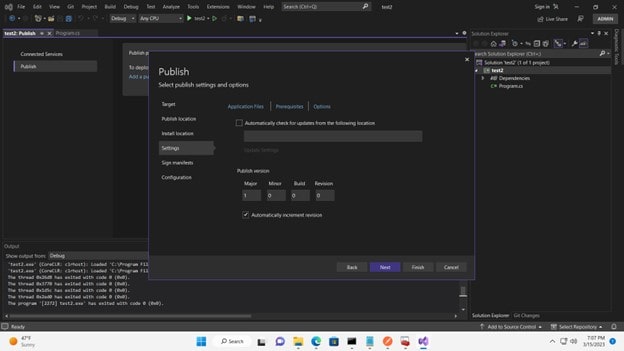
  14. Select your settings in the next tab as you like and click Next

    VS settings
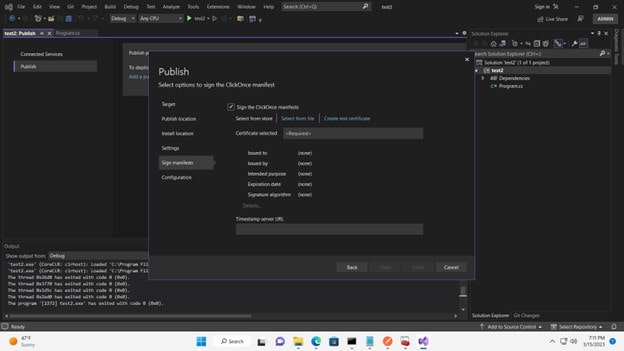
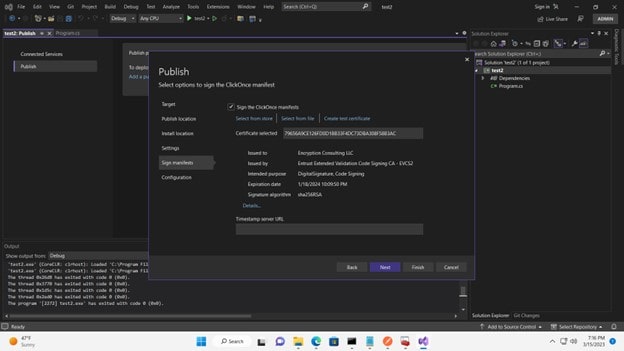
  15. In Sign manifests, check the box “Sign the ClickOnce manifests” and click on select a certificate from the store.

    Sign the ClickOnce manifests

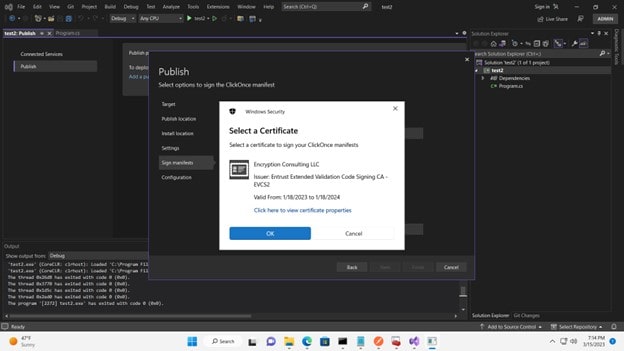
    A dialogue box opens with a certificate, which was initially imported. Click OK to proceed.

    open a certificate

    You can now see the certificate details in Sign manifests

    certificate details
  16. Click on next to choose your configuration and click on Finish.

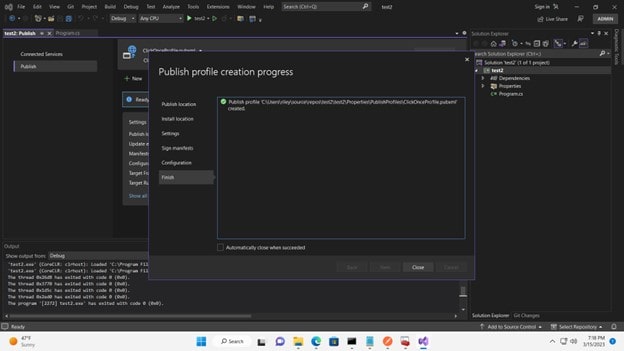
  17. You’ll see Publish profile creation progress and a green tick when successful

    Publish profile creation
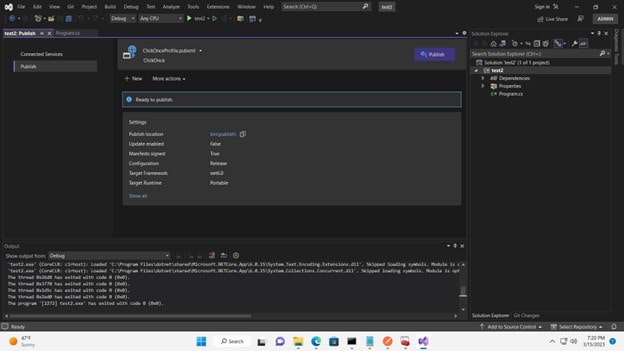
  18. You can see the Publish Profile created.

    ClickOnce manifests with Visual Studio

We have successfully signed ClickOnce manifests with Visual Studio. Click on Publish to publish your project.

Conclusion

With its digital signature and other security features, Signing ClickOnce manifests enables developers to establish the level of trust users should have in an application. This can decrease the probability that harmful software will be executed on a user’s machine. With the rapid increase in viruses and malware on applications online, it’s necessary to take such measures to prevent any damage. It’s always better to be safe than sorry.

To summarize, incorporating code signing into software security is crucial to safeguard it against malware attacks and tampering. Encryption Consulting’s Code Sign Secure offers various advantages, including seamless integration with development workflows, robust authentication and encryption, and customizable pricing options. To learn more about how you could use Code Sign Secure visit: www.encryptionconsulting.com/code-signing-solution/ or contact us at: [email protected]

How to Sign Excel macro project with SignTool

Code signing is a security mechanism used to verify the authenticity and integrity of digital code. It involves adding a digital signature to code, which allows users to determine who created it and whether it has been tampered with. Code signing is commonly used to sign executable files, libraries, and scripts, but it can also be used to sign Excel Macro files.

What is Code Signing?

Code signing is a security practice that involves digitally signing software with a certificate to verify its authenticity and integrity. Code signing certificates are issued by trusted certificate authorities (CA) and allow end-users to verify that the software they are downloading or running has not been tampered with or modified since it was signed by the software publisher.

This helps to prevent malware and other malicious software from being distributed and installed on users’ systems. To establish trust in a digital signature and ensure the code has not been tampered with, popular code signing tools such as Microsoft Authenticode and Java Code Signing usually necessitate a trusted third-party certificate authority-issued digital certificate.

Signing Excel Files

Excel Macro files are used to automate tasks in Microsoft Excel. They can contain macros, which are small programs that automate repetitive tasks, such as formatting data or generating reports. Macro files can be created using the VBA (Visual Basic for Applications) programming language and can be saved with the .xlsm file extension.

Threats posed by Macros

While Office Macros remain the best option for business-critical processes, they also pose a great security threat.  Macros run within Office documents with the same rights as the person who opened it. Not to mention macros that increase their privileges even further by utilizing further exploits, making Macros a powerful tool for hackers to infiltrate an organization.

But what makes Macro so dreadful? In contrast to other programs, people tend to use Office documents without hesitation. Then, it only takes a click to enable macro execution, which is particularly simple to accomplish using social engineering by embedding instructions in an email or even the document itself.

Administrators find themselves in a pinch when it comes to Macros mainly because of these reasons:

  • It is almost impossible to provide policy settings that can define which macros may be executed.
  • Policy frameworks such as application control/whitelisting do not work for macros.
  • Some malicious macros can bypass malware detectors.

Now the question arises, what can be done to secure ourselves from Macro threats? The answer is simple, implement Macro Signing to create secure End User Policies.

By signing an Excel Macro file, you can ensure that users can trust the code in the file and that it has not been tampered with. Digitally signing your organization’s macros creates the foundation for Policy capabilities of MS Office. This empowers you to

  • Use group policies to allow execution only for macros signed with trusted certificates, and
  • Assign trusted certificates to users and groups.

Using CodeSign Secure, we can make the signing and verifying process simple. Our process involves client-side hashing to increase server speed and using HSMs to store private keys, ensuring a low attack surface and speedy, secure signing of files.

Limitations in Current Approaches

This table highlights how easily accessible policies either have insufficient security or have an unacceptably negative impact on the business:

Method Security level Implementation Business Impact Remarks
Let users decide whether to Enable the execution of macros Medium High High You can’t always rely on users to make the best choices
Enable macro execution Low High High It is never appropriate to enable this.
Disable macro execution except for digitally signed macros Medium-high Medium High The process of digital signing in Office is laborious and necessitates macro writers having access to their development PCs’ private keys.
Disable macro execution except for users who require them Medium-high Low Medium Each of these users is still dangerous, and their numbers frequently increase.
Disable macro execution except for certain storage locations Medium-high Medium-high Medium-high Although direct online and email attacks will be lessened as a result, anyone can still leave a harmful document in a reliable place.
Disable macro execution for everyone High High Low Very safe but often unrealistic
Using CodeSign Secure- Disable macro execution except for digitally signed macros High High High Provide a more secure procedure that complies with macro execution policies for signing authorization and approval policies.

Enterprise Code-Signing Solution

Get One solution for all your software code-signing cryptographic needs with our code-signing solution.

Step-by-step Signing Process

Here are the steps to sign an Excel Macro file. First, we must install the required tools

Step 1

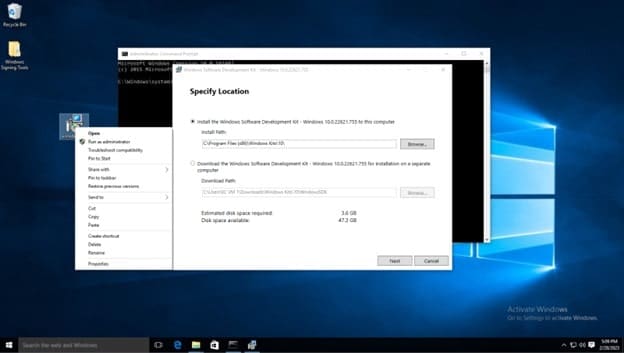
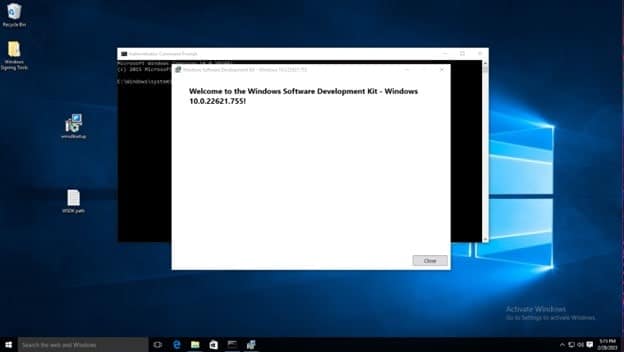
We must install Windows SDK, which provides libraries and tools for building Windows apps. This development kit will install a tool called signtool, which is included as a part of the Windows SDK. Click Download the Installer and run it once it is done downloading.

You can choose to install only the Windows SDK Signing Tools for Desktop Apps. 

Note: Remember the default path shown in the install path, as this will be helpful with running these commands from the command prompt. 

Windows SDK Signing Tools for Desktop Apps

On the Windows Kits Privacy page, either option for allowing Microsoft to collect insights is okay. Click next. 

Windows Kits Privacy page

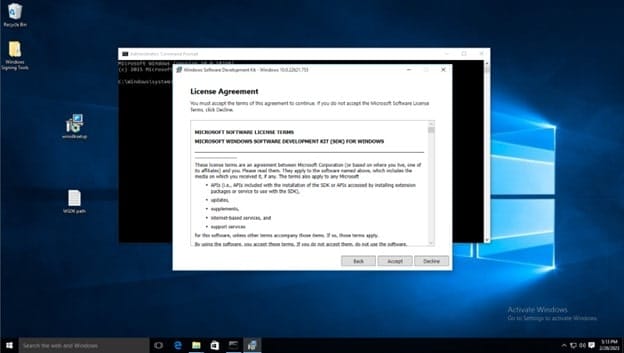
Accept the License agreement

Windows software license terms

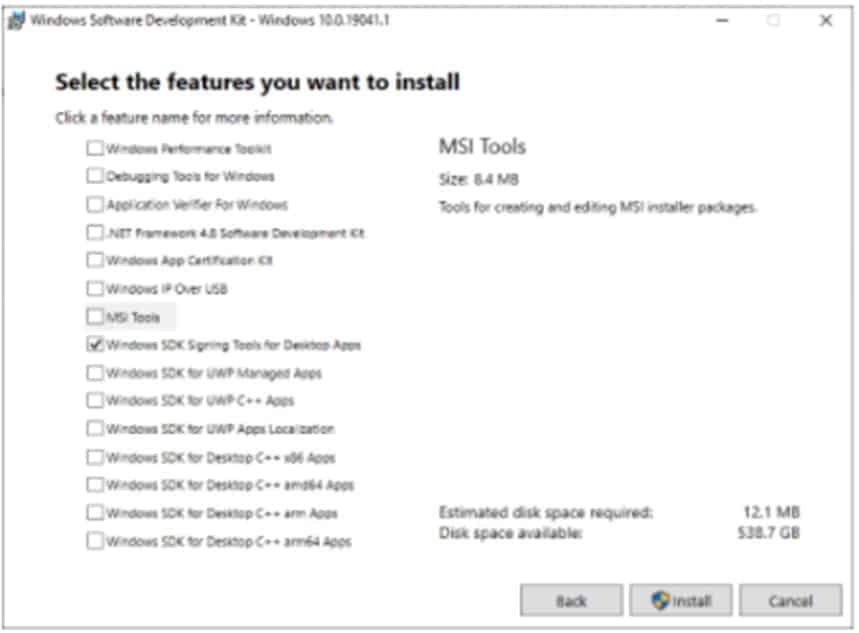
Deselect every feature except for Windows SDK Signing Tools for Desktop Apps, then select install. We don’t need every feature for the signing process to work.

signing process to work

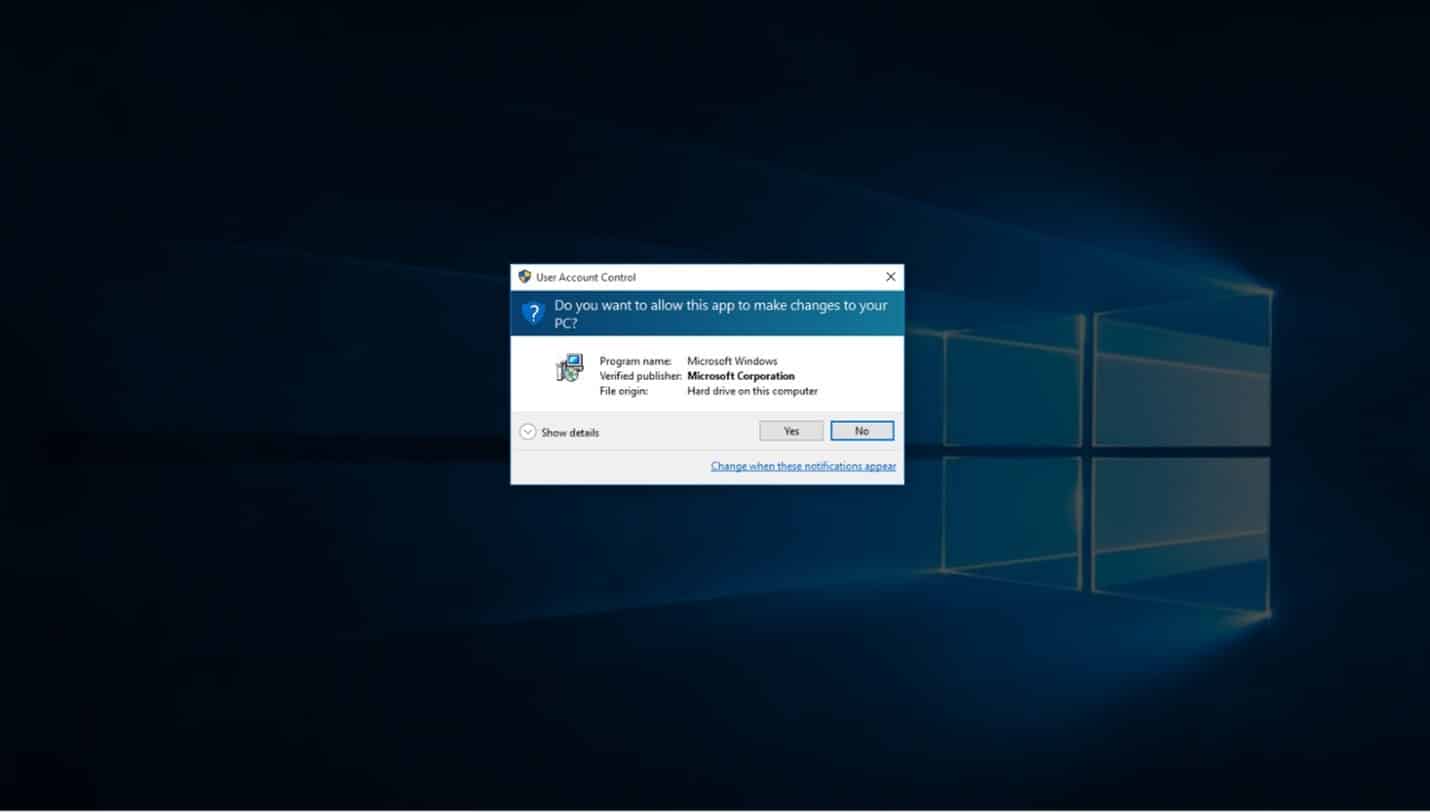
When prompted if you want to allow this app to make changes, select yes. 

system environmental variables

Lastly, select close, and next we have to add a path to the system environment variables in order to run commands from the Command Prompt effectively.

Windows Software development kit

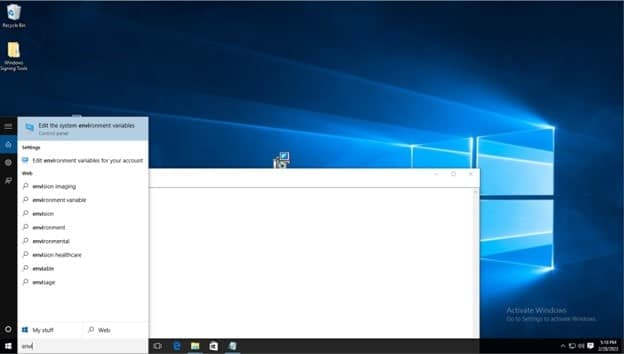
Click on windows search bar on task bar and type “Edit the system environment variables” and select the control panel option of the same name. 

windows control panel

Click environment variables

Windows signtool application

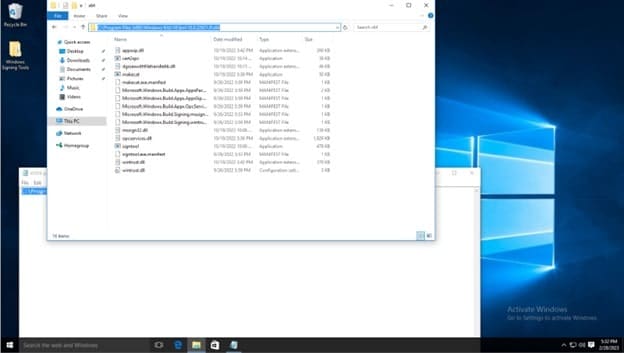
Before editing the variable list, navigate to where the Windows SDK is installed to using file explorer, you must copy the path of the folder which contains the signtool application, the default path is C:\Program Files (x86)\Windows Kits\10\bin\10.0.22621.0\x64, refer to the below screenshot. Make sure to right click and copy the path as shown. You can also see the signtool application at the bottom of the file list, this is the command you will run. 

signtool application

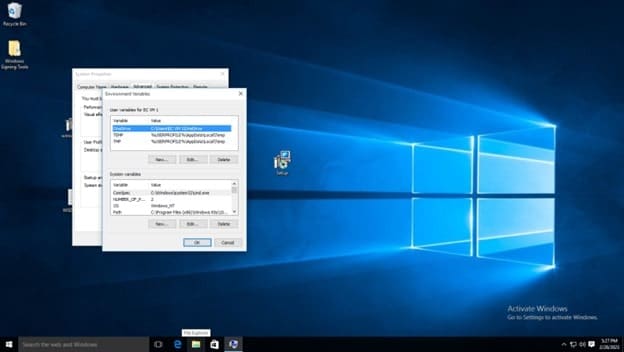
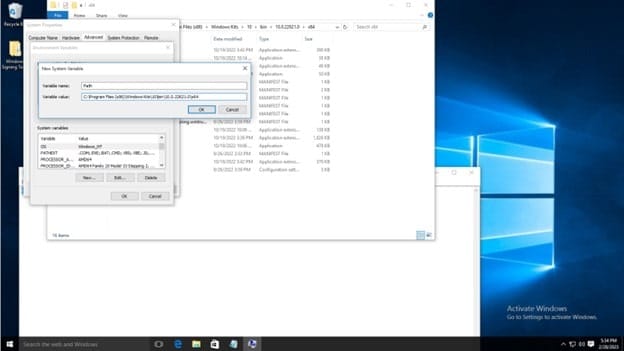
In the System Variables list, click new. Then type Path as the variable name, and copy and paste the aforementioned path. Then click OK on the environment variables window and system properties window. 

environment variables

To test the installation, open the command prompt, and type signtool, and the output should be as shown below. 

default signtool installation

The default signtool installation location is, for example: C:\Program Files (x86)\Windows Kits\10\bin\10.0.22621.0\x64 

Step 2

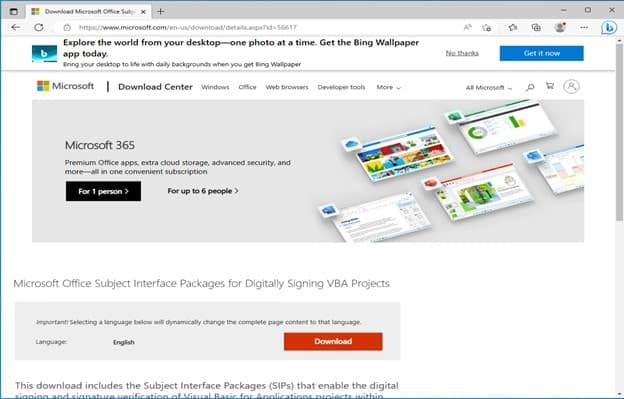
Download and install the Subject Interface Package for Digitally Signing Microsoft Office Files

This link goes to Microsoft’s download page for an Interface Package. This download includes two Subject Interface Package (SIP) libraries that support the digital signing and signature verification of Visual Basic for Applications projects within most Office file formats that support VBA macros. These are required to make signtool recognize .xls and .xlsm files. After downloading the installer, follow the steps below.

Interface Packages

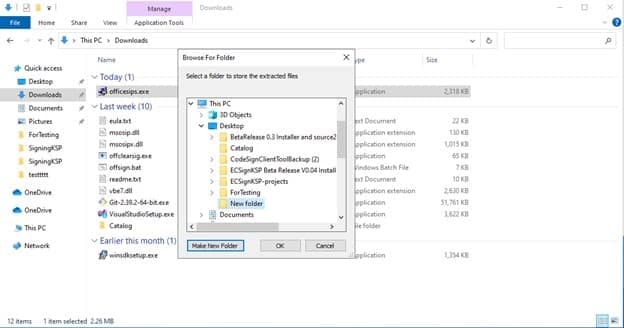
After the .exe is downloaded, open it, and choose an installation folder, or create a new folder as shown below:

signing Excel Macros

It will say that the files were extracted successfully, and you’ll find your installation folder populated with some files. These are the libraries that will are essential to enabling signing Excel Macros. We must run a pair of commands to install these .dll files into the registry.

Open an administrator command prompt and type the following, the path will be where you just installed the files:

regsvr32.exe <complete path to msosip.dll>

regsvr32.exe <complete path to msosipx.dll>  

For more information on how to register OLE controls, visit Microsoft’s website.

If successful, you will see a message: “DIIRegister Server in <complete file path> succeeded.” 

Enterprise Code-Signing Solution

Get One solution for all your software code-signing cryptographic needs with our code-signing solution.

Step 3

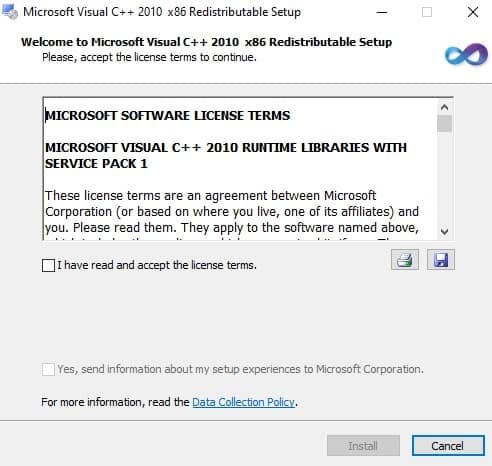
Then we must download the Microsoft Visual C++ Redistributable Installer. These libraries are required by many applications built by using Microsoft C and C++ tools. Since the tools we’re using require these libraries, it is necessary to install them. For more information, see Microsoft’s documentation.

Microsoft Visual C++ Redistributable Installer Download Link:

Download

Run the installer, accept the terms and conditions, and click install.

Microsoft Visual C++ Redistributable Installer
Microsoft Visual C++ 2010 setup complete

Step 4

Now we can use the command prompt to sign our files. Signing Windows Excel Macro files is possible using the signtool command. The /kc is going to be the name of your certificate, /f is going to be the path to the certificate.pem file, /fd and /td are the desired algorithms, /csp is the name of the crypto storage provider (in this case Encryption Consulting Key Storage Provider), /tr is the address of the timestamp server, then after the /td SHA256 is the path in quotations of the file to be signed.

With this case of macro signing, you can use .xls or .xlsm file extensions and run the signing command.  

signtool sign /csp “Encryption Consulting Key Storage Provider” /kc evcodesigning /f C:\Users\Administrator\Desktop\ForTesting\evcodesigning.pem /fd SHA256 /tr http://timestamp.digicert.com /td SHA256 “C:\Users\Administrator\Desktop\ForTesting\MacroTest.xlm”

macro signing

Step 5

After signing the file, you can verify the file and list information about it. To verify the signed file, simply use the verify command: 

signtool.exe verify /pa C:\Users\Administrator\Desktop\ForTesting\MacroTest.xlsm 

signing the file

Conclusion

Once the Excel Macro file is signed, users who open the file will see a warning message that the file contains macros, but they will also see the digital signature and can verify that it is valid. If the digital signature is not valid, users will be warned that the file may contain malicious code and may be unsafe to open.

To summarize, incorporating code signing into software security is crucial to safeguard it against malware attacks and tampering. Encryption Consulting’s Code Sign Secure offers various advantages, including seamless integration with development workflows, robust authentication and encryption, and customizable pricing options. To learn more about how you could use Code Sign Secure visit: Code Sign Solution or contact us at: [email protected]

CipherTrust Manager Backup Error

In this blog, we’ll discuss the issues faced while scheduling backups on CipherTrust Manager.

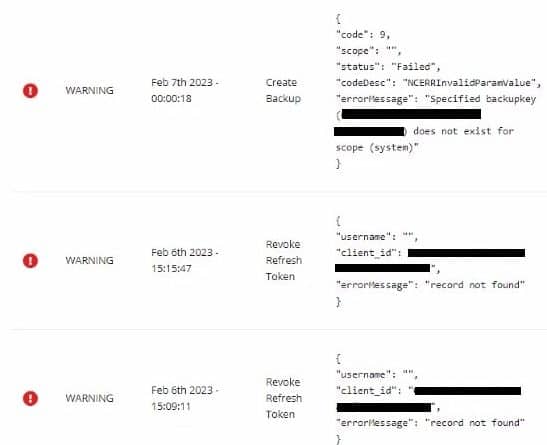
Error

codeDesc: NCERRInvalidParamValue

errorMessage: Specified backup key does not exist for scope (system)

Description

Let’s consider that we have 4 CipherTrust Manager nodes (thales01.ec.com, thales02.ec.com, thales03.ec.com, thales04.ec.com)  in a cluster. As per the procedure, we’ll have to create a system backup schedule on any of the nodes, which will further get replicated on others.

Note: Backups and backup keys are not replicated across the cluster.

Cause

The primary reason for this error is that the backups occur randomly on any one of the nodes, and if the backup key isn’t present on that particular node while it is being initiated, the backup will fail.

CipherTrust Manager Backup Error

Implementation Services for Key Management Solutions

We provide tailored implementation services of data protection solutions that align with your organization's needs.

Solution

Let’s assume we are scheduling a backup from thales01.ec.com. To resolve this error, please follow the below-mentioned steps

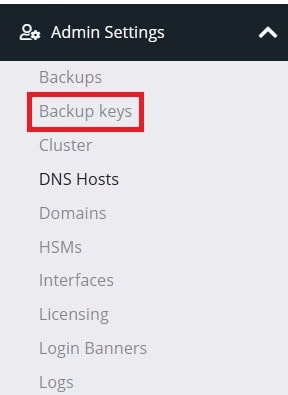
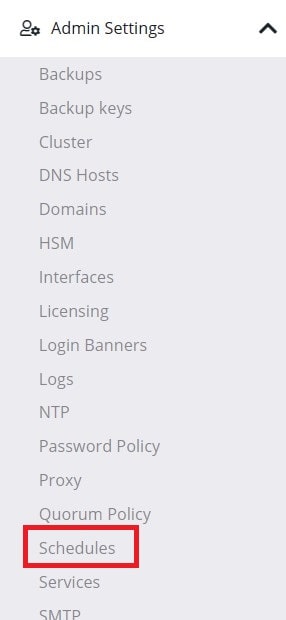
  1. On thales01.ec.com, navigate to the Backup keys under Admin settings.

    Backup keys
  2. First, create a new system backup key and make it as default.

    system backup key
  3. Download the newly created system backup key in order to upload them on other CipherTrust Manager cluster nodes.

    cluster nodes
  4. Enter a password for the corresponding backup key and click “Download.”

    Download backup keys
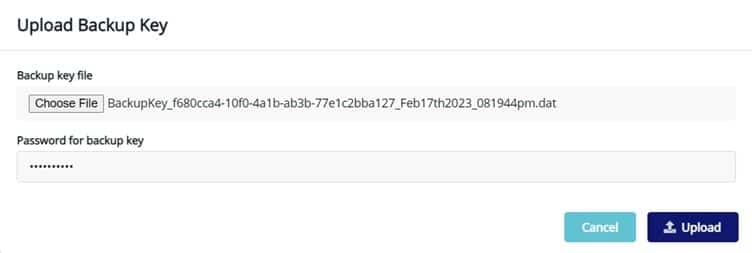
  5. Now, follow the below-mentioned path to upload the system backup key on all the CipherTrust Manager cluster nodes.

    Choose the downloaded file and enter the password generated in the previous step for the uploaded backup key.

    step for the uploaded backup key
  6. Navigate to Admin Settings Schedules to schedule a system-level backup.

    system level backup
  7. Click on “Add Schedule.”

    Schedules
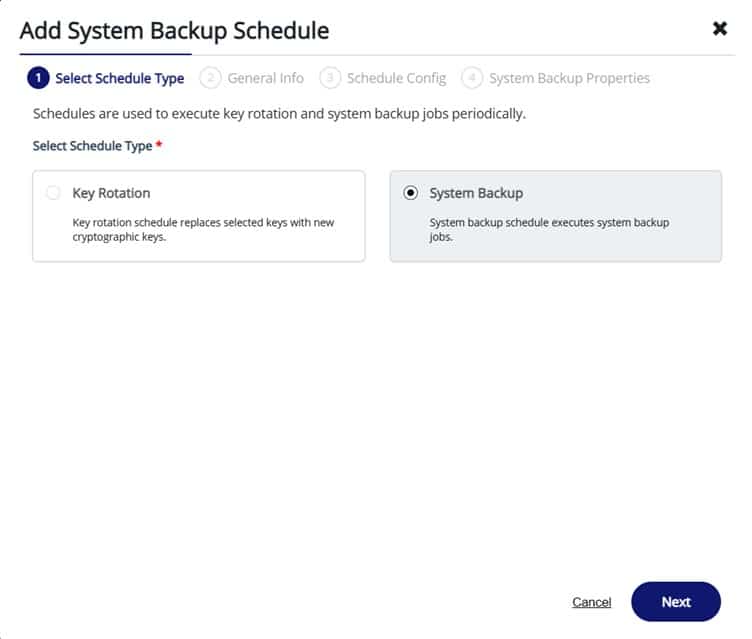
  8. Select “System Backup” and click “Next.”

    System Backup Schedule
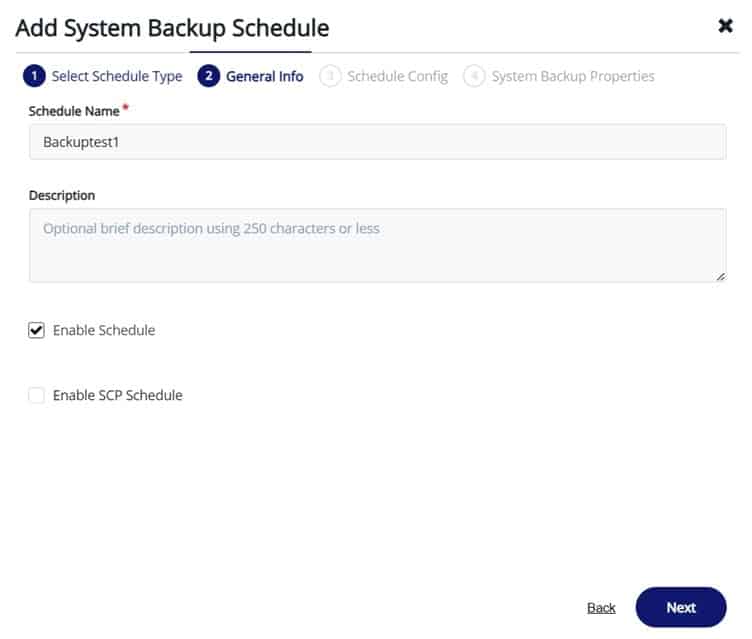
  9. Enter the “Schedule Name” and click “Next.”

    cipher trust schedule name
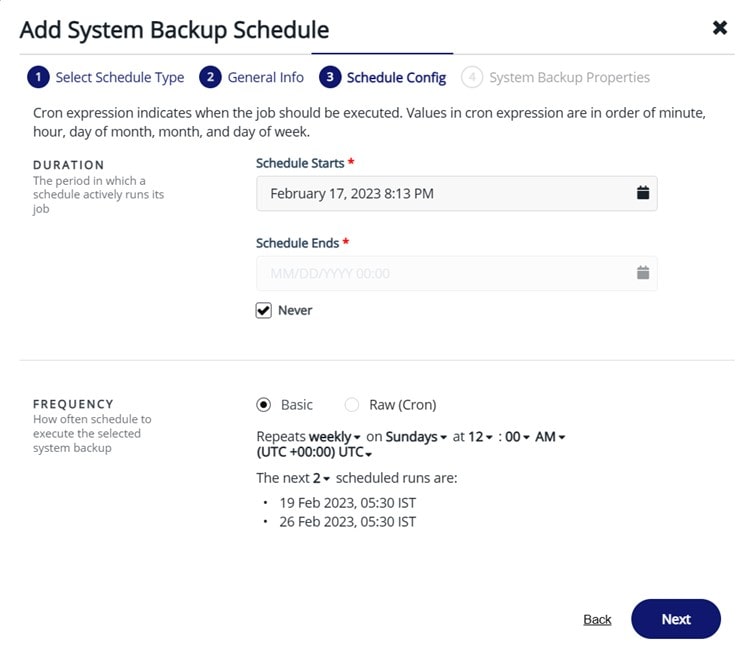
  10. Determine the backup frequency and click “Next.”

    backup frequency
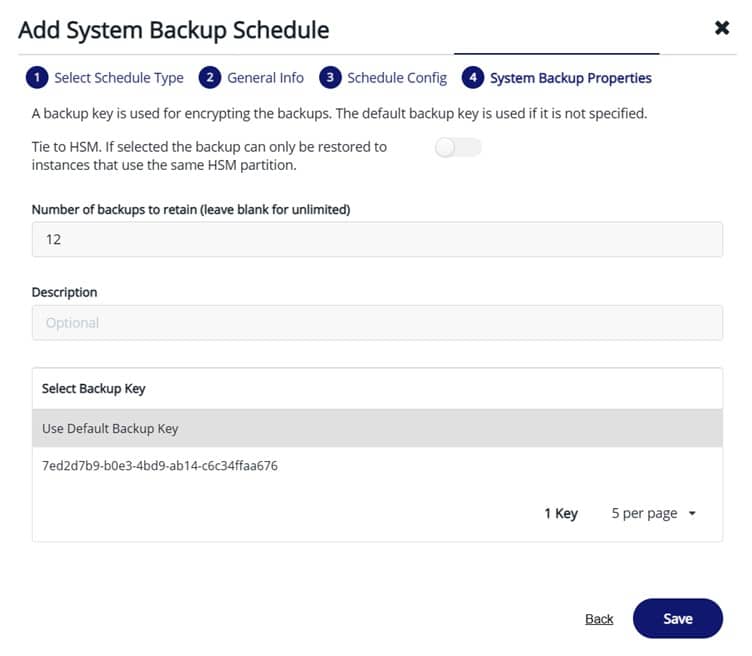
  11. State the number of backups to retain and select “Use default backup key.”

    Note: “Use default backup key” will help perform a successful backup on any cluster node since the default key is the same on all of them.

    Use default backup key

FIPS 140-2 security requirements

FIPS (Federal Information Processing Standard) 140-2 is a set of standards established by the National Institute of Standards and Technology (NIST) for security requirements in cryptographic modules used in government systems. Cryptographic modules are computer hardware or software that protect data through encryption or other cryptographic methods. The purpose of the FIPS 140-2 standard is to provide a level of assurance that these cryptographic modules are secure and will protect sensitive information from unauthorized access or tampering.

FIPS 140-2 security levels

The standard defines four security levels, each representing an increased security level. The levels range from minimal protection to the highest level of security available. They are intended to provide organizations with a way to choose a cryptographic module that meets their specific security requirements. The four security levels are as follows

  1. Level 1

    This level provides basic protection and is used for applications where cost is a primary consideration. The security requirements at this level are minimal and are designed to prevent the most basic attacks.

  2. Level 2

    This level provides increased security compared to Level 1 and is used for applications where security is more important than cost. This level includes additional security requirements such as key generation, storage, and operational security.

  3. Level 3

    This level offers the highest level of security available under the FIPS 140-2 standard and is used for applications that require the highest level of security. At this level, cryptographic modules must provide multiple layers of security and must be tested against a comprehensive set of attacks.

  4. Level 4

    This level provides the ultimate level of security and is used for applications that require the protection of classified information. Cryptographic modules at this level must meet stringent security requirements and be tested against various sophisticated attacks.

Level Release Date Physical Security Cryptographic Key Management Approved Algorithms
1 May 25, 2006 Basic Limited AES, DES/3DES, RC2, RC4, SHA-1/224/256/384/512, DSA, ECDSA
2 May 25, 2006 Intermediate Improved AES, DES/3DES, RC2, RC4, SHA-1/224/256/384/512, DSA, ECDSA
3 May 25, 2006 High Robust AES, DES/3DES, RC2, RC4, SHA-1/224/256/384/512, DSA, ECDSA
4 May 25, 2006 High Robust AES, DES/3DES, RC2, RC4, SHA-1/224/256/384/512, DSA, ECDSA
Table 2 : FIPS 140-2 Security Levels Comparison Chart

Enterprise PKI Services

Get complete end-to-end consultation support for all your PKI requirements!

Security Levels Comparison based on

Physical Security

  1. Level 1

    Basic physical security mechanisms, such as tamper-evident packaging, are in place.

  2. Level 2

    Intermediate physical security mechanisms, such as tamper-evident packaging and secure power and reset controls, are in place.

  3. Level 3

    High physical security mechanisms, such as tamper-evident packaging, secure power and reset controls, and physical protection against tampering and unauthorized access, are in place.

  4. Level 4

    The highest level of physical security, with physical protection against tampering and unauthorized access and a secure environment for the module.

Cryptographic Key Management

  1. Level 1

    Limited key management, with the keys generated and used within the module.

  2. Level 2

    Improved key management, with the keys generated, stored, and used within the module, and the ability to securely update keys.

  3. Level 3

    Robust key management, with secure key generation, storage, and use, and the ability to securely update keys.

  4. Level 4

    The highest level of key management, with secure key generation, storage, use, and the ability to securely update keys, and a secure environment for the module.

Approved Algorithms

  1. Level 1, 2, and 3

    AES, DES/3DES, RC2, RC4, SHA-1/224/256/384/512, DSA, ECDSA algorithms are approved for use at each level.

  2. Level 4

    AES, DES/3DES, RC2, RC4, SHA-1/224/256/384/512, DSA, ECDSA algorithms are approved for use at this level.

It’s important to note that the specific security requirements for each level and the algorithms approved for use at each level may be subject to change as technology and security needs evolve.

FIPS 140-2 Security Levels Key Features

Cryptographic algorithms

Cryptographic algorithms play a crucial role in protecting sensitive information and are an important consideration when choosing a cryptographic module. FIPS 140-2 requires that all cryptographic algorithms used in cryptographic modules be approved by NIST and strong enough to provide the required level of security. In addition, the standard requires that cryptographic algorithms be implemented correctly in the cryptographic module to ensure the desired level of security is achieved.

Key management

Key management is a vital component of any cryptographic system, and FIPS 140-2 requires that all cryptographic modules implement secure key management processes. The standard specifies key generation, storage, and transmission requirements to ensure that cryptographic keys are protected from unauthorized access or tampering. This includes requirements for secure key storage, secure key transmission, and the use of secure key escrow processes.

Physical security

Physical security is a vital aspect of protecting cryptographic modules, and the FIPS 140-2 standard specifies requirements for the physical security of cryptographic modules. This includes requirements for the environment in which the cryptographic module must operate, such as temperature, humidity, and electromagnetic interference, and for physical protection from tampering or theft.

Operational security

Operational security refers to the security of the cryptographic module during normal operation, and the FIPS 140-2 standard specifies requirements for operational security. This includes requirements for user authentication, access control, audit logging, and protecting the cryptographic module against unauthorized access, tampering, or modification.

Testing and certification

To ensure compliance with the FIPS 140-2 standard, cryptographic modules must undergo extensive testing by an accredited third-party laboratory. The laboratory must be accredited by NIST and must follow the procedures specified in the standard. Once the cryptographic module has been tested and certified as compliant with the standard, it can be used in government systems that use cryptographic modules that meet the FIPS 140-2 security requirements.

Conclusion

In conclusion, using FIPS 140-2 cryptographic modules assures organizations that their cryptographic systems meet rigorous security requirements and are suitable for protecting sensitive information. By requiring strict security requirements for key management, physical security, operational security, and testing and certification, the FIPS 140-2 standard guarantees that their cryptographic systems are secure, and that sensitive information is protected against unauthorized access or tampering.

The standard provides a clear framework for evaluating cryptographic modules and helps organizations to choose a cryptographic module that meets their specific security needs.

It is important for organizations to be aware of the security requirements specified by the FIPS 140-2 standard and to choose cryptographic modules that meet the standard’s requirements. This will ensure that their cryptographic systems are secure and provide the required level of protection for sensitive information. 

FIPS 140-3 Security Requirements for Cryptographic Modules

FIPS 140-3 is a U.S. government standard specifying security requirements for cryptographic modules, including hardware and software components. These security requirements are designed to ensure that cryptographic modules provide a minimum level of security for protecting sensitive information and transactions.

Some of the key security requirements specified in FIPS 140-3 include the following

  1. Cryptographic module specification

    A detailed specification of the cryptographic module, including its physical and logical boundaries, interfaces, and security functions.

  2. Roles and services

    A definition of the roles and services provided by the cryptographic module, including key management, encryption, and authentication.

  3. Cryptographic algorithms

    A list of approved cryptographic algorithms that can be used by the cryptographic module, along with specific requirements for key length, block size, and other parameters.

  4. Key management

    Requirements for generating, storing, and protecting cryptographic keys, including key lifecycle management and destruction.

  5. Physical security

    Requirements for physical security measures to protect the cryptographic module from unauthorized access, tampering, and theft.

  6. Logical security

    Requirements for logical security measures to protect the cryptographic module from attacks such as malware, side-channel attacks, and unauthorized access.

  7. Security testing and validation

    Requirements for testing and validating the security of the cryptographic module, including vulnerability testing, penetration testing, and compliance testing.

General requirements for each level of FIPS 140-3

The below table explains the general requirements for each level of FIPS 140-3

General requirements
Level 1 Level 2 Level 3 Level 4
  • The cryptographic module must use an approved algorithm and implement the algorithm correctly.
  • The module must have physical security mechanisms to prevent unauthorized access.
  • The module must have a power-on self-test to verify that the module is functioning correctly.
  • All the requirements for Level 1, plus:
  • The module must have additional physical security mechanisms to detect and respond to unauthorized access
  • The module must have a role-based authentication system to restrict access to authorized users only.
  • The module must have a tamper-evident mechanism to detect if it has been tampered with.
  • All the requirements for Level 2, plus:
  • The module must have physical security mechanisms to prevent unauthorized modification of the module’s firmware or software.
  • The module must have a trusted path for sensitive data to ensure authorized components only process data.
  • The module must have a mechanism for detecting and responding to environmental attacks, such as temperature or voltage variations.
  • All the requirements for Level 3, plus:
  • The module must have physical security mechanisms to protect against the most sophisticated attacks, including invasive and non-invasive attacks.
  • The module must have a highly secure design and implementation with no known vulnerabilities.
  • The module must be resistant to side-channel attacks, which are attacks that exploit information leaked by the module during its normal operation.

Table 1: General requirements of FIPS 140-3 for each level

These are the general requirements for each level of FIPS 140-3. However, there are many specific requirements for each level, and the requirements for each level are quite detailed. The purpose of the standard is to provide a framework for evaluating and certifying the security of cryptographic modules. The specific requirements for each level are designed to ensure that the module provides a certain level of protection against various attacks.

Enterprise PKI Services

Get complete end-to-end consultation support for all your PKI requirements!

FIPS 140-3 Security requirements for each level

FIPS 140-3 is a security standard defining the requirements for cryptographic modules that protect sensitive data.

FIPS 140-3 Level 1

Level 1 of FIPS 140-3 provides the lowest level of security and is intended for use in low-risk applications. The security requirements for level 1 are as follows

  1. Cryptographic module specification

    The module must have a concise specification describing its cryptographic functions, interfaces, and protocols.

  2. Roles, services, and authentication

    The module must define the roles, services, and authentication mechanisms required for secure operation.

  3. Physical security

    The module must have physical safeguards to protect against unauthorized access, theft, or tampering

  4. Design assurance

    The module must have undergone a comprehensive design process, including security analysis and testing.

  5. Mitigation of attacks

    The module must have measures to prevent or mitigate attacks, such as software or hardware countermeasures

  6. Self-tests

    The module must perform self-tests to ensure it is functioning correctly and detect tampering attempts

  7. Environmental design

    The module must be designed to operate in various environmental conditions, including temperature, humidity, and electromagnetic interference.

  8. Cryptographic key management

    The module must have secure key management processes to ensure that cryptographic keys are generated, stored, and used securely.

FIPS 140-3 Level 2

Level 2 of the FIPS 140-3 standard outlines the security requirements for a cryptographic module that provides moderate security assurance. The following are the specific security requirements for a cryptographic module to achieve FIPS 140-3 level 2

  1. Physical security

    The module must be physically protected against unauthorized access, tampering, and theft. It should be designed to withstand environmental hazards like fire, water, and electromagnetic interference.

  2. Cryptographic key management

    The module must have strong key management mechanisms that ensure cryptographic keys’ confidentiality, integrity, and availability. The module should protect keys against unauthorized access, modification, and destruction

  3. Authentication and access control

    The module must authenticate users and restrict access to authorized users only. It should have strong password policies and mechanisms to prevent brute-force attacks.

  4. Audit logging and reporting

    The module must log all security-related events and provide reports to authorized users. The module should also have mechanisms to protect audit logs against tampering or destruction.

  5. Software security

    The module must be designed with secure software practices that minimize the risk of security vulnerabilities. The software should be tested for security flaws and vulnerabilities and undergo regular security updates and patches.

  6. Communication security

    The module must use secure communication protocols and encryption to protect data in transit. The module should also have mechanisms to prevent unauthorized access to data transmitted over networks.

  7. Cryptographic algorithms

    The module must use approved cryptographic algorithms and standards that NIST has validated. The module should also have mechanisms to prevent using weak or outdated cryptographic algorithms.

FIPS 140-3 Level 3

Level 3 of the FIPS 140-3 standard protects against unauthorized cryptographic module access and sensitive information. It is also the third-highest level of FIPS 140-3. The following are the security requirements for level 3

  1. Physical Security

    The cryptographic module must be physically protected against unauthorized access, tampering, theft, and damage. The module must also be designed to resist physical attacks, such as drilling, cutting, and probing. The module must be in a secure facility with access controls, video surveillance, and intrusion detection systems.

  2. Cryptographic Key Management

    The cryptographic module must have a strong key management system that ensures the secure generation, storage, distribution, and destruction of cryptographic keys. The key management system must use strong cryptographic algorithms, such as Advanced Encryption Standard (AES), and have key backup, recovery, and destruction mechanisms.

  3. Cryptographic Operations

    The cryptographic module must perform cryptographic operations securely and reliably. The module must use approved cryptographic algorithms and protocols, such as Transport Layer Security (TLS), Secure Sockets Layer (SSL), and IPsec. The module must also have error detection and correction mechanisms and handle cryptographic exceptions and failures.

  4. Self-Tests and Tamper Evidence

    The cryptographic module must have self-tests and tamper-evidence mechanisms that detect and prevent unauthorized modifications, tampering, or substitution of the module’s hardware or software. The self-tests must be run periodically and must include checks for the integrity and authenticity of the module’s firmware, hardware, and software.

  5. Design Assurance

    The cryptographic module must have a strong design assurance that ensures the module’s security requirements are met throughout the module’s lifecycle. An independent third-party evaluator must review and verify the module’s design. The module must be tested against a set of security requirements defined in the FIPS 140-3 standard. The design assurance also requires using secure coding practices, security testing, and security documentation.

  6. Security Management

    The cryptographic module must have a strong security management system that includes policies, procedures, and controls for managing the module’s security risks. The security management system must include mechanisms for auditing, monitoring, reporting security events, and responding to security incidents and vulnerabilities.

    FIPS 140-3 level 3 provides strong protection against physical and logical attacks and requires a high level of key management, cryptographic operations, self-tests, tamper evidence, design assurance, and security management. The security requirements for level 3 are designed to protect sensitive information and maintain the integrity and availability of the cryptographic module.

FIPS 140-3 Level 4

Level 4 is the highest level of security defined in the standard and is intended for applications where the consequences of a security failure are severe. The following are the key security requirements for FIPS 140-3 Level 4

  1. Physical Security

    The cryptographic module must be housed in a tamper-evident, ruggedized container designed to resist physical attacks, such as drilling, cutting, or punching. The container must also have sensors to detect unauthorized access and trigger alarms.

  2. Cryptographic Key Management

    The module must have a strong, verifiable, and auditable key management system that ensures cryptographic keys’ secure generation, storage, distribution, and destruction. The module must also support key revocation and recovery.

  3. User Authentication

    The module must have a robust and secure user authentication mechanism, such as biometric or smart card-based authentication, to ensure only authorized personnel can access the module.

  4. Logical Security

    The module must have robust logical security mechanisms to prevent unauthorized access, tampering, or manipulation of the cryptographic module or its data. This includes secure boot, secure firmware updates, and secure communications protocols.

  5. Environmental Controls

    The module must operate in various environmental conditions, such as extreme temperatures, humidity, and electromagnetic interference. The module must also be able to withstand power surges and disruptions.

  6. Life Cycle Support

    The module must have a comprehensive life cycle support mechanism that includes regular security updates, vulnerability assessments, and secure disposal procedures

    Overall, FIPS 140-3 Level 4 defines the highest level of security for cryptographic modules, and it is intended for applications where the consequences of a security failure are severe. The standard defines strict security requirements in physical security, cryptographic key management, user authentication, logical security, environmental controls, and life cycle support to ensure the highest level of protection for sensitive data and systems.

Enterprise PKI Services

Get complete end-to-end consultation support for all your PKI requirements!

Requirements of Cryptographic algorithms for each level of FIPS 140-3

The FIPS 140-3 standard outlines four security levels (Level 1-4), each specifying a different set of requirements for cryptographic algorithms

Here are the cryptographic algorithms required for each level

  • Level 1

    This is the lowest level of security, requiring only basic encryption and key management functions. The cryptographic algorithms required for this level include AES (128-bit), Triple-DES (112-bit), and SHA-1.

  • Level 2

    This level requires additional physical security features to protect against tampering or unauthorized access to the cryptographic module. The cryptographic algorithms required for this level include AES (128-bit and 192-bit), Triple-DES (168-bit), SHA-2 (256-bit), and HMAC.

  • Level 3

    This level requires the highest level of physical security to prevent unauthorized access and protect against attacks. The cryptographic algorithms required for this level include AES (256-bit), RSA (2048-bit), ECDSA (224-bit), SHA-2 (384-bit), and HMAC (with keys of at least 128 bits).

  • Level 4

    This is the highest level of security, requiring the most stringent physical and logical security features to protect against sophisticated attacks. The cryptographic algorithms required for this level include AES (256-bit), RSA (3072-bit), ECDSA (384-bit), SHA-3 (512-bit), and HMAC (with keys of at least 256 bits).

Conclusion

In summary, FIPS 140-3 has been approved and launched as the latest standard for the security evaluation of cryptographic modules. It covers a large spectrum of threats and vulnerabilities as it defines the security requirements starting from the initial design phase leading towards the final operational deployment of a cryptographic module. FIPS 140-3 requirements are primarily based on the two previously existing international standards ISO/IEC 19790:2012 “Security Requirements for Cryptographic Modules” and ISO 24759:2017 “Test Requirements for Cryptographic Modules”.

The FIPS 140-3 standard provides a framework for ensuring the security of cryptographic modules used in sensitive applications such as banking, healthcare, and government.

To know more about FIPS 140-3 read : Knowing the new FIPS 140-3

State of Software Supply Chain Attacks

Over the past two years, you’ve probably heard more than you ever wanted or expected to hear about supply chain attacks. According to a study, these attacks have seen approx. 650% year-over-year growth. The survey discovered that software development environments still have low levels of security. Additionally, every business analyzed had flaws and configuration errors that made them vulnerable to supply chain attacks.

What is Software Supply Chain Attacks?

When nefarious hackers penetrate third-party software dependencies utilized in numerous “downstream” applications, it results in a software supply chain attack. The common element is open-source software, frequently an automatically trusted source of code utilized by internal system developers. Attackers may potentially steal sensitive information from, disrupt services for, or breach networks at hundreds or even thousands of businesses by infiltrating a single open-source program or library.

Damage dealt

More recent research sheds light on the tendency that three out of five companies were subject to software supply chain attacks. In 2021, Only 38% of businesses claimed that they were unaffected by this attack. Not every attack is the same; some are big, while others are swiftly in the rearview mirror. Some of the High-profile Software attacks which took the internet off the storms were:

  • Solarwinds (Dec 2020)

    Threat actors used the Orion software as a weapon to access several government networks and thousands of private systems worldwide, making the SolarWinds supply chain attack a worldwide hack. The US departments of health, treasury, and state were noteworthy victims of this attack.

  • Codecov (April 2021)

    Attackers were able to insert a backdoor into Codecov to gain access to sensitive client data, which led to a recent large breach. Very skilled attackers used a flaw in how Codecov created Docker images to carry out this intrusion. They utilized this to alter a script that let them launch several attacks from a remote server using the environment variables from the CI of Codecov users.

  • Microsoft’s Winget (May 2021)

    WinGet’s software registry was inundated with pull requests for applications that were either duplicates or misbehaved the weekend after launch. It was inundated with faulty or duplicate packets, which overwrote the already present ones.

  • Kaseya (July 2021)

    Numerous managed security providers’ remote monitoring and management software platforms contained a zero-day vulnerability that a ransomware organization found and exploited. This incident encrypted the files of over 1,500 businesses.

  • Log4j Vulnerability (Dec 2021)

    The flaw enables attackers to obtain remote access to Log4j-using apps. The vulnerability is in the communication mechanism, allowing an attacker to insert malicious code into the logs and have it run on the system.

And many more on the list.

Top Attack vectors

Many distinct attack vectors are utilized to compromise a software provider and successfully attack through the development pipeline. Attackers mainly concentrated their attacks on these points:

  • Exploiting Open-Source applications flaws

    Most commercial software has open-source code. Two areas are the focus of vulnerable application supply chain assaults:

    • One is exploiting flaws in previously extensively installed and disseminated programs. E.g., Log4j vulnerability.
    • Including malicious code in well-known private and open-source packages to get automated pipeline tools to include them in the application build process. E.g., us-parser-js package poisoning.
  • Compromised Pipeline tools and altered the build process

    The second attack method is the compromise of pipeline tools, which enables attackers to alter or introduce malicious code. The source code of an application, which serves as its blueprint as well as the development infrastructure and procedures, can be made public by a compromised CI/CD pipeline.

    At the same time, the program is being built (as was the case of SolarWinds). Additionally, the pipeline is coupled with dozens of external dependencies that can be utilized to access and launch attacks, like the Codecov attack.

  • Manipulating the Code of Integrity

    Sensitive data in code, poor code quality, and security vulnerabilities were frequently observed in the environments of many of the customers. The submission of flawed code to source code repositories has been recognized as the third risk factor. This influences the security posture and artifact quality.

Enterprise Code-Signing Solution

Get One solution for all your software code-signing cryptographic needs with our code-signing solution.

How can Codesigning help?

Code signing is a process to confirm the authenticity and originality of digital information, such as a piece of software code. It assures users that this digital information is valid and establishes the author’s legitimacy.

Code signing also ensures that this digital information has not changed or been revoked after it was validly signed. Code signing can assure double authentication, thwart attacks, and even avoid namespace conflicts as you share source code throughout the SDLC.

Best Practices

Here are a few code-signing best practices to guarantee the security of your application code.

  • Securing all the private keys

    The loss, theft, or compromise of a code-signing private key poses a serious security risk. There are some simple rules we can follow to avoid the risk:

    • Restricting unauthorized access to the keys.
    • Implementing physical security control over the keys to limit the process.
    • Securing keys with cryptographic hardware items.
  • Automating the signing process by Pipelines

    An end-to-end centralized approach to code signing procedures while enforcing security regulations is part of the automated code signing process. Without slowing down the SDLC, this automation approach connects with CI/CD pipelines and uses granular access control.

  • Describe the roles, responsibilities, and procedures for approval.
  • Integrating with existing environments and tools can make code signing quick and simple for the internal teams.
  • Using time stamps to record all codesigning activities.

Conclusion

Your software supply chain is intricate, extensive, and interrelated, making it vulnerable to attacks. There have been a few devastating and small attacks in the past, and the future could be much better. Attackers have been using different attack vectors to target a specific side. The application of code signing is a crucial security-hardening technique.

Code signing ensures no tampering from unapproved parties and that the final published software is from the original publisher. By following certain code signing best practices, we can ensure that the Supply Chain attacks no longer threaten us.

For more information, you can contact us [email protected]

Understanding how code signing impacts your organization

The executable file that is being delivered is digitally signed when a developer code-signs their programme. Consumers of the programme consider the intact signature as evidence that the code has not been modified between the time it was transmitted and the time it was installed on the consumer’s device. This signature functions as a kind of “wax seal.” Code signing entails applying digital signatures to distribute files using public key encryption

Need of Code Signing

Today, the internet is the primary means by which software is distributed, accessed, and used – almost every application on your computer was probably downloaded online. The widespread use of this media has also increased the risk of criminal activity.

For example, hackers and internet criminals may steal the executable file’s source code, add malware to it, and then make the software accessible for online discovery and distribution. Naturally, the malware would infect every user who downloaded and installed this file.

Code signing prevents this scenario from happening. Your operating system prevents the installation of any programme from moving forward without first verifying the presence of a code signing certificate when you download and install it. The user is informed if a certificate from a trusted vendor is missing at this point, they can decide whether or not to continue with the installation.

Working of Code Signing

  1. For Developer

    The creator must first create a special private key that may be used to encrypt the data. According to the theory behind public key cryptography, a private-public key pair is a collection of encryption techniques that can be used for encryption and decryption. After the key pair has been created, the public key is sent to a Certificate Authority (CA), a reputable organization that issues certificates.
    The CA confirms the developer’s legitimacy before attaching their public key to a digitally signed certificate, the developer’s evidence that they are the rightful owner of the key. The developer who requested the certificate receives the public key and certificate back from the CA.

    digitally signed certificate
  2. For Consumer

    Before a programme is installed, most consumer operating systems are set up to check for the presence of a code-signing certificate. When an installation is requested, the OS first verifies the certificate’s validity before decrypting the digest using a public key from the CA.

Changes made for Software Development

An item (document, file, script, library, etc.) utilized during the software development process is referred to as an intermediate artefact. These artefacts should be signed throughout the development cycle to prevent modification by anybody other than the authorized creator.

Developers can modify a file or script in their development environment, code sign it, and then keep the signed artefact in their repository for future use. These intermediate artefacts’ code signature aids in preventing hackers from introducing undesirable components throughout the building process. Many diverse components are used in contemporary software development approaches.
A significant breach could occur if malware infiltrates any of these components. It is essential that your software development teams take this into consideration. Your software development teams must code sign all the intermediate artefacts they employ to create software as a result.
Benefits of Code-Signing

  • Helps authenticate the identity of the developer, promoting trust on both sides of the transaction.
  • Provides proof that the software has not been tampered or meddled with and is being consumed in the way it was meant to be consumed.
  • Allows developers to distribute on more platforms – given that major platforms enforce code-signing as a mandatory step prior to publishing.

Enterprise Code-Signing Solution

Get One solution for all your software code-signing cryptographic needs with our code-signing solution.

Best Practices of Code Signing

  1. Carry out code integrity checks

    Any code that developers check-in must be digitally signed using their signing key. To ensure that the final code published is unmodified, all developer signatures must be checked. The final build should be signed and released once all of these checks have been finished. A crucial step that helps ensure that the software update is free from tampering and secure for usage by your clients is verifying the integrity of the source code.

  2. Store keys in a highly secure location

    One of the biggest mistakes businesses make when it comes to key storage is keeping the keys on a hard drive, a developer’s personal computer, or built servers. This error can give attackers a broad window of opportunity to obtain your private keys and compromise several systems. Always keep your code signing keys very secure cryptographic areas, such as a FIPS 140-2 level 3 hardware security module, to prevent this danger (HSM). HSMs are exceedingly difficult to breach since they are tampering resistant. You can be guaranteed that no private keys are ever exported and that nobody else will ever have access to or use the code signing keys improperly.

  3. Rotate keys

    Sometimes, organizations tend to use the same key to sign releases across different product lines and businesses. This cannot be a good idea at all. All the releases you have signed with the code signing key run the risk of being hacked. Instead, it would be wise to alternate your keys on a regular basis. Additionally, utilize distinct and independent keys to sign various releases across DevOps teams.

Conclusion

A Code Signing certificate is essential for the user’s trust and to ensure that your source code is intact. Furthermore, it allows you to ensure that your application is not exposed to cyber-attacks. Increasing cyberattacks and a massive app market mean you must be ready on the security front.