Skip to content

What causes NTE_Provider_DLL failure?

In this blog, we are covering an error where the ADCS Service stopped working on Issuing CA. The issue was related to the HSM side as the SafeNet Key Storage provider failed to initialize properly.

Issue

ADCS Service failing to start.

Error Code

Log Name Application
Source Microsoft-Windows-CertificationAuthority
Event ID 100
Level Error

Description

Active Directory Certificate Services did not start: Could not load or verify the current CA certificate. Issuing CA Provider DLL failed to initialize correctly. 0x8009001d (-2146893795 NTE_PROVIDER_DLL_FAIL).

ADCS start problem

This error comes in the case of Luna; if it’s Ncipher, you’ll see that the provider of the Ncipher will fail.

Customizable HSM Solutions

Get high-assurance HSM solutions and services to secure your cryptographic keys.

Steps done

  • We did run certutil -csplist to check whether the SafeNet Key Storage Provider was configured correctly.
  • If there is a provider failed to pass the test. You can check the configuration under the registry entries under
  • HKEY_LOCAL_MACHINE\SYSTEM\CurrentControlSet\Services\CertSvc\Configuration \CA NAME\CSP

Solution

This issue often occurs when CA uses the HSM and HSM is incorrectly configured.

  • Verify that the connectivity of HSM is properly configured.
  • HSM’s cryptographic service provider should be loaded/initialized properly (re-register and reconfiguring along with a reboot).

Why do you need to add Active Directory Certificate Services (ADCS) Containers in your active directory?

To establish a public key infrastructure and offer your company’s public key cryptography, digital certificates, and digital signature capabilities, an ADCS server role is necessary. AD CS provides customizable services for issuing and managing digital certificates in software security systems that engage public key technologies.

The digital certificates that AD CS provides can be used to encrypt and digitally sign electronic documents and messages. These digital certificates can authenticate network computers, users, or device accounts. Digital certificates are used to provide the following:

  1. Confidentiality through encryption
  2. Integrity through digital signatures
  3. Authentication by associating certificate keys with a computer, user, or device account on a computer network

The public key services container cannot be limited to any specific domain or domains. It is available to any client in the forest. Since the public key service container is stored in a configuration naming context, the content is simulated between all domain controllers in the current forest.

CN=Public Key Services, CN=Services, CN=Configuration, DC= {forest root domain}

The followings are the sub-containers under public key services containers:

  1. AIA
  2. CDP
  3. Certificate Templates
  4. Certification Authorities
  5. Enrollment Services
  6. KRA
  7. OID

Below are the descriptions of each container:

AIA

In order to create a trusted certificate chain and retrieve any cross-certificates issued by the CA, clients can retrieve CA certificates from the AIA container by utilizing the authority information access (AIA) certificate extension. Another name for AIA is Authority Information Access (AIA). The AIA container will automatically install the new enterprise CA’s certificate during installation. To install the CA certificate programmatically to this container, run the below command:

Certutil -dspublish -f <PathToCertFile.cer> SubCA

<PathToCertFile.cer> – this is the actual path and certificate name file.

CDP

CDP stores certificate revocation lists. It contains all base CRLs, and Delta CRLs published in the forest.

You can install the certificate revocation list to the CDP container by running the certutil command.

Certutil -dspublish -f <PathToCRLFile.crl> <SubcontainerName>

Enterprise PKI Services

Get complete end-to-end consultation support for all your PKI requirements!

How to add a CDP

Below command is to add CDP

Add-CRLDistributionPoint [-InputObject] <CRLDistributionPoint[]> [-URI] <String[]> [<CommonParameters>]

Parameters

-InputObject <CRLDistributionPoint[]>  -> Specifies the CRLDistributionPoint object to which new CRL distribution points are added

[-URI] <String[]>  -> This specifies new CRL file publishing distribution points for a particular CA.

<CommonParameters> : The cmdlet supports common parameters like: Debug (db), ErrorAction (ea), ErrorVariable (ev), InformationAction (infa), InformationVariable (iv), OutVariable (ov), OutBuffer (ob), PipelineVariable (pv), Verbose (vb), WarningAction (wa), WarningVariable (wv)

CRL Publication options

VariableNameDescription
%1ServerDNSNameThe CA computer’s Domain Name System (DNS) name
%2ServerShortNameThe CA computer’s NetBIOS name
%3CA NameThe CA’s logical name
%6ConfigDNThe Lightweight Directory Access Protocol (LDAP) path of the forest’s configuration naming context for the forest
%8CRLNameSuffixThe CRL’s renewal extension
%9DeltaCRLAllowedIndicates whether the CA supports delta CRLs
%10CDPObjectClassIndicates that an object is a CDP object in AD DS

Certificate Templates

By defining the common features shared by all certificates issued using that template and determining the permissions for which users or computers can enroll in or automatically enroll for the certificate, certificate templates are used to automate certificate deployment. A certificate template that automatically enrolls all domain users with valid email addresses for a secure email (S/MIME) certificate would serve as an illustration.

All certificate templates available in AD, whether published on an enterprise CA or not, are stored in the Certificate Templates container. If an enterprise CA publishes a certificate template, the value is written as an attribute on the CA object in the Enrollment Services container. By default, over 30 Microsoft predefined certificate templates are installed when building an enterprise CA.

Certification Authorities

Certificate authorities container is for the trusted Root CA(s). During the enterprise Root CA creation, the certificate is automatically deployed in the container. In the case of an offline standalone CA, the PKI administrator must manually publish the offline root CA certificate using the certutil command.

Example: certutil -dspublish -f <Root.cer> Root CA

Enrollment services container

It includes the certificates for the enterprise CAs that can grant certificates to individuals, machines, or services located within the forest. Only an Enterprise Admins member who installs an enterprise CA can add enterprise CA certificates to this container. The Manage AD Containers dialogue box cannot be used to add the certificates manually

KRA

Contains the certificates for key recovery agents for the forest. Key recovery agents must be configured to support key archival and recovery. Key recovery agent certificates can be added to this container automatically by enrolling with an enterprise CA. The key recovery agent certificates cannot be added manually by using the Manage AD Containers dialog box.

OID

This container stores object identifiers (OID) registered in the enterprise. OID container can hold object identifier definitions for custom Application Policies, Issuance (Certificate) Policies, and certificate templates. When the client is a member of the Active Directory Forest, it uses an OID container to resolve object identifiers and the local OID database.

New OIDs should be registered via Certificate Templates (certtmpl. msc) MMC snap-in by adding a new Application or Issuance (Certificate) Policy in the certificate template Extension tab.

Conclusion

Understanding each active directory certificate services container is vital for an enterprise PKI administrator. An Administrator must know the activities and necessity of each container while managing the enterprise PKI infrastructure.

What are Cipher Suites ?

A cipher suite is a set of algorithms that help secure online communications by encrypting data and ensuring its integrity. These algorithms play a crucial role in protecting sensitive information, such as your payment details or personal data, during online transactions.

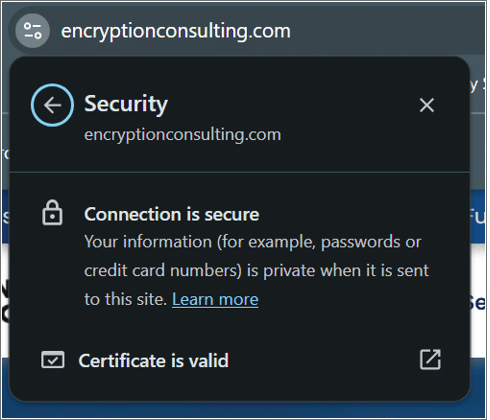
But how does this work in practice? Have you ever wondered what happens behind the scenes when you enter your credentials while making an online purchase? How is it possible for the transaction to happen securely within a few seconds? Right before you enter your payment details, you might notice a little padlock icon in the address bar. Ever wondered what that padlock really means? 

That padlock is more than a symbol. It represents the start of a secure handshake between your browser and the website, initiated by a set of cryptographic tools called cipher suites.

What are Cipher Suites?

It is a collection of algorithms that dictate how information is encrypted and decrypted during an SSL/TLS handshake. It specifies the algorithms used to secure the communication channel between your web server and the browser. 

So, what actually happens behind the scenes? 

When you open a web browser and visit a site, like your online banking platform, your browser starts a connection with the bank’s web server, and this is where SSL/TLS steps in, ensuring the communication between the server and browser is secure and in this process cipher suites play a crucial role by ensuring that the information sent between a client and server is secure, private, and unaltered.

The handshake process of SSL/TLS starts when the client sends a message known as a client hello to the server, listing supported cipher suites in order of preference. The server reviews this list and selects a cipher suite that both the browser and the server can support, and that is secure enough for the connection. Once a cipher suite is selected, it is used to secure the communication channel between the browser and the server. 

Cipher suites play an important role in the broader context of cybersecurity as they are the building blocks of secure communication protocols like SSL/TLS. They define the algorithms used for encryption, authentication, and key exchange, which together ensure data confidentiality, integrity, and authenticity during transmission. Just like choosing the right combination of locks and keys to protect a safe, a cipher suite carefully selects the strongest cryptographic algorithms to ensure your data remains private and untouched.

Components of Cipher Suites and Role of Cipher Suites in TLS 

There are different algorithms that make up a cipher suite, and each has its own specific purpose of guaranteeing that the transmission of data is safe, private, and intact. A cipher suite usually contains the following items:  

  • Key Exchange Algorithms

    To keep data secure, the transmitted information between the client and server during the communication needs to be encrypted. For this process, both the server and client create a shared secret key, which is then used to encrypt and decrypt the data exchanged during that session. The key exchange algorithm defines how these keys are shared between the client and server in a way that only they know. Popular key exchange algorithms include RSA (Rivest-Shamir-Adleman), DH (Diffie-Hellman), ECDHE (Elliptic Curve Diffie-Hellman Ephemeral), and ECDH (Elliptic Curve Diffie-Hellman) because they securely share encryption keys, ensuring that only the client and server can decrypt the session data.

  • Authentication Algorithms

    Authentication algorithms ensure that the client and server can verify each other’s identities. This prevents attacks like man-in-the-middle attacks, where someone could intercept the communication. These algorithms use digital signatures or public key cryptography to validate identities. Preferred authentication algorithms are RSA(Rivest-Shamir-Adleman), DSA (Digital Signature Algorithm), and ECDSA (Elliptic Curve Digital Signature Algorithm) for verifying identities through digital signatures.

  • Bulk Encryption

    This algorithm is responsible for ensuring confidentiality by encrypting the real information exchanged between the client and server. It scrambles the content of the communication so that even if it is intercepted, it cannot be read. Bulk encryption algorithms are designed to secure large amounts of data efficiently. Some commonly used bulk encryption algorithms are AES, ChaCha20, 3DES, and CAMELLIA because of their ability to securely encrypt large amounts of data efficiently, ensuring confidentiality during communication.

  • Message Authentication

    While sending sensitive information over the Internet, it is necessary to ensure that the message remains intact and has not been modified during the transmission. That’s exactly where message authentication codes (MACs) come into play. A MAC acts like a unique signature that confirms the integrity of the message. The sender generates the MAC for the message, and the receiver checks it upon receiving the message to confirm that it has not been altered in any way. Cipher suites often use algorithms like SHA-256, SHA-384, MD5, and POLY1305 because they generate unique message authentication codes (MACs), ensuring data integrity and preventing tampering.

In short, each part of a cipher suite works together to make sure that the information sent between a client and server is secure, private, and unaltered. Whether it is a banking transaction or a routine email, understanding the components of cipher suites can give you a better grasp of how your online activities are kept secure. 

Why is it Necessary to Select Strong Cipher Suites?

Let us imagine a situation where you are sitting in a restaurant and using the free Wi-Fi to check the balance of your bank account. Nothing seems to be wrong, but are you aware that a person sitting nearby could hack your details if adequate protection is not put in place?  

Using techniques like packet sniffing or man-in-the-middle attacks, a hacker can capture your data as it travels over the network. If your connection is not secured with strong encryption, your login credentials and sensitive information could be exposed, putting your overall security at significant risk. 

This makes it crucial to select a strong cipher suite. Let us explore more about how they keep your data safe and secure: 

  1. Prevents Eavesdropping

    How secure will you feel knowing that the message that you want to send to someone is being sent to the unintended recipient?

    This happens in a Man-in-the-Middle (MITM) Attack, where the attacker intercepts and relays communications between two parties who believe they are directly communicating with each other. If a weak cipher is used, the attacker can decrypt, alter, or inject messages, compromising both confidentiality and integrity.

    Weak cipher suites make it easier for attackers to fetch and decrypt sensitive information, such as users’ credentials and financial details. On the other hand, employing strong encryption methods like AES-GCM and ChaCha20 ensures that even if the connection is intercepted by the attacker, no information transmitted over it will be accessible to the attacker.

    AES-GCM and ChaCha20 are considered strong encryption methods because they use advanced techniques to protect data confidentiality and integrity. AES-GCM (Advanced Encryption Standard in Galois/Counter Mode) combines encryption with an authentication layer, which verifies data integrity alongside encryption, making it impossible to alter or decrypt the data without the correct key. ChaCha20 is a fast, secure stream cipher that works efficiently even on low-power devices, providing strong encryption through complex mathematical operations. Both algorithms use large key sizes and resist brute-force and cryptographic attacks, making intercepted data unreadable to attackers.

  2. Preserving Data Integrity

    Imagine yourself in the following situation: You are sending a crucial document to your manager, but someone intercepts it during transmission and alters its content. Isn’t it concerning? So, how can you ensure that your message is not altered during its transmission?

    In a strong cipher suite, a reliable message authentication scheme, such as HMAC with SHA-256, is used to ensure that the data received by the receiver is exactly the same as the data sent by the sender, i.e., no modification is done during the transit. If some changes are made in the data, the receiver will be able to spot it, and thus, the sender will ignore this data packet and request that it be sent again.

    HMAC with SHA-256 combines a secret key with the SHA-256 hash function to create a unique code that ensures data integrity. The receiver recalculates the HMAC using the same key to verify the message has not been tampered with. It is considered strong because it resists attacks like collisions and brute force, and the use of SHA-256 makes it computationally secure and resistant to reversal.

  3. Ensures Confidentiality

    Now, picture the scenario above once again.

    What if some sensitive information you had to transmit gets disclosed during the exchange? And what if your opponents get access to that information, for example, business development plans, strategies, or any sensitive data about your clients? Isn’t it concerning?

    When encryption algorithms are not applied appropriately, attackers can take advantage of weaknesses present in the system to retrieve private information. Therefore, to secure connections and protect sensitive information such as user credentials or personal information, an effective means of encryption, such as the use of AES 128-bit keys, or rather AES 256-bit keys, is employed.

  4. Facilitates Perfect Forward Secrecy (PFS)

    Would you feel safe if someone had access to your key today and could access your previous conversations? Yes, this is possible if the encryption does not include Perfect Forward Secrecy (PFS).

    Perfect Forward Secrecy (PFS) is an advanced encryption feature that enhances the confidentiality of communications. PFS cipher suites ensure that even if an attacker compromises the private key of a server or client, they cannot decrypt previously captured data. This is achieved by using ephemeral keys, which are unique to each session and are discarded after the session ends. By preventing attackers from leveraging stolen keys to access past communications, it adds an additional layer of security, ensuring long-term protection of sensitive data.

  5. Meets Security Compliance Standards

    Choosing strong cipher suites is critical for ensuring that you minimize risks and comply with the regulations applicable to your industry. For example, when processing payments that involve credit card transactions, you should comply with the PCI-DSS standard. The consequences of not employing effective encryption strategies as mandated by standards could result in the serious risks of fines, sanctions, or even adverse effects on the image of the business. Effective cipher suites ensure that these requirements are fulfilled and businesses, as well as their clients, do not suffer legal challenges.

  6. Reduces Vulnerabilities

    Now, let us talk about the importance of staying up to date.

    Using outdated cipher suites such as RC4, DES, or even 3DES is like guarding yourself against criminals with an ancient rusty lock on the front door. When you recognize that the existing security measures are insufficient, the natural response is to upgrade to a more advanced system.

    Similarly, transitioning to modern, robust cipher suites ensures stronger algorithms that are more resistant to attacks, effectively safeguarding your sensitive information from external threats.

    Cipher suites such as TLS_AES_128_GCM_SHA256, TLS_AES_256_GCM_SHA384, and TLS_ECDHE_RSA_WITH_AES_128_GCM_SHA256 are indeed commonly used in modern organizations. These suites use strong encryption algorithms like AES (Advanced Encryption Standard) and ECDHE (Elliptic Curve Diffie-Hellman Ephemeral) to ensure that data transmission is both secure and efficient

Tailored Encryption Services

We assess, strategize & implement encryption strategies and solutions.

Comparing TLS 1.2 and TLS 1.3 Cipher Suites

TLS (Transport Layer Security) is a protocol that ensures secure communication over the Internet by encrypting data between a client and a server. It protects sensitive information, like passwords and credit card details, from being intercepted by attackers. TLS also verifies the authenticity of the parties involved, ensuring you are communicating with the intended source and not an imposter. It is the backbone of online privacy and security. TLS has evolved through versions 1.0, 1.1, 1.2, and 1.3, with each newer version offering enhanced security and performance. TLS 1.0 and TLS 1.1 are outdated and no longer recommended due to their vulnerabilities. The most widely used versions today are TLS 1.2 and TLS 1.3. 

In terms of cipher suites, when shifts were made from TLS 1.2 to TLS 1.3, major improvements in security, speed, and ease of use were seen due to the following reasons: 

  1. Cipher Suites
    • TLS 1.2: Cipher suites are complex as they contain four distinct components:

      TLS is the protocol that is being used, ECDHE indicates the Key Exchange algorithm, RSA is the Authentication algorithm, AES128-GCM is the Bulk Data Encryption algorithm, and SHA256 is the Message Authentication Code (MAC) algorithm.

      Supported cipher suites in TLS 1.2 are:

      • TLS_ECDHE_ECDSA_WITH_AES_128_GCM_SHA256
      • TLS_ECDHE_ECDSA_WITH_AES_256_GCM_SHA384
      • TLS_ECDHE_ECDSA_WITH_AES_128_CBC_SHA256
      • TLS_ECDHE_ECDSA_WITH_AES_256_CBC_SHA384
      • TLS_ECDHE_RSA_WITH_AES_128_GCM_SHA256
      • TLS_ECDHE_RSA_WITH_AES_256_GCM_SHA384
      • TLS_ECDHE_RSA_WITH_AES_128_CBC_SHA256
      • TLS_ECDHE_RSA_WITH_AES_256_CBC_SHA384
      • TLS_ECDHE_RSA_WITH_AES_128_CBC_SHA256
      • TLS_ECDHE_RSA_WITH_AES_256_CBC_SHA384
      • TLS_DHE_RSA_WITH_AES_128_GCM_SHA256
      • TLS_DHE_RSA_WITH_AES_256_GCM_SHA384
      • TLS_DHE_RSA_WITH_AES_128_CBC_SHA
      • TLS_DHE_RSA_WITH_AES_256_CBC_SHA
      • TLS_DHE_RSA_WITH_AES_128_CBC_SHA256
      • TLS_DHE_RSA_WITH_AES_256_CBC_SHA256
      • TLS_ECDHE_ECDSA_WITH_CHACHA20_POLY1305_SHA256
      • TLS_ECDHE_ECDSA_WITH_CHACHA20_POLY1305
      • TLS_ECDHE_RSA_WITH_CHACHA20_POLY1305_SHA256
      • TLS_ECDHE_RSA_WITH_CHACHA20_POLY1305
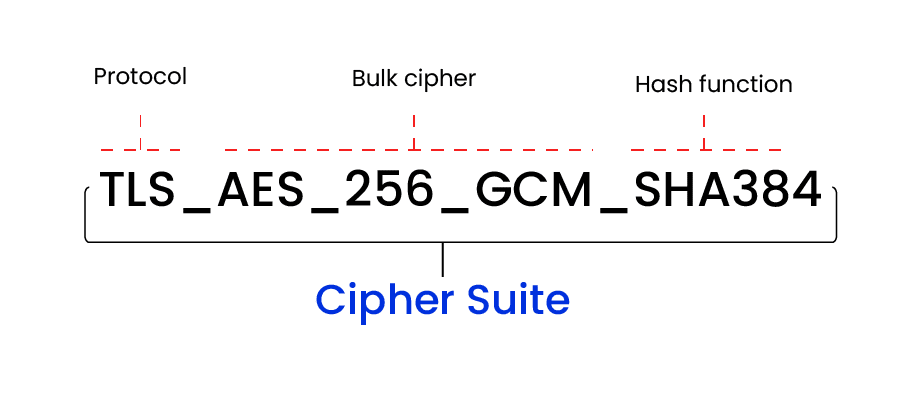
    • TLS 1.3: It simplifies cipher suites by reducing them to two main components: an AEAD (Authenticated Encryption with Associated Data) algorithm, such as AES-GCM or ChaCha20-Poly1305, which combines encryption and integrity, and separate mechanisms for key exchange and authentication during the handshake. The absence of standalone integrity algorithms is compensated by AEAD’s ability to encrypt and authenticate data in a single step, ensuring data confidentiality and integrity. Moreover, TLS 1.3 mandates Perfect Forward Secrecy (PFS), guaranteeing that even if a private key is compromised, previous communications remain secure, thus maintaining a high standard of security. For example:

      TLS indicates the protocol that is being used, AES-256-GCM is used for authenticated encryption, and SHA-384 is the hash function used for the given TLS handshake.

      With the introduction of TLS 1.3, several old and insecure ciphers were deprecated for the following reasons:

      • RC4

        RC4 was deprecated because it was found to have significant vulnerabilities that allowed attackers to recover plaintext from ciphertext, particularly through biases in the RC4 keystream. These weaknesses made it unsuitable for secure communications.

      • DSA (Digital Signature Algorithm)

        DSA is weaker compared to modern elliptic curve cryptography (ECC) algorithms. While it was once widely used for digital signatures, ECDSA (Elliptic Curve Digital Signature Algorithm) and other elliptic curve-based algorithms offer much better security and performance. DSA also tends to be slower and less efficient.

      • MD5 and SHA-1

        Both MD5 and SHA-1 have been found to be cryptographically broken due to vulnerabilities like collision attacks. These algorithms allow attackers to find two different inputs that hash to the same value, undermining their use for integrity checks or signatures.

      • Weak Elliptic Curves

        Some older elliptic curves used in ECDSA and ECDHE (Elliptic Curve Diffie-Hellman) were vulnerable to advanced cryptographic attacks that exploit their weak parameters.

      • RSA Key Exchange

        RSA key exchange does not provide Perfect Forward Secrecy (PFS). Without PFS, if an attacker ever compromises the private RSA key, all previous communications encrypted with that key can be decrypted. Modern key exchange mechanisms, like ECDHE (Elliptic Curve Diffie-Hellman Ephemeral), provide PFS by using ephemeral keys that are discarded after the session ends.

      • Static Diffie-Hellman (DH, ECDH)

        Static Diffie-Hellman (including ECDH) is vulnerable because it uses static (long-term) keys, which do not provide Perfect Forward Secrecy. If the private key is compromised, all past communications are also at risk. The ephemeral versions of these protocols (ECDHE, DH-E) offer better security as the keys are generated and discarded on the fly.

      • Block Ciphers (CBC Mode)

        CBC (Cipher Block Chaining) mode block ciphers are vulnerable to attacks like padding oracle attacks (e.g., BEAST, POODLE, Lucky Thirteen). These attacks exploit vulnerabilities in the way padding is handled in CBC mode, leading to potential plaintext recovery.

      • Non-AEAD Ciphers

        Non-AEAD (Authenticated Encryption with Associated Data) ciphers do not include built-in integrity checks. This makes them prone to attacks such as bit-flipping or truncation, which can alter the ciphertext without detection, potentially compromising the security of the communication.

    • Overall, these older and weaker ciphers were deprecated in TLS 1.3 to improve security and performance and ensure the highest standards of cryptographic protection. TLS 1.3 relies on modern, stronger algorithms, like AEAD ciphers, ECDHE, and SHA-256 (or better) for hashing, which offers robust security and resistance to contemporary cryptographic attacks.

      The supported cipher suites in TLS 1.3 have now dropped to just five and are the following:

      • TLS_AES_256_GCM_SHA384
      • TLS_CHACHA20_POLY1305_SHA256
      • TLS_AES_128_GCM_SHA256
      • TLS_AES_128_CCM_8_SHA256
      • TLS_AES_128_CCM_SHA256
  2. Key Exchange and Authentication
    • TLS 1.2:

      RSA is commonly used for both key exchange and authentication, but if the private key gets compromised, past sessions can be decrypted, i.e., it fails in making the communication channel forward secure.

    • TLS 1.3:

      RSA key exchange is no longer supported. Instead, only FFDHE or ECDHE is used, ensuring Perfect Forward Secrecy for every session. For authentication, ECDSA or RSA signatures are used only to facilitate the handshake. Moreover, TLS 1.3 combined the ServerHello and EncryptedExtensions messages into a single message, simplifying the handshake.

      The ServerHello message is sent by the server in response to the client’s ClientHello and includes essential information such as the protocol version, session ID, and selected cipher suite. The EncryptedExtensions message contains additional parameters necessary for the secure connection, such as supported groups and signature algorithms. By combining these messages, TLS 1.3 reduces the number of round trips required to establish a secure connection, enhancing performance.

  3. Bulk Encryption
    • TLS 1.2:

      Bulk encryption was typically achieved using block ciphers like AES in modes such as CBC, which had multiple weaknesses that made it susceptible to exploitation by padding Oracle attacks. A Padding Oracle attack occurs when an attacker exploits weak error handling in padding schemes of block ciphers, like AES-CBC, to decrypt data. By manipulating ciphertext and analyzing server responses, the attacker can gradually recover the plaintext.

    • TLS 1.3:

      Authentication and encryption are done more efficiently in one process using Authenticated Encryption with Associated Data (AEAD) ciphers like AES-GCM or ChaCha20-Poly1305.

  4. Message Authentication
    • TLS 1.2:

      MAC algorithms are used to verify the integrity of messages.

    • TLS 1.3:

      Eliminates the use of MACs because AEAD substitutes encryption and separates MACs within the upper layer protocol. This removes potential vulnerabilities that can arise from mismatched or weak MAC choices and simplifies the entire process.

  5. Handshake Speed
    • TLS 1.2:

      Requires two round trips for a handshake to complete.

    • TLS 1.3:

      The entire handshake procedure has been reduced to just one round trip (client-server-client) to reduce the time taken to connect. With the introduction of 0-RTT or Zero Round Trip Time in relation to session resumption, the clients can reconnect in a matter of seconds with some security trade-offs. While it improves performance, it can expose the connection to replay attacks if not effectively managed.

  6. Perfect Forward Secrecy
    • TLS 1.2:

      If you needed Perfect Forward Secrecy, you had to choose specific cipher suites because not all the supported algorithms offered PFS.

    • TLS 1.3:

      But in TLS 1.3, PFS support is built into every connection. Just like auto-locking doors for your car, no extra steps are required, and you are always protected. Similarly, PFS is mandatory and, therefore, provides greater protection of past communications.

  7. Outdated Algorithms
    • TLS 1.2:

      Supported weaker, deprecated algorithms like:

      • RC4:Not used due to biases that allow ciphertext analysis.
      • CBC mode: Vulnerable to attacks like Poodle.
      • DES and 3DES: Due to their small key size, are vulnerable to brute-force attacks.
    • TLS 1.3:

      Removed support for these weak algorithms and uses only modern ciphers like:

      • ChaCha20-Poly1305: A fast and secure cipher for devices that do not support AES hardware.
      • AES-GCM: AES with Galois/Counter Mode, which provides both encryption and authentication.
  8. Default Security
    • TLS 1.2:

      Offers a wide range of options, but not all of them are secure, which can result in weakened security if configured inappropriately.

    • TLS 1.3:

      It has fewer choices, but every option it supports is strong and secure by default, which results in better overall security.

To sum it up, TLS 1.3 brings faster speeds, stronger security, and is simpler to set up. It is like switching from an old car with manual locks to a new one with advanced safety features, so you do not have to worry much because you know you are well protected. 

How can Encryption Consulting help?

Encryption Consulting can help by offering expert advice and support tailored to your encryption needs. With our Encryption Advisory services we bring years of experience to assist you in creating strong, customized encryption strategies for your organization. 

One of our key offerings is PKI as a Service (PKIaaS), which provides continuous, 24/7 support to address any challenges related to the Public Key Infrastructure (PKI) environment. With this service, organizations can proactively manage their cryptographic keys, certificates, and authentication processes to ensure secure communications. This comprehensive approach significantly strengthens security and minimizes the risk of potential vulnerabilities or misconfigurations in encryption setups.

Conclusion

In a world where data security is more critical than ever, understanding and selecting the right cipher suite is key to keeping your data secure. By choosing strong, updated cipher suites, you can significantly reduce vulnerabilities, protect sensitive information, and maintain data integrity. The transition from TLS 1.2 to TLS 1.3 has made this process even smoother, with better security, performance, and easier configuration. 

For any organization, prioritizing strong cipher suites does more than just securing data, as it builds trust with clients, ensures compliance, and helps to guard against potential threats. Since the cybersecurity landscape changes rapidly, staying informed and proactive about encryption standards is a wise strategy to keep data safe well into the future. 

What are NDES security best practices?

The Network Device Enrollment Service (NDES) allows software on network devices, such as routers, firewalls, switches, etc., to obtain digital certificates without running any domain credentials. NDES is also one of the role services on Active Directory Certificate Services (AD CS). It implements the Simple Certificate Enrollment Protocol (SCEP), which defines the communication between the Registration Authority (RA) and network devices for certificate enrollment.

Functions of NDES

NDES performs the following functions:

  1. Generates and provides one-time enrollment passwords to administrators
  2. Submits enrollment requests to the Certificate Authority (CA)
  3. Retrieves enrolled certificates from the CA and forward them to the network device

Best Practices

Enable SSL for the NDES administrator site

SSL protection ensures that the enrollment challenge password is protected against inspection attacks when the network device connects to the MSCEP_Admin Web site.

Create extended validity period device certificates

The default IPsec (Offline Request) certificate template has only a one-year validity period. If you define custom signing, encryption, or general-purpose certificate templates, consider creating a version 2 certificate template with a two-year validity period. A longer validity period reduces the management overhead for requesting device certificates.

Disable the NDES service when not in use

Stopping the NDES service ensures that unauthorized certificates will not be issued. Stopping the service also ensures that all data, such as all passwords that were not used by network devices, is cleared from the service cache.

Use the Security Configuration wizard to lock down the server

The Security Configuration Wizard will recommend locking down IIS and other services installed on the NDES server.

Implement Role Separation

Various accounts involved in installing, configuring, and operating NDES:

  • Setup Account
  • Device administrators
  • NDES account
    • Network Service
    • Group Managed Service Account (gMSA) or
    • Domain user account

Recommendations based on the choice of NDES account

  • AES encryption is required for gMSA or Domain user accounts.
  • Configure login restrictions and a long password for domain user accounts
  • Do not use gMSA or Domain user accounts on any other computers or for any other purposes
  •  Enable the “Account is sensitive and cannot be delegated” checkbox for Domain user accounts.
  • Remember to manually configure permissions on the NDES’ certificates’ private keys when using a gMSA or custom certificate template.

Ensure system hardening

Reduce the number of local admins groups to include only PKI Admins. Only members of the PKI Admins group are granted any logon user rights (interactive, remote interactive, log on as a batch job, log on as a service).

Enterprise PKI Services

Get complete end-to-end consultation support for all your PKI requirements!

Secure the keys

The following practices should be implemented to secure the keys:

  • It is strongly advised to use a Hardware Security Module (HSM) to generate, store, and manage access to NDES keys. HSMs ensure that the NDES keys never reside in the operating system’s memory, provide additional operational controls, and limit exposure to the key material.
  • If the NDES is virtualized, it is recommended that HSM should be used to store NDES private keys as the keys can be found in an unencrypted version by Virtualization’s host admins who have access to VM, disk, and memory.
  • Backups must be encrypted, and access should be extremely limited in case an HSM is not being used to store private keys, as Snapshots/Checkpoints and other types of backup typically contain the NDES’ private keys

Infrastructure

The following practices should be followed with respect to infrastructure for NDES:

  • When allowing Internet access to NDES (for example, to enroll certificates in Intune-managed mobile devices), ensure that NDES is properly protected using a reverse proxy (such as Azure AD Application Proxy or Web Application Proxy (WAP)).
  • NDES should be installed on a different computer than the one hosting the CA service. Furthermore, no other services should be running on the computer that hosts NDES.
  • If NDES is deployed on a CA computer, configure the Certification Authority Enrollment and Management Protocol (CERTSVC-RPC-TCP-IN) firewall rule so that only the NDES (and OCSP) IP address can access the CA for enrollment.

Certificate Authority & Certificate templates

The certificate templates assigned by default during the configuration of NDES are:

  • CEP encryption: A certificate based on this template is issued to the NDES computer during the configuration of the service. It is used to apply SCEP-specific encryption to the communication with the requesting client. 
  • Exchange Enrollment Agent (Offline request): A certificate based on this template is issued to the NDES computer during the configuration of the service. The NDES uses it to digitally re-sign the enrollment request received from the device or MDM. After that, the re-signed enrollment request is forwarded to the issuing CA.

Note: Both of the above templates are used only during the initial installation of NDES and when renewing the certificate before it expires—Un-assign these templates from the CA during normal operating times. The Setup Account needs to have Enroll permissions on this template during the configuration of NDES. 

IPSec (Offline Request) aka “Device Template” aka “SCEP Certificate Template”

This certificate template is used for enrolling device or user certificates and is automatically assigned to the CA during NDES configuration. Most of the time, you’ll decide to replace it with a certificate template that better suits your needs. The Device administrator and NDES Service Account need to have Enroll permissions on this template.

Implement Data-in-transit encryption

TLS must be used to encrypt communication between NDES and MDM/the device requesting the certificate. This includes the following:

  • Enforcing TLS by disabling IIS’s HTTP listener
  • TLS 1.2 Compliance

Conclusion

We should implement all the above-mentioned best practices to secure NDES. It is extremely important to protect the private keys as any malicious person who gets access to it will be able to request a valid certificate for logging into the Active directory with any subject.

Reference: NDES Security Best Practices – Microsoft Community Hub

How to Integrate a Thales Hardware Security Module and a CipherTrust Manager: On-Premises?

When working with different security products, one of the many devices you run into is Hardware Security Modules or HSMs. HSMs are devices designed to securely store encryption keys for use by applications or users. The Thales Luna HSM can be purchased as an on-premises, cloud-based, or on-demand device, but we will be focusing on the on-demand version.

Another option available for the Thales Luna HSM is a PED-authenticated version versus the password-authenticated version. The PED-authenticated Hardware Security Module uses a PED device with labeled keys for roles within the HSM, with PINs correlating to the PED keys. This is a way of creating role separation between the different roles on the HSM. The password-authenticated version only requires a typed-in password, and a PED device is not required. This guide can be used for both types of HSM.  

The CipherTrust Manager from Thales works as a centralized key management device, allowing users to generate, manage, destroy, export, and import encryption keys for client and application uses. Working alongside the CipherTrust Manager (CM) can be an HSM that will store the keys that the CM will use.

The CM also has the same options available to it as the Luna HSM, however, if the HSM in use is a PED-authenticated HSM, then the CM must also be PED-authenticated. The same rule is in place for password-authenticated HSMs. Before we move into the integration steps, there are a few pre-integration steps that must be discussed.  

Pre-Integration Steps 

Before integrating an HSM and CM, a few steps must be done in the process beforehand. The most important task to complete beforehand is ensuring that both the HSM and CM have been fully configured. This includes the network configuration, SSH configuration, and the NTP server setup.

When integrating a Hardware Security Module and a CipherTrust Manager, they must use the same NTP, or Network Time Protocol, server so that the times are set the same between the two devices. Additionally, the HSM must be reachable across the network by the CM. This means that the CM and HSM must be on the same subnetwork so that the pinging and accessing of the HSM can be done from the CM.

Also, having remote access to the HSM and CM is important, as sitting in a data center with the CM and HSM can become overwhelming so being able to reach the devices remotely is vital. We will not go over how to configure an HSM and CM in this guide, as this is a long and involved process that you can reach out to www.encryptionconsulting.com for assistance in. Instead, we will focus on the major steps involved in the process of integrating a Hardware Security Module and a CipherTrust Manager.

Pre-Requisites

When working through these integration steps, you first want to ensure a number of different elements are in place and working properly. This begins with ensuring the CM can reach the HSM. This can be done through a number of steps, but the simplest is SSHing into the CM and pinging the IP address of the HSM. This will allow you to be certain that communication between the HSM and CM is in place properly.

Another step is to ensure that both devices are updated to the latest software and firmware versions. This will ensure that all security patches are implemented that need to be in place. One final step is to ensure that the NTP server is working properly with both devices. Without the NTP servers running properly, the integration of the two devices will fail.  

HSM Integration Steps 

To begin integrating the HSM and CM, certificates must first be created. This can be done through the Lunaclient used with the HSM. This software is downloaded from the Thales Knowledge Center, when using a customer support portal login. Once the Lunaclient is downloaded you will need to run the following command: 

cd “C:\Program Files\Safenet\lunaclient” 

From here, you can run the command vtl createcert -n <cert name>. This will create a certificate and private key in the C:\Program Files\Safenet\lunaclient\cert\client directory. From the same lunaclient directory, the command pscp.exe admin@<HSM_IP>:server.pem server_<HSM hostname>.pem should be run for each HSM being integrated.

This will transfer the server certificates of each HSM to the lunaclient directory under the name of server_<HSM hostname>.pem. We specify a different name than server.pem only because if there are multiple HSMs being integrated, the old server.pem certificates would be replaced with the new ones imported in. Now that you have all this information, we will need to get the partition label and the partition serial number of the partitions associated with the CM. This is done by sshing into the HSM via the command ssh admin@<HSM IP>.

Once logged in, the command par list can be run to show all of the different partitions on the HSM, the serial numbers, and the partition labels. Once those are noted down, the final step is to make the CM a client of the HSM via the certificate we have created. This can be done by transferring the certificate file from the client device to the HSM with the following command from the lunaclient directory:  

pscp.exe ./cert/client/<client cert name>.pem admin@<HSM_IP>

Now that the client certificate is on the HSM, the client must be registered with the command client register -n <name of the client> -h <name of the client certificate without the .pem at the end>. Now that the client was successfully registered, a partition must be assigned to the client via the command

client assignpartition -c <client name> -p <partition name>.

These steps should be done for each HSM being integrated.  

Customizable HSM Solutions

Get high-assurance HSM solutions and services to secure your cryptographic keys.

CM Integration Steps 

Now that the CM has been set as a client of the HSM, we must directly connect these files with the CM. To do this, we need to log in to the GUI of the CipherTrust Manager via one of the IP addresses set up during network configuration. Once we go to the webpage https://<IP of the CM>, we can log in and go to the Admin Settings>HSM tab.

From here, we follow the steps as they are prompted. We need to provide the HSM IP address, the HSM server certificate, both the client certificate and key, the partition label, and the partition serial number. For the certificates, you will need to open, copy, and paste the contents of those files to the GUI. Additionally, the Crypto Officer password for the partition will need to be provided as well.  

Once these are provided, the GUI will ask if you want to replicate the keys in the partition across the environment. You should select yes to this option, as the data in the partitions will be lost if you do not. Once this has been done, the CM will restart itself and its services, ensuring it can connect to the HSM properly.

Once the reboot occurs, you can log back into the GUI and see that the HSM is now integrated. From here, you can add additional HSMs to the integration, requiring only the partition password, serial number, label, HSM IP, and the HSM server certificate. Now you have successfully integrated all of your HSMs with your Cipher Trust Manager! 

Known Issues and Workarounds 

Problem: HSM Seal not reachable from the CM GUI. 

Solution: If an error says the HSM seal is not able to be gotten when attempting to connect to the GUI, there is likely an issue with your client certificate. There is a rare bug when creating certificates with vtl createcert that causes a certificate to be created for 11 days instead of ten years. Change the extension of your client certificate to .cert and look at the expiration date of the certificate.

You will need to SSH into the CM and run the command kscfg system reset. You will lose the HSM configurations in place, but you will keep the SSH and network configurations. From here, you will need to refollow the steps for creating a client of the HSM with a new certificate. 

Problem: IP Address unreachable for the GUI 

Solution: If after updating the software of the CM you cannot seem to reach your IP addresses, you will need to setup the same IP address on every interface until you find the appropriate one. The issue is that when updating from version 2.0 to version 2.9, along the way there is a bug that may change the MAC address of the network interfaces to the incorrect ones.

They may say they are interface 1 or 0, but they are actually interface 2 or 3. This can be fixed by trying the same IP address on every interface until it works properly, and you can connect to it.  

Conclusion 

As I mentioned, we did not go into detail here about the general configuration of the HSM and CM. These can be done on your own or with our assistance. To reach out to us for configuration help or assistance, go to our website www.encryptionconsulting.com. We can assist with assessments, planning, and implementation of HSMs, PKIs, CMs, and encryption advisory.

How to extend certificate enrollment to another forest?

This blog discusses Cross Forest Certificate Enrollment and the steps required to do it.

What is Cross Forest Certificate Enrollment?

  • Enterprises can build a central PKI in one Active Directory Domain Services (AD DS) forest that issues certificates to domain members in other forests by using cross-forest enrolment.
  • By combining certificate templates from many forests into a single PKI that supports all forests, enterprises with current per-forest AD CS implementations can lower the number of CAs.
  • To offer enrollment services across all forests, enterprises with multi-forest settings but no PKI can implement AD CS in a single forest.

Prerequisites

  • Two-way forest trusts exist between account and resource forests.
  • One or more enterprise CAs running on Windows Server.

Publish the Root CA Information to another Forest.

  1. Log on to a domain controller in the Forest as a member of the Enterprise Admins group.
  2. Insert the USB thumb drive containing the root CA published certificate and CRL.
  3. Ensure you are in the administrative command prompt.
  4. At the command prompt, type “certutil -f -dspublish ” Root CA.crt” RootCA
  5. At the command prompt, type PKIView.msc and press ENTER.
  6. If the pkiview message box appears, click OK to accept the error message if prompted.
  7. In the console tree, right-click Enterprise PKI, and then click Manage AD Containers.
  8. On the Certification Authorities Container tab, ensure that RootCAName appears.
  9. On the AIA Container tab, ensure that RootCAName appears. Click OK.

Publish SubCA information to new Forest Configuration Partition (Enrollment Services and Templates)

  1. Ensure New Forest has Permissions/Delegations configured on CN=Public Key Services, CN=Services, CN=Configuration, DC={forest root domain}
  2. From existing forests, modify the scheduled task to update PKIsync.cmd to new Forest (Below additional line to be added)
    .\PKISync.ps1 -sourceForest RESOURCE.LOCAL -targetforest account.LOCAL -type Template -cn ” <certificate template common name>. ” >> C:\Temp\CAScripts\PKSyncCorp.txt
  3. Run the Scheduled task “PKI Cross Forest Replication”
  4. Login to target forest open ADSIEDIT.msc > Connect to configuration partition N=Public Key Services, CN=Services, CN=Configuration, DC={forest root domain}
  5. Check Enrollment Services > Verify if PKI Servers exist there.
  6. Check Certificate Templates > Verify customer certificate templates exist there

Note: Above cmd only syncs specific templates; you may choose to sync entire containers.

Enterprise PKI Services

Get complete end-to-end consultation support for all your PKI requirements!

Publish the SubCA Information to a New Forest. 

  1. Open an administrative command prompt.
  2. At the command prompt, type USB: and then press ENTER.
  3. At the command prompt, type CD \CACerts and press ENTER.
  4. At the command prompt, type certutil -dspublish -f <enterprise-ca-cert-filename.cer> SubCA and then press ENTER.
  5. At the command prompt, type certutil -dspublish -f <enterprise-ca-cert-filename.cer> NTAUthCA and then press ENTER.

Add SubCA Information to the Cert Publishers group in New Forest. 

  1. Open Active Directory Users and Computers.
  2. Connect to the Domain needed
  3. In the console tree, navigate to the CN=Users container.

Note: If the group is not in the default container, search for it within the domain.

  • In the details pane, double-click Cert Publishers.
  • On the General tab, ensure that the group’s scope is Domain Local.
  • Add PKI Servers from the forest as members.

Assign permissions of Forest to Certificate Templates

  1. Open Active Directory certificate authority.
  2. Find Certificate templates > Right Click > Manage
  3. Find the Certificate Templates and go to their properties
  4. Assign users/groups/computers
  5. On the General tab, ensure that the group’s scope is Domain Local.
  6. Add PKI Servers from the forest as members.

Assign permissions on CA so new Forest can enroll Certificates

  1. Open Active Directory certificate authority.
  2. Right Click CA Name > Choose Properties
  3. Navigate to Security > Add Groups of New Forest, which needs to enroll.
References: https://learn.microsoft.com/en-us/previous-versions/windows/it-pro/windows-server-2008-r2-and-2008/ff955842(v=ws.10)

SafeNet KSP: Provider DLL failed

In this blog, we will cover a common error while Installing Active Directory Certificate Services. While configuring the setup on Server Manager, the option for SafeNet Luna Cryptographic Key Provider wasn’t available.

Issue

CA Service wasn’t working.

CA Service working Issue

Error Code

Provider Name: SafeNet Key Storage Provider
SafeNet Key Storage Provider: Provider DLL failed to initialize correctly.
CertUtil: -csplist command FAILED: 0x80090030 (-2146893776 NTE_DEVICE_NOT_READY)
CertUtil: The device that is required by this cryptographic provider is not ready for use.

Description

We weren’t getting an option for SafeNet Luna Cryptographic Key Provider while configuring ADCS for Issuing CA despite installing KSPConfig and successfully completing all the HSM setups.

Steps done

  • We did run certutil -csplist to check whether the SafeNet Key Storage Provider was configured correctly.
  • Checked the vtl verify is working.
  • Tried to re-install the KSP configuration again.
  • We ran Regedit to check whether the options for SafeNet are available in the Registry

Solution

This comes out to be a generic error with SafeNet HSM Configuration. To solve it, we did is to re-configure the HSM by Re-registering the account and rebooting the system. It did solve the issue in this case.

Enterprise PKI Services

Get complete end-to-end consultation support for all your PKI requirements!

Configuring the KSP Using the GUI

You can use the KspConfig utility to configure the KSP with your partitions. The Crypto Officer must complete this procedure using Administrator privileges on the client.

You can register the following user/domain combinations with the KSP:

  • Administrator user with the domain-specific to the client. Default Windows domains are in the format WIN-XXXXXXXXXXX.
  • SYSTEM user with the NT-AUTHORITY domain

The configuration tool registers a Crypto Officer password/challenge to a specific user so only that user can unlock the partition.

Steps to configure the KSP using the GUI

1. In Windows Explorer, navigate to the Luna KSP install directory and launch KspConfig as the Administrator user.

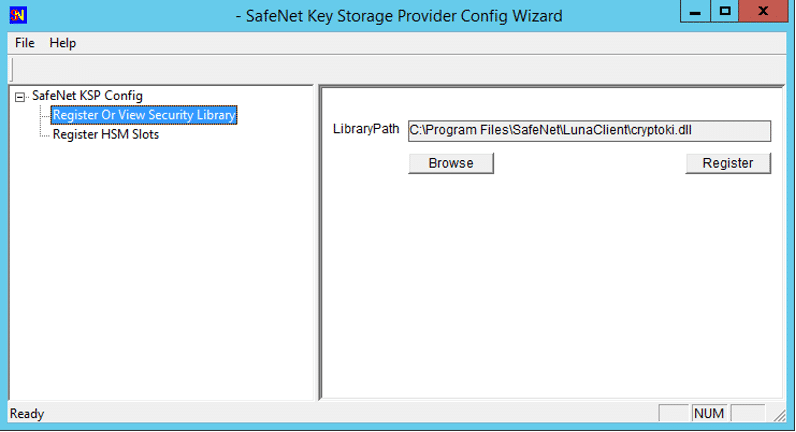
2. In the left panel, double-click Register or View Security Library. Enter the filepath to cryptoki.dll or click Browse to locate it.

<client_install_dir>\cryptoki.dll

Resister Security Library

Click Register to complete the registration.

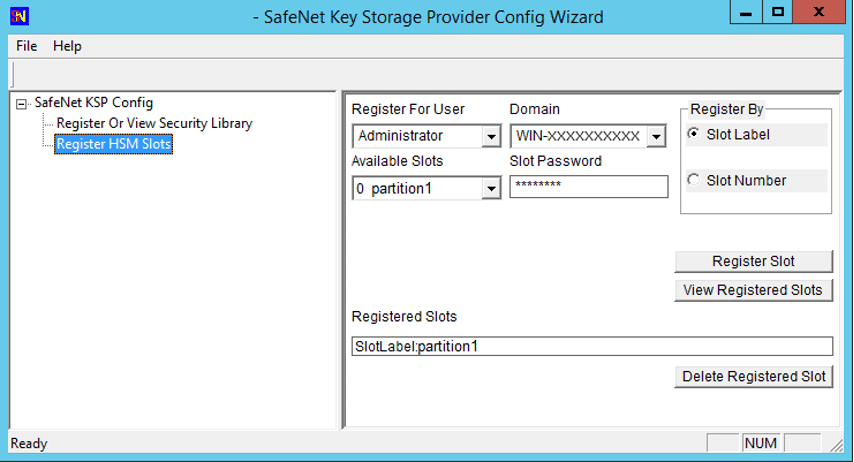
3. In the left panel, double-click Register HSM Slots. Select the Administrator user, client domain, and an available slot to register. Enter the CO password/challenge and click Register Slot.

Register HSM Slots

4. Select the SYSTEM user and NT-AUTHORITY domain and register for the slot.

5. Repeat steps 3-4 for any other available slots you want to register with the KSP.

(One common mistake is to just reconfigure it without rebooting the system).

References: https://thalesdocs.com/gphsm/luna/7/docs/network/Content/sdk/microsoft/ksp_cng.htm

NDES configuration failing with duplicate endpoint error 

This blog will discuss a known bug happening with the Luna HSM Client version, preventing users from installing NDES. 

Source: Microsoft-Windows-Certification Authority

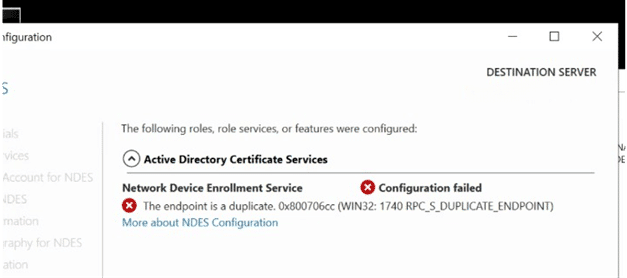
Error Code: 0x6cc (WIN32: 1740 RPC_S_DUPLICATE_ENDPOINT).

Event ID: 34

Description

On Server 2016 while building the PKI, even though with all the CA’s built/configured, OSCP deployed successfully, still the command to restart the services via scripts cannot be issued.  

After running through the scripts to configure the CA using various certutil commands the script gets to  

net stop certsvc && net start certsvc

What the screen displays:

The Active Directory Certificate Services service is stopping. 
The Active Directory Certificate Services service was stopped successfully. 

The Active Directory Certificate Services service is starting. 
The Active Directory Certificate Services service was started successfully. 

When trying to restart the services, it reports:

WIN32: 1749 RPC_S_DUPLICATE_ENDPOINT

Active Directory Certificate Services did not start, could not initialize RPC for Issuing CA, and showed the endpoint as duplicates.  

Enterprise PKI Services

Get complete end-to-end consultation support for all your PKI requirements!

As the setup times out and the installation fails, it reports either RPC is unavailable or that the endpoint text is duplicate. This behavior is consistent across all CAs on the server and prevents from installing NDES.

NDES install problem

Cause

The duplicate endpoint error message is caused by the SafeNet KSP library’s failure to release the service before it is restarted. It was an issue with Luna Version 10.3.0, where the service restart was too fast, and it locked the KSP. 

Solution

Since it is an issue with the Luna Client version, so upgrading the client version will solve the issue. In this case, 10.3.0 was there, and upgrading to 10.5.0 solved the issue. 

HSM as a Service (HSMaaS)

Organizations need to secure keys and secrets, and their data is increasing exponentially. The demand for high-level security for that is at its peak now. For most organizations, automation of key lifecycle management is ideal because the lifecycle of cryptographic keys also calls for a high level of management. HSMs, or hardware security modules, are the mainstay in this scenario. Hardware security module (HSM) adds additional security for sensitive data. Before diving into HSM as a Service, let’s briefly discuss what HSM is and how it works.

What is HSM, and how does it work?

Hardware security modules (HSMs) are fortified, tamper-resistant hardware components that produce, safeguard, and manage keys for encrypting and decrypting data and establishing digital signatures and certificates. This secures cryptographic procedures. To the highest security requirements, including FIPS 140-2 and Common Criteria, HSMs have been evaluated, verified, and certified. HSMs are extremely difficult to breach and have highly regulated access, which is one of the reasons they are so secure.

For constructing tamper-resistant, hardened environments for storing cryptographic keys, HSMs act as trust anchors. An HSM can serve as the ideal Root of Trust in any organization’s security infrastructure thanks to the stringent security procedures implemented inside it. They have the specialized gear to generate high-quality random keys. Multiple organizations use more than one HSM to secure their environment instead of just one. A simplified, central key management system founded on stringent internal security standards and external laws enhances security and compliance regardless of how many HSMs are deployed.

To further protect against breaches, HSMs are often kept off the organization’s computer network. An attacker would need physical access to the HSM to view the protected data.

HSM as a Service

A top priority is creating an encryption key management and maintenance plan, especially if you want to keep your HSMs operating at peak efficiency throughout each encryption certificate. To fully actualize secure techniques for data security, this includes managing your encryption keys over private and public networks and hybrid mixes of physical and cloud-based HSM functions. It would help if you established uniformity around the board to successfully navigate the difficulties of switching to HSM as a Service.

EC’s HSM as a Service

The HSM as a Service from Encryption Consulting offers the highest level of security for certificate management, data encryption, fraud protection, and financial and general-purpose encryption. It is globally compatible, FIPS 140-2 Level 3, and PCI HSM approved. It offers customizable, high-assurance HSM Solutions (On-prem and Cloud) designed and built to the highest standards. We are Vendor- agnostic and provide various options, whichever is best for you to deploy. We ensure Highest Availability around the world and supply our services across the globe. 

Encryption Consulting’s HSM-as-a-Services are suitable for the following:

  • Customers who already have HSM deployed in place.
  • Customers who are planning for new HSM infrastructure (Designing and Deploying)

Being a Vendor-agnostic Organization, we give it upon the customer to implement whichever HSM they want by providing various options:

  1. Entrust N-shield HSM

    nShield HSMs provide a secure solution for encryption and signing keys, creating digital signatures, encrypting data, and more. N-shield as a Service gives the advantages of a cloud service deployment with the same features and capability as on-premises HSMs.

  2. Thales Luna 7 HSM

    Thales Luna Network HSMs secure your sensitive data and critical applications by storing, protecting, and managing your cryptographic keys with high-assurance, tamper-resistant, network-attached appliances offering market-leading performance.

  3. FutureX HSM

    FutureX hardware security module solutions provide robust encryption, tamper resistance, and logical security to safeguard your most sensitive data. Key lifecycle management, payment encryption, and general encryption are all handled by Futurex HSMs.

Customizable HSM Solutions

Get high-assurance HSM solutions and services to secure your cryptographic keys.

For HSM, we provide both varieties of solutions:

Dedicated HSM

Azure Dedicated HSM offers storage for cryptographic keys. Dedicated HSM meets the most demanding security requirements.

  • Organizations who require FIPS 140-2 Level 3-validated devices and total and exclusive control over the HSM appliance should choose this option.
  • Microsoft uses Thales Luna 7 HSM model A790 appliances to supply the Dedicated HSM service.
  • They are directly deployed to a client’s private IP address space.
  • Single-tenant devices.
  • Full administrative control and High Performance.
  • Azure Dedicated HSM is most suitably used in migration scenarios.

Managed HSM

Azure Managed HSM is a fully managed, highly available, standards-compliant cloud service that enables you to safeguard cryptographic keys for your cloud applications.

  • Uses FIPS 140-2 Level 3 validated devices.
  • Your keys are safeguarded using Marvell LiquidSecurity HSM adapters while using Managed HSMs.
  • Single-tenant devices.
  • Supports Import keys from your on-premises HSMs.

Advantages of HSM as a Service

  • Systems that are exceptionally safe against tampering include tamper-evident, tamper-proof, and tamper-resistant systems.
  • Can implement on both On-premises and Cloud with scalability and versatility.
  • Maintain complete control over key materials regardless of where application workloads occur.
  • Leveraging numerous clouds to expand cloud-based cryptography and key management.
  • With a single click, services may be automatically scaled, reducing the administration burden.
  • When necessary, enables the creation and application of rules to ensure compliance

EC Managed HSMaaS

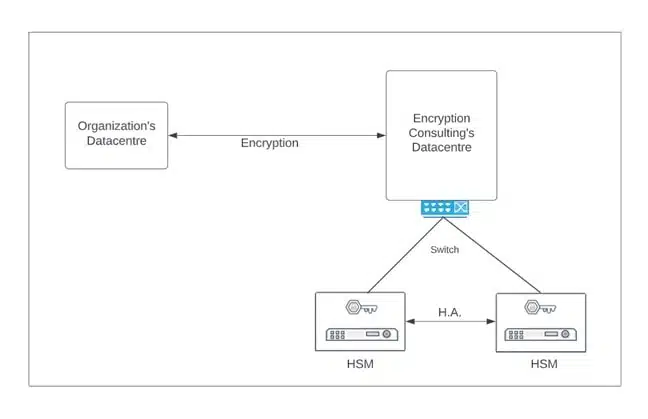
Encryption Consulting LLC (EC) will completely offload the HSM environment, which means EC will take care of deploying the HSM environment to lead and manage the HSM environment (cloud/ hybrid or On-Prem) of your organization. For more information, visit our website or contact us via email.

Conclusion

Hardware Security Module (HSM) is a specialized, highly trusted physical device used for all the main cryptographic activities, such as encryption, decryption, authentication, key management, key exchange, and more. EC’s HSMaaS provides a variety of options for HSM deployment as well as management. Dedicated HSM is used widely in migration scenarios, whereas Managed HSM supports importing keys from your on-prem HSMs. Advantages include security, scalability, versatility, full control, and more. Do visit our website or contact us for more information.

How to upgrade CipherTrust Manager from 2.0 to the higher/latest version?

The CipherTrust data security platform’s core management point is CipherTrust Manager. With the help of this market-leading enterprise key management solution, businesses can set up security policies, give granular access controls, and centrally manage encryption keys. The key lifecycle tasks managed by CipherTrust Manager include creation, rotation, destruction, import, and export. It also gives role-based access control to keys and policies, allows thorough auditing and reporting, and provides REST APIs that are easy for management and development. The physical and virtual form factors of CipherTrust Manager are FIPS 140-2 compliant up to level 3. Additionally, hardware security modules (HSM) like Thales Luna and Luna Cloud HSM can be used to anchor the CipherTrust Manager.

Are you still using the older version of CipherTrust Manager in your environment? Then it’s time to upgrade it to the latest version. The below upgrade details will help you upgrade your CipherTrust Manager all by yourself. This document covers basic system upgrade details for the Thales CipherTrust Manager. For more detailed instructions, please refer to the Thales System Upgrade Guide.

Pre-requisites:

Pre-requisites are important to plan and be ready for the upgrade. The following checks must be run before the upgrade of the CipherTrust Manager is complete:

  • Know your current software version of the CipherTrust Manager (CM) and the desired version of the CipherTrust Manager. Example: Your Current version of CM is 2.0, and the desired version is 2.9.
  • Define the upgrade path: For the above example: The upgrade path would be 2.0 > 2.3 > 2.6 > 2.9 [NOTE: Thales tests upgrades from the three previous minor versions. Upgrades from other versions have never been tested and may not work correctly.]
  • Ensure you have access as Ksadmin with an SSH Key.
  • Take a system-level backup and ensure that you have downloaded the CM backup file and backup key. (This can be done via the CM Web UI).
  • Run the command df -h toensureat least 12 GB of space available (excluding the upgrade file)
  • SCP the upgrade file to the CipherTrust Manager (while using Winscp, ensure that SCP is selected for the file protocol). The upgrade file can be transferred via the WinSCP application or the following command:

scp -i <path_to_private_SSH_key> <upgrade_file_name> ksadmin@<ip>:.

[NOTE: Upgrade files can be downloaded from the Thales Support portal for the desired version. Or you can also open a ticket with Thales support to help you get the upgrade files]

Tailored Advisory Services

We assess, strategize & implement encryption strategies and solutions customized to your requirements.

Upgrade Workaround:

  1. Login as Ksadmin via SSH
  2. Run the following command to upgrade sudo /opt/keysecure/ks_upgrade.sh -f <archive_file_path>
  3. Reboot the appliance once all the services are running Sudo reboot

[NOTE: The upgrade can also be performed via serial connect as a ksadmin]

Post-upgrade Checks:

The following checks should be run after upgrading the CTM:

  1. Check that all services are running with the following command: sudo docker ps | wc -l
  2. Ensure the CipherTrust Manager services have started. From the ksadmin session, run “systemctl status keysecure.”
  3. Alternatively, you can visit the CipherTrust Manager web console or attempt to connect with the ksctl CLI

Known issue

There is a known issue in CipherTrust Manager instances upgraded from 2.6 and earlier, where network device names sometimes swap MAC addresses after reboot. This has been observed for network interfaces beginning with eth and bonded connections created from network interfaces beginning with eth. To avoid this, a connection for each network interface should be configured.

Conclusion

This document does not replace the standard Safenet documentation set for the CipherTrust Manager User Guides. Rather it is an addendum designed to be used alongside that documentation. It is always a best practice to upgrade your security solution software with the major release.

Sources: thalesdocs.com