Code signing is a method of putting a digital signature on a file, document, software, or executable to test its authenticity and genuineness in regards to the functionality and features that it provides. This also ensures that the software entity (file, document, software, or executable) is not tampered with while in transit.
Code signing can be implemented in two ways: Client-side signing & Server-side signing.
Both mentioned Code signing methods that were popular until the SolarWinds’ attack came into the limelight and post that Client-side signing became the talk of the town as this doesn’t require to upload/move the signing files, hence preventing the attacks where malicious code is also getting signed as part of the original file/entity signing.
Time to understand the hashing function first:
The hashing algorithm is the cryptographic function that generates a fixed-length output that is called digest or hash value from a given input that may be of arbitrary size. The hash function has a property to generate a unique and one-way/non-reversible output which means we can’t get to the original input value by doing a reverse hash operation.
Let’s look at a hashing algorithm example with a simple hash function:
In the example above, a cryptographic hash function SHA-256 is shown that converts the arbitrary data into a fixed-size 256-bit hash value.
Now, let’s understand the Server-side Code signing in detail.
The following steps are performed while signing the code or any executable in a Server-side signing fashion:
A unique key pair is generated and based on this key pair a CSR (Certificate Signing Request) is generated by a requester/developer.
CA issues the certificate post validation and returns the code signing certificate with the public key to the requester.
The code/executable to be signed is uploaded to the Code signing server by the requester.
Once the code/executable is uploaded, the hash value of the code/executable is calculated with the help of any cryptographic hash function and since this hash value is computed on the server-side, hence the name Server-side hashing.
The computed hash value is signed by the corresponding private key issued to the requester results in the digital signature.
The digital signature, code signing certificate, and hash function information are now combined into a signature block and placed into the software, which is sent to the receiver/consumer.
When the code/executable is received, the consumer’s computer first checks the authenticity of the code signing certificate.
Once the authenticity is confirmed, the digest is then decrypted with the public key of the created key pair.
The hash function is used on the code/executable to calculate the digest.
The resulting digest is compared to the digest sent by the requester. If the digests match, then the software is safe to install.
Enterprise Code-Signing Solution
Get One solution for all your software code-signing cryptographic needs with our code-signing solution.
Let’s understand the Client-side signing in detail.
The following steps are performed while signing the code or any executable in a Client-side signing fashion:
A unique key pair is generated and based on this key pair a CSR (Certificate Signing Request) is generated by a requester/developer.
The CSR is sent to CA (certificate authority) with a code signing template.
CA issues the certificate post validation and returns the code signing certificate with the public key to the requester.
The hash value of the code/executable is calculated with the help of any cryptographic hash function at the client end itself. Since this hash value is computed at the client-side, hence the name Client-side hashing.
The hash value only i.e., digest of the code/executable to be signed is uploaded to the Code signing server by the requester.
The computed hash value is signed by the corresponding private key issued to the requester results in the digital signature.
The digital signature and hash function information is sent back to the client.
The digital signature, code signing certificate, and hash function information are now combined into a signature block and placed into the software at the requester/developer end.
When the code/executable is received at the consumer end, the consumer’s computer first checks the authenticity of the code signing certificate.
Once the authenticity is confirmed, the digest is then decrypted with the public key of the created key pair.
The hash function is used on the code/executable to calculate the digest.
The resulting digest is compared to the digest sent by the requester. If the digests match, then the software is safe to install.
Conclusion
Code signing has become a quintessential requirement for software developers and the reason is code signing ensures trust among users to install the software without worrying about anything. Although both the Code-signing methods are used in the industry to date, however, SolarWinds’ attack changed the code signing landscape in the industry a lot. Now, the client-side signing is a preferred choice considering the fact that it provides a significant advantage in terms of remote digital signature generation, reducing the overall bandwidth requirement due to only hash value upload, and avoiding the attacks of malicious code signed due to no code file movement within the environment.
Payment Gateway and Payment Processor are two critical links in the payment processing chain. As a business owner, you have probably heard these terms and wondered what the difference is. In short, although the two phrases seem synonymous; they are not. In fact, Payment Gateway and Payment Processor are two entirely different things.
This article will introduce you to Payment Gateway and Payment Processors, along with explaining how the two work. Suppose you plan on accepting credit card payments online. In that case, you will probably need both a Payment Gateway and a Payment Processor, so knowing each is critical to making the right choice for your business.
Before jumping into the details of payment gateway and payment processor, we should understand the role of the parties involved in any transaction on your business platforms. When a customer initiates a transaction with your business, these are the four parties involved:
The customer
The issuing bank (that issues the customer’s debit card or credit card)
the merchant,
and the acquiring bank (that collects the funds from the issuing bank)
Merchant and the customer: These are the parties that start the transaction. You offer a product or a service that your customer is willing to buy and pay for.
Banks and the bank accounts: The bank and the bank accounts of the customers or merchant are the other parties for the transaction process. The customer bank account is hosted by the issuing bank The merchant’s bank account (called a merchant account) and its host bank are called acquiring banks. Every merchant needs a merchant account to accept money from credit or debit cards.
What is a Payment Gateway?
A Payment Gateway is a software that encrypts and sends the customers’ personal and bank details to the Payment Processor securely. An online business needs to have a Payment Gateway to accept credit card payments, amongst other alternative payment methods that their customers might prefer.
From the customer’s perspective, the Payment Gateway is the final checkout page on your website, i.e., the page where they put in their payment information, such as a credit card number, and click the “buy now” button.
The customer interacts with a Payment Gateway when they enter their payment card information on the checkout page. When they proceed to pay, the gateway encrypts the customer’s personal and bank information so that hackers cannot steal and misuse it.
The Payment Gateway technology involves a specific type of encryption called SSL (Secure Socket Layer) encryption. The customer’s sensitive data is encrypted as the Payment Gateway forwards the details from the customer’s system to the issuing bank.
How does a Payment Gateway work?
Below are the steps which describe how a Payment Gateway works:
The Payment Gateway forwards a customer’s encrypted sensitive data from the customer’s computer/device to the issuing bank.
Once the data reaches at the issuing bank, the Payment Gateway decodes the encrypted data and present it to the bank in a usable format.
The issuing bank then authenticates or declines the information, entered by the customer.
Once the issuing bank has confirmed the authenticity of the customer’s request, the Payment Gateway uses SSL encryption to securely deliver the transaction details to the Payment Processor (explained below), which then completes the transaction.
[NOTE: Sometimes banks consider checking other information such as physical location of the requesting device/system, recent activities of the customer, etc., before authenticating the customer and payment card]
Most common types of Payment Gateway in the market
There are many ways you can integrate your payment gateway with your business. We can spend the whole day here, if we start talking about everything, so let us talk about the most common types of payment gateway in the market.
Tailored Encryption Services
We assess, strategize & implement encryption strategies and solutions.
In simple terms, the Payment processor is a financial Institution that works as a mediator between the cardholder/customer, merchant, acquiring bank, the payment gateway, and the issuing bank to process online payments.
How does a Payment Gateway work?
The role of a payment processor is to transmit sensitive customer information in the following way:
The payment gateway sends encrypted customer details to the payment processor.
The payment processor sends the customer’s data to the merchant account bank.
The merchant account bank sends a request to the customer’s card-issuing bank to verify the card holder’s identity and the transaction’s validity.
The customer’s card issuing bank sends a rejection or approval message to the payment processor, directing it back to the payment gateway.
The payment gateway notifies the customer whether the transaction has been approved.
If the transaction is approved, the customer continues with the checkout process to finalize the transaction.
After the transaction is finalized, the processor sends information to the card-issuing bank to transfer funds to the merchant account.
NOTE: Sometimes, the payment processor is the same institution as the merchant account issuer, so data is sent directly to the customer’s card issuing bank.
Differences between a payment gateway and a payment processor
The Prioritized Approach provides six milestones. The table below summarizes the high-level goals and intentions of each milestone.
Payment Gateway
Payment Processor
Payment gateway is a tool/service that approves or declines transaction between your website and your customer
A payment processor is a financial institution that executes the transaction to obtain your funds from the customer properly.
Payment gateways can be integrated to plug into your business accounting software or eCommerce store, allowing you to process credit cards directly within your existing software.
The Payment Processor will set up a merchant account that allows your business to accept credit cards.
Integrating a Payment gateway is an easy way to accept payment online.
Using a Payment Processor ensures proper funds on credit card transactions. The payment processor helps direct the transfer of the amount from the customer’s bank account to the merchant bank account.
Conclusion
The most common use of a gateway is to accept payments for items and offerings online; however, in today’s payment landscape, the gateway technology has impressively expanded to create a seamless buying experience across all sales channels and devices. For an e-commerce business, it is required to choose both the payment services (payment gateway and payment processor) to process online payment.
Most importantly, the payment processor does not deal directly with an authenticator; the Payment Gateway plays that role. Thus choosing the right payment gateway is very important to keep your customer’s sensitive data securely.
SCEP or Simple Certificate Enrollment Protocol, is an open-source certificate management protocol that stands for , automating the task of certificate issuance. Public key infrastructure (PKI) certificate issuance requires a process for information exchange with a trusted Certificate Authority (CA). This is required so that it can authenticate the information provided by the user, like domain name and identities associated with the Certificate. By automating this process, SCEP makes it easy and faster for the IT team to enroll certificates on devices without having to manually exchange the information. Using a URL to exchange information and a shared secret to communicate with the CA, a device can easily enroll for a certificate.
How does SCEP work?
SCEP URL: The Simple Certificate Enrollment Protocol URL enables a device to communicate with the CA to obtain an enrollment Certificate.
SCEP Shared Secret: A case-sensitive, secure password is used as a SCEP shared secret between the CA and SCEP server to authenticate the identities and domains associated with the CA certificate.
SCEP Certificate Signing Request: After setting up and sharing the SCEP gateway and Shared secret, respectively, users can create and distribute a configuration profile that enables managed devices to auto-enroll for certificates by sending a certificate enrollment request to the CA through the SCEP gateway. A signed certificate will be issued to the device after authentication.
SCEP Signing Certificate: The SCEP signed Certificate is uploaded by Mobile Device Management (MDM), in which the entire certificate chain (Root CA, Intermediate CA, End-entity Certificate) is included.
SCEP Device Enrollment Process
The following steps are required for SCEP device enrollment on MDMs:
Add SCEP URL
Add SCEP Shared Secret
Upload the SCEP certificate, which needs to be signed.
Set the SCEP configuration.
Define any application-specific certificate setting.
Specify the device which will receive the certificates.
After authentication by the CA, a signed certificate will be deployed on the required device.
SCEP certificate Configuration profile
While setting up an SCEP server, the Administrator can customize the SCEP implementation by setting up the number of available certificate properties in the certificate configuration profile. The certificate properties are given below:
Certificate Template Name
Certificate Type
Subject Name (this refers to the entity requesting the Certificate, it can be an email id, server name, or IP address of the entity.)
Certificate Validity Period (this refers to the time for which the Certificate is valid, if not revoked.)
Hashing Algorithm
Root CA Certificate
Key Usage (this refers to the usage of the key, whether it is for Digital Signature, key encipherment, or both.)
Key Size (this refers to the size of the key, for example, 1024-bit or 2048-bit)
Subject Alternative Name (this relates to the alternative details of the subject like DNS, URI, UPN, etc.)
Enterprise PKI Services
Get complete end-to-end consultation support for all your PKI requirements!
EST stands for Enrollment over Secure Transport. It is the evolution of SCEP and uses Transport Layer Security (TLS) for client-side device authentication. Both SCEP and EST are used to automate the Certificate enrollment process, but the difference is that SCEP uses Shared Secret protocol and CSRs for enrolling Certificates, whereas EST uses TLS for authentication. EST uses TLS to securely transport the messages and Certificates, whereas SCEP uses PkcsPKIEnvelope envelopes to secure the messages.
SCEP vs. ACME
ACME stands for Automated Certificate Management Environment. Both SCEP and ACME are the same in certificate management. ACME uses key pairs, also known as authorization keys, for validation of the CA and organization. ACME installs the Certificate Management Tool to generate Authorization keys.
SCEP vs. CMP and CMC
CMP stands for Certificate Management Protocol, and CMC stands for Certificate Management CMS. Both SCEP and EST are used for enrollment and issuance of Certificates, whereas CMP and CMC are used for Certificate management like renewal, status, and revocation of Certificates.
Conclusion
SCEP Gateway API can be used to distribute certificates to every managed device. The SCEP Gateway API enables managed devices to enroll for Certificates on their own easily, but it also increases security risk. Mobile devices that use SCEP for digital certificate enrollment may be susceptible to a Privilege Escalation Attack. EST is the evolution of SCEP, which is more secure and uses TLS for client-side device authentication.
Encryption is used every day to secure online communications between two individuals or between clients and servers. Though you may not see it in action, encryption obscures your data-at-rest and data-in-transit from outside attackers who are potentially monitoring your communications. Encryption works by taking in plaintext data, or data that is unobscured, and turning that plaintext into ciphertext. Ciphertext is a random assortment of letters, numbers, and sometimes symbols, that obscures sensitive data from unwanted viewers. Ciphertext can be reversed back into its sensitive data form, as long as either a key was used to encrypt the data, or a pattern is found in the ciphertext to decrypt it. The ability to decrypt data is vital in the online communication process, as the recipient of the information should be able to decrypt the data, which is usually done via key usage. Encryption is vital to ensure sensitive data stays secret from unwanted attackers, and going along with encryption are encryption protocols.
What is an Encryption Protocol?
Encryption is done through encryption algorithms. These algorithms do all the cryptographic operations, using the encryption key, on the plaintext data. These algorithms are then utilized within encryption protocols to protect data for different usages. The point of an encryption protocol is to fulfill a specific function. The functions encryption protocols can perform vary, from communications with TLS/SSL to remote connections to computers with SSH. We will take a look at some of the more well-known encryption protocols later on in our article. Before going in-depth on encryption protocols, there are a few terms we should learn first, starting with asymmetric and symmetric encryption.
Symmetric and Asymmetric Encryption
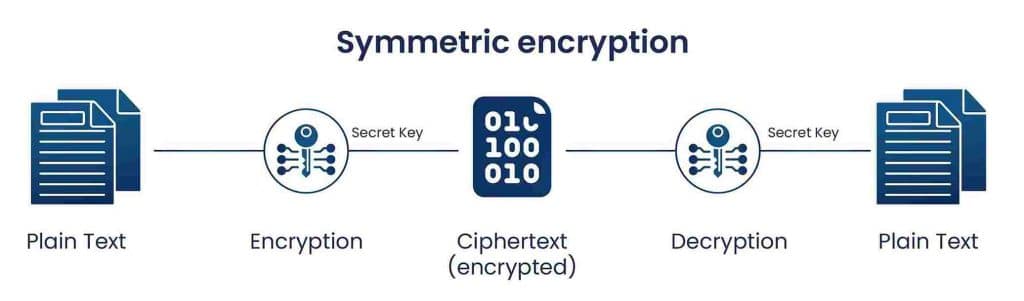
Symmetric encryption is the much simpler form of encryption. Symmetric encryption utilizes one key to encrypt data, whether that data is in-transit or at-rest. In reference to encrypting data-in-motion, the key is created and shared with both the sender and the recipient of the message. The data in the message is encrypted with the symmetric key, meaning the only person who can read this data is someone who owns the encryption key. Once the message reaches the recipient, they can use the symmetric key to decrypt the data. Using symmetric encryption alone is not recommended, as it is much more insecure compared to asymmetric encryption. This is due to the fact that with symmetric encryption, the key created must at some point be delivered to the data recipient. If this transfer is not done securely, the key could be intercepted during delivery, meaning any encryption done with that key is now irrelevant. An example of data-in-transit encrypted with a symmetric key can be seen below.
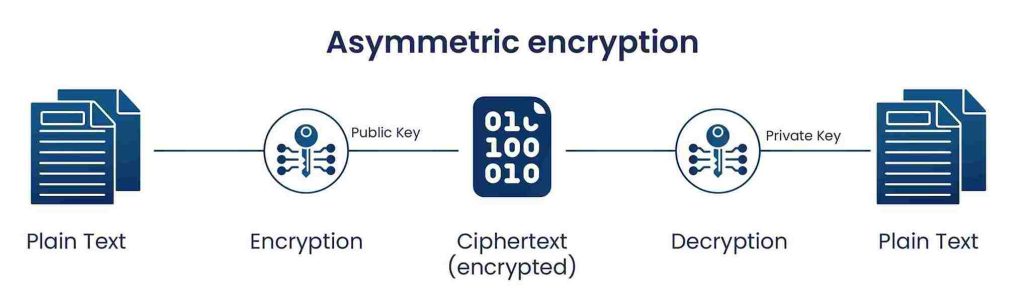
Asymmetric encryption, as I mentioned previously, is the more secure of the two types of encryption. With asymmetric encryption, a key pair is created which consists of a public and private key. The public key is kept available for anyone to see, while the private key is known only by the key pair creator. To asymmetrically encrypt data, the key pair creator encrypts the message with their private key, sends the encrypted message to the recipient, and the recipient can then use the public key, generally found from a public key repository, to decrypt the message. By decrypting the message with the public key, the data recipient can tell that the message is from who they think it is from and that the data in the message has not been changed. If the data in the message had been changed, the decryption with the public key will not produce a readable message, as the data would have been encrypted to a different value. Though asymmetric encryption is more secure than symmetric encryption, they tend to be used in tandem for communications encryption. The initial connection will be created with asymmetric encryption, a symmetric session key will be created, and the session key will then be used to encrypt messages in the session. Below is a diagram of the asymmetric encryption process.
Public Key Infrastructure (PKI)
Working hand in hand with asymmetric encryption and encryption protocols is Public Key Infrastructures, or PKI. A PKI Infrastructure utilizes digital certificates and asymmetric key pairs to authenticate users and devices within a network. When someone wants to use a network that is utilizing a PKI Infrastructure, they must request certificate from a Certificate Authority (CA) within the PKI. The request, also known as a Certificate Signing Request or CSR, which contains information about the requestor, as well as the public key of an asymmetric key pair they are the owner of. The information within the request is verified by the CA and, if it is valid, a certificate is issued to the requestor containing their public key along with a number of other components. Now, when a connection is made between that certificate holder and a server or other user, they can look at their digital certificate’s Chain of Trust to verify that the certificate is still valid. A certificate’s Chain of Trust is a path from the current certificate leading all the way back to the Root CA’s certificate. Each certificate in this chain is checked itself for validity, to ensure the certificate holder is not using an expired or revoked certificate. If this is the case for every certificate in the chain, then the certificate is validated and a connection can occur. For a better understanding of Public Key Infrastructures, I will go more in-depth into how a PKI is built and what makes it up.
Public Key Infrastructures always contain a Root CA. This is the core of trust in the PKI Infrastructure, issuing certificates to the Issuing CAs to ensure they, in turn, can issue certificates to requestors. The compromise of a Root CA invalidates every single certificate issued within that PKI Infrastructure, and so the Root CA is kept offline at all times. Issuing CAs are also involved in every type of PKI Infrastructure, since the Root CA is offline and cannot issue certificates to users. Issuing CAs, of which there can be any number, do as their name suggest: issue certificates. These CAs are the link from the issued certificate to the Root CA in their Chain of Trust. The compromise of an Issuing CA is not as devastating as the compromise of the Root CA, but it still has harsh consequences. When an Issuing CA is compromised, all of its issued certificates are also compromised. This means a large section of the PKI is now unusable. Similar to an Issuing CA is an Intermediate CA. The Intermediate CA is not used in most Public Key Infrastructures, it is only used in a three tier PKI Infrastructure. These add another layer to the Certification Path, or Chain of Trust. They tend to issue certificates for Issuing CAs, and serve as the link from a Root CA to an Issuing CA. Along with the different CAs, a PKI also includes Certificate Revocation Lists. Certificate Revocation Lists, or CRLs, are lists containing the information of certificates that have been revoked for one reason or another. This should be sufficient to answer the question of: How does a PKI work? Now, let us take a look at the most common encryption protocols and what they do.
Tailored Encryption Services
We assess, strategize & implement encryption strategies and solutions.
TLS/SSL: TLS/SSL is the most common encryption protocol, which is used every day on the Internet. TLS/SSL stands for Transport Layer Security/ Secure Sockets Layer, which is an encryption protocol that ensures communications between a client and server are kept secure. When your web browser connects to a website, if the connection is secured with TLS/SSL, then a padlock and the word “https” is shown in the search bar. TLS/SSL does not do the encryption itself, it instead uses a variety of encryption algorithms, like RSA or AES, to encrypt the communications. This is why SSL/TLS is considered an encryption protocol. Using TLS/SSL to encrypt communications is very common, as a number of different encryption algorithms are used with it. TLS/SSL can be used for user authentication, traffic encryption, and showing that data has not been modified in transit. The way TLS/SSL works is that an asymmetric key pair is utilized in a “Handshake” process to secure the initial connection between the client and server. That “Handshake” is where the specific protocol version to be used is selected, the TLS/SSL certificates of both server and client are verified, the algorithm for the “Record” process is selected, and the shared key is generated with symmetric encryption. The shared key is then used in the next step of the communication, the “Record” protocol. In this, packets shared between the two users are encrypted with the shared key to ensure the safest form of communications.
IPsec: IPsec, or Internet Protocol Security, is an encryption protocol which utilizes encryption algorithms like 3DES, AES, SHA, and CBC to encrypt data in applications, routing, or Virtual Private Networks, most commonly. Using its two modes, tunneling and transport mode, IPsec protects data moving from one location to another. Transport mode encrypts only the payload of the message, not the header. As some information can be gained from the header, this is only used for simple data transfer situations such as connecting to a server or workstation. Tunneling mode, on the other hand encrypts and authenticates both the payload and header. Tunneling mode is most often used with Virtual Private Networks, or VPNs. Though using VPNs with IPsec is generally faster, as IPsec is quicker to setup a connection, other parts of TLS/SSL make it the preferred method of data-in-transit encryption and authentication.
SSH: Secure Shell, also known as SSH, is another type of encryption protocol. The way SSH works is similar to a VPN. By creating an encrypted tunnel, users can use SSH to securely and remotely connect to computers, transfer files, port forward, and more. SSH works on 3 different levels: the transport level, the user authentication level, and the connection level. The transport level is the layer which securely connects two parties, securely encrypts any data sent between them, authenticates the users to each other, and ensures that the data shared between the users is not changed in any way in-transit. To exchange keys, the two parties in the SSH connection are connected and the keys of the client and server are traded via the Diffie-Hellman key exchange. During this phase of SSH, the symmetric algorithm, asymmetric algorithm, message authentication algorithm, and the hash algorithm to be used in the transfer of data and messages are chosen. In the authentication level, the client authenticates its identity via a supported authentication method specified by the server from the transport layer. The authentication method in question can be anything, from a password to a digital signature. The connection level handles all of the connections created between the server and client. A different channel is opened for every communication between the server and client. An example of this is if multiple sessions are created to the same server, then for each session a different communication channel is opened. Either the client or the server can open a new communication channel, as long as the parameters for the channel are available for use by both the client and server.
PGP: OpenPGP, also referred to as PGP, is an encryption protocol which allows users to encrypt their messages and digitally sign them, giving the message sender a stronger method of both authentication and data integrity protection. Mainly, PGP is used for the purpose of protecting sensitive email information. PGP was developed in the 90’s in an attempt to make it a globally used and interoperable system. PGP is free to use and integrate into a number of different email clients. Different encryption algorithms are available for use with PGP, such as RSA and DSA for asymmetric encryption, AES, 3DES, and Twofish for symmetric encryption, and SHA for hashing. Different vulnerabilities have been found for PGP throughout the years, but these flaws have always been addressed with updates or recommendations.
S/MIME: Secure/Multipurpose Internet Mail Extensions, or S/MIME, is a competitor to OpenPGP as an email based encryption protocol. Just like PGP, S/MIME allows users to encrypt and sign email data to further protect it from attackers. The difference with PGP and S/MIME is that S/MIME uses different encryption algorithms to secure data.
Kerberos: The encryption protocol Kerberos works by acting as a single sign-on authentication protocol. The protocol authenticates its users against a central authentication and key distribution server. Users of the protocol are given “tickets”, once authenticated, allowing them to use the different services within the network. When a client with a “ticket” reaches out to a server, that server verifies the “ticket and grants the user access. Kerberos’ main use is on Local Area Networks (LANs) and for establishing shared secrets. Kerberos is a well-known and often used encryption protocol, but both the client and server must include code to utilize Kerberos, which turns some organizations away from its usage.
Though many other encryption protocols exist, these are the most well-known and most widely used encryption protocols. Many of the protocols are may seem the same, as they fulfill the same purpose, but they use many different encryption algorithms, so it is vital to research the algorithms in use when choosing the correct encryption protocol for your organization.
Is it Safe to use Encryption Protocols?
You may note that throughout our discussion of different types of encryption protocols that some of the protocols had vulnerabilities found within them. This begs the question: are these encryption protocols safe to use? The answer is yes. Though oftentimes vulnerabilities are found within encryption protocols, as soon as they are detected security patches, upgrades, or requirements are put in place to protect users from those who would exploit such gaps in security. Even such things that seem like they would never be vulnerable to attacks, like Operating Systems, also have to patch or update to fix vulnerabilities, so as you can see nothing is one hundred percent secure on the Internet. Encryption protocols and encryption algorithms in general are also backed by the National Institute of Science and Technology. The National Institute of Science and Technology (NIST) is an institution designed to provide recommendations for online security for government organizations. The NIST also approves of the newest encryption algorithms and protocols through their recommendations. What I mean by this is that if an encryption protocol or encryption algorithm is recommended for use by the NIST for government organizations, then you know that it has the highest level of security and thus can be used by anyone.
Tailored Encryption Services
We assess, strategize & implement encryption strategies and solutions.
Why should your organization use encryption protocols?
Even for all of the vulnerabilities that can be found in encryption protocols, they are still one of the most secure tools on the Internet for securing sensitive data. Rather than relying on a single method to secure data, encryption protocols like PGP or Kerberos utilize asymmetric encryption, symmetric encryption, and digital signatures to protect the security, integrity, and authenticity of data and the data handlers. These encryption protocols are used in almost every Internet interaction to keep data safe. From email, remote desktop connections, Wi-fi network connections, and more, you use encryption protocols every day. Even governments, who face much more serious threats than the average person, use encryption protocols to keep communications and connections secure. Along with this, as threats grow throughout time, more advanced methods of data protection are developed, including more secure encryption algorithms. These encryption algorithms and security methods are implemented into existing and new encryption protocols to ensure the user of these protocols have the best possible protections in place. Another thing to note is that as newer encryption protocols are created, these protocols will likely do different tasks. Next year’s newest encryption protocols could make the security of databases, Cloud systems, or even self-driving cars much safer than they are today. The updating of existing encryption protocols with newly created encryption algorithms ensures that if an encryption algorithm has been found to be vulnerable, there is another option for users to implement.
Conclusion
In our article, we addressed several questions about encryption protocols, including how does a PKI work, what does an encryption protocol do, are encryption protocols safe to use, and many more. As is readily obvious, encryption protocols permeate every part of the Internet, from emails to website connections. These are vital pieces to a secure Internet for everyone, even big companies and governments. Encryption protocols can be made up of encryption algorithms, digital signing algorithms, hashing algorithms, digital signing code, and more. Encryption protocols are also a big part of Public Key Infrastructures. PKIs need to utilize encryption protocols to ensure data, like an asymmetric digital certificate key, is secure. There are a number of encryption protocols to choose from as well, which all tend to have their own purpose and method of accomplishing that purpose. Protocols like S/MIME or PGP focus on the protection of email messages, while other protocols, like SSH, work to securely connect users to remote computers or outside servers. It is worth noting that encryption protocols can contain security gaps that go unnoticed, but as soon as these gaps are detected, the encryption protocol creators release a fix or configuration option which fixes that vulnerability. Encryption protocols are one of the best tools an organization or user can implement to keep communications and data, both in-transit and at-rest, secure.
AWS provides many services, including database, storage, networking, and many more. AWS Key Management Service (KMS) is one of the most popular services offered by AWS. It is a beneficial service that helps in dealing with sensitive data and managing cryptographic keys.
What is AWS Key Management Service (KMS)?
AWS KMS is a service that can be integrated with various other AWS services. It can be used to create, store, and control cryptographic keys to encrypt data in your application. With the help of the AWS KMS service, a user can control access to the encrypted data. AWS KMS provides almost 100 percent of the durability of cryptographic keys.
Keys are stored in multiple Availability Zones (AZ’s) that ensure the high availability of keys. AWS KMS is integrated with CloudTrail, which allows users to audit the purpose for which the key is used, when it was used, and by whom the key was used.
Some Important Points about AWS KMS
The keys generated in a region cannot be sent outside of that region.
KMS uses an AWS Hardware Security Module (HSM), which is FIPS 140-2 compliant, to store keys.
Users can encrypt data stored in Amazon EBS, Amazon S3, and Amazon Redshift as AWS KMS is integrated with these services.
How does AWS KMS work?
To learn the inner workings of AWS KMS, we must first learn the terms and concepts used in AWS KMS.
There are two types of keys in AWS KMS:
Customer Master Keys
Data Keys
Customer Master Keys (CMKs)
A CMK is a logical representation of the master key. The CMK contains metadata like key ID, Creation Date, key state, and description of the key and the key material used for encryption and decryption.
By default, Key material is created by AWS KMS. No one can modify, manage, view, or extract the key material. Key material cannot be deleted as well. If a user wants to delete key material, then the user has to delete the CMK. Users can import their key material into a CMK or create key material for CMKs in an AWS CloudHSM Cluster.
AWS CMK provides both Symmetric and Asymmetric CMKs. Symmetric CMKs use a 256-bit key for encryption and decryption. In contrast, asymmetric CMKs use RSA key pairs for encryption and decryption or Signing and verification. An asymmetrically created key, called an ECC key, can only be used for signing and verification. CMKs are created in AWS KMS. CMKs can be managed by the AWS Management Console or the AWS KMS API. All symmetric keys and private asymmetric keys never leave the AWS KMS unencrypted. To perform any cryptographic operation using CMKs, the user must use the AWS KMS API.
There are three types of CMKs supported by AWS KMS:
Customer Managed CMK: Customer Managed CMKs are those CMKs in the user account that the user can create, own, and manage. Users have complete control over Customer Managed Keys, allowing them to establish and manage their key policies, IAM policies, grants, rotation of cryptographic material, etc.
AWS Managed CMK: The CMKs in the user account created and managed by AWS on behalf of the user is known as AWS Managed CMKs. AWS managed CMKs cannot be directly used in cryptographic operations. Users cannot manage, rotate or change the key policies of AWS managed CMKs. However, users can view the key policies and audit their use in AWS CloudTrail (integrated with AWS KMS) in their AWS account.
AWS Owned CMK: The Collection of CMKs owned and managed by AWS for use in multiple clouds is known as an AWS Owned CMK. AWS owned CMKs protect the resources in the user account. These CMKs are not found in the user’s account. With AWS owned CMKs, users do not need to create or manage CMKs. Users cannot view, use, track, or audit them.
Data Keys
The keys used to encrypt data and other data encryption keys are Data Keys. Data keys are used to encrypt a large amount of data as customer master keys (CMKs) cannot encrypt data larger than 4KB. Data keys are used and managed outside of AWS KMS. Data keys are not stored, managed, or tracked by AWS KMS. AWS KMS does not perform any cryptographic operation with data keys, however, users can generate, encrypt, and decrypt data keys with the help of AWS KMS customer master keys (CMKs). Data keys can encrypt and decrypt data in other AWS services like Amazon S3, EBS, EC2, etc.
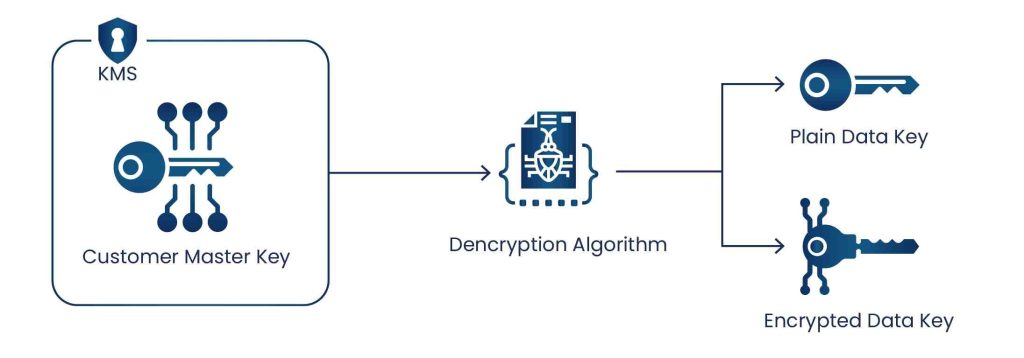
Create data key AWS KMS uses user-specified CMKs to generate a data key. A data key can be generated by calling the GenerateDataKey operation. This operation returns two copies of the data key, one in plaintext and the other one encrypted under the CMK. Another operation, GenerateDataKeyWithoutPlaintext, can also be used, which returns a single copy of the data key that is encrypted under CMK. Before using an encrypted data key, ask AWS KMS to decrypt it.
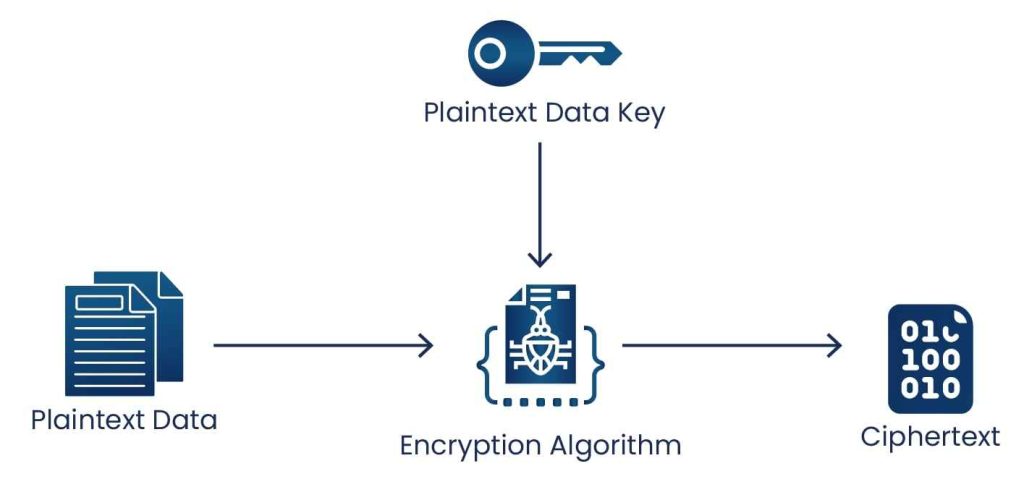
Encrypting data with a data key As mentioned earlier, AWS KMS does not use data keys to perform any cryptographic operation. To encrypt data with a data key, use a plaintext data key, encrypt data outside of AWS KMS, and delete it from memory, then, store the encrypted data key.
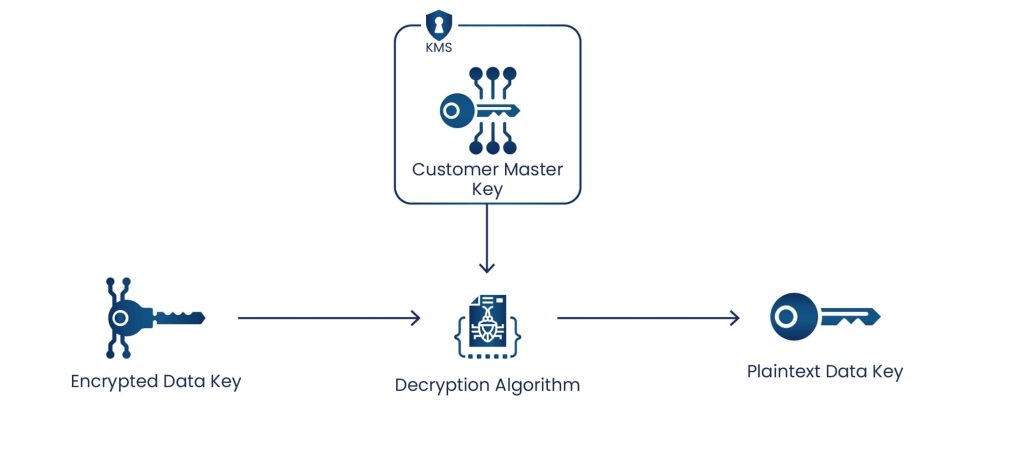
Decrypting data with a data key To decrypt data outside of AWS KMS with a data key, the Decrypt operation is used to decrypt the encrypted data key, which returns a plaintext copy of the data key. Now, Data outside of AWS KMS can be decrypted using a plaintext data key. The user must remove the plaintext data key from memory after using it. The following diagram show how the Decrypt operation decrypt the Encrypted Data Key:
Data Key Pair Users can create an asymmetric data key pair consisting of mathematically related private and public keys. Generally, these key pairs are used for client-side encryption and decryption or the signing and verification process outside of AWS KMS. The private key of each data key is protected by AWS KMS using user-specified symmetric CMKs, but users have to manage and use the data key pair outside the AWS KMS as it does not track, manage or use data key pairs to perform any cryptographic operations. Users can generate the following data key pairs in AWS KMS:
RSA key pair of 2048 bit, 3076 bit, and 4096 bits. Generally used for encryption and decryption.
Elliptical Curve key pair: ECC_NIST_P256, ECC_NIST_P384, ECC_NIST_P512, and ECC_SECG_P256K1. Generally used for Signing and verification.
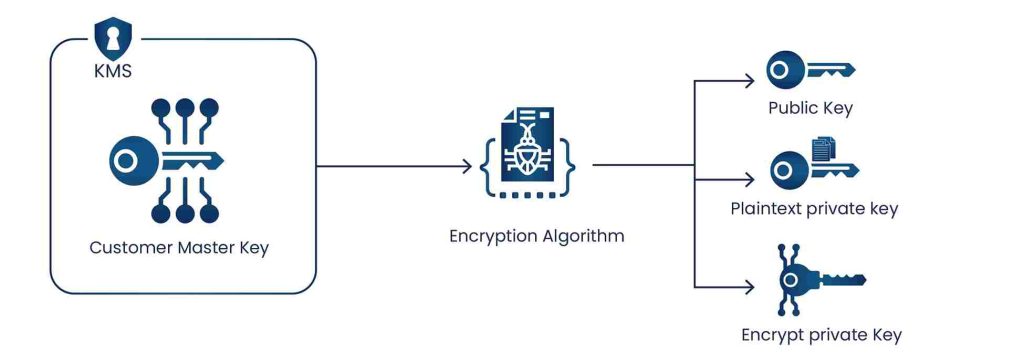
Creating a Data key Pair To generate a data key pair, the user needs to call the GenerateDataKeyPair or GenerateDataKeyPairWithoutPlaintext operation according to the requirement and specify a symmetric CMK that will encrypt the private key. GenerateDataKeyPair operations generate three keys: a plaintext public key, a plaintext private key, and an encrypted private key. In contrast, GenerateDataKeyPairWithoutPlaintext generates two keys: a plaintext public key and an encrypted private key.
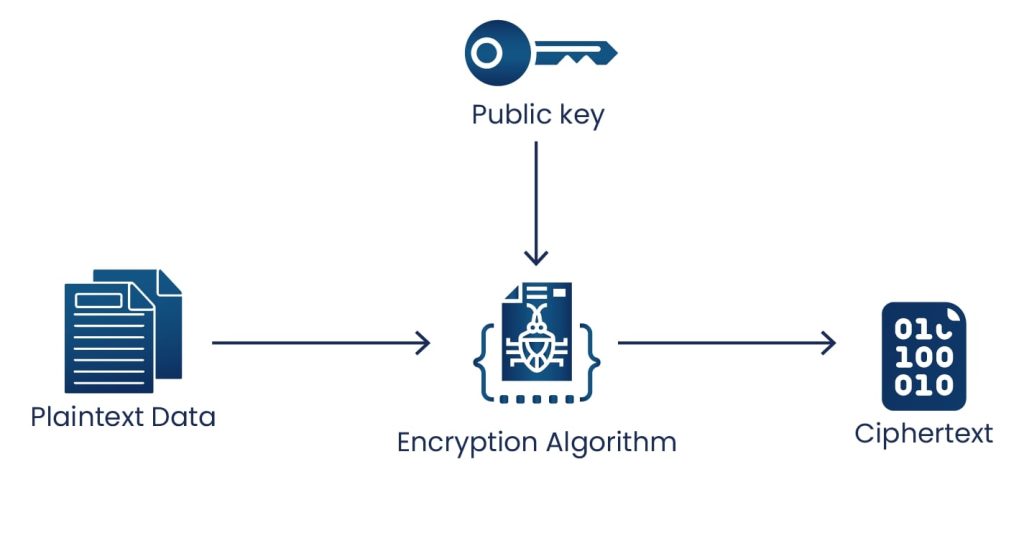
Encrypting data with a data key pair The public key of a data key pair is used to encrypt the data, and the private key of the same data key pair is used to decrypt the data.
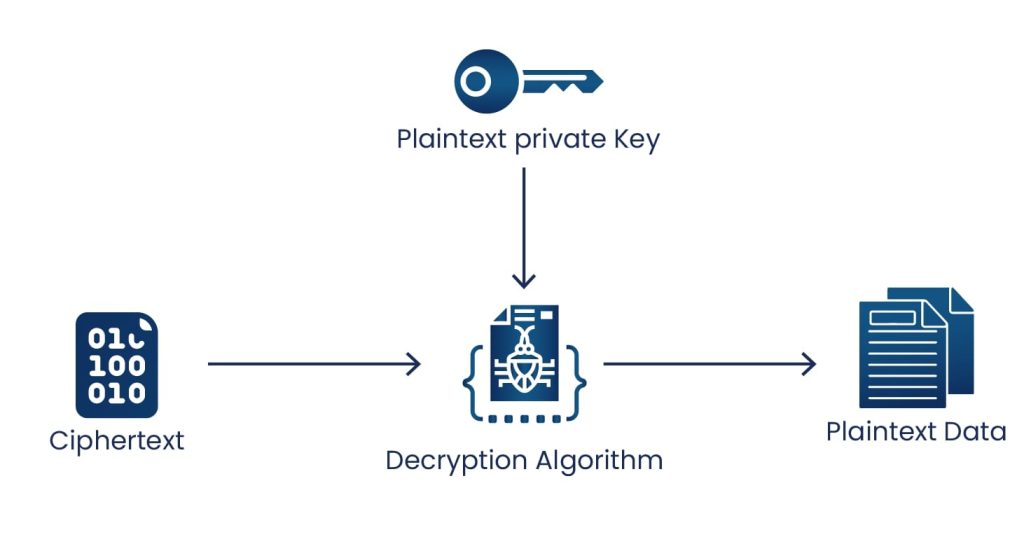
Decrypting data with a data key pair The plaintext private key of the same data key pair whose public key was used for encryption is used to decrypt the data. The Decrypt operation is used to decrypt the encrypted private key of a data key pair, and remove the plaintext private key from memory after using it.
Signing messages with a data key pair The plaintext private key of a data key pair is used to generate a cryptographic signature for a message, and anyone with the public key of the same data key pair can use it to verify the signature. If the private key is encrypted with the AWS CMK, the Decrypt operation is used, which returns the private key in plaintext format used for signing purposes. As always, the user should remove the plaintext private key from memory after use.
Verifying a message with a data key pair The public key of the data key pair is used for verification. The public key should belong to the same data key pair whose private key was used for Signing. Verification of the signature confirms that an authorized user signed the message and it has not been altered.
Aliases Users can give a friendly name to a CMK known as an Alias. For example, the CMK name is 9897aswd-34dw-1234-89hg-asdkal212012, the user can give it an alias of key-01. With the help of an alias, users can easily identify a CMK in AWS KMS operations.
Cryptographic Operations The AWS SDK, AWS Tools for PowerShell, or AWS Command Line Interface (AWS CLI) is required to perform any cryptographic operations with CMKs because CMKs remain within AWS KMS. Users cannot perform any cryptographic operation with CMKs in the AWS KMS console.
Below is a table which summarizes the AWS KMS cryptographic operations:
Operation
CMK Key Type
CMK Key Usage
Decrypt
Symmetric/Asymmetric
ENCRYPT_DECRYPT
Encrypt
Symmetric/Asymmetric
ENCRYPT_DECRYPT
GenerateDataKey
Symmetric
ENCRYPT_DECRYPT
GenerateDataKeyWithoutPlaintext
Symmetric
ENCRYPT_DECRYPT
GenerateDataKeyPair
Asymmetric
ENCRYPT_DECRYPT
GenerateDataKeyPairWithoutPlaintext
Asymmetric
ENCRYPT_DECRYPT
ReEncrypt
Symmetric/Asymmetric
ENCRYPT_DECRYPT
Sign
Asymmetric
SIGN_VERIFY
Verify
Asymmetric
SIGN_VERIFY
Note: GenerateDataKeyPair and GenerateDataKeyPairWithoutPlaintext operations generate asymmetric data key pair which symmetric CMKs protect it.
Envelope Encryption Users can protect their plaintext data by encrypting it with a key, but how do they protect the encryption key? This brings in the concept of Envelope encryption, where the plaintext data is encrypted with the data keys, and the data keys are encrypted with master key. AWS KMS is responsible for the security of the master key. Master keys are stored and managed by AWS KMS and never leave the HSM unencrypted. Benefits of Envelope Encryption:
Protecting data keys: The data keys are inherently protected by encrypting them with CMKs. So, the encrypted data keys can be safely stored with encrypted data.
Encrypting the data key with master key: Encrypting large data with data keys, again and again, can be a time-consuming process. So, instead of encrypting data repeatedly, the encryption key can be encrypted with a master key.
Combining the strength of multiple algorithms: Envelope Encryption enables you to use the strength of both Symmetric and Asymmetric algorithms.
Key Policy Users can define the permissions for CMK in a document called a key policy. Users can add, remove or change permissions at any time for Customer Managed Keys, but cannot edit the AWS Managed CMK as AWS manages it on behalf of the user.
Grant Grants are temporary permissions that users can create, use, and delete without changing key or IAM policies. Grants are also considered with IAM policies and key policies when users access a CMK.
Auditing CMK Usage AWK KMS is integrated with CloudTrail, which can be used to audit key usage. CloudTrail creates log files for AWS API calls and related events in the account. These log files contain all AWS API requests from AWS SDK, AWS Management Console, or AWS command-line tools. These log files can be used to find important information like when the CMK was used, which operation was requested, requester identity, and the source IP address.
Tailored Cloud Key Management Services
Get flexible and customizable consultation services that align with your cloud requirements.
A user should follow the following steps to create Customer Managed Symmetric CMK using AWS Management Console:
Sign in to the AWS management console and open the AWS KMS console.
You can change the AWS region from the upper-right corner of the page.
Choose customer manages keys from the navigation pane.
Choose create key.
In Key type, select the type of CMK, i.e., Symmetric.
Click on Next.
Create an alias for the CMK.
Type the description for the CMK. (Optional)
Click on Next.
Type a tag key and tag value. (Optional)
Click on Next.
Select IAM users and roles that can administer the CMK.
Clear Allow key administrators to delete this key check box if you do not want to allow IAM users and roles to delete this key. (Optional)
Click on Next.
Select IAM users and roles that can use the CMK to perform cryptographic operations.
In the Other AWS accounts section, click on Add another AWS account and type AWS account identification number to allow them to use this CMK for cryptographic operations. (Optional)
Click on Next.
Review the key configuration that you have done.
Click on Finish to create the CMK.
Creating Customer Managed Asymmetric CMKs
A user should follow the following steps to create Customer Managed Symmetric CMK using AWS Management Console:
Sign in to the AWS management console and open the AWS KMS console.
You can change the AWS region from the upper-right corner of the page.
Choose customer manages keys from the navigation pane.
Choose create key.
In Key type, select the type of CMK, i.e., Asymmetric.
In Key usage, select the purpose for which key is created, i.e., Encrypt and decrypt or Sign and verify.
Select the specification of your asymmetric CMK.
Click on Next.
Create an alias for the CMK.
Type the description for the CMK. (Optional)
Type a tag key and tag value. (Optional)
Click on Next.
Select IAM users and roles that can administer the CMK.
Clear Allow key administrators to delete this key check box if you do not want to allow IAM users and roles to delete this key. (Optional)
Click on Next.
Select IAM users and roles that can use the CMK to perform cryptographic operations.
In the Other AWS accounts section, click on Add another AWS account and type AWS account identification number to allow them to use this CMK for cryptographic operations. (Optional)
Click on Next.
Review the key configuration that you have done.
Click on Finish to create the CMK.
Benefits of AWS KMS
Fully managed: AWS KMS provides full control access to encrypted data by enforcing the permissions defined by the user to use keys.
Centralized key management: AWS KMS provides a single control point to manage and define key policies. Users can create, import, manage, delete, or rotate keys from the AWS key management console, or use AWS CLI or SDK.
Digitally Sign data: The user can generate an asymmetric key in AWS KMS and can perform digital signing operations to maintain the integrity of the data.
Secure: In AWS KMS, keys are generated and protected in Hardware security modules (HSMs) validated under FIPS 140-2. For security, keys are only used inside HSMs and can never be shared outside the AWS region in which they were created.
Built-in auditing: AWS KMS is integrated with CloudTrail to help in monitoring key usage to meet regulatory and compliance needs.
Below is the table which summarizes the AWS Key Management Service Crypto Properties:
AWS CloudHSM is an AWS hardware security module that is customer-owned and managed. AWS CloudHSM acts as a single-tenant on hardware, restricting it from being shared with other customers and applications. Organizations can utilize AWS CloudHSM for those wanting to use HSMs to administer and manage encryption keys, but not have to worry about managing HSM Hardware in a datacenter. AWS CloudHSM allows FIPS 140-2 Level 3 overall validated single-tenant HSM clusters in your Amazon Virtual Private Cloud (VPC) to store and use your keys. Complete control is given to users whose keys are used through an authentication mechanism separate from AWS.
AWS CloudHSM supports multiple use cases, including the following: management of Public/Private key pairs for Public Key Infrastructure (PKI), Code & Document Signing, or storing private keys for various services such as database, storage, and web applications, storing keys for DRM solution. AWS CloudHSM will allow your organization to meet compliances of key management requirements with the use of Hardware Security Modules supervised by AWS with the ability to incorporate multiple platforms to store keys.
Below is the table which summarizes the AWS Cloud HSM Crypto Properties
Accessible in multiple regions (Keys outside the region in which created cant be used)
High Availability
AWS Managed Service
Audit Capability
– CloudTrail – Cloud Watch
Custom Key Store
The Custom Key store feature of AWS KMS provides a way of integrating AWS CloudHSM clusters easily with AWS KMS.
Users can configure their CloudHSM cluster to store keys rather than the default KMS key store.
Users can also generate key material within the CloudHSM cluster. The master keys generated in the customer key store never leave the AWS Hardware Security Module in the CloudHSM Cluster in plaintext form, and all the cryptographic operations required by KMS are performed within the HSMs.
Conclusion
AWS CloudHSM provides single-tenant key storage giving organizations FIPS 140-2 Level 3 compliance. CloudHSM allows full control of your keys, including Symmetric (AES), Asymmetric (RSA), SHA-256, SHA 512, Hash-Based, or Digital Signatures (RSA). On the other hand, AWS Key Management Service is multi-tenant key storage owned and managed by AWS. AWS KMS allows Customer Master Keys for symmetric key encryption (AES-256-XTS) and asymmetric keys (RSA or elliptic curve (ECC)). Suppose your organization’s key management strategy for encryption will be running a singular cloud service provider for now and for the foreseeable future. In that case, AWS KMS will provide the simplest environment to maintain the keys. However, suppose you are planning to take advantage of multiple cloud providers but do not wish to maintain the HSMs. In that case, AWS CloudHSM may be the solution for your organization that allows separating encryption keys from the data of the other platforms that are being utilized.
Asymmetric and symmetric encryptions are the types of encryptions used in cryptography. There is only one key involved in symmetric encryption, which is used for both encryption and decryption. The key has to be shared among the parties involved who wish to encrypt and decrypt data. In comparison, asymmetric encryption uses two separate keys which are related to each other mathematically. The keys are called Private keys and public keys. Generally, a certificate is associated with a public key, which holds the information about the public key owner.
The certificate contains information such as name, organization name, algorithms used, etc. Even though symmetric and asymmetric encryption seems similar, symmetric encryption is comparably faster than asymmetric encryption; thus, performance-wise, asymmetric encryption is slower, which is why symmetric encryption is often used in conjunction with asymmetric encryption. We will explore more about this on the use cases discussed below.
Symmetric Encryption
As discussed above, symmetric encryption uses the same key for encryption and decryption, so the sender would somehow send the key to the receiver to decrypt the encrypted data. The key involved has to be protected and transferred securely. If the key is lost, then the data cannot be decrypted, and if the key gets compromised, that will compromise the encryption.
Thus, symmetric keys are transferred among parties using asymmetric encryption, ensuring that the symmetric key remains encrypted. Two different keys are now involved in encrypting and decrypting the data.
Symmetric encryption is comparably much faster than asymmetric encryption, which is why it is still used massively today.
Asymmetric Encryption
Asymmetric encryption uses two separate keys which are mathematically involved with each other. The first key is called the private key. The private key is the one that is heavily protected. Often this key remains in an HSM or an air-gapped computer to ensure the protection of the private key. The public key is derived from the private key and can be distributed. A certificate is often created with a public key containing information about the key’s owner and a few details about the key itself.
The key pair relies on prime numbers of extended length. The public and private keys are computed simultaneously, using the same mathematical operation, namely trapdoor functions. The most characteristic of trapdoor functions is that they’re simple to calculate in one direction, nevertheless troublesome calculating in the reverse order. Using a private key, we can find the public key, but the private key cannot be obtained using the public key.
Even though asymmetric encryption provides more protection to the keys, they are comparatively slower than symmetric encryption. For this reason, asymmetric encryption is often used to exchange the secret key, which can be used to establish symmetric encryption for faster data transfer and make encryption and decryption of the data faster.
Use Cases
Symmetric Encryption Symmetric Encryption uses one key for encryption and decryption, which is why it is best used to encrypt and decrypt local data. Some of the use cases involving symmetric encryption can be:
Data at rest: Data at rest refers to data stored in a physical drive and is not transferred among devices. This data can be stored in hard drives, SSD, flash drives, etc. Data at rest often involves data that can be valuable to attackers as it usually contains customer information, employee information, trade secrets, Intellectual Properties, etc. To be able to protect this data adequately, organizations use symmetric encryption. One effective way to encrypt all the data in a physical drive is to encrypt the drive itself. This is called whole disk or full disk encryption, which has fewer benefits than partial or folder encryption. Many files (such as Word files) create a temporary file while it is opened. This temporary file can remain unencrypted. Many Linux distribution does provide full disk encryption while installing the operating system, and Microsoft delivers BitLocker Drive Encryption for Windows. Full drive encryption does leave the boot volume unencrypted for the operating system to boot, but every other volume, including swap space and temporary files, remains encrypted.
Banking and Payment Industry: The banking and Payment Industry is one of the most secure industries, and there are many compliances involved in keeping it safe. Nevertheless, it is also one of the busiest industries, which requires them to be fast. Symmetric encryption provides fast encryption and decryption of a large amount of data, which includes the transaction. It can often contain Personal Identifiable Information (PII), which needs to be protected for being compliant with PCI DSS and preventing Identity Theft. They also need to ensure the identity of the user and the authenticity of the transactions fast. This is one of the reasons why the banking industry uses symmetric encryption.
Asymmetric Encryption Asymmetric Encryption is slower than symmetric encryption, so it is used for small amounts of data, such as exchanging secret keys or providing digital identities.
As organizations move to the digital age, digital signatures become crucial to identifying authentic data and ensuring someone’s identity. Digital signatures provide that the data involved has not been modified and if the data (which can include PDF, applications, etc.) is authentic. The recipient of signed data will use a digital signature to demonstrate to a 3rd party that the claimed individual generated the signature. This is often called non-repudiation since the individual cannot simply repudiate the signature at a later time.
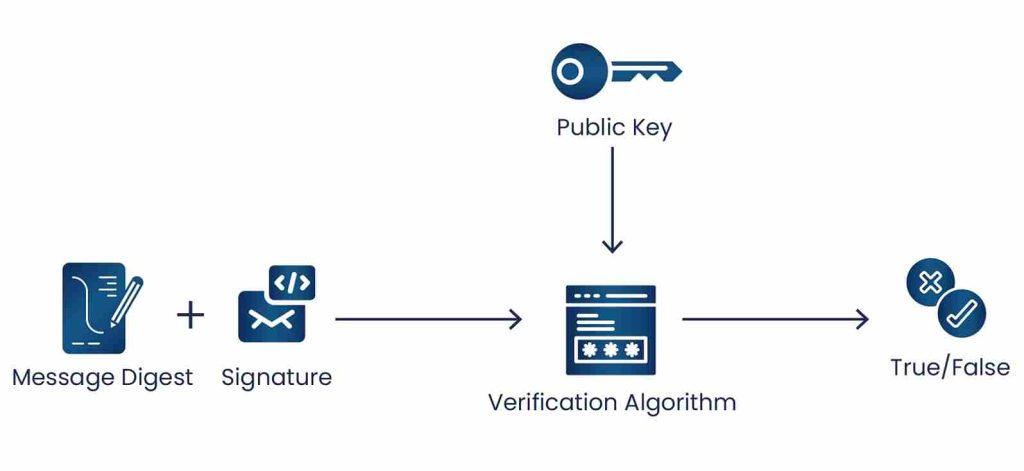
The following steps explain how a digital signature is used to exchange information between a sender and a receiver:
First, the data that would be transferred is hashed using some hashing algorithms such as SHA-256. Hashing is a one-way function and produces a unique value for unique input. The original data cannot be obtained using the hash value. This ensures data integrity, as if the data is modified, the corresponding hash value will also change.
The hash is then encrypted using the sender’s private key. This creates a digital signature.
The digital signature would now be attached and sent to the sender.
After receiving the data and the digital signature, the signature is decrypted using the sender’s public key, which provides the hash value generated on the first step.
The receiver then hashes the obtained data.
If the hash obtained on step 5 is equal to the hash receiver got on step 4, it ensured data integrity. If, however, the hashes do not match, then the data has been modified.
Digital signatures are meant to be used in emails, transferring data, distributing software, and other applications, requiring data integrity and ensuring the authenticity of the data origin.
Tailored Encryption Services
We assess, strategize & implement encryption strategies and solutions.
Asymmetric and symmetric encryption is often used in combination with each other to maintain a balance of performance, secure transfer, identification, etc. A single one may not be able to achieve alone.
Use case 1: Messaging Applications
Many messaging applications such as WhatsApp, telegram, Signal provide end-to-end encryption to provide confidentiality of the users involved and authenticate users to communicate with each other securely.
In end-to-end encryption, the messages and calls are encrypted so anyone apart from the users would not obtain plaintext information. Only the data is encrypted, but the headers, trailers, and routing information of the messages remain unencrypted.
One of the best features is that even if the key is somehow compromised from the user’s physical device, that key cannot be used to decrypt any previously encrypted text.
To be able to achieve this, both symmetric and asymmetric encryptions are used. Asymmetric encryption is used to initiate the conversation among the users, which involves exchanging secret keys for symmetric encryption. After the communication is established and a secret key is exchanged, symmetric encryption is used for the whole duration of the communication.
First, when the application is installed on the user’s end, the key pair is created. The user’s public key is registered and stored in the application server, but the private key remains in the user’s device. The user who wants to initiate the conversation obtains the receiver’s public key from the application server. Using the public key, the sender sends an encrypted message to the receiver. The encrypted message contains parameters to establish a symmetric session among the parties involved.
The receiver would use their private key to decrypt the message and develop symmetric encryption between the sender and the receiver. Once the session has been established, clients exchange messages protected with a Message Key using AES256 in CBC mode for encryption and HMAC-SHA256 for authentication. The encrypted session would be recreated only when the application is re-installed, or the device is changed.
Use case 2: HTTPS
HTTPS (Hypertext Transfer Protocol Secure) is a secure version of the HTTP protocol that uses the SSL/TLS protocol for encryption and authentication. HTTPS is specified by RFC 2818 (May 2000) and uses port 443 by default instead of HTTP’s port 80.
The HTTPS protocol makes it possible for website users to transmit sensitive data such as credit card numbers, banking information, and login credentials securely over the internet. For this reason, HTTPS is essential for securing online activities such as shopping, banking, and remote work. HTTPS is now the standard protocol for all websites, whether they exchange sensitive data with users.
An HTTPS connection between a client and a server uses both symmetric and asymmetric encryption. Like the previous one, asymmetric encryption is first used to establish communication and exchange secrets, and then symmetric encryption is used for the rest of the communication. The key used for symmetric encryption is called session keys. Session keys are randomly generated when a session is created and are used for that particular session only. The steps involved in HTTPS are:
When the client tried to connect to the server, the server first sends a TLS certificate. The respective CA would verify the certificate to ensure the authenticity of the certificate and the server involved.
The certificate also contains cipher suits and the maximum TLS version supported.
After the certificate is verified and the algorithms and TLS versions are set to be the maximum among the client and the server, the client generates a session key. The session key is encrypted using the server’s public key and is sent to the server.
The server decrypts the session key using its private key.
The session key is then used for symmetric encryption, and data is exchanged among the server and the client using the session key.
The session continues with only symmetric encryption.
Conclusion
Symmetric encryption is indeed one of the fastest encryption techniques, but the secret key needs to be exchanged securely to be effective. Asymmetric encryption is thus used to exchange the key involved for symmetric encryption. In both use cases, asymmetric encryption is used briefly to exchange parameters and establish symmetric encryption used for the rest of the communication. Being slow and resource exhaustive, asymmetric encryption is only used to cover the shortcomings of symmetric encryption. Thus, both of them are used together to achieve ideal secure communication, maintain privacy, achieve authenticity, data integrity, and proper authentication.
In today’s world, protecting your data is the most critical job at hand for any security expert. Once the data is protected with the help of some data protection tool and passphrases or passwords, then the next challenge is how to protect the passphrases or passwords or secrets itself. That’s when you need a software or hardware tool which can help you manage the secrets effectively and efficiently. AWS Secrets Manager is one such tool that can manage, retrieve, and rotate the passwords, database credentials, API keys, and other secrets throughout their lifecycle. It provides the central credential management with security at its best, resulting in avoidance of hard coding of credentials in the code.
Today, we will discuss the AWS Secrets Manager and its role in credential management facilitating some of the critical security use cases.
Characteristics of AWS Secrets Manager
AWS Secrets Manager provides various characteristics with respect to credentials management, such as:
Integration with AWS KMS:AWS Secrets Manager is fully integrated with AWS KMS service and encrypts secrets as data-at-rest encryption with the Customer managed KMS keys. While retrieving the secrets, it decrypts the secrets using the same CMK KMS keys used earlier for encryption and transmits the secrets to your local environment securely.
Secret Rotation: AWS Secrets Manager enables you to meet security and compliance requirements as per your organization’s goal. It provides you the secret rotation functionality on-demand or on a scheduled basis through the AWS management console, AWS SDK, or AWS CLI.
Integrating with AWS Database services: AWS Secrets Manager supports native AWS database services such as Amazon RDS, Amazon DocumentDB, and Amazon Redshift. It also provides you the capability to rotate other types of secrets such as API Keys, OAuth tokens, and other credentials with the help of customized lambda functions.
Contains multiple versions of secrets: AWS Secrets Manager can contain multiple versions of secrets with the help of staging labels attached with the version while rotating the secrets. Each secrets’ version contains a copy of the encrypted secret value.
Manage access with fine-grained policies: AWS Secrets Manager provides you flexible access management using IAM policies and resource-based policies. For e.g., you can retrieve secrets from your custom application running on EC2 to connect to a specific database instance (on-prem or cloud).
Secure and audit secrets centrally: AWS Secrets Manager is fully integrated with AWS CloudTrail service for logging and audit purposes. For e.g., AWS CloudTrail will show the API calls related to creating the secret, retrieving the secret, deleting the secret, etc.
Tailored Cloud Key Management Services
Get flexible and customizable consultation services that align with your cloud requirements.
We have discussed some of the characteristics of the Secrets Manager. Now, below are the key points to be kept in mind while working with Secrets Manager:
You can manage secrets for databases, resources in On-prem & AWS cloud, SaaS applications, third-party API keys, and SSH keys, etc.
AWS Secrets Manager provides compliance with all the major industry standards such as HIPAA, PCI-DSS, ISO, FedRAMP, SOC, etc.
Secrets Manager doesn’t store the secrets in plaintext in persistent storage.
Since the Secrets Manager provides the secrets over the secure channel, it doesn’t allow any request from any host in an unsecure fashion.
Secrets Manager supports the AWS tags feature, so you can implement tag-based access control on secrets managed by the secrets manager.
To keep the traffic secured and without passing through the open internet, you can configure a private endpoint within your VPC to allow communication between your VPC and Secrets Manager.
Secrets Manager doesn’t delete the secrets immediately; rather, it schedules the deletion for a minimum period of 7 days. Within those 7 days, you may recover the secrets depending upon your requirements and post the scheduled period; the secrets are deleted permanently. However, through the AWS CLI, you may delete any secrets on an immediate basis.
The AWS Secrets Manager offers a cost-effective pricing model where it charges $0.40 per secret per month or $0.05 per 10K API calls.
Use cases for AWS Secrets Manager
Secrets Manager avoids the need for hard-coding the credentials or sensitive information in your application code. It serves the purpose of having an API call to the secrets manager to retrieve the secret programmatically. Having this mechanism in place restricts anyone from compromising sensitive information or credentials as secret information doesn’t exist in the plaintext in the code.
Secrets Manager provides centralized credential management, which reduces the operational burden resulting in the active rotation of credentials at regular intervals to improve the security posture of the organization.
Secret management plays a critical role in data protection for any organization in any environment (On-prem or Cloud). AWS Secrets Manager provides a rich feature set when it comes to secret management solutions. It supports a wide variety of secrets such as database credentials, credentials for On-prem resources, SaaS application credentials, API keys, and SSH keys, etc. In today’s security world, there are a number of secret management solutions available; however, considering the fact that AWS Secrets Manager works seamlessly in the AWS environment, it also provides great compatibility with other environments (On-prem) as well.
WPA2 stands for Wireless Fidelity Protected Access 2 – Pre-Shared Key. It allows home users or small offices to secure their network without using an enterprise authentication server.
How WPA2-PSK works?
WPA2-PSK requires a router with a passphrase, with a length between 8 to 63 characters, to encrypt the data in the network. It uses a technology named TKIP, i.e., Temporal Key Integrity Protocol, that requires network SSID and the passphrase to generate unique encryption keys for each wireless client.
WPA2-PSK (AES) is more secure than WPA2-PSK (TKIP), but WPA2-PSK (TKIP) can be used with older devices that are not WPA2-PSK (AES) enabled devices.
When a user connects to the router, the user provides a password to authenticate their identity and, as long as the password matches, the user is connected to WLAN.
With WPA2-PSK, user can secure their data, transmitted through the wireless channel between a router and other network devices. It is the latest generation of Wi-Fi security where the key is shared between connected devices. WPA2-PSK is also known as WPA2 Personal.
Is WPA2-PSK vulnerable?
WPA2-PSK is designed for small offices and home networks to allow users to trust the network they are connected to. WPA2-PSK is secure but shares a password to all the users connected to the network, leading to snoop on the network by the attacker.
WPA2-PSK is also found in airports, public hotspots, or universities as it is easy to implement and requires only one password. But if your WPA2-PSK gets compromised, an attacker can easily get access to your network and is capable of doing the following malicious activities:
Switch Spoofing
Spanning Tree Protocol (STP) Attacks
Dynamic Host Configuration (DHCP) Spoofing
Media Access Control (MAC) Spoofing
Double Tagging
Address Resolution Protocol (ARP) Spoofing.
Using a single password for network access requires good faith to keep the password secret on every user’s device. The reason for this is that if one user gets compromised, then all users can be hacked.
Brute force attacks like dictionary attacks can be performed, and an attacker can decrypt all the device traffic if it obtains the Pre-Shared Key and capture the key handshake while a user joins the network.
Alternatives to WPA2-PSK
WPA2-PSK is secure enough for a home network as users can change passwords when they doubt that an unintended person is using it.
However, if users can not compromise with security, then WPA2-Enterprise can be used to provide different passwords to each participant and not allow access to the network as a whole. It isolates the network per user. The requirement of RADIUS in 802.1x implementation makes it complex, but for more security, 802.1x can be used, which allows authentication through certificates instead of credentials.
Enterprise PKI Services
Get complete end-to-end consultation support for all your PKI requirements!
Secure Your 802.1x Network with WPA2 EAP-TLS Authentication
The larger organization can adopt WPA2 Extensible Authentication Protocol over Transport Layer Security. It uses AES encryption but adds username and password authentication. A user without a registered account or whose account is disabled cannot access the wireless network. The wireless network can be impenetrable to over-the-air attacks by certificate-based authentication that relies on EAP-TLS with server certificate validation. The unauthorized user cannot access the information being sent for authentication through an encrypted EAP tunnel, and the identifying information is only sent to the correct RADIUS through the server certificate validation process.
The implementation of WPA2 EAP-TLS can be an issue due to its complexity with its initial design and configuration. It can also be resource-intensive as it requires setting up and management of a Public Key Infrastructure.
Secure your network with WPA3
WPA3 removes the security issue by using individualized data encryption. If WPA3 is enabled and the user connects to an open Wi-Fi network, then the data transmitted between the device and the Wi-Fi access point will be encrypted. Even at the time of connection, the user does not enter any password.
Conclusion
Security is essential in this connected world. Our data should be secured and can only be accessed by the intended person. In today’s world of wireless networks, we should configure our network security to the latest so that no one can penetrate our network. Users should use WPA3 to improve the authentication and encryption while making the connection easier. WPA3-SAE (Simultaneous Authentication of Equals) replaced the WPA2-PSK authentication process. WPA3-SAE uses a 128-bit encryption key and Forward secrecy protocol to resist offline dictionary attacks while improving key exchange security without any additional complexity. On the other hand, WPA2-Enterprise is replaced by WPA3-Enterprise, which uses a 192-bit encryption key and a 48-bit initialization vector as requested by sensitive organizations.
Payment Card Industry Data Security Standards (PCI DSS) provides a total of 12 requirements for securing cardholder data which can be stored, processed and transmitted by organizations. The standard provides a large amount of information about security – which can be complicated for organizations to prioritize their points of compliance.
In this article, we will provide a Prioritized approach recommended by PCI Security standards which will help organizations understand where they should start, and how to reduce risk in the compliance process.
What is Prioritized approach?
The prioritized approach provides 6 major security milestones that will help organizations secure high risk factors and escalating threats while being PCI DSS compliant.
Milestones for Prioritized approach
The Prioritized Approach provides six milestones. The table below summarizes the high-level goals and intentions of each milestone.
Milestone
Objective
1
Remove sensitive authentication data and limit data retention.
If an organization doesn’t need sensitive authentication data and other cardholder data, they can simply remove it which will greatly decrease the risk of compromise.
2
Protecting systems and networks, and being prepared to respond to a system breach.
In this objective, organizations should focus on access points and processes of responding.
3
Securing Payment Card Applications.
In this objective, organizations should focus on control of the application, application processes, and servers. Weakness and vulnerability to these areas would provide an easy way to access cardholder data and other information
4
Monitor and access control to systems.
Organizations should focus on who, what, when, and how something or someone accesses the card holder information, network and data environments.
5
Protecting stored cardholder data.
Organizations must properly protect cardholder data which may include Primary Account Numbers, Milestone Five targets, and key protection mechanisms for that stored data.
6
Finalizing remaining compliance efforts, and ensure all controls are in place.
This objective intends to complete PCI DSS requirements, and finalize the remaining policies, procedures and processes which are needed to properly protect cardholder environment.
Tailored Encryption Services
We assess, strategize & implement encryption strategies and solutions.
Install and maintain a firewall configuration to protect cardholder data
Establish and implement firewall and router configuration standards that include the following:
A formal process for approving and testing all network connections and changes to the firewall and router configurations
Current network diagram that identifies all connections between the cardholder data environment and other networks, including any wireless networks
Current diagram that shows all cardholder data flows across systems and networks
Requirements for a firewall at each Internet connection and between any demilitarized zone (DMZ) and the internal network zone
Description of groups, roles, and responsibilities for management of network components
Documentation of business justification and approval for use of all services, protocols, and ports allowed, including documentation of security features implemented for those protocols considered to be insecure.
Requirement to review firewall and router rule sets at least every six months
Build firewall and router configurations that restrict connections between untrusted networks and any system components in the cardholder data environment.
Restrict inbound and outbound traffic to that which is necessary for the cardholder data environment, and specifically deny all other traffic.
Secure and synchronize router configuration files.
Install perimeter firewalls between all wireless networks and the cardholder data environment, and configure these firewalls to deny or, if traffic is necessary for business purposes, permit only authorized traffic between the wireless environment and the cardholder data environment.
Prohibit direct public access between the Internet and any system component in the cardholder data environment.
Implement a DMZ to limit inbound traffic to only system components that provide authorized, publicly accessible services, protocols, and ports.
Limit inbound Internet traffic to IP addresses within the DMZ.
Implement anti-spoofing measures to detect and block forged source IP addresses from entering the network.
Do not allow unauthorized outbound traffic from the cardholder data environment to the Internet.
Permit only “established” connections into the network.
Place system components that store cardholder data (such as a database) in an internal network zone, segregated from the DMZ and other untrusted networks.
Do not disclose private IP addresses and routing information to unauthorized parties.
Install personal firewall software or equivalent functionality on any portable computing devices that connects to the Internet when outside the network, which are also used to access the CDE. Firewall (or equivalent) configurations include:
Specific configuration settings are defined.
Personal firewall (or equivalent functionality) is actively running.
Personal firewall (or equivalent functionality) is not alterable by users of the portable computing devices.
Ensure that security policies and operational procedures for managing firewalls are documented, in use, and known to all affected parties.
Tailored Encryption Services
We assess, strategize & implement encryption strategies and solutions.
Do not use vendor-supplied defaults for system passwords and other security parameters.
Always change vendor-supplied defaults and remove or disable unnecessary default accounts before installing a system on the network
For wireless environments connected to the cardholder data environment or transmitting cardholder data, change ALL wireless vendor defaults at installation, including but not limited to default wireless encryption keys, passwords, and SNMP community strings
Develop configuration standards for all system components. Assure that these standards address all known security vulnerabilities and are consistent with industry-accepted system hardening standards. Sources of industry-accepted system hardening standards may include, but are not limited to:
Center for Internet Security (CIS)
International Organization for Standardization (ISO)
SysAdmin Audit Network Security (SANS) Institute
National Institute of Standards Technology (NIST)
Implement only one primary function per server to prevent functions that require different security levels from co-existing on the same server.
Enable only necessary services, protocols, daemons, etc., as required for the function of the system.
Implement additional security features for any required services, protocols, or daemons that are considered to be insecure.
Configure system security parameters to prevent misuse.
Remove all unnecessary functionality, such as scripts, drivers, features, subsystems, file systems, and unnecessary web servers.
Encrypt all non-console administrative access using strong cryptography.
Maintain an inventory of system components that are in scope for PCI DSS.
Ensure that security policies and operational procedures for managing vendor defaults and other security parameters are documented, in use, and known to all affected parties.
Shared hosting providers must protect each entity’s hosted environment and cardholder data.
Requirement 3
Protect Stored cardholder data
Keep cardholder data storage to a minimum by implementing data retention and disposal policies, procedures, and processes that include at least the following for all cardholder data (CHD) storage:
Limiting data storage amount and retention time to that which is required for legal, regulatory, and/or business requirements.
Specific retention requirements for cardholder data.
Processes for secure deletion of data when no longer needed.
A quarterly process for identifying and securely deleting stored cardholder data that exceeds defined retention.
Do not store sensitive authentication data after authorization (even if encrypted). If sensitive authentication data is received, render all data unrecoverable upon completion of the authorization process. It is permissible for issuers and companies that support issuing services to store sensitive authentication data if:
There is a business justification and
The data is stored securely.
Do not store the full contents of any track (from the magnetic stripe located on the back of a card, equivalent data contained on a chip, or elsewhere) after authorization. This data is alternatively called full track, track, track 1, track 2, and magnetic-stripe data.
Do not store the card verification code or value (three-digit or four-digit number printed on the front or back of a payment card used to verify card-not-present transactions) after authorization.
Do not store the personal identification number (PIN) or the encrypted PIN block after authorization.
Mask PAN when displayed (the first six and last four digits are the maximum number of digits to be displayed), such that only personnel with a legitimate business need can see more than the first six/last four digits of the PAN.
Render PAN unreadable anywhere it is stored (including on portable digital media, backup media, and in logs) by using any of the following approaches:
One-way hashes based on strong cryptography, (hash must be of the entire PAN)
Truncation (hashing cannot be used to replace the truncated segment of PAN)
Index tokens and pads (pads must be securely stored)
If disk encryption is used (rather than file- or column-level database encryption), logical access must be managed separately and independently of native operating system authentication and access control mechanisms (for example, by not using local user account databases or general network login credentials). Decryption keys must not be associated with user accounts.
Document and implement procedures to protect keys used to secure stored cardholder data against disclosure and misuse:
Additional requirement for service providers only: Maintain a documented description of the cryptographic architecture that includes:
Details of all algorithms, protocols, and keys used for the protection of cardholder data, including key strength and expiry date
Description of the key usage for each key.
Inventory of any HSMs and other SCDs used for key management
Restrict access to cryptographic keys to the fewest number of custodians necessary
Store secret and private keys used to encrypt/decrypt cardholder data in one (or more) of the following forms at all times:
Encrypted with a key-encrypting key that is at least as strong as the data-encrypting key, and that is stored separately from the data-encrypting key
Within a secure cryptographic device (such as a hardware (host) security module (HSM) or PTS-approved point-of-interaction device)
As at least two full-length key components or key shares, in accordance with an industry-accepted method
Store cryptographic keys in the fewest possible location.
Ensure that security policies and operational procedures for protecting stored cardholder data are documented, in use, and known to all affected parties.
Conclusion
This article is part 1 of PCI Compliance specifications. We guide you to achieve proper PCI Compliance and prioritize the requirements while focusing on each task based on a particular milestone. This will help organizations secure cardholder data and environment and also achieve PCI compliance.
A secure connection to websites is vital to ensure sensitive data is not stolen in transit, and this process is accomplished through Secure Sockets Layer (SSL) via SSL certificates. What is an SSL certificate, you may ask? An SSL certificate moves your connection from an HTTP connection to an HTTPS connection. HTTP, or Hypertext Transfer Protocol, is an insecure connection between a web browser and a website. The reason HTTP is so insecure is due to its lack of encryption of data, which is what HTTPS does. HTTPS, or Hypertext Transfer Protocol Secure, implements encryption of data-in-transit to ensure that even if a Man in the Middle (MITM) attack occurred, that data would not be readable to the threat actor. SSL stripping bypasses this, however. With SSL stripping, attackers can implement a MITM attack and change the connection from an HTTPS connection to the unprotected HTTP connection. Before we look at how an SSL strip works, first we need to answer a common question: what is SSL?
SSL, more commonly known as Transport Layer Security (TLS) or SSL/TLS, is method of encrypting traffic through the Internet and authenticating a server’s identity. This encryption is accomplished through the TLS Handshake. When a user tries to connect to a webserver through their browser, they initiate a TCP Handshake and then a TLS Handshake between the client and server. A TCP Handshake is fairly straightforward, compared to a TLS Handshake. The TCP Handshake starts with a SYN message from the client to the server, as you can see in the above diagram. A SYN message contains a sequence number set by the client, which is then acknowledged by the server by its incrementation of the sequence number. The incremented sequence number is sent to the client, to acknowledge that server received it. Along with the incremented number, the server also sends its own chosen sequence number to be acknowledged by the client. The client’s acknowledged sequence number as well as the server’s sequence number are sent in a message called a SYN/ACK. The final step of a TCP Handshake occurs when the client acknowledges the server’s sequence number, through incrementation, in the ACK message.
The TCP Handshake is unencrypted, as its only purpose is to connect the client and server in the first place. The TLS Handshake is where encryption comes in. A TLS Handshake includes several steps, beginning with the Client Hello:
Client Hello message: The Client Hello initiates contact between the client and server. The client sends a “hello” message to the server. This “hello contains SSL/TLS information necessary for a proper TLS connection, including SSL/TLS version and the cipher suites supported by the client for server use, and a string of random bytes referred to as the “client random”.
Server Hello message: The Server Hello is sent in response to the Client Hello. Contained within the Server Hello are the server’s SSL certificate, the chosen cipher suite of the server, and the “server random”. Like the “client random”, this is another random string of bytes.
Authentication of the server’s SSL certificate: The next step in the TLS Handshake is that the client authenticates that the server’s SSL certificate is valid and owned by who the server says it is. This process is done by the client checking with the Certificate Authority (CA) who issued the certificate and verifying this information.
The premaster secret: The client then sends another random string of bytes to the server, encrypted with the server’s public key. When a keypair is created, it contains a public key and private key, known by all and known by no one but the creator, respectively. As only the keypair owner knows the private key, anything encrypted by the server’s public key can only be decrypted with the server’s private key. This step adds another way to verify the identity of the server.
Premaster secret decryption: The private key of the server is used to decrypt the premaster secret, verifying the server’s identity to the client.
Session key creation: Using the “client random”, the “server random”, and the premaster secret, both the client and the server generate a session key. If the server and client both have the correct keys, meaning they are who they say they are, the session keys created should be identical.
Client Finished message: The client sends the server a message that says “Finished”, which is encrypted with the session key. If the server is who it says it is, they should be able to decrypt the message, as they should have generated the same session key.
Server Finished message: The server sends the client a message that says “Finished”, which is encrypted with the session key. If the client is who they say they are, they should be able to decrypt the message, as they should have generated the same session key.
Secure symmetric encryption is used: Now, using asymmetric encryption, a symmetric encryption connection is setup. Asymmetric encryption involves the use of two keys, while symmetric encryption involves only one key. The client and server will now use the generated session key to symmetrically encrypt all of their communications.
Now that we have answered the question of what is SSL, we can see how SSL stripping occurs.
SSL Stripping
The process of SSL stripping is a fairly straightforward Man in the Middle attack. An SSL strip, as the name implies, strips a connection from an HTTPS connection to a lesser HTTP connection. The attacker does this by setting themselves up in the middle of the connection between the client and the server. This allows the threat actor to intercept all traffic between the client and the server. As a connection is started with the unencrypted TCP Handshake, this is where the SSL stripping occurs. How it works is the user sends a request to the server to access a webpage, like https://www.example.com. The attacker intercepts that message, but sends it along to the anyways. The reason they send it to the server is to receive the SYN/ACK. It sends out to the client after receiving the website request. Now, the threat actor sends the website connection back to the client, but instead of the original website requested, it is instead http://www.example.com.
Since the connection is now HTTP instead of HTTPS, every message, including any sensitive data, sent across the connection is visible to the man in the middle. This includes passwords, usernames, and bank account information sent along by the user. Threat actors could also potentially setup a proxy server with a similar name to the requested server, allowing them to further infect a victim with malware. Setting up of a proxy server with SSL stripping is a much more successful way of following victims compared to phishing attacks. Phishing attacks are a method of fooling a victim into visiting a webpage that looks legitimate, allowing the attacker to steal sensitive information entered into different fields by the victim. With SSL stripping, a user may never know they have been giving attackers sensitive information. Attackers can implement SSL stripping with either ARP spoofing, a proxy server, or by using Hotspot. Now that we know how SSL stripping works, let’s see how to detect if SSL stripping has occurred, and how to protect from it.
Detection and Best Practices
SSL stripping can be detected a number of different ways. The most obvious way to note if your connection has been through SSL stripping is looking at the web address in the search bar. The web address will have http next to the web address, as opposed to https, if SSL stripping has occurred. Also, you will note that the padlock at the left end of the search bar will look unlocked or red, meaning the connection is not in the HTTPS format you desire. Another way to find out that SSL stripping has occurred is by noting any faulty design details in the website. If you suspect SSL stripping has occurred, finding miniscule details on the webpage that look much different than the legitimate page can tip you off. Things like slightly tweaked company logos, a lack of multiple pages within the website, or even spelling errors can let you know that this isn’t the website you think it is.
Once SSL stripping is detected, the next step is thwarting it, now and in the future. One of the best prevention methods for stopping SSL stripping is noting irregularities in the search bar or webpage in the first place. Once you are alert for this threat, you can constantly be on the lookout for SSL stripping attacks. Team members within your organization should also be aware of this threat to protect themselves and the company from SSL stripping. Training classes via experienced team members or trained professionals will go a long way towards safeguarding sensitive data. Another way to protect web browsers from SSL stripping is through manually entry of the URL in the search bar. Most Man in the Middle attacks are started via redirections from one website to the target website. With this redirection, an attacker can set up in the middle of a data exchange between a client and server. By entering the URL into the search bar by your own hand, you can stop the Man in the Middle attack from beginning in the first place.
Browser extensions are another strong method of stopping both Man in the Middle attacks and SSL stripping. Extensions like HTTPS Everywhere use domain and rule lists to handle page calls through HTTPS connections, meaning all calls to web pages are done through HTTPS connections exclusively. If you work as a website administrator, you should also follow certain best practices to ensure SSL stripping cannot occur with your website. The main way to do this is by enabling SSL sitewide. Many threat actors take advantage of websites with SSL only enabled on one web page, but by enabling SSL sitewide attackers will have more difficulty setting up an SSL stripping operation. Even pictures and links within webpages should be protected with SSL certificates.
One of the biggest protection methods from SSL stripping is the use of HTTP Strict Transport Security. HTTP Strict Transport Security, or HSTS, is a policy where websites only allow connections utilizing HTTPS connections. This stops attackers from using SSL stripping to connect users to websites via HTTP connections. Requests that use an HTTP connection will automatically be rerouted to an HTTPS connection with HSTS in place. Once HTTP Strict Transport Security is in place, your domain name can be added to the HSTS preload list. This list is used by many search engines including Google Chrome, Mozilla Firefox, and other big search engines to prevent any HTTP connections to that browser. Included with the domain name of your web browser in the preload list is any subdomains and Top Level Domains. Also, certain Top Level Domains (TLDs), like .APP, are on the preload list by default. This means any .APP website is automatically encrypted with HTTPS, and never HTTP.
A few final steps you can utilize in your environment to protect from SSL stripping are as follows:
Usage of Virtual Private Networks: Virtual Private Networks, or VPNS, protect user data on websites no matter the connection type. If a user is using a VPN when viewing an HTTP website, data remains encrypted due to the Virtual Private Network. This extra layer of security can help an entire network or a single user.
Avoidance of public Wi-fi: Public Wi-fi hotspots, especially airport Wi-fi hotspots, are perfect for Man in the Middle attacks. Sensitive data can be easily intercepted, or user can be redirected to malicious websites, via public Wi-fi.
Cookies and bookmarks: If you are on a trusted network, bookmark your websites where you enter sensitive information. Once you reach a website with HTTPS, like a banking website, bookmark that secure website for future use, as the bookmarked website will always have an HTTPS connection. Along with this, enabling secure cookies ensures that all cookie data is served with secure traits.
Unknown links and HTTPS: The most obvious, but still frequently occurring, way to stop SSL stripping is by never clicking suspicious links and never accepting a connection to a website without HTTPS. If a website has an HTTP connection, leave the website and retype the URL.
Certificate Management
Prevent certificate outages, streamline IT operations, and achieve agility with our certificate management solution.
A number of our services at Encryption Consulting can help defend your organization against attacks like SSL stripping. Our Encryption Advisory services can help your company identify any security gaps within your IT infrastructure, including missing or expired Secure Sockets Layer certificates. We then design and implement a plan to cover all your security issues, thus protecting your sensitive data from malicious attackers. For SSL/TLS certificates issues, we recommend usage of certificate lifecycle management tools, or movement to Cloud PKI services. Setting up a Public Key Infrastructure on a Cloud platform, such as Amazon Web Services, allows you to use AWS SSL certificates, for a better managed and protected infrastructure. Working with your teams, we help design a strategy to encrypt data at every phase, especially data-at-rest and data-in-motion like data sent across an HTTP connection. Our expert team will implement our strategy for encryption in the exact way your company desires, allowing you to customize your requirements as much as you wish.
We also offer our Certificate Lifecycle Management services to customers as well. Encryption Consulting offers a broad range of services in the Certificate Management space, from strategy to implementation and managed services. Encryption consulting can help solve the problems and challenges faced with certificate lifecycle management, by:
Establishing requirements, and designing the architecture
Performing a network discovery scan
Importing existing certificates
Configuring policies and reports
Onboarding a set of pilot applications
Preparing documentation for operations and training
Developing a plan for addressing gaps
Developing a guide for process/operations and offering certified training
With our Certificate Lifecycle Management services, we can help you monitor and protect SSL certificates on-premises as well as in the Cloud. We support Cloud certificate services on a variety of platforms, including AWS, Microsoft Azure, and Google Cloud Platform (GCP).
One last service we offer that can help defend you from SSL stripping attacks are our Public Key Infrastructure assessment, strategy and implementation services. With this service, we will help you assess what requirements your organization should set for it’s PKI to gain the most protection and benefits from it. In our strategy phase, we create a roadmap to help you understand how to reach all of your Public Key Infrastructure requirements at the least cost to you. In the final stage, the implementation phase, we create the Public Key Infrastructure based off of the roadmap made in the previous stage. Our PKIs are created with your requirements in mind, meaning they are in compliance with any standards, like FIPS 140-2 or PCI DSS, that you may need to meet. To go along with our advising services, we also offer PKI-as-a-Service to customers. With our PKI-as-a-Service, we create a hybrid Public Key Infrastructure, with the Root CA located either at our datacenter in Dallas, Texas, or on your own premises. We can also give your organization as much or as little permissions and management tasks as you desire. We can manage the entirety of the Public Key Infrastructure for you, if you desire.
Conclusion
Throughout our guide, we have answered a number of common questions, such as what is SSL and what is an SSL certificate. In answering these questions, we developed a better understanding of how an SSL Handshake occurs, as well as how threat actors manipulate the unsecured TCP Handshake that occurs before the SSL/TLS Handshake, to intercept sensitive data sent across a connection. Along the way, we also learned how SSL stripping attacks occur and the details of how they can steal information from users. Even with an AWS SSL certificate, attackers can still set up Man in the Middle attacks to strip your connection from an HTTPS connection to an HTTP connection. Attackers use redirect links and public Wi-fi hotspots to strip your connection to a legitimate website and steal your information. Luckily, there are a number of different best practices you or your organization can implement to defend against SSL stripping attacks. Virtual private networks are a great method of protecting SSL connections, as they cover an entire network and they keep your data encrypted whether you connect to a website via HTTP or HTTPS. Other, simpler, methods of stopping SSL stripping include utilizing bookmarks on HTTPS connected websites, enabling secure cookies, avoiding public Wi-fi hotspots, never clicking unknown links, and never continuing to a website without an HTTPS connection. Another way to protect your organization that we discussed is hiring Encryption Consulting’s data protection services to help manage your Public Key Infrastructure, certificate lifecycle, and to help find and patch any gaps in your security infrastructure.
To learn more about how Encryption Consulting can protect your sensitive data, visit our website at: www.encryptionconsulting.com/