01. Japan’s Largest Port Grinds to a Halt in Ransomware Attack
Japan’s largest port, the Port of Nagoya, has stopped operations following a ransomware attack on its container terminals. The attack, which occurred on July 4, has impacted the port’s central system, causing a halt in container processing.
The port, handling over two million containers annually and accounting for 10% of Japan’s trade volume, is crucial for Toyota’s car exports.
The port authority aims to restore the system by 6 PM and resume operations by tomorrow morning. The attack has resulted in significant financial losses and disrupted the flow of goods in and out of Japan. This is the largest cyberattack on the port to date.
02.NHS Data Stolen in University Cyberattack, Patient Information Compromised!
NHS data, including trauma patient information from over 200 hospitals, was stolen in a ransomware attack on the University of Manchester. The compromised data includes NHS numbers and partial home postcodes. The university has informed NHS Trusts and warned affected patients of potential follow-on attacks.
Forensics experts are working to assess the impact, while the university restores its systems and enhances cybersecurity training. The incident raises concerns about the storage and security of sensitive medical data by universities and the increasing trend of ransomware attacks involving data exfiltration.
03. Shell Confirms Impact by Clop Ransomware Attack on File Transfer Tool
Shell, the global oil and gas giant, confirms the Clop ransomware gang’s breach of the MOVEit file transfer tool. The group listed Shell on its extortion site. This marks the second time Shell has been targeted by Clop, highlighting vulnerabilities in the file transfer service.
Shell states that its core IT systems remain unaffected, and investigations are ongoing. Other UK victims of the MOVEit breach include the BBC, British Airways, Aer Lingus, Boots, Ofcom, and Transport for London. The software company Progress, developer of MOVEit, recently disclosed a second vulnerability in the tool.
04. Eftpos Provider Smartpay Hit by Ransomware Attack, Customer Data Stolen
Eftpos provider Smartpay has fallen victim to a ransomware attack, resulting in the theft of customer data. However, the company assures that no card data was compromised, and its payment systems remain fully operational. Smartpay, listed on NZX, does not store card information. The affected customers, primarily retailers, are being contacted directly.
Smartpay has taken immediate steps to contain the incident, engage cybersecurity specialists, and collaborate with government authorities. The investigation is ongoing, focusing on determining the extent and content of the data theft. The incident reflects a surge in cyber-attacks targeting the eftpos industry in New Zealand.
05. Apple Supplier Faces $70 Million Ransomware Attack by LockBit Gang
Taiwan Semiconductor Manufacturing Company (TSMC), an Apple supplier, experienced a data breach due to a ransomware attack on one of its suppliers, Kinmax Technology. The Russian ransomware gang, LockBit, demanded a $70 million payment from TSMC to prevent the publication of stolen data.
While the data breach mainly involved server setup information, TSMC confirmed that its business operations and customer information remained unaffected. Kinmax Technology apologized to affected customers but did not disclose the exact impact of the cyber-attack.
In an era dominated by interconnected software systems and widespread dependency on third-party libraries, software supply chain attacks have become a significant threat to organizations and individuals. These attacks exploit software development and distribution vulnerabilities, aiming to compromise the integrity and security of applications. Among the various techniques attackers employ, one particularly alarming avenue is the compromise of code-signing mechanisms. Code signing, a trusted method developers use to verify software authenticity, is now under increased scrutiny due to its susceptibility to sophisticated supply chain attacks.
The Role of Code Signing in Software Security
Code signing plays a crucial role in maintaining the security and trustworthiness of software applications. It involves digitally signing software binaries or components using a cryptographic key, thus associating them with a known entity, such as a developer or organization. The primary purposes of code signing include:
Authenticity Verification
Code signing allows users to verify the origin and integrity of
software. Users can ensure that malicious actors have
not tampered with or modified the software by checking the digital signature.
Trust Establishment
When software bears a valid code signature, it establishes trust between the developer and the end-user. Users
are more
likely to trust and install signed software, believing it to be from a reputable source.
Mitigating Malware Risks
Code signing helps identify and prevent the installation of malware or unauthorized software. Operating systems
and
security software often treat unsigned or improperly signed applications as potential security risks, raising
warnings
or blocking their execution.
Notable Software Supply Chain Attacks
SolarWinds Attack
The SolarWinds attack, discovered in late
2020, exposed the vulnerabilities in software supply chains. The
attackers
compromised the build process of SolarWinds’ Orion software, injecting a malicious backdoor into the distributed
software updates. As the software was signed with a valid digital certificate, it bypassed traditional security
measures, allowing the attackers to gain unauthorized access to numerous high-profile organizations and government
agencies.
ASUS Live Update Attack
In 2019, attackers compromised the ASUS Live Update utility by distributing a compromised software update to many
users.
The attackers delivered malware-infected binaries to unsuspecting users by impersonating a legitimate update. The
compromised update was signed with a valid code signing certificate stolen from ASUS, making it difficult for
antivirus
software to detect the threat.
Enterprise Code-Signing Solution
Get One solution for all your software code-signing cryptographic needs with our code-signing solution.
Code Signing Vulnerabilities and Mitigation Measures:
Certificate Theft
Attackers target code-signing certificates through various means, including social engineering, phishing, or
compromising the certificate authorities (CAs). Once in possession of a stolen certificate, attackers can sign
malicious
software, making it appear legitimate to unsuspecting users. Developers should adopt strong certificate management
practices to mitigate this risk, including secure storage, two-factor authentication, and regular certificate
audits.
Weak Certificate Verification
Developers should enforce stringent certificate validation processes, promptly verifying the chain of trust and
revoking
compromised or expired certificates. In some cases, developers fail to implement strict verification mechanisms,
allowing weak or expired certificates to be used. Attackers can exploit this oversight by signing malware with
self-signed or fraudulent certificates.
Compromised Build Environments
Supply chain attacks often target the built environments of software development organizations. By compromising
the
build systems, attackers can inject malicious code into the final product. Developers must adopt robust security
measures for build environments, including secure access controls, continuous monitoring, and vulnerability
assessments.
Recent Trends in Code Signing Attacks
Code-signing attacks have witnessed notable trends in recent years as cybercriminals continually evolve their tactics. Understanding these trends can help organizations stay vigilant and implement effective security measures. Here are a few key subheadings to explore:
Supply Chain Poisoning
Attackers have increasingly targeted the software supply chain by injecting malicious code into legitimate
software
packages during the build or distribution process. This poisoning technique allows them to bypass traditional
security
measures and distribute compromised software to unsuspecting users.
Certificate Abuse and Forgery
Cybercriminals have exploited vulnerabilities in the certificate infrastructure to abuse and forge code-signing
certificates. They either steal legitimate certificates from developers or create fraudulent certificates that
appear
authentic. These tactics enable them to sign malicious software and deceive users into believing it is from a
trusted
source.
Targeted Attacks on High-Value Software
Hackers have shifted their focus towards high-value software targets, such as widely used operating systems,
enterprise
applications, or critical infrastructure software. Compromising the code signing process for such software can
have
far-reaching consequences, allowing attackers to infiltrate numerous organizations and cause significant damage.
Sophisticated Certificate Spoofing
Attackers have employed advanced techniques to spoof code signing certificates, making their malicious software
appear
more convincing. This includes creating certificates with similar names or manipulating certificate metadata to
match
legitimate entities closely. Such tactics make it challenging for users and security software to differentiate
between
genuine and malicious software.
Enterprise Code-Signing Solution
Get One solution for all your software code-signing cryptographic needs with our code-signing solution.
To mitigate the risks associated with code signing and protect against software supply chain attacks, organizations should implement the following best practices:
Secure Key Management
Safeguard the private keys used for code signing, ensuring they are stored securely and accessible only to
authorized
personnel. Employ strong encryption, hardware security modules (HSMs),
and regular key rotation to minimize the
impact
of key compromise.
Certificate Lifecycle Management
Establish robust certificate issuance, renewal, and revocation procedures. Implement stringent verification
processes
when requesting or renewing certificates. Regularly audit and monitor certificates in use, promptly revoking any
compromised or expired certificates.
Build System Security
Strengthen security measures around the built environment, including secure access controls, intrusion detection
systems, and continuous monitoring. Regularly update and patch build tools and dependencies to mitigate known
vulnerabilities.
Supply Chain Integrity
Implement strict controls throughout the software development lifecycle, including secure code repositories,
continuous
integration and deployment (CI/CD) pipelines, and regular security audits. Validate the integrity of third-party
components and libraries before incorporating them into software projects.
User Education and Awareness
Educate users about the importance of code signing and how to verify the authenticity of the software. Promote
awareness
of potential risks and common attack vectors, such as social engineering or phishing attempts impersonating
legitimate
software updates.
Conclusion
Code signing, once a trusted method for software authenticity verification, has become a prime target for sophisticated supply chain attacks.
Organizations must proactively address code-signing vulnerabilities, adopt robust security measures, and stay updated on emerging attack trends to protect their software supply chains and maintain user trust in an increasingly interconnected digital landscape.
In today’s digital landscape, ensuring the security and integrity of software applications is paramount. With the increasing frequency and sophistication of cyberattacks, organizations must adopt robust security measures to protect their software build pipelines. Code signing emerges as a critical component in this regard, providing a mechanism to verify the authenticity and integrity of software during the build process.
Understanding Code Signing
Code signing is the process of digitally signing software executables and files to establish their authenticity and integrity. It involves of using cryptographic techniques to bind a digital signature to the software, indicating that it has not been tampered with since the signature was applied. Code signing employs public key infrastructure (PKI) to generate digital certificates that bind the software publisher’s identity to the code being signed. The certificate contains a digital signature that can be verified using the corresponding public key. Digital certificates issued by trusted certificate authorities (CAs) are used to sign the software code.
These certificates include information about the publisher, the validity period, and the public key used for
verification. Verifying the digital signature against the public key ensures the integrity and authenticity of the
code.
Code Signing in the Software Build Pipeline
In today’s digital landscape, ensuring the security and integrity of software applications is paramount. With the increasing frequency and sophistication of cyberattacks, organizations must adopt robust security measures to protect their software build pipelines. Code signing emerges as a critical component in this regard, providing a mechanism to verify the authenticity and integrity of software during the build process.
Securing the software supply chain and protecting against tampering are key challenges that organizations face. Code signing addresses these challenges by offering authenticity, verification, and integrity assurance. By integrating code signing into the software build pipeline, organizations can establish trust with users and customers, strengthen the software supply chain, and mitigate the risks associated with malicious actors.
Benefits of implementing code signing in the build pipeline
Authenticity verification
Code signing allows users to verify the authenticity of the software they are installing by confirming the
digital
signature against the publisher’s certificate. This instills confidence in users that the software has not been
tampered
with and comes from a trusted source.
Integrity assurance
Code signing provides a way to detect any modifications or tampering attempts made to the software. If the code
is
altered after signing, the digital signature verification will fail, indicating a potential security risk.
Protection against tampering
Signed code is resistant to tampering, as any modification will invalidate the digital signature. This helps
prevent
malicious actors from injecting malicious code or introducing vulnerabilities into the software.
Establishing trust with users and customers
By signing software with trusted certificates, organizations can establish trust with their users and customers.
Digital
signatures provide a visible assurance of authenticity and security, enhancing the software’s reputation and the
organization behind it.
Code signing and continuous integration/continuous deployment (CI/CD) workflows
Integrating code signing into GitLab CI/CD pipelines
GitLab, a popular DevOps platform, offers comprehensive support for code signing within its CI/CD pipelines.
Developers
can incorporate code-signing steps at various stages of the pipeline to ensure the security and integrity of the
software being built.
Automated code signing processes
GitLab enables organizations to automate the code signing process by integrating with certificate authorities and
key
management systems. This streamlines the signing workflow and reduces manual effort while maintaining
security.
Enterprise Code-Signing Solution
Get One solution for all your software code-signing cryptographic needs with our code-signing solution.
GitLab provides native features and integrations that make implementing code signing in your software build pipeline convenient. It supports different code signing mechanisms, including signing executables, container images, and release artifacts.
Setting up code signing in GitLab
To implement code signing in GitLab, you need to generate and manage digital certificates. This involves obtaining a certificate from a trusted CA or setting up an internal CA. GitLab allows you to store and manage certificates securely within the platform.
Generating and managing digital certificates
You can generate a certificate signing request (CSR) within GitLab or use an existing certificate and private key
pair.
GitLab’s integrated certificate management allows you to store and manage certificates securely.
Configuring GitLab CI/CD for code signing
GitLab CI/CD pipelines can be configured to include code-signing steps using predefined or custom scripts. You
can sign
the software artifacts using the private key associated with the certificate and store the signed artifacts
securely.
Challenges and Considerations
Overcoming implementation challenges
Implementing code signing in a software build pipeline may present challenges, such as managing certificates,
ensuring
key security, and integrating with different development and deployment tools. Proper planning, automation, and
documentation are essential to overcome these challenges.
Balancing security and development speed
Code signing adds an additional step in the build process, which may impact development speed. Organizations need
to
strike a balance between security requirements and the need for efficient and agile software development.
Code signing for open-source projects
Open-source projects often rely on code signing to establish trust. Organizations contributing to or leveraging
open-source software should consider implementing code-signing practices to maintain the integrity of the software
and
the community’s trust.
Key management and certificate revocation
Managing private keys and handling certificate revocation are crucial for code signing. Organizations must have
proper
procedures in place to ensure secure key storage, key rotation, and timely revocation of compromised or expired
certificates.
Enterprise Code-Signing Solution
Get One solution for all your software code-signing cryptographic needs with our code-signing solution.
Code signing is not a standalone security measure but works in conjunction with other security controls. It
complements
practices such as vulnerability management, secure coding, and secure deployment to provide a comprehensive
security
strategy.
Protecting against malicious actors
Code signing helps protect against supply chain attacks and malicious code injection. It ensures that only
authorized
code is executed and prevents unauthorized modifications that could introduce vulnerabilities or malware.
Code signing and vulnerability management
By integrating code signing with vulnerability management processes, organizations can verify that software
updates or
patches come from trusted sources. This reduces the risk of inadvertently installing compromised or malicious
software.
Compliance and regulatory considerations
Code signing can assist organizations in meeting compliance requirements and regulatory standards. Many industry
regulations mandate code signing for specific software types, and demonstrating adherence to these regulations is
simplified with code signing in place.
Conclusion
Code signing is vital in securing the software build pipeline, protecting software applications from tampering, and ensuring their authenticity and integrity. GitLab provides comprehensive support for code signing, making it easier for organizations to implement this critical security control. By integrating code signing into the CI/CD workflows, organizations can establish trust with users and customers, strengthen the software supply chain, and mitigate the risks associated with malicious actors. Embracing code signing in the software development lifecycle is essential to building secure and reliable software applications in today’s threat landscape.
Within the framework of society’s structure, the desire for monetary rewards drives cybercriminals to target and obtain valuable data. Generally, this includes personal details, organization information, login credentials, customer information like credit card details, contact info, and other crucial information.
Knowing the absolute worth of data, cybercriminals target it. In an instance of a ransomware attack, the operational capabilities of a company are crippled as cybercriminals encrypt data and potentially restrict device access, demanding payment of a ransom as the condition for unlocking the compromised resources. These attacks not only put user data on display to the world but also breach the principle “Right to Privacy.” Ransomware’s aftermath also devastates organizations, sometimes leading them to close completely, damaging company reputation and user trust.
Not only does it take time and money to rebuild the business functionality back to speed, but only 4% of businesses that pay a ransom retrieve all of their data.
Ransomware behaves differently according to the malware code. Some general types of ransomware behaviours are: –
Ransomware-as-a-service (RaaS)
Scareware
Deceives user with fake messages of malware infecting the system and prompts the user to remove this malware by
downloading the solution mentioned, generally an Antivirus.
DDoS extortion
Prompts users to pay the ransom, or the attacker will launch a DDoS attack.
Cryptoware
Encrypts important data and demands a ransom to decrypt it.
ScreenLocker
Locks the device and demands a ransom to unlock it within a limited time.
All these attacks put a time restriction on the user and demand ransom payment within a time limit or else destroy the data.
Ransomware-as-a-Service (RaaS)
RaaS is a business model where malware developers lend ransomware to other malicious groups or cybercriminals.
RaaS is a variation of MaaS, Malware-as-a-service, a malicious variant of SaaS, Software-as-a-service. Like SaaS in RaaS, you use malware instead of software.
RaaS is generally used to spread Cryptoware, malware that encrypts data and decrypts it only if the ransom is paid to the organization.
According to a report by Forbes titled “The rise of RaaS,” The average total cost of recovery from a ransomware attack
($1.8 million in 2021) is now 10 times the size of the ransom payment itself ($170,404).
RaaS and its variations
RaaS is generally divided into two main variations:
Affiliate programs
This is where the attacker is doing this on behalf of a larger group. They do the encryption and earn a
percentage of
each successful ransom payment.
Outright payment
Ransomware executables are purchased outright and left to their own devices for distribution, infection, and
facilitation of ransom payment.
The main catch in RaaS is that even a starter cybercriminal can successfully pull off a ransomware attack on an esteemed organization with the help of RaaS.
Tailored Encryption Services
We assess, strategize & implement encryption strategies and solutions.
After your organization is hit by ransomware, it does its work of encrypting the files or locking the system, according to the type of ransomware used. The screen displays a message and the instructions for payment. At the same time, ransomware pivots to other systems and tries to do the same.
The following few steps can help you while being under a ransomware attack.
The first and foremost task at hand would be identifying the system affected.
Isolating affected systems from the organizational network.
Identifying and shutting down any backdoors present in the systems.
If necessary, cut the power supply of the affected systems.
Call for experts to look into the environment and eradicate the threat present.
Monitor your server and network and back up key systems. Make multiple backups and store them.
Emails are the primary source of distributing ransomware attacks. Spearhead phishing, broken into simple terms,
targets a particular person who holds substantial influence over the organization.
Invest in user training and build a culture of security.
Network segmentation helps to stop the further proliferation of the attack over the organizational network.
Secure web gateways can scan users’ web surfing traffic to identify malicious web ads that might lead them to
ransomware
Using security tools like Intrusion Detection Systems (IDS) and Intrusion Prevention Systems (IPS).
Depending on timely Vulnerability assessments and Penetration Testing.
If organizations have followed best practices and made regular backups of the data, the restoration will be quite easy, and no need for a ransom payment. This will also ensure that your organization gets to working conditions as soon as possible.
Conclusion
Ransomware-as-a-service (RaaS) is a growing threat to businesses of all sizes. RaaS makes it easy for even the most unskilled criminals to launch ransomware attacks, which can result in significant financial losses and downtime.
The best way to prevent ransomware attacks is by never letting it happen. Using advanced security tools and proper
training, the employees will save millions.
Timely Vulnerability assessments, along with penetration testing, will help organizations follow up on any disadvantages posed to them.
If you are struck with ransomware attacks, your movements should be swift, and the incident should be reported immediately.
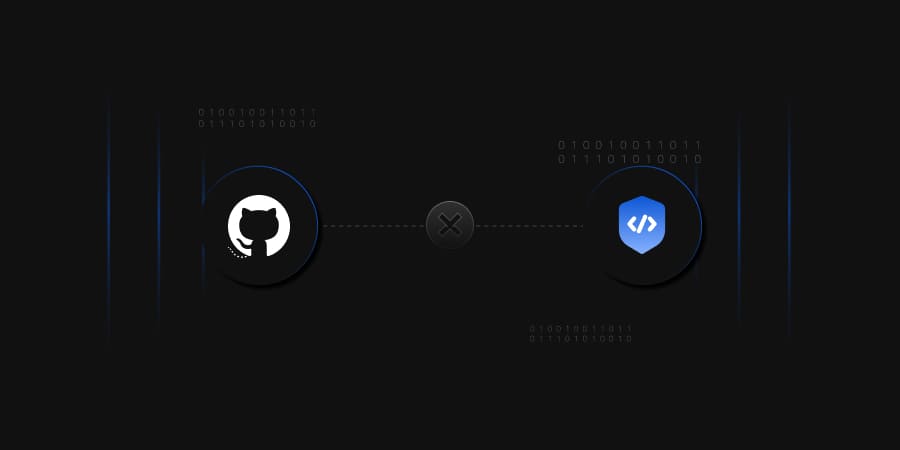
Code signing certificates play a vital role in establishing trust and ensuring the integrity of software applications. They provide a means for developers to verify the authenticity of their code, assuring users that it has not been tampered with or compromised. However, recent events have highlighted the risks associated with stolen code signing certificates, leading to concerns about the security of software distributed through trusted channels.
In a significant incident, GitHub, one of the largest software development platforms, was targeted by attackers who gained unauthorized access to several of its repositories. The attackers stole source code and obtained code signing certificates used to sign software distributed through GitHub’s platform. This incident raised alarm bells within the software development community and triggered a swift response from GitHub to revoke the compromised certificates.
The Importance of Code Signing Certificates
Code signing certificates serve as digital signatures threats for software code. Code signing certificates, when compromised or misused, can potentially act as a threat to software code. They assure that the code originates from a trusted source and has not been modified during transit or storage. Code signing offers several benefits, including:
Authenticity
Code signing certificates enable users to verify the identity of the software developer or publisher. This establishes
trust and confidence in the software’s legitimacy.
Integrity
The digital signature associated with a code signing certificate ensures that the code has not been tampered with or
altered since it was signed. Any modifications to the code would invalidate the signature, alerting users to potential
risks.
Security
Code signing certificates protect against malware and unauthorized software. They act as a deterrent to attackers
seeking to distribute malicious code under the guise of legitimate software.
The GitHub Incident
In the GitHub incident, attackers gained unauthorized access to repositories and exfiltrated source code. However, the more concerning aspect was the theft of code signing certificates associated with the affected repositories. Code signing certificates are valuable assets for attackers as they allow them to sign malicious code with the appearance of legitimacy.
GitHub detected unauthorized access to its systems on December 6th, 2022, and discovered that three encrypted code signing certificates had been stolen. On December 7th, 2022, GitHub revoked the compromised credentials and started investigating the attack on its system and customers.
The stolen certificates were a significant security breach, but the situation was somewhat mitigated because only three of them were active at the time of the theft, out of which one was set to expire on January 4th, 2023, and the other on February 1st, 2023. However, the remaining active certificate, which was set to be valid until 2027, required special attention, for which GitHub worked closely with Apple to monitor for any new apps signed with this certificate.
The theft of code signing certificates raised significant concerns within the software development community. If attackers were to use these certificates to sign malicious software, unsuspecting users might unknowingly install and execute compromised applications. This could lead to various consequences, including data breaches, system compromise, and unauthorized access to sensitive information.
GitHub’s Response
GitHub immediately addressed the compromised code signing certificates. Their response included the following measures:
Revoking Certificates
GitHub promptly revoked the stolen code signing certificates on February 2nd, 2023, rendering them invalid. This action ensured that
any
software signed with those certificates would be recognized as untrusted by systems that check the validity of the
signatures.
Notifying Users
GitHub proactively communicated the incident to affected users and guided the steps they should take to protect
themselves. This included recommending the regeneration of new certificates and updating software to use the new
certificates.
Enhancing Security Measures
GitHub implemented additional security measures to prevent similar incidents in the future. These measures
included
strengthening access controls, improving monitoring capabilities, and enhancing authentication mechanisms.
Collaboration with Certificate Authorities
GitHub worked closely with certificate authorities to ensure the revocation of compromised certificates and
prevent
misuse. This collaboration helped reinforce the trustworthiness of software distributed through GitHub’s platform.
Enterprise Code-Signing Solution
Get One solution for all your software code-signing cryptographic needs with our code-signing solution.
To mitigate the risks associated with stolen code signing certificates, organizations and developers can adopt the following best practices:
Robust Access Controls
Implement strong access controls and authentication mechanisms to protect code signing certificates and prevent
unauthorized access.
Secure Key Management
Employ key management practices, such as encryption and secure storage, to safeguard code signing certificates
and
private keys.
Regular Certificate Audits
Conduct periodic audits of code signing certificates to detect anomalies or unauthorized use. Monitor certificate
validity and expiration dates to ensure timely renewal and revocation when necessary.
Multi-Factor Authentication (MFA)
Enable MFA for code signing certificate management to add an extra layer of security and prevent unauthorized
access.
Incident Response Planning
Develop and maintain an incident response plan that outlines the steps to be taken in the event of a compromised
code
signing certificate. This includes procedures for certificate revocation, communication with affected users, and
remediation measures.
Conclusion
The theft of code signing certificates significantly threatens the integrity and security of software distributed through trusted channels. The GitHub incident highlighted the potential consequences and the need for swift action to mitigate these risks. By promptly revoking compromised certificates, notifying users, and implementing enhanced security measures, GitHub demonstrated its commitment to maintaining the trust of its developer community.
As software developers and organizations, it is crucial to prioritize the protection of code signing certificates and implement best practices to prevent unauthorized access and misuse. By doing so, we can safeguard the integrity of our software applications and maintain the trust of users who rely on them for secure and reliable functionality.
01. French Ad Tech Firm Fined with €40M for GDPR Breach
French ad tech firm Criteo has been fined €40 million by the French privacy regulator, CNIL, for breaching
GDPR
regulations. The company was found to have used website tracking cookies without users’ consent and failed
to adequately
inform users about how their data was being processed. CNIL’s investigation was prompted by complaints from
civil rights
organizations.
Criteo plans to appeal the fine, arguing that it uses pseudonymized and non-sensitive data in its
activities and that
CNIL’s claims are inconsistent with legal rulings. The violations are estimated to have impacted 370 million
users in
Europe.
02. Patient Information Compromised in Kentucky-based Firm’s Cybersecurity Incident
Kentucky-based firm iHealth Solutions, also known as Advantum Health, will pay a $75,000 fine to federal
regulators
following a data exfiltration breach in 2017. The breach compromised patient information stored on an
unsecured network
server, Affecting 267 individuals. The Department of Health and Human Services (HHS) found that iHealth had
not
conducted a comprehensive security risk analysis.
As part of the settlement, iHealth will implement a corrective action plan, including conducting a thorough
security
risk analysis and developing a risk management plan. HHS will monitor iHealth’s compliance for two years.
03. Massive Data Leak Exposes Personal Details of Thousands from US Auto Insurance
Comparison Site RateForce!
RateForce, a US auto insurance price comparison site, has suffered a massive data breach exposing the
personal
information of thousands of individuals. The breach involved an unsecured database containing scans and
images of
various documents, including driver’s licenses, insurance cards, and vehicle registrations. The breach was
discovered by
a security researcher who contacted the insurer, USA Underwriters, but received no response.
The researcher eventually managed to secure the database with the help of the insurer. The breach revealed
that a
third-party vendor, RateForce, was the owner of the compromised database, highlighting the risks associated
with such
vendors and the need for robust security measures.
04. NSA and CISA Join Forces to Shield Your Software
The NSA and CISA have released guidelines to secure CI/CD environments against cyberattacks.
Recommendations include
minimizing long-term credentials, implementing two-person rules for code updates, securing user accounts,
enforcing
least-privilege policies, adopting secure code signing, implementing network segmentation, conducting
regular
vulnerability scanning, and integrating security measures throughout the CI/CD pipeline.
These guidelines aim to mitigate unauthorized access, supply chain compromise, and code injection attacks.
This follows
a report by Kaspersky showing high malware infection rates in the industrial sector in 2022.
05. Microsoft Sounds Alarm on Rising Russian Hacker Attacks
Microsoft reveals an increase in credential-stealing attacks by Russian hacker groups Midnight Blizzard
(formerly
Nobelium) and APT29. Midnight Blizzard targets governments, IT service providers, NGOs, defence, and
critical
manufacturing sectors using residential proxy services to hide their IP addresses.
Despite being exposed in the SolarWinds compromise, they continue using undisclosed tools and techniques.
APT28 conducts
spear-phishing campaigns, exploiting vulnerabilities in Roundcube webmail software and a Microsoft Outlook
zero-day flaw
to target government and military entities in Ukraine.
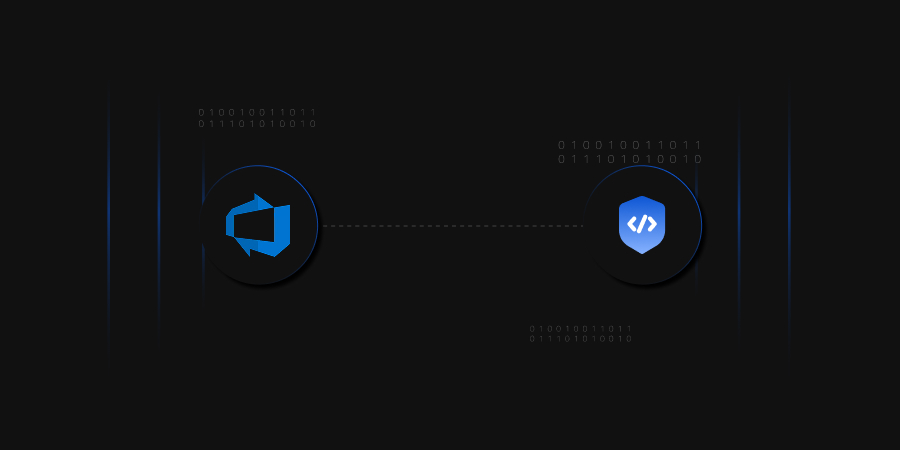
Azure DevOps is a powerful cloud-based platform that integrates people, processes, and tools to streamline software development and enable seamless collaboration throughout the entire development lifecycle. From ideation to deployment and beyond, Azure DevOps offers a full range of services covering the entire software development lifecycle. It assembles powerful technologies like Azure Boards, Azure Repos, Azure Pipelines, Azure Test Plans, and Azure Artifacts to empower development teams and allow them to achieve a quicker time-to-market, more productivity, and higher customer satisfaction. Incorporating Azure into their CI/CD workflows allows organizations to accelerate software delivery, improve collaboration, and maintain high-quality standards throughout the development lifecycle.
CodeSigning
Code signing is a procedure that verifies the legitimacy of the author and the originality and authenticity of digital information, particularly software code. It also ensures that the information is not malicious code. Additionally, it guarantees that this information has not been altered, falsified, or canceled after being digitally signed. The digital signature is created using a private key only available to the software publisher. When the software is downloaded and installed, the digital signature is checked against the public key to confirm that it matches, and that the software hasn’t been modified. Code signing is important for ensuring the safety and security of software applications, as it helps prevent the distribution of malware and other malicious software.
Encryption Consulting has a CodeSigning solution, “CodeSign Secure,” which can help you with tamper-proof storage for the keys and complete visibility and control of Code Signing activities. The private keys of the code-signing certificate can be stored in an HSM to eliminate the risks associated with stolen, corrupted, or misused keys.
Integration Azure DevOps for Codesigning
To get started with this, you’ll first require an Azure account and a system where you’ve signtool and ECSigningKSP installed and configured. Listing down the prerequisites.
A system that has ECSigning KSP, Signtool installed and configured. This runner should be provided with
administrative privileges.
Azure Account.
Enterprise Code-Signing Solution
Get One solution for all your software code-signing cryptographic needs with our code-signing solution.
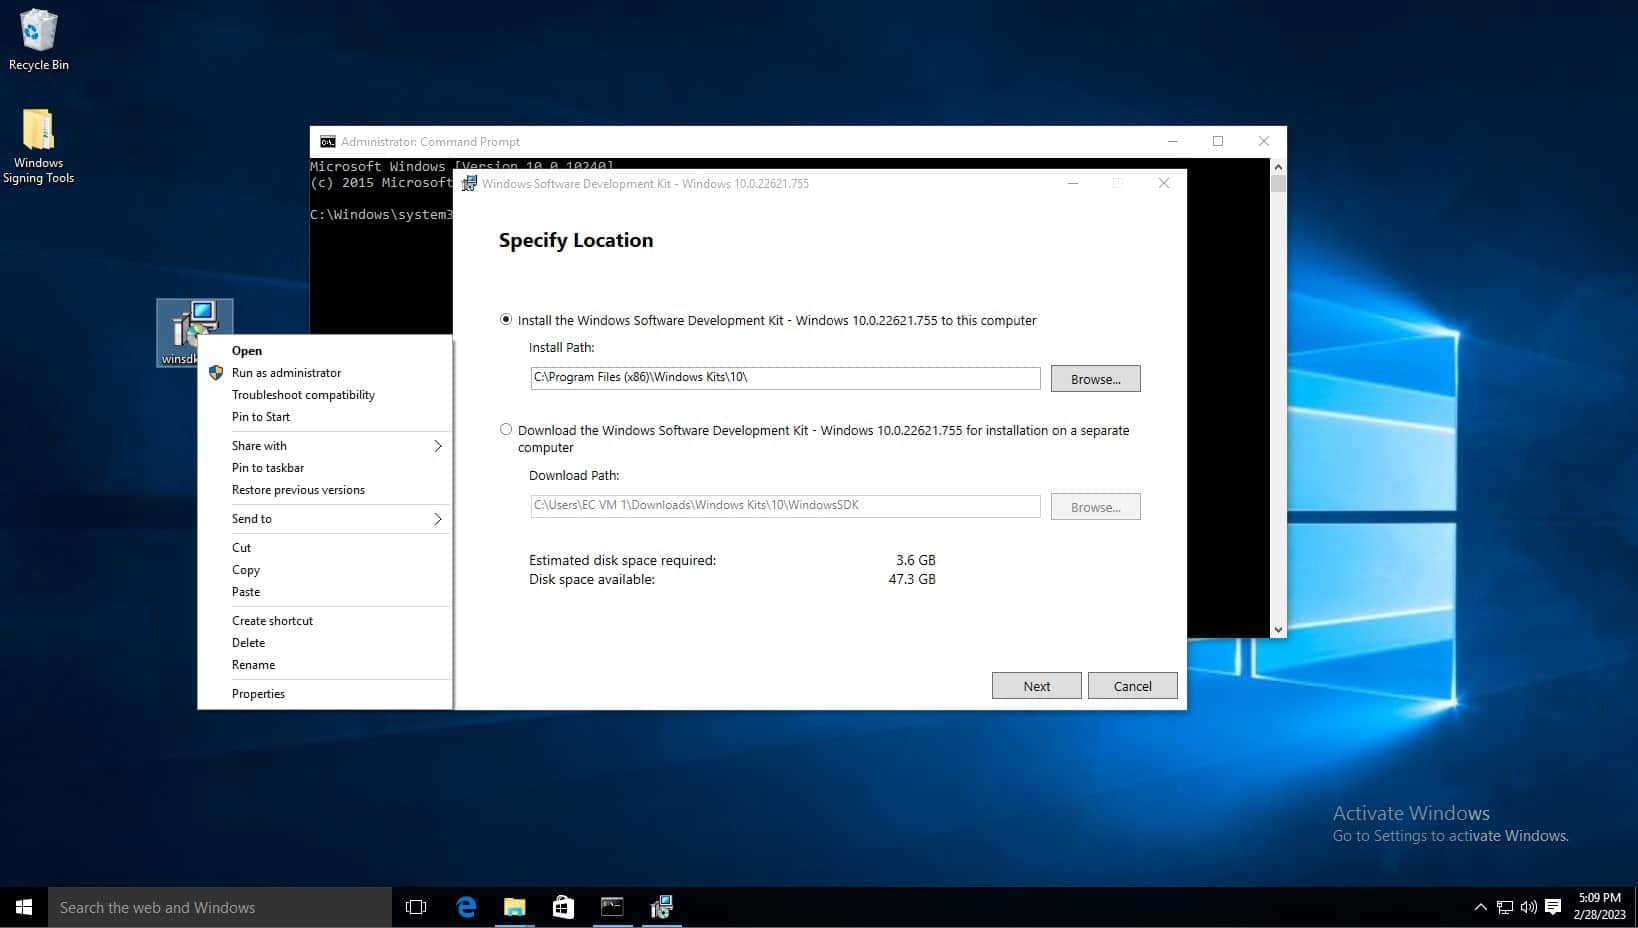
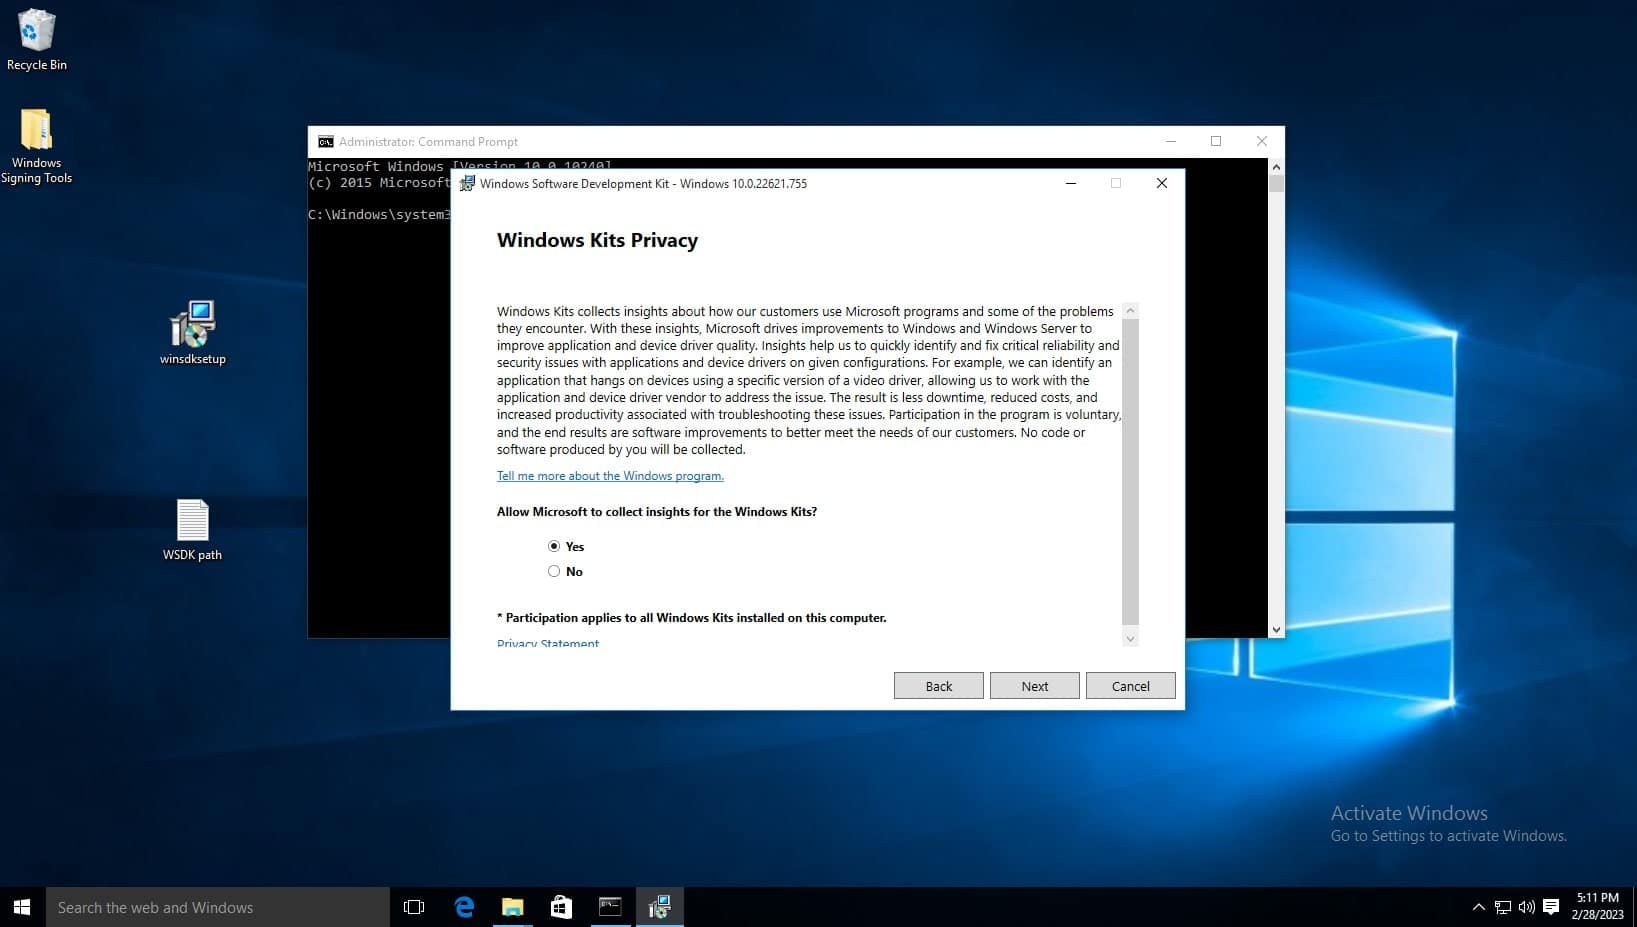
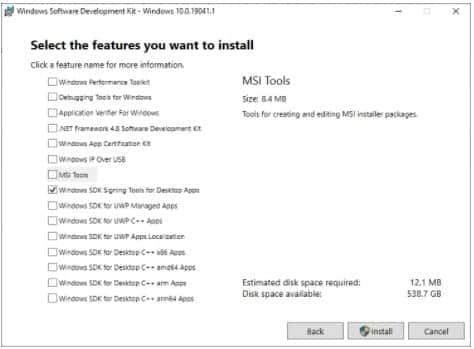
You can choose to install only the Windows SDK Signing Tools for Desktop Apps.
Open the winsdksetup.exe file. Remember the default path shown in the install path, as this will be helpful with running these commands from the command prompt.
On the Windows Kits Privacy page, either option for allowing Microsoft to collect insights is okay. Click next.
Accept the license agreement
Deselect every feature except for Windows SDK Signing Tools for Desktop Apps, then select install.
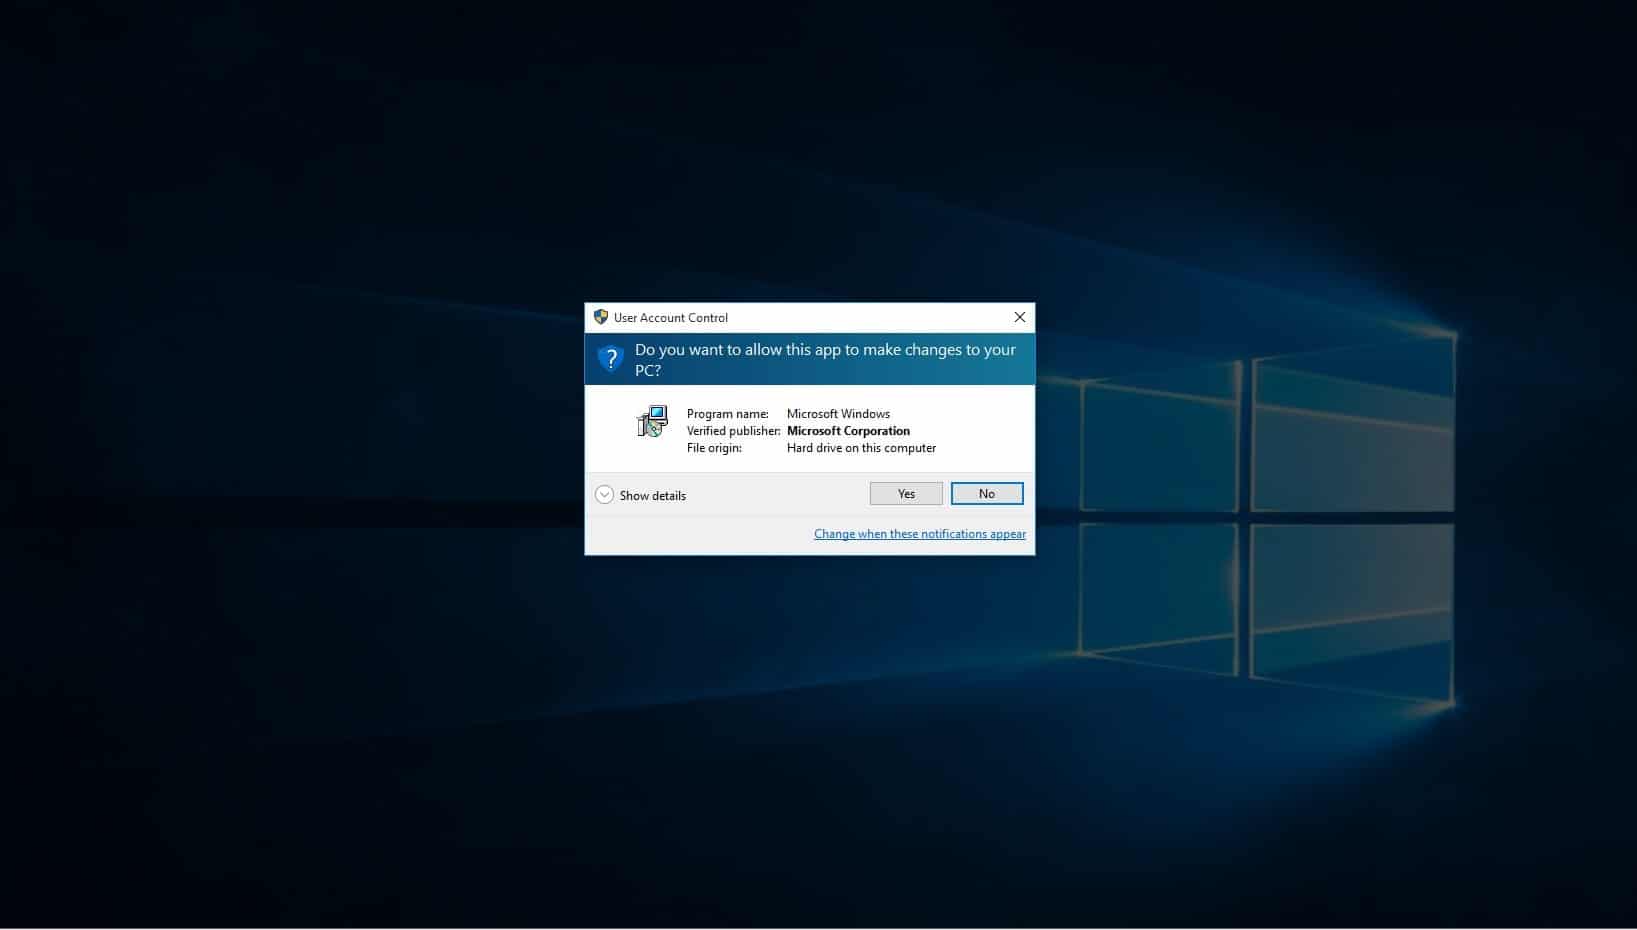
When prompted if you want to allow this app to make changes, select yes.
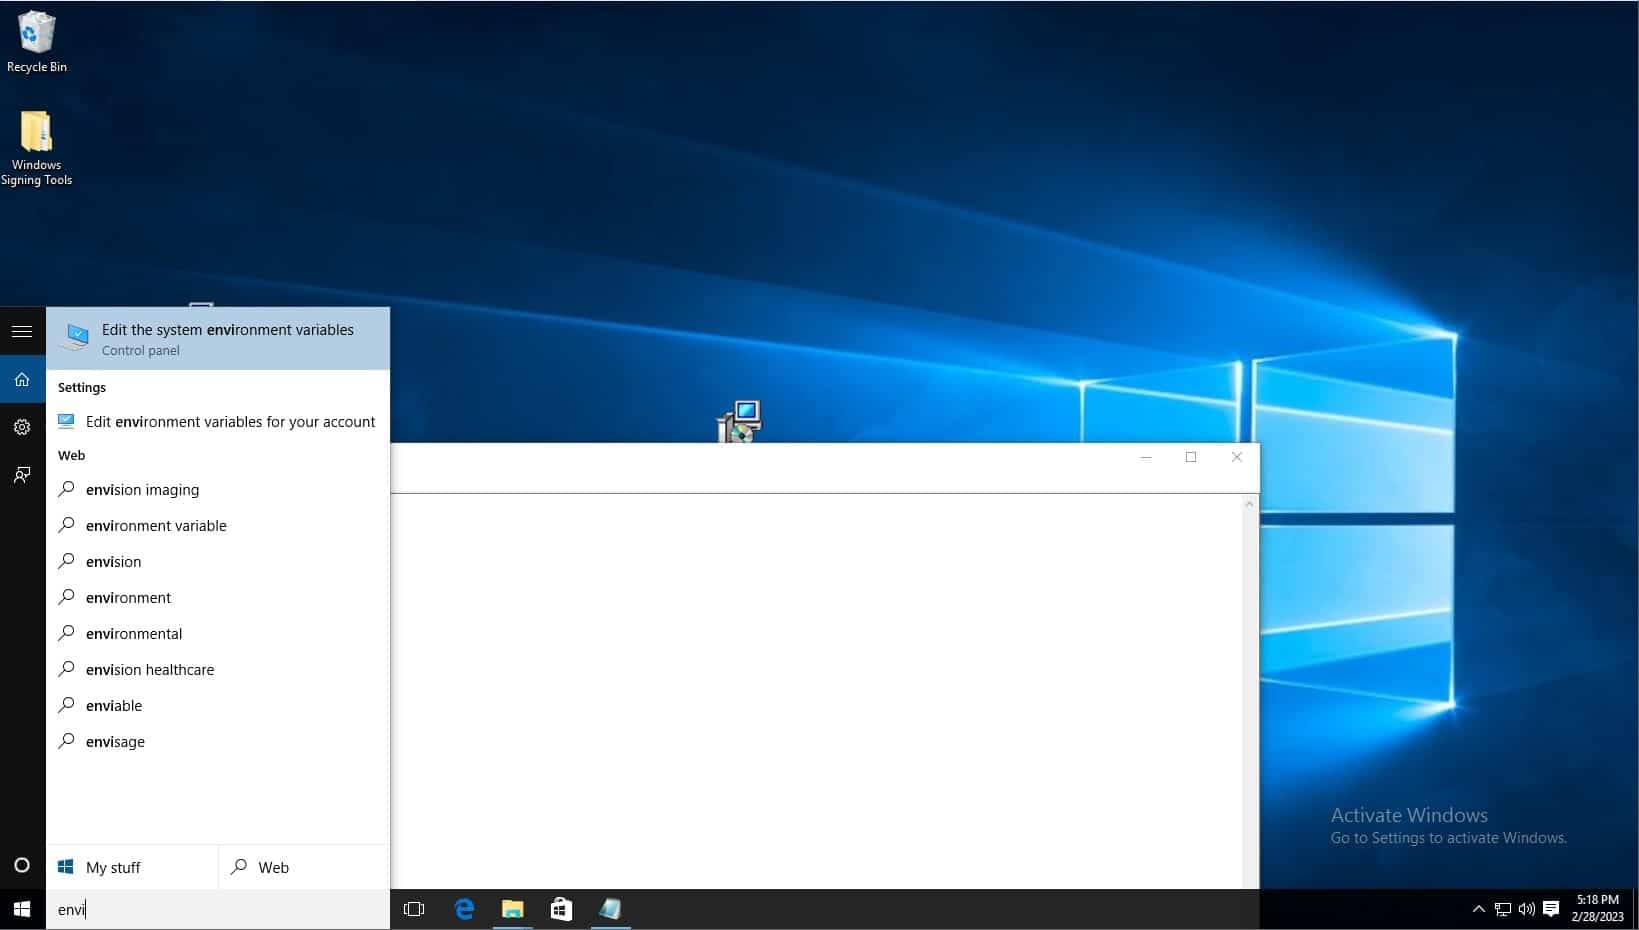
Click on windows search bar on task bar and type “Edit the system environment variables” and select the control panel option of the same name.
Click environment variables.
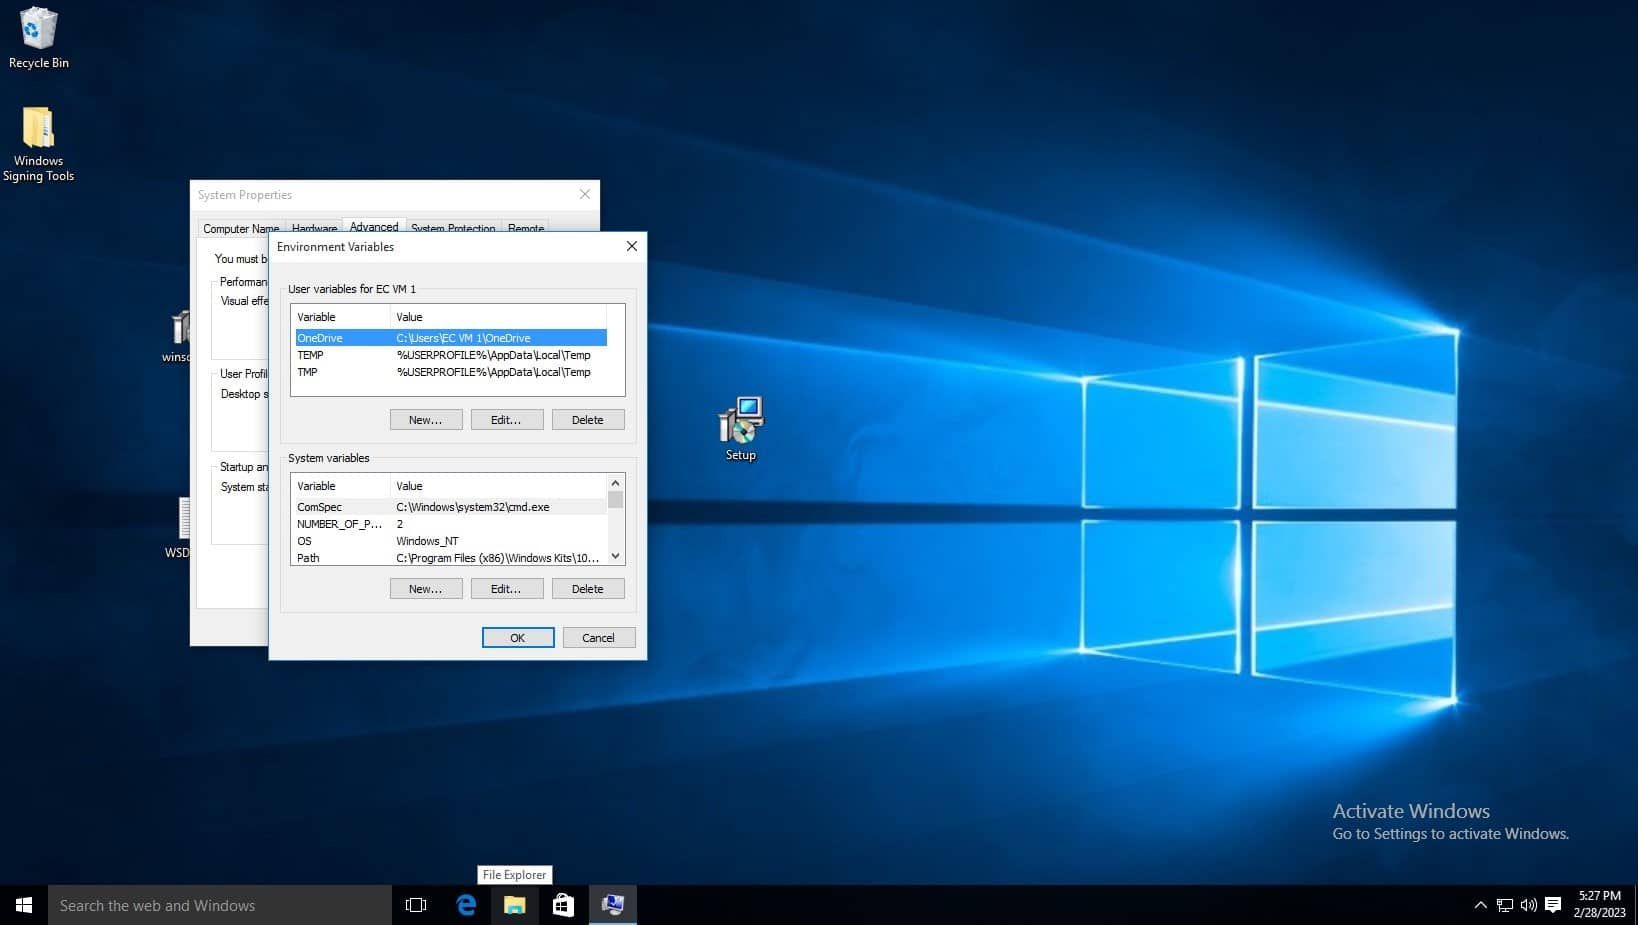
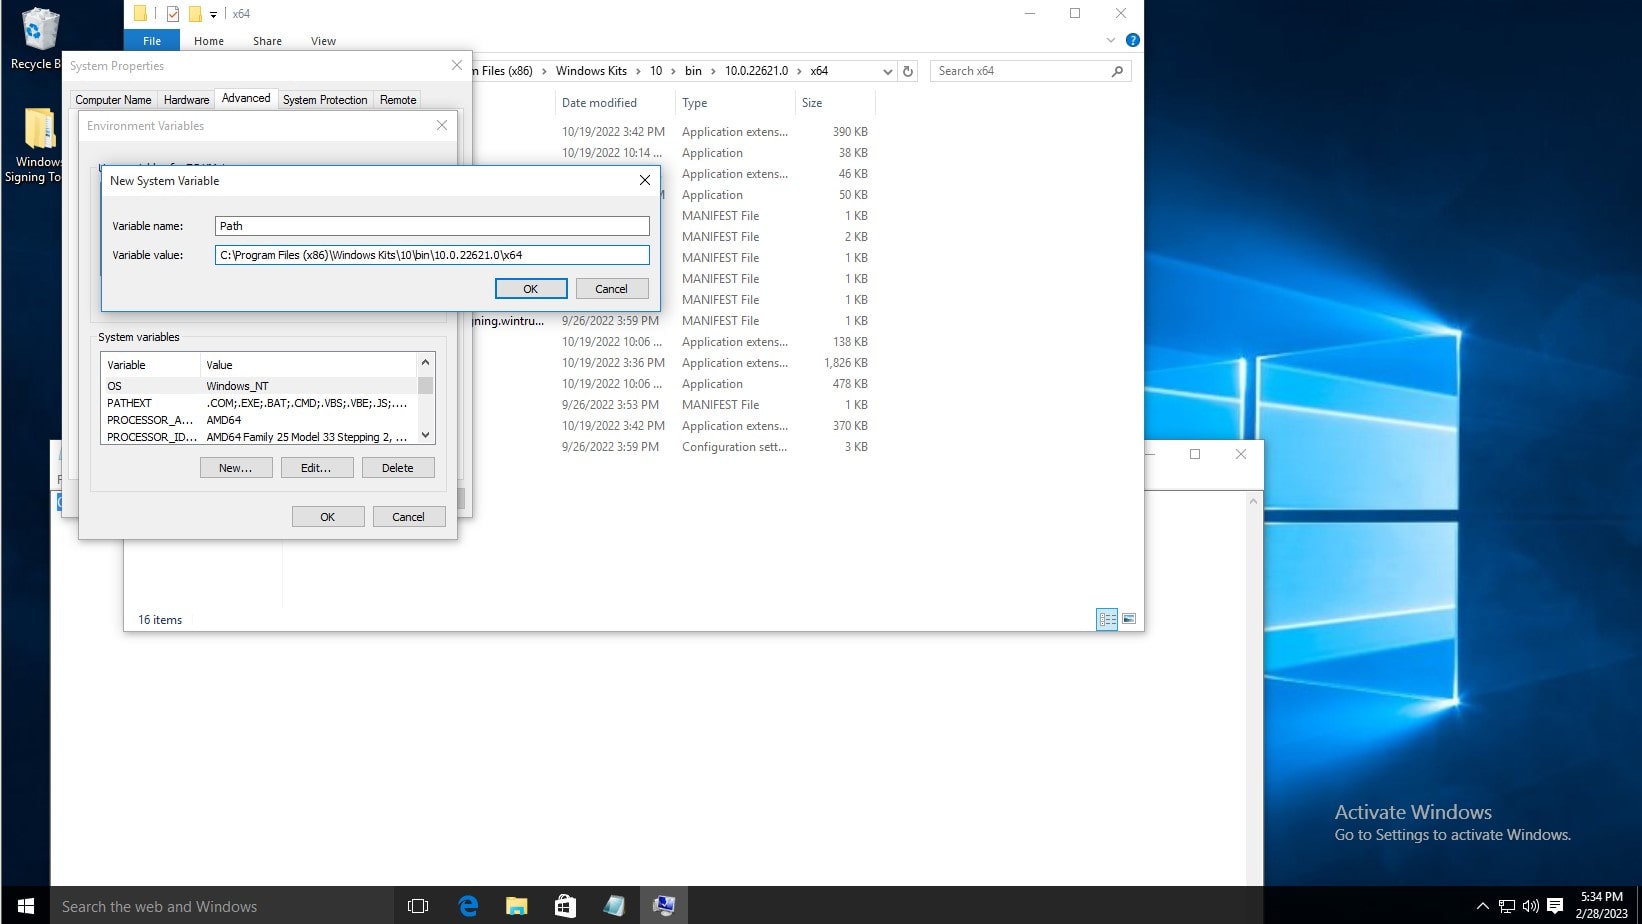
Before editing the variable list, navigate to where the Windows SDK is installed to using file explorer, you must copy the path of the folder which contains the signtool application, the default path is C:\Program Files (x86)\Windows Kits\10\bin\10.0.22621.0\x64, refer to the below screenshot. Make sure to right click and copy the path as shown. You can also see the signtool application at the bottom of the file list, this is the command you will run.
In the System Variables list, click new. Then type Path as the variable name, and copy and paste the aforementioned path. Then click OK on the environmentvariables window and systemproperties window.
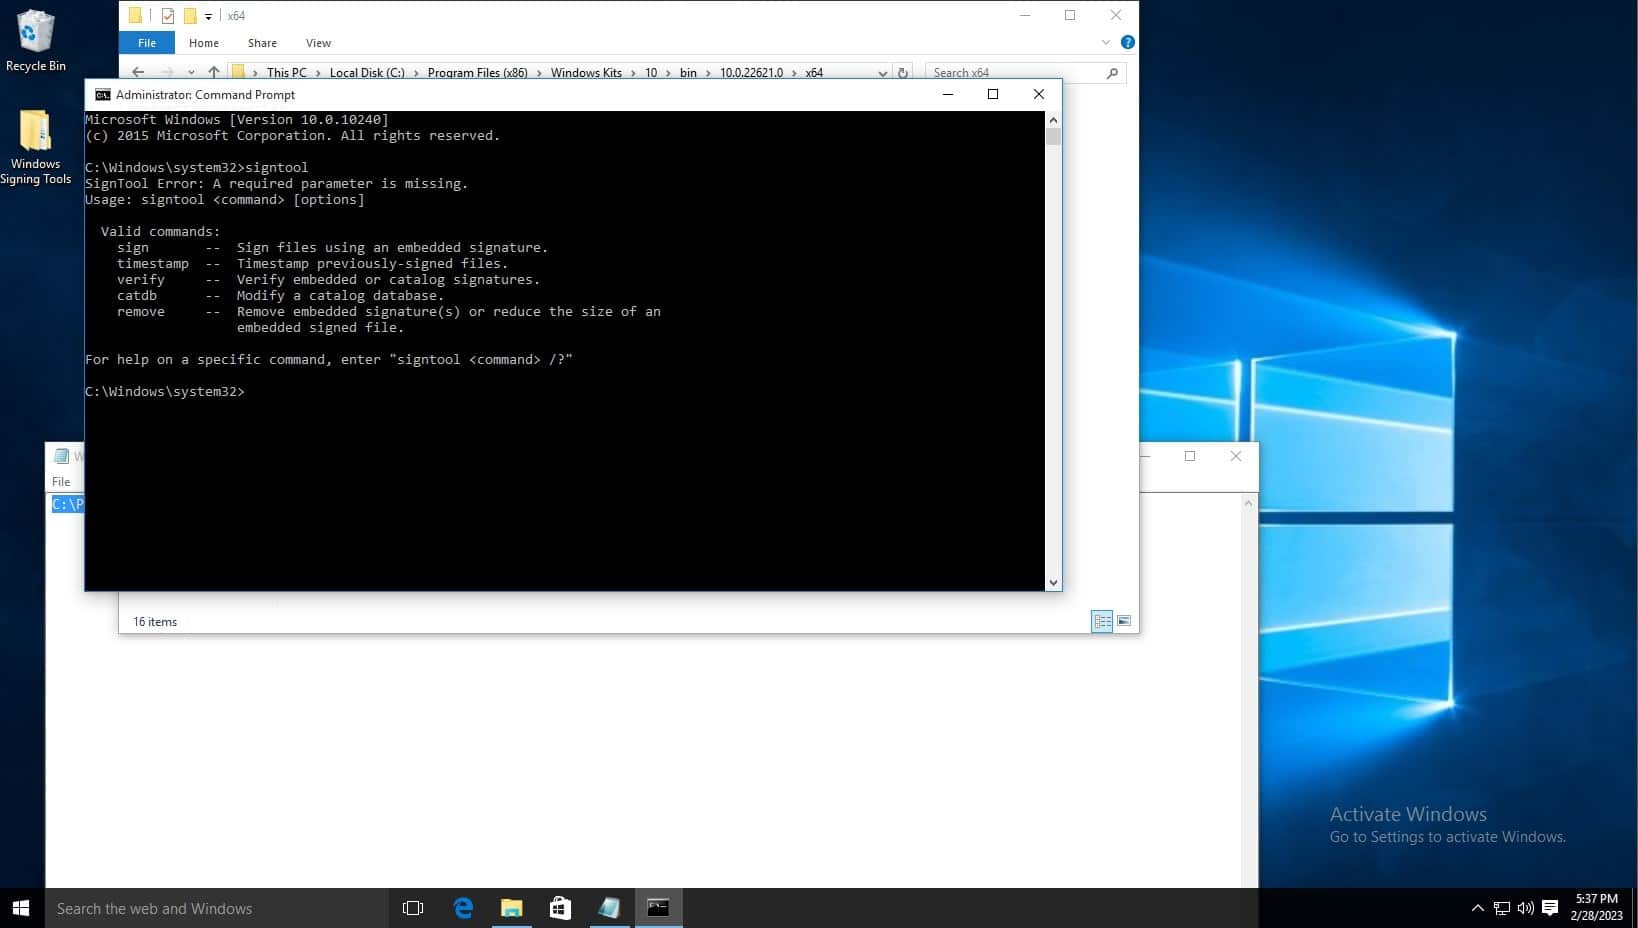
To test the installation, open command prompt, and type signtool, and the output should be as shown below.
The default signtool installation location is, for example: C:\Program Files (x86)\Windows Kits\10\bin\10.0.22621.0\x64
Enterprise Code-Signing Solution
Get One solution for all your software code-signing cryptographic needs with our code-signing solution.
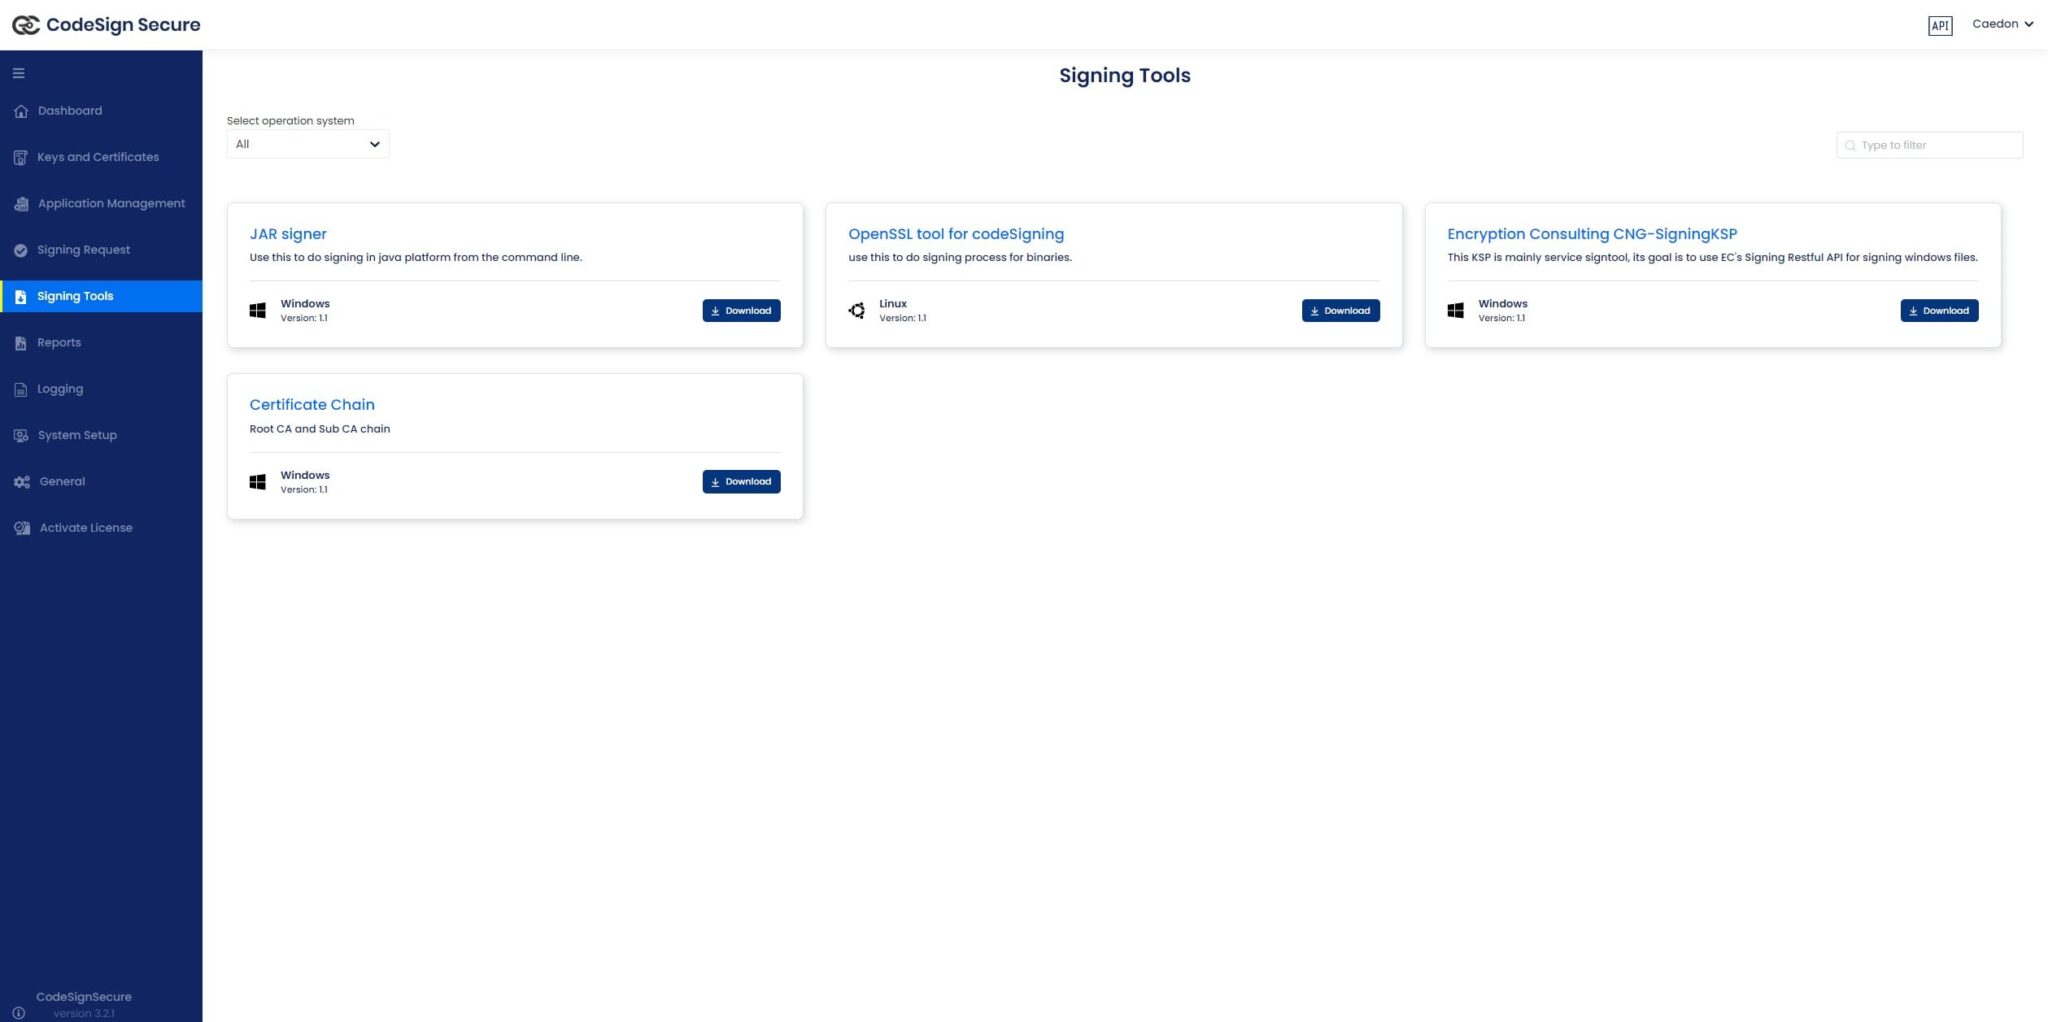
If you’re using our solution you can download the KSP using the steps below:
Sign in to Code Sign Secure.
Navigate to: Signing tools repository.
Download “Encryption Consulting CNG-SigningKSP”
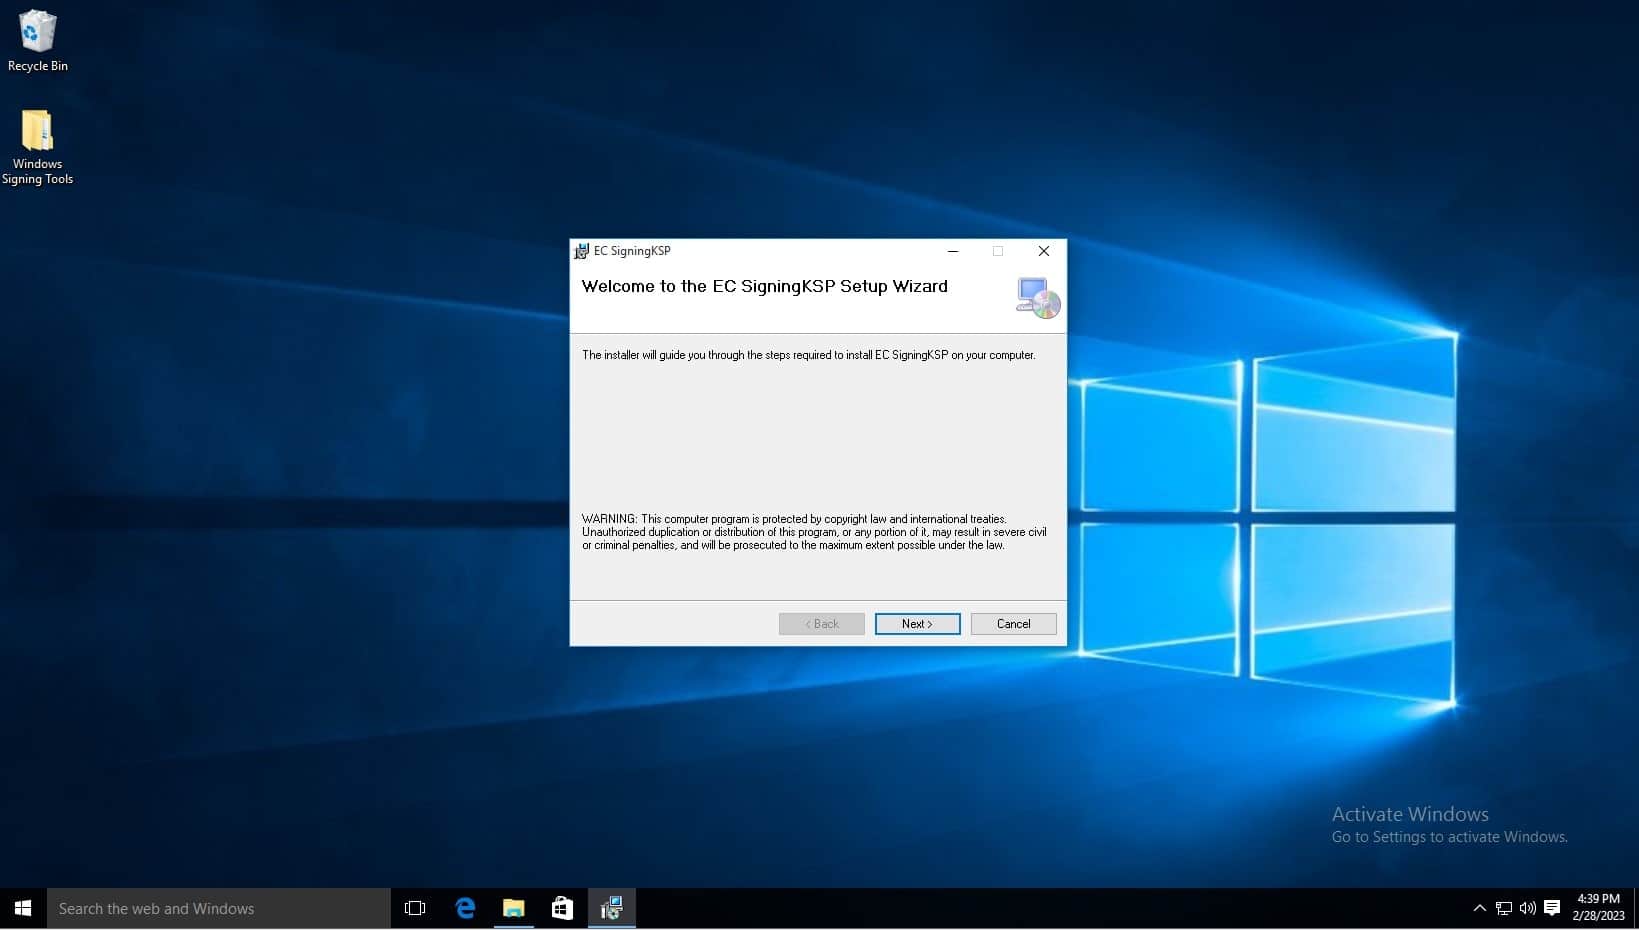
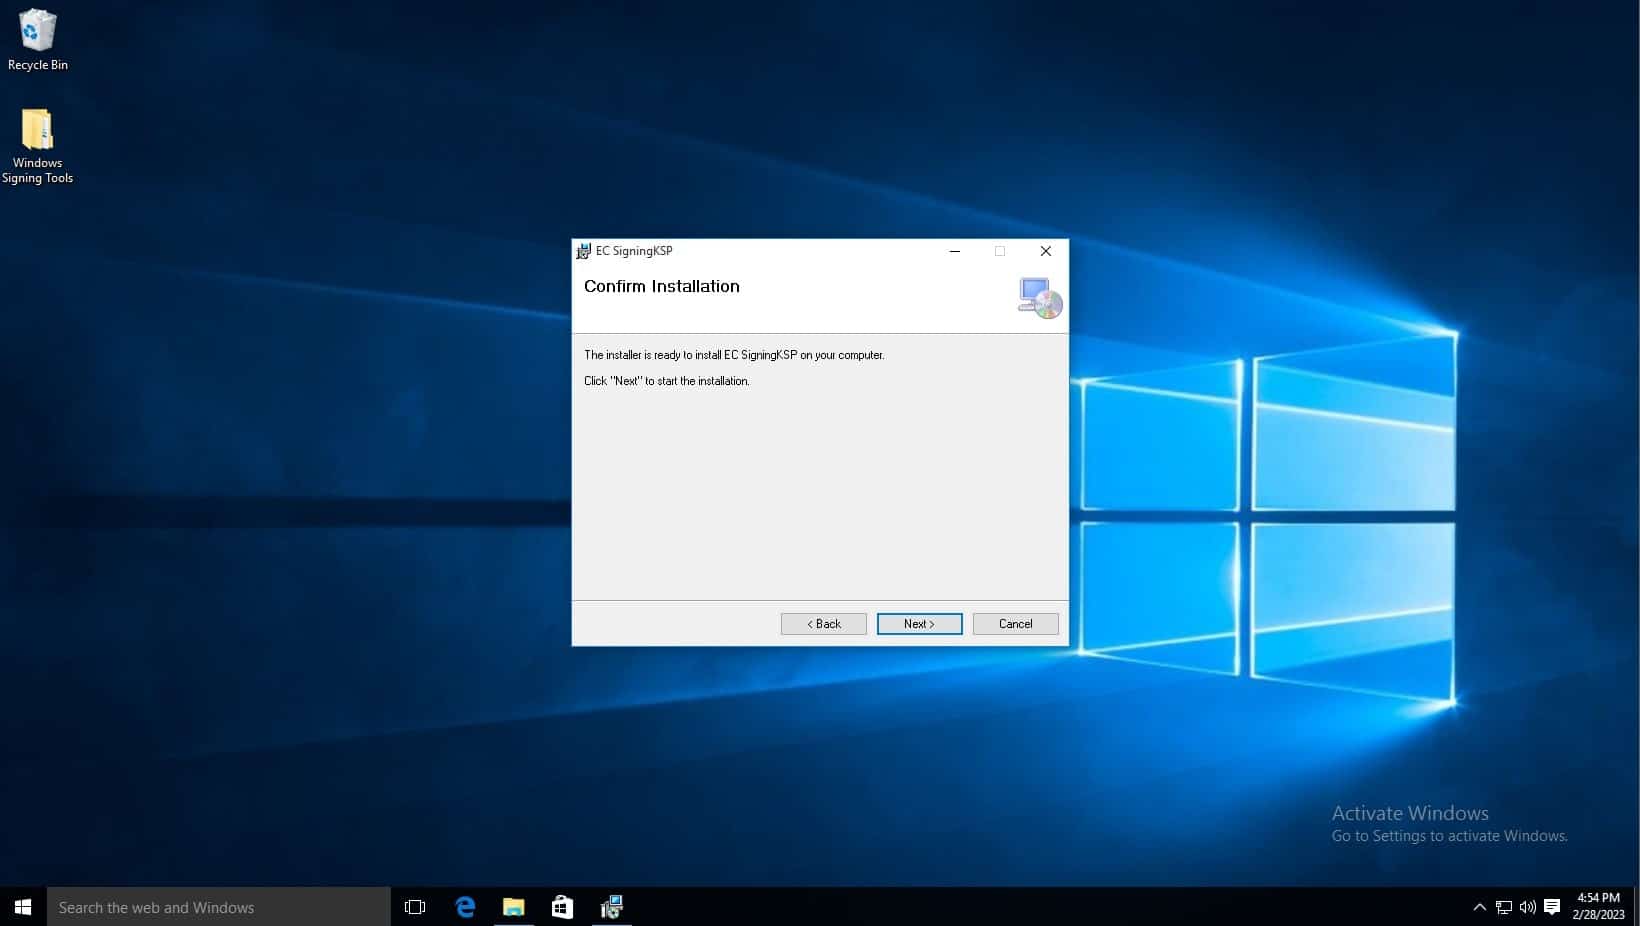
Install the client tools using the .MSI installer. The .MSI installer automates much of the configuration. Navigate to where the downloaded file is saved and launch the installer.
Click next when the installation wizard appears.
Click next.
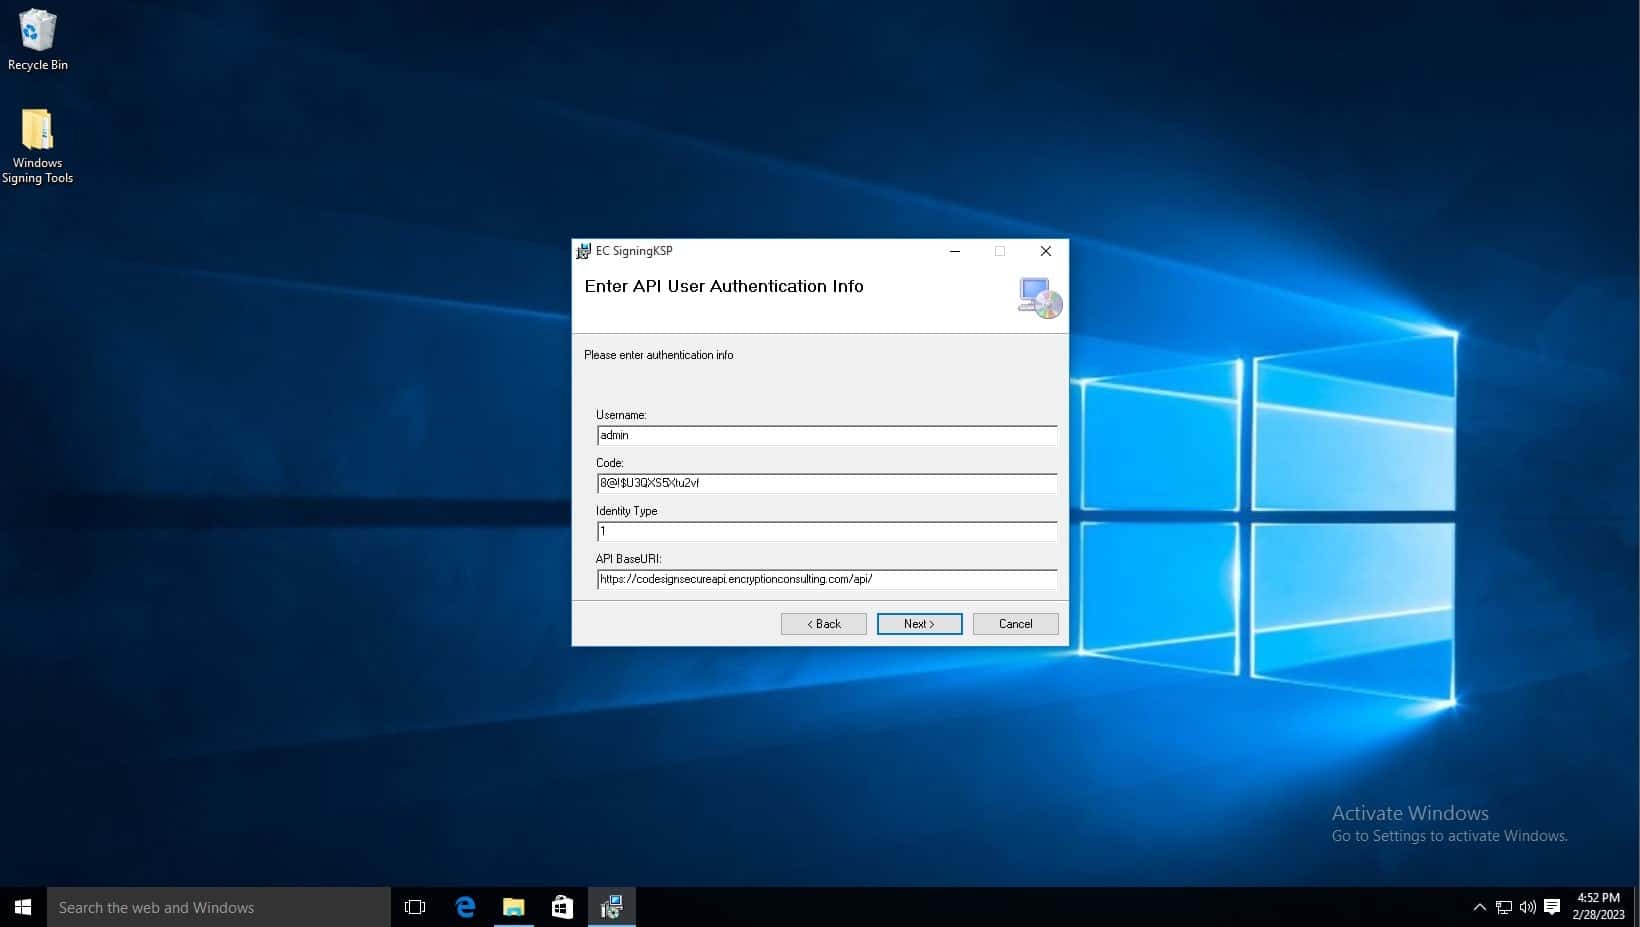
In the Username field, type admin.
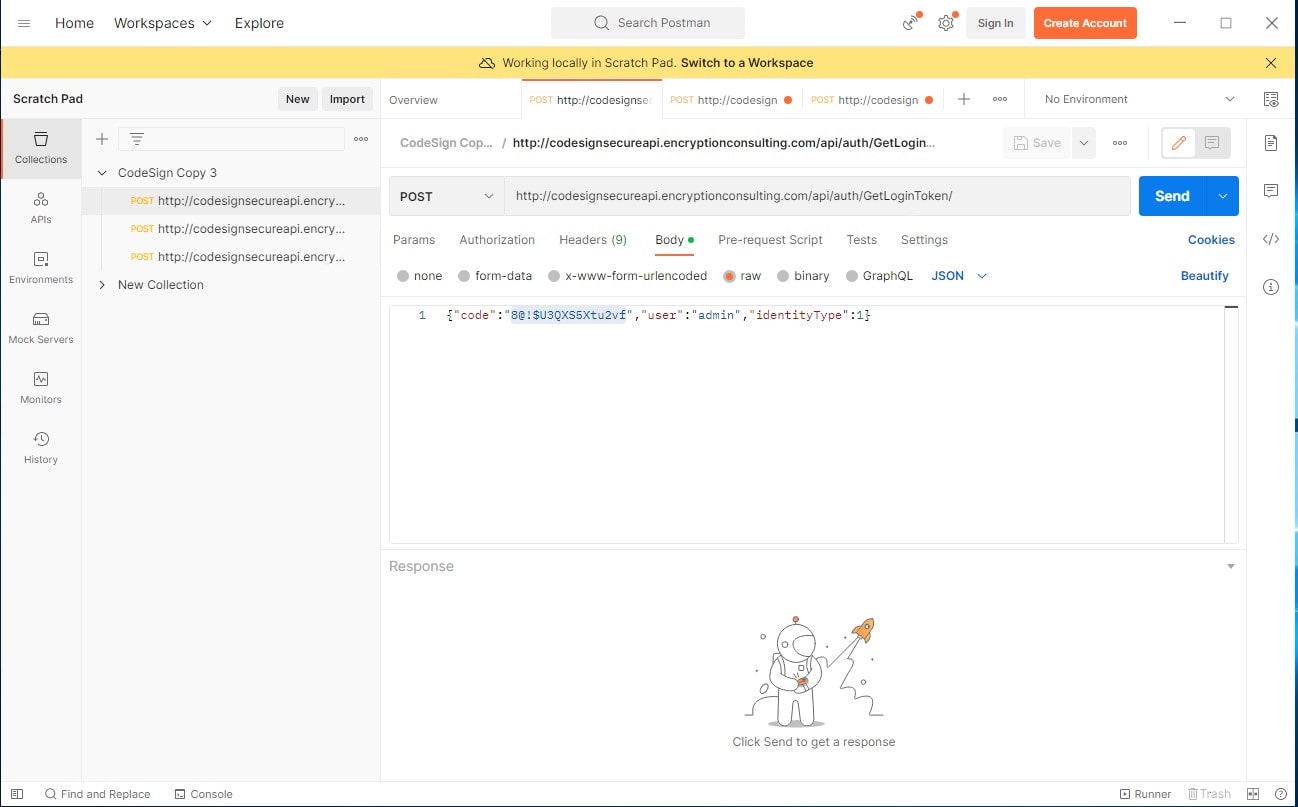
In the Code field, copy the code from the Postman API Repository. Click on the GetLoginToken api and copy the code from the Body.
Download PostMan from this link. Once downloaded, click the skip button at the bottom of the window. Once on dashboard, add a new collection using the plus sign button next to collections.
GetLoginToken API (http://codesignsecureapi.encryptionconsulting.com/api/auth/GetLoginToken):
This is the most important API, as this gives you a Bearer Token to use with the rest of the APIs, What should be in the body is shown below. The code serves as a password in order to get a the Bearer Token, the user field is the username, and the identity type field specifices the user type. Click Send to generate an output which has the Bearer Token listed at the bottom. Copy this token for use.
Change the IdentityType to 1.
Leave API BaseURL the same.
Click next.
Click next.
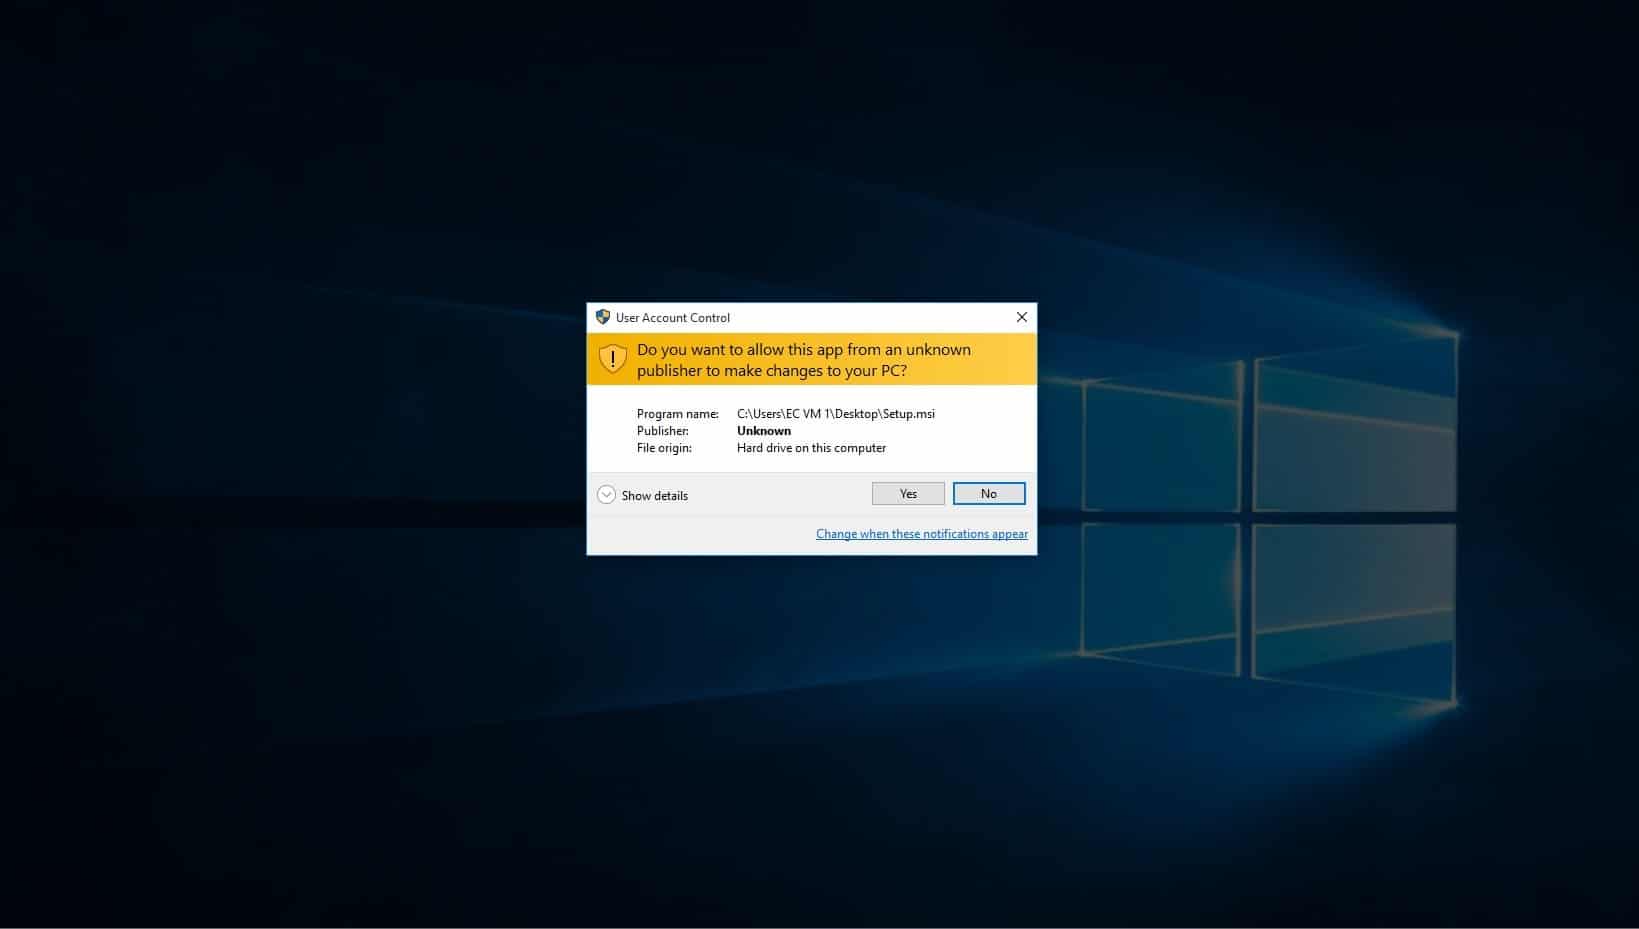
You will then be notified that this program will make changes to your pc, click yes.
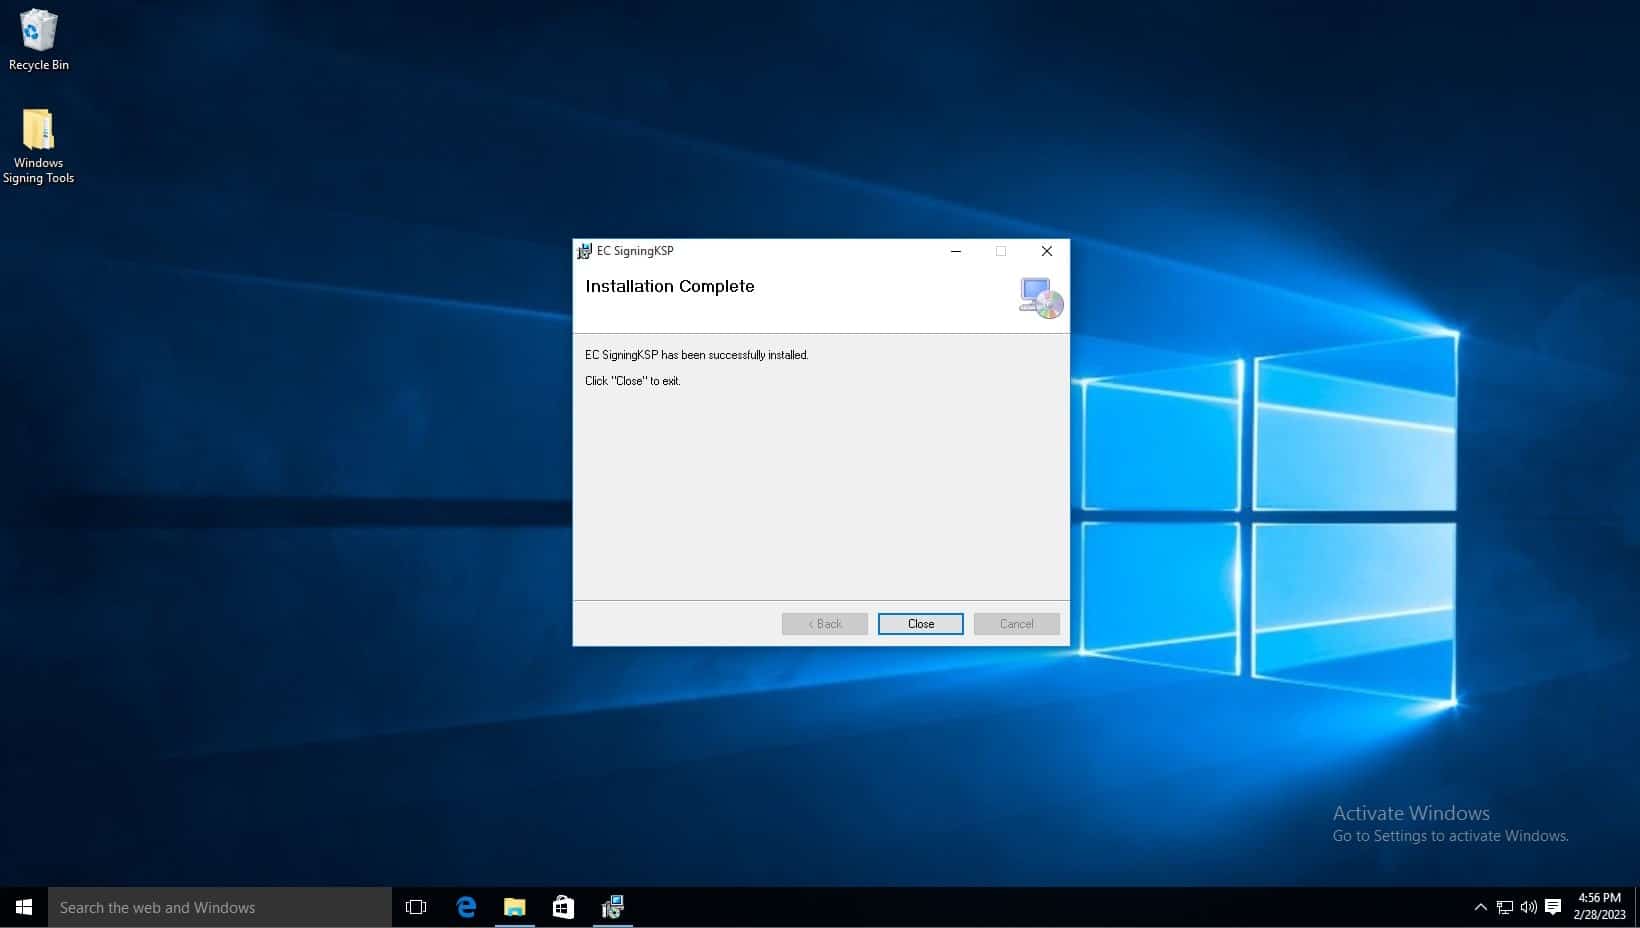
Installation is now complete.
Enterprise Code-Signing Solution
Get One solution for all your software code-signing cryptographic needs with our code-signing solution.
Please follow the steps below to setup with azure devops:
Navigate to dev.azure.com and sign in with your Microsoft account or you can start free with your GitHub Account
too
Give the details as prompted
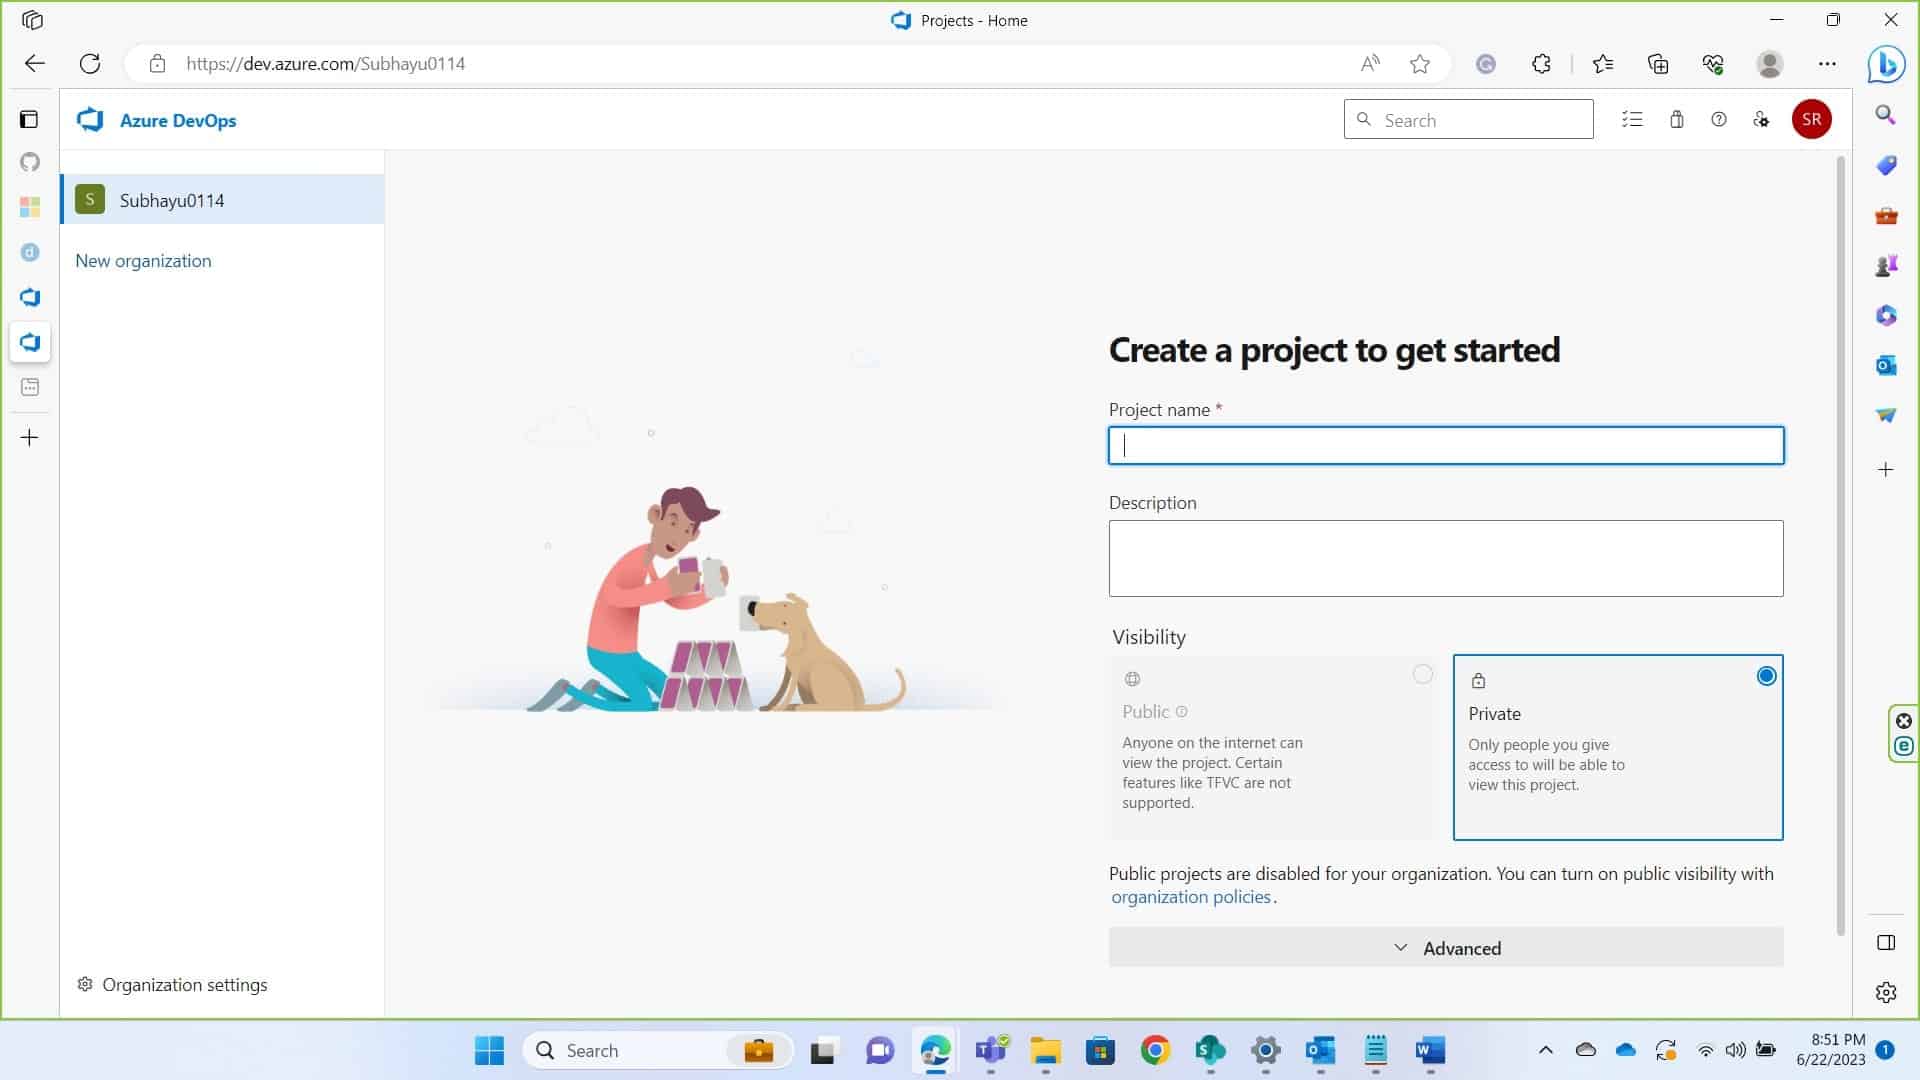
You’ll be asked to create an organization if you haven’t already. Create a organization and get started with the
project.
If you already have a project where you want to build the pipeline, navigate to pipelines. If not create a
simple
project first. Provide the necessary details to continue.
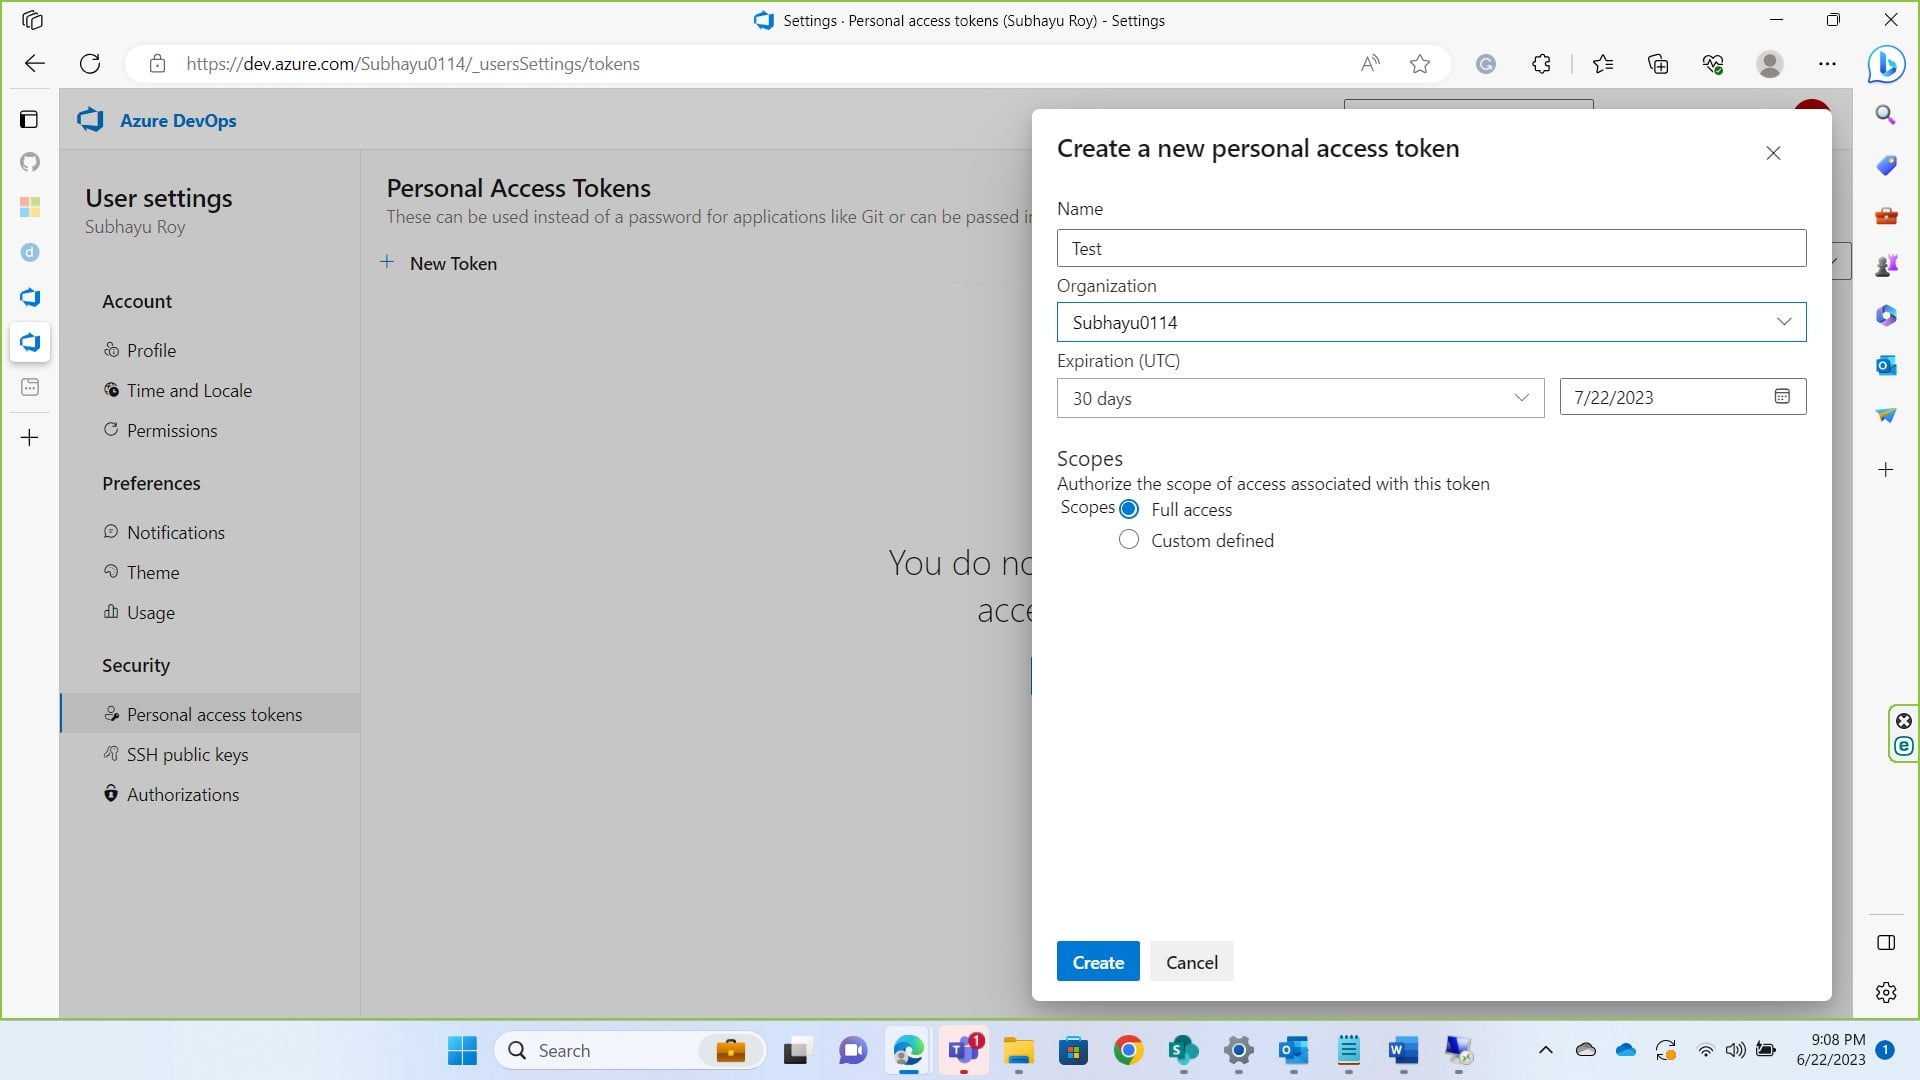
After a project is made, navigate to user setting at the top left corner of your screen and click on personal
Access
token. On the next page click on “New Token”. On the dialogue box prompted, provide necessary details such as name
of
the token, organization name (the organization you created/accessed earlier. Set Expiration and Scopes. I have set
the
Scope to full access.
Click on create and copy the token somewhere as you won’t be able to see the token again.
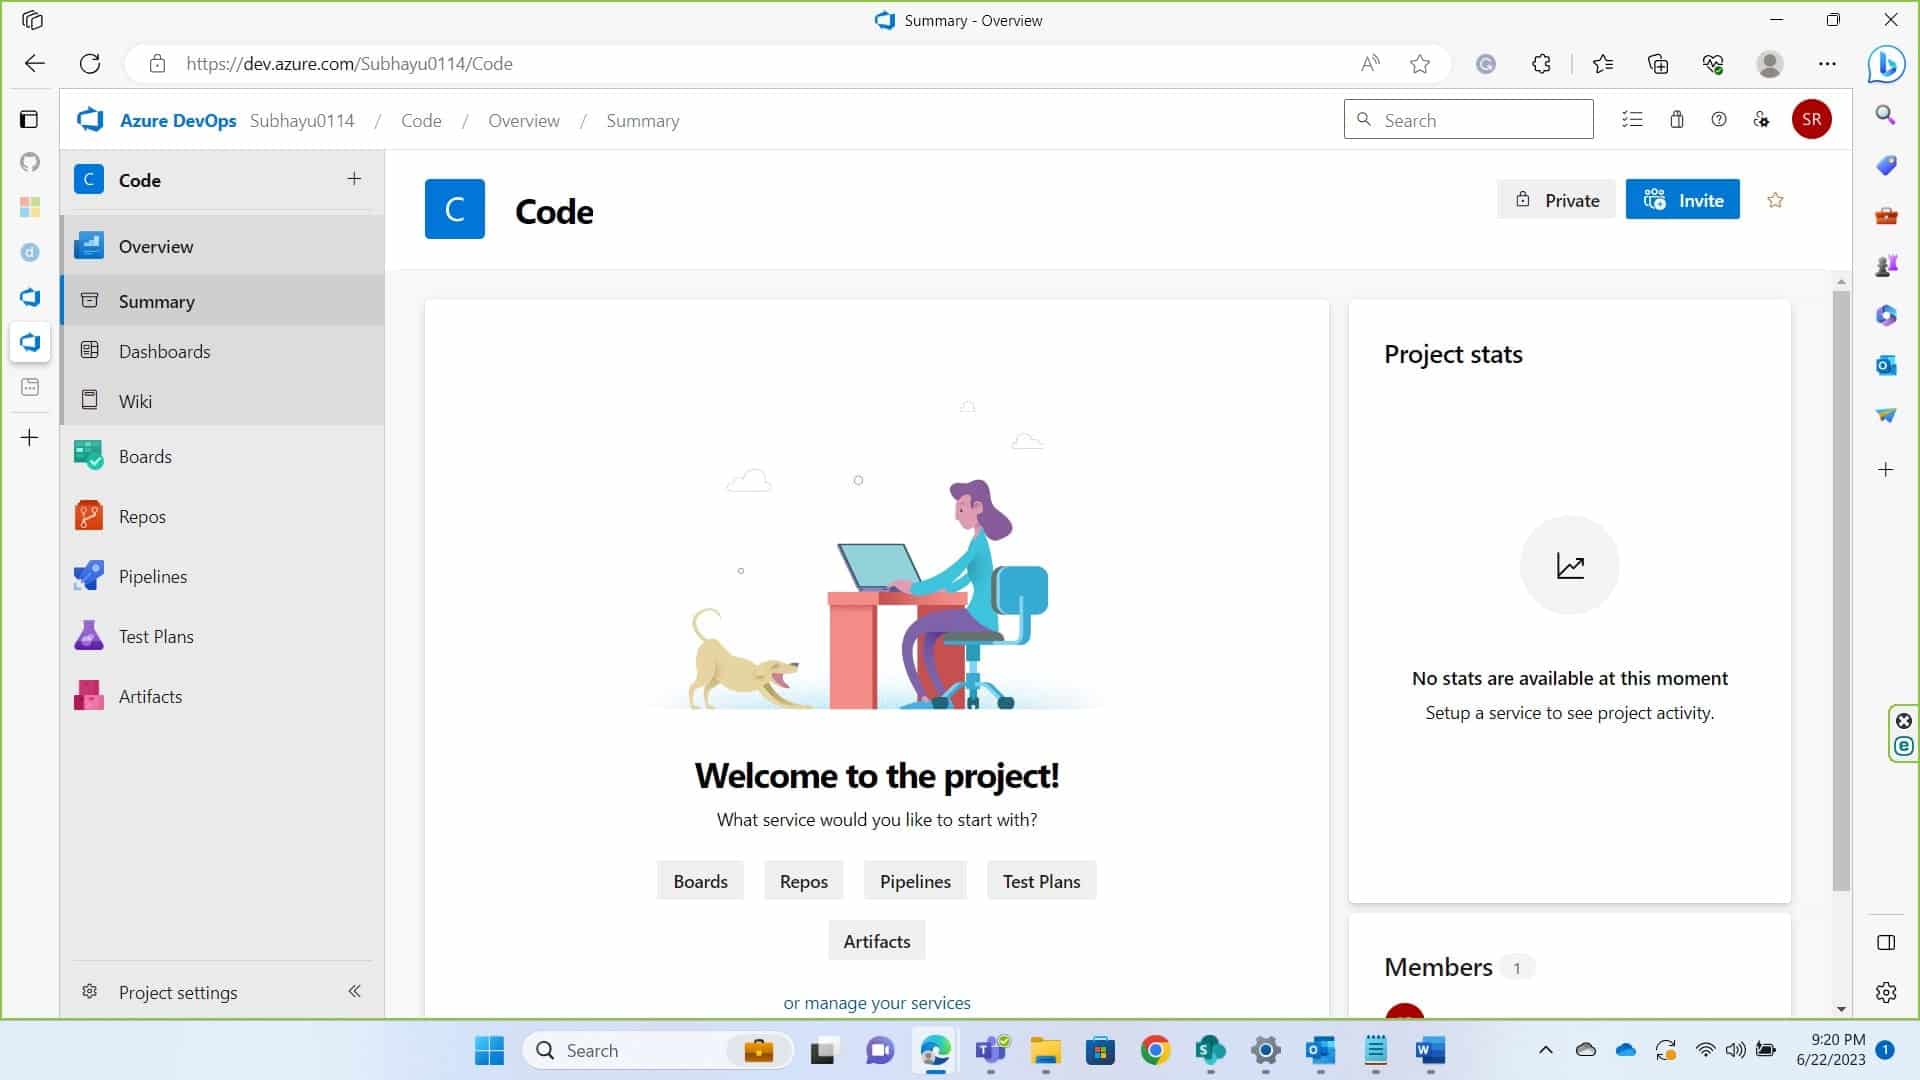
After we are done getting a token, we need to set up a self-hosted runner. This is a machine where Signtool
and
ECSigningKSP is installed and configured. To do so return to the Code Summary page and on the bottom right of the
screen
you’ll see Project settings, click on that.
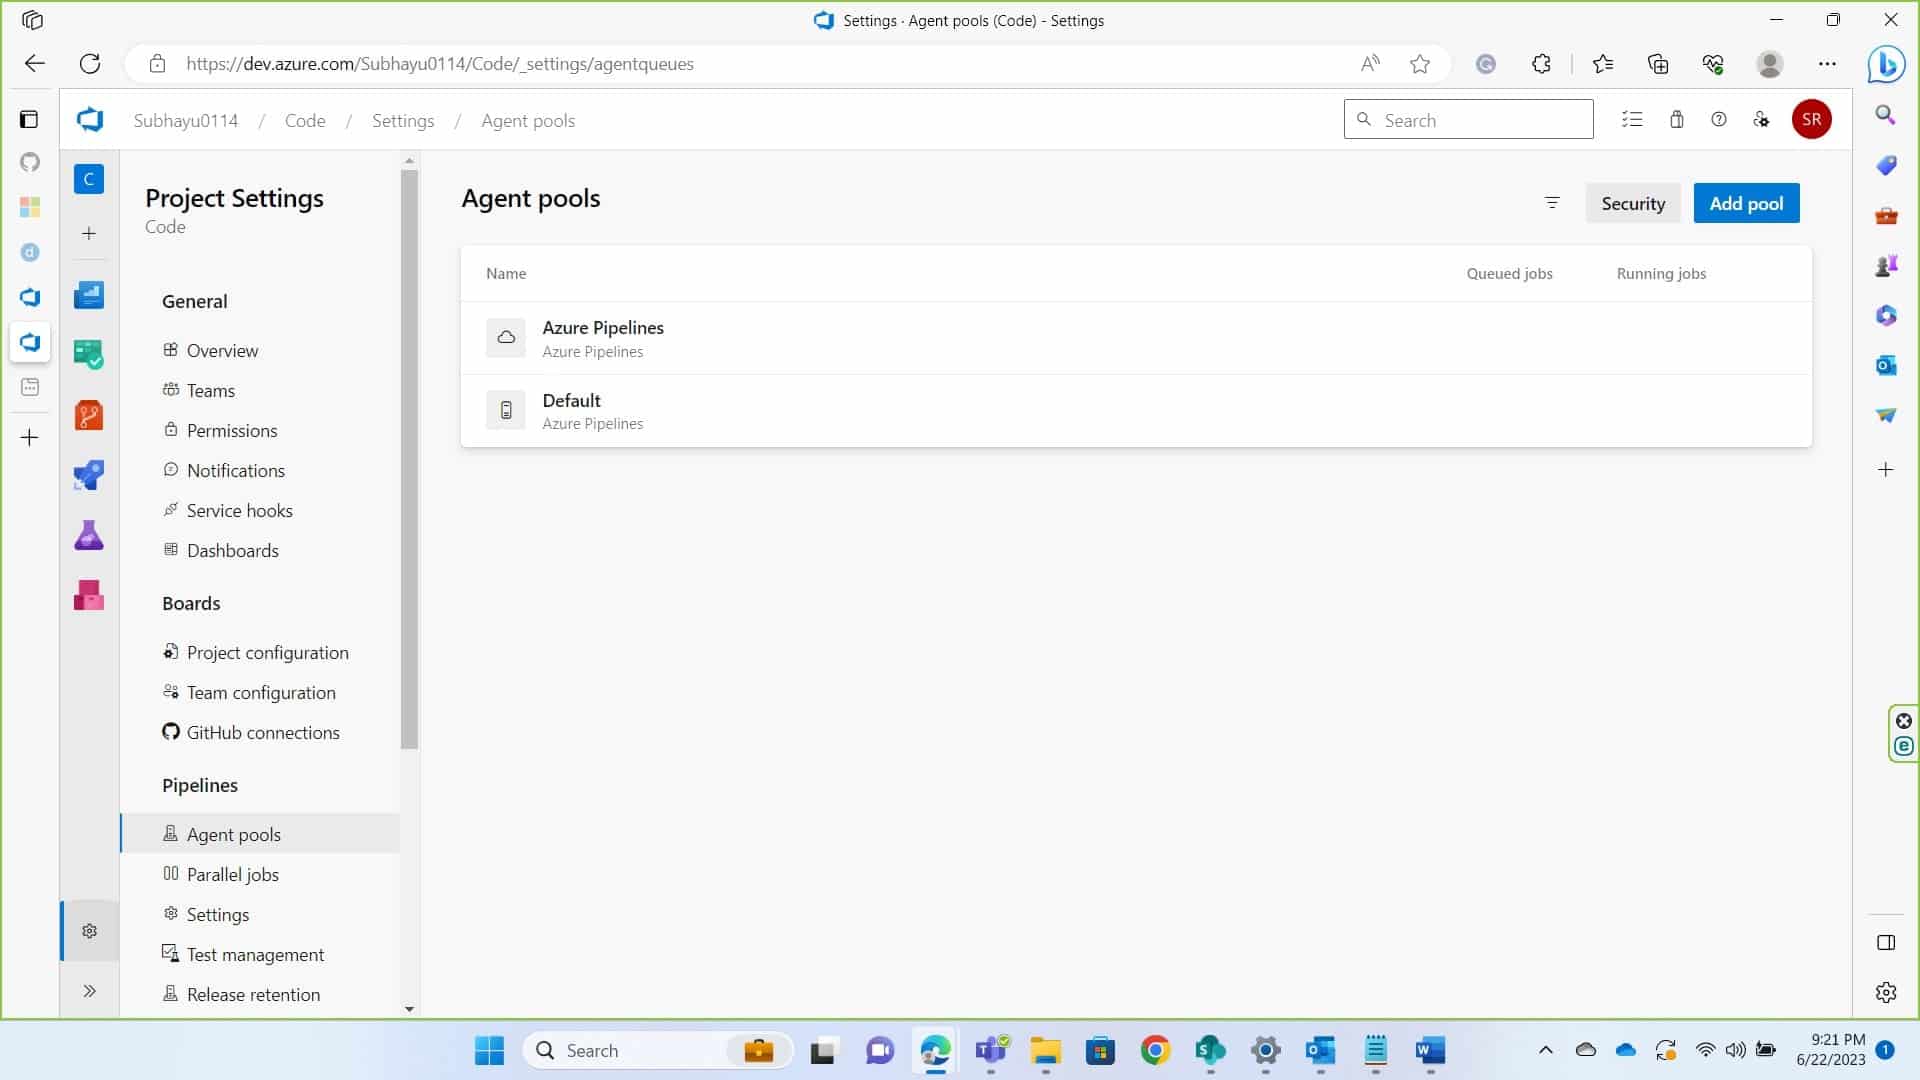
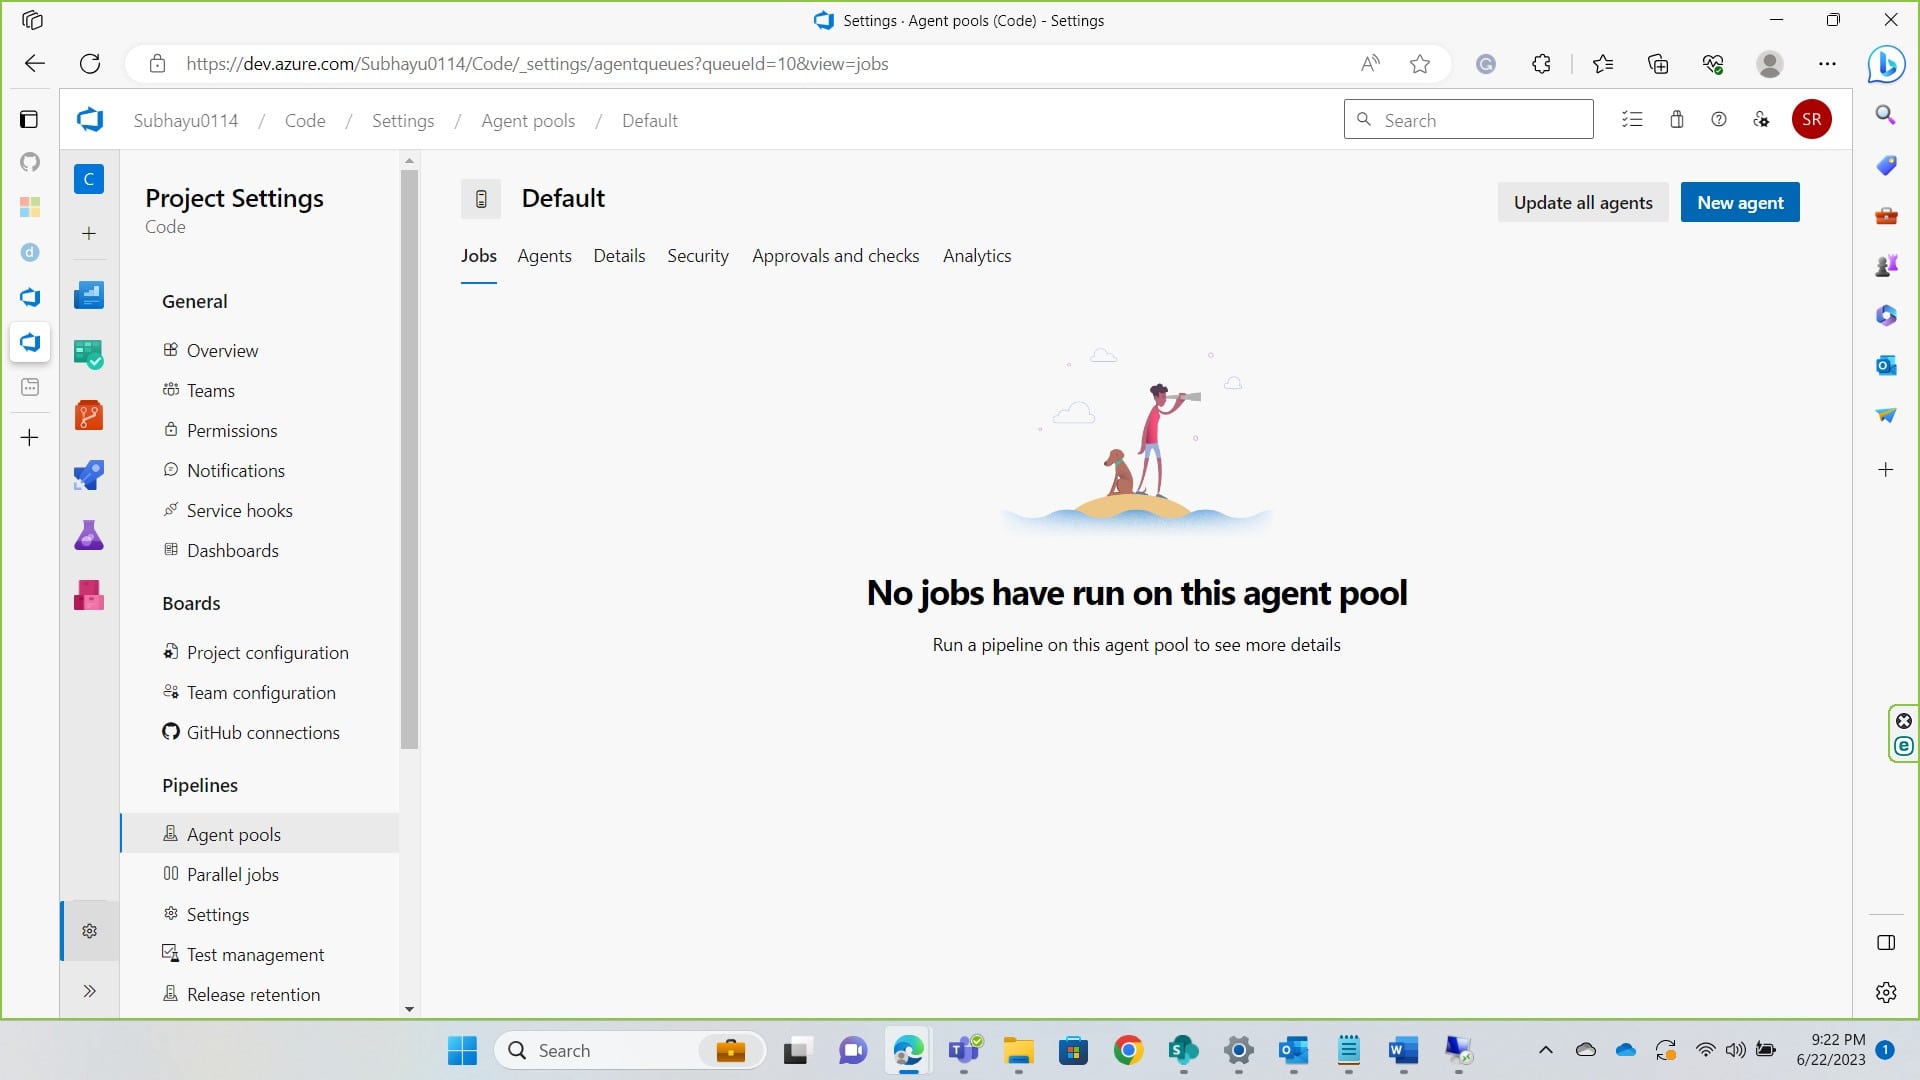
Under Pipelines, you’ll see Agent Pools. Click on that and then click on default.
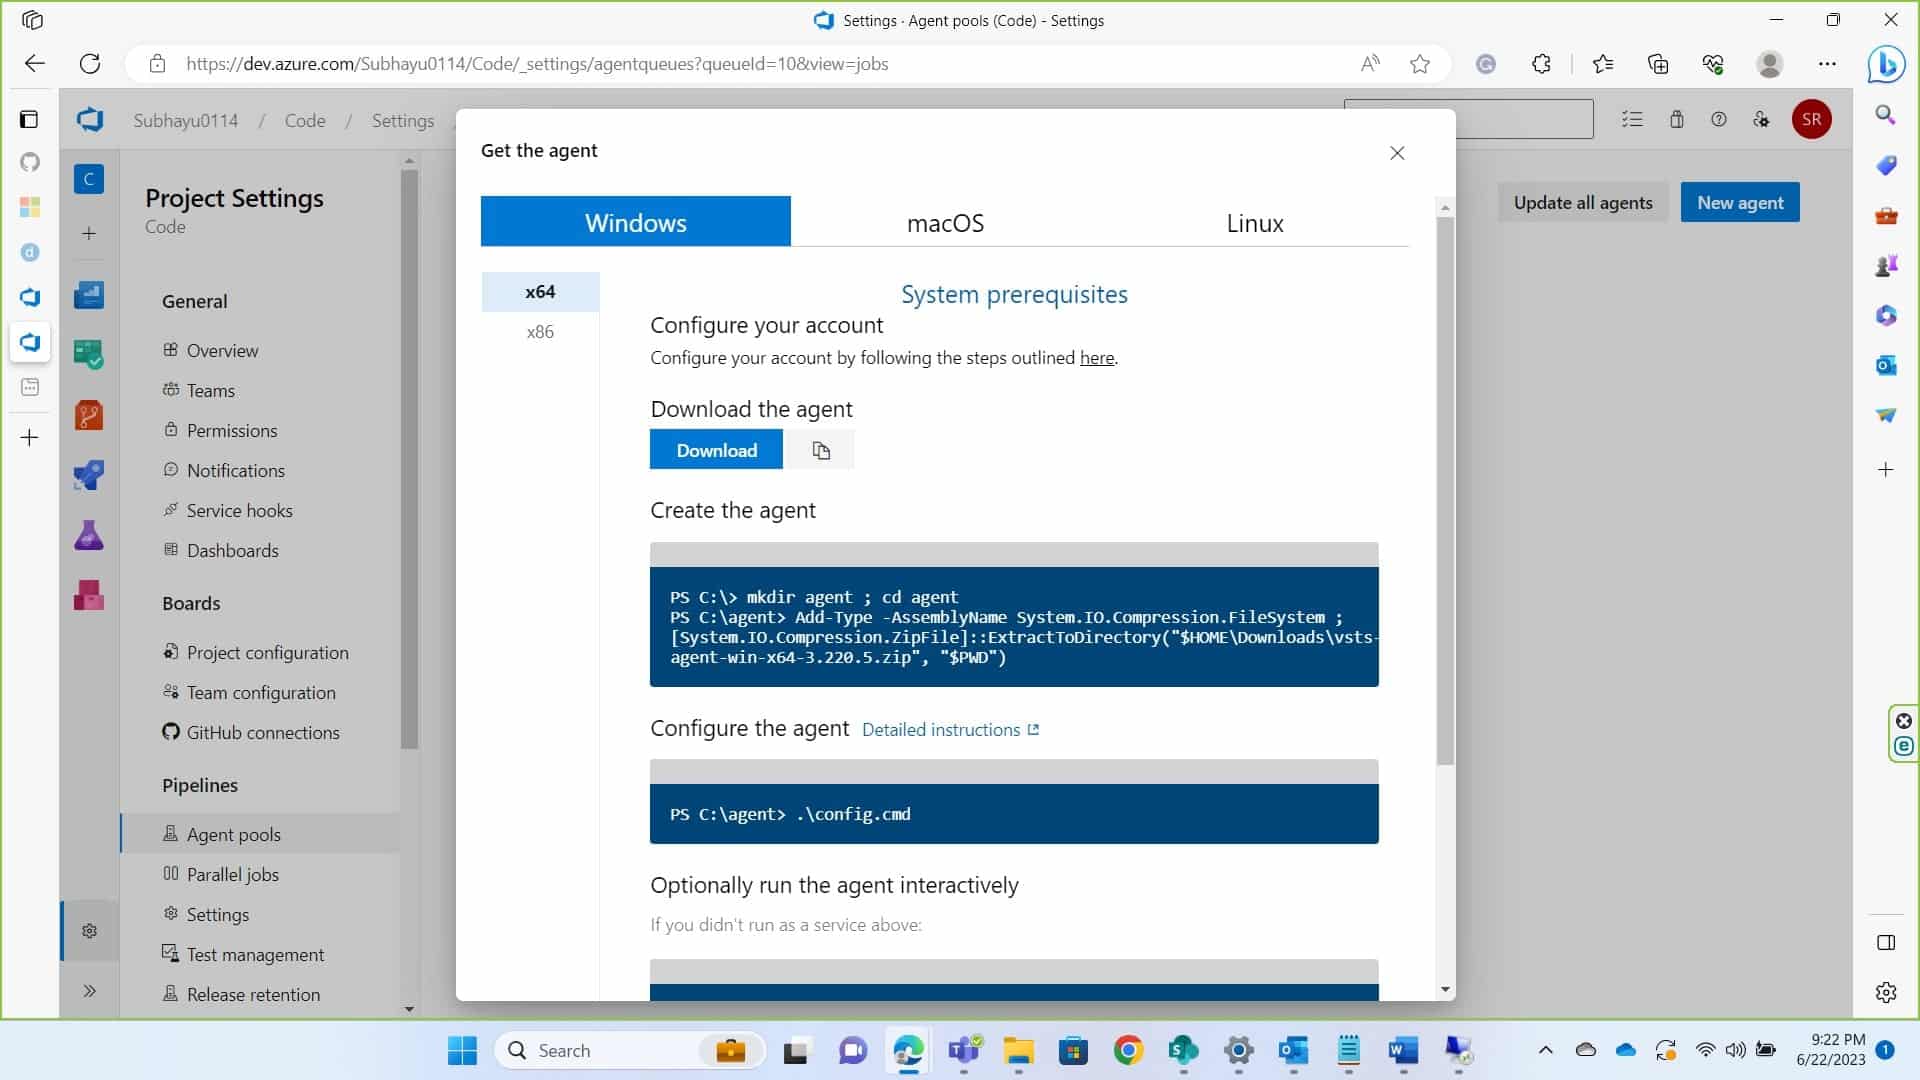
Click on new agent at the top left.
Get the agent as per your operating system. I am proceeding with windows. Download the agent, extract it to a
folder
“C:\agents”.
You can also follow this documentation for more help about this
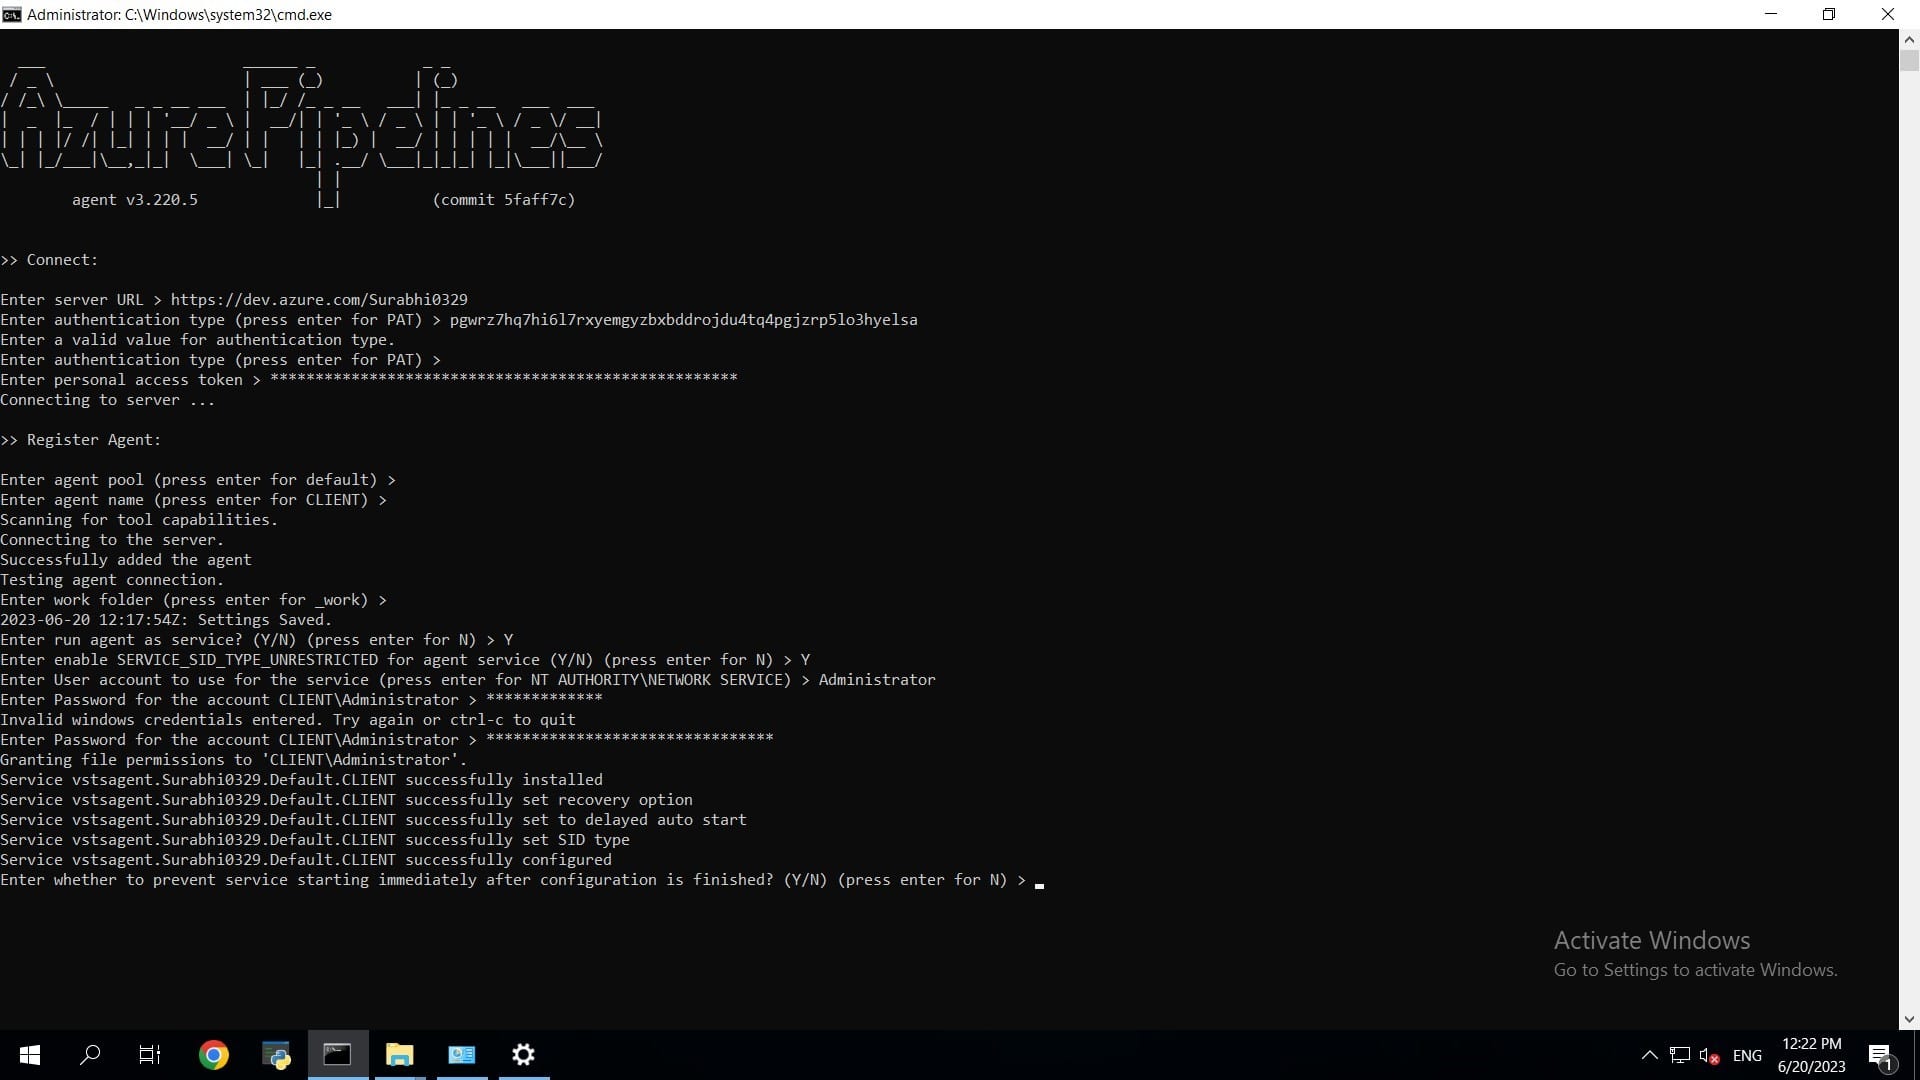
After you extract the files, navigate to the folder where you extracted it to from cmd and run .\config.cmd.
Now, Server url will be https://dev.azure.com/<your_organzation_name Just press enter for PAT
on the authentication type and on the next question provide the token copied earlier.
Once the Agent is registered, For Agent Pool, since we’ve it as default, press enter If you want to name your
agent something you can name them but press enter for it to be named as CLIENT.
Once the agent it added, You can leave the work folder as default or change as per your choice For Running Agent
as a Service enter Y as in yes For User account to use for service make sure you set this as
Administrator, this
is important because you’ll require Administrative Privilege to perform code signing. Provide password for your
administrative account of your machine
Since we have set this as a service, the agent will run automatically if we hadn’t set this as service, we would
have to
manually run the agent.
Navigate to services.msc and scroll down to Azure Pipeline Agent to see you’ve se Log on as Administrator. If you
didn’t
do so, you can change it from itself. Just click on log on and a dialogue box will appear; navigate to log on, set
it to
Administrator and provide the password for the same and restart the service. Once this is done, go back to Azure
DevOps
to build the pipeline.
Click on pipelines to get started.
Click on Create Pipeline in the following page.
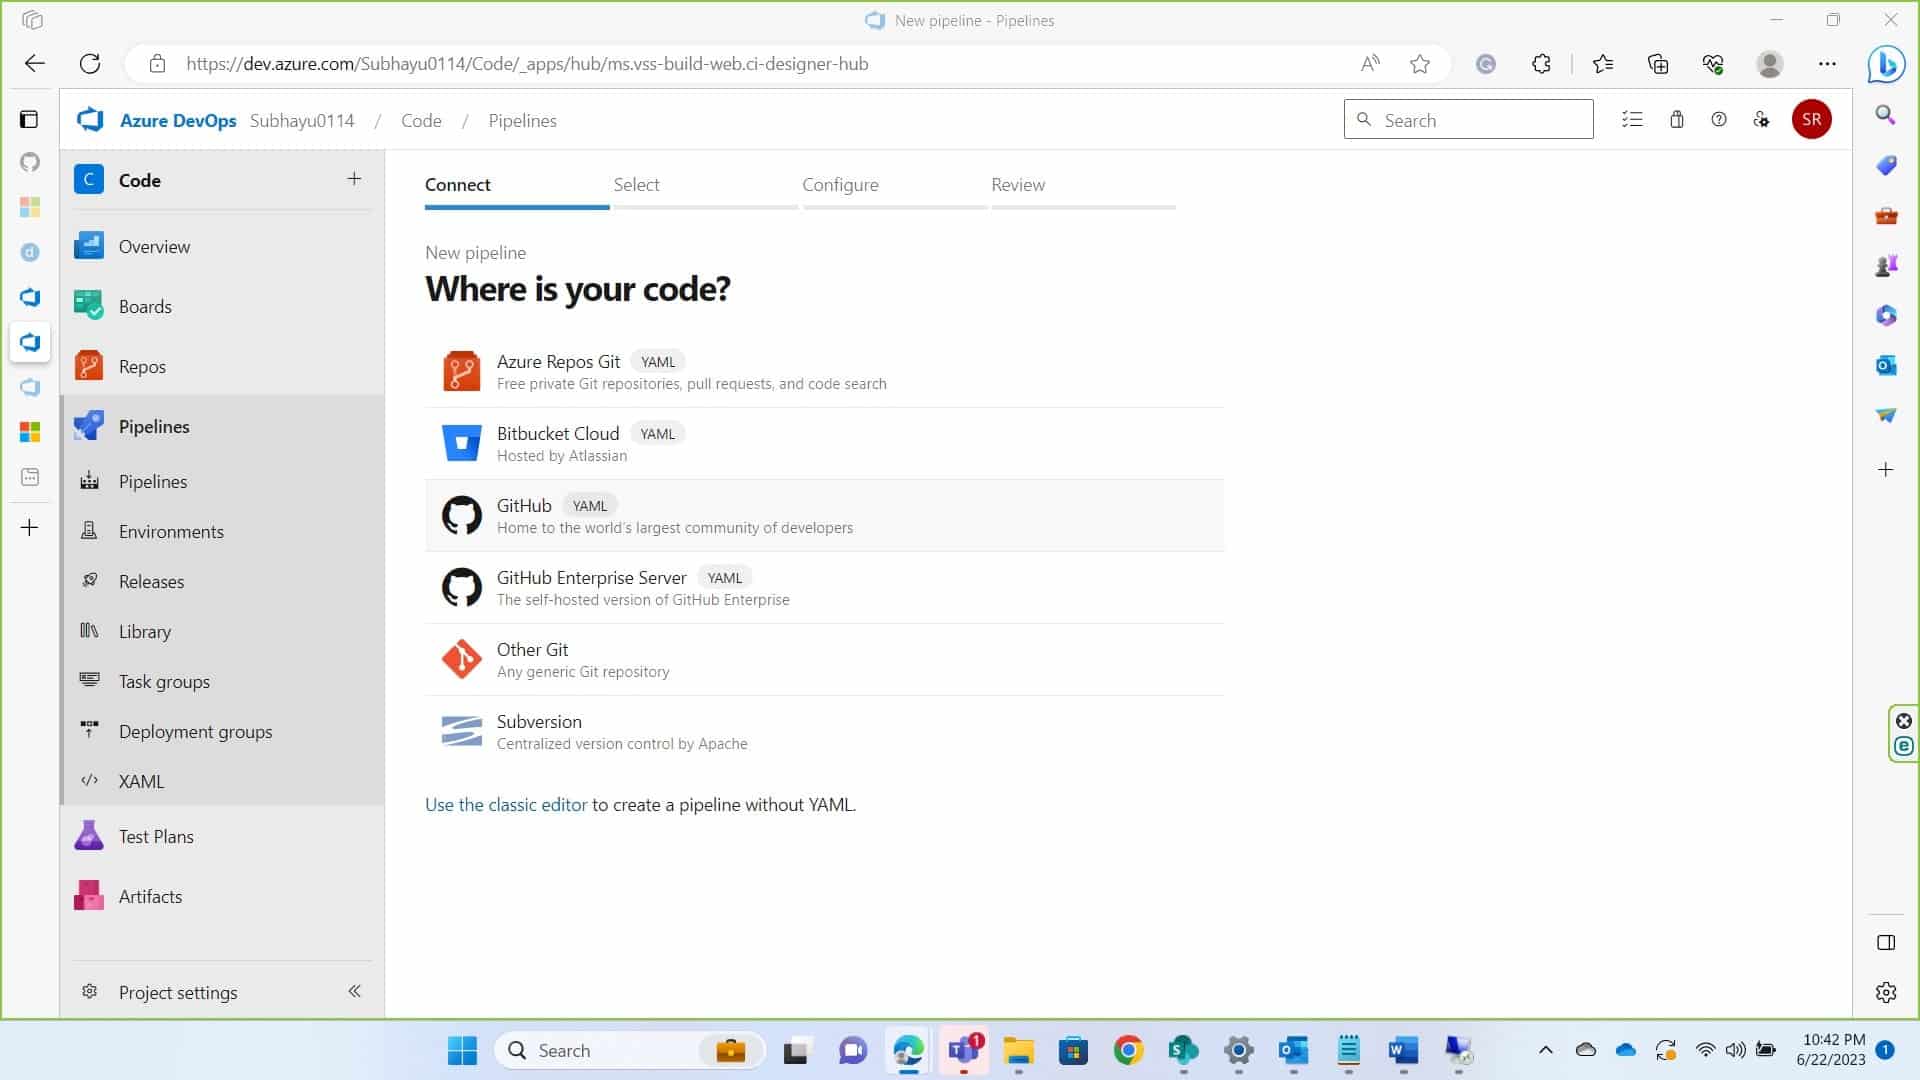
In the next page, in the Connect section, choose where your code is. In this my code is in GitHub and I am
proceeding
with so. You will require Administrative Privilege of your repository to grant access.
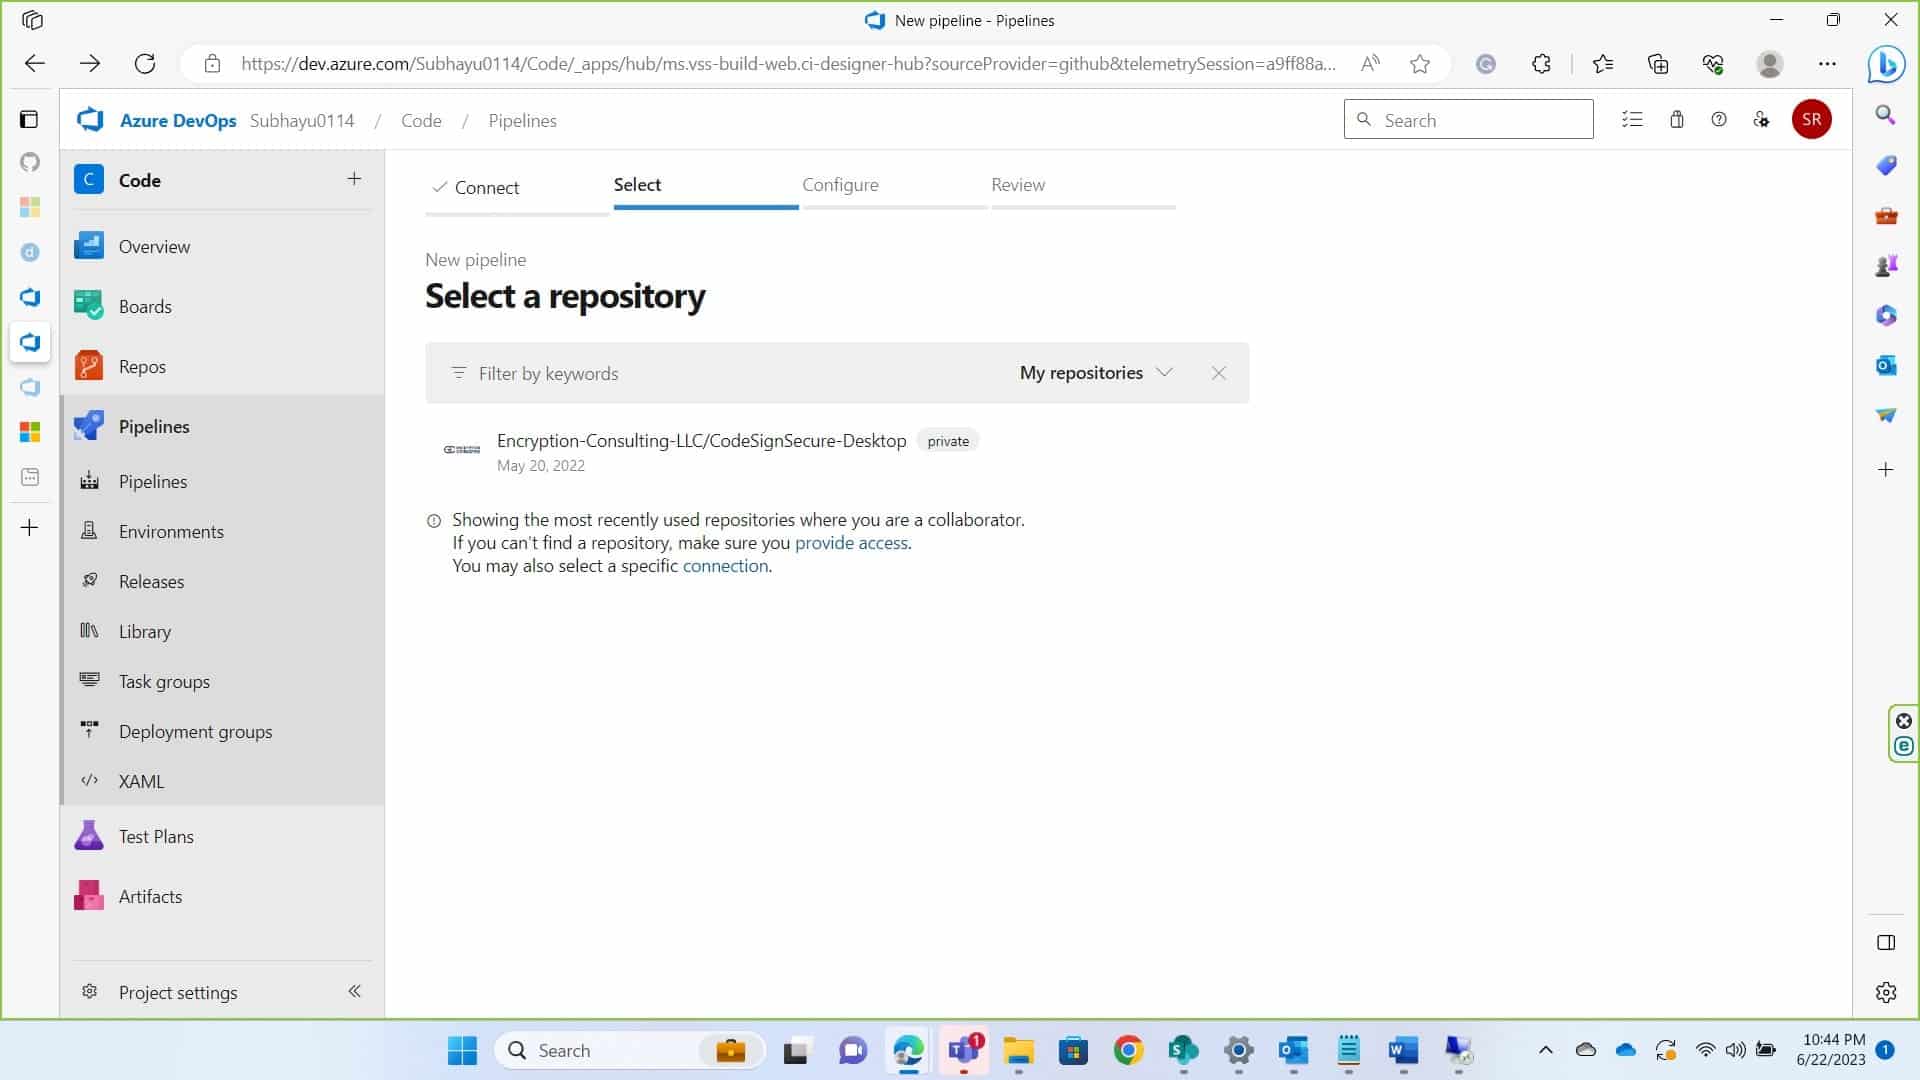
Select the repository where you’ve your code.
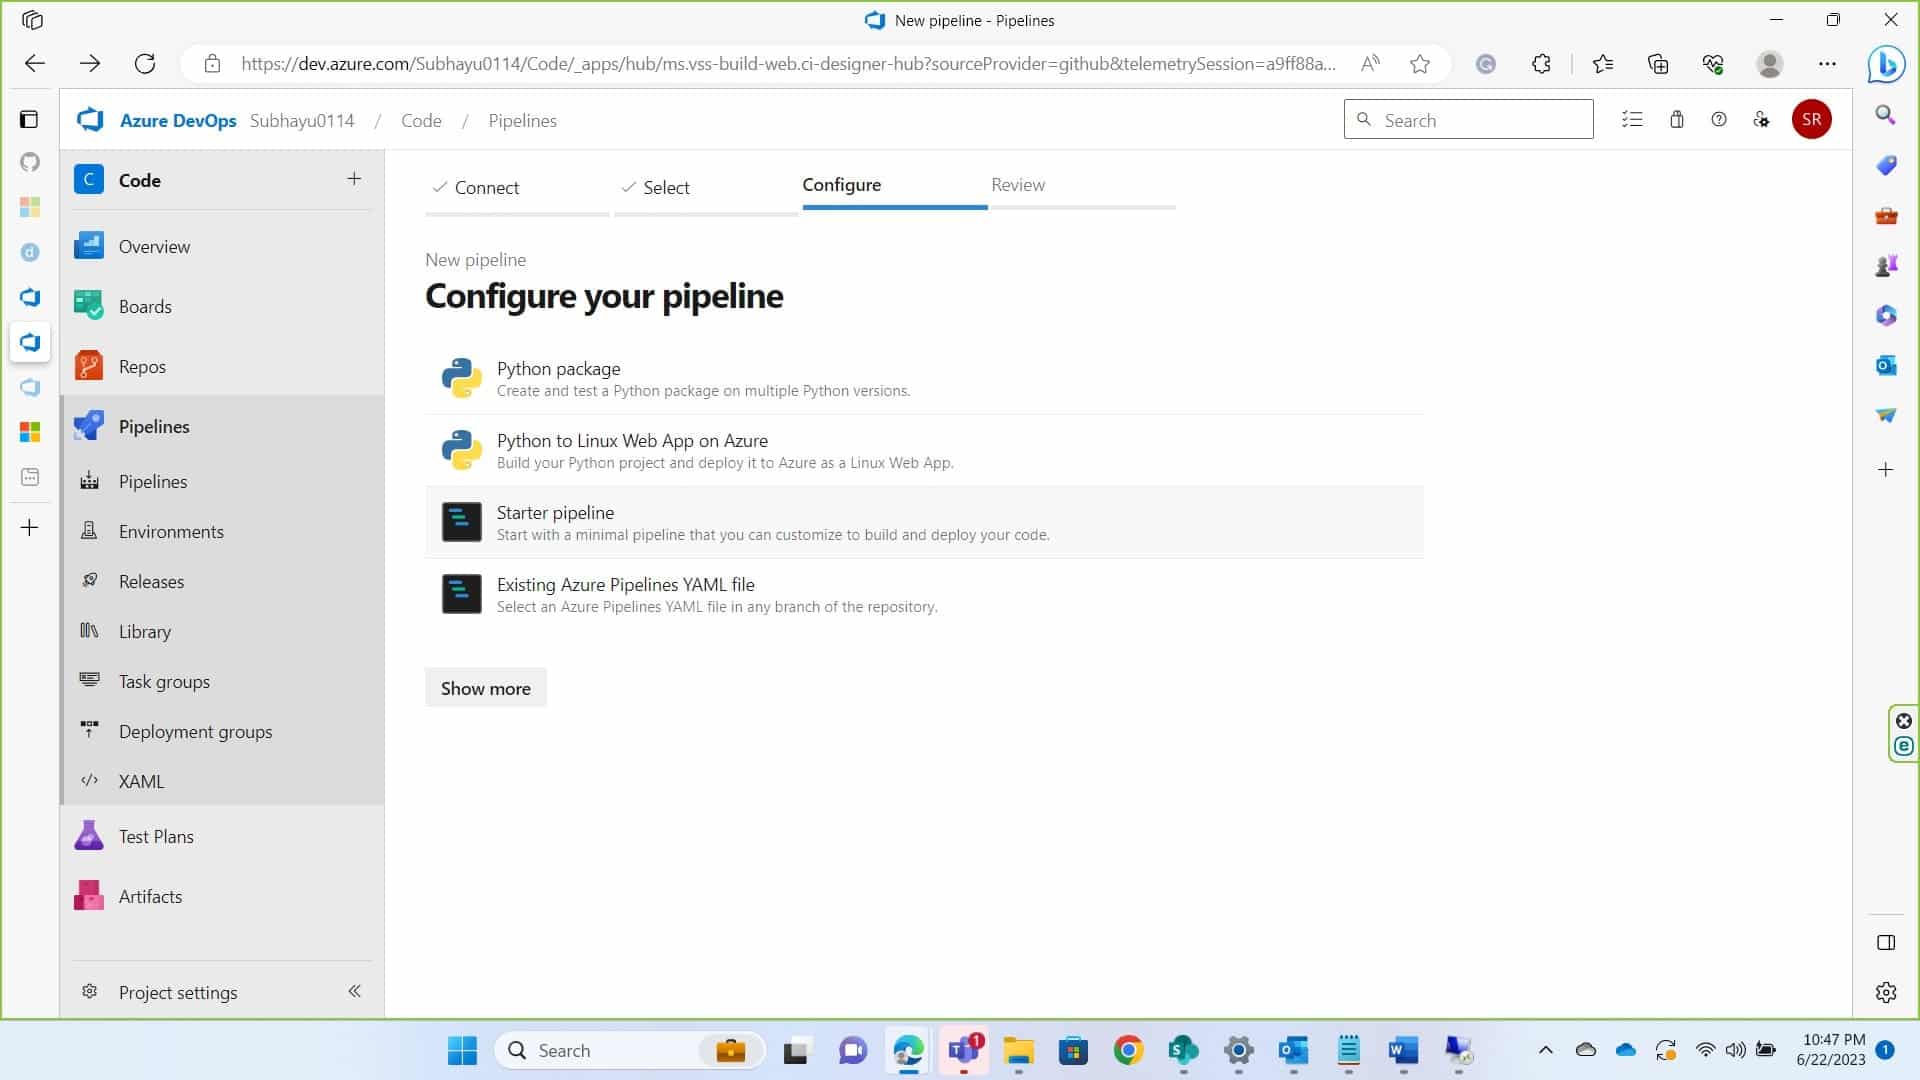
Now in the Configure Section, if you don’t already have .yml file in your repository click on Starter Pipeline,
if
you do click on Existing Azure Pipeline. For starter pipeline, you may need to create a new branch or commit on
the main
branch itself it’s your choice.
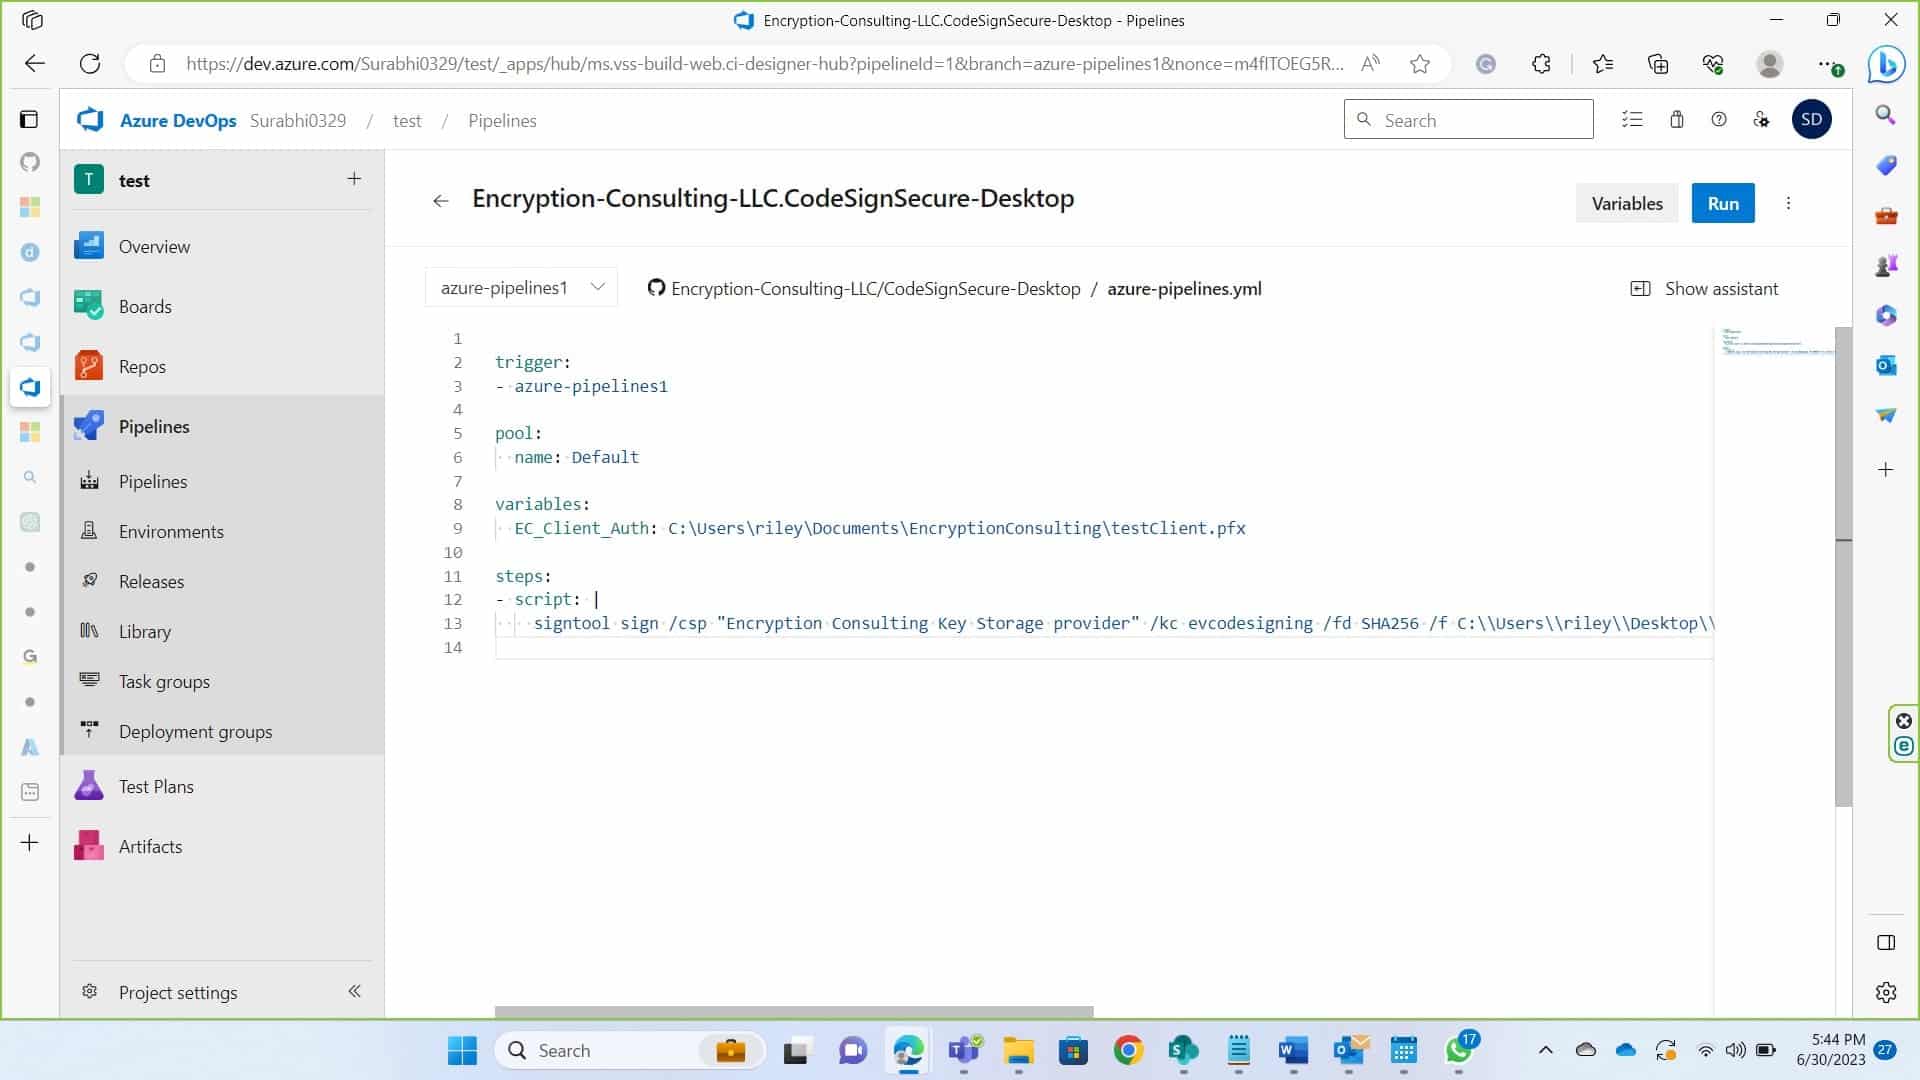
In the editor write the following script
trigger:
- <your_branch_name>
pool:
name: <your_pool_name> #In this documentation it’s set as Default
variables:
varible_name: variable_value
Please replace the variables specified under <variable name>. A short description of expected variable is given below.
<key name>: This refers to the cryptographic key used to sign the code. Example – evcodesigning
<hashing algorithm>: You need provide the name of hashing algorithm such as SHA256, SHA384, or SHA512. It must be one of these three values.
<certificate location>: An example of what can be put in this field is C:\testing.pem. The certificate.pem file MUST be included in this input. You can generate a pem file of the certificate for codesigning, if you have the key name using, ECSigningKSP. For doing so follow the commands below:
In your device where you have ECSigningKSP installed and configured, navigate to the folder of ECSigningKSP, which is usually present in “C:\Program Files\Encryption Consulting\SigningKSP”
In your command prompt reach to this directory.
Then use following command to get pem file of the certificate.
<time stamp server>: A timestamp server provides proof that a digital signature was performed at a specific time, allowing verification in the future that a file was signed at a particular time. The one we generally use is http://timestamp.digicert.com
<file path>: This is where you provide the path of file that you want to sign. Example C:\<Folder_name>\<File_name>. Make sure you have provided a file name with the proper extension.
When you click save and run, you’ll prompted with branch tag, make sure the name provided here and under trigger in script is same before running the script.
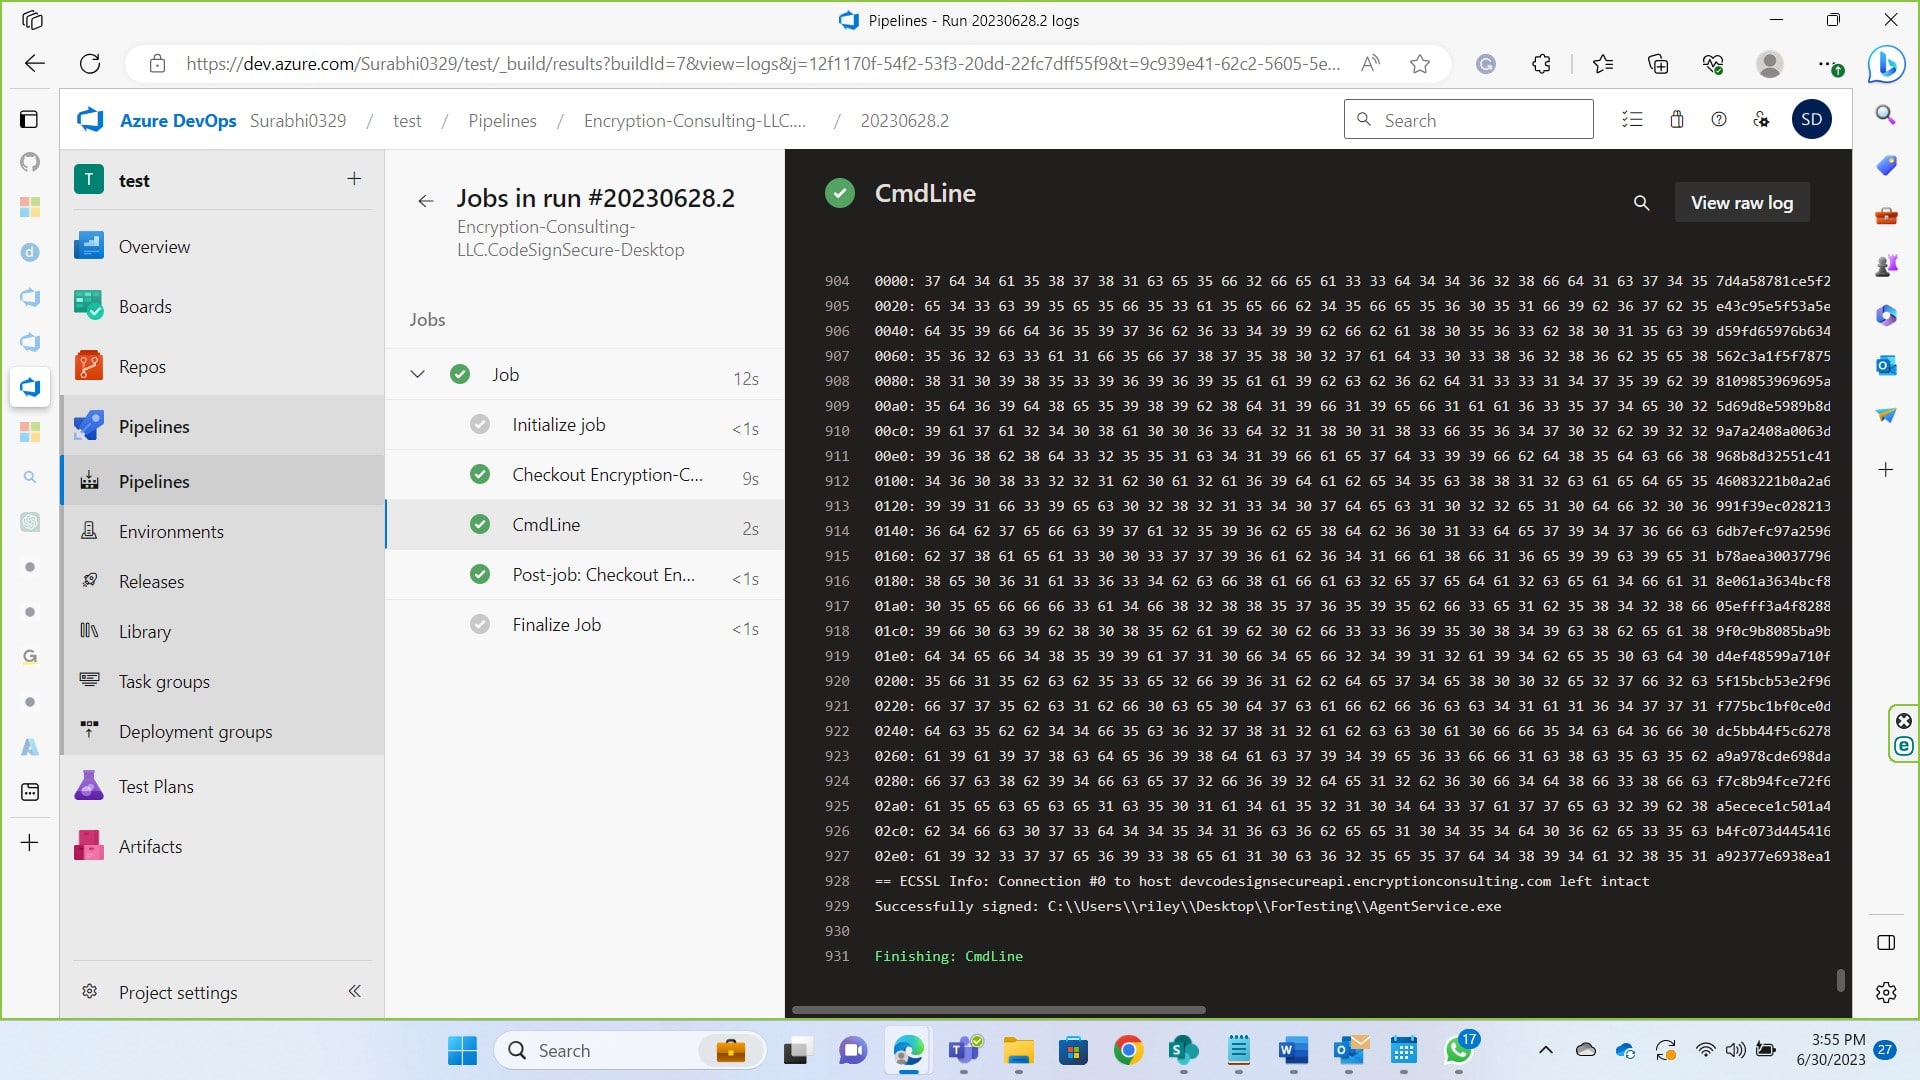
Once the build is successful, you’ll see that your file has been successfully signed.
Conclusion
The article above demonstrates the process of integration your Azure Devops CI/CD pipeline with codesigning. It is a very simple process as you’re just required to set up a runner, connect it with an Azure Devops account and build the pipeline to run the job. Codesigning is crucial in today’s date as malicious software, files continue to grow. Code signing establishes trust between software publishers and end-users, assuring them that the code has not been compromised or altered. You can contact us at [email protected] for any help regarding our code signing solution.
01. AWS Unveils DSSE-KMS, A Dual-Layer Encryption for Enhanced Data Security!
AWS has introduced Amazon S3 dual-layer server-side encryption with keys stored in AWS Key Management
Service
(DSSE-KMS). This new encryption option provides two layers of encryption to objects uploaded to an Amazon S3
bucket,
ensuring compliance with regulatory requirements. DSSE-KMS meets FIPS and CNSA encryption standards and
offers four
server-side encryption options, including DSSE-KMS.
Users can enable DSSE-KMS through various methods, such as the AWS CLI, AWS Management Console, or Amazon
S3 REST API.
With its enhanced security features, DSSE-KMS is available in all AWS Regions. Pricing details are on the
Amazon S3 and
AWS KMS pricing pages.
At the re:Inforce conference, AWS unveiled Payment Cryptography, a new service streamlining payment
cryptography
operations. Designed to meet PCI security requirements, this flexible solution replaces on-premises payment
hardware
security modules (HSMs) by providing encryption and decryption functions for payment-related data.
With support for symmetric and asymmetric keys like TDES, AES, and RSA, Payment Cryptography ensures key
separation,
identification, and access control. By leveraging AWS’s compliant HSMs, this service enables payment
facilitators,
processors, and banks to minimize dependencies on external data centers. The pricing model includes charges
per API call
and the number of active keys, making it attractive for early-stage Fintechs. Currently available in the US
East and US
West regions.
03. iOttie Site Hacked: Customer Credit Cards Stolen in Major Data Breach!
Popular mobile accessory maker, iOttie, has revealed a major data breach lasting nearly two months,
resulting in the
theft of online shoppers’ credit card details and personal information. The breach was caused by malicious
scripts
injected into the iOttie website between April 12th and June 2nd. While the company has removed the
malicious code,
customers who purchased during that period should remain vigilant for potentially fraudulent activities. The
attack,
MageCart, highlights the importance of monitoring credit card statements and bank accounts for unauthorized
transactions.
04. UPS Data Breach Exposes Customers to SMS Phishing Attacks
UPS has disclosed a data breach affecting Canadian customers, revealing that personal information obtained
through its
online package look-up tools was used in SMS phishing attacks. The breach occurred between February 2022 and
April 2023,
with threat actors accessing recipients’ contact details. UPS has taken measures to restrict access and is
notifying
affected individuals.
Phishing attempts impersonating companies like LEGO and Apple have been reported. Customers are advised to
exercise
caution, avoid clicking suspicious links, and refrain from sharing sensitive information in response to such
messages.
UPS is actively working with law enforcement and experts to halt the scheme.
05. Microsoft Addresses Azure AD Authentication Vulnerability
Microsoft has fixed a security flaw in Azure Active Directory (Azure AD) that could have enabled threat
actors to gain
control over targeted accounts. The flaw, named nOAuth, allowed attackers to exploit misconfigurations in
Azure AD OAuth
applications using the email claim from access tokens.
Attackers could fully control the target’s account by changing the email on their Azure AD admin account to
the victim’s
email address and using the “Log in with Microsoft” feature. Microsoft has deployed mitigations to address
the issue and
advises developers to review their app’s authorization logic for protection against unauthorized access.
A block of encrypted text known as a Certificate Signing Request is sent when requesting an SSL Certificate from a Certificate Authority. It is typically generated on the server where the certificate will be installed. It contains information in the certificate, such as the organization name, common name (Domain name), place, and nation. Furthermore, it includes the public key that will be used to sign the certificate.
Why are CSRs important?
CSRs act as a conduit between the entity requesting the SSL certificate and the CA issuing it. By generating a CSR, you are creating two essential items. The first is the public key, which is included in the CSR. The second is the private key, generated simultaneously as the CSR and remains on your server. The private key must be kept secret, as it allows the server to authenticate and decode information once the SSL certificate is operational.
Overview of Luna Cloud HSM by Thales: Features and Benefits
Luna Cloud HSM is a Hardware Security Module (HSM) provided by Thales. The “Cloud HSM” part signifies that it’s a cloud-based offering. You can access it as a service over the internet instead of physically installing and managing an HSM in your data center. The Luna Cloud HSM is part of the CipherTrust Cloud Key Manager service provided by Thales.
An HSM is a dedicated hardware device with specialized cryptographic processors designed to manage digital keys and perform cryptographic operations. They provide a secure environment where you can generate, manage, and use encryption keys, keeping them isolated from other system parts to enhance security. HSMs are typically used to secure an organization’s most sensitive digital assets.
The Luna Cloud HSM brings the best of the cloud to the HSM world – scalability, accessibility, and lower upfront costs. You get the security of a traditional HSM with the added benefits of a cloud service.
The main features of Luna Cloud HSM are:
Robust Security
Luna Cloud HSM leverages Thales’s strong encryption and key management capabilities, delivering one of the
highest cloud
data protection levels. The HSMs are tamper-resistant and provide a secure environment for cryptographic
operations.
Scalability
As your cryptographic needs grow, Luna Cloud HSM can easily scale with them. You don’t have to worry about buying
and
installing additional HSM hardware.
High Availability
Luna Cloud HSM provides high availability and automatic failover capabilities to ensure business continuity. You
can
deploy HSMs across multiple regions to mitigate local outages.
Compliance
Luna Cloud HSM helps you meet regulatory standards related to cryptographic operations and key management,
including
PCI-DSS, GDPR, and HIPAA. The service comes with comprehensive auditing and logging capabilities.
Interoperability
Luna Cloud HSM supports a wide range of cryptographic APIs, libraries, and integrations, such as PKCS#11, Java
(JCE),
Microsoft CryptoAPI, and Microsoft CNG, making it compatible with a broad range of applications and services.
Also, check the list of Supported Client Platforms for Luna Cloud HSM here.
How to Generate a CSR?
Generating a CSR can differ depending on the software you are using, but the core steps remain the same. Here is a general outline of the process:
Preparation
You must have all the relevant details before generating your CSR. This includes your domain name, organization
name,
locality (city), state or province name, and country code.
Generate a Key Pair
The first step in generating a CSR is creating a public-private key pair. Remember, your private key should
remain
securely within the server or hardware module it generates.
Generate the CSR
Use a CSR generation tool that aligns with your server software. This tool will ask you for the details prepared
in Step
1 and for the private key generated in Step 2. The tool then generates an encoded file with the .csr or .req
extension.
During the CSR generation process, you will be prompted to enter your details (common name, organization, locality, etc).
Generating CSR from Luna HSM
We will be generating CSR on Thales DPoD. So, first, we need to do the Application Owner Configuration, which means Adding and Configuring a client.
The client installation uses a .zip (Windows) or .tar (Linux) to deliver the client materials required for configuring your system’s connection to the Luna Cloud HSM Service. The client .zip includes a pre-configured crystoki-template.ini file and a client archive file containing a library and binary files.
Installing the Service Client
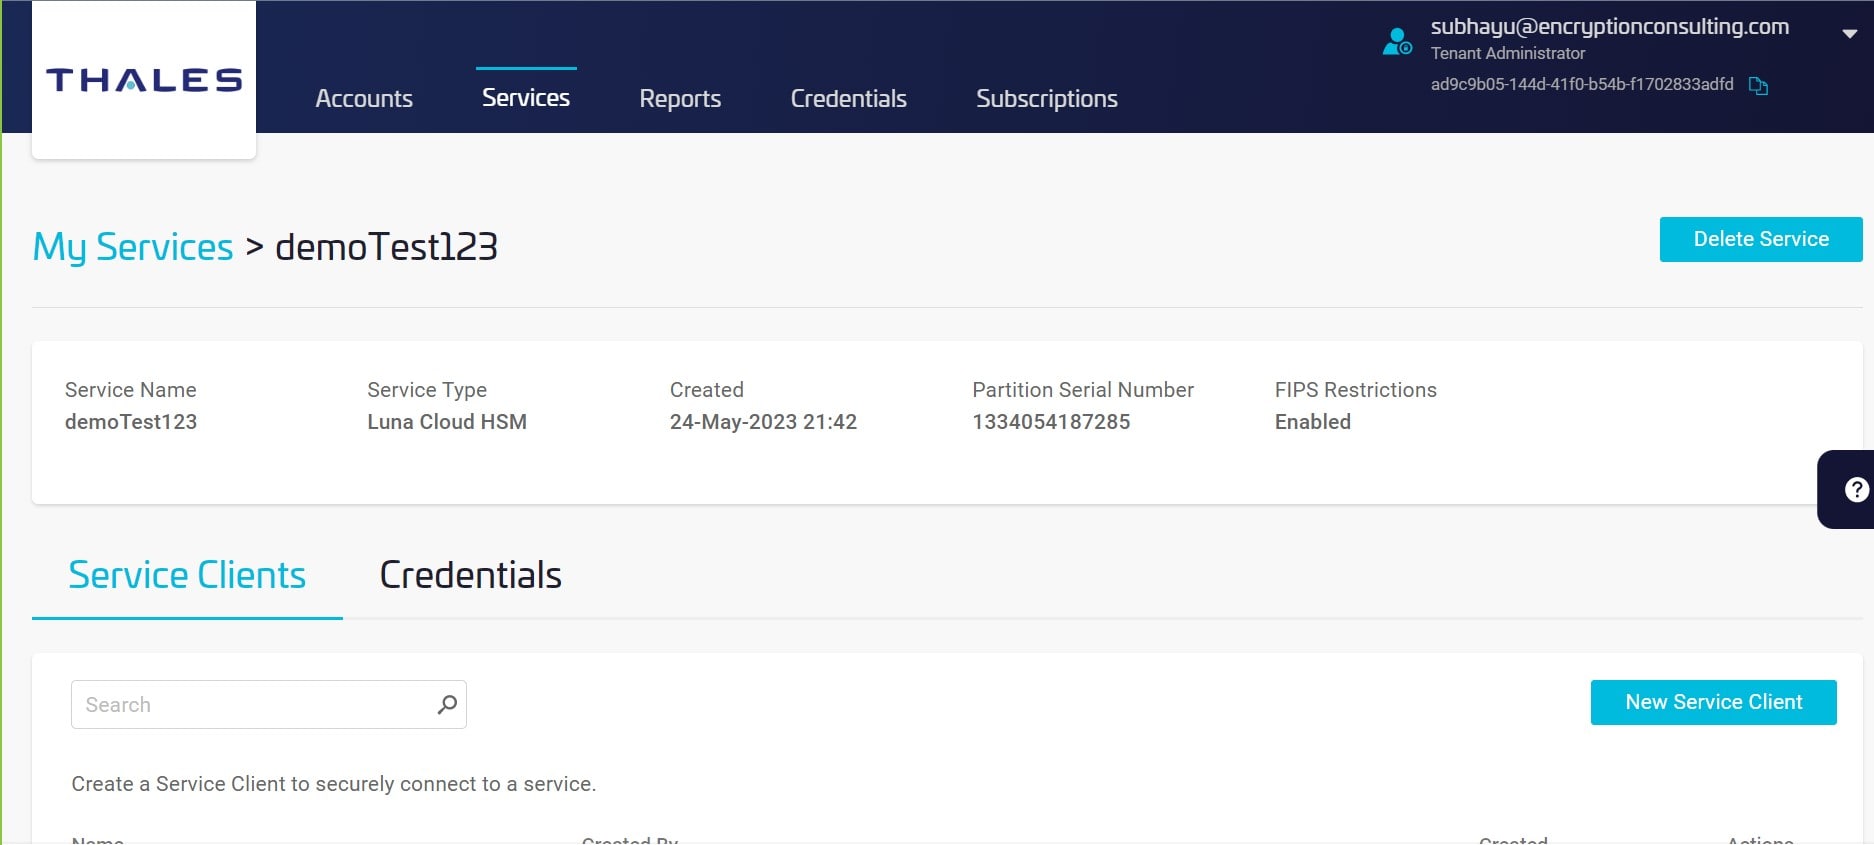
Access the Service Page and click the service or the partition name you want to generate a client.
Click New Service Client – the Create Service Client window displays.
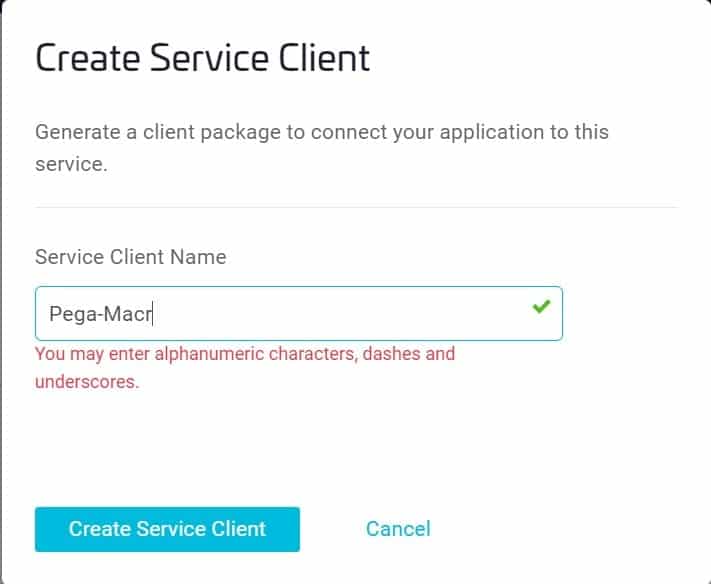
In the Create Service Client window, enter a Client Name (e.g., Pega-Macro) and select Create Service Client.
Implementation Services for Key Management Solutions
We provide tailored implementation services of data protection solutions that align with your organization's needs.
A new client (in this case, setup-PKI-Luna.zip) generates and is provided for downloading and
installing on your
client machine.
The client is a zip file containing system information needed to connect your machine to an HSM partition. See
the
section Client Contents for client content details.
Transfer the client to your machine. You can transfer the client through SCP, PSCP, WinSCP, FTPS, or other
security
tools.
Using the Windows GUI or an unzip tool, unzip the file – setup-PKI-Luna.zip.
Decompress the cvclient-min.zip.
Extract the cvclient-min.zip within the directory you created in the previous step. This location is required for
the
setenv command in step 7. Do not extract to a new cvclient-min.zip directory.
Set the environment variable. Open an Administrator Command Prompt – right-click Command Prompt and select Run
as
Administrator. Execute the following in the Administrator Command Prompt:
Configuring the SafeNet Key Storage Provider (KSP)
System requires access to the SafeNet Key Storage Provider (KSP). Copy the SafeNetKSP.dll file from your
downloaded
Luna Cloud HSM Service Client to C:\\Windows\System32.
Note: Failure to copy the SafeNetKSP.dll file will result in no access to the SafeNet Key
Storage Providers during the
integration. For example, if configuring Microsoft Active Directory Certificate Services, the SafeNet Key Storage
Providers will not be available options when setting up the Cryptography for CA.
Run KspConfig.exe
Navigate to the KSP installation directory.
Double-click Register or View Security Library.
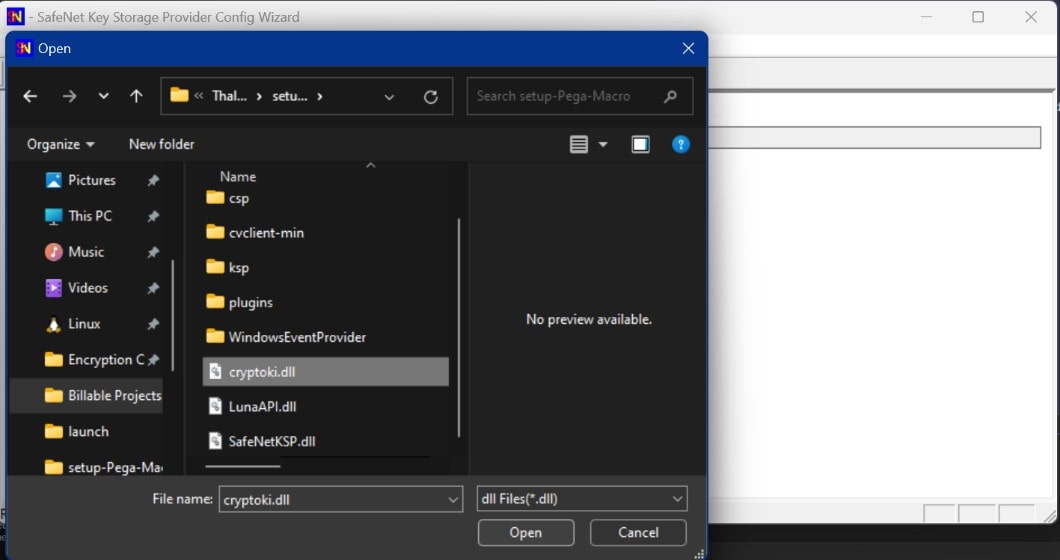
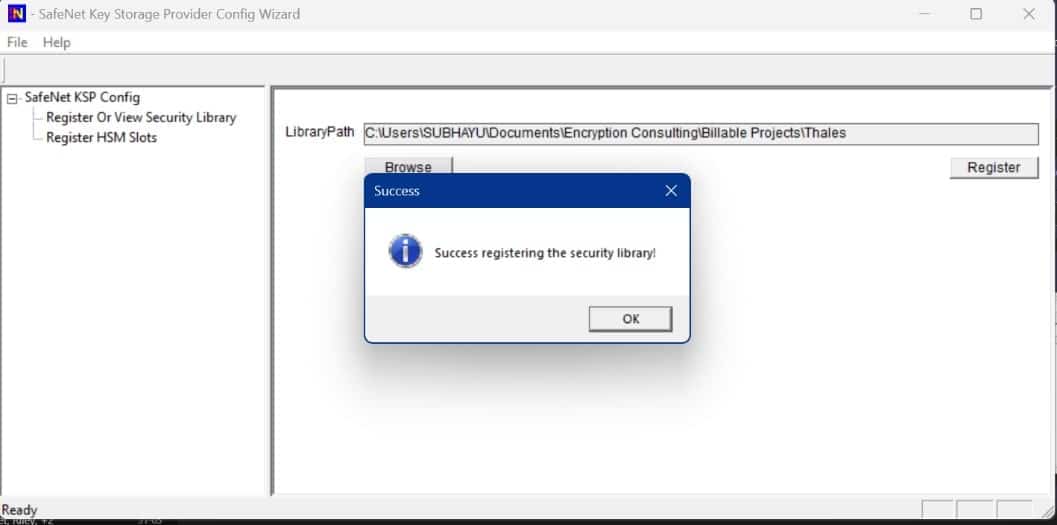
Click Browse. Select the cryptoki.dll file from the Luna Cloud HSM Service Client.
Click Register.
On successful registration, a Success! Message displays. Click OK.
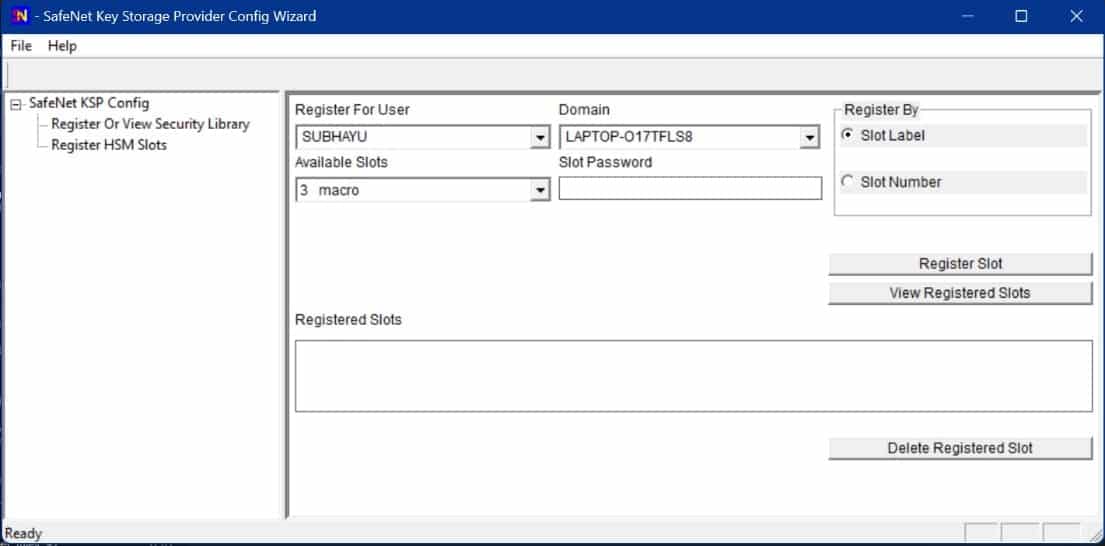
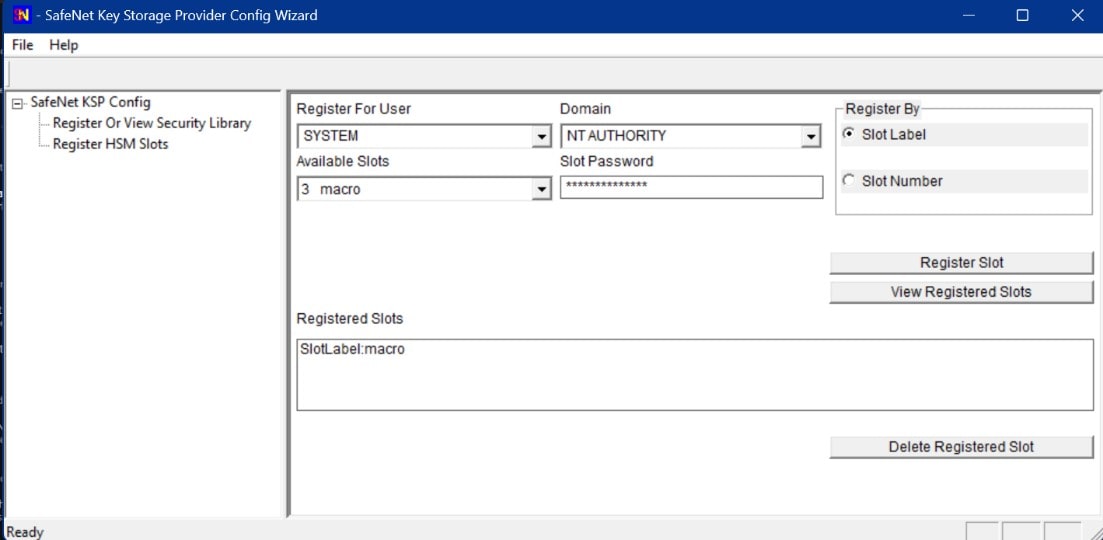
Double-click Register HSM Slots.
Register the HSM for the Administrator user. For that, Open the Register For User drop-down menu
and select
Administrator; open the Domain drop-down menu and select your domain. Open the Available
Slots drop-down menu, select
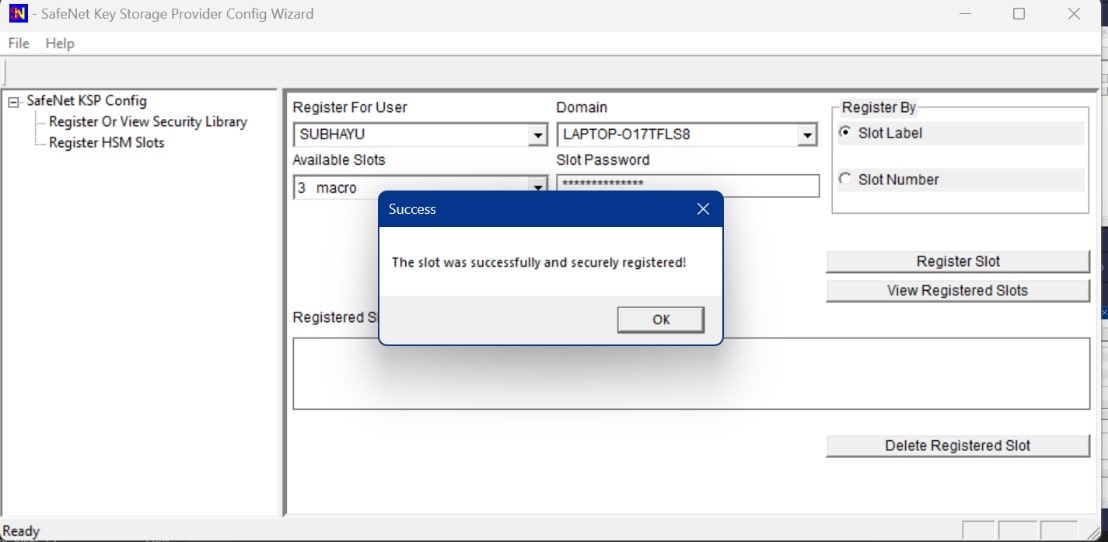
the service label, Enter the Slot Password, and Click Register Slot.
On successful registration, a Success! Message displays. Click OK.
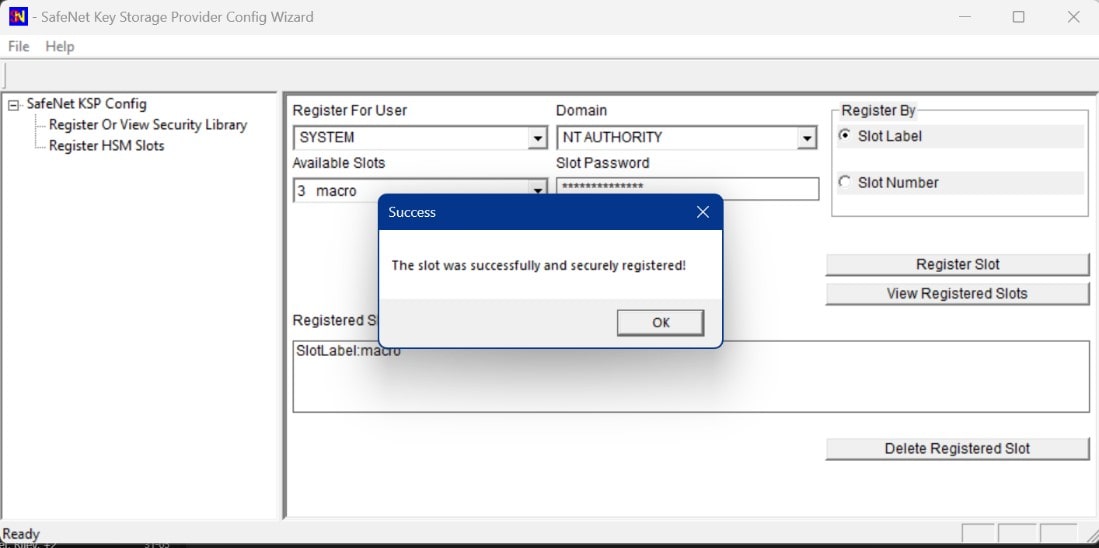
Register the HSM for the System user. Open the Register For User drop-down menu and select SYSTEM, the Domain
drop-down menu, and NT AUTHORITY. Open the Available Slots drop-down menu, select the service label, Enter the Slot
Password, and Click Register Slot.
On successful registration, a Success! Message displays. Click OK.
Generating the CSR in the Service Client
Create a file named request.inf and fill it with the following details to generate a request for
an SSL certificate
connected to an RSA key. The contents are:
Note: The Subject’s Common Name (CN) is arbitrarily chosen for this request and is subject to
change.
The parameters are:
Signature
“$Windows NT$” specifies that the INF file is intended for use with Windows NT and later versions of Windows.
Subject
C – defines the two-letter country name for the certificate request’s distinguished subject
name (DN). This parameter should
be present in the subject DN.
S – defines the state name for the certificate request’s distinguished subject name (DN).
This parameter should be present
in the subject DN.
L – defines the locality (typically the city) for the distinguished subject name of the
certificate request. This parameter
may be present in the Subject DN.
O – defines the organization name for the certificate request’s distinguished subject name
(DN). This parameter should be
present in the subject DN.
OU – defines the organization unit name for the certificate request’s distinguished subject
name (DN). This parameter may be
present in the subject DN.
e – is the official or contact e-mail address of the certificate authority.
CN – defines the common name for the certificate request’s distinguished subject name (DN).
This parameter should be present
in the subject DN.
HashingAlgorithm
SHA256 sets the hashing algorithm to SHA256, a standard and safe choice.
KeyAlgorithm
RSA sets the key algorithm to RSA, a widely used public key algorithm.
KeyLength
2048 sets the length of the key to 2048 bits. This is the current industry standard for RSA keys.
ProviderName
“SafeNet Key Storage Provider” indicates the Cryptographic Service Provider (CSP) to be used. The CSP is
a
software
library that implements cryptographic functions. In this case, the SafeNet Key Storage Provider is used.
KeyUsage
0xf0 specifies the purpose of the key in the certificate. The value 0xf0 in hexadecimal corresponds to the binary
value
11110000, which represents Digital Signature (0x80), Key Encipherment (0x20), Data Encipherment (0x10), and Key
Agreement (0x08) key usages.
MachineKeySet
True indicates the private key is stored in the local computer’s certificate store, not the current user’s.
EnhancedKeyUsageExtension
OID=1.3.6.1.5.5.7.3.1 is an Object Identifier (OID) that specifies a usage for the certificate. The OID
1.3.6.1.5.5.7.3.1 represents “Server Authentication,” meaning that the certificate is intended for authenticating
servers in SSL/TLS communications.
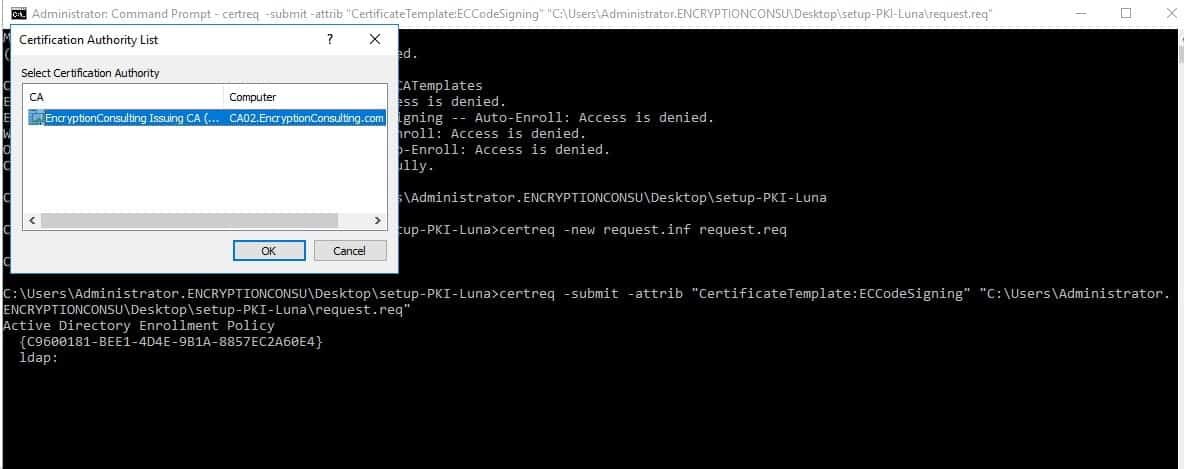
Open a new command prompt window as an administrator. You can do this by searching for “cmd” in the Start Menu,
right-clicking on Command Prompt, and selecting “Run as administrator.”
Navigate to the path where requested.inf is and pressing Enter.
Now, generate the certificate request with the following command:
certreq -new request.inf request.req
This command will create a new Certificate Signing Request (CSR) file named `request.req` based on the
configuration in
your `request.inf` file. You can send this CSR file to a Certificate Authority (CA) for your SSL certificate.
Implementation Services for Key Management Solutions
We provide tailored implementation services of data protection solutions that align with your organization's needs.
Here, Template Name = “EncryptionConsuCodeSigning”
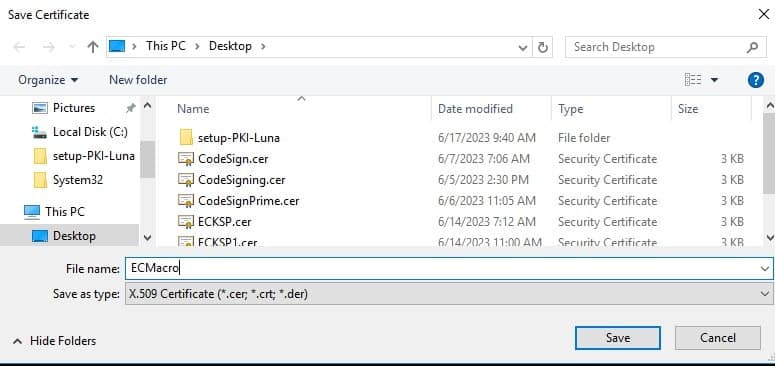
After Selecting the Certificate Authority from the Certificate Authority List, save the
certificate with an appropriate
name. (E.g.,= ECMacro, the extension should be either .crt or .cer)
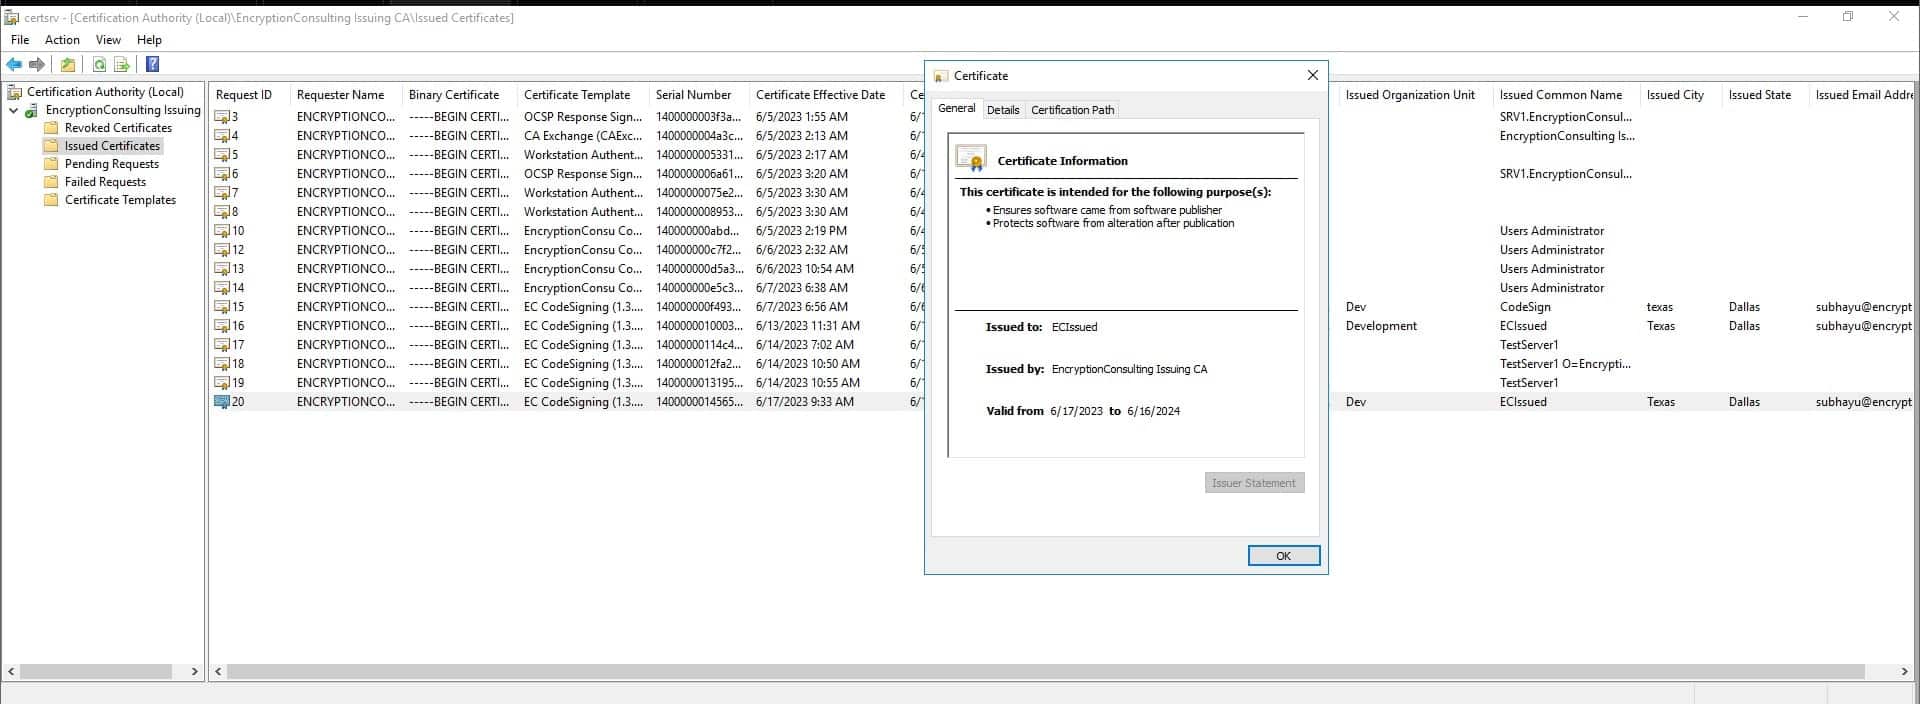
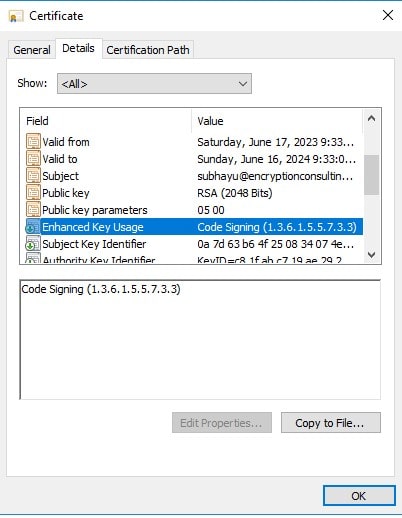
On successful execution, you will find the Certificate inside the Issued Certificates in
Certification Authority
Check whether “Code Signing” is inside the attribute Enhanced Key Usage of the newly generated
certificate.
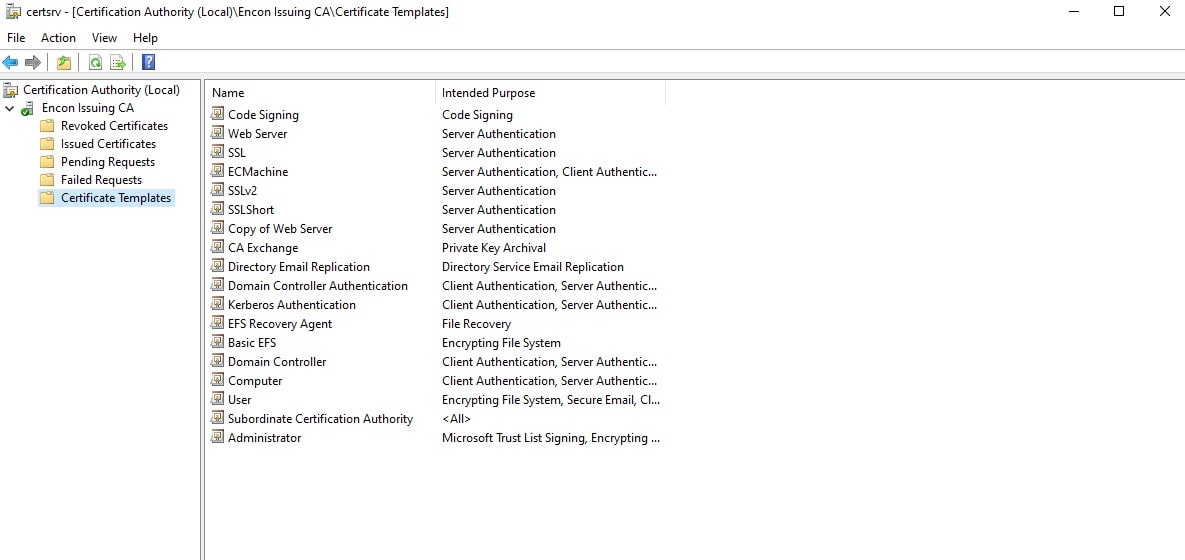
Via Web Enrolment
The available Templates in the Certificate Authority
Now, perform the Web Enrollment after selecting a template – “Code Signing.”
(in our case – https://ca02.encon.com/certsrv/)
After selecting Request a Certificate, this screen will come up. Select Advanced Certificate Request. (In our
case –
https://ca02.encon.com/certsrv/certrqus.asp)
Paste the contents of the CSR inside Saved Request and select Code Signing in the Certificate template. After
that,
click on Submit.
This will prompt for two options – Download Certificate and Download Certificate chain. Choose the latter one and
download the chain to your local system.
Accepting and installing the certificate to be available within the Windows environment.
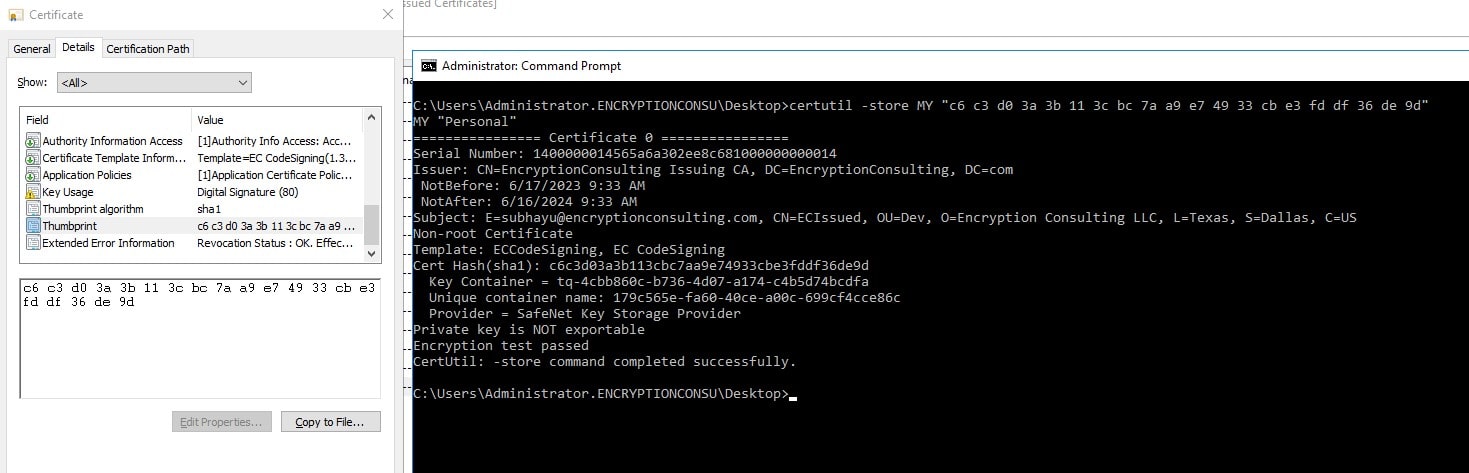
Next, add the certificate to the “Personal” Certificates of Certificates – Local Computer using the command –
certutil -store MY “<thumbprint of the certificate>”
Troubleshooting
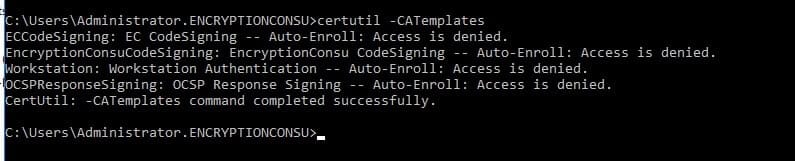
To check the list of CA templates present inside the Issuing CA –
certutil -CATemplates
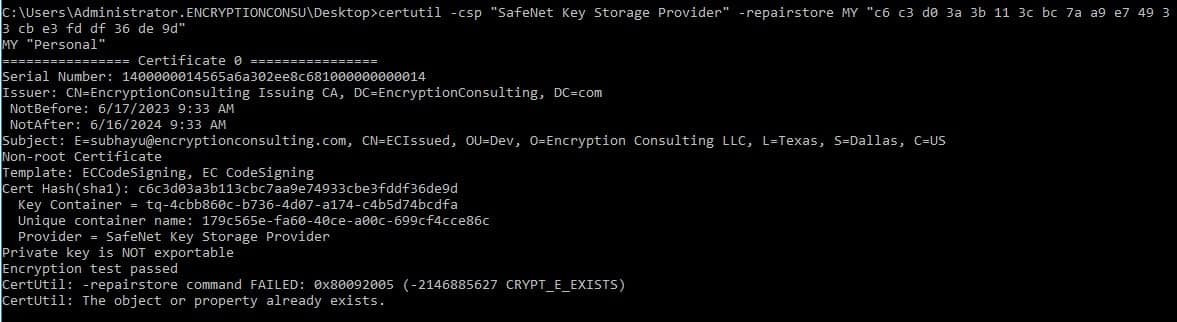
If the private key is not attached to the Certificate, try this “repairstore” command
CSP/KSP Registration is failing in Windows.
CSP/KSP Registrations Can Fail if Windows Update is missing as it includes a step that verifies the DLLs are
signed by
Thales’ certificate that chains back to the DigiCert root of trust G4 (in compliance with industry security
standards).
This step can only succeed if your Windows operating system has the required certificate. If your Windows OS is
updated,
you should already have that certificate.
If your Luna HSM Client host is connected to the internet, use the following commands to update the certificate
manually:
Download the DigiCert Trusted Root G4 (http://cacerts.digicert.com/DigiCertTrustedRootG4.crt
DigiCertTrustedRootG4.crt)
to a separate internet-connected computer.
Transport the certificate, using your approved means, to the Luna Client host into a <downloaded cert path>
location of
your choice
Add the certificate to the certificate store using the command:
certutil -addstore -f root <downloaded cert path>
If the Subject from the certificate request is not shown on the certificate, try the following
steps.
Open the Certificate Templates Console: On the AD CS server, open the Certificate Templates Console by running
`certtmpl.msc` from the Run dialog (Win + R).
Duplicate an Existing Template: It’s generally a good idea to duplicate an existing template rather than modify
one.
Find a template that’s similar to what you want, right-click it, and select `Duplicate Template.`
Configure the Template: In the properties dialog for the new template, you can configure various settings. To
set the
Key Usage and Enhanced Key Usage fields:
Key Usage: Go to the `Extensions` tab, select `Key Usage` in the list, and click `Edit.`
Here you can select the key
usages you want to include, such as `Digital Signature,` `Key Encipherment,` etc.
Enhanced Key Usage: Still on the `Extensions` tab, select `Application Policies` and click
`Edit.` Here you can add the enhanced key usages
you want to include, such as `Code Signing,` `Server Authentication,` etc.
Save the Template: Once you’ve configured the template to your liking, give it a name and save it.
Issue the Template: The new template is now available but needs to be issued before it can be used. In the
Certification
Authority console (`certsrv.msc`), right-click `Certificate Templates,` select `New,` then `Certificate Template
to
Issue,` and select your new template.
Requiring a certificate using this template should include the Key Usage and Enhanced Key Usage fields as you’ve
configured them.
Implementation Services for Key Management Solutions
We provide tailored implementation services of data protection solutions that align with your organization's needs.
Once produced, the CSR may be used to seek an SSL certificate from a Certificate Authority. The CSR’s data will be used by the CA to build the certificate, assuring the security of your website and the transmission of information in a secure manner.
Although the procedures and protocols may appear difficult, using an SSL certificate to secure your website is essential for gaining visitors’ trust and safeguarding critical information. A CSR is essential to ensure that the correct data is included in your SSL certificate.
RPM (Red Hat Package Manager) is a package management system used in Linux distributions, particularly those based on Red Hat, such as Fedora and CentOS. RPM packages are software bundles that contain executable files, libraries, documentation, and other resources required for a specific application or service to function correctly on a Linux system.
RPM packages are compressed archives that follow a specific file format and naming convention. They typically have the extension “.rpm” and can be installed, upgraded, or removed using RPM package management tools.
The RPM package format is widely used in many Linux distributions, and it simplifies software management by providing a standardized and reliable method for packaging and distributing software.
Overview
To sign RPM packages with GPG keys, the following steps are typically involved:
Generate GPG Key Pair
The package maintainer or distributor generates a GPG key pair consisting of a private key and a corresponding
public
key. The private key is kept secure (preferably in HSM) and should not be shared, while the public key can be
distributed widely.
Configure RPM Signing
The GPG public key is added to the RPM package manager’s keyring, allowing it to verify the packages signed with
the
corresponding private key. This step ensures that the package manager recognizes the GPG key as trusted.
Sign RPM Packages
The package maintainer signs the RPM packages using the private key associated with the GPG key pair. This
process
generates a digital signature for each package.
Verify RPM Packages
When the RPM package manager encounters a signed package, it uses the GPG public key to verify the package’s
signature.
It checks whether the signature is valid and matches the package’s content, ensuring that it hasn’t been modified
or
tampered with since it was signed.
RPM signing with GPG keys adds additional security to RPM packages. It helps to establish the authenticity and integrity of the packages by confirming that they were signed by the entity possessing the private key associated with the GPG public key. This method allows users and systems to verify the trustworthiness of RPM packages before installation and guards against unauthorized modifications or malicious tampering.
Prerequisites
Generate key pair on HSM
Change directory to /opt/nfast/bin
$ cd /opt/nfast/bin
Execute the command and enter the appropriate details
$ ./generatekey pkcs11 selfcert=yes
Note: Remember your key’s name and email address, as they will be required in the subsequent
steps.
Here, the “-f” option corresponds to “self-cert,” the “-k” option refers to
the key, and the
“-L” parameter
should match
the Key name entered previously.
Install the gnupg-pkcs11-scd
$ sudo apt-get install gnupg-pkcs11-scd
Note: If you encounter any issues with executing the “sudo apt-get
install” command,
try running the following
command
beforehand.
$ sudo apt-get update && sudo apt-get upgrade -y
Configure gnupg agent
Edit the following lines in the gpg-agent.conf
                  $ nano ~/.gnupg/gpg-agent.conf


                  - Enter the below lines and save the file


                  scdaemon-program /usr/bin/gnupg-pkcs11-scd


                  pinentry-program /usr/bin/pinentry
Edit the following lines in the gnupg-pkcs11-scd.conf
                  $ nano ~/.gnupg/gnupg-pkcs11-scd.conf


                  - Enter the below lines and save the file


                  providers p1


                  provider-p1-library /opt/nfast/toolkits/pkcs11/libcknfast.so
-u: A username on Encryption Consulting Code Signing Server.
-k: Key/certificate name for signing/verification provided by Encryption Consulting Code Signing
server.
-i: User email address used to generate key pair.
-f: gpg key fingerprint in hex format.
-a:
Algorithm to be used for signing. One of the below options to be used:
SHA224
SHA256 (Default)
SHA384
SHA512
If the algorithm is not provided, it will use SHA256 as a default.
-o: Output file to store signature. This is an optional parameter. If this option is provided, a
signature file will be generated as per the given name <file_to_be_signed>.sig
Encryption Consulting’s CodeSign Secure provides organizations with a comprehensive code-signing solution tailored to their unique requirements. By utilizing this solution, organizations can establish a strong code-signing policy that effectively mitigates security risks and ensures the authenticity of their software. Our product streamlines the code-signing process and offers a range of features designed to enhance security.
One key feature of CodeSign Secure is secure key management. It enables organizations to securely store their private keys of the code-signing certificate by integrating with industry-leading Hardware Security Modules (HSMs) that are FIPS certified. This integration eliminates the potential risks associated with stolen, corrupted, or misused keys, as the private keys never leave the HSM during the code signing operation.